
Next Gen - Car seat Chipolino - Free user manual and instructions
Find the device manual for free Next Gen Chipolino in PDF.


| Product Type | Car Seat (Group 0+/1) |
| Brand | Chipolino |
| Model | Next Gen |
| Dimensions (H x W x D) | 60 cm x 45 cm x 45 cm |
| Weight | 6 kg |
| Child Weight Range | 0 – 18 kg (approx. 0 – 4 years) |
| Installation Method | Vehicle seat belt (rearward and forward facing) |
| Harness Type | 5-point harness with adjustable straps |
| Recline Positions | Multiple positions (typically 3–4) |
| Headrest Adjustment | Adjustable height |
| Side Impact Protection | Integrated side impact protection system |
| Safety Standards | ECE R44/04 compliant |
| Material | High-density polyethylene shell, polyester cover |
| Cleaning Instructions | Remove cover and machine wash at 30°C; wipe plastic parts with damp cloth |
| Power Supply | None (manual operation) |
| Accessories Included | Infant insert, seat belt guides, instruction manual |
| Spare Parts Availability | Contact Chipolino customer service for harness, covers, and buckles |
| Warranty | 2 years (check local regulations) |
Frequently Asked Questions - Next Gen Chipolino
User questions about Next Gen Chipolino
0 question about this device. Answer the ones you know or ask your own.
Ask a new question about this device
Download the instructions for your Car seat in PDF format for free! Find your manual Next Gen - Chipolino and take your electronic device back in hand. On this page are published all the documents necessary for the use of your device. Next Gen by Chipolino.
USER MANUAL Next Gen Chipolino
This child restraint system is manufactured in compliance with the requirements of Regulation No 129 of the Economic Commission for Europe of the United Nations (UN/ECE) — Uniform provisions concerning the approval of enhanced Child Restraint Systems used on board of motor vehicles (ECRS), the provisions of the Product safety Directive 2001/95/EU of the European Parliament and The Council as well as the Consumer Protection Law of Bulgarian Legislation.
Car seat "NEXT GEN" is suitable for children with height 40-150 cm, age 0-12 years.
| Height of the child | Position of the car seat | Approximate age of the child | Installation method of the car seat | Category |
| 40-105 cm | REARWARD facing | 0-15 months ISOFIX + Top Tether i-Size | ||
| 76-105 cm | FORWARD facing | 15 months - 4 years | ISOFIX+ Top Tether i-Size | |
| 100-150 cm | FORWARD facing | 3-12 years | ISOFIX +3-point safety belt of the vehicle | i-Size booster seat |
| 100-150 cm | FORWARD facing | 3-12 years | 3-point safety belt of the vehicle | i-Size booster seat |
Notice for i-Size category enhanced child restraint systems : 40-105cm
This is an “i-Size” enhanced child restraint system. It is approved according to Regulation No.129, for use in, i-Size compatible vehicle seating positions as indicated by vehicle manufacturers in the vehicle users’ manual. If in doubt, consult either the enhanced child restraint system manufacturer or the retailer.
Notice for i-Size category enhanced child restraint systems: 100-150 cm
This is a i-Size booster seat enhanced child restraint system. It is approved according to Regulation No. 129, for use primarily in “i-Size seating positions” as indicated by vehicle manufacturers in the vehicle user’s manual. If in doubt, consult either the enhanced child restraint system manufacturer or the retailer.

DO NOT FORGET THAT NO RESTRAINT SYSTEM CAN PROVIDE ABSOLUTE PROTECTION IN CASE OF A CRASH OR ROAD ACCIDENT! DRIVE WITH CARE WHEN THERE IS A CHILD IN YOUR VEHICLE!
IN ORDER TO ENSURE THE SAFETY OF YOUR CHILD, FOLLOW EXACTLY THE INSTRUCTIONS AND SAFETY RECOMMENDATIONS IN THIS MANUAL!
MISUSE OF THE CAR SEAT WILL CONTRIBUTE TO REDUCING ITS SECURITY AND SAFETY FEATURES! FAILURE OF THE GUIDELINES OF THIS INSTRUCTION INCREASES THE RISK OF SERIOUS INJURY OR DEATH!
CAUTION!
- NEVER INSTALL THE CAR SEAT IN “FORWARD FACING” POSITION BEFORE THE CHILD'S AGE EXCEEDS 15 MONTHS!
- DO NOT PLACE THE RESTRAINT SYSTEM ON A VEHICLE SEAT EQUIPPED WITH ACTIVE AIR BAG! THIS MAY RESULT IN DEATH OR SERIOUS INJURY!
- DO NOT USE ANCHOR POINTS OTHER THAN THE ONES DESCRIBED IN THIS MANUAL AND MARKED ON THE RESTRAINT SYSTEM!
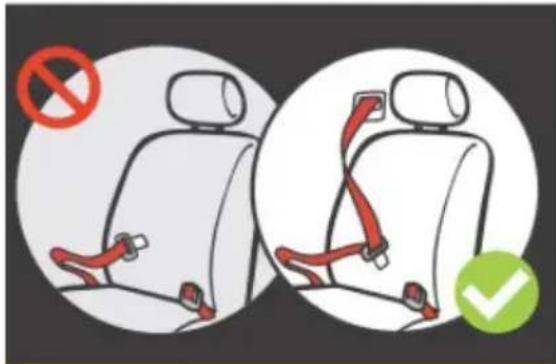
! NEVER INSTALL THE CAR SEAT IN VEHICLE WITH 2-POINT BELT! INSTALL IT ONLY IN VEHICLE WITH 3-POINT SAFETY BELT!
CAUTION! This car seat is only suitable for installation in vehicles fitted with APPROVED 3-POINT SAFETY BELTS WITH RETRACTOR, meeting the requirements of Regulation no. 16 of EC of UN!
PLACES FOR INSTALATTION OF THE CAR SEAT IN THE VEHICLE
The rear seats are the most safety places in the vehicle for children under 12 years old. Install the car seat only on forward facing passenger seats, in direction of the vehicle's movement. Do not install on side facing or rearward facing vehicle seats. If any doubt about installation, please check your vehicle user manual, or contact the vehicle supplier.
Some vehicles do not have appropriate places for installation of this or another car seat.
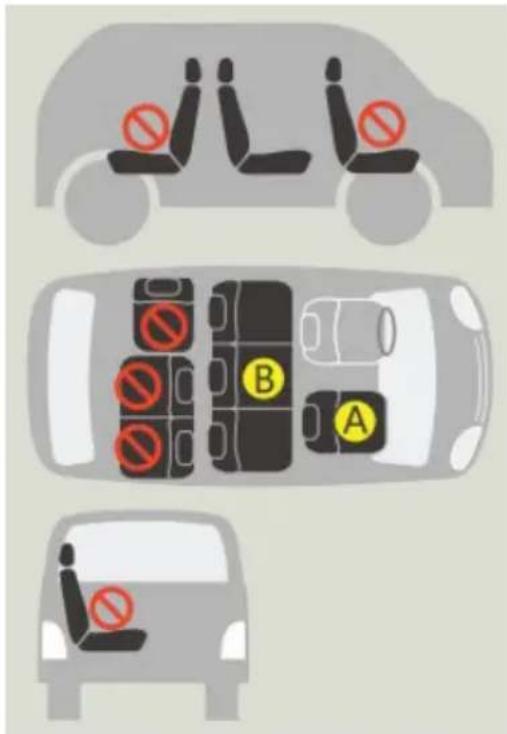

Do not install the car seat on that vehicle

"REARWARD FACING" installation of the seat is not recommended. The vehicle seat is equipped with 3-point safety belt and the must be deactivated or move the vehicle back, so that it is as far away from the airbag sible.

You can install car seat only if the vehicle equipped with 3-point safety belt.
CHOOSING OF APPROPRIATE WAY FOR INSTALLATION OF THE CAR SEAT (ACCORDING TO THE HEIGHT OF THE CHILD)
natural_image
Simple line drawing of a baby with green band inside a circle (no text or symbols)Size
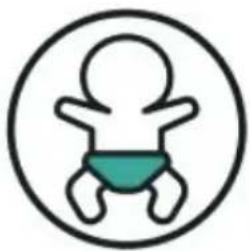
40\~105cm
rearward
i-Size
approx from birth to 15 months


natural_image
Simple icon of a child with arms raised, enclosed in a circle (no text or symbols)Size
76\~105cm
forward
i-Size
approx from 15 months to 4 years old


natural_image
Simple icon of a child with arms outstretched inside a circle (no text or symbols)Size
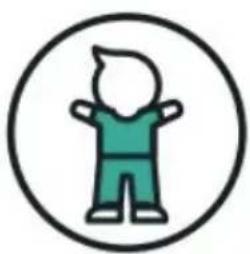
100\~150cm
forward
i-Size
booster seat
approx from 3 to 12 years old
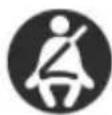


natural_image
Simple icon of a person standing with hands on hips, enclosed in a circle (no text or symbols)Size
100\~150cm
forward
i-Size
booster seat
approx from 3 to 12 years old
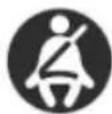
CAUTION! WARNINGS!
CAUTION! NEVER LEAVE YOUR CHILD UNATTENDED!
✿ CAUTION! DO NOT USE ANCHOR POINTS OTHER THAN THE ONES DESCRIBED IN THIS MANUAL AND MARKED ON THE RESTRAINT SYSTEM!
CAUTION! WHEN YOU INSTALL THE CAR SEAT IN POSITION „REARWARD FACING“, NEVER PLACE IT ON PASSENGER SEAT, EQUIPPED WITH ACTIVE AIRBAG! THIS MAY LEAD TO SERIOUS INJURY OR DEATH!
CAUTION! NEVER INSTALL THE CAR SEAT IN DIRECTION OF NORMAL MOVEMENT OF THE VEHICLE AND POSITION OF THE CHILD "FORWARD FACING" BEFORE THE CHILD'S AGE EXCEEDS 15 MONTHS!
CAUTION! THE VEHICLE SAFETY BELTS WHICH HOLD THE CAR SEAT TO THE PASSENGER SEAT MUST BE TIGHTENED AND FIXED!
CAUTION! THE CAR SEAT SAFETY BELTS MUST BE PROPERLY ADJUSTED ACCORDING TO CHILD'S HEIGHT, NOT TWISTED AND SNUG WELL AGAINST CHILD'S BODY.
✿ CAUTION! THE LAP BELT MUST BE PLACED LOW DOWN, SO THAT THE PELVIS IS FIRMLY ENGAGED WITHOUT PRESSING!
✿ CAUTION! DO NOT MAKE CHANGES, ADDITIONS OR MODIFICATIONS ON THE CAR SEAT WITHOUT THE APPROVAL OF THE NOTIFYING AUTHORITY ! IT IS DANGEROUS NOT TO KEEP STRICTLY THE INSTRUCTIONS GIVEN BY THE MANUAFACTURER!
CAUTION! KEEP AWAY FROM FIRE!
Installation in the vehicle and securing the child in the car seat to be done only by adult!
The hard parts and the parts of the child restraint made of plastic should be located and installed so that when the vehicle is in normal use, they can not be trapped by a sliding seat or in a door of the vehicle.
Do not allow the safety belts of the car seat and the vehicle to be twisted, frayed or torn, latches and locks (buckles) must be always in good order and firmly fixed.
If you find uncertainty or defect in the structure, latches, straps or locking mechanisms of the car seat or ISOFIX attachments, discontinue usage until removal of the damaged parts and replacement with new ones.
✿ After a violent impact the car seat may be damaged, therefore, it is recommended to replace the car seat with a new one.
✿ Never use a second hand child restraint. It may have suffered structural damage, which may make the child restraint extremely dangerous.
Do not use this car seat without its seat cover and do not replace it with a new one, unless supplied by the manufacturer. The fabric parts are integral parts of the restraint system and its safety features!
✿ Any luggage or other objects that could cause injury in the event of a collision must be well secured. Remove or secure at a safe distance from the seat and child any luggage that may cause injury in the event of a sudden stop or accident while driving.
Always check that the seat is firmly attached to the vehicle seat, even when you are not placing a child in it. A loose car seat, even without a child in it, can cause injury in the event of a collision.
Do not put additional pads except the ones supplied from the manufacturer!
Do not use spare parts and other components not supplied by the manufacturer. The manufacturer assumes no responsibility for safety in the event that are used spare parts other than original.
- Keep the instructions for use in the space provided in the car seat or in the vehicle in which you are going to use the car seat.
Do not expose the car seat to direct sunlight to prevent the child from burning, deforming the car seat and especially the plastic parts.
The car seat does not replace the child's cot or bed. When a child needs a sleep, you have to place him/her in a suitable baby stroller, baby crib or bed.
Do not attach objects with long cords or strings on the car seat in order to avoid danger of suffocation!
✿ Never place the car seat on beds, couches or similar soft surfaces!
Do not allow children to play with the product!
Do not remove stickers and warnings – they contain important information!
The packaging of the product must be kept out of the reach of children at the time of and after unpacking in order to avoid the risk of strangulation!
PRODUCT FEATURES
This is I-Size child restraint system, suitable for children with height 40-150 cm, approximate age 0-12 years.
The child restraint rotates 360 degrees on the base;
◆ Backrest recline;
◆ Headrest height adjustment;
◆ 5-point safety harness on the restraint;
◆ Additional soft pads;
MAIN PARTS
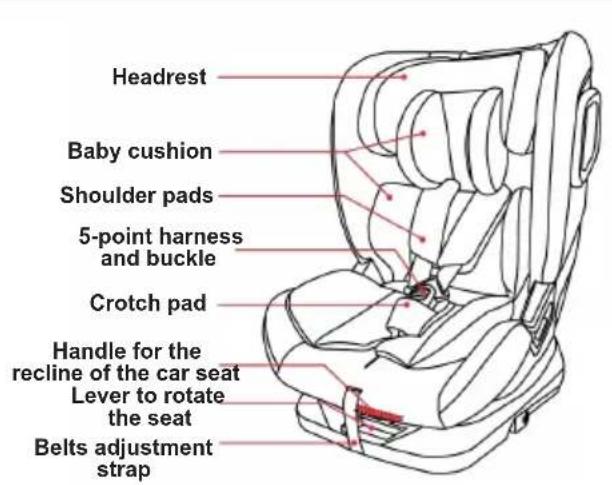
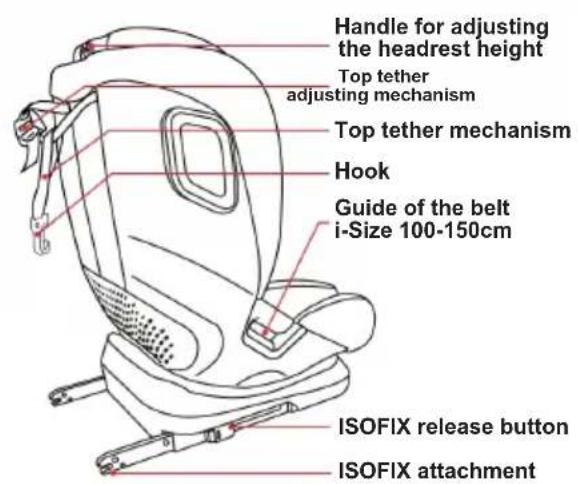
INSTRUCTIONS FOR USE OF THE CHILD RESTRAINT SYSTEM
IMPORTANT!
- Follow exactly the instructions and sequence of installation steps and use of the product described in the text and figures of this manual.
- Check the security of fixing after each operation!
• ALWAYS CHECK THE SECURITY OF FIXING OF THE SAFETY BELTS!
• After each installation make sure that the seat belts are not twisted and they are in the correct position.
INSTALLATION OF THE CAR SEAT WITH ISOFIX AND TOP TETHER
natural_image
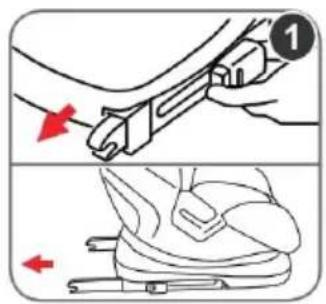
Illustration of a car seatbelt with arrows indicating motion direction (no text or symbols)- Press the ISOFIX connectors release button and set them maximum out.
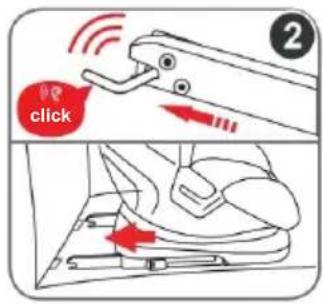
- Insert ISOFIX attachment of car seat to ISOFIX anchor point of the vehicle and push the seat until you hear click sound and it get fixed.
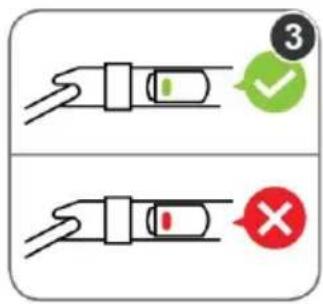
- IMPORTANT! ISOFIX connectors are fixed when both indicators show "green color"
Note: If the indicators are red, make the installation again, following the sequence of actions described above.
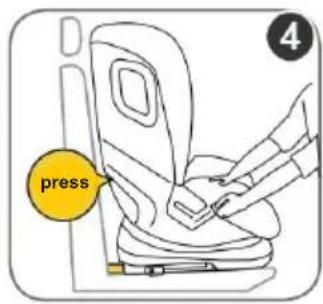
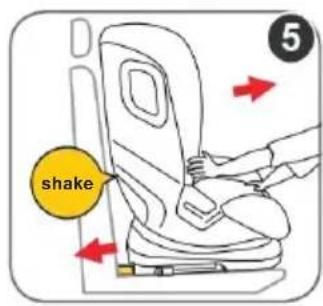
- Push the seat back towards the vehicle seat.
- Shake the mounted car seat. If it is unstable or one of the ISOFIX attachments is loose, make again the installation.
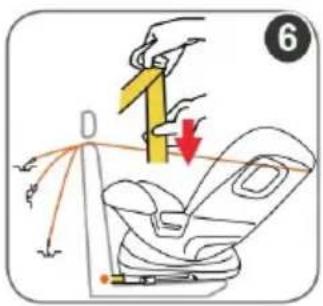
- Find place for fixing the top tether to the vehicle. Press the button on the length adjustment mechanism of top tether and pull it out as far as possible. Attach the hook to the attachment point.
CAUTION! The attachment points of the top tether for the vehicles can be located in different places. Usually the attachment point is a device fixed on the trunk or the floor!
- Attach the hook to the appropriate anchor point for your vehicle and tighten the top tether.
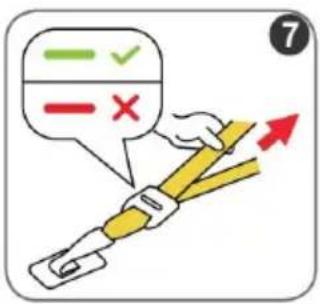
Note: The belt must not be twisted!
After tightening, the belt indicator on the top tether should be completely green.
Note: If the indicator is red, perform the installation again, following the sequence of actions described above.
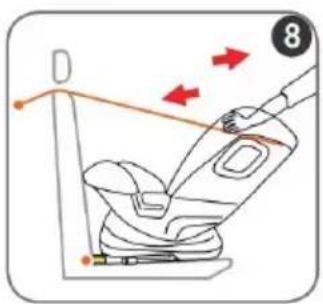
- Shake and check if the seat is firmly enough.
| DIRECTION OF THE TOP TETHER IN “REAR FACING” CAR SEAT | SHORTENING THE LENTGH OF THE TOP TETHER STRAP |
| Some top tether anchor points are very close to the child seat (place A), you have to shorten the top belt strap, on which the hook is mounted. | |
| The belt must not be twisted, the hook opening must point downwards. | 1. Pass the hook under the upper fixing belt and rotate it over it.2 and 3. Pass the hook through the loop and tighten. |
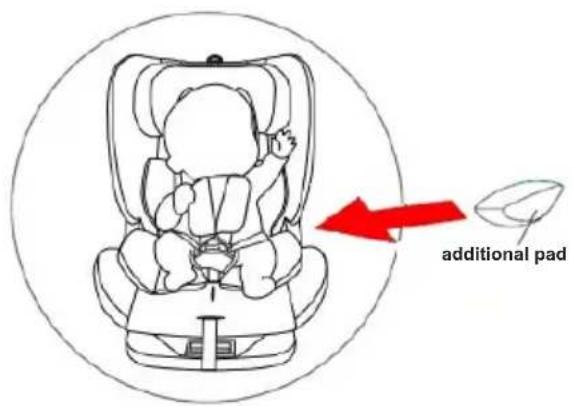
USE OF BABY CUSHION
CAUTION!
Use the soft baby cushion for babies with height from 40 up to 75 cm. The soft cushion makes additional comfort and convenience for small babies.
The extra pad is placed in a special pocket underside of the fabric and is suitable for newborn babies.
INSTALLATION FOR CATEGORY i-Size Universal ISOFIX
40-105 cm, "REARWARD" facing car seat
For children from birth to about 4 years
ISOFIX + Top Tether + 5-point harness of the car seat
natural_image
Line drawing of a car seat assembly with highlighted safety zones (no text or symbols)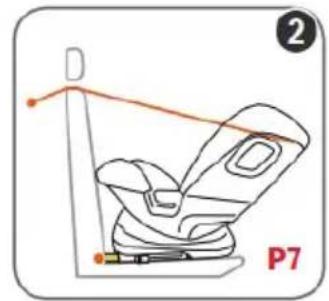
natural_image
Line drawing of a car seat assembly with no text or symbols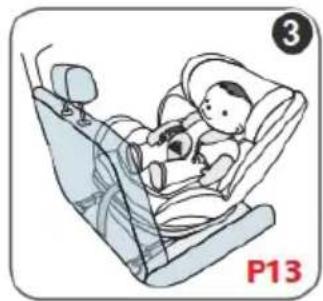
natural_image
Illustration of a baby inside a car seat, showing seatbelt and seatbelt (no text or symbols)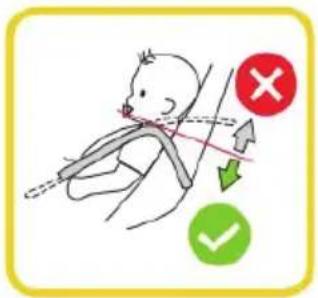
- Place the car seat in position "REARWARD" facing and adjust it to „R“ reclining position.
- Install ISOFIX connectors and top tether.
- Place the child in the car seat, fasten 5-point harness, lock in the buckle and tighten.
IMPORTANT! Adjust the headrest until the shoulder belt is about 1.5 - 2 cm (one finger) above the child's shoulder.
INSTALLATION FOR CATEGORY i-SIZE Universal ISOFIX
76-105 cm, "FORWARD" facing car seat
For children from 15 months to about 4 years
ISOFIX + Top Tether + 5-point harness of the car seat
natural_image
Line drawing of a car seatbelt with highlighted seat area and motion arrows (no text or symbols)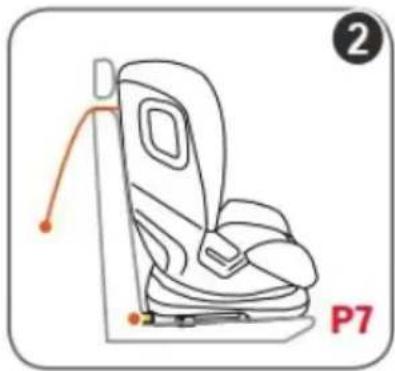
natural_image
Line drawing of a car seat with orange connectors and label P7 (no text or symbols on the diagram itself)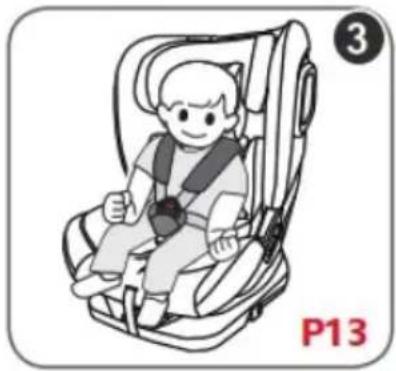
natural_image
Illustration of a child wearing a car seatbelt, giving a thumbs-up (no text or symbols)- Place the car seat in position „FORWARD“ facing and adjust the seat in one of positions 1,2,3 and 4.
- Fix the ISOFIX connectors and top tether.
- Place the child in the car seat, fasten 5-point harness, lock in the buckle and tighten.
natural_image
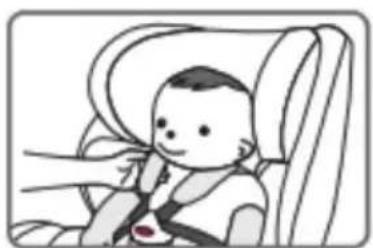
Illustration of a child seated in a car seat, wearing a seatbelt (no text or symbols present)ATTENTION! Make sure the belts are not twisted and the soft pads are close to the child's chest at a distance of about 2 fingers (about 2 - 3 cm) from them.
5-POINT HARNESS OF THE CAR SEAT CATEGORY i-SIZE Universal ISOFIX
natural_image
Illustration of a baby car seat with yellow straps, no text or symbols present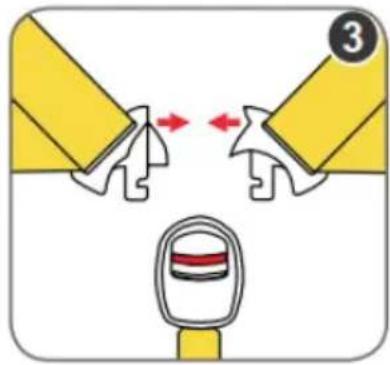
natural_image
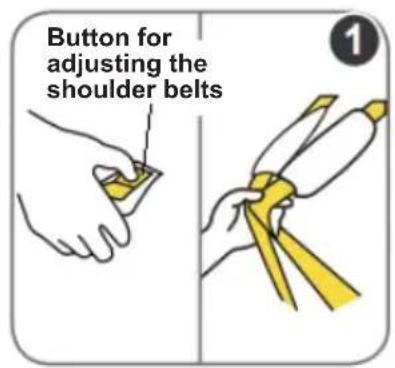
Illustration of a baby car seat with red arrows indicating pressure points, no text or symbols present- Press the release button on the shoulder belts with one hand and pull them out with the other.
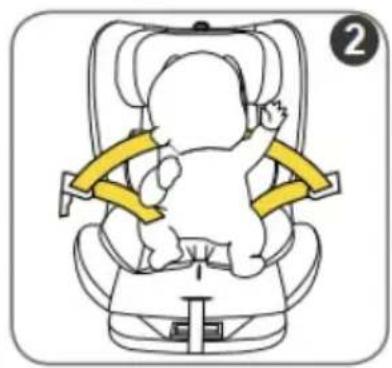
- Unfasten the belt from the buckle and place the child in the seat.
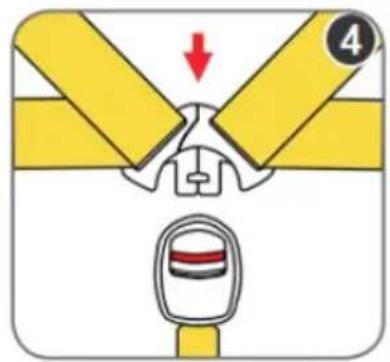
- IMPORTANT! Connect the metal ends of the two shoulder belts.
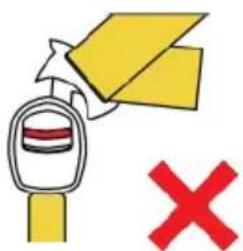
IMPORTANT! NEVER INSERT ONLY ONE METAL END INTO THE BUCKLE.
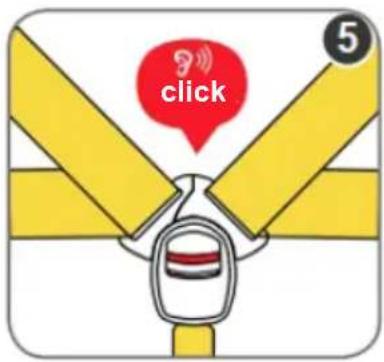
- Insert them into the buckle.
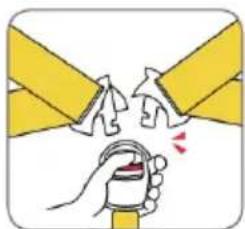
- You will hear a "click" sound when locked. Make sure the seat belts are locked in the buckle by trying to pull them up.
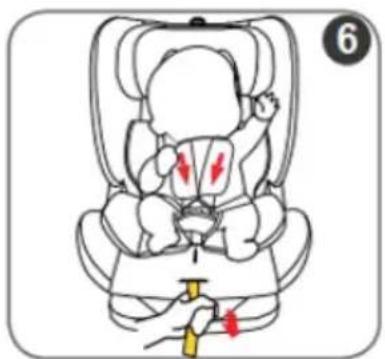
- Pull the adjustment strap so that the belts fit snugly around the child's body without pressing or causing discomfort. The recommended distance between the child's body and the belts is 2 fingers (about 2-3 cm)
ATTENTION! Make sure that the belts are not twisted, snug well against baby's body without making discomfort to him!
natural_image
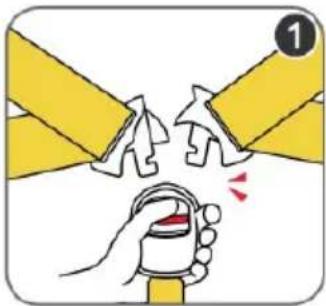
Illustration of a hand holding a cup with a magnifying glass above, emitting a red droplet (no text or symbols)To remove the child from the seat, release the seat belts by pressing the red button on the buckle
INSTALLATION FOR CATEGORY i-SIZE BOOSTER SEAT
100-150 cm, "FORWARD" facing car seat
For children from 3 to about 12 years
ISOFIX + 3-point safety belt of the vehicle
or
Only with 3-point safety belt of the vehicle
natural_image
Line drawing of a car seat with seatbelt and seat plate (no text or symbols)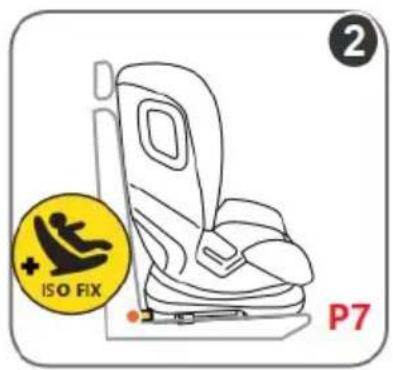
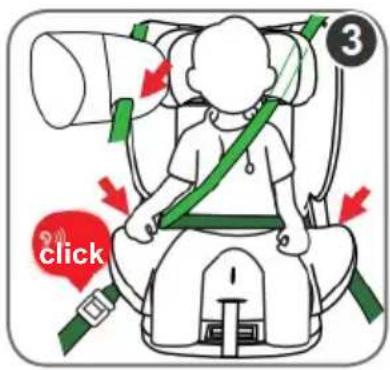
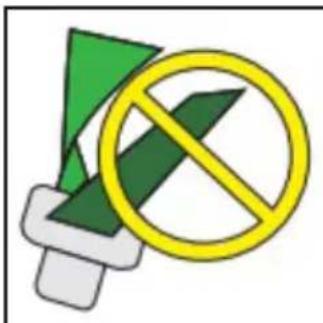
Loose safety belt can not guarantee the protection function of the car seat.
CAUTION! Make sure the belt is not twisted and the child pelvis is firmly engaged without pressing!
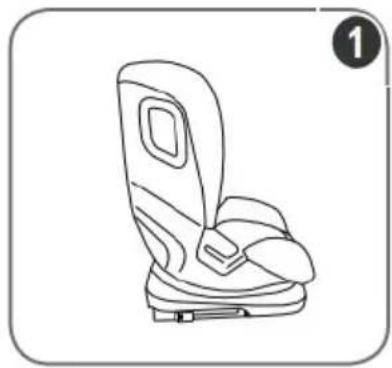
- Place the car seat in position "FORWARD" facing and adjust the recline to position 1.
CAUTION! FOR CATEGORY I-SIZE BOOSTER SEAT (100-150 cm) YOU CAN USE THE RECLINE OF THE SEAT ONLY IN POSITION 1.
- Fix the ISOFIX connectors to the anchor points of the vehicle seat.
Note: For that category is not suitable and should not install the top tether.
If you do not wish to use ISOFIX, but only mounting with the 3-point seat belt, skip this step (#2).
- Place the child in the car seat. Pass the diagonal belt through the guide of the headrest, the lap belt through the guides at the bottom of the seat. Fasthen 3-point vehicle seat belt into the buckle until you hear a "click" sound.
RELEASE OF ISOFIX AND TOP TETHER
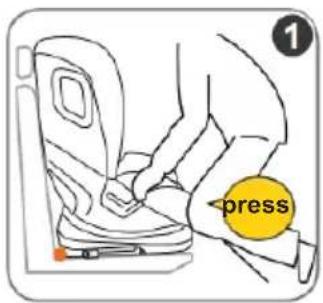
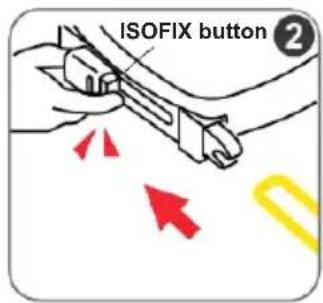
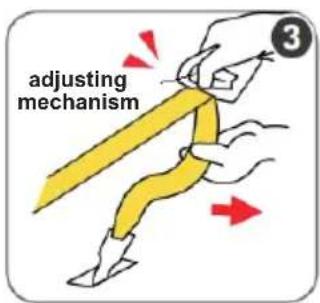
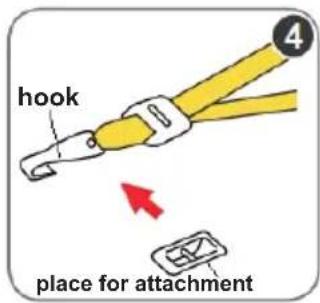
- Push the seat back with your hand or leg.
- Press the ISOFIX release button, pull it back and release ISOFIX connectors.
- Loosen the top tether belt from the adjusting mechanism.
- Release the hook from the vehicle attachment place.
CAUTION!
Do not release or remove the elements of the ISOFIX connectors and top tether with force, in case of damage.
If the ISOFIX system cannot be released successfully, please repeat the above steps again.
ADJUSTING THE RECLINE OF THE CAR SEAT
natural_image
Illustration of a person adjusting a car seatbelt, with a red arrow indicating direction (no text or symbols)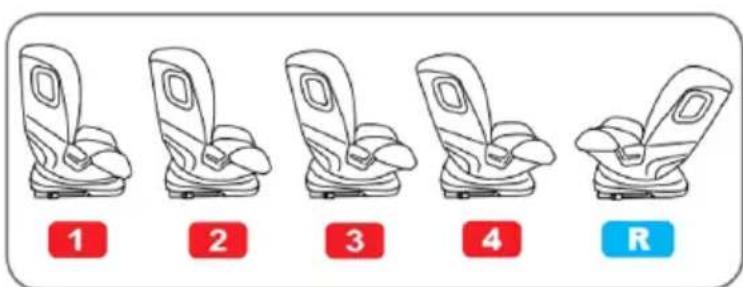
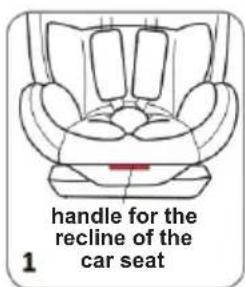
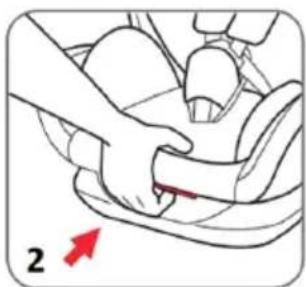
- Use the handle for adjusting the recline of the car seat, located at the bottom of the seat.
- Pull the handle up and place the seat in the selected position. At fixing in position, you will hear "click" sound.
The seat recline can be adjusted as follows:
Position 1, 2, 3 and 4 – "FORWARD" facing car seat.
Position R – ONLY for "REARWARD" facing car seat.
TIGHTENING /LOOSENING OF 5-POINT HARNESS OF THE CAR SEAT
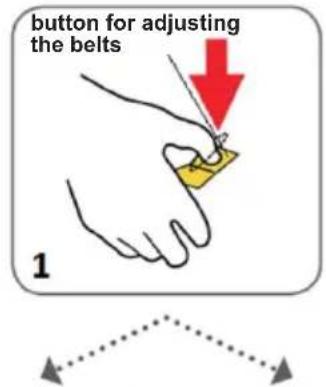
Loosening Tightening
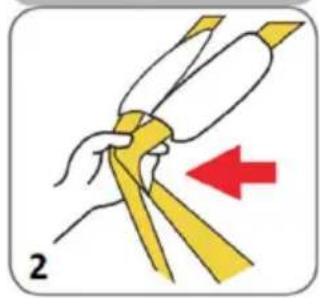
natural_image
Illustration of a hand holding a yellow ribbon with a red arrow indicating direction (no text or symbols)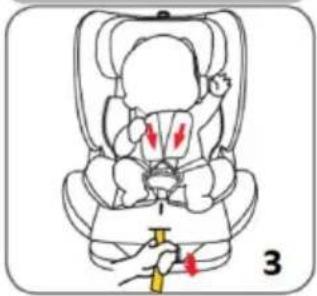
natural_image
Illustration of a baby car seat with red arrows indicating pressure points (no text or symbols)- Press the button for adjusting the belts.
2. Loosening:
Press the button for adjustment with one hand and with the other pull the shoulder belts.
3. Tightening:
Pull the adjustment strap, so that the belts fit snugly around the child's body without pressing or causing discomfort. Keep the recommended distance of about 2 fingers (2-3 cm) between the child's body and the shoulder straps!
ADJUSTING THE HEIGHT OF THE HEADREST
MOVE TO HIGHER POSITION MOVE TO LOWER POSITION
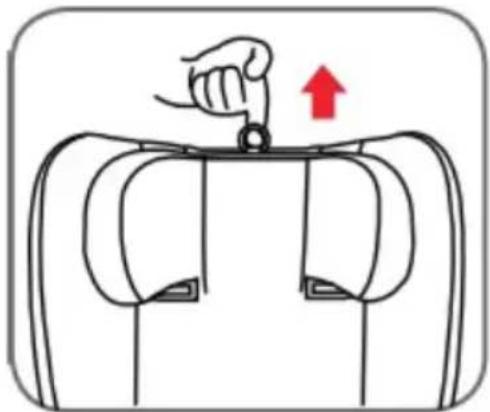
natural_image
Diagram of a hand pressing down on a seatbelt with a red upward arrow indicating motion (no text or symbols)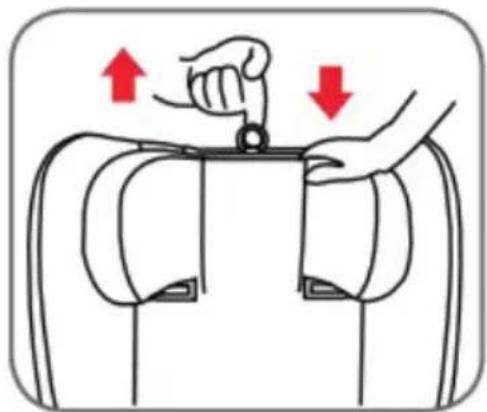
natural_image
Illustration of a person adjusting a seatbelt with red arrows indicating movement (no text or symbols)Loosen the harness first and pull the ring up. Pull the ring up with one hand, with the other push the headrest down.
natural_image
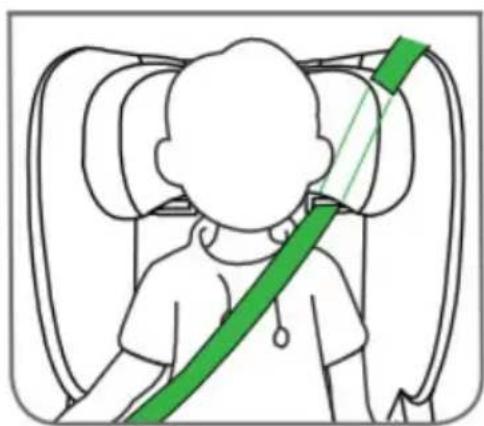
Illustration of a person sitting in a car seat with a green belt (no text or symbols)CAUTION!
Suitable headrest height is when the harness pass right over the child's shoulder.
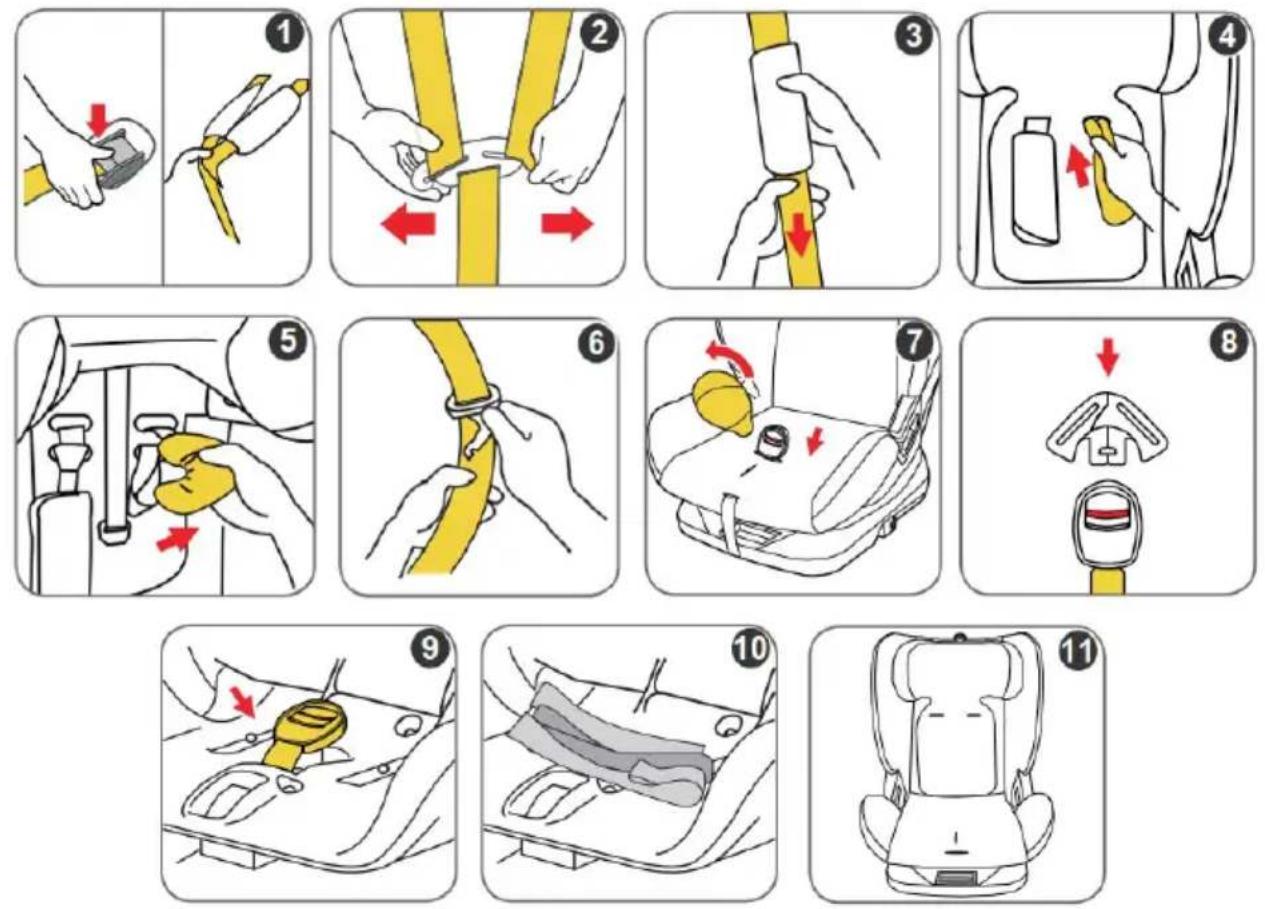
- Press the belt adjustment button and at the same time pull the shoulder belts out.
- Remove the seat belts from the connector on the back of the seat.
- Pull the shoulder belts out of the soft pads (the pads are sewn to the belts).
- Thread the shoulder strap pads through the slots of the fabric cover as shown in the figure
- Remove the shoulder belts pads with the straps.
- Remove the metal ends from the belts.
- Remove the crotch soft pad. Thread the buckle through the opening of the seat cover.
- Connect the two metal ends and lock them in the buckle, so not to lose them.
- Store the buckle under the seat.
- Fold and place the harness under the seat cover, as shown on the figure.
- Place the adjustment strap on the seat bottom, put the cover over.
natural_image
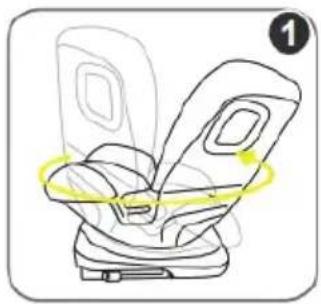
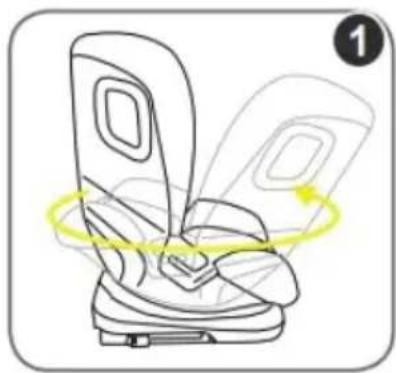
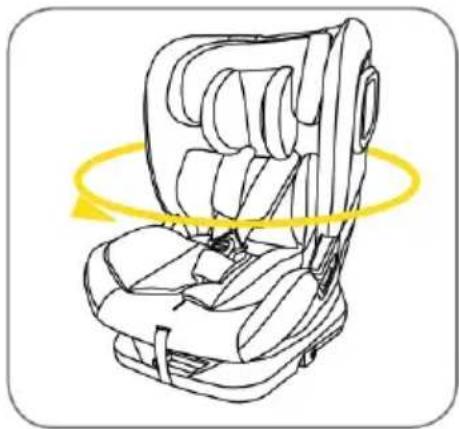
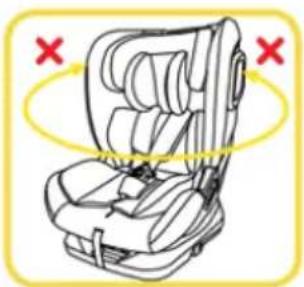
Line drawing of a car comfort seat with yellow motion rings indicating rotational motion (no text or symbols)This seat can rotate 360^ .
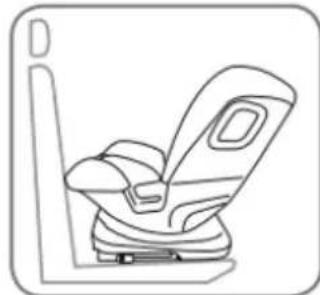
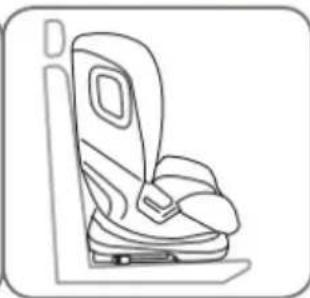
It can be fixed in two positions – in direction FORWARD facing and in direction REARWARD facing.
CAUTION!
ALWAYS CHECK THAT THE SEAT IS FIXED IN THE SELECTED POSITION BEFORE DRIVING! DO NOT USE THE SEAT IF IT IS NOT FIXED!
1 "REARWARD" facing
natural_image
Line drawing of a car seatbelt device (no text or symbols)Only for I-SIZE universal ISOFIX 40-105 cm
2 "FORWARD" facing
natural_image
Line drawing of a car seatbelt device (no text or symbols)for 76-150 cm
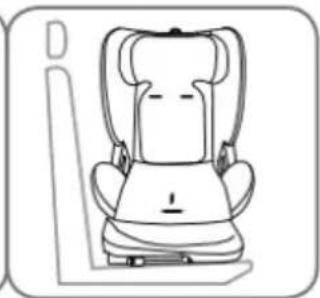
3 4 "SIDEWAYS" facing
natural_image
Line drawing of a car seat with no text or symbolsOnly for convenience when installing the seat in the car!
Do not use while driving!
natural_image
Illustration of a car seatbelt being adjusted for a hand (no text or symbols)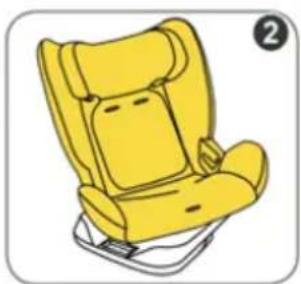
natural_image
Illustration of a yellow car seat with seatbelt and seat, no text or symbols present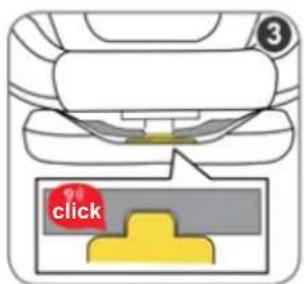
natural_image
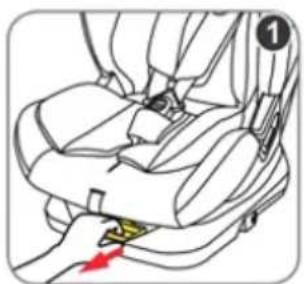
Line drawing of a car seat with red X marks indicating no text or symbols on the chair itself- With one hand, pull the lever out.
- With the other hand, turn the seat.
- The seat will lock when placed in the FORWARD facing position or REAR facing position. You will hear a "click" sound when locking.
IMPORTANT: Shake the seat with your hands to make sure it is secure.
REMOVAL AND PLACING THE SEAT COVER
natural_image
Line drawing of a car seat with labeled P20 and P21 (no text or symbols on the diagram itself)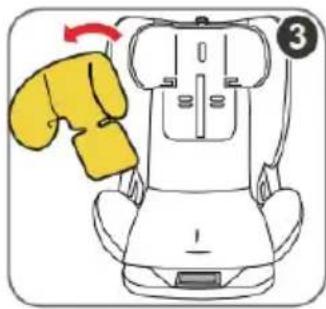
natural_image
Illustration of a yellow boxing glove pressing down on a car seat (no text or symbols)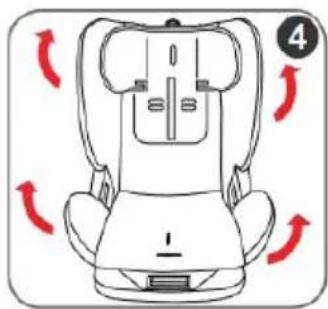
natural_image
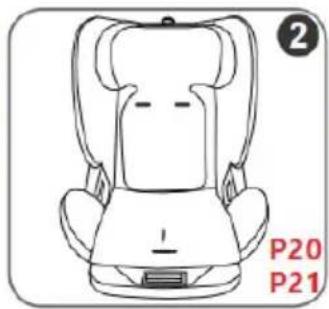
Line drawing of a car seat with red curved arrows indicating clockwise motion (no text or symbols)- Unfasten the buckle.
- Remove the 5-point harness from the seat (See section "REMOVING THE 5-POINT HARNESS").
- Remove the headrest cover.
- Unbutton the seat cover on both sides of the seat and remove it.
To put the seat cover on the seat, perform the steps described in reverse order.
CAUTION! Do not use the car seat without its fabric cover!
CARE AND MAINTENANCE
- Clean the plastic or metal parts with damp cotton cloth or sponge and mild soap.
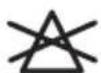
❖ Upholstery and soft pads may be hand washed at 30 °C using mild detergent!
Do not bleach! Do not tumble dry! Do not machine wash! Do not iron!
Do not use abrasive, bleach or other aggressive detergents.
❖ Always after cleaning leave the car seat fully dry and after that use it or store it. - Belts must be cleaned with damp cloth and mild soap!
Do not wet or remove the stickers. They contain important information!
Always store your car seat indoors – on dry and clean place. Do not expose to direct environment influence - sun, rain, moisture and high temperature changes!
Please, contact your authorized dealer for problems connected with the use or repair.
Fabric:
Outer: 100% polyester
Filling: 100% polyester



Materials used: plastic, metal, textile
STKNG02xxxxx
- Notice for i-Size category enhanced child restraint systems : 40-105cm
- Notice for i-Size category enhanced child restraint systems: 100-150 cm
- CAUTION!
- ! NEVER INSTALL THE CAR SEAT IN VEHICLE WITH 2-POINT BELT! INSTALL IT ONLY IN VEHICLE WITH 3-POINT SAFETY BELT!
- PLACES FOR INSTALATTION OF THE CAR SEAT IN THE VEHICLE
- CHOOSING OF APPROPRIATE WAY FOR INSTALLATION OF THE CAR SEAT (ACCORDING TO THE HEIGHT OF THE CHILD)
- CAUTION! WARNINGS!
- PRODUCT FEATURES
- MAIN PARTS
- INSTRUCTIONS FOR USE OF THE CHILD RESTRAINT SYSTEM
- IMPORTANT!
- INSTALLATION OF THE CAR SEAT WITH ISOFIX AND TOP TETHER
- USE OF BABY CUSHION
- INSTALLATION FOR CATEGORY i-Size Universal ISOFIX
- 5-POINT HARNESS OF THE CAR SEAT CATEGORY i-SIZE Universal ISOFIX
- IMPORTANT! NEVER INSERT ONLY ONE METAL END INTO THE BUCKLE.
- INSTALLATION FOR CATEGORY i-SIZE BOOSTER SEAT
- RELEASE OF ISOFIX AND TOP TETHER
- ADJUSTING THE RECLINE OF THE CAR SEAT
- TIGHTENING /LOOSENING OF 5-POINT HARNESS OF THE CAR SEAT
- Loosening:
- Tightening:
- ADJUSTING THE HEIGHT OF THE HEADREST
- REMOVAL AND PLACING THE SEAT COVER
- CARE AND MAINTENANCE
Brand : Chipolino
Model : Next Gen
Category : Car seat