
PLCMDVR49 - Rear Camera Pyle - Free user manual and instructions
Find the device manual for free PLCMDVR49 Pyle in PDF.


| Product Type | Rear View Backup Camera |
| Brand | Pyle |
| Model | PLCMDVR49 |
| Video Resolution | 480p (720x480) |
| Viewing Angle | 150° |
| Night Vision | Yes, with IR LEDs (range ~15 ft) |
| Waterproof Rating | IP68 |
| Power Supply | 12V DC |
| Dimensions (L x W x H) | 1.5 x 1.5 x 1.2 inches |
| Weight | 0.2 lbs |
| Installation Type | License plate mount or flush mount |
| Wiring | RCA video output, power wire (red), ground wire (black) |
| Compatibility | Universal, works with most monitors with RCA input |
| Features | Parking guide lines, mirror image function |
| Maintenance | Clean lens with soft, dry cloth |
| Safety | Use only with 12V DC system; avoid exposing power wires |
| Spare Parts | Replacement cable kit (RCA + power) available |
| Reparability | Not user-serviceable; contact Pyle support for issues |
| General Information | Designed to assist in reversing; IP68 rated for all-weather use |
Frequently Asked Questions - PLCMDVR49 Pyle
User questions about PLCMDVR49 Pyle
0 question about this device. Answer the ones you know or ask your own.
Ask a new question about this device
Download the instructions for your Rear Camera in PDF format for free! Find your manual PLCMDVR49 - Pyle and take your electronic device back in hand. On this page are published all the documents necessary for the use of your device. PLCMDVR49 by Pyle.
USER MANUAL PLCMDVR49 Pyle
natural_image
Side mirror with rear camera and camera module, showing a car driving on a blue surface (no text or symbols visible)PLCMDVR49
DVR REARVIEW MIRROR DASH CAM KIT
Dual Camera Vehicle Video Recording System with Full HD 1080p
USER MANUAL
INTRODUCTION
PLCMDVR49 DVR Rearview Mirror Dash Cam Kit is developed to find evidence in case of traffic accident.
This camera can also be used in other occasions such as meetings, monitoring and forensics, location shooting and video evidence. This product is a blend of wide dynamic digital industry leading camera, no leakage of seconds, seamless circular camera, ultra wide angle shooting, with display real-time playback, mobile detection camera, parking guard technology in one; streamline design of unique fashion, favored by the vast number of consumers.
This manual will detail how to install, operate, product parameter and matters needing attention. Please read carefully and keep for future reference before use.
The specification parameters may be due to upgrade, update and other reasons do change, refer to the actual product, without prior notice. The manufacturer reserves without prior notice, to change the technology of direct rights.
Infringement of copyright or privacy notice
Please note that this product is for personal use only, its use shall not violate domestic or international copyright / privacy laws. The image is for personal use only recorded, not foreign free to publish spread; in addition the product record show, exhibition or commercial activities of the image may in some cases infringe copyright or the legal rights and interests.
INSTALLATION NOTES
This product should be tied together with the original rear-view mirror, To determine whether the lens in the windshield wiper range, ensure good vision, also good even in rainy environments.
Don't touch the lens with your fingers, the finger's grease may remain in the lens, resulting in camera or photograph to be unclear, please clean the lens regularly.
Attention
- Please use the original standard charger
- Please do not dismantle the machine to avoid affecting the scope of warranty.
- Please find a professional to modify the power line.
PRODUCT STRUCTURE DESCRIPTION
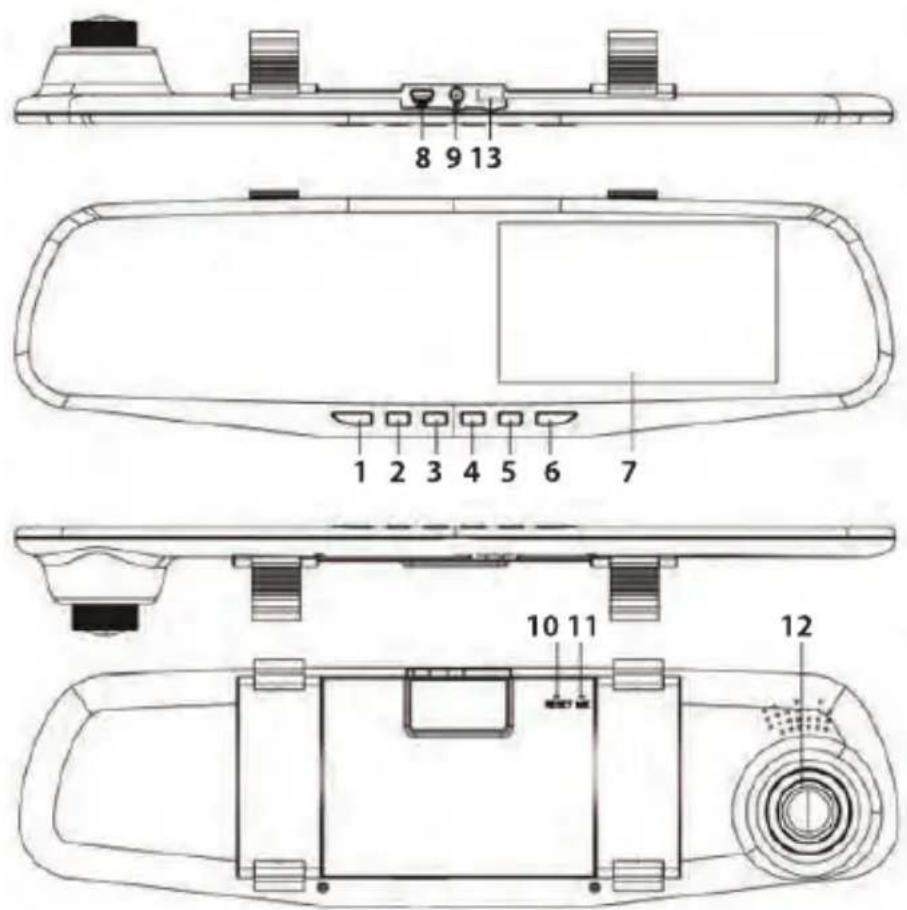
Host keys and interface specification
| No | Icon | Name | Operating instructions |
| 1 |  | Key switch machine | Press to turn on / off; press the on / off for screen back-light |
| 2 |  | The menu key | Standby, press the key to transfer function setup menu; Continuously press the key to switch between the settings menu |
| 3 |  | Mode Switch/Video Emergency lock button | For video / photo / Playback switch function/In Recording mode, press the button to lock on the file, not be cyclic covering; |
| 4 | [7CBD] | Page up / front & back camera display switching/Motion Detection | Menu options, select the function key; Standby or video mode, insert the rear camera, a rear-view camera / forward-looking lens / double image display can be switched on screen display; long press to open the motion detection modl,long press to exit |
| 5 | [kH55] | Turn down/Mute /parking control/Playback Mode / Sound Volume Adjust | Menu options, downward selection function keys/ In video mode, press this button to mute the sound/Playback mode, press the button to reduce the sound volume/hold the key will open the parking control, Hold to close parking control |
| 6 | OK | Menu setting confirm key/video record & photo capture button | Video / Photo / Menu setting confirm key Standby mode, press this button to launch the on / off camera; Photograph mode, press the key to take photos; menu mode to confirm key; |
| 7 |  | Display | 4.3 inch 16:9 TFT, high-definition display screen; |
| 8 |  | USB interface / Power Input | Connected to a computer for data; Power In connection |
| 9 | [AATS] | AV In | Real-view Camera connection port |
| 10 | RESET | Reset button | System restart/reset button; |
| 11 | MIC | Microphone | Collection the sound |
| 12 |  | Front Camera | Front Camera video/image collection |
| 13 | TF card slot | TF memory card slot, please install according to the right direction prompt |
Recorder Installation
- Insert Memory Card: Insert the Micro SD card by following the device memory card instructions, DVR supports memory size from 4GB to 32G (Class6 Above).
Note: Please format the memory card before using the machine for the first time. - Removing the memory card in memory card slot: Turn off the camera first then press pop-up.
Note: If the camera is powered on, do not remove or insert the memory card. - Installing on the rear-view mirror
The equipment will be installed with the silica gel, the left position of the lens from the original car rear-view mirror, equipment flat on the original car rear-view mirror, strained silicon adhesive tape, hanging below the hook.
The equipment will be fastened in the original car rear-view mirror.
- Connect the power supply
Please use the original charger, and connect one end of the charger into USB interface of the camera, then insert the other end of the car charger into the car cigarette port.

natural_image
Line drawing of a car dashboard and steering wheel (no text or symbols)Note: The car charger extension cord wiring should be installed along the windshield.
5. Turn On / Off Device
- The automatic on / off: Automatically boots device when auto engine starts.
The DVR will record automatically when your car's engine starts. If the car charger is constantly plugged in, the DVR will stop recording and save the data to your micro SD card automatically. Theres 15 seconds delay when your car's engine is off, then DVR turns off.
- The manual on / off: Short Press "💡" Power ON/OFF button, and you will hear a "music" sound, DVR will start to record automatically, To stop recording press "OK" Rec/Confirm Button, the DVR will save the data to your SD card and be in standby mode. Short Press "💡" Power ON/OFF button again to turn off the camera.
The initial setting recorder
Set the date and time:
- The DVR will record automatically when your car's engine starts, press the OK button, the device enters standby state.
- In standby mode, press the "88" to enter into menu setting, then press the "◀" and "▶" button to find the "date" menu, then press "OK" button to enter into setting.
- Press "◀" or "▶" button to adjust the value, then press "OK" button to confirm. Short Press "☐" button to exit until the complete setting.
Camera Recorder Operation
- The DVR will record automatically when your car's engine starts, if the car charger is constantly plugged in the DVR will stop recording and saves the data to your micro SD card automatically after 15 seconds delay when your car's engine is off, Or Press "OK" button to manually stop recording.
Note: For some cars if the car's engine is off, and the DVR is still ON, turn off the DVR manually or unplug the power charger from the car cigarette port.
- Other types of Recording: In standard mode, Press the "OK" button, the DVR starts recording; press "OK" button again, then the DVR will stop the recording.
Note:
- Theres 1, 2, 3 minute options for video recording. It will save one video file automatically.
- If memory card capacity is full, then the previous video recording file will be automatically overwritten.
- For G-Sensor Trigger or emergency video recording, video will be overwritten, you need to delete manually.
3. Emergency Camera
Note: If in the start of the gravity sensing (G-sensor) function detects collision, the device will automatically lock the current recorded video and will not be overwritten.
Video / Photo Capture Operation
- Press "⚙️" button to switch to video mode, video recording icon displays in the upper left corner of the screen.
- Press "💡" button to switch to photo capture mode, press "OK" key to take pictures, while the DVR takes a picture you will hear "KA" sound, It means that photo taking is successful.
Video / Photo Playback Operation
- In standby mode, press "💡" key twice and enter into playback mode, the "▶" icon showing in the middle of the screen.
- Press "◀" or "▶" keys to choose the file you need to view.
- Short press "OK" key to play the selected video files; press " ✪" button to exit.
Menu Operation
- In standby mode, press "88" to enter into menu setting.
- Press "◀" or "▶" keys to choose the menu which you need to adjust.
- Press "OK" key to confirm your setting.
- Press "88" button after the completion of menu setting.
Special Function:
1. The G-Sensor Function
The G-sensor triggered (Compact detect). The DVR will save the accident video file and will not be over written automatically. You can adjust the Sensitivity of G-Sensor in the menu setting.
2. File Locking Function
In Recording Mode, when you shoot one important event through this DVR, you can press “✨” key to lock the file manually and the video file will not be overwritten.
3. Parking Monitoring Function
- Enable this function through the menu setting first (or long press the “▶” keys to start the parking monitoring), when the car’s engine is turned off and the DVR detects external vibrations and DVR will pop-up automatically and starts to record 10-15 seconds, then the DVR turns off automatically.
- Parking Monitoring video file will be locked automatically.
Note: Please disable the parking monitoring function when you want to do normal video recording
4. Motion Detection Function
The DVR is equipped with motion detection in case you wish to leave the unit on and record a vandal or if somebody is hitting your car or parking too close. In standby mode. Turn on the DVR and enable motion
detection from the menu setting, then the LCD display will appear “💡” icon in the middle of the upper corner of the screen, if it detects movement from any object within 3 meters, the DVR will start to record 10-30 seconds automatically.
5. USB Model
Charging: Selecting this mode can be used for charging the battery products.
6. Battery Instructions
Battery indicator, please refer to the:


Sufficient power Low power Low battery Electricity shortage
Turn on vehicle power supply, the charging time is about 180 minutes. The red ligh charge indicator shuts off automatically after charging.
Note: This DVR can work for a long time while driving using the car power input. The built-in battery is only for parking monitoring, battery capacity has limited operating time without car power input, please connect to the vehicles power for daily use.
7. Reset
If DVR freezes or any abnormal operation occurs, you can use a small needle to touch "RESET" button through the hole to reset the machine operation.
Display Interface Icon
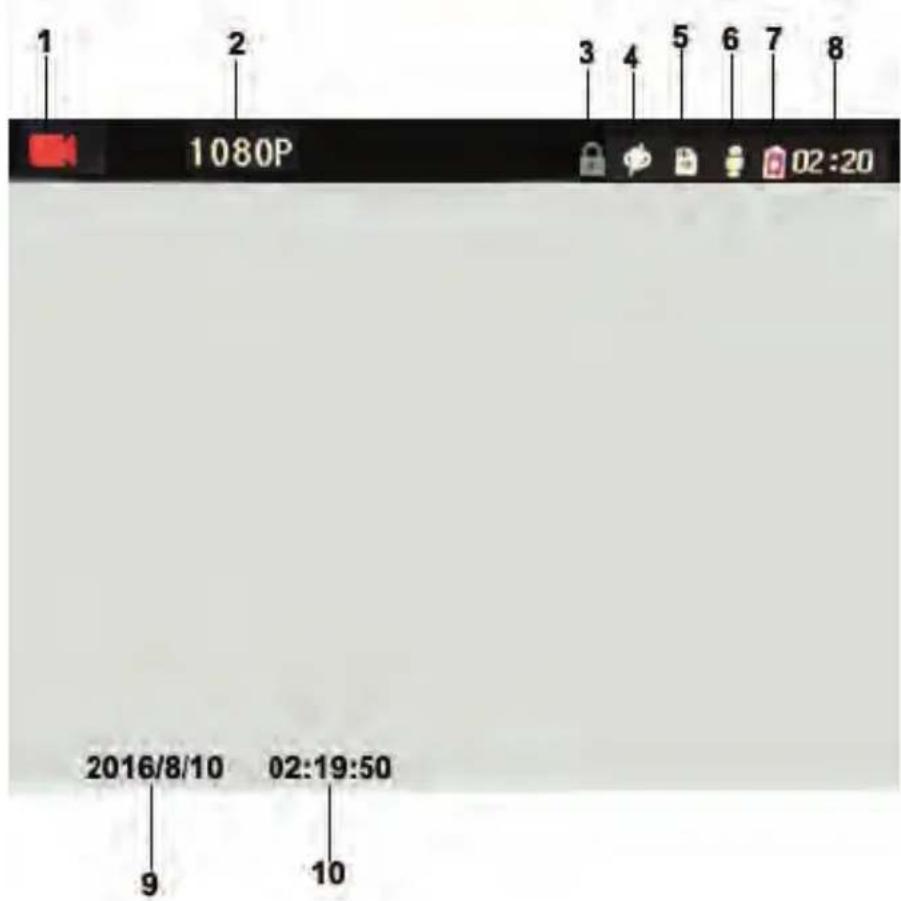
- □: Video Icon
:Photo Icon :Video Playback Icon
:Motion detection Icon
2.1080P: Indicates the current video format size - ☑: Video Locked
- ☐: Open the parking control ☐: Parking control off
- : Memory Card Icon
- ♦: Recording open Ⓞ: Recording off
- : Battery Power Display
- 02:20: The video time shows
- 2016-8-10 : Display the current Date (user can adjust)
- 02:19:50: Display the current Time (user can adjust)
Setup Menu
| Menu Options | Explain | Available Options |
| Resolution | Set the video resolution | FHD HD |
| Photo Quality | Set the Photo Resolution | 12M/10M/8M/5M/3M/2M/1.3M/1M |
| Loop Video | Set each video file length | 1 min, 2 min, 3 min, off;If you choose close, card will not be covered with automatic cycle. |
| Motion Detection | Standby, automatic video detection to a moving picture | OFF/ON |
| White Balance | Screen is dim,need to fill in | Automatic/Sunlight/Overcast/Tungsten lamp/Fluorescent lamp |
| Contrast | The color for the video | 0/1/2/3/4/5 |
| Exposure | Underexposure | 0;-1/3;-2/3;-1.0;1.0;2/3;1/3;2/3 |
| Boot Video | Turn on the power record | OFF/ON |
| Screen Protection | Time to turn off the screen | 0ff/10seconds/30seconds/1minutes |
| Video Sound | Video sound open or closed | OFF/ON |
| Parking Monitoring | Parking stall, the body if received external vibrations,the camera will turn on then starts to record | OFF/ON |
| G-Sensor | Collision generated video not overwritten | off/2G/4G/8G |
| Auto Power Off | Automatic Shutdown Time | off/3 Minutes/5 Minutes/10 minutes |
| Date | Date and time | Set the year, month, day, hour, minute, second |
| Language | Menu language | English/Simplified Chinese / Simplified first article /German / French / Polish / Korean / Italian/Portuguese / Russian /Spanish/Thai |
| Time Watermark | Video shows the date | OFF/ON |
| Format | Storage card data delete | Confirm/Cancel |
| Restore Factory Settings | Reset all the information as the factory set | Confirm/Cancel |
| Version | Factory software version | The software version number |
Product Specifications:
| Product name | Rear-view mirror dual channel recorder |
| Product features | 140 level is very wide, full HD 1080P |
| G-sensor | Built-in |
| display size | 4.3” TFT |
| Camera lens | 140 A+ level lens |
| Language | Multi language |
| File format | AVI |
| Video resolution | 1920*1080P 1280*720P |
| Video format | H . 264, AVI |
| The effect of color | Standard |
| loop video | Seamless loop video, no leakage. |
| Car switch machine | Support |
| Motion detection function | Support |
| Date time | Support |
| carrier medium | built-in (total: 1024MB) |
| Photo | 12M |
| Photo format | JPEG |
| Memory card | Micro SD Memory Card (32Gb Max) |
| Microphone | Support |
| sound | Built-in |
| Parking control | Support |
| Video format | PAL/NTSC |
| current frequency | 50HZ/60HZ |
| USB function | charge |
| Power interface | 12-24V 1A |
| Battery | Built-in 450mAh |
Troubleshooting
Under normal operating conditions, such as product problems, please consult the solution:
Cannot boot:
Check if the recorder is correct and the car charger, in manual boot, check whether the low battery needs recharging. As a result of the program can be passed by the RESET key, restore to factory settings.
The camera automatically stop shooting, or non-circular camera:
The HD video data is huge, possibly because the memory card reader cannot keep up the pace. Please use the high speed Memory card such as high speed C10 card.
Non circular camera also has the possibility in the gravity sensing function if open. Car memory files is locked. Please close the gravity sensing function and reformat memory card.
Set up recycling camera is not the same:
Check if the open mobile detection function is open. Long camera motion detection depends on the picture with no movement.
Video and Image is not clear:
Check if the lens have finger print. Clean the lens surface before recording, keep it clean and tidy.
Sometimes the effect is good or bad:
Camera effect has a very big relation to the lighting environment and light intensity.
The images has fringe interference:
This is because of the mistake of "light frequency" under fluorescent light generated.
Reset the machine
Press "RESET" button to restore from start.
PYLE®
Experience Life!

natural_image
Illustration of a laptop with a red checkmark on screen, accompanied by partial text (no readable document text)VISIT US ONLINE:
Have a question?
Need service or repair?
Want to leave a comment?
PyleUSA.com/ContactUs
PYLE
- PLCMDVR49
- INTRODUCTION
- Infringement of copyright or privacy notice
- INSTALLATION NOTES
- Attention
- Recorder Installation
- Note: The car charger extension cord wiring should be installed along the windshield.
- Turn On / Off Device
- The initial setting recorder
- Set the date and time:
- Camera Recorder Operation
- Note:
- Emergency Camera
- Video / Photo Capture Operation
- Video / Photo Playback Operation
- Menu Operation
- Special Function:
- The G-Sensor Function
- File Locking Function
- Parking Monitoring Function
- Motion Detection Function
- USB Model
- Battery Instructions
- Reset
- Display Interface Icon
- Troubleshooting
- Cannot boot:
- The camera automatically stop shooting, or non-circular camera:
- Set up recycling camera is not the same:
- Video and Image is not clear:
- Sometimes the effect is good or bad:
- The images has fringe interference:
- Reset the machine
- PYLE®
- Experience Life!
- VISIT US ONLINE:
Brand : Pyle
Model : PLCMDVR49
Category : Rear Camera