
VENU100A - Sound system Hamilton Buhl - Free user manual and instructions
Find the device manual for free VENU100A Hamilton Buhl in PDF.


| Product Type | Portable Sound System |
| Model | VENU100A |
| Brand | Hamilton Buhl |
| Dimensions (W x H x D) | 15.5 x 10.2 x 8.7 inches (39.4 x 25.9 x 22.1 cm) |
| Weight | 14.5 lbs (6.6 kg) |
| Power Supply | AC 100-240V, 50/60Hz (built-in power supply) |
| Battery | Rechargeable lead-acid, up to 6 hours at moderate volume |
| Amplifier Power | 60W RMS (class D) |
| Speaker Configuration | 8" woofer + 1" compression driver |
| Frequency Response | 60 Hz - 20 kHz |
| Inputs | 2 XLR/1/4" combo jacks (mic/line), 1 RCA stereo line input, 1 3.5mm aux input |
| Outputs | 1 XLR mixed output, 1 1/4" headphone output |
| Wireless Connectivity | Bluetooth 4.0 for audio streaming |
| Controls | Master volume, individual channel volume, tone control (bass/treble), Bluetooth pairing button, power indicator |
| Mounting Options | Pole mount socket (1-3/8" diameter), fold-down carry handle, tilt-back legs for monitor use |
| Included Accessories | Power cable, user manual |
| Cleaning and Maintenance | Wipe with dry cloth; do not use solvents or abrasive cleaners. Keep vents free of dust. |
| Safety Features | Overload protection, thermal shutdown, safety grille on speaker |
| Spare Parts & Repairability | Replacement speakers and amplifier modules available through authorized service centers. User‑replaceable fuses. |
| Warranty | 2 years limited warranty |
Frequently Asked Questions - VENU100A Hamilton Buhl
User questions about VENU100A Hamilton Buhl
0 question about this device. Answer the ones you know or ask your own.
Ask a new question about this device
Download the instructions for your Sound system in PDF format for free! Find your manual VENU100A - Hamilton Buhl and take your electronic device back in hand. On this page are published all the documents necessary for the use of your device. VENU100A by Hamilton Buhl.
USER MANUAL VENU100A Hamilton Buhl
Portable PA Amplifier System
natural_image
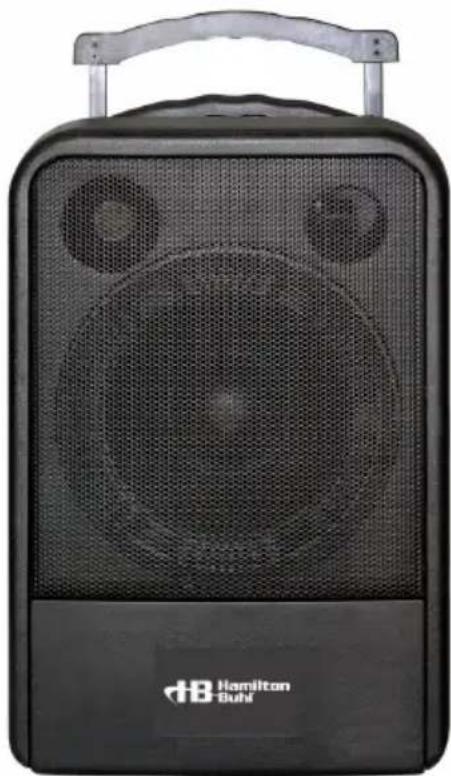
Black Hamilton Buhl portable speaker with mesh grille and front handle (no visible text or symbols on device body)13 Hamilton Buhl®
Never-Ending Learning Innovation
80 Little Falls Road, Fairfield, NJ 07004
1-800-631-0868
www.HamiltonBuhl.com
Table of Contents
- Introduction and Product Specifications....4
- Important Safety Information .... 5
- Main – Parts Description, Control Panel and Operations Guide ..... 6-9
- Wireless Microphone – Parts Description and Specifications ..... 10
- Optional Wireless Body Pack Transmitter and Headset Microphone Parts Descriptions and Specifications 11-12
- Optional Accessories – Multi-Format Player.... 13-16
- Optional Accessories – Remote Control Battery....17
- Optional Accessories – Valve Regulated Sealed Lead Acid Battery ..... 18
- Basic Set....19
1. Introduction and Product Specifications
1.1 Introduction
Thank you for choosing the HamiltonBuhl VENU100A PA Amplifier System. Please read this manual carefully before using and retain for future reference.
Please recharge this unit every month to achieve the best performance.
1.2 Product Specifications
| Power Output RMS 60W | |
| Speakers One 10” Woofer Speaker; One 1” Tweeter | |
| Rechargeable Batteries Two 12V 7AH | |
| Distortion 1% at 10W | |
| Frequency Response 80Hz-15KHz ±3dB | |
| Input Wireless/Wired Mic In, Line In | |
| Output Line/Video Out | |
| Recharging Time 12-15 Hours | |
| Working Time 8-9 Hours | |
2. Important Safety Information
When a failure or problem occurs, please contact the manufacturer for further troubleshooting, evaluation and/or repair. One receiver cannot receive a signal from two of the same frequency microphones simultaneously. Other brand microphones with different frequencies cannot be used with this receiver.
| Do not open or attempt to fix or adjust this product yourself. To reduce the risk of fire or electric shock, do not remove the cover. High voltage parts are inside. | Do Not Disassemble |
| To reduce the risk of electric shock, do not touch power outlet during thunderstorm. Do not touch power plug with wet hands. Do not put liquid containers or small metal parts on the top of the equipment. Do not drop metal parts or flammables into the equipment. | Do Not Touch |
| To reduce the risk of fire or electric shock from a damaged power cord, do not pull hard when pulling out the power plug. Always grasp the plug tightly, then pull it out gently. Turn off the power if this equipment will not be used for a long period of time. | Pull Out AC Plug |
| To reduce the risk of electric shock, use the specified power voltage only. Do not expose this equipment or power cord to sun, moist or dusty places. Keep away from heat, oil, smoke and water. | Caution |
| To prevent damage, never put heavy items on top of this equipment. Place and use on flat, stable surfaces only. | |
| Always insert the power plug fully into a power outlet. Please pull out the power plug and contact the manufacturer if the following occurs:1 Smoke comes out of the unit or you smell burning.2 Water or other liquid is accidentally spilled on this equipment.3 Unit is dropped on the ground and damaged.4 Power cord is damaged.(If core is exposed or cord is frayed) | Warning |
3. Parts Description
3.1 Main Unit


(1) Handle
(2) Telescopic Trolley
(3) Metal Shield
(4) Battery Compartment
(5) Wheels
(6) Pole Mount
(7) Control Panel
(8) Cabinet
3.2 Control Panel
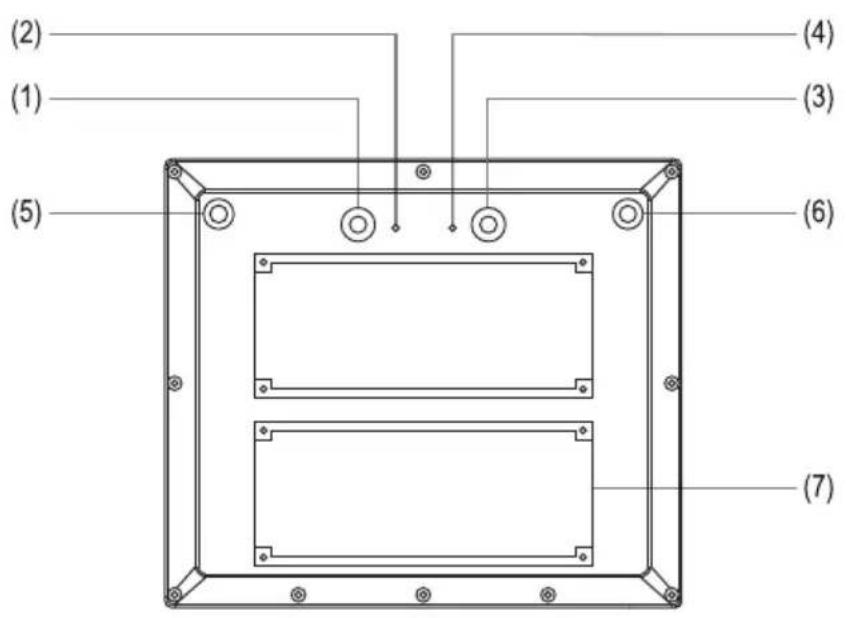
(1) Wireless MIC A Volume
(2) Wireless MIC A RF LED Indicator
(3) Wireless MIC B Volume
(4) Wireless MIC B RF LED Indicator
(5) Antenna A
(6) Antenna B
(7) DVD Player
3.2 Control Panel (continued)

(1) Power switch
(2) Power LED indicator: When voltage is low, red light appears.
(3) Battery Status LED indicator:
Battery supply: When battery voltage reduces from strong to weak, green indicator will extinguish one by one from right to left.
Battery charge: When charging battery, power indicator will flash, with battery voltage enhancing from weak to strong, the indicator will light one by one, from left to right.
(4) DC power input jack (15V/6A)
(5) Battery disconnect switch
(6) Voice priority switch
(7) Volume control of wired MIC-1
(8) Wired MIC-1 input jack
(9) Volume control of wired MIC-2 (Balanced input)
(10) Balanced Input Jack
(11) TONE control
(12) REVERB control
(13) LINE IN volume control
(14) LINE IN jacks (3.5mm & RCA Stereo)
(15) LINE OUT jack
(16) DISC / MP3 / BT Player Volume Control
(17) VIDEO OUT jack
(18) BASS control
(19) TREBLE control
(20) Master volume control
3.3 Main – Operations Guide
This unit uses DC power. When inputting DC 15V, current cannot be less than 5A, or the system will not work properly.
Note: Before using this device, please charge fully for approximately 10-12 hours.
-
(A) When using DC power, insert one end of DC cord into DC power input jack (4), the other end into AC power outlet. Switch Power on (1) and the LED indicator (2) lights in green to indicate normal condition.
(B) When using built-in rechargeable battery, the power LED indicator light (2) is green and indicates a normal battery. When power LED indicator light (3) is red, it indicates the battery power is low and you should recharge or replace it.
(C) If battery power is failing, the main unit will power off automatically.
(D) If you insert the power cord into DC input jack (4), the machine charges automatically. -
Turn on handheld microphone or body pack transmitter power switch, the RF LED indicator (2) / (4) on the top plastic panel and the receiver will light. This indicates signal has been received properly.
-
If wired microphone is used, insert plug into into a 3.5mm input MIC 1 (8) or a XLR input MIC 2 (10) jack and adjust the volume control (7 for MIC 1 and 8 for MIC 2), as desired.
-
To amplify external sound source, insert signal cable into LINE OUT (15). Volume can be adjusted by LINE IN VOL (13).
-
To use an external amplifier, insert one end of signal cable into LINE OUT jack (15), and the other end to the external amplifier.
-
This unit has TONE (11), REVERB (12), BASS (18) and TREBLE controls (19).
-
Press playback on the DISC / MP3 / BT Player to play the music. The volume can be controlled controlled by volume knob (16) on control-board.
-
When connecting with video, you can insert one end of video-out connection to VIDEO OUT jack (17).
-
Voice Priority: Turn on Voice Priority Switch (6). When using microphone, music will be cut off automatically to hear voice. When you stop using the microphone, the music will start again.
-
Voice levels can be controlled by using the general volume key (20).
Note: Please recharge the built-in rechargeable battery fully before operation.
Switch off the power and plug in the DC cord to start charging. Charging time is approximately 10-12 hours. Please recharge the unit every month.
If this system is not going to be used for a long period of time, charge the battery at least once per month. Pull out the power plug and turn the Power Switch to the OFF position.
4. Wireless Transmitter
4.1 Wireless Handheld Microphone (UHF 3V) Parts Description

(1) Mesh cover
(2) Power LED Indicator
(3) Display
(4) Power Switch
(5) Plastic Body
(6) Battery Cover
(7) Cap
- Open battery cover (6) and insert batteries (insert carefully paying attention to positive and negative poles). Close the battery cover.
- Turn on microphone power switch (4) and the power LED indicator (2) will flash on once then off. When indicator (2) stays red, it indicates battery power is low. Please change the battery.
- When switching on microphone power, please operate the switch step-by-step. When the switch moves to the center, please wait for at least 0.2 seconds or it may cause noise. Then only - move to on position.
4.2 Wireless Handheld Microphone Specifications
Microphone Type Dynamic Handheld
Frequency 902MHz-928MHz
Spurious Emissions >55dBm
Power Source 2 x "AA" 1.5V Batteries (included)
Operating Time Approx. >6 Hours
On-board Indicators Power Status/On/Off Switch
Dimensions ∅ 50mm, L 260mm
Weight 0.35 lbs
5. Optional Wireless Body Pack Transmitter
5.1 Optional Wireless Body Pack Transmitter (UHF 3V) Parts Description

(1) ON/OFF Power
(2) Power LED Indicator
(3) MIC IN
(4) Antenna
(5) Belt Clip
(6) Battery Compartment/Cover
- Open the battery cover (6) and insert 2 x "AA" batteries according to the polarity indicated with + or -.
- Turn ON POWER switch (1). The POWER LED indicator (2) will turn green, indicating good battery voltage.
- Plug in headset microphone into MIC IN (1).
5.2 Optional Wireless Body Pack Transmitter Specifications
Frequency UHF 902MHz\~928MHz
Spurious Emissions >55dBm
Power Source 2 x "AA" 1.5V Batteries (included)
Operating Time Approx. >6 Hours
On-board Indicators Power Status/On/Off Switch
Weight 0.22 lbs
5.3 Headset Microphone Specifications
Microphone Type Condenser
Frequency Range 50Hz-16KHz
Directional Characteristic Uni-Directional
Sensitivity -46dB±3dB (1V / PA @1KHz)
Impedance 600Ω
Output Connector Cable φ3.5 XLR Material
Material 2mm × 100cm Black Shield Cover
6. Multi-Format Player
6.1 Multi-Format Player Parts Description
Multi Format Player (1)
Remote Control

6.2 Multi-Format Player Parts Description (continued)
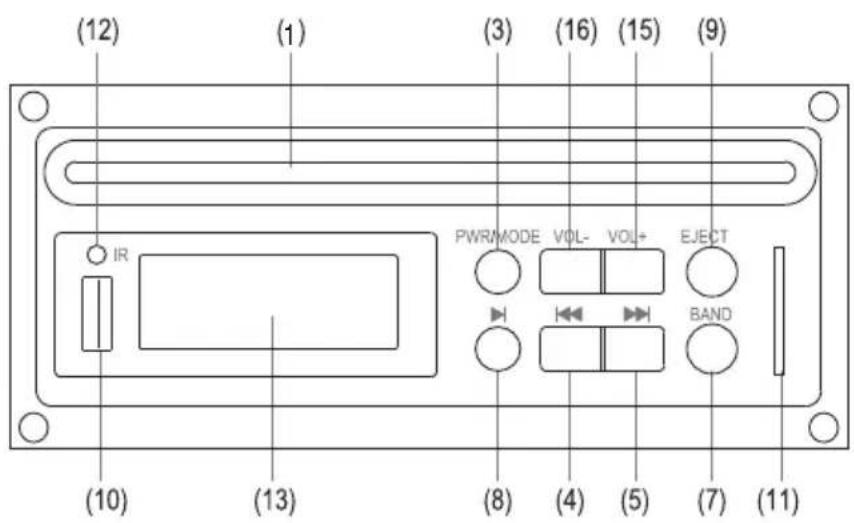
(1) DISC Slot
(2) Power Switch
(3) Power/Mode Button
(4) Short Press: Skip Previous/Chapter; Long Press: Rewind; Scanning on Radio
(5) Short Press: Skip Next/Chapter; Long Press: Fast Forward; Scanning on Radio
(6) Function Mode
(7) Band Mode
(8) Play / Pause
(9) Eject
(10) USB Port
(11) SD Card Slot
(12) Infrared Sensor
(13) LCD Display
(14) Mute
(15) VOL+
(16) VOL-
(17) Tone Up
(18) Tone Down
(19) Default
(20) Loud
(21) Audio/ST
(22) Zoom
(23) Arrow Buttons
(24) Menu Enter
(25) Setup / AMS
(26) Key for Angle
(27) Sub / Title / Language Setting
(28) Repeat
(29) PROG
(30) Slow
(31) Key for Title of DISC
(32) Key for DSP-Off, Loud on, Volume / Function Selection
(33) Menu
(34) Stop / Back
(35) Number Keys
(36) GOTO Playing Time Setting
(37) Display Time
6.3 Guide to Operations – Multi-Format Player
- Press Power switch (2) / (3) to turn on the multi-format player, press again to turn off.
- Quickly press "MODE" (3) on the front panel. It will be in BLUETOOTH mode, and the LCD will display "NO LINK". Open the Bluetooth function on smart phone and search until smart phone displays "PA SYSTEM". The LCD will display "LINK OK" a few seconds later. This means Bluetooth connection is successful, and the music playing on the smart phone will transfer to your PA System.
- The built-in DVD player uses high quality DVD movement, and can play in multiple formats: DVD / DVD-9 / VCD / DVCD / MP3 / CD-R / RW and others.
- While the player is working, if there is no disc in (1), the LCD display (13) will display "No Disc". If a disc has not been inserted correctly, the LCD display (13) will also display "No Disc"; If the disc has been inserted correctly, the LCD display (13) will display TITLE and Playing Time.
a. While the DVD disc is playing, the LCD (13) will display the current title and playing time.
b. While VCD / SVCD / CD is playing, the external LCD display on the player will display the total titles and the current title; PBC, the current title and the playing time.
- While the file is playing:
a. Press PLAY / PAUSE (8) on player or the remote control to stop playing. It will display PAUSE on the LCD display. Press again to resume playing.
b. Press STOP (3) on the player or the remote control to stop playing. The LCD display (13) will display STOP.
- While stopped, press PLAY / PAUSE (8) on the player or the remote control, and the current file will be resume playing.
- While stopped, pressing STOP / BACK (34) on the remote control, then pressing PLAY / PAUSE (8) on the player or the remote control will play the first file.
-
Press EJECT (9) on the player or the remote control and the disc will be ejected automatically. It may take about 30 seconds to re-insert the disc automatically again. To select music / fast forward / backward, press (4) / (5) to search up or down on the radio. In SD / USB can be read, upper / lower selections, long press fast forward / rewind.
-
Press BAND (7) on the multi-format player to switch on the radio.
-
Press FUNC (6) on the remote control to select radio function / playback of USB / SD.
-
While the disc is playing, press BAND (7) on the remote control to select NTSC, PAL, AUTO.
-
For video or audio output, press VOL+ (15) / VOL- (16) on the remote control to adjust the volume. Press VOL + (15) to increase or VOL- (16) to decrease the volume.
6.3 Guide to Operations – Multi-Format Player (continued)
Press # (17) / b (18) on the remote control to adjust tone up or down. Press the MUTE key (14) on the remote control to mute the audio and the LCD will display MUTE. Press again to resume audio; Press (19) to resume original audio.
- When playing CD / VCD, press LOUD (20) on the remote control to increase the bass.
- When playing a CD / VCD, press (21) on the remote control to select left channel, right channel and stereo. Please note: When selecting voice mode for various types of discs, some may have only one voice mode that will be appear on the LCD display.
- When playing in DVD / VCD mode, Press (22) on the remote control to zoom in or zoom out image, Press (30) for slow play.
- While playing a VCD, Press MENU on the remote control to set up main menu (33), then the PBC can be played. From the menu, and press Number (35) to select a song. Press again to cancel playing. While playing a DVD, press (33) once to set up the main menu, or to return to the main menu, then press (35) to select the chapter, press again to enter into title menu, press three times to switch off; Press (26) on the remote control to select the angle of viewing the image.
- Pressing (27) on the remote control while the multi-format player is working will allow you to change language if supported by the specific disc. Some discs only provide one language. When the language has been selected, it will appear on the LCD display. Subtitles can be selected under DVD mode only.
- Set up a sequence of files while the multi-format player is under DVD / VCD / CD mode. Press (29) on the remote control, and P00:00 will appear on the LCD display. Then, press (35) to select the playing sequence of the files. When it is programmed, press (23) to play (Arrow buttons are workable only when you enter into main menu).
- While the player has a DVD / VCD / CD inserted, you can setup the menu by pressing (23) and (24) on the remote control to confirm an operation.
- Press (25) on the remote control to enter the main menu, then press (23) to setup the a TV system, audio, media, television system code, etc. (You can keep current settings without changing).
- Press (28) to repeat the single file or all the files.
- Repeatedly pressing (32) on the remote control will allow you to select the acoustic function.
- Press (37) to view the total lead time and time left for the files to play.
7. Remote Control Battery
7.1 Battery Installation
First, open the battery cover and remove the protective PVC plastic film from the contacts before using the remote control.
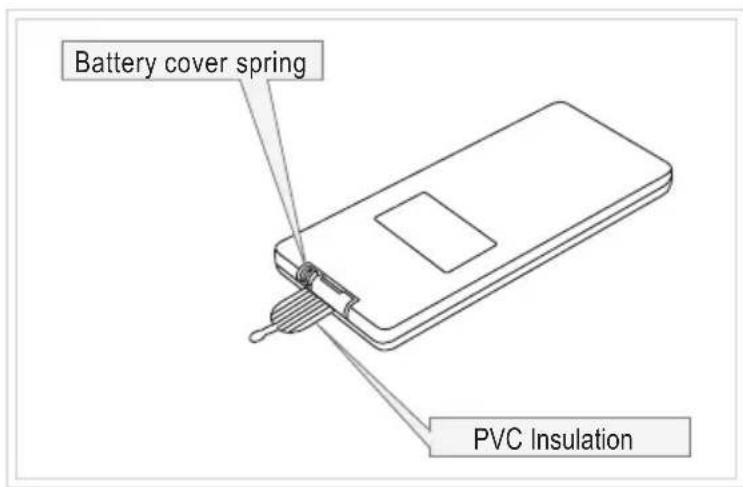
7.2 Changing the Battery
Battery life is approximately one year, depending on usage frequency and operation. If the remote control does not work when it is near the unit, please change the battery.
7.3 Remote Control Range of Operation
- Remote control operation range: Within 12 feet from front panel ≤45°.
- Effective distance of remote control may be different according to differences in the environment.
- Use remote control to read the date you need.
- When using for karaoke, the remote can be used for tone adjustments and controlling/eliminating the original sound.
8. Valve Regulated Sealed Lead Acid Battery
- Please follow these instructions to use and maintain the battery:
When the battery is fully depleted, charge it fully within 72 hours, to avoid battery damage. Charging the battery in a timely manner will help prevent an internal short circuit, outer case distortion, plate corruption, or a voltage drop.
- Sealed lead acid battery features:
a. The battery can be charged at anytime.
b. Battery efficiency can be affected by environmental factors (temperature, humidity). (The optimal temperature is 68^ - 78^ F.)
c. To avoid a dead battery, charge once a month when not in use.
d. The normal lifespan of a battery is one year.
- IMPORTANT NOTE:
a. Be sure to charge for 24 hours the first time charging.
b. Recharge the battery once per month when not in use.
c. Charge the battery fully before each use.
9. Basic Set
(1) Main Unit 1 pc.
(2) AC Cord 1 pc.
(3) Wireless Handheld Microphones 2 pcs.
(4) 1.5V AA Battery 4 pcs.
(5) Instruction Manual 1 pc.
Product Registration:
Visit www.HamiltonBuhl.com
- Click on Customer Care
- Click on Product Registration Icon
- Please fill out all fields marked with * to register

Warranty:
Warranty begins the date item ships from our warehouse. All products have a one year warranty from original date of shipment, unless otherwise noted.

80 Little Falls Road, Fairfield, NJ 07004
1-800-631-0868
www.HamiltonBuhl.com
- Portable PA Amplifier System
- Table of Contents
- Introduction and Product Specifications
- Introduction
- Product Specifications
- Important Safety Information
- Parts Description
- Main Unit
- Control Panel
- Control Panel (continued)
- Main – Operations Guide
- Wireless Transmitter
- Wireless Handheld Microphone (UHF 3V) Parts Description
- Wireless Handheld Microphone Specifications
- Optional Wireless Body Pack Transmitter
- Optional Wireless Body Pack Transmitter (UHF 3V) Parts Description
- Optional Wireless Body Pack Transmitter Specifications
- Headset Microphone Specifications
- Multi-Format Player
- Multi-Format Player Parts Description
- Multi-Format Player Parts Description (continued)
- Guide to Operations – Multi-Format Player
- Guide to Operations – Multi-Format Player (continued)
- Remote Control Battery
- Battery Installation
- Changing the Battery
- Remote Control Range of Operation
- Valve Regulated Sealed Lead Acid Battery
- Basic Set
- Product Registration:
- Warranty:
Brand : Hamilton Buhl
Model : VENU100A
Category : Sound system