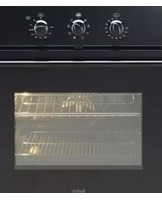
BDOM613DG - Oven Bellini - Free user manual and instructions
Find the device manual for free BDOM613DG Bellini in PDF.


| Product Type | Built-in Electric Oven |
| Model | BDOM613DG |
| Brand | Bellini |
| Dimensions (H x W x D) | 885 x 594 x 563 mm |
| Net Weight | Approx. 51.2 kg |
| Upper Oven Capacity | 35 L |
| Lower Oven Capacity | 70 L |
| Electrical Supply | 230-240V ~/50Hz |
| Functions (Main Oven) | Conventional, Fan Oven, Grill (Large/Small), Fan Grill, Base Heat, Intensive Bake, Defrost |
| Top Oven Type | Conventional Electric |
| Grill | Single grill in top oven; multi-function grill in main oven (inner element only) |
| Cooling Fan | Yes, cycles on/off during use |
| Child Lock | Yes, via clock/programmer lock button |
| Oven Light | Halogen, 25-40W/220-240V, T300°C |
| Door Removal | Yes, for cleaning |
| Inner Glass Panel Removal | Yes, for cleaning |
| Cleaning Method | Manual cleaning; do not use steam cleaners |
| Warranty | 3 years in-home (Australia/NZ) |
Frequently Asked Questions - BDOM613DG Bellini
User questions about BDOM613DG Bellini
0 question about this device. Answer the ones you know or ask your own.
Ask a new question about this device
Download the instructions for your Oven in PDF format for free! Find your manual BDOM613DG - Bellini and take your electronic device back in hand. On this page are published all the documents necessary for the use of your device. BDOM613DG by Bellini.
USER MANUAL BDOM613DG Bellini
Built-in Electric Oven
Model No. BDOM613DG
Thank you.
Thank you for choosing Bellini Appliances.
Bellini appliances carry a 3 year In Home warranty, be sure to retain your installation and user manual and receipt.
For all warranty and technical queries please phone:
Australia 1300 373 199
New Zealand 0800 764 912
Contents
Safety instructions 2 - 4
Installation 5 - 6
Connection of the Oven 7
Start using your appliance 8 - 21
Cleaning 22 - 24
Warranty 25 - 26
Safety Instructions
This manual explains the proper installation and use of your appliance, please read it carefully before using even if you are familiar with the product. The manual should be kept in a safe place for future reference. In case of failure, only the authorised Technical Service may repair this oven. Otherwise the guarantee will be null and void.
All Bellini Appliances are for domestic use only.
Never to do:
When using electrical appliances, in order to reduce the risk of fire, electric shock and/or injury, these basic safety precautions should always be followed:
For Your Safety
Read all instructions carefully, even if you are quite familiar with the appliance.
• Make sure that you have removed all packaging and wrapping. Some of the items inside this appliance may have additional wrapping.
- CAUTION: Accessible parts may become hot when used with cooking appliances.
- This appliance can be used by children aged from 8 years and above and persons with reduced physical sensory or mental capabilities or lack of experience and knowledge if they have been given supervision or instruction concerning the use of the appliance in a safe way and understand the hazards involved. Children shall not play with the appliance, cleaning and user maintenance shall not be made by children without supervision.
- Unattended cooking on a hob with fat or oil can be dangerous and may result in fire.
- Never try to extinguish a fire with water but switch off the appliance and then cover the flam with a lid or damp cloth.
- Do not store items on the cooking surfaces.
• Servicing should be carried out only by authorised personnel.
- The appliance must never be disconnected from the mains supply during use, as this will seriously affect the safety and performance, particularly in relation to surface temperatures becoming hot and gas operated parts not working efficiently. The cooling fan is designed to run on after the control knob has been switched off.
- Do not spray aerosols in the vicinity of this appliance while it is in operation.
- Do not store or use flammable liquids or items in the vicinity of this appliance.
- Do not modify this appliance.
- CAUTION: The use of a gas cooking appliance results in the production of heat, moisture, and products of combustion in the room in which it is installed. Ensure that the kitchen is well ventilated especially when the appliance is in use: prolonged intensive use of the appliance may call for additional ventilation, for example opening of a window, or more effective ventilation, for example increasing the level of mechanical ventilation where present.
- Excess spillage must be removed before cleaning.
- During pyrolytic cleaning, accessible parts may become hotter than normal. Young children should be kept away.
- WARNING: Do not operate the appliance without the glass door correctly closed.
- WARNING: Never put items directly on the base of the oven or cover the oven base with foil, as this can cause the base element to overheat.
- WARNING: Do not modify the outer panels of this appliance in any way.
• WARNING: This appliance must be earthed.
Safety Instructions
- WARNING: Always allow the product to cool down before you change a bulb. There is a risk of electric shock, so always make sure you have turned off and unplugged your appliance before starting.
- WARNING: The top element gets extremely hot when in use, so take extra care to avoid touching it.
- WARNING: Always allow the product to cool down before you change a bulb. There is a risk of electric shock, so always make sure you have turned off and unplugged your appliance before starting.
- WARNING: Do not use harsh abrasive cleaners or sharp metal scrapers to clean the oven door glass since they can scratch the surface, which may well result in shattering of the glass.
- CAUTION: If the supply cord is damaged, it must be replaced by the manufacturer, its service agent or similarly qualified persons in order to avoid a hazard.
- WARNING: The steam cleaner is not to be used.
- WARNING: The appliance must not be installed behind a decorative door in order to avoid overheating.
- Dispose of packaging properly keeping plastic bags away from babies and young children.
Compulsory Warning
If the supply cord is damaged, the cord must be replaced by the manufacturer, its service agent or similarly qualified persons in order to avoid a hazard.
This product has not been designed for any uses other than those specified in this booklet.
Save These Instructions
The manufacturer reserves the right to introduce changes which do not affect the operation of the appliance.
OVEN / GRILL Do
• Always take care when removing food from the oven as the area around the cavity may be hot.
• Always use oven gloves when handling any utensils that have been in the oven as they will be hot.
- Always make sure that the oven shelves are resting in the correct position between two runners. Do not place the oven shelves on top of the highest runner, as this is not stable and can lead to spillage or injury.
- Always use the Minute Minder (if fi ted) if you are leaving the oven unattended - this reduces the risk of food burning.
Do Not
- Never place items on the door while it is open.
- Never wrap foil around the oven shelves or allow foil to block the air flue.
- Never drape tea towels near the oven while it is on; this will cause a fire hazard.
- Never pull heavy items, such as turkeys or large joints of meat, out from the oven on the shelf, as they may overbalance and fall.
DISPOSAL: Do not dispose this product as unsorted municipal waste. Collection of such waste separately for special treatment is necessary.

Caution: Accessible parts may be hot when the grill is used - young children should be kept away.
If cleaning the grill pan when it is hot, use oven gloves to move it.
Food for grilling should be positioned centrally on the trivet.
Using the TOP Oven grill

Important: The grill door must be fully open when the grill is used.
open the grill door. Turn the control knob to the required setting. For best cooking results, we recommend that you preheat the single grill for 5 minutes.
push the grill pan towards the back of the shelf, to position it under the grill.
Turn the temperature knob to the MAX position or by selecting a higher or lower shelf position. For toasting, and for grilling foods such as bacon, sausages or steaks, use a higher shelf position. For thicker foods such as chops or chicken joint pieces, use a middle to low shelf position.
To switch off, turn the control knob to the off position.
Using aluminium foil
Using aluminium foil to cover the grill pan, or putting items wrapped in foil under the grill creates a fire hazard.
The cooling fan
When the grill is switched on, the cooling fan comes on to keep the fascia and control knobs cool during grilling.
during use the fan may cycle on and off, this is normal.
INSTALLATION
- Depending on the specific cabinet construction the oven is to be fitted into, it may be required to raise the oven within the cabinet cavity to provide adequate clearance when oven door is in the fully open position.
This is particularly relevant when a draw with draw front or panel is fitted directly below the bottom oven door.
Should the oven door when fully opened interfere with the top of the cabinet draw front/panel, then there are two options:
- Lower the draw front fit to draw itself (Where this is physically possible to do so).
- Raise the actual oven within the cabinet cavity from the cavity floor/shelf by 4.0 mm
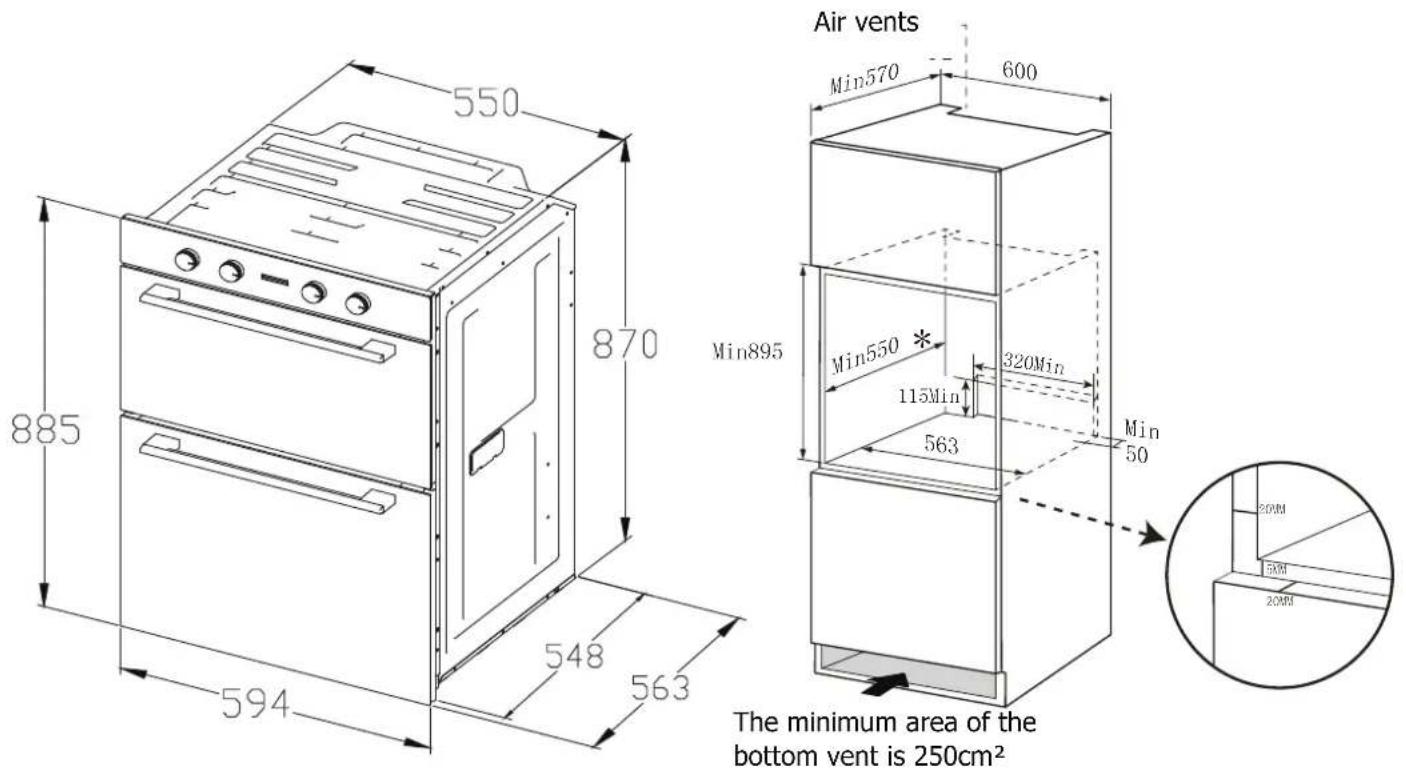
Technical Specifications
| ProductDimensions(h x w x d) m m | Net Weight | UseableCapacity | ElectricalConnection | Max. PowerRating |
| 885 x 594 x 563 | Approx. 51.2 KG | 35 L (Upper) | 230-240V | ~/50Hz |
| 70 L (Lower) |
- The above illustration shows where there is a distinct step be-tween base of the cabinet cavity floor the oven sits on and the top of the draw front below it, this may be due to both cabinets having their own top or floor panels where a full overlay draw/panel fit is possible.
In that instance the oven door fully open position will not interfere with draw front below and oven can be fitted directly on floor panel of the above cabinet cavity floor.
- The above illustration shows where there is a distinct step be-tween base of the cabinet cavity floor the oven sits on and the top of the draw front below it, this may be due to both cabinets having their own top or floor panels where a full overlay draw/panel fit is possible.
In that instance the oven door fully open position will not interfere with draw front below and oven can be fitted directly on floor panel of the above cabinet cavity floor.

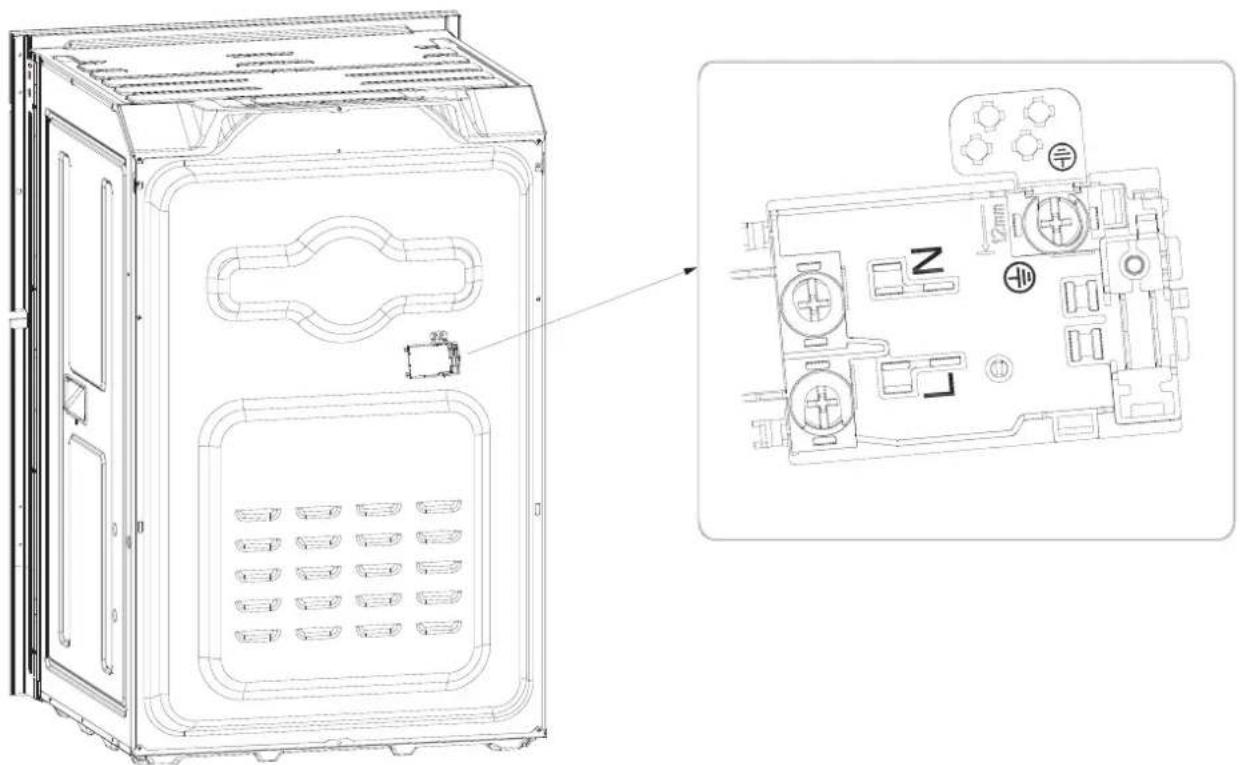
CONNECTION OF THE OVEN
This appliance is marked according to the European directive 2012/19/EU on Waste Electrical and Electronic Equipment (WEEE).
By ensuring this product is disposed correctly, you will help prevent potential negative consequences for the environment and human health, which could otherwise be caused by inappropriate waste handling of this product. The symbol on the product indicates that this product may not be treated as household waste. Instead it shall be handed over to the applicable collection point for the recycling of electrical and electronic equipment. Disposal must be carried out in accordance with local environmental regulations for waste disposal. For more detailed information about treatment, recovery and recycling of this product, please contact your local city office, your household waste disposal service or the shop where you purchased the product.
USING THE TOP OVEN - ELECTRIC
When you are cooking keep children away from the vicinity of the oven.
Caution: The top element gets extremely hot when in use, so take extra care to avoid touching it. The top oven is a conventional oven.
Note: The top oven is not controlled by the programmer.
To turn on the top oven
Turn the temperature control knob until the required temperature is selected.
The red thermostat indicator will come on until the selected temperature is reached, and then go off; it will turn on and off periodically as the thermostat operates to maintain the selected temperature.
To switch off, return the top oven control knob to the off position.
Important: Never put items directly on the base of the oven, or cover the oven base with foil, as this may cause the element to overheat. Always position items on the shelf.
The cooling fan
When the top oven is switched on, you will hear the cooling fan come on - this keeps the fascia and control knobs of the appliance cool during cooking.
Preheating
The oven must be preheated when cook-ing frozen or chilled foods, and we recommend preheating for yeast mixtures, batters, soufflés, and whisked sponges.
preheat the oven until the indicator light switches off for the first time, this will take up to 15 minutes depending on the temperature selected.
If you are not preheating the oven, the cooking times in the following guide may need to be extended, as they are based on a preheated oven.
Shelf positions
There are 3 shelf positions which are counted from the bottom of the oven up-wards, so shelf position 1 is the lowest.
When cooking frozen or chilled food, use the highest possible shelf position, while allowing some clearance between the food and the top element.
The oven shelf must be positioned with the up-stand at the rear of the oven and facing up. position baking trays and roast-ing tins on the middle of the shelves, and leave one clear shelf position between shelves, to allow for circulation of heat.
When using the top oven
When opening the oven door, care should be taken to avoid any possible contact with potential hot air, since this may cause discomfort to people with sensitive skin. We recommend that you hold the underneath of the oven door handle.
USING THE TOP OVEN - ELECTRIC
TOP OVEN BAKING GUIDE
Cooking times
These times are based on cooking in a preheated oven.
These cooking times are approximate, because the size and type of cooking dish will influence time according to personal preferences.
Shelf positions
As a general guide, when cooking frozen or chilled food, use the highest possible shelf position, while allowing some clearance between the food and the top element. Follow the instructions given on packaging.
Cooking temperatures
The temperature settings and time given in the Baking Guides are based on dishes made with block margarine. If soft tub margarine is used, it may be necessary to reduce the temperature setting. If a recipe gives a different temperature setting to that shown in the guide, the recipe instruction should be followed.
Because the top oven is more compact, it may be necessary to reduce cooking temperatures in recipes by up to 20° c.
Use the baking guide as a reference for determining which temperatures to use.
| Item Temperature | (°C) | Shelf Position | Approximate cooking time |
| Small cakes Victoria sandwich (2 x 180mm / 7") Swiss roll | 160 - 170 | 2 | 20 - 25 mins |
| 160 | 1 | 20 - 25 mins | |
| Semi rich fruit cake (180mm x 7") Scones | 200 | 1 | 8 - 12 mins |
| Meringues | 140 | 1 | 21/4 - 23/4 hours |
| 215 | 1 | 10 - 15 mins | |
| 90 - 100 | 1 | 2 - 3 hours | |
| Shortcrust pastry Puff / flak pastry choux pasrty | 200 - 210 | 1 | depends on size & type of cook-ing |
| 200 - 210 | 1 | dish & also the filling | |
| 200 - 210 | 1 | ||
| Biscuits Sponge pudding Milk pudding | 160 - 200 | 2 | 10 - 20 mins |
| 150 | 1 | 30 - 45 mins | |
| 140 | 1 | 2 - 21/2 hours |
USING THE MAIN OVEN - ELECTRIC
Accessible parts may be hot when the oven is used. Young children should be kept away.
To switch on the oven
Turn the oven control knob(s) to the required setting.
The red thermostat indicator will come on until the selected temperature is reached and then go off; it will turn on and off periodically as the thermostat operates to maintain the selected temperature.
When using the oven
As part of the cooking process, hot air is expelled through a vent in the oven. When opening the oven door, care should be taken to avoid any possible contact
with potential hot air, since this may cause discomfort to people with sensitive skin. We recommend that you hold the underneath of the oven door handle.
PREHEATING
Fanned oven
When cooking sensitive items such as souffle and Yorkshire puddings, or when cooking bread, we recommend that the oven is preheated until the neon switches off for the first time. For any other types of cooking, a preheat may not be re-quired.
Conventional oven
Preheating is always required.
Manual Operation (fanned only)
The cooling fan
The cooling fan may operate when the main oven is on and may continue to operate for a period after the oven has been switched off.
Oven shelves
The oven shelf must be positioned with the upstand at the rear of the oven and facing upwards.
position baking trays and roasting tins on the middle of the shelves.
Baking tray and roasting tins
For best cooked results and even brown-ing, the recommended size baking trays and roasting tins that should be used are as follows;
Baking tray 473mm x 370mm
We recommend that you use good quality cookware. poor quality trays and tins may warp when heated, leading to uneven baking results.
USING THE MAIN OVEN - ELECTRIC
Aluminium foil
Use foil only to cover food or cooking dishes, using foil to cover the shelves or oven base creates a fire hazard.
Cooking with a fanned oven
As this is a high efficiency oven, you may notice the emission of steam from the oven when the door is opened. Please take care when opening the door.
There are no zones of heat in a fan oven as the convection fan at the back of the oven ensures an even temperature throughout the oven.
This makes it ideal for batch baking - eg; when planning a party as all the items will be cooked within the same length of time.
Foods are cooked at a lower temperature than a conventional oven, so conventional recipe temperature may have to be reduced. please refer to the conversion chart.
preheating is generally not necessary as a fan oven warms up quickly.
When batch baking foods that will rise during cooking - eg; bread - always ensure that enough space has been left between the shelves to allow for the rise.
Notes:
When 2 or more shelves are being used, it may be necessary to increase the cooking time slightly.
Because the 2 oven shelves are wider than in many ovens, it is possible to cook 2 items per shelf - eg; 2 victoria sand-wiches or 2 casseroles.
Although you need to keep in mind the points 'To help the air circulate freely' with careful choice of dishes and tins, it is possible to cook a complete meal, and perhaps something else for the freezer, in the oven at the same time.
When roasting meats, you will notice that fat splashing is reduced, which is due in part to the lower oven temperatures, and will help keep cleaning of the oven to a minimum.
Because a fan oven has an even temperature throughout the oven, there is no need to follow the shelf positions given in the baking guide.
USING THE MAIN OVEN - ELECTRIC
There is no need to interchange dishes onto different shelves part way through cooking, as with a conventional oven.
To help the air circulate freely
position the shelves evenly within the oven and maintain a clearance from the oven roof and base.
If more than one cooking dish or bak-ing tray is to be used on a shelf, leave a gap of at least 25mm between the items themselves and the oven interior.
Defrosting and cooling in the main oven

To defrost frozen foods, turn the main oven control to the defrost position, place the food in the centre of the oven and close the door.
To cool foods after cooking prior to refrigerating or freezing, turn the main oven control to the defrost position and open the door.
Defrosting times
Small or thin pieces of frozen fish or meat - eg; fish filets, prawns & mince will take approximately 1 - 2 hours.
placing the food in a single layer will reduce the thawing time.
A medium sized casserole or stew will take approximately 3 - 4 hours.
A 1½kg/3lb oven ready chicken will take approximately 5 hours, remove the giblets as soon as possible.
Be safe
do not defrost stuffed poultry using this method.
do not defrost larger joints of meat and poultry over 2kg/4lb using this method.
Never place uncooked food for defrosting next to cooked food which is to be cooled, as this can lead to cross contamination.
Defrosting meat, poultry, and fish can be accelerated using this method but make sure they are completely thawed before cooking thoroughly. place meat and poul-try on a trivet in a meat tin.
MAIN OVEN BAKING GUIDE
Cooking times & temperatures
The temperature settings and times given in the baking guide are based on dishes made with block margarine. If soft tub margarine is used it may be necessary to reduce the temperature setting.
Allow enough space between shelves for food that will rise during cooking.
do not place items on the oven base as this will prevent air circulating freely.
USING THE MAIN OVEN - ELECTRIC
Note: This is a highly efficient oven, therefore some adjustments will have to be made to conventional cooking temperatures. The table below shows conventional cooking temperatures, A: efficient temperatures and gas marks. For optimum results,
conventional temperatures need to be converted to A: efficient temperatures.
For example, an item which would nor-mally cook at a conventional temperature of 180° C, will now cook at the A: efficient temperature of 160° C.
| Conventional temperature (°C) A: | Efficient Oven (°C) |
| 100 | 100 |
| 110 | 110 |
| 130 | 120 |
| 140 | 130 |
| 150 | 140 |
| 160 | 150 |
| 180-190 | 160 |
| 200 | 170 |
| 220 | 180 |
| 230 | 190 |
| 250 | 200 |
| Food Type Temperature | settings (°C) | Time Approx. | Shelf Position | |
| Cakes: | Conv | Fanned | ||
| Small cakes, Victoria sandwich, Semi-rich fruit cake, Christmas cake | 170180150150 | 160160125125 | 15 - 2520 - 302.5Hr S - 3Hr S2.5Hr S - 3Hr S | 3322 |
| Puddings: Bread and butter pudding, Fruit crumble | 170200 | 150175 | 45 - 1hr40 - 1hr | 33 |
| Miscellaneous Yorkshire pudding: large, small, Shortcrust pastry. | 220220200 | 200200180 | 40 - 4815 - 20 | 4 - 54 - 54 - 5 |
USING THE MAIN OVEN - ELECTRIC
Traditional fruit cakes
It should be remembered that ovens can vary over time, therefore cooking times can vary, making it difficult to be precise when baking fruit cakes.
It is necessary therefore, to test the cake before removal from the oven. Use a fine skewer inserted into the centre of the cake. If the skewer comes out clean, then the cake is cooked.
- Follow the temperatures suggested in the recipe and then adjust accordingly to the conversion table.
- do not attempt to make christmas cakes larger than the oven can cope with, you should allow at least 25mm (1") space between the oven walls and the tin.
• Always follow the temperatures recommended in the recipe.
• To protect a very rich fruit cake during cooking, tie 2 layers of brown paper around the tin.
• We recommend that the cake tin is not stood on layers of brown paper, as this can hinder effective circulation of air.
• do not use soft tub margarine for rich fruit cakes, unless specified in the recipe.
• Always use the correct size and shape of tin for the recipe quantities.
Roast turkey
Roasting turkey involves cooking two different types of meat - the delicate light breast meat, which must not be allowed to dry out, and the darker leg meat, which takes longer to cook.
The turkey must be roasted long enough for the legs to cook, so frequent bast-ing is necessary. The breast meat can be covered once browned.
• Always make sure that the turkey is completely thawed and that the gib-lets are removed before cooking.
• Turkey should be roasted at 160° C - 180° C (fanned) or 180° C - 200° C (conventional) for 20 minutes per 450g (1 lb), plus 20 minutes, unless packaging advises otherwise.
- The turkey can be open roasted, breast side down, for half of the cook time, and then turned over for the remainder of the cooking time.
• If the turkey is stuffed, add 5 minutes per 450g (1 lb) to the cooking time.
- If roasting turkey covered with foil, add 5 minutes per 450g (1 lb) to the cooking time.
To test if the turkey is cooked, push a skewer into the thickest part of the thigh. If the juice runs clear, the turkey is cooked. If the juices are still pink, the turkey will need longer cooking.
USING THE MAIN OVEN - ELECTRIC
Roasting guide
The times given in the roasting guide are only approximate, because the size will influence cooking times.
Frozen meat should be thoroughly thawed before cooking. For large joints it is advisable to thaw over night.
Frozen poultry should be thoroughly thawed before cooking. The time required depends on the size of the bird - eg; a large turkey may take up to 48 hours to thaw.
Use of a trivet with a roasting tin will reduce fat splashing and will help to keep the oven interior clean. Alternatively, to help reduce fat splashing, potatoes or other vegetables can be roasted around the meat/poultry.
Notes:
- When cooking stuffed meat or poultry calculate the cooking time from the total weight of the meat plus the stuffing
- For joints cooked in foil or covered roasters, and for lidded casseroles, add 5 minutes per 450g (1lb) to the calculated cooking time.
- Smaller joints weighing less than 1.25kg (2½lb) may require 5 minutes per 450g (1lb) extra cooking time.
- position the oven shelf so that the meat or poultry is in the centre of the oven.
- It is recommended that the appliance is cleaned after open roasting.
| Cook in main oven at: 160°C - 180°C (fanned) 180°C - 200°C (conventional) | Approximate Cooking Time (preheated oven) | |
| Beef | rareMediumWell done | 20 minutes per 450g (1lb), plus 20 minutes 25 minutes per 450g (1lb), plus 25 minutes 30 minutes per 450g (1lb), plus 30 minutes |
| Lamb | MediumWell done | 25 minutes per 450g (1lb), plus 25 minutes 30 minutes per 450g (1lb), plus 30 minutes |
| Pork | 35 minutes per 450g (1lb), plus 35 minutes | |
| Poultry | 20 minutes per 450g (1lb), plus 20 minutes | |
USING THE OVEN/GRILL - MULTI-FUNCTION
Oven & Grill Functions
The chart below details all of the functions which are available. Your oven may not have all of the functions shown here.
| Symbol Function / Feature | Recommended Uses |
 | For grilling small amounts of steaks, sausages, toast and pieces of fish. The centre part of the grill heating element becomes hot. |
 | For grilling steaks, sausages, toast and pieces of fish. The whole area below the grill heating element becomes hot. |
 | The fan allows heat to circulate around the food. Ideal for thinner foods such as bacon, fish and steak. Foods do not require turning. Use with the oven door closed |
 | This function is ideal for traditional roasting. The meat is placed in the middle of the oven, roast potatoes towards the top. |
 | The base heat can be used to provide additional brown-ing for pizzas, pies and quiche. Use this function towards the end of cooking. |
 | The even temperature in the oven makes this function suitable for batch baking, or batch cooking foods. |
 | Suitable for food with a high moisture content, such as quiche, bread and cheese cake. It also eliminates the need for baking pastry blind. |
 | To defrost foods, such as cream cakes/gateaux, use with the oven door closed. For cooling dishes prior to refrigeration, leave the door open. |
 | Use to select the oven temperature. |
 | Use when the oven is switched off and cold to aid cleaning the oven. |
USING THE OVEN/GRILL - MULTI-FUNCTION
GRILLING IN THE MAIN OVEN
The main oven grill & fanned grill are fitted settings using the inner element only. Make sure that the programmer is set to manual before grilling. When using either grill function, invert the grill pan trivet and preheat for 5minutes.
Grill, small area

The door must be closed when the grill is used for grill, small area.
(i) Turn the selector control knob to the conventional grill setting.
(ii) Turn the oven temperature control knob to the full on setting.
Fanned grill

The door must be closed when the fanned grill is used. When opening the door, take care to avoid skin contact with any steam which may escape from the cooking.
(i) Turn the selector control knob to the fan grill setting.
(ii)Turn the oven temperature control knob to the desired temperature setting.
Caution: Accessible parts may be hot when the ovens are used, young children should be kept away.
Grill, large area

The door must be closed when the large area grilling is used.
When opening the door, take care to avoid skin contact with any steam which may escape from the cooking.
(i) Turn the selector control knob to the grill, large area setting.
(ii)Turn the oven temperature control knob to the desired temperature setting.
The main oven is a multi-function oven, and may be used as a conventional oven or a fanned oven. It may also be used as a grill, or with one of the other oven functions.
Manual operation
The programmer must be set to manual operation before the main oven or grill functions can be used.
To turn on the main oven
Step 1 - Select the function
Turn the selector control knob in either direction, until the function you require appears in the window.
Step 2 - Set the main oven control If you have selected an oven cooking function, then simply turn the main oven temperature control knob to the required temperature - this brings on the neon indicator light, which will stay on until the oven reaches the required temperature. To switch off the main oven, return the control knob to the off position.
Automatic operation
See 'programmer / clock' section.
USING THE OVEN/GRILL - MULTI-FUNCTION
Using the main oven
Caution: Accessible parts may be hot when the appliance is in use - keep children away from the vicinity of the oven.
Never put items directly on the base of the oven or cover the oven base with foil, as this can cause the base element to overheat.
Manual operation
Set the programmer to manual operation. See 'programmer / clock' section. Turn the selector control knob to the symbol for the desired oven function. Turn the main oven temperature control knob to
the desired temperature. The red thermo-stat indicator neon will come on and off until the selected temperature is reached and then go off; it will turn on and off periodically as the thermostat operates to maintain the selected temperature.
To switch off the main oven, return the main oven control knob to the off position.
Automatic operation
See 'programmer / clock section.
Preheating
Always use the fan oven setting for preheating to save time and electricity. After the oven has been preheated on the fan oven setting, turn the selector control knob to the oven setting you require. The oven must be preheated when cooking frozen or chilled food, and we recommend preheating for yeast mixtures, batters, soufflé and whisked sponges, otherwise preheating is not necessary as a fan oven warms up quickly. preheat the oven until the indicator neon switches off for the first time; this will take between 5 - 15 minutes, depending on the temperature selected.
To help the air circulate freely
- position the shelves evenly within the oven and maintain a clearance from the oven roof and base.
- If more than one cooking dish or baking tray is to be used on a shelf, leave a gap of at least 25mm be-tween the items themselves and the oven interior.
- Allow enough space between shelves for food that will rise during cooking.
• do not place items on the oven base as this will prevent air from circulating freely.
Main oven functions Conventional oven

(i) Turn the selector control knob to the conventional oven symbol.
(ii)Turn the main oven control knob to the required temperature.
The temperature you select corresponds to the temperature in the middle of the oven. The top heat comes from the outer element of the grill, and the base heat is under the oven base.
Base heat only

(i) Turn the selector control knob to the base heat symbol.
(ii)Turn the main oven control knob to the required temperature.
USING THE OVEN/GRILL - MULTI-FUNCTION
Fan oven

(i) Turn the selector control knob to the fan oven symbol.
(ii)Turn the main oven control knob to the required temperature.
The fan oven comes on when the oven is switched on and circulates the air around the oven to give a fairly even temperature throughout the oven.
Intensive bake

(i) Turn the selector control to the intensive bake symbol.
(ii)Turn the main oven control to the required temperature.
Defrosting and cooling

(i) Turn the selector control knob to defrost

(ii)Turn the main oven control to the required temperature.
To defrost frozen foods, place food in the centre of the oven and close the door.
To cool foods after cooking prior to refrigeration or freezing, place food in the centre of the oven with the door open.
Be safe
• do not defrost stuffed poultry using this method.
- do not defrost larger joints of meat or poultry over 2kg / 4lb using this method.
- Never place uncooked food which is to be defrosted next to cooked food which is to be cooled, as this can lead to cross contamination.
please refer to the cooking Guide for more information on using the defrost function.
USING THE CLOCK/PROGRAMMER-ELEC

After power on, '0:00' and the clock icon will flash on the screen, press any button to quit.
Button 1:*clock→alarm setting→duration setting→end time setting→clock setting→*clock (* : d eault)
Button 2: minus(-)
Button 3: plus
Button 4: Lock
1、Set alarm
1) Press button 1, alarm icon flashing means alarm function chosen. "0:00" will display. Press button 2 and 3 to set alarm time. Time adjust range is "0:01\~23:59". Press once to plus or minus 1, and hold for 3 seconds for quick-adjust.
Waiting for 5 seconds to confirm setting, the alarm icon will be display, alarm time will be shown and alarm starts. After the count down, "0:00" will display, buzzing starts 4 times every 5 seconds. Press any button to stop.
2) If there's no operation for 2 minutes, buzzing will stop.
2、Duration setting
1) Press button 1, choose 'duration' function, duration icon will flash, "0:00" will display. Press button 2 and 3 to set duration time, adjusting range is "0:01\~23:59". Press once to plus or minus 1, hold for 3 seconds for quick-adjust. The flashing will last for 5 seconds, so the settings must be done within this time frame or the time of day will show again. After setting, the duration icon will display, counting down starts. When counting down stops, power will turn off, 'Duration' icon will flash, "0:00" will display, buzzing will starts for twice every 5 seconds. Press any button to stop buzzing, and press button 1 to show the time of day.
2) During the cooking duration, press button 1 can check and change the cooking time.
USING THE CLOCK/PROGRAMMER-ELEC
3) After counting down stopping, if there's no operation for 2 minutes, buzzing will stop.
4) If set duration time before end time, end time can only be added, not decreased. (The max time added can be after 23h 59m. When end time is longer than duration time+ current time, end time can be decreased by pressing button 2. It will be decreased until end time equals to duration time+ current time+ 1 minute). If end time is longer than duration time + current time, power will be off, end time icon will display. When end time equals to duration time+ current time, power will be on again, end time icon will turn off.
3、time function
1) Press button 1 to choose time function. Time icon will flash, press button 2 or 3 to set time. The range is 24hrs. Press once to plus or minus 1, hold for 3 seconds for quick-adjust. No operation for 5 seconds, the time of day will show, time icon will turn off.
2) If time setting is changed after setting alarm, duration and end time, the alarm will not be changed, and duration and end time will reset.
4、lock function.
Press lock button for 3 seconds any time, the lock function will active, and lock icon will display. Press lock button for 3 seconds again, it will be unlock. The icon turns off.
During the lock condition, press button will cause buzzing, meanwhile the lock icon will flash for 3 seconds.
5、Other notification
1) If setting alarm, duration time and end time, alarm time will display, and alarm, duration, end time icons will display.
2) After setting alarm, duration, and end time, Button 1 can be pressed to check and change alarm time, duration time, end time and day time.
3) If duration time is later than alarm time, there will be only buzzing for alarm. If duration is earlier than alarm time, there will be only buzzing for alarm.
CLEANING
General
- It is important to clean the product regularly as a build up of fat can affect its performance or damage it and may invalidate your guarantee.
• Always switch off your appliance and allow it to cool down before you clean any part of it. - do not use undiluted bleaches, products containing chlorides, wire wool or abrasive cleaners on alu-minium, stainless steel, or plastic/painted parts as they can damage the appliance. Nylon pads can also be unsuitable.
• Take extra care when cleaning over symbols on fascia panels. Excessive cleaning can lead to the symbols fading. - If your product is fitted with stainless steel cladded stips. You may notice a small white residue on the outer edges, this can be removed with a non abrasive wipe.
Painted & Plastic parts
- only use a clean cloth wrung out in hot soapy water.
- do not use abrasive cleaners, wire or nylon cleaning pads on these parts.
Stainless steel & Aluminium surfaces
• only use a clean cloth wrung out in hot soapy water, and dry with a soft cloth.
- Stubborn marks can be removed using a stainless steel cleaner. Supplies can be purchased from the customer care centre.
- Sharp objects can mark the surface of stainless steel, but will become less noticeable with time.
- Wipe any spillage immediately, taking care to avoid burning your hands
- Some foods are corrosive eg; vinegar, fruit juices and especially salt - they can mark or damage the metal if they are left on the surface.
- Baby oil can be used to restore stain-less steel finishes - but only use a few drops. don't use cooking oils as they can contain salts, which will damage the metal.
• do not use steam cleaners.
Enamel surfaces & parts
- clean with warm, soapy water and a clean cloth.
- If larger splashes of fat do not readily disappear, you can use a mild cream cleaner to remove them. More stubborn marks can be removed using a soap filled pad.
- rinse well and dry with a soft clean towel or cloth.
• do not use steam cleaners.
Glass parts
WARNING:- do not use harsh abrasive cleaners or sharp metal scrapers to clean the oven door glass since they can scratch the surface, which may result in shattering of the glass.
- only use a clean cloth wrung out in hot soapy water, or a specialist glass cleaner.
Rinse away any excess cleaner and dry with a soft cloth.
Chrome plated parts
- Use a moist soapy sponge, or place in a dishwasher
CLEANING
REMOVING OVEN PARTS FOR CLEANING
- To remove the door, open the door to the maximum angle. Then pull the buckle at the door hinge backward.
- Close the door to an angle approximately 30° . Hold the door with one hand on each side. Lift up and slowly pull the door out from the oven.

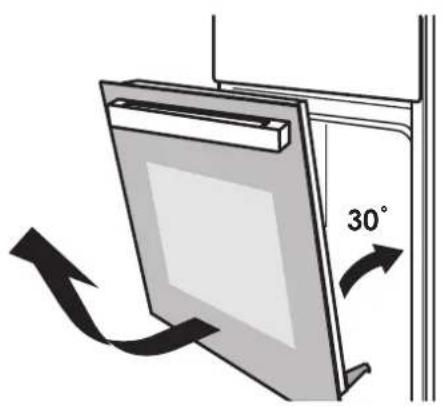
The inner door glass panel can be removed for cleaning but it must be replaced the right way up. If there is any writing on the glass, you must be able to read it clearly when the cavity doors are open.
• Always make sure that the glass is pushed fully into the Stop position.
- To remove the glass panel, open the door wide, push the clips on the left and right sides of door bracket. Then remove the plastic top cover. Hold the glass and slide it out along the door bracket.


CLEANING
- Warning: Do not operate the appliance without the glass panel correctly fitted.
- For your safety, glass door panels are made of toughened glass. This en-sures that, in the unlikely event that a panel breaks, it does so into small fragments to minimise the risk of in-jury. Please take care when handling, using or cleaning all glass panels, as any damage to the surfaces or edges may result in the glass breaking without warning or apparent cause at a later date. Should any glass panel be damaged, we strongly recommend that it is replaced immediately.
BULB REPLACEMENT
For replacement, process as follows:
- Disconnect power from the mains outlet or switch off the circuit breaker of the unit's mains outlet.
- Unscrew the glass lamp cover by turning it counter-clockwise (note, it may be stiff) and replace the bulb with a new one of the same type.
- Screw the glass lamp cover back in place.
NOTE: Only use 25-40W/220V-240V, T300°C halogen lamps.
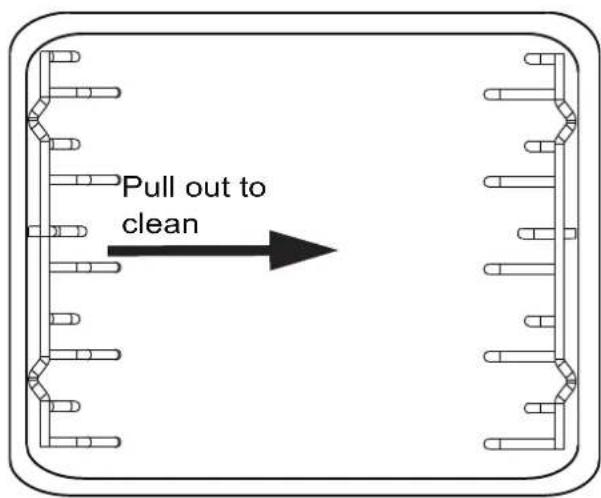
Shelf Runners
- Shelf runners can be removed to enable you to clean them thoroughly. Make sure they are cool to touch and then grasp the runners and slide out of their hanging holes.

WARRANTY
1.1 In this warranty:
1.1.1 Australian Consumer Law means the law as set out in Schedule 2 of the Competition and Consumer Act 2010;
1.1.2 Company means GSM Retail Australia Pty Ltd ABN 53 007 682 475 of 142-144 Fullarton Road, Rose Park SA 5067. Telephone 1300 373 199. Email admin@gsmretailgroup.com;
1.1.3 Consumer means a "consumer" as that term is defined in Section 3 of the Australian Consumer Law as the original purchaser of a Bellini product;
1.1.4 Consumer Guarantees means the guarantees under the Australian Consumer Law;
1.1.5 You means the Consumer.
1.2 Nothing in this warranty affects any person's rights under the Australian Consumer Law. The benefits to any Consumer under this warranty are in addition to the rights and remedies available under any Consumer Guarantees.
1.3 Subject to the other clauses of this warranty, the Company warrants to the Consumer that the Bellini product will be free of manufacturing defects and will perform to the Company's specifications.
1.4 The benefit of this warranty extends only to the Consumer as original purchaser of a Bellini product which installed in a domestic household area. *The in Home warranty does not apply to Commercial and or industrial usage. *Please See 1.7.7 for additional information
1.5 This warranty commences on the date of purchase of the Bellini product by the Consumer and continues for the benefit only of the Consumer until the expiry of three (3) year (Warranty Period).
1.6 If within the Warranty Period a manufacturing defect is discovered in the Bellini product or it fails to perform to the Company's specifications as a result of some defect in materials, components or workmanship (Defect) then the Company will, at its option, repair the Bellini product or supply a replacement Bellini product free of charge. A replacement Bellini product may differ from the original product purchased by the Consumer.
1.7 This warranty will not apply to any Bellini product:
1.7.1 Installed by any person other than a qualified tradesperson; or
1.7.2 Subjected to misuse, neglect, negligence or accidental damage; or
1.7.3 Operated in any way contrary to any operating or maintenance instructions; or
1.7.4 Improperly handled, installed or maintained; or
1.7.5 Altered or modified prior to or after installation; or
1.7.6 Damaged directly or indirectly by power surges, electrical storm damage or connection to incorrect power supply
1.7.7 Industrial and or Commercial usage is inclusive of staff areas in office/shop environments, hotel/motel or other similar accommodation or rental type properties including Bed and Breakfast establishments.
The Australian consumer law requires the following statement with this product
Our goods come with guaranteed that cannot be excluded under the Australian Consumer Law. You are entitled to a replacement or refund for a major failure and for compensation for any other reasonably foreseeable loss or damage. You are also entitled to have the goods repaired or replaced if the goods fail to be of acceptable quality and the failure does not amount to a major failure.
IN ORDER TO MAKE A CLAIM UNDER THIS WARRANTY THE CONSUMER MUST CALL 1300 373
199
(AUSTRALIA) OR 0800 764 912 (NEW ZEALAND) TO CONNECT TO THE NEAREST
AUTHORISED CENTRE
1.8 You must provide proof of your purchase of the Bellini product and the date of purchase in order to obtain the benefit of this warranty.
1.9 If you live outside the service area of the Company or one of its service agents, this warranty does not cover the cost of transport of the Bellini product for service nor the service agent's traveling costs to and from your home.
1.10 If you are required to transport the Bellini product to the Company or its service agent, you must ensure it is safely disconnected by a qualified tradesman and securely packed and insured. The Company does not accept any responsibility for loss or damage of the Bellini product prior to it being received by the Company or its service agent.
1.11 You will be responsible for all costs of returning a Bellini product to the Company and for redelivery of the Bellini product by the Company (whether it is the original or a repaired and/or a replacement Bellini product) and for any other expenses you incur in claiming under this warranty.
1.12 The Company or its service agent will examine any Bellini product and if the Company determines that it is defective through no fault of the Owner and is otherwise undamaged, the Company will repair or replace the Bellini product in accordance with this warranty.
DO NOT SEND IN THIS WARRANTY
Fill out the following details and file with your purchase invoice.
RETAIN & FILE WITH YOUR RECEIPT
Your Purchase Receipt/Invoice is proof of date of purchase. If you are unable to establish the date of purchase, or if the fault is not covered by this warranty, or if the product is found to be in working order, you will be required to bear all service call charges. GSM Retail Australia Pty Ltd reserves the right to discontinue items, modify designs and change specifications without incurring obligation. Whilst every effort is made to ensure that descriptions, specifications and other information in this publication is correct, no warranty is given in respect thereof and the company shall not be liable for any errors therein.
• Purchased from:
Co. Name:
- Address:
• Date of Purchase:
- Serial number:
NOTE: Consistent with our continuing product development policy, improvements may have been made which render the contents of this packaging slightly different to that shown.
FOR WARRANTY SERVICE CALL 1300 373 199
(AUSTRALIA) OR 0800 764 912 (NEW ZEALAND) TO CONNECT YOU TO THE NEAREST AUTHORISED SERVICE CENTRE
WE ENCOURAGE YOU TO REGISTER YOUR PURCHASE ON OUR WEBSITE, WWW.BELLINIAPPLIANCES.COM.AU TO RECEIVE PRODUCT SUPPORT, UPDATES & NEWS.

G|S|M
Gerard Sourcing & Manufacturing
GSM RETAIL AUSTRALIA PTY LTD
The GSM Retail Australia Pty Ltd Group Companies has a policy of continual improvement throughout the product range. As such the unit contained within may differ slightly from the unit illustrated on the pack.
MADE IN CHINA for the GSM Retail Australia Pty Ltd. Group Companies
- THANK YOU
- CONTENTS
- SAFETY INSTRUCTIONS
- NEVER TO DO
- FOR YOUR SAFETY
- COMPULSORY WARNING
- SAVE THESE INSTRUCTIONS
- OVEN / GRILL DO
- DO NOT
- USING ALUMINIUM FOIL
- THE COOLING FAN
- INSTALLATION
- CONNECTION OF THE OVEN
- USING THE TOP OVEN - ELECTRIC
- TO TURN ON THE TOP OVEN
- PREHEATING
- SHELF POSITIONS
- WHEN USING THE TOP OVEN
- TOP OVEN BAKING GUIDE
- COOKING TIMES
- COOKING TEMPERATURES
- USING THE MAIN OVEN - ELECTRIC
- TO SWITCH ON THE OVEN
- WHEN USING THE OVEN
- FANNED OVEN
- CONVENTIONAL OVEN
- MANUAL OPERATION (FANNED ONLY)
- OVEN SHELVES
- BAKING TRAY AND ROASTING TINS
- ALUMINIUM FOIL
- COOKING WITH A FANNED OVEN
- NOTES
- TO HELP THE AIR CIRCULATE FREELY
- DEFROSTING AND COOLING IN THE MAIN OVEN
- DEFROSTING TIMES
- BE SAFE
- MAIN OVEN BAKING GUIDE
- COOKING TIMES & TEMPERATURES
- TRADITIONAL FRUIT CAKES
- ROAST TURKEY
- ROASTING GUIDE
- USING THE OVEN/GRILL - MULTI-FUNCTION
- GRILLING IN THE MAIN OVEN
- GRILL, SMALL AREA
- FANNED GRILL
- GRILL, LARGE AREA
- MANUAL OPERATION
- TO TURN ON THE MAIN OVEN
- STEP 1 - SELECT THE FUNCTION
- AUTOMATIC OPERATION
- USING THE MAIN OVEN
- MAIN OVEN FUNCTIONS CONVENTIONAL OVEN
- BASE HEAT ONLY
- FAN OVEN
- INTENSIVE BAKE
- DEFROSTING AND COOLING
- USING THE CLOCK/PROGRAMMER-ELEC
- 1、SET ALARM
- 2、DURATION SETTING
- 3、TIME FUNCTION
- 4、LOCK FUNCTION
- 5、OTHER NOTIFICATION
- CLEANING
- GENERAL
- PAINTED & PLASTIC PARTS
- STAINLESS STEEL & ALUMINIUM SURFACES
- ENAMEL SURFACES & PARTS
- GLASS PARTS
- CHROME PLATED PARTS
- REMOVING OVEN PARTS FOR CLEANING
- SHELF RUNNERS
- WARRANTY
- 1.1 IN THIS WARRANTY
- DO NOT SEND IN THIS WARRANTY
- RETAIN & FILE WITH YOUR RECEIPT
Brand : Bellini
Model : BDOM613DG
Category : Oven