
One+ R18SEC - Uncategorized RYOBI - Free user manual and instructions
Find the device manual for free One+ R18SEC RYOBI in PDF.


| Product Type | Cordless Jigsaw |
| Brand | RYOBI |
| Model | One+ R18SEC |
| Power Source | 18V ONE+ Lithium-Ion Battery (not included) |
| Battery Compatibility | All RYOBI ONE+ 18V batteries |
| Stroke Length | 20 mm |
| No-Load Speed | 0 - 3000 SPM |
| Variable Speed Trigger | Yes |
| Orbital Action | 4 settings (0, 1, 2, 3) |
| Bevel Cut Capacity | Up to 45° left and right |
| Cutting Capacity (Wood) | Up to 135 mm |
| Cutting Capacity (Steel) | Up to 10 mm |
| Cutting Capacity (Aluminum) | Up to 20 mm |
| Tool-Less Blade Change | Yes |
| Dust Blower | Yes |
| LED Work Light | Yes |
| Weight (with battery) | 2.5 kg (approx.) |
| Dimensions (L x W x H) | 280 x 80 x 220 mm (approx.) |
| Safety Features | Lock-off trigger, blade guard, ergonomic overmold grip |
| Recommended Accessories | RYOBI ONE+ 18V batteries and chargers, jigsaw blades T-shank |
Frequently Asked Questions - One+ R18SEC RYOBI
User questions about One+ R18SEC RYOBI
0 question about this device. Answer the ones you know or ask your own.
Ask a new question about this device
Download the instructions for your Uncategorized in PDF format for free! Find your manual One+ R18SEC - RYOBI and take your electronic device back in hand. On this page are published all the documents necessary for the use of your device. One+ R18SEC by RYOBI.
USER MANUAL One+ R18SEC RYOBI
natural_image
Close-up of a propeller blade with mesh texture, no visible text or symbols
natural_image
Close-up of a white mechanical component with textured surface and mounting bracket (no visible text or symbols)
natural_image
Solid gray vertical rectangle with no visible text, symbols, or featuresR18SEC

IMPORTANT!
It is essential that you read the instructions in this manual before assembling, operating, and maintaining the product.
Subject to technical modification.
Safety, performance, and dependability have been given top priority in the design of your cordless secateurs.
INTENDED USE
The cordless secateurs are only designed for cutting and pruning small wood limbs and branches. Do not cut branches with diameters that are greater than the cutting capacity of the product. Do not use the product for any other purpose.
GENERAL PRODUCT SAFETY WARNINGS
⚠ WARNING! Read all safety warnings, instructions, illustrations and specifications provided with this power tool. Failure to follow the warnings and instructions may result in electric shock, fire, and/or serious injury.
Save all warnings and instruction for future reference.
The term "power tool" in the warnings refers to your mains-operated (corded) product or battery-operated (cordless) product.
WORK AREA SAFETY
- Keep work area clean and well lit. Cluttered or dark areas invite accidents.
- Do not operate power tools in explosive atmospheres, such as in the presence of flammable liquids, gases or dust. Power tools create sparks, which may ignite the dust or fumes.
- Keep children and bystanders away while operating a power tool. Distractions can cause you to lose control.
ELECTRICAL SAFETY
■ Power tool plugs must match the outlet. Never modify the plug in any way. Do not use any adapter plugs with earthed (grounded) power tools. Unmodified plugs and matching outlets will reduce risk of electric shock.
■ Avoid body contact with earthed or grounded surfaces, such as pipes, radiators, ranges and refrigerators. There is an increased risk of electric shock if your body is earthed or grounded.
- Do not expose power tools to rain or wet conditions. Water entering a power tool will increase the risk of electric shock.
- Do not abuse the cord. Never use the cord for carrying, pulling or unplugging the power tool. Keep cord away from heat, oil, sharp edges or moving parts. Damaged or entangled cords increase the risk of electric shock.
■ When operating a power tool outdoors, use an extension cord suitable for outdoor use. Use of a cord suitable for outdoor use reduces the risk of electric shock.
If operating a power tool in a damp location is unavoidable, use a residual current device (RCD) protected supply. Use of an RCD reduces the risk of electric shock.
PERSONAL SAFETY
■ Stay alert, watch what you are doing and use common sense when operating a power tool. Do not use a power tool while you are tired or under the influence of drugs, alcohol or medication. A moment of inattention while operating power tools may result in serious personal injury.
■ Use personal protective equipment. Always wear eye protection. Protective equipment such as dust mask, non-skid safety shoes, hard hat, or hearing protection used for appropriate conditions will reduce personal injury.
■ Prevent unintentional starting. Ensure the switch is in the off-position before connecting to power source and/or battery pack, picking up or carrying the tool. Carrying power tools with your finger on the switch or energising power tools that have the switch on invites accidents.
■ Remove any adjusting key or wrench before turning the power tool on. A wrench or a key left attached to a rotating part of the power tool may result in personal injury.
- Do not overreach. Keep proper footing and balance at all times. This enables better control of the power in unexpected situations.
■ Dress properly. Do not wear loose clothing or jewellery. Keep your hair, clothing and gloves away from moving parts. Loose clothes, jewellery or long hair can be caught in moving parts.
If devices are provided for the connection of dust extraction and collection facilities, ensure these are connected and properly used. Use of dust collection can reduce dust-related hazards.
- Do not let familiarity gained from frequent use of tools allow you to become complacent and ignore tool safety principles. A careless action can cause severe injury within a fraction of a second.
POWER TOOL USE AND CARE
- Do not force the power tool. Use the correct power tool for your application. The correct power tool will do the job better and safer at the rate for which it was designed.
- Do not use the power tool if the switch does not turn it on and off. Any power tool that cannot be controlled with switch is dangerous and must be repaired.
■ Disconnect the plug from the power source and/or the battery pack from the power tool before making any adjustments, changing accessories, or storing power tools. Such preventive safety measures reduce the risk of starting the power tool accidentally.
■ Store idle power tools out of the reach of children and do not allow persons unfamiliar with the power tool or these instructions to operate the power tool. Power tools are dangerous in the hands of untrained users. - Maintain power tools. Check for misalignment or binding of moving parts, breakage of parts and any other condition that may affect the power tool's operation. If damaged, have the power tool repaired before use. Many accidents are caused by poorly maintained power tools.
- Keep cutting tools sharp and clean. Properly maintained cutting tools with sharp cutting edges are less likely to bind and are easier to control.
■ Use the power tool, accessories and tool bits etc. in accordance with these instructions, taking into account the working conditions and the work to be performed. Use of the power tool for operations different from those intended could result in a hazardous situation.
- Keep handles and grasping surfaces dry, clean and free from oil and grease. Slippery handles and grasping surfaces do not allow for safe handling and control of the tool in unexpected situations.
BATTERY TOOL USE AND CARE
■ Recharge only with the charger specified by the manufacturer. A charger that is suitable for one type of battery pack may create a risk of fire when used with another battery pack.
■ Use power tools only with specifically designated battery packs. Use of any other battery packs may create a risk of injury and fire.
- When battery pack is not in use, keep it away from other metal objects, like paper clips, coins, keys, nails, screws or other small metal objects that can make a connection from one terminal to another. Shorting the battery terminals together may cause burns or a fire.
■ Under abusive conditions, liquid may be ejected from the battery; avoid contact. If contact accidentally occurs, flush with water. If liquid contacts eyes, additionally seek medical help. Liquid ejected from the battery may cause irritation or burns.
- Do not use a battery pack or tool that is damaged or modified. Damaged or modified batteries may exhibit unpredictable behaviour resulting in fire, explosion or risk of injury.
- Do not expose a battery pack or tool to fire or excessive temperature. Exposure to fire or temperature above 130°C may cause explosion.
■ Follow all charging instructions and do not charge the battery pack or tool outside the temperature range specified in the instructions. Charging improperly or at temperatures outside the specified range may damage the battery and increase the risk of fire.
SERVICE
■ Have your power tool serviced by a qualified repair person using only identical replacement parts. This will ensure that safety of the power tool is maintained.
■ Never service damaged battery packs. Service of battery packs should only be performed by the manufacturer or authorised service providers.
CORDLESS SECATEURS SAFETY WARNINGS
⚠️ DANGER! Keep hands away from the blade. Contact with the blade will result in serious personal injury.
⚠ WARNING! Do not leave the product unattended before the LED and sound indicate that it is off.
■ Save these instructions. Refer to them frequently, and use them to instruct others who may use the product. If you loan someone the product, loan them these instructions also to prevent misuse of the product and possible injury.
■ Never allow children, persons with reduced physical, sensory, or mental capabilities or lack of experience
and knowledge, or people who are unfamiliar with these instructions to use the product. Local restrictions may limit the age of operator.
- Do not operate the product in poor lighting. Use the product only in daylight or good artificial light.
■ To reduce the risk of injury associated with contacting moving parts, always turn off the product, remove the battery pack, and make sure that all moving parts have come to a stop:
• before clearing a blockage - before checking, cleaning, or working on the product
• before changing accessories
• before leaving the product unattended
• before performing maintenance
- Keep the product clean of clippings and other materials. They may become lodged between the jaw and blade.
- Keep the area clear of all bystanders, children, and pets while operating the product.
■ When cutting a limb under tension, be alert for springback so that you will not be struck when the tension in the wood fibres is released.
- Maintain the product with care. Keep the cutting blades sharp and clean for best performance and to reduce the risk of injury. Follow the instructions for lubricating and changing accessories. - Before using the product, check for damaged parts and press the trigger to ensure that the cutting blades open and close correctly. Before further use of the product, any part that is damaged must be carefully checked to determine that it will operate properly and perform its intended function. Keep hands away from the blade.
- Keep your body warm in cold weather. When operating the product, wear gloves to keep the hands and wrists warm. It is reported that cold weather is a major factor contributing to Raynaud's Syndrome.
■ Injuries may be caused, or aggravated, by prolonged use of a tool. When using any tool for prolonged periods, ensure that you take regular breaks.
If the blade is stuck in a branch during operation, do not twist the cutting blade. Turn off the product and pull the cutting blades straight out slowly from the branch.
■ Cut branches one by one.
■ Never hold the branch you are pruning with your free hand. Keep hands and any other part of the body away from the cutting area. Never touch the blades to avoid injuries.
- Do not grasp the exposed cutting blades when picking up or holding the product.
■ Do not use the product in rain or snow.
■ Do not use the product to cut wires.
■ Do not cut where there is a risk of hidden wiring.
■ Operate the product only in temperatures between 0^ C and 40^ C.
■ Store the product in a location where the ambient temperature is between 0°C and 40°C.
ADDITIONAL BATTERY SAFETY WARNINGS
■ To reduce the risk of fire, personal injury, and product damage due to a short circuit, never immerse the tool, battery pack, or charger in fluid or allow fluid to flow inside them. Corrosive or conductive fluids, such as seawater, certain industrial chemicals, and bleach or
bleach-containing products, etc., can cause a short circuit.
- Charge the battery pack in a location where the ambient temperature is between 10^ and 38^ .
■ Store the battery pack in a location where the ambient temperature is between 0°C and 40°C.
■ Use the battery pack in a location where the ambient temperature is between 0°C and 40°C.
TRANSPORTATION AND STORAGE
■ Turn off the product, remove the battery pack, and allow both to cool before storing or transporting.
■ Remove all foreign material from the product. Install the blade cover.
■ For transportation in a vehicle, secure the product against movement or falling to prevent injury to persons or damage to the product.
■ Store the product in a cool, dry, and well-ventilated place that is inaccessible to children. Keep the product away from corrosive agents such as garden chemicals and deicing salts. Do not store the product outdoors.
TRANSPORTING LITHIUM BATTERIES
Transport the battery in accordance with local and national provisions and regulations. Follow all special requirements on packaging and labelling when transporting batteries by a third party.
Ensure that no batteries can come in contact with other batteries or conductive materials while in transport by protecting exposed connectors with insulating, nonconductive caps or tape. Do not transport batteries that are cracked or leaking. Check with the forwarding company for further advice.
MAINTENANCE
- Use only original manufacturer's replacement parts, accessories, and attachments. Failure to do so can cause possible injury, can contribute to poor performance, and may void your warranty.
■ Servicing requires extreme care and knowledge and should be performed only by a qualified service technician. Have the product serviced by an authorised service centre only.
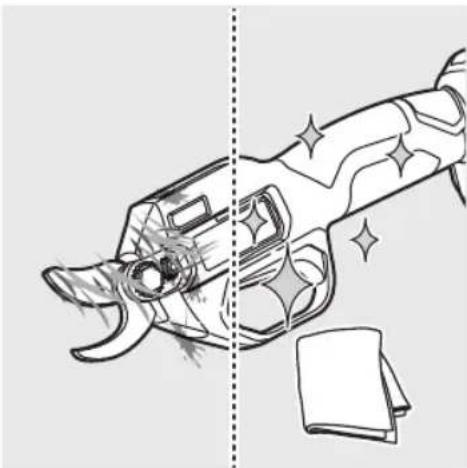
■ After each use, clean the body and handles of the product with a soft, dry cloth. Any part that is damaged should be properly repaired or replaced by an authorised service centre.
■ After each use, clean the debris from the blades with a stiff brush, and then use a disinfectant wipe to clean the blades. Carefully apply a rust-preventative lubricant. Use a recommended rust-preventative lubricant spray to apply an even distribution and reduce the risk of personal injury from contact with the blades. For information about suitable spray products, check with your local authorised service centre.
■ You may make adjustments and repairs described in this manual. For other repairs, contact an authorised service centre. - Check all nuts, bolts, and screws at frequent intervals for proper tightness to ensure that the product is in safe working condition.
■ Avoid using solvents when cleaning plastic parts. Most plastics are susceptible to damage from various types of commercial solvents and may be damaged by their
use. Use clean cloths to remove dirt, dust, oil, or grease. Do not at any time let brake fluids, gasoline, petroleum-based products, or penetrating oils come in contact with plastic parts. Chemicals can damage, weaken, or destroy plastic, resulting in serious personal injury.
NOTE: To ensure long and reliable service, carry out the following maintenance regularly:
- Check for obvious defects, such as loose, dislodged, or damaged blades; loose fixings; and worn or damaged components.
- Visually check the condition of the cutting edges of the cutting blade. Replace the blade when worn or damaged.
■ To avoid serious personal injury, always remove the battery pack from the product when cleaning or performing any maintenance. Ensure that the cutting mechanism has stopped before setting the product down and storing the product.
LED INDICATIONS
LED INDICATOR SOUND STATUS
| On 2 beeps (low to high) | The product is on. | |
| Flashing Continuous | beep until the blades open | The product is jammed. The cutting blades open. Once the flashing of the LED and the beep tone stops, operation may be resumed. |
| Off 1 beep | before LED turns off | The product has been inactive for 30 seconds and is going into sleep mode. |
| Off 2 beeps | (high to low) | The product is off. |
SYMBOLS ON THE PRODUCT

Safety alert

Read and understand all instructions before operating the product. Follow all warnings and safety instructions.
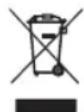
Waste electrical products should not be disposed of with household waste. Please recycle where facilities exist. Check with your local authority or retailer for recycling advice.

Wear head and eye protection.

Wear non-slip, heavy duty gloves.

Do not expose to rain or damp condition

Visible radiation, instructional safeguard

To prevent serious injury, do not touch cutting blades.

Regulatory Compliance Mark (RCM). Product meets applicable regulatory requirements.
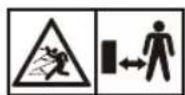
Beware of thrown or flying objects. Keep all bystanders, especially children and pets, at least 15 m away from the operating area.
SYMBOLS IN THIS MANUAL

Note

Warning

Parts or accessories sold separately

Lock

Unlock

R18SEC
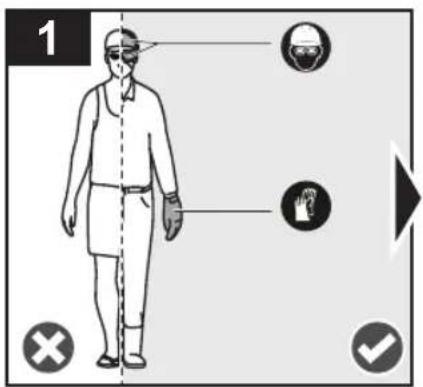
Always wear head and eye protection. Wear non-slip, heavy-duty protective gloves.
natural_image
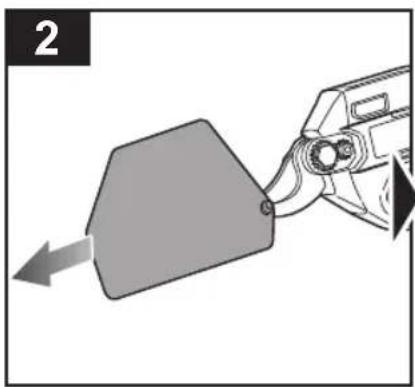
Diagram showing a mechanical component being inserted into a housing, with an arrow indicating direction (no text or symbols present)Remove the blade cover.
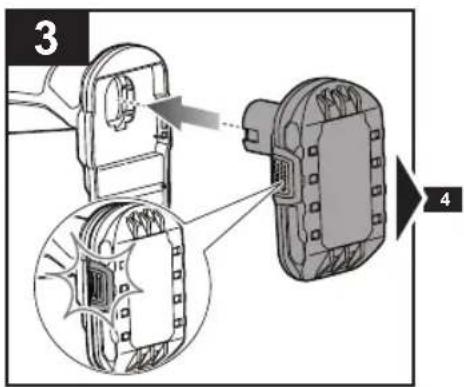
Install the battery pack. Make sure that the latches on the battery pack snap in place.
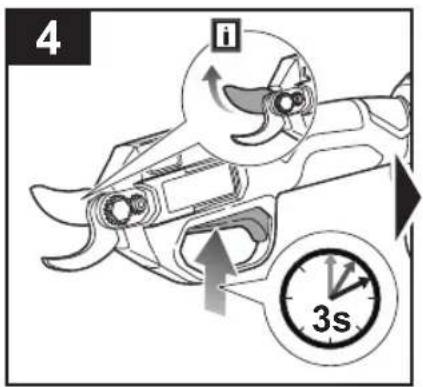
Press and hold the trigger for 3 seconds to turn on the product and open the cutting blade. The LED indicator turns on.
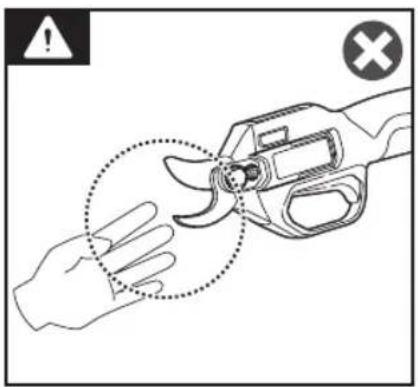
Keep hands away from the blade. Contact with the blade will result in serious personal injury.
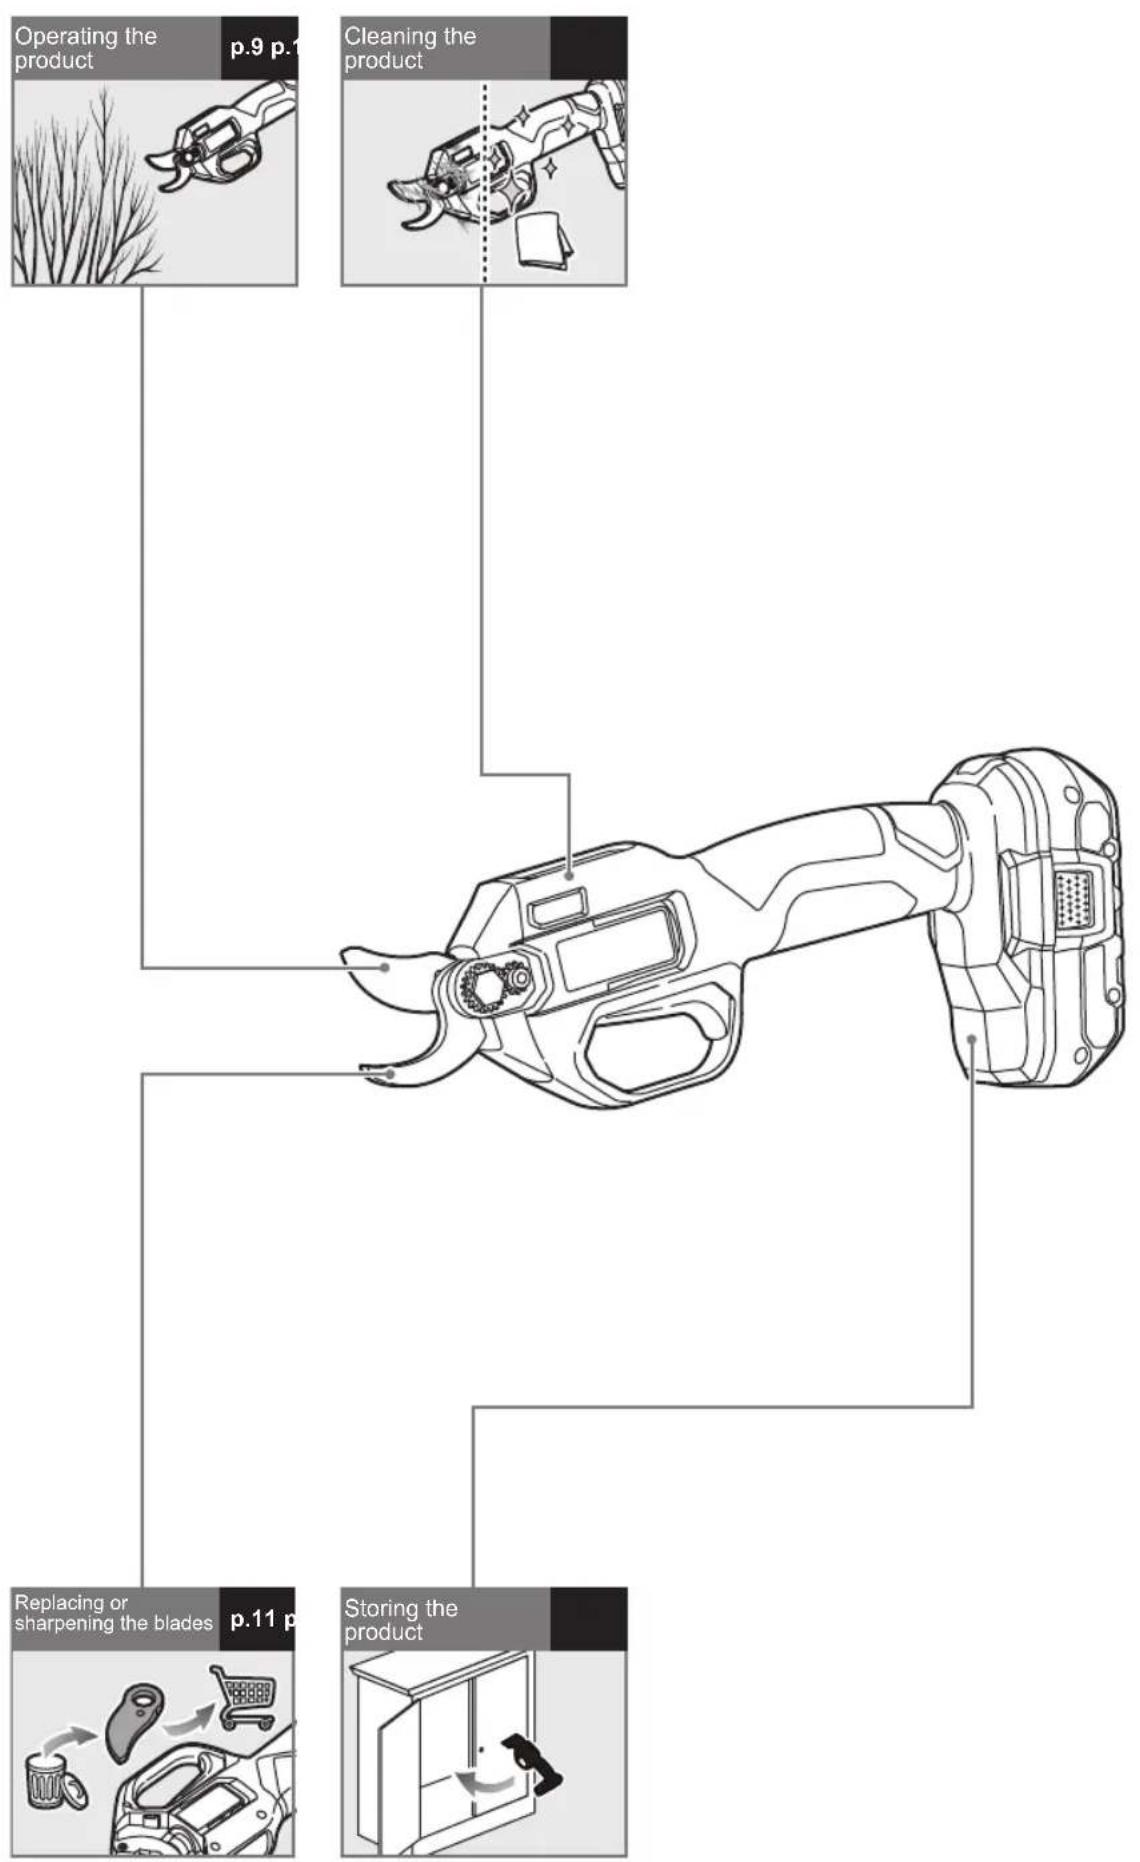
flowchart
graph TD
    A["Operating the product"] --> B["p.9 p.1"]
    B --> C["Cleaning the product"]
    C --> D["Replacing or sharpening the blades"]
    D --> E["p.11 p.1"]
    E --> F["Storing the product"]
natural_image
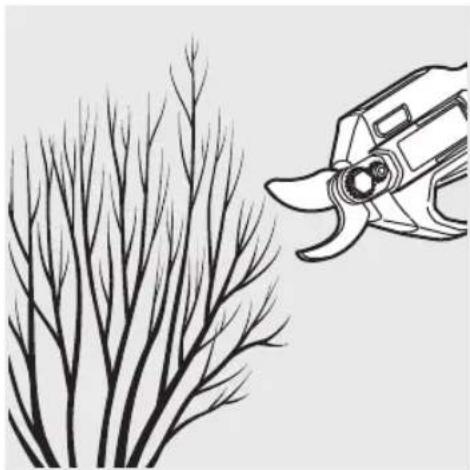
Illustration of a manual cutting tool next to bare tree branches (no text or symbols)OPERATING THE PRODUCT
- Remove the blade cover.
- Install the battery pack. Make sure that the latches on the battery pack snap in place.
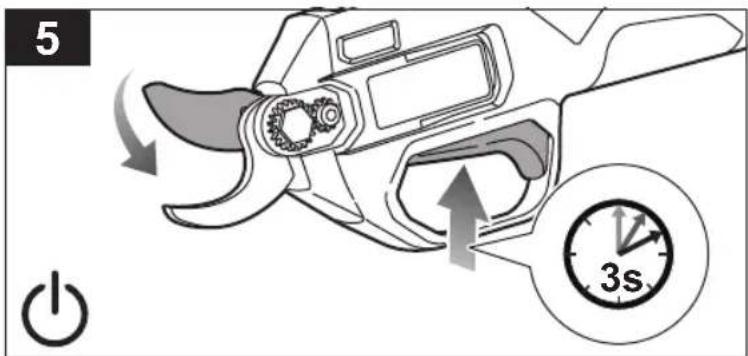
- Press and hold the trigger for 3 seconds to turn on the product and open the cutting blade. The LED indicator turns on.
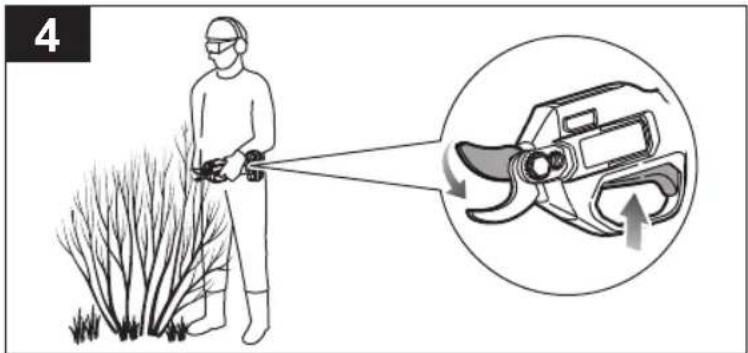
- Press and release the trigger to cut off a branch.
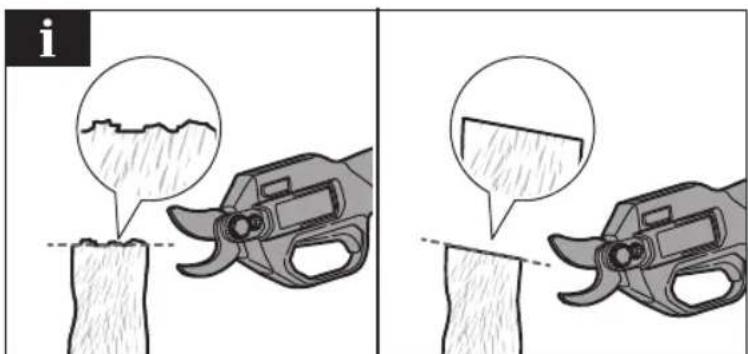
NOTE: Cut at an angle for a cleaner cut.
WARNING: The temperature of the product may rise, and over-temperature protection may be activated when cutting very dry or hard materials. Wait for 10-15 minutes or until the product has cooled down before resuming
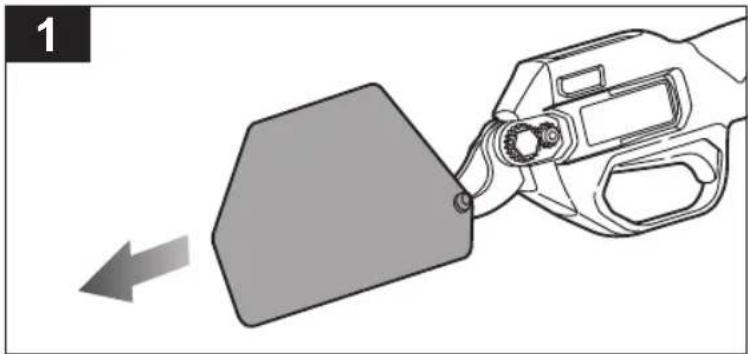
natural_image
Illustration of a hand holding a device with a gray tag being inserted, showing a left-pointing arrow (no text or symbols)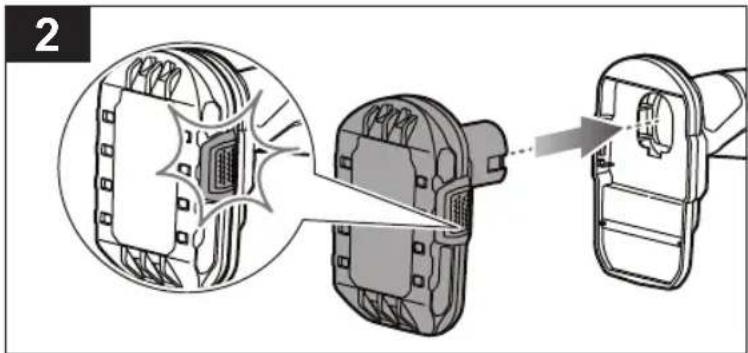
natural_image
Diagram showing a device being processed into a housing, with an inset close-up of internal components (no text or symbols)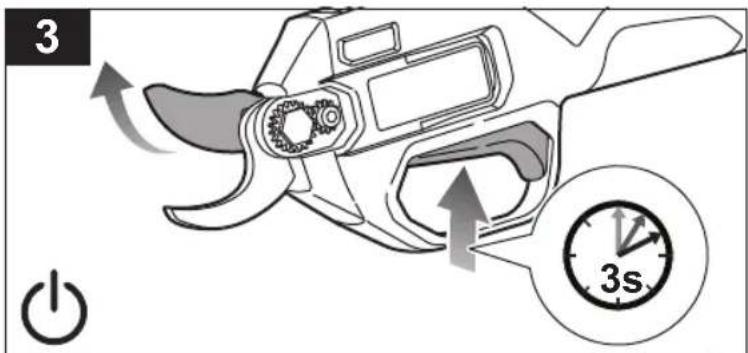
operation.
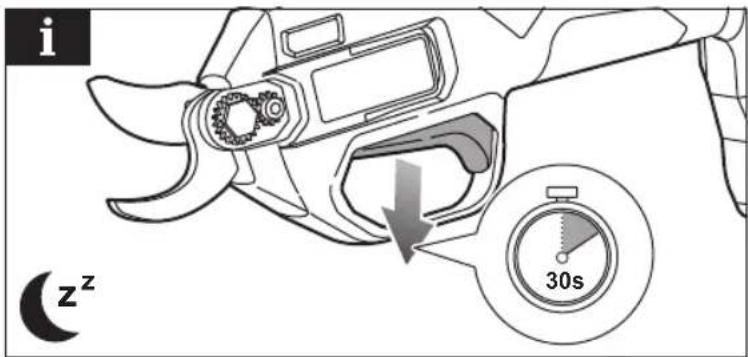
NOTE: The product goes into sleep mode if the trigger is not pressed for more than 30 seconds. The LED indicator turns off. Press and hold the trigger for 3 seconds to wake the product.
- Press and hold the trigger for 3 seconds to turn off the product and close the cutting blade. The LED indicator turns off.
REPLACING OR SHARPENING THE CUTTING BLADE
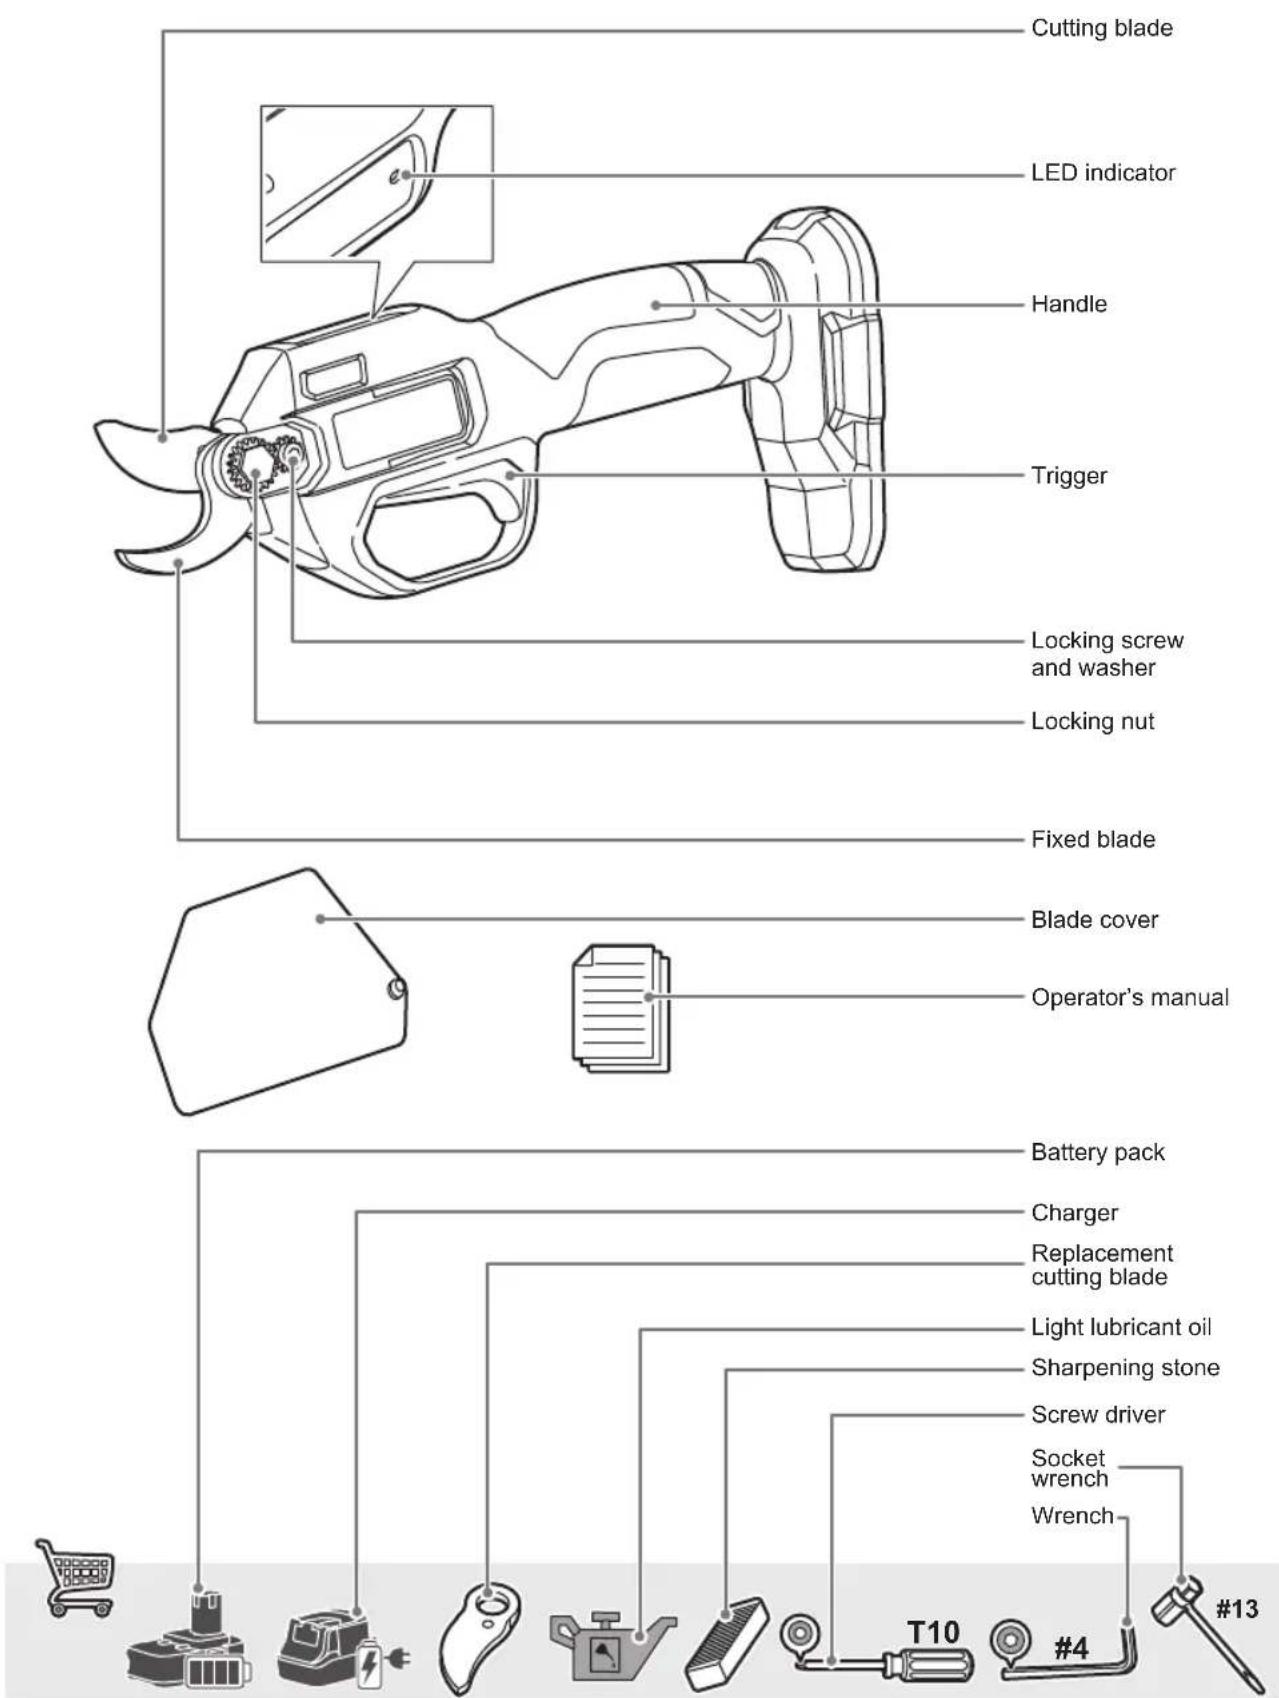
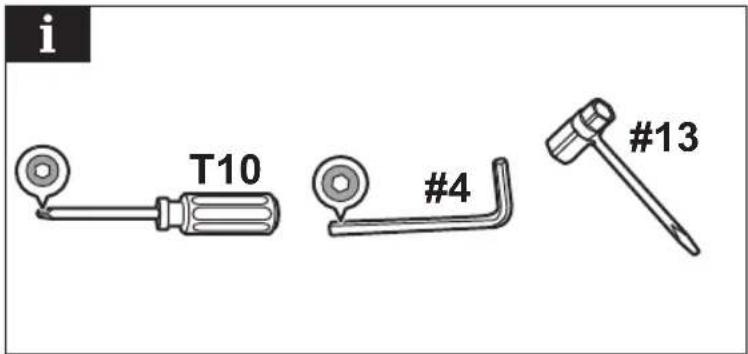
NOTE: Before removing the blade for sharpening or replacement, ensure that you have a T10 screwdriver, a #4 wrench, and an #13 socket wrench. Refer to the replacement parts list in this manual for the correct replacement parts.
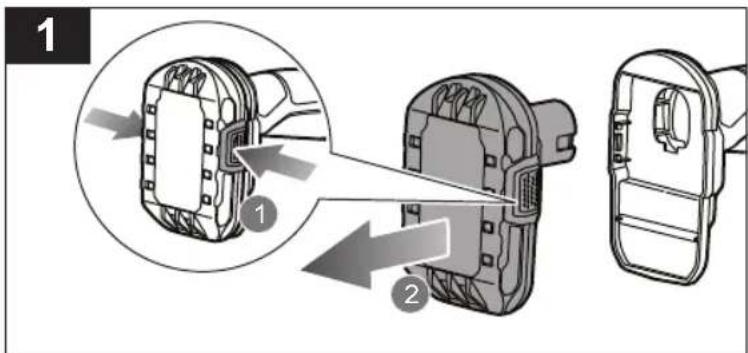
- Press the latches on the battery pack to remove it from the product.
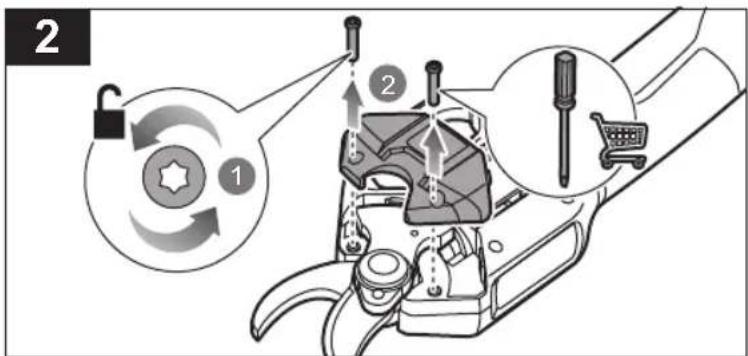
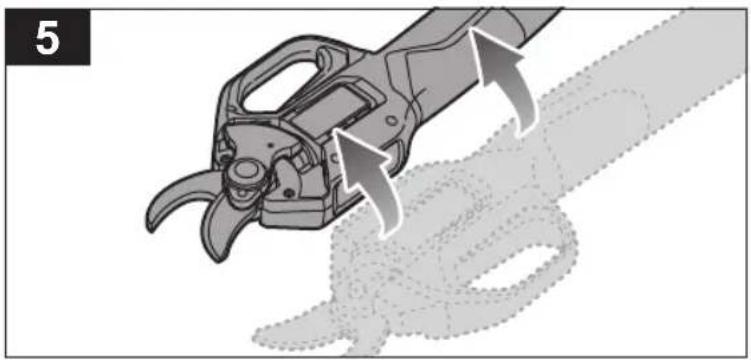
- Place the product on a level surface with the housing side facing up. Turn the screws counterclockwise to unlock. Remove the housing.
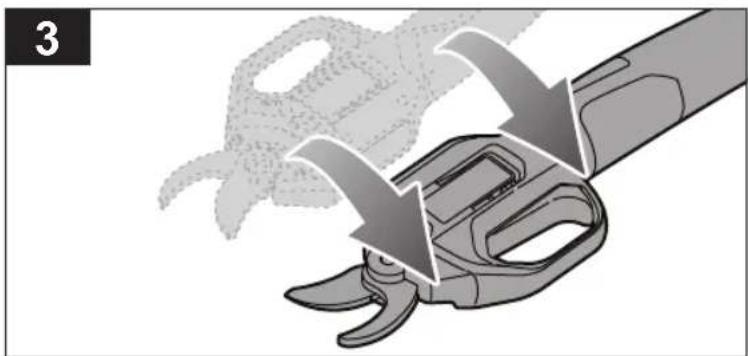
- Flip the product onto its other side.
- Turn the locking screw counterclockwise to remove. Remove the washer and the gear. Turn the locking nut counterclockwise to remove.
natural_image
Illustration of a mechanical component being cut with arrows indicating motion (no text or symbols)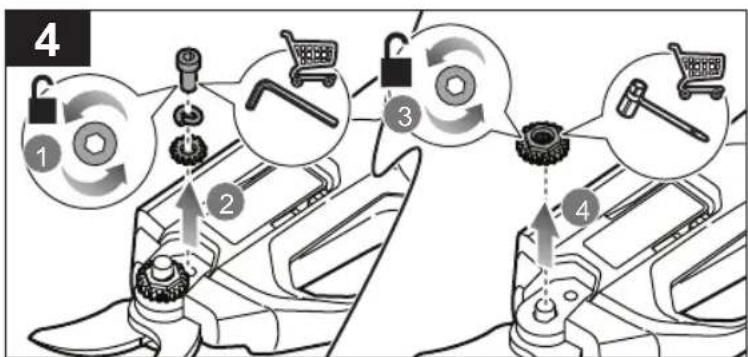
flowchart
graph TD
    A["Step 1: Lock"] --> B["Step 2: Chain repair"]
    B --> C["Step 3: Tire marking"]
    C --> D["Step 4: Tooling"]
- Flip the product over onto its other side.
- Remove the swing gear assembly, bolt, and cutting blade.
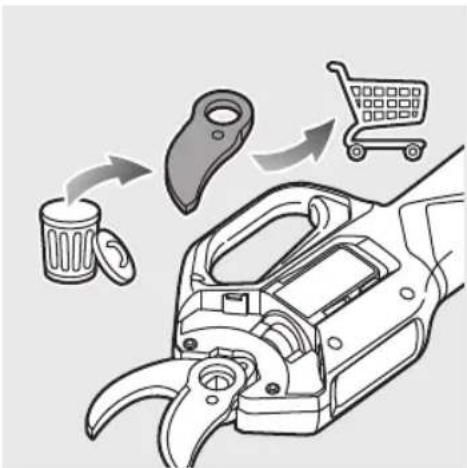
- Remove the cutting blade, and dispose of it properly.
NOTE: Use a 300 - 400 grit sharpening stone to sharpen the cutting edge of the cutting blade and to remove burrs on the edge of the fixed blade if there are any.
- Install the new blade.
natural_image
Illustration of a manual tool gripping a mechanical part, with arrows indicating motion (no text or symbols)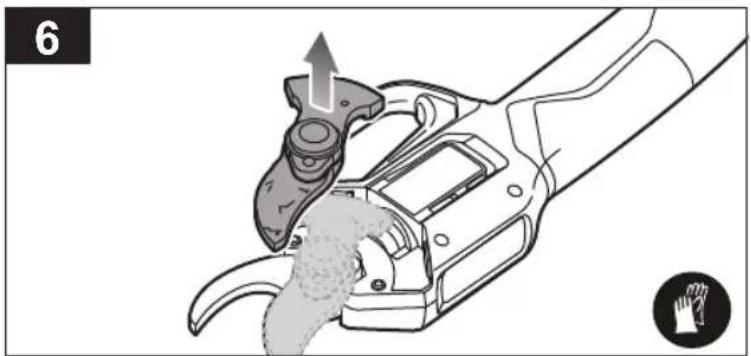
natural_image
Illustration of a hand using a manual tool to lift a curved blade, with no text or symbols present.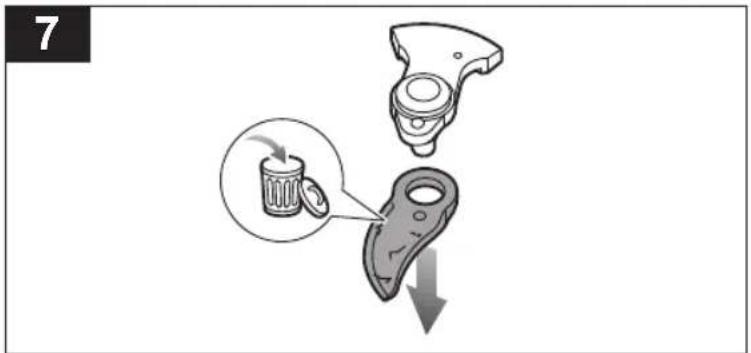
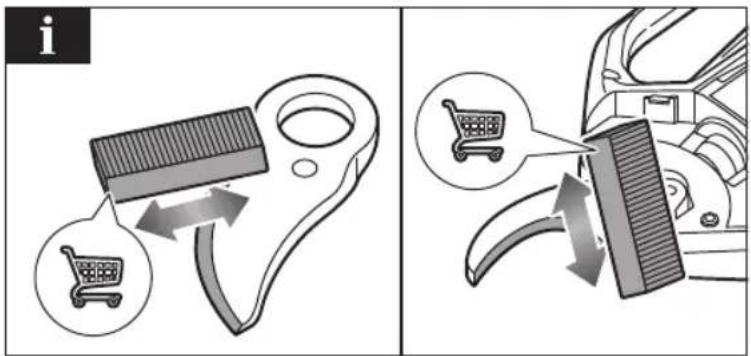
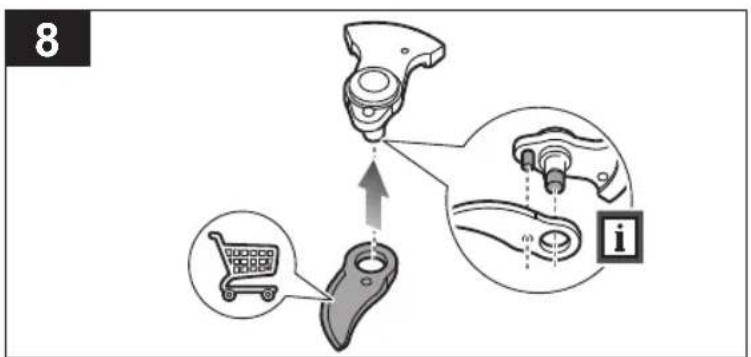
- Reinstall the swing gear assembly, bolt, and cutting blade.
- Reinstall the locking nut, washer, and screw on the other side.
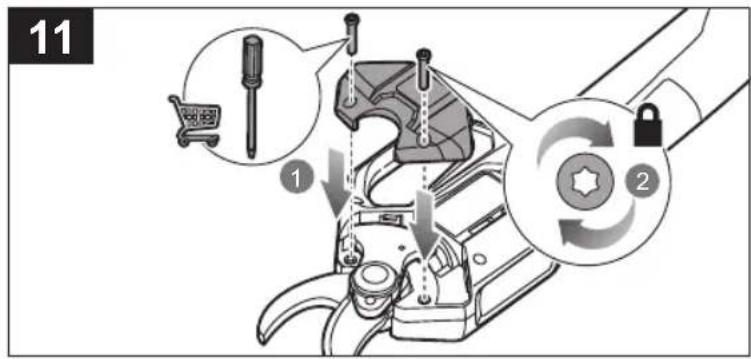
- Reinstall the housing and the screws. Rotate the screws clockwise to secure the housing.
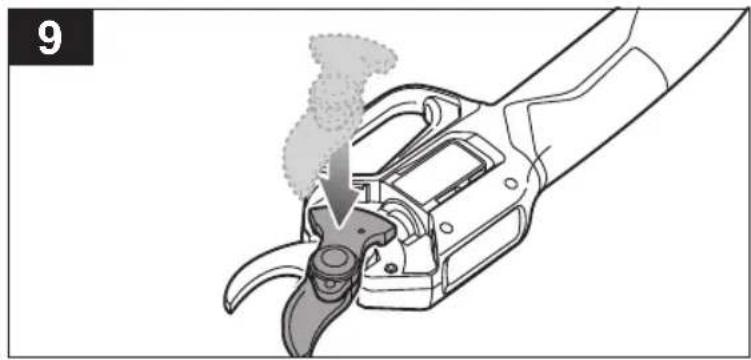
natural_image
Illustration of a manual pliers being inserted into a tool, with smoke rising (no text or symbols)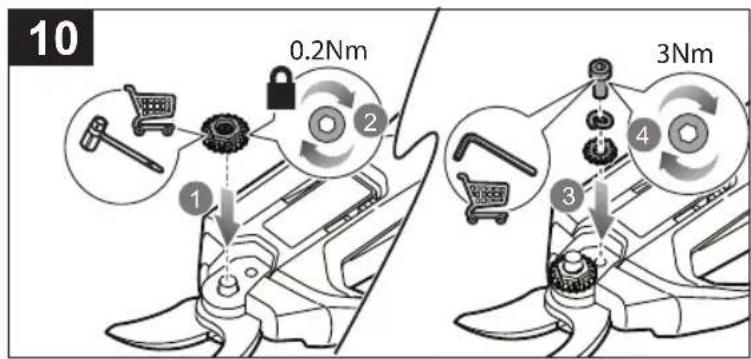
natural_image
Illustration of a robotic arm with motion blur and a folded paper, no text or symbols presentCLEANING THE PRODUCT
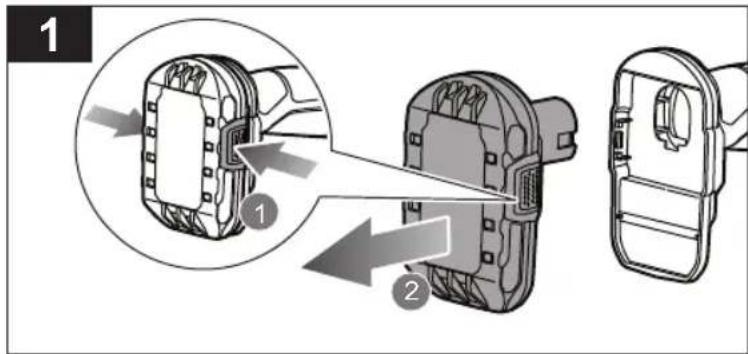
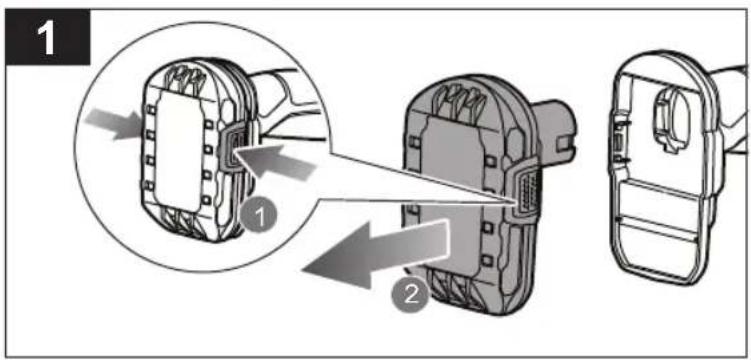
- Press the latches on the battery pack to remove it from the product.
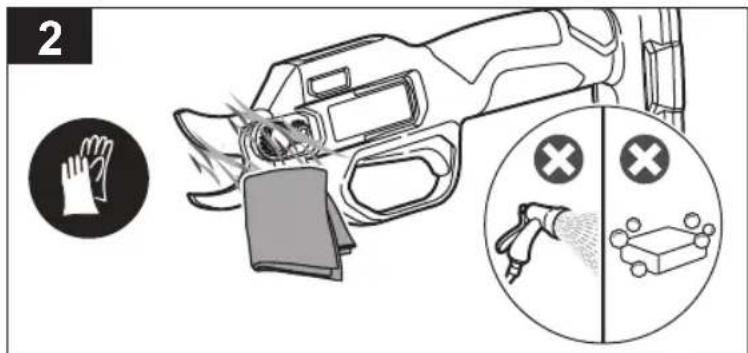
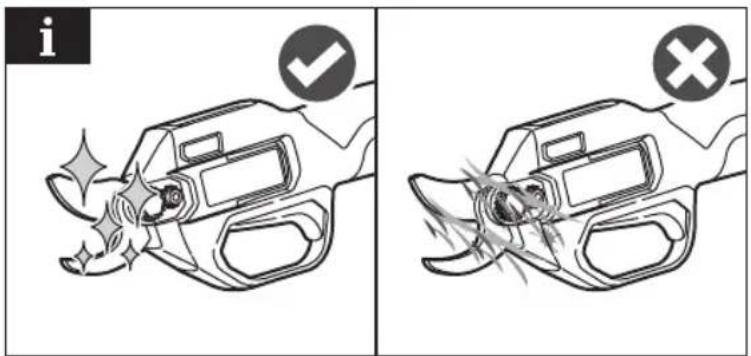
- Clean the body and handles of the product with a soft, dry cloth after each use. Do not use water and soap to clean the product.
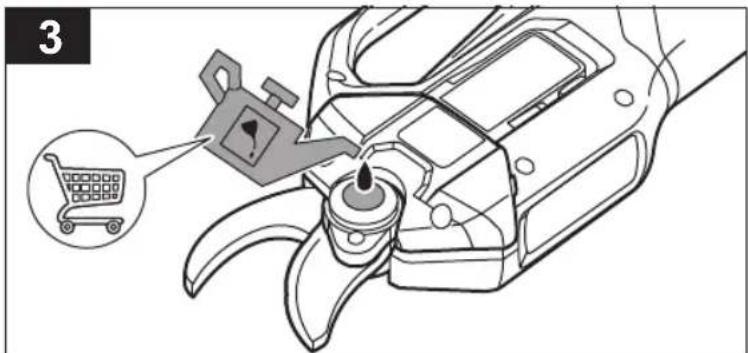
- Put the nozzle of the lubricant oil tank against the steel ball on the product. Add lubricant oil into the hole of the bolt.
natural_image
Illustration of a person cleaning a window with a curved arrow indicating rotation (no text or symbols)STORING THE PRODUCT
- Press the latches on the battery pack to remove it from the product.
NOTE: Make sure that all parts are clean and dry before storing the product.
-
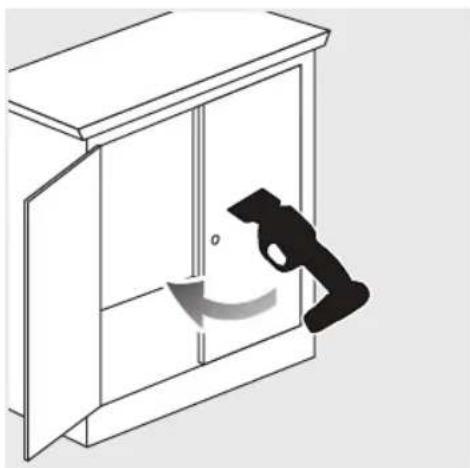
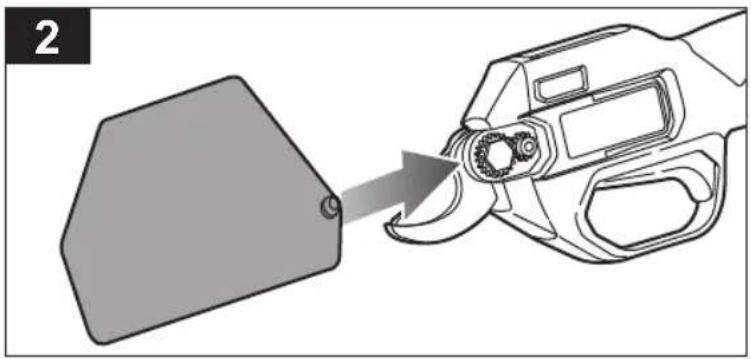
Install the blade cover. Always install the blade cover when storing or transporting the product.
-
Store the product in a cool, dry, and well-ventilated area that is inaccessible to children. Keep the product away from corrosive agents, such as garden chemicals and de-icing salts. Do not store the product outdoors.
natural_image
Illustration of a hand using a power tool to cut a polygonal object, no text or symbols present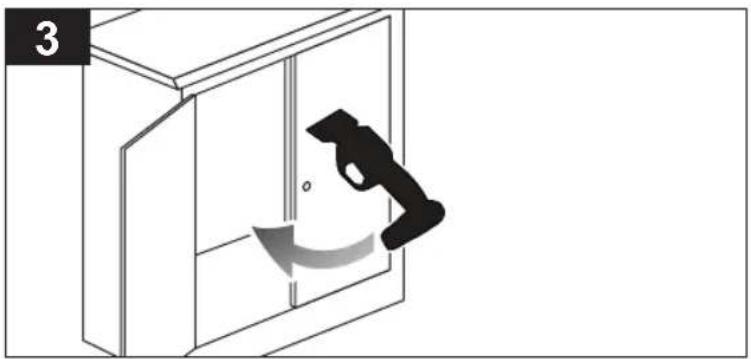
natural_image
Illustration of a person using a tool to lift a wall-mounted device, showing motion with no text or symbolsPRODUCT SPECIFICATIONS
Cordless secateurs
Model R18SEC
Rated voltage 18 V
Cutting capacity (hardwood) 16 mm
Cutting capacity (softwood) 20 mm
Cutting cycle time ≤2.5 sec
Product length 315 mm
Weight without battery pack 0.74 kg
Weight with the heaviest battery pack 1.9 kg
Noise emission level (in accordance with IEC62841-1)
| A-weighted sound pressure level at the operator's position | L_pA = 68.4 dB (A) |
Uncertainty K = 3.0 dB
| A-weighted sound power level L | _wA =79.4 dB (A) |
Uncertainty K = 3.0 dB
Vibration level (in accordance with IEC62841-1)
| Vibration total value a | _h = 0.1 m/s^2 |
| Uncertainty K = 1.5 m/s | 2 |
BATTERY AND CHARGER
Model
RY18SEC
Compatible battery packs
RB18L13, RB18L13Z, RB18L15, RB18L15A, RB18L15B, RB1815C, RB18L20, RB18L20A, RB1820C, RB18L25, RB18L25A, RB18L30A, RB18L40, RB18L40A, RB1840C, RB1840X, RB18L50, RB18L50A, RB18L60A, RB18L90A
Compatible chargers
BCL18141H, BCL18143H, BCS618, RC18627U, RC18150, RC18150U, RC18120, RC18115, BCL1814IV
REPLACEMENT PARTS
Replacement blade set RSE1 (099981362)
NOTE: Visit your local Bunnings special orders desk or contact RYOBI Customer Service for replacement parts.
⚠ WARNING! The declared vibration total values and the declared noise emission values given in this instruction manual have been measured in accordance with a standardised test and may be used to compare one tool with another. They may be used for a preliminary assessment of exposure.
The declared vibration and noise emission values represent the main applications of the tool. However, if the tool is used for different applications, used with different accessories, or poorly maintained, the vibration and noise emission may differ. These conditions may significantly increase the exposure levels over the total working period. An estimation of the level of exposure to vibration and noise should take into account the times when the tool is turned off or when it is running idle. These conditions may significantly reduce the exposure level over the total working period.
Identify additional safety measures to protect the operator from the effects of vibration and noise, such as maintaining the tool and the accessories, keeping the hands warm (in case of vibration), and organising work patterns.



natural_image
Three vertical panels with diagonal striped patterns, no text or symbols presentImported by:
Techtronic Industries Australia Pty Ltd
31 Gilby Road, Mount Waverley, VIC 3149
Melbourne, Australia
Techtronic Industries N.Z. Limited
Unit C, 70 Business Parade South,
Highbrook, Auckland 2013, New Zealand
RYOBI is a trade mark of Ryobi Limited, and is used under license.
© 2021 Techtronic Cordless GP
099241001001-01
- IMPORTANT!
- INTENDED USE
- GENERAL PRODUCT SAFETY WARNINGS
- WORK AREA SAFETY
- ELECTRICAL SAFETY
- PERSONAL SAFETY
- POWER TOOL USE AND CARE
- BATTERY TOOL USE AND CARE
- SERVICE
- CORDLESS SECATEURS SAFETY WARNINGS
- ADDITIONAL BATTERY SAFETY WARNINGS
- TRANSPORTATION AND STORAGE
- TRANSPORTING LITHIUM BATTERIES
- MAINTENANCE
- LED INDICATIONS
- SYMBOLS ON THE PRODUCT
- SYMBOLS IN THIS MANUAL
- R18SEC
- OPERATING THE PRODUCT
- CLEANING THE PRODUCT
- STORING THE PRODUCT
- PRODUCT SPECIFICATIONS
- BATTERY AND CHARGER
- REPLACEMENT PARTS
Brand : RYOBI
Model : One+ R18SEC
Category : Uncategorized