USER MANUAL CF-21D30X LG
This set operates on an AC mains supply, the voltage is as indicated on the label on the back cover. Never apply DC power to the set. In the event of thunderstorms or powercuts, please pull out the aerial and mains plugs.
Warning
To prevent fire or shock hazard, do not expose the set to rain or moisture.
Service
Never remove the back cover of the set as this can expose you to very high voltage and other hazards. If the set does not operate properly, unplug it and call your dealer.
Aerial
Connect the aerial cable to the socket marked 175 on the back cover. For the best reception an outdoor aerial should be used.
Location
Position your set so that no bright light or sunlight falls directly onto the screen. Care should be taken not to expose the set to any unnecessary vibration, moisture, dust or heat. Also ensure that the set is placed in a position to allow a free flow of air. Do not cover the ventilation openings on the back cover.
Battery installation
The remote control handset is powered by two AA type batteries. Gently pull down the cover of the remote control handset until the battery compartment is exposed. Install two batteries as indicated by the polarity symbols(s] and s^) marked inside the compartment.

Note : To avoid damage from possible battery leakage, remove the batteries if you do not plan to use the remote control handset for an extended period of time.
Location and function of controls
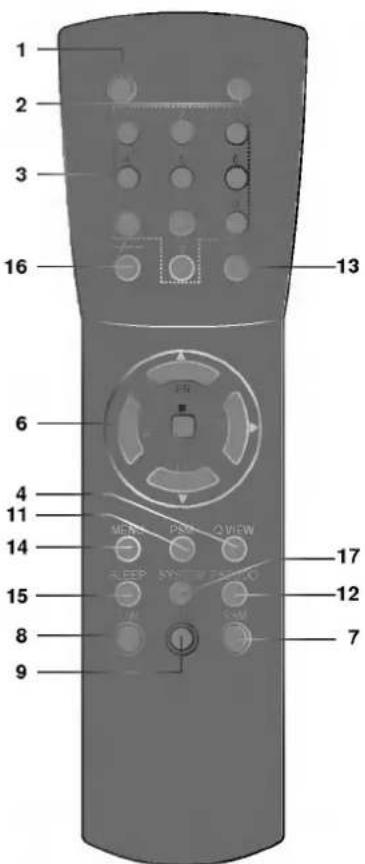
Remote control handset

(With TELETEXT)
All the functions can be controlled with the remote control handset. Some functions can also be adjusted with the buttons on the front panel of the set.
Before you use the remote control handset, please install the batteries.
1. POWER
switches the set on from standby or off to standby.
2. MUTE
switches the sound on or off.
switch the set on from standby or directly select a number.
4. QUICK VIEW
returns to the previously viewed programme.
5. TELETEXT BUTTONS (option)
These buttons are used for teletext.
For further details, see the 'Teletext' section.
6. i^a/i (Programme Up/Down)
switches the set on from standby.
selects a programme or a menu item.
φr/φ'' (Volume Down/Up)
adjusts the volume.
adjusts menu settings.
OK
accepts your selection or displays the current mode.
7. SSM (Sound Status Memory)
recalls your preferred sound setting.
8. DUAL
In AV mode, selects the sound output.
9. EYE (option)
switches on or off algorithm eye picture mode.
control the video cassette recorder of our brand.
Location and function of controls
Remote control handset
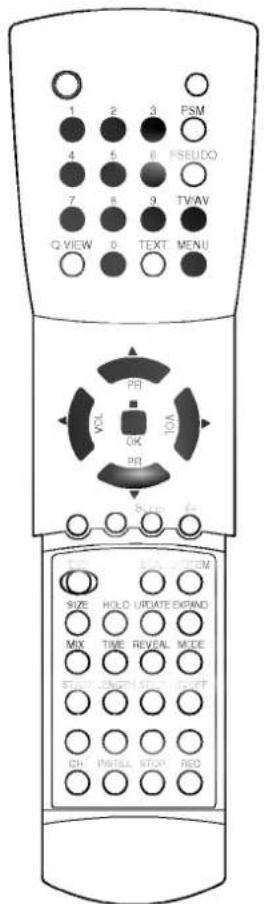
(Without TELETEXT)
- PSM (Picture Status Memory)
recalls your preferred picture setting.
- PSEUDO
To get a pseudo stereo sound effect.
- TV/AV
selects TV or AV mode.
- MENU
selects a menu.
- SLEEP
sets the sleep timer.
- UNIT
selects single or double digit.
- SYSTEM
displays the system selection mode.
- MAIN POWER (①)
switches the set on or off.
- STANDBY INDICATOR
illuminates red when the set is in standby mode.
flashes when a button on the remote control handset is pressed.
20 REMOTE CONTROL SENSOR
- ALGORITHM EYE (option)
Window for analyze picture according to the condition of surroundings.
- AUDIO/VIDEO IN SOCKETS (option)
Connect the audio/video out sockets of external equipment to these sockets.
Front panel

Shown is a simplified representation of front panel.

Basic operation
On and off
- Press the main power button to switch the set on.
- If the set is in standby mode, press the POWER, ;a/; or NUMBER buttons on the remote control handset to switch it on fully.
- Press the POWER button on the remote control handset. The set reverts to standby mode.
- Press the main power button again to switch the set off.

Note : If, while the set is switched on, the mains plug is disconnected the set will switch to standby on or power on when the mains plug is replaced in the mains power socket.
Programme selection
You can select a programme number with the ;a/; or NUMBER buttons.
Before entering double digit programme numbers, press the -/-- button until the display -- appears on the screen.
Volume adjustment
Press the ♦,/♦" button to adjust the volume.
Mute function
Press the MUTE button. The sound is switched off and the display appears. You can cancel it by pressing the MUTE, ♦, / ♦", SSM or PSEUDO button.
Quick view
Press the Q.VIEW button to view the last programme you were watching.
On screen language selection (option)
This is an optional function. In the models which have on screen language function, the menu can be displayed on the screen in the desired language. First select your language.
- Repeatedly press the MENU button to select MENU 4.
- Press the ;#/; button to select LANGUAGE.
- Press the OK button to display the sub menu.
- Press the i a /i button to select the desired language.
All the on screen displays will appear in the selected language.
- Press the MENU button repeatedly or TV/AV button once to return to normal TV viewing.

The dialogue between you and your set takes place on screen with an operator menu. The buttons required for the operating steps are also displayed.
-
Repeatedly press the MENU button to display each menu.
-
Press the ;#/; button to select a menu item.
The selected menu item changes from green to purple.
- Press the ¢,/¢" button to change the setting of a menu item or OK button to display the sub menu.
Note :
a. The menus automatically disappear in about 12 seconds if you do not press a button.
b. In the AV mode, MENU 1 is not displayed.
In some models, the menu item AUTO AV is not displayed on the screen in the PROGAM EDIT mode.
c. In the teletext mode, MENUs are not displayed.
d. In some models, the menu item LANGUAGE is also displayed on the screen in MENU 4 and the menu item NTSC3.58 or SECAM is not displayed on the screen in the SYSTEM mode.
![graph TD A["MANUALPROGRAM\nAUTOPROGRAM\nPROGRAMEDIT\n▲▼00KOMENU"] --> B["MENU 1"] B --> C["○0800CONTRAST\n○0600BRIGHTNESS\n○0500COLDUR00000000\n○0500SHARPNESS\n||||||||||||....\n▲▼04▶00KOMENU"] B --> D["MENU 2"] D --> E["○0500VOLUME 0\n○0500TREBLE00000000\n○0500BASSCOO...\n○0 0 BALANCE\n||||||||||||…](/content/2026/05/996534/images/2ddf483680d29450d743ddd10065b191461ea53cd64594a03e60f874328d435e.jpg)
Setting up TV stations
MANUALOPROGRAM
AUTOOPROGRAM
PROGRAMOEDIT
00KOMENU
Up to 100 TV stations can be stored in this set by programme numbers (0 to 99). Once you have preset the stations, you will be able to use the ja/i or NUMBER buttons to scan the stations you programmed. Stations can be tuned using an automatic or a manual mode.
Auto programme tuning
All stations that can be received are stored by this method. It is recommended that you use auto programme during installation of this set.
-
Press the MENU button to select MENU 1.
-
Press the ;a/; button to select AUTO PROGRAM
-
Press the OK button to begin auto programming.
The band automatically changes
VHF-L □A VHF-H □A UHF
When auto programming is completed, the station stored into programme number 1 will appear on the screen.
To stop auto programming, press the MENU button. The active station at that time will be displayed.
Note : Some undesired stations may be stored, such as noisy or unclear signals from distant transmitters. You can easily skip these stations by entering PROGRAM EDIT mode.
Manual programme tuning
Manual programme lets you manually tune and arrange the stations in whatever order you desire.
-
Press the MENU button to select MENU 1.
-
Press the : a/; button to select MANUAL PROGRAM
-
Press the OK button to display the MANUAL PROGRAM mode.

- Press the ;a/; button to select PROGRAM. Select the desired programme number with the ¢,/¢" or NUMBER buttons.
- Press the ;a/; button to select BAND. Press the ¢,/¢" button to select VHF-L, VHF-H or UHF as required.
- Press the ;a/; button to select SEARCH. Press the ¢,/¢" button to commence searching. To stop the search at any time press the MENU or ;a/; button.
- If this station is the one required store it with the OK button, if not press the ¢,/¢" button again.
- To store another station repeat steps 4 to 7.
- Press the MENU button repeatedly or TV/AV button once to return to normal TV viewing.
Fine tuning
Normally fine tuning is only necessary if reception is poor.
- Repeat steps 1 to 3 above
- Press the ;a/; button to select FINE.
- Press the "c,/c" button to fine tune for the best picture and sound. If the "button is pressed, the display will appear. And if the c, button is pressed, the display will appear.
- Press the OK button to store the new setting. The display STORED will appear.
- Press the MENU button repeatedly or TV/AV button once to return to normal TV viewing.
The finely tuned programme will be indicated by yellow number during programme selection.
Setting up TV stations
MANUALOPROGRAM
AUTOOPROGRAM
PROGRAMOEDIT
00KOMENU

Programme edit
This function enables you to rearrange the programmes stored by auto programming in whatever order you desire. Also you can skip particular programme numbers stored by auto programming.
- Press the MENU button to select MENU 1
- Press the ;*/; button to select PROGRAM EDIT.
- Press the OK button, and the PROGRAM EDIT mode will appear.
Exchanging programmes
- Press the ♦/¢" button to change the left hand programme number. The viewing station corresponding to the new programme number is shown on the screen.
- Press the NUMBER buttons to enter the desired right hand programme number. Any number under 10 is entered with a numeric '0' in front of it, i.e. '05' for 5.
- Press the OK button. The station stored in the right hand programme number will now appear as the left hand programme number.
- Repeat steps 1 to 3 to exchange other programmes.
Skipping the stored programme
- Press the ♦,/♦" button to select the programme you want to skip. The viewing station corresponding to the selected programme number is shown on the screen.
- Press the ;a/; button to select SKIP
- Press the ¢,/¢" button to select ON or OFF
If you select ON, the selected station is skipped.
- Press the OK button. The display STORED will appear.
- Press the ;a/; button to select first menu item then repeat steps 1 to 4 to skip another programme.
The selection of the skipped programme numbers with the NUMBER buttons is still possible and they will be indicated by cyan numbers during programme selection.
Auto AV setting (option)
If your VCR outputs a switching voltage when it is switched to playback, select AUTO AV ON with the VCR connected to Euro scart socket. The set is automatically switched to AV-1 mode when an AV signal is input. But if you want to keep on watching TV mode, set AUTO AV to OFF.
- Press the ♦,/♦" button to select the desired programme.
- Press the ;a/; button to select AUTO AV.
- Press the ¢,/¢" button to select ON or OFF
- Press the OK button. The display STORED will appear.
- Repeat steps 1 to 4 to set another programme.
Press the MENU button repeatedly or TV/AV button once to return to normal TV viewing.
Picture adjustment
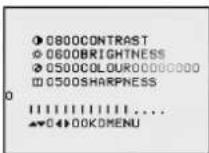

Picture adjustment
You can adjust picture contrast, brightness, colour intensity, sharpness and tint (NTSC input only) to the levels you prefer.
- Repeatedly press the MENU button or the EYE button to select MENU 2.
- Press the ; a/; button to select the desired picture item.
- Press the ♦,/♦" button to make appropriate adjustments.
At this point you can complete your adjustments or store your setting for immediate recall by following steps 4 to 6.
- Press the OK button.

- Select FAVORITE 1 or FAVORITE 2 with the ;a/; button.
The FAVORITE 1 or FAVORITE 2 options allow you to programme two entirely different picture settings for various lighting conditions such as day and night.
- Press the OK button. The display STORED will appear.
To recall your preferred setting, press the PSM button until the desired picture (STANDARD, FAVORITE 1 or FAVORITE 2) appears. The STANDARD picture is programmed for good picture reproduction at the factory and cannot be changed.
Algorithm eye (option)
This set sets the picture according to the condition of surroundings after analyzing such conditions of a room as a brightness and a kind of a light. So you can always enjoy the most proper picture to your eyes with a natural colour according to the surroundings.
- To make the Algorithm eye perform press the EYE button until EYE ON is displayed as shown below.
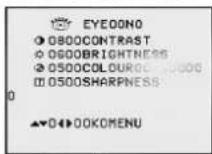
You can make the Algorithm eye perform with the MENU button. Press the EYE button until EYE ON is displayed after selecting MENU 2 with the MENU button.
- Press the OK button.
Note : To switch off the Algorithm eye, press the EYE button until EYE ON disappears or adjust the picture item to the levels you prefer.
Sound adjustment
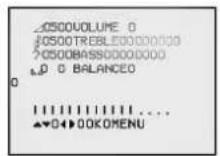
Sound adjustment
You can adjust the sound treble, bass and balance to the levels you prefer.
- Press the MENU button to select MENU 3.
- Press the ;a/; button to select the desired sound item.
- Press the ♦,/♦" button to make desired adjustment.
- Press the OK button to store.

To recall your preferred setting, press the SSM button until the desired sound (STANDARD, FAVORITE 1 or FAVORITE 2) appears. The STANDARD sound is programmed for good sound reproduction at the factory and cannot be changed.
Sound output selection
In AV mode, you can select output sound for the left and right loudspeakers.
Repeatedly press the DUAL button to select the sound output.
LR : Audio signal from audio L input is sent to left loudspeaker and audio signal from audio R input is sent to right loudspeaker.
LL: Audio signal from audio L input is sent to left and right loudspeakers.
RR: Audio signal from audio R input is sent to left and right loud-speakers.
Pseudo stereo
In the models which have the pseudo stereo function, you can experience sound effect as stereo sound by pressing the PSEUDO button.
- Press the PSEUDO button.
The display ◀ will appear on the screen.
- Press the button again to switch pseudo stereo off. The PSEUDO button is a toggle switch.
Other functions


TV and AV modes
Inputs can be set for TV or AV mode. AV mode is used when a video cassette recorder (VCR), or other equipment is connected to the set.
Note : When a VCR is connected via the aerial socket the set is used in TV mode. See the 'Connection of external equipment' section.
-
Repeatedly press the MENU button to select MENU 4.
-
Press the ;a/; button to select INPUT.
-
Press the ¢,/¢" button to select TV, AV1 or AV2.
-
Press the OK button.
Alternatively you can select the TV or AV mode by pressing the TV/AV button.
Child lock
The TV can be set so that the remote control handset is needed to control it. This feature can be used to prevent unauthorised viewing.
-
Repeatedly press the MENU button to select MENU 4.
-
Press the ;a/; button to select CHILD LOCK.
-
Press the "button" on the remote control handset to select ON.
-
Press the OK button to return to normal TV viewing
With the lock on, the display CHILD LOCK ON appears on the screen if any button on the front panel is pressed while viewing the TV.
Auto sleep
If you select AUTO SLEEP ON the set will automatically switch itself to standby mode approximately ten minutes after a TV station stops broadcasting.
-
Repeatedly press the MENU button to select MENU 4.
-
Press the ;a/; button to select AUTO SLEEP
-
Press the ¢,/¢" button to select ON
-
Press the OK button to return to normal TV viewing.
Colour system setting
This set is adjusted for the main TV system in your area. Under normal circumstances, select AUTO. If necessary (if input signal is weak, colour and sound are poor), change the colour system by using the instructions below.
-
Repeatedly press the MENU button to select MENU 4.
-
Press the ;a/; button to select SYSTEM
-
Press the OK button to display the sub menu
-
Press the ;a/; button to select the correct colour system.
-
Press the OK button to store the setting. The display STORED will appear.
You can directly display the system selection mode by pressing the SYSTEM button. And then repeat steps 4 to 5 above.
Note :
a. If you adjusted the system as shown steps above, the colour system appears in cyan when the current mode is displayed by pressing the OK button.
b. When receiving the system NTSC3.58, select NTSC3.58
c. The colour system which the set cannot receive could be selected but not operated.
Sleep timer
You don't have to remember to switch the set off before you go to sleep. The sleep timer automatically switches the set to standby after the preset time elapses.
For selecting your desired number of minutes, press the SLEEP button several times or continuously. --- will appear on the screen, followed by 120, 90, 60, 30, 20 and 10.
The timer begins to count down from the number of minutes selected.
Note :
a. To view the remaining sleep time, press the SLEEP button once.
b. To cancel the sleep time, repeatedly press the SLEEP button until the display SLEEP-- appears.
c. When you switch the set off, the set releases the preset sleep time.
Time setting

Clock
The clock uses the 24 hour system, and must be set to the correct time before operating the set. You must set the clock correctly before using on/off time functions.

- Repeatedly press the MENU button to select MENU 5.
- Press the i a / j button to select CLOCK.
- Adjust hour and minute with the ♦,/♦" button or NUMBER buttons.
- Press the OK button to return to normal TV viewing.
Off time
The set automatically switches off at the preset time.
- Repeatedly press the MENU button to select MENU 5.
- Press the i a /i button to select OFF TIME.
- Adjust hour and minute with the ♦,/♦" button or NUMBER buttons.
- Press the OK button to return to normal TV viewing.
On time
The set automatically switches on at the preset time and station.
- Repeatedly press the MENU button to select MENU 5.
- Press the i a /; button to select ON TIME.
- Adjust hour and minute with the ♦,/♦" button or NUMBER buttons.
- Press the ia/i button to select ON PR. then press the φ, / φ'' button or NUMBER buttons to select the desired programme number.
- Press the OK button to return to normal TV viewing.
Note :
a. In the event of power interruption (disconnection or power failure), the clock must be reset.
b. If the same time is set for the on time and the off time, only the off time operates.
c. This set must be put into standby mode with the POWER button on the remote control handset to operate the on time function.
d. If the on time function activates, the TV will automatically switch to the on time programme number, even during viewing.
e. Two hours after the set is turned on by the on time function it will automatically switch back to standby mode unless a button has been pressed.
f. Once the on or off time is set, these functions operate daily at the preset time.
Teletext (option)

Teletext is an optional function, therefore only a set with the teletext system can receive the teletext broadcast.
Teletext is a free service broadcast by most TV stations which gives up-to-the-minute information on news, weather, television programmes, share prices and many other topics.
The teletext decoder of this TV can support the Simple, TOP and FASTEXT systems. Simple mode consists of a number of pages which are selected by directly entering the corresponding page number. TOP and FASTEXT are more modern methods allowing quick and easy selection of teletext information.
Switch on/off
Press the TEXT button to switch to teletext. The initial page or last selected page appears on the screen.
Two page numbers, TV station name, date and time are displayed on the screen headline. The first page number indicates your selection, while the second shows the current page displayed.
Press the TEXT or TV/AV button to switch off teletext. The previous mode reappears.
Simple mode
If the TV is in TOP or FASTEXT mode, press the MODE button to switch to LIST mode.
Page selection
-
Enter the desired page number as a three digit number with the NUMBER buttons. If during selection you press a wrong number, you must complete the three digit number and then re-enter the correct page number.
-
The i a /i button can be used to select the preceding or following page.
TOP mode
The user guide displays four fields-red, green, yellow and blue at the bottom of the screen. The yellow field denotes the next group and the blue field indicates the next block.
Block/group/page selection
-
With the BLUE button you can progress from block to block.
-
Use the YELLOW button to proceed to the next group with automatic overflow to the next block.
-
With the GREEN button you can proceed to the next existing page with automatic overflow to the next group. Alternatively the ; a button can be used.
-
The RED button permits to return to previous selection. Alternatively the ; button can be used.
Direct page selection
Corresponding to the Simple mode, you can select a page by entering it as a three digit number using the NUMBER buttons in TOP mode.
FASTEXT mode
The teletext pages are colour coded along the bottom of the screen and are selected by pressing the corresponding coloured button.
Page selection
-
Press the INDEX button to select the index page.
-
You can select the pages which are colour coded along the bottom line with the same coloured buttons.
-
Corresponding to the Simple mode, you can select a page by entering its three digit page number with the NUMBER buttons in FASTEXT mode.
-
The i a /; button can be used to select the preceding or following page.
Teletext (option)
Special teletext functions
REVEAL
Press this button to display concealed information, such as solutions of riddles or puzzles.
Press this button again to remove the information from the display.
SIZE
Selects double height text.
Press this button to enlarge the top half of the page.
Press this button again to enlarge the bottom half of the page.
Press this button again to return to the normal display.
UPDATE
Displays the TV picture on the screen while waiting for the new teletext page. The display ⏻ will appear at the top left hand corner of the screen. When the updated page is available then display ⏻ will change to the page number.
Press this button to view the updated teletext page.
HOLD
Stops the automatic page change which will occur if a teletext page consists of 2 or more sub pages. The number of sub pages and the sub page displayed is, usually, shown on the screen below the time. When this button is pressed the stop symbol is displayed at the top left-hand corner of the screen and the automatic page change is inhibited.
To continue press this button again.
MIX
Displays the teletext pages superimposed on the TV picture.
To switch the TV picture off press this button again.
TIME
When viewing a TV programme, press this button to display the time at the top right hand corner of the screen. Press this button again to remove the display. In the teletext mode, press this button to select a sub page number. The sub page number is displayed at the bottom of the screen. To hold or change the sub page, press the RED/GREEN, i a /i or NUMBER buttons. Press again to exit this function.

Connection of external equipment
You can connect additional equipment, such as VCRs, camcorders etc. to your set. Here shown may be somewhat different from your set.
Aerial socket

- Connect the RF out socket of the VCR to the aerial socket on the back of the set.
- Connect the aerial cable to the RF aerial in socket of the VCR.
- Store the VCR channel on a desired programme number using the 'Manual programme tuning' section.
- Select the programme number where the VCR channel is stored.
- Press the PLAY button on the VCR.

Audio/Video in/out sockets
- Connect the audio/video out sockets of the VCR to audio/video in sockets of the set and in sockets of the VCR to out sockets of the set.
- Press the TV/AV button to select AV.
- Press the PLAY button on the VCR.
The VCR playback picture appears on the screen.

You can also record programmes received by the TV on video tape via audio/video out sockets.

Euro scart socket
If your set has the Euro scart socket,
- Connect the euro scart socket of the VCR to the Euro scart socket of the set.
- Press the PLAY button on the VCR.
If your VCR outputs a switching voltage the set will switch to AV mode automatically.
Otherwise, press the TV/AV button on the remote control handset to select AV. The VCR playback picture appears on the screen.
Troubleshooting check list
Symptoms


Check these items and try to adjust these
The mains plug-(plugged in and switched on)
Is the TV switched on
Try another channel (weak signal)
Check aerial (plugged into TV?)
Check aerial (broken lead?)
Check aerial
Check for local interference
Adjust contrast
Adjust brightness
Adjust colour
Adjust volume
Check the batteries in remote control
Check Audio/Video sockets (VCR only)


