GT1238 - Hedge Trimmer LawnMaster - Free user manual and instructions
Find the device manual for free GT1238 LawnMaster in PDF.


| Brand | LawnMaster |
| Model | GT1238 |
| Product Type | Hedge Trimmer |
| Power Source | Electric Corded |
| Motor Voltage | 120V ~ 60Hz |
| Amperage | 4.5 Amps |
| Blade Length | 22 inches |
| Blade Type | Dual Action Steel Blades |
| Cutting Capacity | Up to 3/4 inch |
| Weight | 5.5 lbs |
| Overall Length | 27 inches |
| Handle Design | Rear Ergonomic Handle with Soft Grip |
| Safety Features | Two-Handed Operation, Blade Guard, Lock-Off Switch |
| Blade Maintenance | Oil blades after each use |
| Cleaning | Wipe with damp cloth; do not use solvents |
| Storage | Store in dry place with blade cover |
| Replacement Parts | Blade assembly, blade cover, spare screws |
| Repair Service | Contact LawnMaster customer service |
| Certifications | ETL Listed |
| Included Accessories | Blade cover, manual, oil bottle |
Frequently Asked Questions - GT1238 LawnMaster
User questions about GT1238 LawnMaster
0 question about this device. Answer the ones you know or ask your own.
Ask a new question about this device
Download the instructions for your Hedge Trimmer in PDF format for free! Find your manual GT1238 - LawnMaster and take your electronic device back in hand. On this page are published all the documents necessary for the use of your device. GT1238 by LawnMaster.
USER MANUAL GT1238 LawnMaster
natural_image
Technical line drawing of a manual sewer brush (no text or symbols)MNL GT1238 V1

Read all safety rules and instructions carefully before operating this tool.
Distributed By Cleva North America 601 Regent Park Court Greenville, SC 29607 (866)-384-8432


Intertek
3084514
TABLE OF CONTENT
| Contents | 2 |
| Product Specifications | 2 |
| Important Safety Instruction | 3-4 |
| Electrical Information | 5-7 |
| Symbols | 8-9 |
| Know Your Grass Trimmer | 10 |
| Assembly | 11-13 |
| Operation | 14-15 |
| Maintenance | 16-17 |
| Troubleshooting | 18 |
| Warranty | 19 |
| Exploded View | 20 |
| Parts List | 21 |
| Notes | 22 |
SPECIFICATIONS
| 12”CORDED GRASS TRIMMER | |
| Type | Corded |
| Voltage | 120V~60Hz |
| Amp | 4.2 A |
| Revolutions Per Minute | 10000rpm |
| Line Size | 0.065 inch(1.65mm) |
| Cutting Swath | 12 inch(305mm) |
| Feed System | dual line auto feed |
| Weight | 5.51lbs(2.5Kg) |
IMPORTANT!
When using electric gardening appliance, basic safety precautions should always be followed to reduce the risk of fire, electric shock and personal injury. For your own safety and bystanders please read these instructions before operating the grass trimmer. Do not use the grass trimmer without reading the instruction sheet. Please keep the instructions safe for later use.
READ ALL INSTRUCTIONS
- Grass trimmer is designed for cutting grass and similar soft vegetation and for trimming grass edges in private and hobby garden areas which are not accessible with a grass trimmer.
- The device is not allowed to be used in public gardens, parks, sports centers or at roadsides as well as in agriculture and forestry.
-
This grass trimmer is not allowed to be used for cutting or chopping, otherwise, there is a risk of injury:
-
Hedges, shrubs and bushes,
- Flowers,
-
In terms of composting.
-
This grass trimmer is not intended for use by persons (including children) with reduced physical, sensory or mental capabilities, or lack of experience and knowledge, unless they have been given supervision or instruction concerning use of the appliance by a person responsible for their safety.
- Children should be supervised to ensure that they do not play with the appliance.
- If the supply cord is damaged, stop using the unit. Take the unit to a qualified service dealer for inspection and possible repair using identical replacement parts.
- Wear protective glasses or goggles.
- Never allow children or people unfamiliar with the instructions to use the grass trimmer.
- Stop using the grass trimmer while people, especially children, or pets are nearby.
- Only use the grass trimmer in daylight or good artificial light.
- Before using the grass trimmer and after any impact, check for signs of wear or damage and repair as necessary.
- Never operate the grass trimmer with damaged guards or without the guards in place.
- Keep hands and feet away from the cutting means at all times and especially when switching on the motor.
• Take care against injury from any device fitted for trimming the filament line length. After extending new cutter line always return the grass trimmer to its normal operating position before switching on. - Never fit metal cutting elements.
- Never use replacement parts or accessories not provided or recommended by the manufacturer. See the Parts List in this manual for identical replacement parts.
- Disconnect the grass trimmer from the power supply before checking, cleaning or working on the grass trimmer and when it is not in use.
- Always ensure that ventilation openings are kept clear of debris.
ADDITIONAL SAFETY INSTRUCTIONS FOR YOUR GRASS TRIMMER
- Do not expose to moisture.
- Use only on AC outlet supply voltage shown on the product rating label.
- Avoid operating your trimmer in wet grass, where feasible.
• Take care in wet grass, you may lose your footing. - On slopes, be extra careful of your footing and wear nonslip footwear.
- Do not walk backwards when trimming, you could trip. Walk never run.
- Switch off before pushing the trimmer over surfaces other than grass.
- Never pick up or carry a trimmer by the cable.
- Do not lean over the trimmer guard. Objects may be thrown by the trimming line.
- Keep all nuts, bolts and screws tight to be sure the trimmer is in safe working condition.
- To avoid the risk of injury, keep fingers and hands clear of the line cut-off blade on the leading edge of the guard.
- Don't Force Appliance - It will do the job better and with less likelihood of a risk of injury at the rate for which it was designed; Don't Overreach - Keep proper footing and balance at all times; Stay Alert - Watch what you are doing. Use common sense.
Do not operate appliance when you are tired.
MAINTENANCE
• After use, disconnect the machine from the outlet and check for damage.
- When not in use store the machine out of the reach of children.
- Electric powered trimmers should only be repaired by a qualified service dealer using identical replacement parts.
- Use only identical replacement parts as listed in the Parts List of this manual.
The preparation for use, operation and maintenance of the appliance:
- Read the instructions carefully;
- Be familiar with the controls and proper use of the equipment;
- Before use check the supply and extension cord for signs of damage or ageing;
- If the cord becomes damaged during use, disconnect the cord from the power supply immediately: DO NOT TOUCH THE CORD BEFORE DISCONNECTING THE SUPPLY.
- Do not use the grass trimmer (edge trimmer), if the cords are damaged or worn.
WARNING
- Cutting elements continue to rotate after the motor is switched off;
- Keep extension cords away from cutting elements;
- It is recommended that appliances should be supplied via a residual current device (RCD) with a tripping current of not more than 30mA.
SAVE THESE INSTRUCTIONS
WARNING
TO AVOID ELECTRICAL HAZARDS, FIRE HAZARDS, OR DAMAGE TO THE TOOL, USE PROPER CIRCUIT PROTECTION. YOUR GRASS TRIMMER IS WIRED AT THE FACTROY FOR 120 V OPERATION. CONNECT TO A 120 V, 15 A CIRCUIT, AND USE A 15 A TIME-DELAYED FUSE OR CIRCUIT BIREAKER. TO AVOID SHOCK OR FIRE, IF THE EXTENSION CORD IS WORN, CUT OR DAMAGED IN ANY WAY, REPLACE IT IMMEDIATELY.
DOUBLE INSULATED

This grass trimmer has a plug that looks like the one shown in Fig. 1
The grass trimmer is double insulated to provide a double thickness of insulation between you and the tool's electrical system. All exposed metal parts are isolated from the internal metal motor components with protective insulation.
natural_image
Technical line drawing of a metal detector with handle and internal components (no text or symbols)WARNING
USE ONLY IDENTIFICAL REPLACEMENT PARTS WHEN SERVICING THE GRASS TRIMMER, TO AVOID INJURY.
WARNING
DOUBLE INSULATION DOES NOT TAKE THE PLACE OF NORMAL SAFETY PRECAUTIONS WHEN OPERATING THIS GRASS TRIMMER
WARNING
TO AVOID ELECTROCUTION:
- Use only identical replacement parts when servicing a tool with double insulation. Servicing should be performed by a qualified technician.
- Do not use in wet or damp areas or expose to rain.
GROUNDING INSTRUCTIONS
IN THE EVENT OF A MALFUNCTION OR BREAKDOWN, grounding provides the path of least resistance for electric current, and reduces the risk of electric shock. This tool is equipped with a POLARIZED plug. The plug MUST be plugged into a matching grounded extension cord in accordance with All local codes and ordinances.
DO NOT MODIFY THE PLUG PROVIDED. If it will not fit the properly grounded extension cord, have the proper outlet installed by a qualified electrician.
CAUTION
ALWAYS MAKE SURE THAT YOUR OUTLET IS PROPERLY GROUNDED. IF UNCERTAIN, HAVE IT CHECKED BY A CERTIFIED ELECTRICIAN.
WARNING
THIS GRASS TRIMMER IS FOR OUTDOOR USE ONLY. DO NOT EXPOSE TO RAIN OR USE IN DAMP LOCATIONS.
GUIDELINES FOR USING EXTENSION CORDS
USE THE PROPER EXTENSION CORD. Make sure your extension cord is in good condition. When using an extension cord, be sure to use one heavy enough to carry the current your product will draw. An undersized cord will cause overheating. The table below shows the correct size to use depending on cord length and nameplate ampere rating. If in doubt, use the next heavier gauge. The smaller the gauge number, the heavier the cord.
Minimum Gauge for Extension Cords (AWG) (when using 120 V only)
| Ampere Rating | Total Length of Cord in Feet (meters) | ||||
| More Than | Not More Than | 25' (7.6 m) | 50' (15 m) | 100' (30.4 m) | 150' (45.7 m) |
| 0 | 6 | 18 | 16 | 16 | 14 |
| 6 | 10 | 18 | 16 | 14 | 12 |
| 10 | 12 | 16 | 16 | 14 | 12 |
| 12 | 16 | 14 | 12 | Not Recommended | |
Make sure your extension cord is properly wired and in good electrical condition. Always replace a damaged extension cord or have it repaired by a qualified person before use. Keep extension cords away from sharp objects, excessive heat and damp or wet areas.
Use a separate electrical circuit for your tools. This circuit should comprise a wire of at least 12 gauge and should be protected with a 15 A time-delayed fuse. Before connecting the motor to the power line, make sure the switch is in the OFF position and the electric current is identical to that stamped on the motor nameplate. Running at a lower voltage will damage the motor.

WARNING
ALTHOUGH THIS GRASS TRIMMER IS DOUBLE INSULATED, THE EXTENSION CORD AND RECEPTACLE MUST STILL BE GROUNDED WHILE IN USE TO PROTECT THE OPERATOR FROM ELECTRICAL SHOCK.
Some of the following symbols may be used on this product. Please study them and learn their meaning. Proper interpretation of these symbols will allow you to operate the product better and safer.
| SYMBOL NAME DESIGNATION/EXPLANATION | ||
| V Volts Voltage | ||
| A Amperes Current | ||
| Hz | Hertz | Frequency (cycles per second) |
| W Watts Power | ||
| min | Minutes | Time |
| ~ | Alternating Current | Type of current |
| --- | Direct Current | Type or a characteristic of current |
 | Class II Construction | Double-insulated construction |
 | Safety Alert Symbol | Indicates a potential personal injury hazard. |
 | Read The Operator's Manual | To reduce the risk of injury user must read and understand operator's manual before using this product. |
 | Wet Conditions Alert | Do not expose to rain or use in damp locations |
 | Eye and Hearing Protection | Always wear eye protection with side shields marked to comply with ANSI Z87.1, along with hearing protection. |
 | Keep Bystanders Away | Keep all bystanders at least 50 ft. away. |
 | Gloves | Wear non-slip, heavy-duty protective gloves when handling the grass trimmer. |
 | Safety Footwear | Wear non-slip safety footwear when using this equipment. |
 | Electric Shock | Failure to use in dry conditions and to observe safe practices can result in electric shock. |
 | Long Hair | Failure to keep long hair away from the air inlet could result in personal injury. |
 | Loose Clothing | Failure to keep loose clothing from being drawn into air intake could result in personal injury. |
| The following signal words and meanings are intended to explain the levels of risk associated with this product.SYMBOLSIGNALMEANING | ||
 | DANGER | Indicates an imminently hazardous situation, which, if not avoided, will result in death or serious injury. |
 | WARNING | Indicates a potentially hazardous situation, which, if not avoided, could result in death or serious injury. |
 | CAUTION | Indicates a potentially hazardous situation, which, if not avoided, may result in minor or moderate injury. |
| CAUTION | (Without Safety Alert Symbol) Indicates a situation that may result in property damage. | |
 | WARNING | To avoid serious personal injury, do not attempt to use this product until you read thoroughly and understand completely the operator's manual. If you do not understand the warnings and instructions in the operator's manual, do not use this product. Call the Customer Care Hot Line for assistance at 1-888-331-4569. |
  | The operation of any power tool can result in foreign objects being thrown into your eyes, which can result in severe eye damage. Before beginning power tool operation, always wear safety goggles or safety glasses with side shields and, when needed, a full face shield. We recommend Wide Vision Safety Mask for use over eyeglasses or standard safety glasses with side shields. Always use eye protection which is marked to comply with ANSI Z87.1. | |
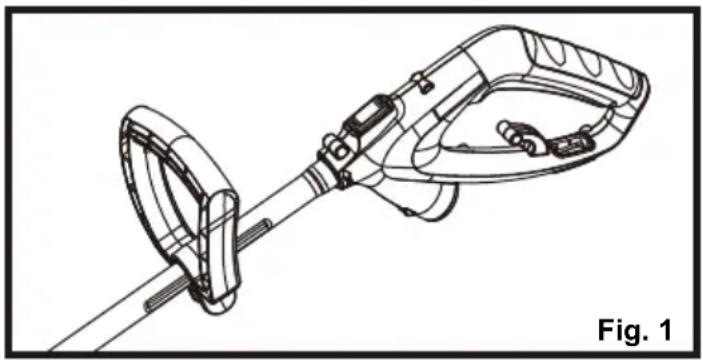
KNOW YOUR GRASS TRIMMER (See Figure 1.)
The safe use of this product requires an understanding of the information on the product and in this operator's manual as well as a knowledge of the project you are attempting. Before use of this product, familiarize yourself with all operating features and safety rules.

WARNING
Before assembly, make sure that the grass trimmer is switched off and unplugged.
Fitting The Guard (See Figure 2 & Figure 3.)
- Fit the debris guard with pre-installed screws into the slots on the trimmer housing and line up the screw hole in the debris guard with the screw hole in the trimmer head.
- Tighten the pre-installed screws on the debris guard by turning clockwise with a Phillips screwdriver.1

WARNING
The line cut-off blade on the safety guard is sharp. Avoid contact with the blade. Failure to avoid contact can result in serious personal injury. Never use the grass trimmer unless the guard is properly fitted.
FITTING THE AUXILIARY HANDLE (See Figure 4 & Figure 5.)
Loosen and remove the wing nut from the auxiliary handle.
- Place the auxiliary handle on the upper shaft. Adjust the handle to mount on the index channel as shown.
- Along the index channel, slide the auxiliary handle to the most comfortable position.
- Insert the bolt in the hole on the auxiliary handle and tighten the wing nut securely.

JOINING THE UPPER SHAFT TO THE MOTOR HEAD (See Figure 6.)
- Align the upper shaft with the lower shaft.
- Insert upper shaft into the lower shaft and lock pin button into place.

natural_image
Technical line drawing of a mechanical component with a central notch and two circular holes, labeled Fig. 6 (no text or symbols on the diagram itself)NOTE: If the button does not release completely in the positioning hole, the shafts are not locked into place. Slightly rotate from side to side until the button is locked into place.
WARNING
Never adjust the upper handle while the power head is running. Failure to stop the motor may cause serious personal injury
PREPARING THE TRIMMER FOR USE (See Figure 7 & Figure 8.)
- Attach the outlet end of an extension cord to the plug on the rear of the grass trimmer.
NOTE: Use only approved outdoor extension cords.

natural_image
Line drawing of a car interior with hoses and a connector, labeled Fig.7 (no text or symbols on the diagram itself)- Route the extension cord through the slot located on the rear of the grass trimmer housing and place underneath the cord retainer.
- To start the grass trimmer, press the switch trigger.
- To stop the grass trimmer, release the switch trigger.

natural_image
Technical line drawing of a cleaning or cleaning device with an upward arrow indicating motion (no text or symbols present)WARNING
If any parts are damaged or missing, do not operate this product until the parts are replaced. Failure to heed this warning could result in serious personal injury.
WARNING
Do not connect to power supply until assembly is complete.
Failure to comply could result in accidental starting and possible serious personal injury.
WARNING
Never attempt to lock the switch trigger in the ON position.
Hint for optimum use
- In order to achieve optimum cutting results, only cut dry grass.
Trimming (See Figure 10.)
- Hold the grass trimmer as shown.
• Gently swing the trimmer from side to side. - When cutting long grass, work in stages from hard objects and delicate pants.
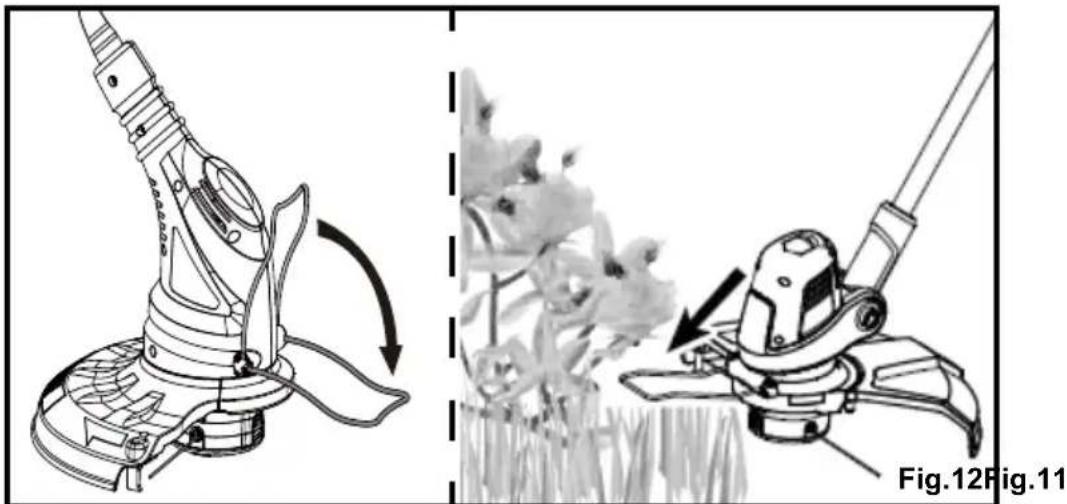
- If the grass trimmer starts running slowly, reduce the load. Using the Flower Guard (See Figure 11 & Figure 12.)
- If necessary the flower guard can be swung down until it engages. Use the flower guard for example, to cut around plants.

natural_image
Illustration of a person using a lawn power shaver in a grassy field (no text or symbols)Using the Flower Guard (See Figure 11 & Figure 12.)
- If necessary the flower guard can be swung down until it engages. Use the flower guard for example, to cut around plants.
natural_image
Two-panel illustration showing a manual sprinkler and a manual sprinkler with a plant, both without any text or symbols.IF GRASS BECOMES WRAPPED AROUND STRING HEAD SHAFT:
- Stop trimmer.
- Unplug the string trimmer.
- Remove the grass.
ADVANCING STRINGS
NOTE: Trimmer is equipped with an auto-feed head.
Do not bump the head to try to advance the line will damage trimmer and void warranty.
- With the trimmer running, release the switch trigger.
- Wait two seconds, and press the switch trigger.
NOTE: Auto feed function works during the starting and stopping of trimmer. Strings will extend approximately 3/16 in. with each stop and start of switch trigger WHILE NOT TRIMMING until the strings reach the length of the grass deflector blade.
- It may take up to 10 complete starting and stopping to advance the line.
ROTATING MAIN HANDLE FOR EDGING(See Figure 13.)
NOTE: The best method of edging is performed with the main handle rotated.
- Unplug the grass trimmer.
- Press the rotational lock button and rotate the main handle clockwise.
- Release button when main handle has been rotated 180° to the edging position.
- Rotate auxiliary handle 180^ and snap onto index channel.

EDGING (See Figure 14.)
- The rotating main handle can be used in combination with the flower guard for edging sidewalks and walkways. To use the flower guard, flip down from its stored position.

natural_image
Technical line drawing of a mechanical tool with a curved arrow indicating rotation (no text or symbols)Your grass trimmer has been designed to operate over a long period of time with a minimum of maintenance. Continuous satisfactory operation depends upon proper tool care and regular cleaning.

WARNING
Before proceeding any maintenance, switch off and unplug to tool.
- Regularly clean the ventilation slot in your grass trimmer using a soft brush or dry cloth.
- Regularly clean the trimming line and spool using a soft brush or dry cloth.
- Regularly use a blunt scraper to remove grass and dirt from the underneath of the guard.

WARNING
When servicing, use only identical replacement parts. Use of any other parts may create a hazard or cause product damage.
Fitting a new spool of trimming line (See Figure 15 & Figure 16.)
- Unplug the grass trimmer
- Keep the tabs
① depress thumb tabs and remove the spool cover ② from the housing ③ Remove the empty. spool ④ from the spool cover. - Remove any dirt and grass from the spool cover and housing
• Taking the new spool and push It into the boss in the spool cover. Rotate the spool slightly until it is seated. - Unclip the end of one of the trimming lines and guide the line into one of the eyelets ⑤. The line should protrude approx. 4 inches from the spool cover.
- Unclip the end of the other trimming line and guide the line into the other eyelet. The line should produce approx. 4 inches from the spool corner.
- Align the tabs ① on the spool cover with the cut outs ④ in the housing.
- Push the cover onto the housing until it snaps securely into place.


NOTE: Use LawnMaster replacement spool; part # RS0101
Winding new line onto a spool(See Figure 17 & Figure 18 & Figure 19.)
- Only use .065" replacement line
- You may wind new trimming line onto an empty spool.
- Replacement packs of trimming line are available from dealer.
- Remove the empty spool from the grass trimmer as described above.
- Remove any remaining trimming line from the spool.
- First feed 4 inches of trimming line ⑥ into the two eyelet ⑦ in the upper section of the spool as show
- Wind the trimming line onto the spool in the direction of the arrow. Make sure to wind the line on neatly and in layers. Do not criss-cross.
- Feed trimming line ⑥ into the two eyelet ⑦ in the upper section of the spool as show
- Finish winding, Produce as described above to fit the spool on the grass trimmer. Do not forget to release the trimming line from the parking slot.

Fig. 17 Fig.

natural_image
Line drawing of a mechanical component with a coiled spring and curved shaft (no text or symbols)

WARNING
Only use the appropriate type of trimming line.
STORING THE TRIMMER
- Clean all foreign material from the trimmer.
- Store it in a place that is inaccessible to children.
- Keep away from corrosive agents such as garden chemicals and de-icing salts.
If your grass trimmer does not seem to operate properly, first consult the Troubleshooting Table below.
If the solution to your trimmer problem is not found in the Troubleshooting information, take the trimmer to a qualified service dealer for inspection and possible repair.

WARNING
Before proceeding, switch off and unplug.
Tool runs slowly
- Check that the spool housing can rotate freely. Carefully clean it if necessary.
- Check that the trimming line does not protrude more than 4 inches from the spool housing. If it does, cut it off so that it just reaches the line trimming blade.
Automatic line feed does not work.
- Keep the tabs depressed and remove the spool cover from the housing.
- Pull the trimming line until it protrudes 4 inches from the housing. If insufficient trimming line is left on the spool, install a new spool of trimming line as instructed above.
- Align the tabs on the spool cover with the cut outs in the housing.
- Pushing the cover onto the housing until it snaps securely into place.
- If the trimming line protrudes beyond the trimming blade, cut it off so that it just reaches the blade.
- If the automatic line feed still does not work or the spool is jammed, try the following suggestion:
- Carefully clean the spool cover and housing.
- Remove the spool and check if the lever can move freely.
- Remove the spool and unwind the trimming line, then wind it on neatly again as describe above. Replace the spool as instructed.
We take pride in producing a high quality, durable product. This Lawnmaster® product carries a limited two (2) year warranty against defects in workmanship and materials from date of purchase under normal household use. If product is to be used for commercial, industrial or rental use, a 30 day limited warranty will apply. Batteries carry a one-year warranty against defects in workmanship and materials. Batteries must be charged in accordance with the operator's manual directions and regulations in order to be valid. Warranty does not apply to defects due to direct or indirect abuse, negligence, misuse, accidents, repairs or alterations and lack of maintenance. Please keep your receipt/packing list as proof of purchase. This warranty gives you specific legal rights, and you may have other rights, which vary from state to state. For product service call Customer Service at (866) 384-8432.
Items not covered by warranty :
- Any part that has become inoperative due to misuse, commercial use, abuse, neglect, accident, improper maintenance, or alteration;
- The unit, if it has not been operated and/or maintained in accordance with the owner's manual;
- Normal wear, except as noted below;
- Routine maintenance items such as lubricants, blade sharpening;
- Normal deterioration of the exterior finish due to use or exposure.
Transportation Charges : Transportation charges for the movement of any power equipment unit or attachment are the responsibility of the purchaser. It is the purchaser's responsibility to pay transportation charges for any part submitted for replacement under this warranty unless such return is requested in writing by LawnMaster.
SAVE YOUR RECEIPTS. THIS WARRANTY IS VOID WITHOUT THEM.
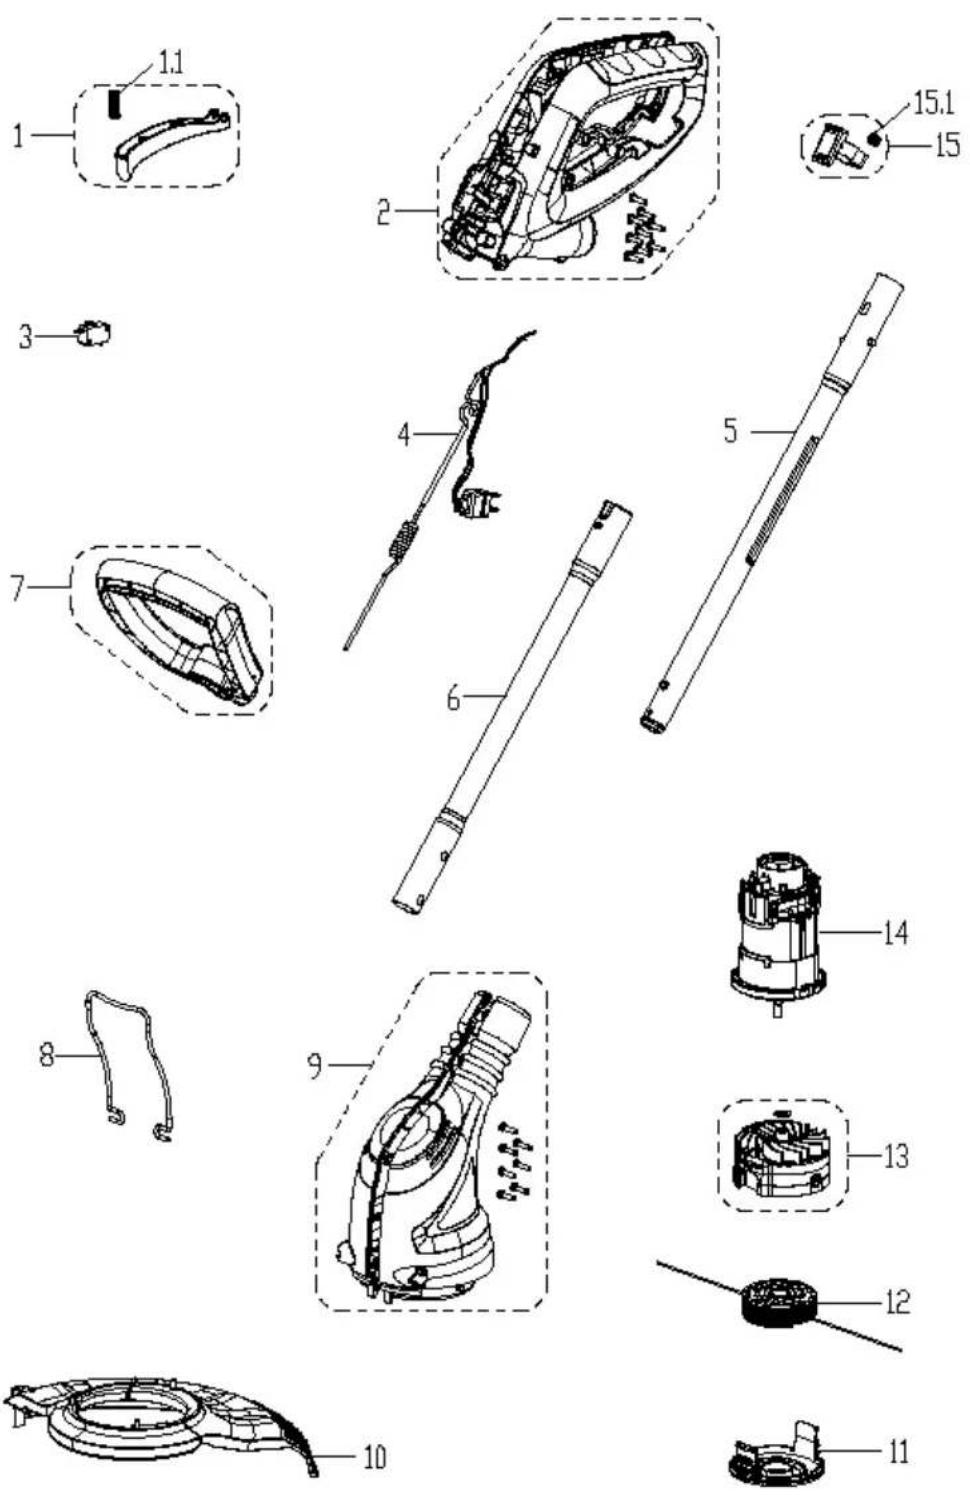
GT1238 MANUAL EXPLODED VIEW
GT1238 MANUAL PARTS LIST
| ITEM NO. | PART NO. DESCRIPTION | QTY | |
| 1 | 121020110 | Switch Trigger Assembly | 1 |
| 1.1 | 221001117 | Compression Spring | 1 |
| 2 | 121043101 | Handle Assembly | 1 |
| 3 | 121013105 | Micro Switch | 1 |
| 4 | 121043102 | Tie Cable Assembly | 1 |
| 5 | 121013115 | Upper Extension Tube Assembly | 1 |
| 6 | 121013113 | Lower Extension Tube Assembly | 1 |
| 7 | 121013114 | Assistant Handle Assembly | 1 |
| 8 | 121043104 | Flower Guard | 1 |
| 9 | 121043105 | Motor Housing Assembly | 1 |
| 10 | 121043106 | Debris Guard Assembly | 1 |
| 11 | 121013106 | Spool Cover | 1 |
| 12 | RS0101 | Spool (RS0101) | 1 |
| 13 | 121043107 | Cutting Head Assembly | 1 |
| 14 | 121043108 | Motor Assembly | 1 |
| 15 | 121030110 | Telescopic Tubes Locking Button | 1 |
| 15.1 | 121002106 | Compression Spring | 1 |
NOTES
- IMPORTANT!
- READ ALL INSTRUCTIONS
- ADDITIONAL SAFETY INSTRUCTIONS FOR YOUR GRASS TRIMMER
- MAINTENANCE
- WARNING
- SAVE THESE INSTRUCTIONS
- DOUBLE INSULATED
- GROUNDING INSTRUCTIONS
- CAUTION
- GUIDELINES FOR USING EXTENSION CORDS
- KNOW YOUR GRASS TRIMMER (See Figure 1.)
- Fitting The Guard (See Figure 2 & Figure 3.)
- FITTING THE AUXILIARY HANDLE (See Figure 4 & Figure 5.)
- JOINING THE UPPER SHAFT TO THE MOTOR HEAD (See Figure 6.)
- PREPARING THE TRIMMER FOR USE (See Figure 7 & Figure 8.)
- Hint for optimum use
- Trimming (See Figure 10.)
- Using the Flower Guard (See Figure 11 & Figure 12.)
- IF GRASS BECOMES WRAPPED AROUND STRING HEAD SHAFT:
- ADVANCING STRINGS
- ROTATING MAIN HANDLE FOR EDGING(See Figure 13.)
- EDGING (See Figure 14.)
- Before proceeding any maintenance, switch off and unplug to tool.
- Fitting a new spool of trimming line (See Figure 15 & Figure 16.)
- Winding new line onto a spool(See Figure 17 & Figure 18 & Figure 19.)
- STORING THE TRIMMER
- Tool runs slowly
- Automatic line feed does not work.
- NOTES
Brand : LawnMaster
Model : GT1238
Category : Hedge Trimmer