USER MANUAL WM1-24E-01 SoleusAir
WM1-24E-01 24,700 BTU
Electronic Window Air Conditioner Operating Instructions

natural_image
White SOLEUS air conditioner unit with ventilation grilles and control panel (no visible text or symbols)
Thank you for choosing a Soleus Air Air Conditioner. This owner's manual will provide you with valuable information necessary for the proper care and maintenance of your new product. Please take a few moments to thoroughly read the instructions and familiarize yourself with all the operational aspects of your new air conditioner.
For your own records, please attach a copy of your sales receipt to this manual. Also, write the store name/location, date purchased, and serial number below:
Store Name: ____
Location: ____
Date Purchased: ____
Serial Number (located on back of unit): ____
IMPORTANT SAFETY INSTRUCTIONS
Before installing and using your air conditioner, please read this owner's manual carefully. Store this manual in a safe place for future reference. Your safety and the safety of others is very important to us. Please pay attention to all safety messages outlined in this owner's manual.
WARNING: To reduce the risk of fire, electrical shock or injury when using your air conditioner, follow the following basic precautions:
- Plug into a grounded 3 prong outlet.
- Do not remove the ground prong.
- Do not use a plug adapter.
- Do not use an extension cord.
- Unplug the air conditioner before servicing
- Use two or more people to move and install the air conditioner

This is a safety alert symbol.
This symbol alerts you to potential hazards that can harm you or others or even cause death.
All safety messages will directly follow the safety alert symbol and/or the words "DANGER" or "WARNING".
⚠️ DANGER
WARNING
Failure to immediately follow these instructions may cause serious injury or even death.
All Safety messages alert you of potential hazards, how to reduce the chance of injury, and what can happen if instructions are not followed correctly.
LCDI POWER CORD AND PLUG
This air conditioner is equipped with an LCDI (Leakage Current Detection and Interruption) power cord and plug as required by US National Electric Code 440.65. This cord consists of a length of shielded flexible cord with no termination on the load side and a LCDI attachment plug on the line side.
The LCDI power cord and plug will remove the supply source via electrical disconnect (circuit trip) if the nominal current leakage between the cord shield and either load conductor exceeds a predetermined value. The cord will remain de-energized until the devise has been manually reset. This is intended to reduce the risk of a fire in the power cord or combustible materials nearby. The cord shields are not grounded and they must be considered a shock hazards if exposed. The cord shield must not be connected to ground or to any exposed metal.
The test and reset buttons on the LCDI Plug are used to check if the plug is functioning properly. To test:
- Plug power cord into wall outlet. The LED light will turn on.
- Press TEST Button, circuit should trip, cutting power to the air conditioner. When this occurs, the LED light will turn off.
- Press RESET button to restore power to the machine. Once power is restored, the LED light will turn on again.
If test button is pressed and unit can still be turned on, current leakage has been detected. Do not use the air conditioner or attempt to reset the LCDI Plug. Contact Soleus Air Customer Service for troubleshooting recommendations.
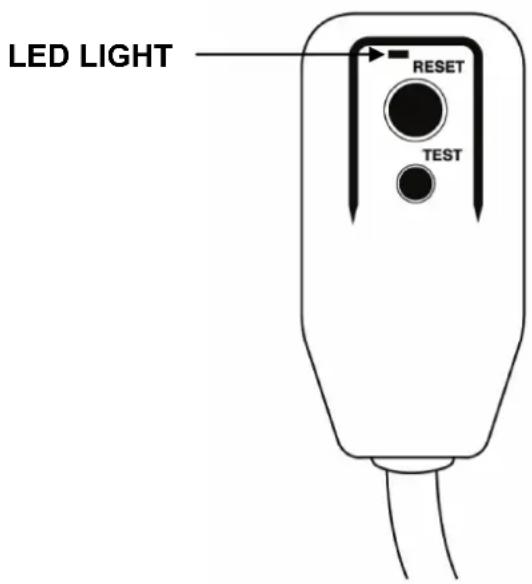
Note: Your units power cord and plug may differ from the one shown.
WARNING:
- DO NOT press the TEST button while the air conditioner is operating.
- The TEST and RESET buttons should not be used as "ON" and "OFF" switches.
- The cord and plug are not intended to offer protection to externally connected loads or supply circuits.
- The cord and plug are intended for indoor use only.
PARTS LIST

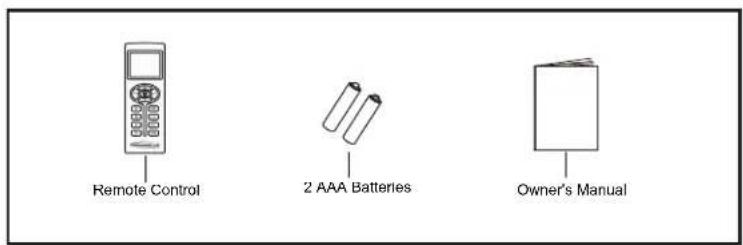
| Hardware (in plastic bag) | Qty. |
 | Sash Lock | 1 |
 | Screw and Locknut | 4 |
 | Flathead Bolt and Locknut | 2 |
 | Sill Angle Bracket | 2 |
 | Curtain Lock | 2 |
 | Long Screws | 13 |
 | Short Screws | 10 |
Large Flathead Screwdriver
Tape Measurer
Adjustable Wrench or Pliers
Pencil
Level
Socket Wrenches
Phillips Head Screwdriver
Non-Hardware Part List
• Window Air Conditioner (1)
- Remote Control (1)
- AAA Batteries (2)
- Top Mounting Rail (1)
- Foam Gasket (1)
- Curtain (2)
• Window Sash Seal (1)
• Foam Seal for Bottom Rail (1)
- Owner's Manual (1)
• Weather Insulation Board (2)
SPECIFICATIONS
- Noise level is measured at a distance of 3.28 ft away from the front of the unit in cooling mode.
- Power consumption is measured when the fan runs at the highest speed setting.
• These specifications are for reference only. For actual data, please refer to the rating label on the back of the unit.
| Model | WM1-12E-01 | WM1-15E-01 |
| Power Supply (Ph/V/Hz) | 1/115/60 | 1/115/60 |
| Rated Cooling Capacity (BTU/h) | 12,600 | 15,400 |
| Cooling Power Input (Watts) | 1,000 | 1,230 |
| Rated Current Cooling (Amperage) | 9 | 12 |
| EER | 12 | 11.8 |
| Noise Level dB(A) (L/H) | 55/59 | 55/59 |
| Airflow CFM (H/L) | 600/520 | 700/610 |
| Dehumidifying Capacity | 52 Pints per day | 74 Pints per day |
| Product Dimensions (W” x H” x D”) | 23.625 x 17.75 x 25.375 | 23.625 x 17.75 x 25.375 |
| Package Dimensions (W” x H” x D”) | 26.125 x 20 x 30.5 | 26.125 x 20 x 30.5 |
| Net/Gross Weight (Lbs) | 106/117 | 110/121 |
| Refrigerant Type | R-410A | R-410A |
| Plug Type | NEMA 5-15P | NEMA 5-15P |
| Model | WM1-18E-01 | WM1-24E-01 |
| Power Supply (Ph/V/Hz) | 208/230/60 | 208/230/60 |
| Rated Cooling Capacity (BTU/h) | 18,300 | 24,700 |
| Cooling Power Input (Watts) | 1,530 | 2,330 |
| Rated Current Cooling (Amperage) | 6.7 | 10.3 |
| EER | 11.8 | 10.3 |
| Noise Level dB(A) (L/H) | 56/61 | 56/61 |
| Airflow CFM (H/L) | 730/630 | 760/660 |
| Dehumidifying Capacity | 83 Pints per day | 152 Pints per day |
| Product Dimensions (W" x H" x D") | 26.375 x 18.625 x 26.625 | 26.375 x 18.625 x 26.625 |
| Package Dimensions (W" x H" x D") | 29.5 x 20.875 X 31.125 | 29.5 x 20.875 X 31.125 |
| Net/Gross Weight (Lbs) | 132/154 | 141/163 |
| Refrigerant Type | R-410A | R-410A |
| Plug Type | NEMA 6-15P | NEMA 6-20P |
WARNING:
Avoid fire hazard or electronic shock,
DO NOT use an extension cord or an adapter plug.
DO NOT remove any prong from the power cord.
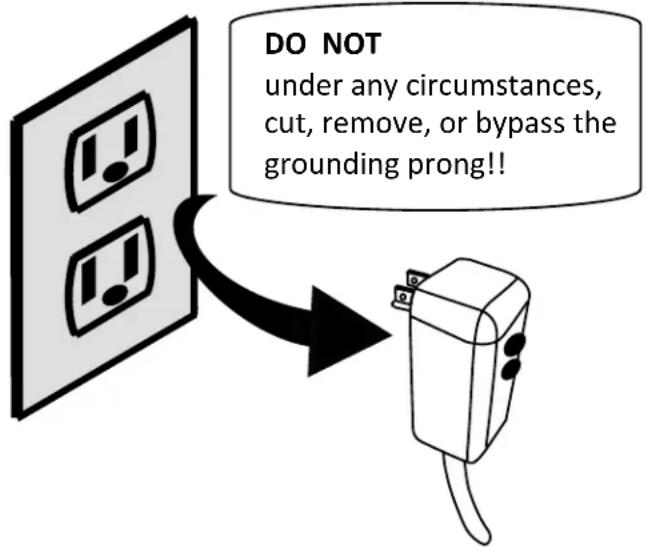
Power supply cord with 3-prong grounding plug and current detection device
DISCLAIMER
ALL INFORMATION AND THE TECHNICAL SPECIFICATIONS PRESENTED IN THIS USER'S MANUAL ARE THE PRESENTATION OF THE MANUFACTURER. SOLEUS HOME COMFORT HAS NOT CONDUCTED INDEPENDENT TEST TO THE INFORMATION AND THE SPECIFICATIONS PRESENTED HEREWITHIN.
INSTALLATION & ASSEMBLY INSTRUCTIONS
Window Preparation
Please read all instructions prior to installing your air conditioner. Two people are recommended to install this product. If a new electrical outlet is required, have the outlet installed by a qualified electrician before installing the unit.
Before installing the unit, check the dimensions of your window to make sure the air conditioner will fit. This unit is made to fit inside a standard double-hung window. Make sure the window is in good shape and able to firmly hold the needed screws. If not, make repairs prior to installing the unit.
| Model WM1-12E-01 / WM1-15E-01 WM1-18E-01 / WM1-24E-01 | |
| Unit Height 17 3/4" 18 5/8" | |
| Unit Width 23 5/8" 26 3/8" | |
| Min.Window Opening(See FIG 1) | 1Θ" |
| Min. Window Width 28 1/8" 30" | |
| Max Window Width 41 3/4" | 50 " |
Storm Window Requirements
A storm window frame will not allow the air conditioner to tilt properly which in turn will keep it from draining properly. To adjust for this, attach a board or piece of wood to the sill. The board or wood piece should have a depth of at least 1 1/2". Make sure the board or piece of wood is approximately 1/2" higher than the storm window frame. This will allow the air conditioner to tilt enough for proper drainage. (See FIG. 2).
FIG. 1

FIG. 2

Prior to Installing the Air Conditioner
- Check for anything that could block airflow. Check the area outside of the window for things such as shrubs, trees, or awnings. Check the inside area to make sure curtains, drapes, or blinds will not prevent proper airflow.
- Check the available electrical outlet. The power supply must be the same as shown on the unit serial nameplate (located on the left side of the unit, near the front faceplate). Be sure the outlet is close enough for the power cord to reach.
- Carefully unpack the air conditioner. Remove all packing material and make sure the floor is protected when removing. Due to the large size of this air conditioner, two people should move the unit together.
CAUTION
When handling the unit, be careful to avoid cuts from the sharp metal edges and aluminum fins on the front and rear coils.
INSTALLATION & ASSEMBLY INSTRUCTIONS - WINDOW MOUNTING
REMOVE CHASSIS
- Pull down the front panel and remove the filter. (See Fig. 3)
- Lift the front panel upwards to remove and place to the side.

natural_image
Illustration of a hand pressing down on an air conditioner unit (no text or symbols visible)
natural_image
Line drawing of an air conditioner unit with a hand pulling the outlet (no text or symbols)
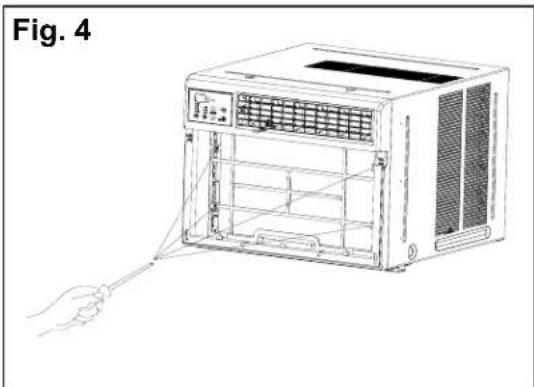
- Locate the four faceplate screws and remove. These screws will need to be re-installed prior to mounting the air conditioner. (See Fig. 4)
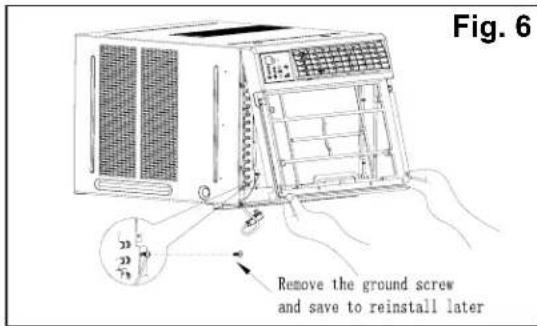
- After removing the screws, gently pull away the faceplate from the air conditioner cabinet. Remove the ground screw and save for reinstallation later. (See Fig. 5 & 6)

natural_image
Line drawing of a portable air conditioner unit with ventilation grilles and a hand holding the lid (no text or symbols)
- Remove the two screws from top of the unit. (See Fig. 7) Hold the cabinet while pulling on the base handle, and carefully remove the unit.

natural_image
Technical line drawing showing two views of a mechanical component, one with a bracket and arrow indicators, the other with a rectangular housing (no text or symbols)
Weather Insulation Board Installation
NOTE: The Weather Installation Board adds an extra layer of insulation to keep air from passing through the sides of the window air conditioner.
- Using a sharp blade or scissors, slowly cut the Weather Insulation Board to a size that will fit inside of the side curtain rails and completely cover the curtain.
- Once properly sized, remove the backing to expose the adhesive tape.
- Place the Weather Insulation Board over the left curtain and firmly press and hold for 5 seconds.
- Place the Weather Insulation Board over the right curtain and firmly press and hold for 5 seconds (FIG. 7.1).

Curtain Installation
- Attach the top mounting rail to the unit with short screws (See Fig.8).
Top Mounting Rail
Fig. 8

natural_image
Technical line drawing of a rectangular industrial enclosure with ventilation grilles and mounting holes (no text or symbols)
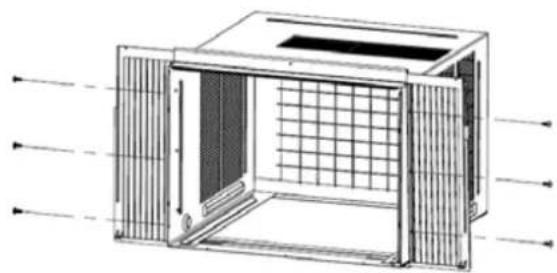
- Slide the free end of the curtain into the side panel of the air conditioner. Do this for each side. The flange for securing the curtain into the window sill will be facing the room side when installed (See Fig.9).

- Fasten the curtains to the unit with short screws (See Fig.10)
natural_image
Technical line drawing of a modular air vent or enclosure with internal grid structure (no text or symbols)
Fig. 10
Placing the Cabinet Inside the Window
- Open the window and place the cabinet in the middle of the window sill.
- Make sure the bottom rail is seated over the window-sill as shown below. Bring the window down temporarily behind the top mounting rail to hold the cabinet in place.

- Fasten cabinet to window sill using three long screws. Pre-drill holes if needed. Add the bottom rail seal over the screws (See Fig.11).

Fig. 11
Long Screw
Install Support Brackets
- Hold each support bracket flush against the outside of the window sill. Tighten each bracket to the bottom of the cabinet as shown below. Mark the brackets at top lever of the window sill and then remove.
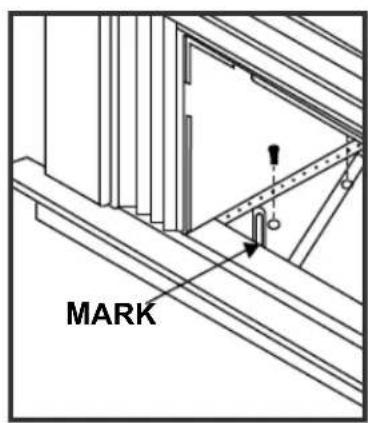
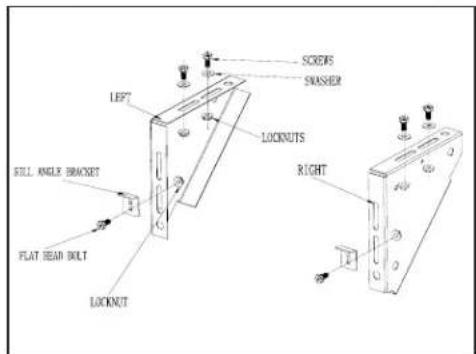
- Assemble the sill angle brackets to the support brackets at the marked position as shown above. Hand tighten, but not all the way for any changes that may need to be made later during installation.
- Install the support brackets (with sill angle brackets attached) to the bottom of the cabinet as shown below.
- Tighten all 6 bolts securely.

Install the Window Lock and Sash Seal
- Trim the sash seal to fit the width of the window. Insert the sash seal into space between the upper and lower sashes.

- Attach the right angle safety lock as shown below.

ASSEMBLY & INSTALLATION (CONT.)
Installing the Chassis into the Cabinet
- Team lift (two people) the air conditioner chassis and carefully slide it into the cabinet. Let the front of the air conditioner hang out approximately 6".
- CAUTION: DO NOT PUSH ON THE CONTROLS OR FINNED COILS.
- Be sure the chassis is firmly seated in the back of the cabinet.
- Insert all screws removed during window installation and reattach the front face plate, front panel, and the air filter. Use the REMOVE CHASSIS instructions and figures 3-7 on page 8 for reference.
Extend the Curtain Panels
- Carefully raise the window to expose the curtain panel and panel frame. Extend the curtain panels to fill the window opening.
- Place the curtain lock between the curtain extensions and the window sill, drive locking screws through the lock and into the sill.
Secure the Air Conditioner
- Secure the left and right flanges on the lower end sides of the panel with long screws. (See Fig. 12)
- Drive locking screws through upper frame holes into window sash.
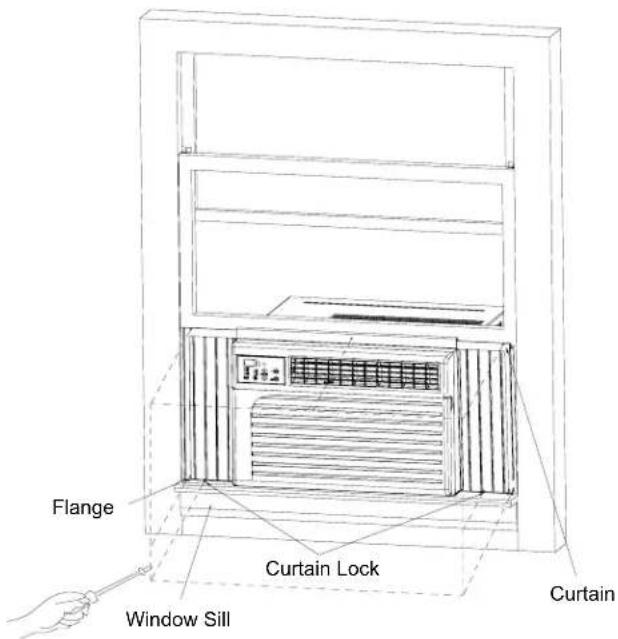
Fig. 12
USING YOUR AIR CONDITIONER
Electronic Control Panel & Remote Control
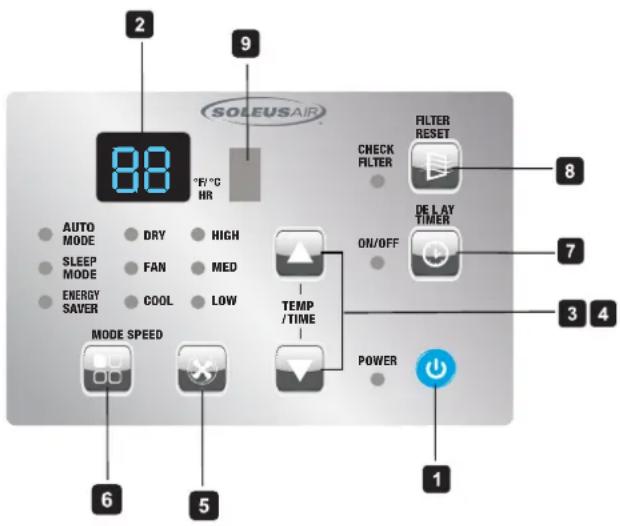
Note: This control panel display always shows the room temperature in Fan Mode except when setting the temperature and timer.
Normal Operating Sounds
- You may hear a pinging noise caused by water hitting the condenser on rainy days, or when the humidity is high. This design feature helps remove moisture and improve efficiency.
- You may hear the thermostat click when the compressor cycles on and off.
- Water will collect in the base pan during rain or days of high humidity. The water may overflow and drip from the outside part of the unit.
-
The fan may run even when the compressor is not on.
-
Power Button: Turn the air conditioner on and off.
- Digital Display: Will display set temperature when the unit is in Cool, Dry, Auto, Sleep, Energy Saver mode, and display current room temperature when in Fan mode.
-
Temperature Set: Use these buttons on the control panel or remote to increase or decrease the Set Temperature.
-
Timer Set: Use these buttons on the control panel and remote control to set the timer. Each press of the ▲ or ▼ button will increase or decrease the timer. For timer instructions see #7.
- Fan Speed: Use the fan speed button to change the fan speed. Choose between high, medium, and low.
- Mode Button: Press the MODE button to cycle through the various modes: Auto, Sleep, Energy
- Auto-on Timer: When the air conditioner is off, it can be set to automatically turn on in 1-24 hours at the previous set mode and fan settings. To set the Auto-on Timer, press the DELAY TIMER button on the unit or remote control. Timer can be set in 1 hour increment.
Auto-off Timer: When the air conditioner is on, it can be set to automatically turn off in 1-24 hours. To set the Auto-off Timer, press the DELAY TIMER button on the unit or remote control. Timer can be set in 1 hour increment.
Once timer is set, TIMER ON/OFF indicator on control panel will light up, the set temperature will also shown on digital display.
- To see the remaining time, press DELAY TIMER button. To change the timer settings, use the ▲or▼ on control panel or remote control.
-
During preview of timer setting, press DELAY TIMER button once to display set time, press the button one more time to cancel the settings.
-
Filter Reset: After the fan rotates for 250 total hours, the filter check light will turn on to remind the user to clean the filter. Press the FILTER RESET button to reset the reminder once the filter is cleaned.
-
Signal Receiver: Point the remote control to the air conditioner when sending instruction to the unit.
Battery Size: AAA - NOTE: Do not mix old and new batteries or different types of AAA batteries.
REMOTE CONTROL OPERATING INSTRUCTIONS
- ON/OFF - Press the ⏻ button to turn the A/C on or off. When the unit is turned off, the Timer function will be cancelled. The set temperature will be saved.
- MODE SELECTION - Press the MODE button repeatedly to cycle between the different modes: Auto, Cool, Dry (Dehumidifier), and Fan.
- TEMPERATURE SETTING - Press the ▼ button to decrease the temperature when the unit is on. Stop pressing the button when the desired temperature is displayed. Temperature range is 61°F-90°F. Press the ▲ button to increase the temperature when the unit is on. Stop pressing the button when the desired temperature is displayed. Temperature range is 61°F-90°F.
- FAN - Press the FAN button to turn on the fan mode.
FAN HIGH –Press this button to set the fan speed to high. Can be used in COOL or FAN mode.
FAN MED –Press this button to set the fan speed to medium. Can be used in COOL or FAN mode.
FAN LOW –Press this button to set the fan speed to low. Can be used in COOL or FAN mode.
- SLEEP MODE - Sleep mode can be activated under Cool mode, Dry mode, Auto mode, and Fan mode. Press the SLEEP button on the remote control, When in SLEEP mode, the fan will run on low to keep fan noise at a minimum. The temperature setting will gradually increase to 2irc F above the original set temperature for each of first 2 hours. The unit will keep operating the same temperature until the sleep mode is turned off.
- ENERGY SAVER - Press the ENERGY SAVER button to turn on Energy Saver mode. When the unit is in Energy Saver mode, the energy saver light will turn on. Selecting Energy Saver mode will cycle the fan off and on with the compressor to limit energy consumption. Use this feature when the room is unoccupied and a greater range of room temperature is acceptable.
- TIMER - Press the TIMER button when the unit is off to set up the Auto-on timer. The hour indicator on the digital display will start flashing. Press the ▲ or ▼ button to set timer within 1-24 hours. Press the TIMER button when the unit is on to set up the Auto-off timer. The hour indicator on the digital display will start flashing. Press the ▲ or ▼ button to set timer within 1-24 hours. To cancel the timer, press the TIMER button repeatedly until the timer mode is off.
- °C /°F - Press the °C /°F button to switch the temperature between Celsius and Fahrenheit.
- MYTEMP MODE - Press the MYTEMP MODE button to change the thermostat sensor from the air conditioner to the remote location. When Mytemp mode is activated, current set temperature will flash 3 seconds on digital display. The air conditioner will cool the area depending on the location and set temperature of the remote control. Take the remote control with you so the air conditioner cools the room to your location.
- CHILD LOCK - Press this button to lock/unlock the remote control buttons.
USING YOUR AIR CONDITIONER
-
Freezing Conditions: This is a cooling only air conditioner. It is not designed for freezing outdoor conditions. It must not be used in freezing outdoor conditions.
-
Remote Control: To ensure proper operation when using the remote control, aim the remote directly at the signal receiver on the air conditioner.
-
The remote control has a signal range up to 20 feet.
• Make sure nothing is blocking the remote control signal from being received by the air conditioner.
-
Make sure the batteries are installed correctly and still have power.
-
Cooling Mode: Use the Cool mode at High, Medium, Low fan speed when cooling is needed. Use the temperature ▲or▼buttons to set the desired temperature between 61°F-90°F.
-
Once the temperature is set, the compressor will cycle on and off to keep the room temperature at the set temperature level. The lower the set thermostat temperature, the cooler the room will be. The higher the set thermostat temperature, the warmer the room will become.
- For Normal Cooling - set the mode to Cool and the Fan to High or Med with the temperature set in the Middle.
- For Maximum Cooling - set the mode to Cool and the Fan to High with a lower set temperature.
- For Quieter & Nighttime Cooling - set the mode to Cool and the Fan to Low with the temperature set in the middle.
4. Energy Saver Mode:
- When the Energy Saver mode is ON, the fan will cycle on and off with the compressor. This results more winder variations of room temperature and humidity. Normally, it is used when the room is occupied. The fan may continue to run for a short time after the compressor cycles off.
-
When the Energy Saver mode is OFF, the fan runs all the time in fan or cool mode.
-
Fan Only Mode: Use Fan Only mode at High, Medium, or Low fan speed to provide air circulation and filtering without cooling. Since Fan Only setting does not provide cool, a set temperature cannot be entered. The room temperature will appear in the display.
- Loss of Power Protection: If power to the air conditioner is lost or interrupted, the air conditioner will automatically restart in the setting last used prior to power loss. Timer will be cancelled when power is lost or interrupted. You may need to set a new timer if desired.
- Air Direction: Use the lever on the front air vents to adjust the airflow direction. You can direct the airflow to left, right, up or down. The lever is located on the lower left and right side of the air vent.
- Auto Mode: The air conditioner will automatically choose Cool or Fan mode based on current room temperature.
- Ventilation: In order to maintain the best cooling condition, pull the Fresh Air Lever to close the vent. When fresh air is necessary, push the Fresh Air Lever to open the vent allowing fresh air being re-circulated in the room.

natural_image
Line drawing of an air conditioner unit with a close-up inset showing airflow direction (no text or symbols)
Fresh Air Lever
CARE AND CLEANING
Clean your air conditioner to keep it looking new and to minimize dust build up.
Air Filter Cleaning
The air filter should be checked at least once every month to see if it needs cleaning. Trapped particles and dust can build up in the filter and may decrease airflow as well as cause the cooling coils to accumulate frost. To clean the air filter:
- Remove the filter by pulling down on the in-dents of the filter door on the front of the unit. (See FIG. 13)
- Wash the filter using liquid dish soap and warm water. Rinse the filter thoroughly. Gently shake the filter to remove excess water.
- Let the filter dry completely before placing it into the air conditioner.
- If you do not wish to wash the filter, you may vacuum the filter to remove the dust and other particles.

Wear and Tear
To minimize wear and tear on the air conditioner, always wait at least 3 minutes before changing modes. This will help prevent the compressor from overheating and the circuit breaker from tripping.
Cabinet Cleaning
To clean the air conditioner cabinet:
- Unplug the air conditioner to prevent shock or a fire hazard. The cabinet and front panel of the air conditioner may be dusted with an oil-free cloth or washed with a cloth dampened in a solution of warm water and mild liquid soap. Rinse thoroughly with a damp cloth and wipe dry.
- Never use harsh cleaners, wax or polish on the cabinet front.
- Be sure to wring excess water from the cloth before wiping around the controls. Excess water in or around the controls may cause damage to the air conditioner.
Winter Storage
To store the air conditioner when it is not in use for an extended period of time, remove it carefully from the window according to the installation instructions and cover it with plastic or place it in the original box.
Error Codes
| Error Codes | Description |
| E2 Room temperature | perature sensor failure |
| E3 Room temperature p | ipe sensor failure |
If the Error Codes continue to display after unplugging and re-plugging the power cord, call our customer service for further solution.
TROUBLESHOOTING
| PROBLEM | POSSIBLE CAUSES | SOLUTIONS |
| The Air Conditioner will not start | The air conditioner is unplugged | Make sure the air conditioner plug is pushed completely into the out- et. |
| The fuse is blown/circuit breaker is tripped. | Check the main fuse/circuit breaker box and replace the fuse or reset the breaker. |
| Power Failure | The unit will automatically re-start when power is restored.There is a protective time delay (approx. 3 minutes) to prevent tripping of the compressor overload. For this reason, the unit may not start normal cooling for 3 minutes after it is turned back on. |
| The current interrupter device is tripped. | Press the RESET button located on the power cord plug.If the RESET button will not stay engaged, discontinue use of the air conditioner and contact a qualified service technician. |
| The Air Conditioner does not cool as it should | Airflow is restricted | Make sure there are no curtains, blinds, or furniture blocking the front of the air conditioner |
| The temperature control may not be set correctly. | Lower the set thermostat tempera-ture |
| The air filter is dirty | Clean the filter. See the Cleaning and Care Section of the manual. |
| The room may be too warm | Please allow time for the room to cool down after turning on the air conditioner. |
| Cold air is escaping | Check for open furnace registers and cold air returns |
| The Cooling Coils are frozen | See “Air Conditioner Freezing Up” below. |
| The Air Conditioner is freezing up | Ice blocks the air flow and stops the air conditioner from cooling the room | Set the MODE dial to HIGH FAN or HIGH COOL and set the ther-mostat to a higher temperature |
| The Remote Control is not working | The batteries are inserted incorrectlyThe batteries may be dead | Check the position of the batteries.Replace the batteries |
| Water is dripping outside | Hot and Humid weather. | This is normal |
| Water is dripping inside the room | The air conditioner is not correctly tilted outside. | For proper water drainage, make sure the air conditioner is slightly tilted downward from the front of the unit to the rear. |
| Water collects in the base pan | Moisture removed from the air is draining into the base pan. | This is normal for a short period in areas with low humidity and normal for a longer period in areas with high humidity. |
Warranty
Soleus Home Comfort warrants the accompanying Soleus Air Air Conditioner to be free of defects in material and workmanship for the applications specified in its operation instruction for the period of parts specified below.
5 YEARS FOR COMPRESSOR
2 YEAR FOR OTHER COMPONENTS
This warranty shall not apply to broken or marred cabinets, accessories, knobs, filters or routine maintenance. This warranty does not apply to uncrating, setup, installation, removal of the product for repair or reinstallation of the product after repair.
This warranty does not apply to repairs or replacements necessitated by any cause beyond the control of Soleus Home Comfort including, but not limited to, any malfunction, defect or failure caused by or resulting from unauthorized service or parts, improper maintenance, operation contrary to furnished instructions, shipping or transit accidents, modification or repair by the user, abuse, misuse, neglect, accident, incorrect power line voltage, fire, flood or other Acts of God, or normal wear and tear.
Warranty service must be performed by a qualified HVAC contractor. Soleus Home Comfort maintains a centralized service network to provide parts and assist in resolving service problems if difficulties are encountered. Soleus Home Comfort agress to provide service information, sell repair parts and reimburse the dealer / serviceman for parts in accordance with Soleus Home Comfort's Policies and Procedures.
SOLEUS HOME COMFORT MAINTAINS THAT ALL WARRANTIES, INCLUDING IMPLIED WARRANTY OR MERCHANTABILITY ARE LIMITED TO THE TERMS AND CONDITIONS SPECIFIED ABOVE. SOLEUS HOME COMFORT DISCLAIMS ANY LIBILITY FOR CONSEQUENTIAL OR INCIDENTAL DAMAGES AND IN NO EVENT SHALL SOLEUS HOME COMFORT'S LIABILITY EXCEED THE RETAIL VALUE OF THE AIR CONDITIONER.
This warranty covers only new products purchased from our authorized dealers or retailers. It does not cover internet sales, used, salvaged, or refurbished products.
FOR TECHNICAL SUPPORT AND WARRANTY SERVICE
Please Call (888) 876-5387
Comf
www.soleushomecomfort.com


