
T120 - Screen IBM - Free user manual and instructions
Find the device manual for free T120 IBM in PDF.


| Product Type | CRT Monitor |
| Brand | IBM |
| Model | T120 |
| Display Size | 15 inches (diagonal) |
| Maximum Resolution | 1024 x 768 pixels |
| Dimensions (W x H x D) | 360 x 370 x 380 mm |
| Weight | 12.5 kg |
| Power Consumption | 75 W (typical) |
| Input Connector | VGA (DB-15) |
| Display Type | Color CRT with antiglare coating |
| Refresh Rate | 60-75 Hz |
| Cleaning Instructions | Use a soft, dry cloth. Do not use liquids or ammonia-based cleaners. |
| Safety Features | CE, FCC compliance; automatic degaussing |
| Energy Star | Yes |
| VESA Mount | Not compatible (fixed stand) |
| Repairability | Serviceable by qualified technician; CRTs contain high voltage |
Frequently Asked Questions - T120 IBM
User questions about T120 IBM
0 question about this device. Answer the ones you know or ask your own.
Ask a new question about this device
Download the instructions for your Screen in PDF format for free! Find your manual T120 - IBM and take your electronic device back in hand. On this page are published all the documents necessary for the use of your device. T120 by IBM.
USER MANUAL T120 IBM
Second Edition (July/2006) @ Copyright International Business Machines Corporation 2005. All rights reserved. US Government Users Restricted Rights – Use, duplication or disclosure restricted by GSA ADP Schedule Contract with IBM Corp.
Note: For important information, refer to the Monitor Safety and Warranty manual that comes with this monitor.
Safety (Read first) 2
Setting up the monitor....3
Product Description....3
Handling Instructions....3
Workplace Preparation 4
Adjusting the Monitor Position 4
Working Practices 4
Caring for your Monitor....5
Connecting your Monitor for Analog....6
Connecting your Monitor for Digital 7
Switching on your Monitor 8
Device Driver Installation 9
Windows 2003/Me 9
Windows XP 10
Windows Vista 11
Auto Setup 12
Auto Setup....12
Auto Setup for DOS....13
Auto Setup for Windows 2003, Windows Me ,Windows XP or Windows Vista...... 14
Manual Setup 15
Adjusting Your LCD Monitor 16
User controls 16
On-screen display (OSD) controls 18
General Information 20
Display modes 20
Power Management 22
Product Disposal 22
Troubleshooting 23
Further Help 26
Specifications 26
Product recycling and disposal....27
IBM®
Safety: Read first
Before installing this product, read the Safety Information.
The IBM TFT LCD T120 Monitor works with a computer with a suitable
on-board sub-system or Video Adapter card that can support UXGA 1600 x 1200, SXGA 1280 x 1024, XGA 1024 x 768, SVGA 800 x 600, or VGA 640 x 480 at 60 Hz.
The product package should include the following items:
- User's Guide and Installation Files CD
• Monitor Safety and Warranty Guide - Quick Installation Guide
• Power Cord For Model 4945-20U - IBM T120 Monitor
• Analog & Digital Interface Cables
Handling Instructions
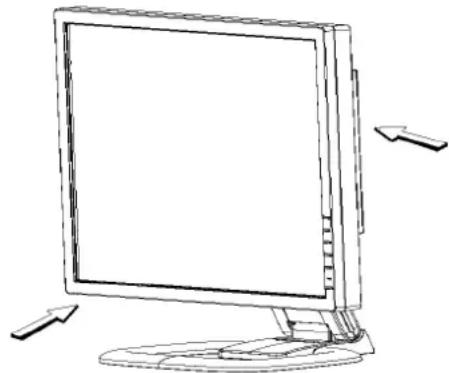
Do not support the monitor within the screen area. The Liquid Crystal Display is glass and can be damaged by rough handling or excessive pressure.
- Lift the monitor by placing your hands where indicated below.
natural_image
Line drawing of a flat-screen computer monitor with directional arrows indicating orientation (no text or symbols)- Before using your monitor for the first time, remove the clear protective film from the front of the screen.
Workplace Preparation

This section gives advice on what you should consider before you set up your monitor.
Height
Position the monitor so that the top of the screen is slightly below your eye level when you sit at your workstation.
Orientation
Choose a position that gives the least reflection from lights and windows, usually at a right angle to any windows. Position the monitor directly in front of you so that you do not have to twist your body to use it. Tilt the monitor to a comfortable viewing angle.
Adjusting the Monitor Position
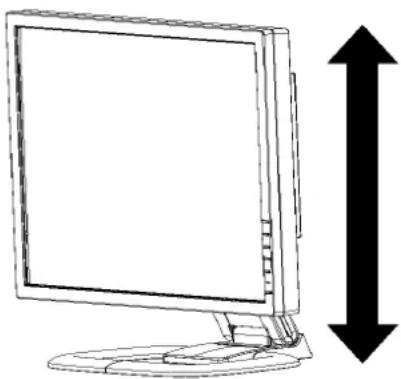
The monitor offers the adjusting height, rake, and rotation possibility that enable the monitor to be optimally adjusted for the respective user and the respective situation.
T120
You can tilt the screen backward and forward, as well as lift up and down as shown below:
natural_image
Line drawing of a computer monitor with a vertical double-headed arrow indicating upward motion (no text or symbols)Working Practices

This section gives advice on how you can work comfortably and reduce fatigue.
Rest
Take regular breaks. Vary your posture, stand up and stretch occasionally as prolonged use of computer workstations can be tiring.
Back
Sit back in your chair and use the backrest.
Hands
Adjust the seat height so that your forearms are approximately horizontal and your wrists are straight when using the keyboard. Your upper arms should be relaxed with your elbows near your body.
Use a light touch on the keyboard, keeping your hands and fingers relaxed. Allow a space in front of the keyboard to rest your wrists when not typing. Consider using a wrist pad.
Eyesight
Working with monitors, in common with any prolonged close work, can be visually demanding. Look away from the screen periodically and have your eyesight checked regularly.
Screen settings
Set the screen brightness and contrast to a comfortable level. You may have to adjust this as the lighting changes during the day. Many application programs let you select color combinations which can help you to view in comfort. See the User controls section on page 15 for more information.
Caring for your Monitor
Be sure to turn off the power before you perform any maintenance on the monitor. Clean your monitor as follows:
• Gently wipe the device covers and the screen with a soft cloth.
- Remove finger marks and grease with a damp cloth and mild detergent; do not use solvents or abrasives.
- Never use flammable cleaning material to clean your IBM monitor or any other electrical apparatus.
Connecting your Monitor for Analog
Be sure to read the 'Safety' Information located in the Monitor Safety and Warranty Guide before carrying out this procedure.
- Turn off your computer and all attached devices.
- Tilt the monitor all the way forward.
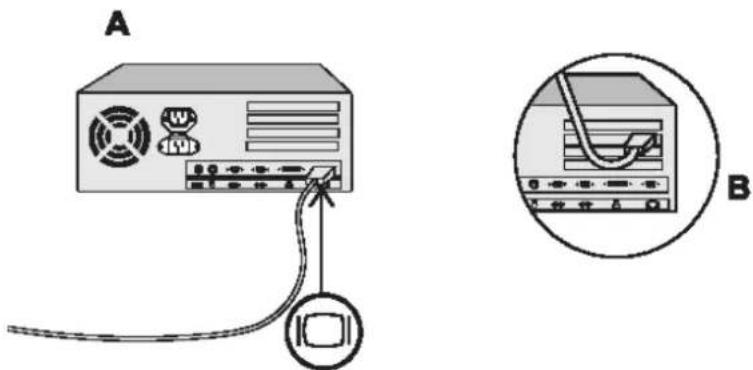
- Connect the analog signal cable to the VGA video port on the back of your computer.
This port might be directly attached to your computer (figure A), or it might be part of a video adapter card (figure B). The analog video port on your computer or video adapter card is normally blue to match the blue connector on your monitor's analog video cable.
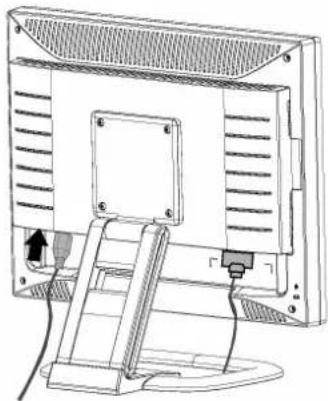
- Attach the power cord at the back of the monitor where it says "AC IN". The arrow in the drawing below indicates the approximate area:
natural_image
Line drawing of a computer monitor with a stand and cable, showing no text or symbols- Insert the power plug into a properly grounded electrical outlet.
Connecting your Monitor for Digital
- Turn off your computer and all attached devices
- Tilt the monitor all the way forward.
- Connect the DVI connector to the DVI port located on the back of the Monitor. See picture below.
Connecting DVI Cable
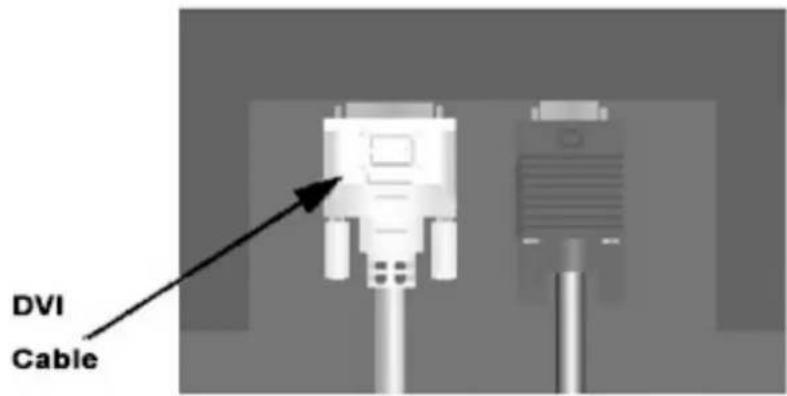
- Connect the other end of the signal cable to the DVI port located on the back of the graphics adapter. See picture below.
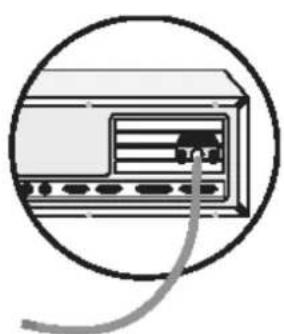
natural_image
Diagram of a computer monitor with cable inserted, enclosed in a circle (no text or symbols)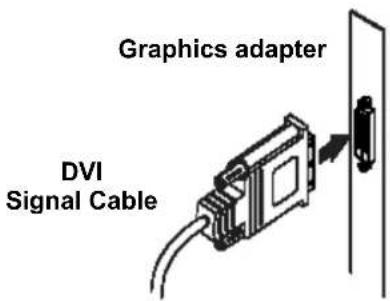
Switching on your Monitor
- Switch on the power source and your computer.
- Switch on your monitor by pushing and releasing the power switch marked.
(To switch off your monitor, push and release the power switch again.) - To update or install device drivers, follow the instructions in the Device Driver Installation section on page 9.
- To optimize the displayed image, run Auto Setup by following the instructions in the Auto Setup section on page 12.
Device Driver Installation
Driver Installation for Windows 2003 or Windows Me
This section must be completed before continuing with the Windows 2003, Windows Me Auto Setup on page 13

On LCD monitors, unlike
CRTs, a faster refresh rate
does not improve display quality. IBM recommends using 1600 x 1200 at a refresh rate of 60Hz.
To use the Plug and Play feature in Microsoft® Windows® 2003 or Microsoft Windows Millennium Edition (Me) files should be loaded from the IBM Monitor CD.
- Turn off the computer and all attached devices.
- Ensure that the monitor is connected correctly.
- Turn on the monitor and then the system unit. Allow the system to boot into Windows 2003 or Windows Me.
- Open the DISPLAY PROPERTIES window by clicking START, SETTINGS, CONTROL PANEL and then double-clicking the DISPLAY icon.
- Click the SETTINGS tab.
- Click the ADVANCED button.
- Click the MONITOR tab.
- Click theROPERTIES button.
-
Click theRIVER tab.
-
Open the UPGRADE DEVICE DRIVER WIZARD window by clicking on UPDATE DRIVER and then click the NEXT button.
-
Select the "Display a list of the known drivers for this device so that I can choose a specific driver" and then click the NEXT button.
-
Insert the Setup CD into the CD drive and click the HAVE DISK button.
-
Click OK.
-
Ensure that the CD drive letter is selected, and then select the 'Drivers' folder.
-
Choose IBM 4945 and click OK. The files will be copied from the CD to your hard disk drive.
-
Close all open windows and remove the CD.
-
Restart the system.
The system will automatically select the maximum refresh rate and corresponding Color Matching Profiles.
Driver Installation for Windows XP
This section must be completed before continuing with the Windows XP Auto Setup on page 13

On LCD monitors, unlike CRTs, a faster refresh rate does not improve display
quality .IBM recommends using1600_x 1200 at a refresh rate of 60Hz.
To use the Plug and Play feature in Microsoft® Windows® XP files should be loaded from the IBM Monitor CD.
- Turn off the computer and all attached devices.
- Ensure that the monitor is connected correctly.
- Turn on the monitor and then the system unit. Allow the system to boot into Windows XP.
- Open the DISPLAY PROPERTIES window by clicking START, SETTINGS, CONTROL PANEL and then double-clicking the DISPLAY icon.
- Click the SETTINGS tab.
- Click the ADVANCED button.
- Click the MONITOR tab.
- Click the PROPERTIES button.
- Click theRIVER tab.
- Open the Hardware Update Wizard window by clicking on UPDATE DRIVER and then click the NEXT button.
- Select the "Install from a list or Specific location (Advanced)" and then click the NEXT button.
- Insert the Setup CD into the CD drive: and click the HAVE DISK button.
- Click OK.
- Ensure that the CD drive letter is selected, and then select the 'Drivers' folder.
- Choose IBM 4945 and click OK. The files will be copied from the CD to your hard disk drive.
- Close all open windows and remove the CD.
- Restart the system.
The system will automatically select the maximum refresh rate and corresponding Color Matching Profiles.
Driver Installation for Windows VISTA
This section must be completed before continuing with the Windows VISTA Auto

Setup on page 13
On LCD monitors, unlike CRTs, a faster refresh rate does not improve display quality .IBM recommends using 1600 x1200 at a fresh rate of 60Hz
To install the device driver in use the Plug and Play feature in Microsoft® Windows® Vista files should be loaded from the IBM Monitor CD.
- Turn off the computer and all attached devices.
- Ensure that the monitor is connected correctly.
- Turn on the monitor and then the system unit. Allow the system to boot into Windows Vista
- Open the DISPLAY PROPERTIES window by clicking START, CONTROL PANEL and then double-clicking the Personalization icon.
- Click the display Settting button.
- Click the advanced Setting button.
- Click the Monitor tab.
- Click the Properties button, Click the Continue button
- Click the DRIVER tab.
- Open the "Update Driver Software-Generic PnP Monitor" window by clicking on Update Driver and then click the "Browse my computer for driver software" button.
- Select the "Let me pick from a list of device on my computer"
- Insert the Setup CD into the CD drive: and click the HAVE DISK button.
- Ensure that the CD drive letter is selected.
- Click OK.
- Choose X:\driver\windows vista driver\IBM4945 and click OK. and click OK. The files will be copied from the CD to your hard disk drive.
- Close all open windows and remove the CD.
- Restart the system.
The system will automatically select the maximum refresh rate and corresponding Color Matching Profiles.
Auto Setup

The Setup Utility included on the installation CD is for displaying dot patterns.
They do not replace or modify the display driver.
The Auto Setup instructions require the monitor to be warmed up for 15 minutes. This is not required for normal operation.
By pressing the Auto key, you will have direct access to Auto Adjustment.

The AUTO SETUP process only applies to the current screen mode. When a new
mode is selected, repeat this section to reset the monitor.
Auto setup is not required when using digital input
When you first use your monitor you must perform Auto Setup. This procedure sets up your monitor to process the video signals from your computer without image discoloration or smearing. After you perform Auto Setup, the settings are stored and used each time you turn on the monitor.
To optimize the displayed image a set-up utility is provided on the CD. Operation of the utility is dependent on the operating system on your computer. For correct operation locate the operating system on your computer from the table below and follow the appropriate instructions. You can choose to run AUTO SETUP for each operating system that you use. This means that if you sometimes use your monitor while running a version of Windows and sometimes also use it from within DOS (not a DOS window), you must run AUTO SETUP for both Windows and DOS. You can run versions of AUTO SETUP in any order.
| Operating System | Corresponding Auto Setup procedure |
| DOS | Auto Setup for DOS on page 13 |
| Windows 2003, Windows Me, Windows XP or Windows Vista | Auto Setup for Windows 2003, Windows Me, Windows XP or Windows Vista on page 14 |
Before you begin AUTO SETUP for your computer:
Make sure the computer's video mode is set in the range of the supported screen resolution shown in the Table on page 21.
You should perform AUTO SETUP for each screen mode you use.
Auto Setup for DOS

If the monitor is in power saving mode, it may
automatically turn off while you are waiting for it to warm up. If this happens, switch off the monitor and switch it on again after a few seconds.

If you are using PC-DOS/V, change to U.S. mode by typing 'CHEV US' and pressing
ENTER at the command prompt.

The size and diversity of the dot pattern varies with the screen resolution.
To set up the monitor automatically in DOS, do the following:
- Turn on the monitor first; then turn on the computer.
If the message Attention No Signal is displayed, or if nothing is displayed, check:
- That the video interface cable is connected properly.
- The correct video adapter card is installed.
-
The correct supported display mode is selected for your computer.
-
Wait approximately 15 minutes, until the monitor warms up.
- Insert the User's Guide and Installation Files CD into the computer CDROM drive.
- Display the command prompt screen of the DOS full-screen display.
- Type d:\ (change the drive letter to match your CD-ROM drive if it is not drive D).
- Type TESTPATD and press ENTER.
- Select from the screen the number for the color or text mode you want to set up.
- Select from the screen the number for the video mode you want to set up. You can repeat this process for as many of the color and video modes as you need.
- When the dot pattern appears, press the AUTO button at the bottom of the monitor. This activates the AUTO SETUP procedure, which will optimize the display settings with the provided dot-patterns.
The screen will momentarily turn black while auto adjustment proceeds.
- When finished, the Auto Adjustment menu disappears and the screen returns to a normal display.
- Press the ESCAPE key to exit the test pattern program.
- Type Exit at the command prompt to return to Windows.
If you use other operating systems, perform the appropriate Auto Setup for those systems using instructions given in "Auto Setup for Windows 2003, Windows Me, Windows XP or Windows Vista on page 14".
Auto Setup for Windows 2003, Windows Me, Windows XP or Windows Vista
To set up the monitor automatically in Windows 2003, Windows Me, Windows XP or Windows Vista, do the following:
i If the monitor is in power saving mode, it may automatically turn off while you are waiting for it to warm up.
- Turn on the monitor first; then the computer.
If the message Attention No Signal is displayed, or if nothing is displayed, check:
- That the video interface cable is connected properly.
- The correct video adapter card is installed.
- The correct supported display mode is selected for your computer.
- If the message "Input not supported" is displayed, configure your computer for 1600 ×1200@60HZ
i The size and diversity of the dot pattern varies with the screen resolution.
- Wait approximately 15 minutes, until the monitor warms up.
- Drag the icon bar and tool bar, if they are displayed, to the bottom of the screen.
- Insert the User's Guide and Installation CD into the computer CDROM drive.
- Check the operating system installed on your computer and follow the instructions from the table below.
Operating system installation steps
| Operating System | Step1 | Step2 | Step3 |
| Windows 2003, Windows XP, Window 2000 server Window Vista | Select START | Select RUN | Type d:\TESTPAT (change the drive letter to match your CD-ROM drive if it is not drive D) and press ENTER |
- When the test pattern appears, press the AUTO button at the bottom of the monitor. This activates the AUTO SETUP procedure, which will optimize the display settings with the provided test patterns.
The screen will momentarily turn black while auto adjustment proceeds.
-
When finished, the Auto Adjustment menu disappears and the screen returns to a normal display.
-
Press the ESC key to return to Windows.
You have completed the monitor setup for Windows. If you are using the DOS operating system, go to Auto Setup for DOS on page 13.
Manual Setup
if the monitor is in power saving mode, it might automatically turn off while you are waiting for it to warm up.
Manual setup is not required when using digital input.
Normally, you can complete the setup procedure using AUTO SETUP; however, if your screen image is still distorted after you perform AUTO SETUP or the Installation CD does not run on your system, perform MANUAL SETUP.
- Have your monitor turned on for about 15 minutes, until the monitor warms up.
- Display the image you most frequently use on the screen then go to windows shut down mode.
-
Press the OSD Enter button MENU at the bottom of the monitor to display the initial OSD menu.
-
Use the or button and MENU to select Image Setup then adjust clock or Focus
(a) "Clock" (pixel frequency) controls the number of pixels scanned by one horizontal sweep.
If the frequency is not correct, the screen shows vertical stripes and the picture does not have the correct width.
(b) "Focus" adjusts the Phase of the pixel clock signal. With a wrong phase adjustment the picture has horizontal disturbances in light picture.
- Use the or V button to manually adjust and optimize the screen quality. Save by pressing the Exit button AUTO once & press 2 more times to exit the OSD menu.
You have completed monitor setup.
Adjusting Your LCD Monitor
User controls
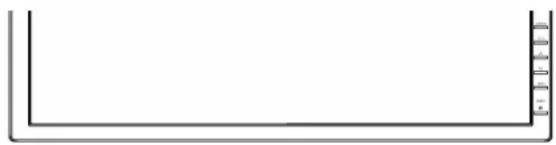
natural_image
Simple line drawing of a U-shaped frame with vertical tick marks (no text or symbols)User control features
- Direct access controls when OSD is not displayed,
| Icon | Control | Description |
AUTO | Image Setup | Activates automatic image adjustment. |
| Brightness | Directly accesses to Brightness on the OSD menu. | |
MENU | OSD Enter | Displays the OSD main menu. |
| Power Switch | Switches the monitor on and off. | |
 | Contrast | Directly accesses to contrast on the OSD menu. |
| SOURCE | Input | Switches between DVI and D-Sub |
- Main OSD menu when OSD is displayed,
| Icon Control Description | ||
| AUTO | Exit | Exits from menus and sub-menus Exits the OSD. |
| ^ | Up Arrow | Moves the cursor to highlight icons and other options. |
| ∨ | Down Arrow | Moves the cursor to highlight icons and other options. |
| MENU | OSD Enter | Enters menus and sub-menus and selects the highlighted option. |
| SOURCE | Input | Switches between DVI and D-Sub |
i The image is already optimized for many display modes; however the user controls can be used to adjust the image to your liking.
OSD Operation
- Press the OSD Enter button to display the main OSD menu.
- Use the Arrow buttons to move among the icons. Select an icon and press OSD Enter to access that function. If there is a sub-menu, you can move between options using the Arrow buttons, then press OSD Enter MENU to select that function. Use the Arrow buttons to make adjustments. Press the MENU button to save.
- Press the Exit (AUTO) button to move backwards through the sub-menus and exit from the OSD.
OSD Lock / Unlock
- This feature allows you to secure the current control settings, so that they cannot be changed, while allowing you to adjust the brightness and contrast. You can unlock the OSD controls at any time using the same procedure.
- To lock the OSD, first turn off the monitor. Then, hold down the "Menu" key and press "Power" key once to turn on the monitor. This will lock the OSD and show the message "Attention OSD Locked".
When the OSD is locked, if you press the "Menu" key, the message "Attention OSD Locked" will be displayed.
When the OSD is locked, the "Power" key and Hot-Key functions are still available.
To unlock the OSD, first turn off the monitor. Then, hold down the "Menu" key and press the "Power" key once to turn on the monitor. The OSD will be unlocked.
On-screen display (OSD) controls

The LCD monitor needs time to become thermally stable the first time you turn it on each day. Thus, to achieve more accurate adjustments for parameters, allow the LCD monitor to warm up for at least 15 minutes before making any screen adjustments.
The settings adjustable with the user controls are viewed through the On-screen display (OSD). Press the OSD MENU button (MENU) to activate the OSD.
Initial appearance of OSD
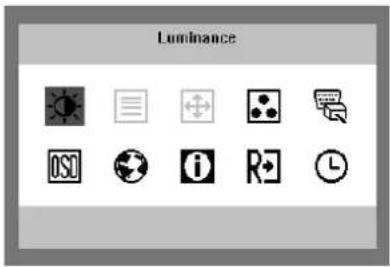
OSD functions
| Main Menu Item | Main Menu Icon | Sub Menu Item | Sub Menu Icon | Description |
| Luminance |  | Contrast |  | Contrast from Digital-register. |
| Brightness |  | Backlight Adjustment | ||
| Image Setup |  | Focus |  | Adjust Picture Phase to reduce Horizontal-Line noise |
| Clock |  | Adjust picture Clock to reduce Vertical-Line noise. | ||
| Image Position |  | H. Position |  | Adjust the horizontal position of the picture. |
| V. Position |  | Adjust the vertical position of the picture. | ||
| Color Temp. |  | Warm N/A Recall Warm Color Temperature from EEPROM. | ||
| Cool N/A Recall Cool Color Temperature from EEPROM. | ||||
| User / Red |  | Red Gain from Digital-register. | ||
| User / Green |  | Green Gain Digital-register. | ||
| User / Blue |  | Blue Gain from Digital-register. | ||
| Input Select |  | Analog | N/A | Select input signal from analog (D-Sub) |
| Digital | N/A | Select input signal from digital (DVI) | ||
| DDC/CI | N/A | Select "Enable" and "Disable" for DDC/CI function enable and disable. | ||
| OSD Setup |  | H. Position |  | Adjust the horizontal position of the OSD. |
| V. Position |  | Adjust the vertical position of the OSD. | ||
| OSD Timeout |  | Adjust the OSD timeout. | ||
| Language |  | English N/A Set OSD display language to English. | ||
| Deutsch N/A Set OSD display language to German. | ||||
| Français N/A Set OSD display language to French. | ||||
| Español N/A Set OSD display language to Spanish. | ||||
| Italiano N/A Set OSD display language to Italian. | ||||
| 简体中文 | N/A | Set OSD display language to Simplified Chinese. | ||
| 日本語 | N/A Set OSD display language to Japanese. | |||
| Information |  | Information N/A | Show the resolution, H/V frequency and current input | |
| Reset |  | Yes N/A Adjusts all controls to factory settings. | ||
| No N/A Do not execute reset, return to main menu. | ||||
| Exit |  | N/A N/A | Exit OSDNote: Some models do not have this function. | |
| Key Repeat Rate |  | Fast | N/A | Control key repeat rate.Note: Some models do not have this function. |
| Slow | ||||
| None | ||||
General Information
Display modes
The display mode the monitor uses is controlled by the computer.
Therefore, refer to your computer documentation for details on how to change display modes.
The image size, position and shape might change when the display mode changes. This is normal and the image can be readjusted using AUTO SETUP and the monitor controls.
Unlike CRT monitors, which require a high refresh rate to minimize flicker, TFT technology is inherently flicker-free. If possible, configure your computer for 1600 ×1200 address ability at 60Hz vertical refresh rate.
For the display modes listed on the next page, the screen image has been optimized during manufacture.

To optimize image quality,
you may want to run AUTO
Setup after switching
between modes shown in this
section. AUTO SETUP can fix the
problems in most cases. See Auto
Setup for DOS on page 13 for
details.
Factory Set Display Modes
| Addressability Refresh Rate | |
| 640 × 350 70 Hz | |
| 640 × 480 60 Hz | |
| 640 × 480 72 Hz | |
| 640 × 480 75 Hz | |
| 720 × 400 70 Hz | |
| 800 × 600 60 Hz | |
| 800 × 600 72 Hz | |
| 800 × 600 75 Hz | |
| 1024 × 768 ^ 60 Hz | |
| 1024 × 768 | 70 Hz |
| 1024 × 768 75 Hz | |
| 1280×1024 | 60 |
| 1280×1024 | 75 |
| 1600×1200 | 60Hz |
Hz
Hz
† Recommended
Note: VESA timings conform to detailed in the VESA "Display Monitor Timing
Specification". Version 1.0, Revision 0.8, dated 09/17/98.
Power Management

If your computer has
previously been used with a
CRT monitor and is currently
configured to a display mode
outside the range that the Flat Panel monitor can display, you may need to re-attach the CRT monitor temporarily until you have re-configured the computer, preferably to 1600 x 1200 at 60Hz.
To benefit from power management, the monitor must be used in conjunction with a computer that implements the Video Electronics Standards Association (VESA) Display Power Management Signalling (DPMS) Standard.
The power management feature is invoked when the computer recognizes that you have not used your mouse or keyboard for a user-definable period. There are several states as described in the table below.
As an ENERGY STAR ^® Partner, IBM has determined that this product meets the ENERGY STAR ^® guidelines for energy efficiency.
For optimal performance, switch off your monitor at the end of each working day, or whenever you expect to leave it unused for long periods during the day.
| State | Power Indicator | Screen | Restoring Operation | Compliance |
| On | Steady green Normal | |||
| Power saving | Amber Blank | Press a key or move the mouse. * | ENERGY STAR® |
* There may be a slight delay before the picture reappears.
Product Disposal
The fluorescent lamp in the liquid crystal display contains mercury. Dispose of it as required by local ordinances and regulations.
Troubleshooting

To optimize image quality,
you may want to run AUTO
Setup again before
consulting this section. In
most cases, AUTO SETUP can fix
the problems. See Auto Setup for
DOS on page 13 for details.
If you have a problem setting up or using your monitor, you might be able to solve it yourself. Before calling your retailer or IBM, try the suggested actions that are appropriate to your problem.
| Problem | Possible Cause | Suggested Action | Reference |
| Computer does not boot after the graphics adapter is installed | There is another Graphics adapter in the computer | ◆ Remove the other graphics adapter plugged into one of the expansion slot.◆ If the card is built-in to the motherboard, check your system manual for instructions on how to disable the built-in adapter. | Connecting your Monitor section on page 6~8 |
| The screen image is garbled or unusable (rolling screen images, overlapping screen images or a blank screen) | The display driver is trying to use a setting your monitor does not support | ◆ Select the correct monitor resolution, 1600 x 1200 at 60 Hz. | Connecting your Monitor section on page 6~8 |
| Screen is blank and power indicator is off | No power to monitor | ◆ Ensure that the electrical outlet and the monitor are both switched on.◆ Check that the power cord is firmly plugged into the electrical outlet and the power supply unit.◆ If the power cord plug has a removable fuse, replace it.◆ Try another power cord.◆ Try another electrical outlet. | Connecting your Monitor section on page 6~8 |
| Screen is blank and power indicator is steady green | Brightness and Contrast may be too low | ◆ Adjust brightness and contrast. | User controls section on page 15 |
| Screen is blank and power indicator is Amber | The monitor is in the Power saving status | ◆ Press any key on the keyboard or move the mouse to restore operation.◆ Check the Power Management software on your computer | Power Management section on page 22 |
| Screen shows “Attention - No Signal” message | The monitor is not receiving a video signal | ◆ Check that the signal cable is firmly connected to the computer.◆ Check that no pins are bent in the signal cable connector. | Connecting your Monitor section on page 6~8 |
| Screen shows “Input Not Supported” message | Display mode of the computer is outside the range of the monitor | ◆ Reconfigure the computer to use a supported display mode. | General Information section on page 20 |
| Image appears to be smeared | There are noises in the video signal | ◆ Select Image Setup menu in the OSD. Then select MANUAL to adjust Phase/Clock settings. | User Controls section on page 16 |
| Image appears to be discolored | The Color setting may be incorrect | ◆ Adjust the Color settings. | User Controls section on page 16 |
| A few bright or dark dots are visible on the screen. | ◆ This is an intrinsic characteristic of the TFT LCD technology and is not an LCD defect. | None |
Further Help

If possible, stay by your
computer. Your Technical
Support Representative may
wish to go through the problem with you during the call.

More help, late-breaking
news and details of the latest
accessories for these
products may be found on the worldwide web at: http://www.pc.ibm.com/us/accessories
If you are unable to correct the problem yourself, you may seek further help as follows:
Call the IBM support center®.
In the US call 1-800-772-2227
In Canada (Toronto Only) call 416-383-3344
In Canada (all others) call 1-800-565-3344
In other countries contact your dealer, retailer, or other IBM authorized Servicer.
Before calling, please have available as much of the following information as possible:
-
Model and serial number from the label on your monitor.
-
Purchase receipt.
-
Description of problem.
-
Computer type and model.
-
System configuration (hardware fitted, etc.).
-
System BIOS version number.
-
Operating System and version number.
-
Display driver version number.
-
Video Adapter Type.
This color monitor (4945-HC1, 4945-20U, 4945-20X) uses a 20.1-inch TFT LCD
| Model Contents | T120 | |
| Dimensions Height: (max) | 416.6 mm (16.40 in.) | |
| 361.6 mm (14.24 in.) | ||
| Depth: 246.0 mm (9.69 in.) | ||
| Width: 445.6 mm (17.54 in.) | ||
| Weight Unpackaged: | 4.8 kg (10.58 lb) | |
| 6.3 kg (13.89 lb) | ||
| Image Viewable Image | 510.5 mm (20.1 in.) | |
| 408.0 mm (H) x 306 mm (V) | ||
| 0.255 mm | ||
| Power Input Supply Voltage: | 100-240 V ac, | |
| 60/50 ± 3Hz | ||
| 1.5A at 120 V ac | ||
| Power Consumption | Normal Operation: | < 60W |
| DPMS Stand-by: | < 2W | |
| DPMS Suspend: | < 2W | |
| DPMS off: | < 1.5W | |
| Switch off: | 0W | |
| Video Input (Analog) | Input Signal: | Analog Direct Drive, |
| Horiz. Addressability: | 75 ohm 0.7 V | |
| Vert. Addressability: | 1600 pixels (max) | |
| Clock Frequency: | 1200 lines (max) | |
| 162 MHz | ||
| Video Input (Digital) | Interface: | DVI input, |
| Input Signal: | TMDS | |
| Horiz. Addressability: | 1600 pixels (max) | |
| Vert. Addressability: | 1200 lines (max) | |
| Clock Frequency: | 162 MHz | |
| Communications | VESA DDC: | 2 B |
| Supported Display Modes | VESA Standard modes between Horiz. Frequency: | 30 kHz - 91.1 kHz |
| 55 Hz - 85 Hz (1600x1200 limited to 60Hz) | ||
| Vert. Frequency: | ||
| Environment Temperature: | ||
| 10 to 35°C (5 to 95°F) | ||
| -20 to 60°C (-4 to 140°F) | ||
| -20 to 60°C (-4 to 140°F) | ||
| 10 to 80% | ||
| 10 to 90% | ||
| 10 to 90% | ||
| Lift 55mm | ||
| Swivel | N/A | |
| Tilt -5° / + 40° | ||
Product recycling and disposal
This unit must be recycled or discarded according to applicable local and national regulations. IBM encourages owners of information technology (IT) equipment to responsibly recycle their equipment when it is no longer needed. IBM offers a variety of product return programs and services in several countries to assist equipment owners in recycling their IT products. Information on IBM product recycling offerings can be found on IBM's Internet site or email address in the following table.
| Country Recycling information | |
| Japan | For company use: http://www-06.ibm.com/jp/pc/service/recycle/pcrecycle/ For Household use: http://www-06.ibm.com/jp/pc/service/recycle/personal/ |
| Australia | http://www-03.ibm.com/financing/au/gars/index.html |
| New Zealand http://www-03.ibm.com/financing/nz/gars/index.html | |
| Taiwan | http://www-8.ibm.com/financing/tw/gar/index.html |
| USA | http://www.ibm.com/ibm/environment/products/prp.shtml |
| Austria http://www-5.ibm.com/at/umwelt/recycling/produktion.html | |
| Belgium | http://www.ibm.com/be/weee/en/ http://www.ibm.com/be/weee/fr/ http://www.ibm.com/be/weee/nl/ |
| Czech Republic http://www-5.ibm.com/cz/environment/ | |
| Denmark http://www-5.ibm.com/dk/ibm/environment/recycle.html | |
| Estonia JPT@dk.ibm.com | |
| Finland http://www-5.ibm.com/fi/ibm/environment/envwork/recycling.htm | |
| Germany http://www-5.ibm.com/de/umwelt/ruecknahme/produktion.html | |
| Greece http://www-5.ibm.com/gr/recycling/ | |
| Hungary http://www-5.ibm.com/hu/kornyezet/ | |
| Ireland http://www-5.ibm.com/ie/weee/index.html | |
| Luxembourg http://www.ibm.com/be/weee/lu/fr/ http://www.ibm.com/be/weee/lu/en/ | |
| Netherlands http://www-5.ibm.com/nl/weee/ | |
| Portugal http://www.ibm.com/pt/weee/ | |
| Slovakia http://www-5.ibm.com/sk/environment/ | |
| Spain http://www-5.ibm.com/es/weee/ | |
| Sweden http://www-5.ibm.com/se/ibm/environment/ateranvandning.html#atertagna | |
| Norway http://www-5.ibm.com/no/ibm/environment/ateranvandning.html#atertagna | |
| France http://www-5.ibm.com/fr/weee/ | |

natural_image
Symbol of a trash bin crossed out by two diagonal lines (no text or numbers present)Notice: This mark applies only to countries within the European Union (EU) and Norway.
This appliance is labeled in accordance with European Directive 2002/96/EC concerning waste electrical and electronic equipment (WEEE). The Directive determines the framework for the return and recycling of used appliances as applicable throughout the European Union. This label is applied to various products to indicate that the product is not to be thrown away, but rather reclaimed upon end of life per this Directive.
In accordance with the European WEEE Directive, electrical and electronic equipment (EEE) is to be collected separately and to be reused, recycled, or recovered at end of life. Users of EEE with the WEEE marking per Annex IV of the WEEE Directive, as shown above, must not dispose of end of life EEE as unsorted municipal waste, but use the collection framework available to customers for the return, recycling, and recovery of WEEE. Customer participation is important to minimize any potential effects of EEE on the environment and human health due to the potential presence of hazardous substances in EEE. For proper collection and treatment, contact your local IBM representative.

- Safety (Read first) 2
- Setting up the monitor....3
- Device Driver Installation 9
- Auto Setup 12
- Manual Setup 15
- Adjusting Your LCD Monitor 16
- General Information 20
- Troubleshooting 23
- Specifications 26
- Product recycling and disposal....27
- IBM®
- Safety: Read first
- Handling Instructions
- Workplace Preparation
- Height
- Orientation
- Adjusting the Monitor Position
- T120
- Working Practices
- Rest
- Back
- Hands
- Eyesight
- Screen settings
- Caring for your Monitor
- Connecting your Monitor for Analog
- Connecting your Monitor for Digital
- Switching on your Monitor
- Device Driver Installation
- Driver Installation for Windows 2003 or Windows Me
- Driver Installation for Windows XP
- Driver Installation for Windows VISTA
- Auto Setup
- Auto Setup for DOS
- Auto Setup for Windows 2003, Windows Me, Windows XP or Windows Vista
- Manual Setup
- Adjusting Your LCD Monitor
- User control features
- OSD Operation
- OSD Lock / Unlock
- On-screen display (OSD) controls
- Initial appearance of OSD
- General Information
- Display modes
- Power Management
- Product Disposal
- Troubleshooting
- Further Help
- Product recycling and disposal
Brand : IBM
Model : T120
Category : Screen