Isochrone Trinity - Horloge maître Antelope - Free user manual and instructions
Find the device manual for free Isochrone Trinity Antelope in PDF.


| Product Type | Master Clock |
| Brand | Antelope |
| Model | Isochrone Trinity |
| Dimensions (W x D x H) | 19" x 10.5" x 1.75" (rack unit) |
| Weight | Approx. 5.5 kg |
| Power Requirement | 100-240 VAC, 50/60 Hz, 30W max |
| Clock Outputs | 8 x BNC (word clock), 2 x AES/EBU, 1 x 75Ω BNC (10MHz reference) |
| Sample Rates Supported | 44.1 kHz to 384 kHz, DSD64/128 |
| Jitter | < 1 ps RMS (typical) |
| Stability | ±0.1 ppm over temperature |
| Warm-up Time | 15 minutes for rated accuracy |
| Front Panel Display | LCD with status indicators |
| Remote Control | Ethernet (web interface) and USB |
| Cooling | Fanless, passive convection |
| Operating Temperature | 0°C to 50°C |
| Storage Temperature | -20°C to 70°C |
| Humidity | 20% to 80% non-condensing |
| Included Accessories | Power cable, BNC cables, rack ears, manual |
| Maintenance | Keep clean, avoid dust, firmware updates via USB |
| Safety Certifications | CE, FCC, RoHS |
| Spare Parts / Repairability | Contact Antelope support; replaceable internal fuses |
Frequently Asked Questions - Isochrone Trinity Antelope
User questions about Isochrone Trinity Antelope
0 question about this device. Answer the ones you know or ask your own.
Ask a new question about this device
Download the instructions for your Horloge maître in PDF format for free! Find your manual Isochrone Trinity - Antelope and take your electronic device back in hand. On this page are published all the documents necessary for the use of your device. Isochrone Trinity by Antelope.
USER MANUAL Isochrone Trinity Antelope
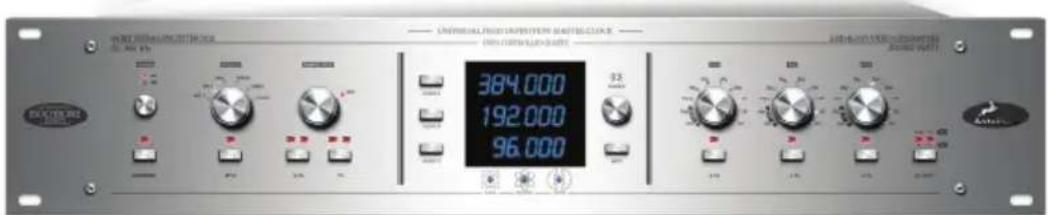
Universal High Definition Master Clock
To reduce the risk of electrical shocks, fire, and related hazards:
- Do not remove screws, cover, or cabinet. There are no user serviceable parts inside. Refer servicing to qualified service personnel.
- Do not expose this device to rain, moisture or spillover of liquid of any kind.
- Should any form of liquid or a foreign object enter the device, do not use it. Switch off the device and then unplug it from the power source. Do not operate the device again until the foreign object is removed or the liquid has completely dried and its residues fully cleaned up. If in doubt, please consult an authorized repair .
- Do not handle the power cables with wet hands!
Make sure the device is switched off when plugging/unplugging it to/from the power source. - When unplugging from the wall outlet always pull the plug, not the power cable.
- Make sure ventilation outlets are not obstructed: putting things on the cabinet or using the device in a narrow and poorly ventilated place may result in the temperature rising which could affect its operation or the operation of other closely located components.
- If anything goes wrong, turn off the device first and then unplug the power cables. Do not attempt to repair the device yourself: Consult authorized service personnel or your dealer.
IMPORTANT
About the 12V DC power supply option, please note the following:
- Improper application of the 12V DC power supply may damage the device. When connecting a _2M_DC power to the power source, make sure to comply with the circuit diagram given on page 13 in this manual so that the correct polarity is applied. If in doubt, consult a competent electronics technician.
CONTENTS
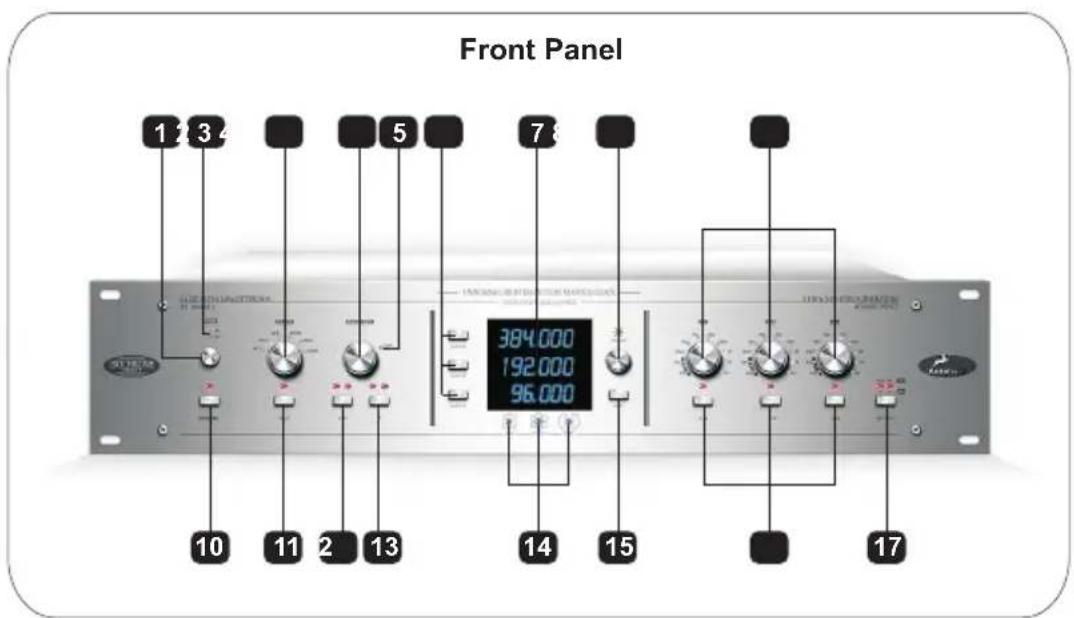
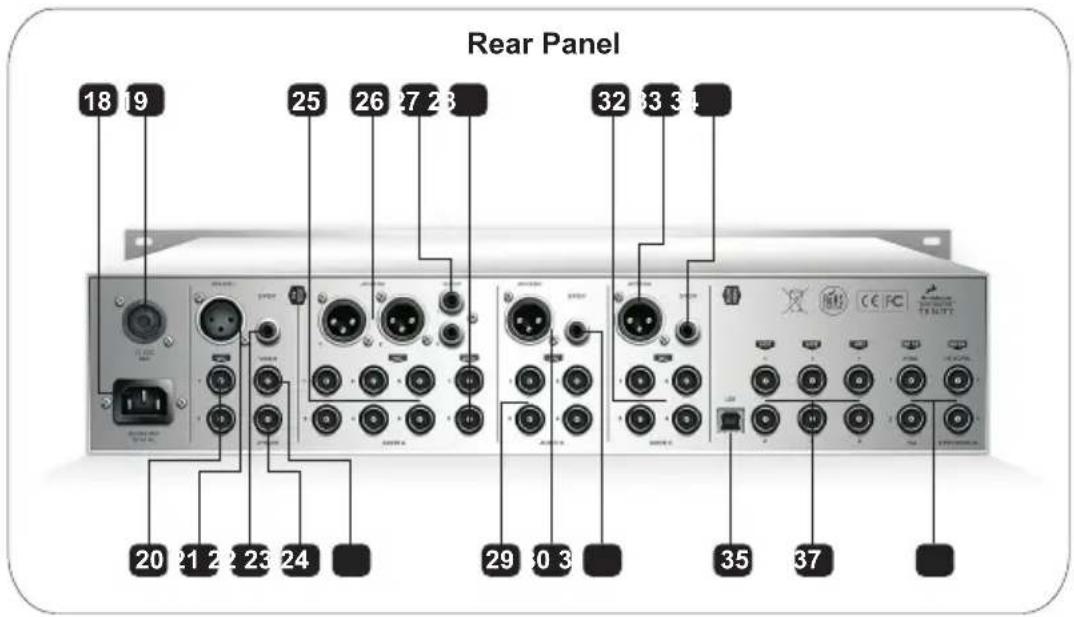
Front and Rear Panel layout reference 3
Introduction 4
Getting Started 5
Front Panel functions explained 6-8
Rear Panel explained 9-10
Gearboxing in detail 11
Appendix B: Table of valid input video formats 11
Appendix C: Error Messages 12
Installation and connection 13
Calibration 14
Technical specifications 15-16
Notes 17
INTRODUCTION
Congratulations! You are now the proud owner of the latest generation of master clock from the world's favourite clocking company. Based on years of research, Trinity is a brand new design that is the most flexible, best sounding, most stable, and easiest to use master clock available.
In one box, Trinity will save you time. Imagine! One pass with multiple frequencies and formats of virtually any choice, all running in perfect synchronization. Well, imagine no longer, because it's truly possible with Trinity.
Based on Antelope's Oven Controlled Crystal Technology, Trinity has many new features including 3 Independent Audio Generators up to 384kHz, with Varispeed control. 3 Independent SD Generators, simultaneously offering PAL and NTSC. 3 Independent HD Generators, presenting a choice of 16 formats, and the latest revision of Antelope's Acoustically Focused Clocking (AFC), now in its ^th 4 generation and employing 64 bit DSP. So, that's a mind blowing 9 Independent and Simultaneous Audio/Video Generators, all perfectly locked. USB allows full remote control via PC and Mac. Firmware updates can also be applied via USB if updates are available.
The triple display shows the frequencies of the audio generators, varispeed values, source information, pull-ups/pull-downs, and useful messages.
Temporarily lose sync from your source?... Trinity will seamlessly free-wheel until the signal returns, and then re-lock using the latest Antelope `Gentle Lock Technology`.
Trinity also maintains features from the OCX-V, but in a brand new design features as the Antelope Jitter Management Module, Black Burst Generator, Atomic Input for connection to the 10M RubidiumAtomic Clock, and full Audio and Video Gearboxing with simultaneous 0.1% and 4% pull-ups/pull-downs.
So, please take some time to read through this reference manual, and familiarize yourself with the functionality that Trinity has to offer.
Above all, we hope you enjoy your new Antelope Trinity as much as we enjoyed designing it for you.
All the best,
The Antelope Team
GETTING STARTED
It only takes a few moments to harness the benefits of the Isochrone Trinity.
- Connect Trinity to an AC or DC power source via rear panel connectors 18 or 19.
- Power on using front panel power button 1.
- To use Trinity's internal clock, set SOURCE knob 3 to OVEN, and press to confirm. If slaving to an external source, connect the master sync device to an input on the rear panel, and select the corresponding position with the SOURCE knob 3. Press to confirm.
Note: If using internal OVEN, there is a warm up period when the unit is first powered on. Pressing the INFO button just after powering on when SOURCE is set to OVEN will show the OVEN heating up. Correct operating temperature is reached when the OVEN light 14 is lit solid.
- Set sample rate: Press AUDIO A button 6 to allow the sample rate to be changed on Audio channel A. Select desired sample rate with SAMPLE RATE knob 4, and press to confirm.
- Trinity is now providing your chosen clock sample rate to Audio outputs A. You can also use Audio channels B and C in the same way. It is also possible to edit all audio channels together so that one frequency is sent to all outputs on all channels.
Some devices will automatically sync to clock coming from Trinity. Some will require that you set them to external clock manually. Other devices may require additional configuration to be able to sync to the incoming clock. Please consult the operating manual(s) of your device(s) regarding external clocking.
Note: When making initial connections, it is advised to do so with the studio volume turned down. Some devices may emit an unpleasant sound until properly configured to accept incoming clock.
FRONT PANEL
1. Power on/off button
2. AC/DC power indicators
Indicators to show whether AC or DC power is in use.
3. SOURCE Encoder Knob
The source knob selects the input from which Trinity receives a timing reference. Select OVEN to use the internal oven controlled crystal oscillator, or if Trinity is connected to the 10M Atomic Clock via the rear panel Atomic Input. The other five source knob positions correspond to the remaining physical inputs on the back panel input section.
If a SOURCE light flashes, the SOURCE is in a state of edit, and needs to be confirmed by pressing the SOURCE button. If not confirmed within 10 seconds, SOURCE will revert to previously saved position.
4. SAMPLE RATE Encoder Knob
The sample rate encoder is used to select standard frequencies, DA mode, adjust varispeed, and confirm settings. It is used in conjunction with AUDIO buttons 6, VARISPEED button 10 and pull up/pull down buttons & 12 13
DA Mode
In DA mode Trinity takes the incoming audio clock selected by the SOURCE knob 3, and puts it through the Jitter Management Module to regenerate a clean, de-jittered signal that is distributed to the outputs on any channel that is in DA mode. In DA mode, the outgoing sample rate will always match the incoming reference.
DA mode will not work if the SOURCE kno3 is set to VIDEO or OVEN, as there is no audio reference to distribute. In this case the display will scroll the message "Cannot DA chosen source". Note that in DA mode Trinity can work with non-standard sample rates, and any sample rate in the range 27.340 kHz 449.433 kHz is acceptable.
To select DA mode for any channel, press the desired AUDIO button(s) 6, turn SAMPLE RATE knob 4 fully clockwise, and then press the SAMPLE RATE knob to confirm. If not confirmed within a few seconds the audio channel(s) will revert to their last saved settings.
5. EDIT indicator
Flashes when in edit mode, but not for HD mode.
Note: Trinity will exit edit mode without saving if there is no user input for 10 seconds.
6. AUDIO Channel Edit Select Buttons
These three buttons are used to select the audio channels for editing, and can be edited individually or all at the same time which, if editing all can give you a big single channel master clock utilizing all rear panel outputs. If pressed once from standard mode the current state of the channel(s) will be visible, including varispeed and pull ups/pull downs.
Note: In edit mode, pull ups/downs are not only shown with lights 12 & 13, but are also shown with dashes after the frequency on the main display. So, If 0.1% & 4% pull ups are selected, the middle and top line of the last digit on the display are lit. If 0.1% & 4% pull downs are selected, the middle and bottom line of the last digit in the display are lit.
7. Triple Display
Displays information for everything except HD.
8. DIMMER Knob
Adjusts the brightness of the triple display.
9. HD Select Encoders
Use these knobs to select HD rates for the three HD channels. Press to confirm a change.
HD1, HD2, HD3 signals are sent to the corresponding rear panel output BNC connections 35
10. VARISPEED Select Button
Press this button when editing an audio channel allowing varispeed adjustment via the SAMPLE RATE encoder knob 4 The VARISPEED button toggles between adjustment options of cents and percent, where a 'c' on the display signifies cents mode, and a 'p' on the display signifies percent mode. Press SAMPLE RATE knob 4 to confirm varispeed setting.
Once any channel has been saved with a varispeed setting, the varispeed indicator will always light when NOT in edit mode to show that one or more channels is using varispeed.
11. SPLIT Mode
This is an advanced function, and to be used only if receiving a varispeed signal on the input. Using SPLIT will likely cause synchronization errors if used when the inputS a standard gearboxing frequency. SPLIT mode disables gearboxing for any channels that are set to DA while in SPLIT mode.
The reasoning behind this function is to avoid TRINITY mis-locking to an input frequency that is non-standard, but very close to a standard gearboxing frequency. (See standard gearboxing frequencies in Appendix A). If you know that your input frequency is a non-standard, non-gearbox frequency, then use SPLIT mode to allow DA of this non-standard input.
For this function to have any effect, at least one audio channel must be in DA mode. If no audio channels are in DA mode, and SPLIT is activated, the input will be ignored. When SPLIT is activated, the audio channel(s) that is/are set to DA will NOT lock to the SOURCE signal. All channels not in DA mode will continue to generate the frequency displayed for the respective channel(s), and will be running on internal oven or external Atomic.
Note: The SPLIT button has no function when SOURCE is set to VIDEO or OVEN.
12. USA pull up/pull down (+/-0.1%)
When in edit mode, this button toggles +/- 0.1% pull up/pull down for the channel(s) being edited. To confirm an edit press the SAMPLE RATE knob 4. On the triple display for the given channel(s), the top line of the digit to the far right is lit for a pull up, and the bottom line is lit for a pull down.
Notes:
If 0.1% & 4% pull ups are selected, the middle and top line of the last digit on the display are lit. If 0.1% & 4% pull downs are selected, the middle and bottom line of the last digit in the display are lit.
13. European pull up/pull down (+/- 4%)
When in edit mode, this button toggles +/- 4% pull up/pull down for the channel(s) being edited. To confirm an edit press the SAMPLE RATE knob 4. On the triple display for the given channel(s), the top line of the digit to the far right is lit for a pull up, and the bottom line is lit for a pull down.
Notes:
If 0.1% & 4% pull ups are selected, the middle and top line of the last digit on the display are lit. If 0.1% & 4% pull downs are selected, the middle and bottom line of the last digit in the display are lit.
14. Status LEDs
LOCK When lit, indicates that Trinity is locked to a valid incoming reference. The light will flash if there is no input, or a frequency present at the input is not one of the recognized valid gearboxing frequencies as in Appendix A on page 11.
ATOMIC Will be lit if SOURCE is set to OVEN, and a valid signal is present at the rear panel atomic input.
OVEN Flashes when Trinity is first turned on, and will light solid when the oven reaches its operating temperature.
Note: In normal operation OVEN and LOCK or ATOMIC and LOCK will not be lit at the same time. However, when using the advanced SPLIT mode this is possible.
15. INFO Button
Press to display further information on the SOURCE. Press again, or wait ten seconds to return.
16. HD Pull Down Select Buttons
Toggles -0.1% pull down On or Off for each HD channel. Press HD button for the given channel(s) to confirm edit(s).
17. SD Video Select Button
Use this button to select the format that will be present at rear panel outputs SD 3 & 4. This is an instant change that doesn't require confirmation
REAR PANEL
18. AC Power Socket
The IES AC Connection supports an input range of -20VAC. This enables the device to automatically accommodate mains voltages in any country.
19. DC Power Connection
Speakon NL4FX socket for 12VDC 15 Watt power supply.
20. Word Clock Inputs 1 & 2
BNC connections used to accept word clock reference.
21. AES/EBU Input
The AES/EBU input is a female XLR connection that accepts AES/EBU clock or audio.
22. S/PDIF Input
The S/PDIF input is an RCA connection that accepts S/PDIF clock or audio.
23. Video Input
The video input is a BNC connection that accepts video reference. See appendix B for sapedred formats.
24. Atomic Input
The BNC Atomic Input connection allows Trinity to receive a 10MHz reference from an atomic clock device, such as the Antelope 10M. When locked to Atomic, the internal oven on Trinity is automatically bypassed, the front panel ATOMIC LED lights, and the atomic device becomes the primary timing reference. This effectively provides 8 day sample accuracy, which means even more detailed sound and greater stability.
Note: User functionality of Trinity is unaffected by the presence of an Atomic device.
25. Audio Channel A - Word Clock Outputs 1 to 6
The sample rate on these outputs always matches the sample rate indicated by the frequency display for channelA on the front panel.
26. Audio Channel A - AES/EBU Outputs 1 & 2 (male)
These two outputs provide AES/EBU clock at the sample rate shown on the front panel frequency display for ChannelA.
27. Audio Channel A - S/PDIF Outputs 1 & 2
These two outputs provide S/PDIF clock at the sample rate shown on the front panel frequency display for ChannelA.
28. Audio Channel A 256x Word Clock Outputs 1 & 2
These two outputs provide 256x Word Clock, a protocol used in some older Digidesign components.
29. Audio Channel B Word Clock Outputs 1 to 4
The sample rate on these outputs always matches the sample rate indicated by the frequency display for channel B on the front panel.
30. Audio Channel B AES/EBU Output (male)
This output provides AES/EBU clock at the sample rate shown on the front panel frequency display for Channel B.
31. Audio Channel B S/PDIF Output
This output provides S/PDIF clock at the sample rate shown on the front panel frequency display for Channel B.
32. Audio Channel C Word Clock Outputs 1 to 4
The sample rate on these outputs always matches the sample rate indicated by the frequency display for channel C on the front panel.
33. Audio Channel C AES/EBU Output (male)
This output provides AES/EBU clock at the sample rate shown on the front panel frequency display for Channel C.
34. Audio Channel C S/PDIF Output
This output provides S/PDIF clock at the sample rate shown on the front panel frequency display for Channel C.
35. USB
Allows connection to PC and Mac for complete remote control and firmware updates. The control panel for PC and Mac is available as a download from the support section at www.antelopeaudio.com
36. HD Video Outputs
BNC connections that provide HD video outputs corresponding to front panel HD1, HD2, HD3.
37. SD Video Outputs
BNC connections that provide SD video outputs as follows.
SD1 NTSC with black burst
SD2 PAL with black burst
SD3 NTSC 30 or PAL 24, composite sync. Toggled via front panel button 17.
SD4 NTSC 60 or PAL 48, composite sync. Toggled via front panel button 17.
TRINITY GEARBOXING MODE
In Gearboxing Mode, Trinity always generates an output clock at the sample rate set by the SAMPLE RATE knob for each channel, regardless of the incoming reference frequency. This output clock is still phase-locked to the reference input, but the sample rates need not match.
For example, you may set the SAMPLE RATE for AUDIO channel A at 48 kHz and apply a 44.1 kHz reference. The device then “gearboxes” 44.1 kHz into 48 kHz output, as selected by the SAMPLE RATE knob for that channel. This ability to lock to one sample rate and generate another is very useful for sample rate conversions. Gearboxing Mode dramatically improves the sound quality of sample rate conversions.
For Gearboxing to work, the incoming reference must be one of 81 recognized valid frequencies. A valid frequency is i) one of the standard frequencies: 32, 44.1, 48, 88.2, 96, 176.4, 192, 352.8, 384 kHz ii) a standard frequency subjected to every possible combination of US and Euro pull up/pull downs (8 combinations are possible). See Appendix Abelow a complete table of the valid frequencies.
Note: Gearboxing can be disabled by using SPLIT mode. For this to work, at least one of the AUDIO channels must be set to DA, otherwise the input is ignored. SPLIT mode is to be used only if the input signal is known to be a varispeed frequency, and NOT a standard gearbox frequency as in the table below.
Appendix A
Table of valid input frequencies in Gearboxing mode
| 32 | 44.1 | 48 | 88.2 | 96 | 176.4 | 192 | 352.8 | 384 | |
| USPD+EUPD | 30.689 | 42.294 | 46.034 | 84.587 | 92.068 | 169.175 | 184.136 | 338.350 | 368.272 |
| EUPD | 30.720 | 42.336 | 46.080 | 84.672 | 92.160 | 169.344 | 184.320 | 338.688 | 368.640 |
| USPU+EUPD | 30.751 | 42.378 | 46.126 | 84.757 | 92.252 | 169.513 | 184.504 | 339.027 | 369.009 |
| USPD | 31.968 | 44.056 | 47.952 | 88.112 | 95.904 | 176.224 | 191.808 | 352.448 | 383.616 |
| None | 32.000 | 44.100 | 48.000 | 88.200 | 96.000 | 176.400 | 192.000 | 352.800 | 384.000 |
| USPU | 32.032 | 44.144 | 48.048 | 88.288 | 96.096 | 176.576 | 192.192 | 353.153 | 384.384 |
| USPD+EUPU | 33.300 | 45.892 | 49.950 | 91.783 | 99.900 | 183.566 | 199.800 | 367.133 | 399.600 |
| EUPU | 33.333 | 45.938 | 50.000 | 91.875 | 100.000 | 183.750 | 200.000 | 367.500 | 400.000 |
| USPU+EUPU | 33.367 | 45.983 | 50.050 | 91.967 | 100.100 | 183.934 | 200.200 | 367.868 | 400.400 |
Appendix B
Table of valid input video formats
| PAL 24 | 1080i - 60 | 1080p - 30 | 1080psf - 60 | 720p - 60 |
| PAL | 1080i - 59.94 | 1080p - 29.97 | 1080psf - 59.94 | 720p - 59.94 |
| 1080i - 50 | 1080p - 25 | 1080psf - 50 | 720p - 50 | |
| NTSC 60 | 1080i - 49.95 | 1080p - 24.975 | 1080psf - 49.95 | 720p - 30 |
| NTSC 59.94 | 1080i - 48 | 1080p - 24 | 1080psf - 48 | 720p - 25 |
| 1080i - 47.952 | 1080p - 23.976 | 1080psf - 47.952 |
Appendix C
Error Messages
Display says: CANNOT dACHOSEN SOURCE
Read: Cannot DA Chosen Source
Reason: The Audio channel is set to DA, and SOURCE is set to either OVEN or VIDEO.
Solution 1
Continue in DAmode by changing SOURCE knob to a position corresponding to a valid rear panel input.
Solution 2
Leave DAmode, selecting an internal sample rate.
Display says: NO IIPUT
Read: No Input
Reason: The Audio channel is set to DA, but there is no input on the chosen SOURCE.
Solution 1
Continue in DA mode by applying a valid rear panel input that corresponds to the front panel SOURCE knob.
Solution 2
Continue in DAmode by changing SOURCE knob to a position where there is a valid rear panel input.
Solution 3
Leave DAmode, selecting a standard sample rate.
Display says: SOURCE OFF-ΓAtE
Read: Source Off-Rate
Reason: Input is a non-standard frequency that is not one of the recognized gearboxing frequencies as in Appendix A on page 11, and is likely a varispeed input frequency.
Solution 1
Continue with the off-rate input, and select SPLIT mode. The audio channel must also be in DAmode.
Solution 2
Change SOURCE knob to OVEN and run on internal clock.
INSTALLATION AND CONNECTION
-
Before placing the device into its operating location, consider the following:
-
To minimize frequency instabilities, the device should not be placed near equipment generating strong magnetic fields, such as generators, transformers, etc.
- To prevent possible interference, observe a minimum distance of 5 centimetres (2 inches) between the cables of this device and any non-coaxial audio cables.
-
It is talking the device unmounted (i.e. not in a rack) as long as the above conditions are met. There is no requirement for the device to be levelled horizontally
-
If the DC Power Connection is to be 19ised, make sure the power is wired cable properly, because reversed polarity may damage the device. Refer to the illustration below for information on how to make the connection. If in doubt consult a competent technician.
| If the mark on the Speakon NL4FX plug is... | Connect to the following mark on the power supply unit circuit board / terminal: |
| 1+ | +12 V |
| 2- | Ground |
| 1- | Earth(optional, use it if available on the power supply unit) |
- Mount the device on its operating place in the rack and secure it with screws.
- Connect the AC Power Connection and/or DC Power Connection to the respective power outlet(s).
Note: When connecting devices, do so with the studio volume turned down as some devices may emit an unpleasant sound until properly configured to accept incoming clock.
CALIBRATION MODE:
Trinity can be calibrated periodically by connecting it to the 10M Atomic Clock. This is not something that necessarily needs to be done very often, but if desired here's how to do it...
Connect 10M to Trinity as normal.
Power on both devices, and wait for 10M device to reach operating temperature.
Set Trinity SOURCE knob 3 OVEN, and be sure that the ATOMIC LED is 14
Wait for 1 minute to allow the units to stabilize.
Press Display button 15, and then Varispeed button 10. Trinity is now in calibration mode.
Note: The middle line of the display is the only thing you need to look at when in CAL mode. If this is stable at +/- 0.5 ppm or greater then it is worthwhile to proceed with calibration. If the display is not stable, please wait for a minute or two until it stabilizes before deciding whether calibration is needed or not.
To proceed with calibration, press the SAMPLE RATE knob . 4 nity is now calibrated to better than +/- 0.001 ppm accuracy.
Exit calibration mode by pressing the INFO butto 15
TECHNICAL SPECIFICATIONS
| Clocking System: | 4^th Generation Acoustically Focused Clocking64 bit DDSOven Controlled Crystal Oscillator |
| Stability: | < +/- 0.02ppm @ 64.Degrees Celsius |
| Ageing: | < 1 ppm per year |
| Calibration: | < +/- 0.001 ppm |
Atomic Clock Input: 10MHz @ 1Vpp, BNC
Basic sampling rates (kHz): 32, 44.1, 48, 88.2, 96, 176.4, 192, 352.8, 384
Generators: 9 Independent and simultaneous: 3 Audio, 3 HD, 3 SD
Gearboxing standards: See Appendix A
HD Formats: See Appendix B
Varispeed: +/- 200 cents + 12.246 % - 10.910 %
Pull ups/downs: +/- 0/4% NTSC and/or 4% PAL -0.1% HD
Inputs: Universal video input on BNC. Recognizes all video formats automatically 2 selectable Word Clock on BNC 32kHz - 384 kHz 1 AES/EBU on XLR. 32kHz - 192kHz @ 110 Ohms terminated 1 S/PDIF on RCA. 32kHz - 192kHz @ 75 Ohms terminated
2.0 Full-speedUSB:
Outputs:
HD Video 6x BNC @ 75 Ohms
SD 1 BNC @ 75 Ohms fixed for NTSC video standard. Black Burst
SD 2 BNC @ 75 Ohms fixed for PAL video standard. Black Burst
SD 3 BNC @ 75 Ohms PAL 24/NTSC 30 selectable. Composite Sync
SD 4 BNC @ 75 Ohms PAL 48/NTSC 60 selectable. Composite Sync
Wordclock: 16 BNC, 3Vpp @ 75 Ohms
| WC Basics | Word clock outputs except Audio A 256x | Audio A 256x | |||
| x1 x2 x4 | x8 x256 | ||||
| 32.0 kHz | 32.0 kHz | - | - | - | 8.192 MHz |
| 44.1 kHz | 44.1 kHz | 88.2 kHz | 176.4 kHz | 352.8 kHz | 11.2896 MHz |
| 48.0 kHz | 48.0 kHz | 96.0 kHz | 192.0 kHz | 384.0 kHz | 12.288 MHz |
AES/EBU: 4 XLR @ 110 Ohms
| WC Basics | Word clock outputs except Audio A 256x | Audio A 256x | |||
| x1 x2 x4 | x8 x256 | ||||
| 32.0 kHz | 32.0 kHz | - | - | - | - |
| 44.1 kHz | 44.1 kHz | 88.2 kHz | 176.4 kHz | - | - |
| 48.0 kHz | 48.0 kHz | 96.0 kHz | 192.0 kHz | - | - |
S/PDIF: 4 RCA @ 75 Ohms
| WC Basics | Word clock outputs except Audio A 256x | Audio A 256x | |||
| x1 x2 x4 | x8 x256 | ||||
| 32.0 kHz 32.0 kHz - - - - | |||||
| 44.1 kHz | 44.1 kHz | 88.2 kHz | 176.4 kHz | - | - |
| 48.0 kHz | 48.0 kHz | 96.0 kHz | 192.0 kHz | - | - |
Power Supply:
AC, universal input 90 - 250VAC, 15W
DC, 12VDC +/- 1VDC, 15W
Operating Temperature:
0-50 C, 32-122 F
Weight:
4 kg, 81B
Dimensions:
482mm (W) x 89mm (H) x 203mm (D)
19" (W) × 3.5" (H) × 8" (D)
NOTES
- Universal High Definition Master Clock
- IMPORTANT
- CONTENTS
- INTRODUCTION
- GETTING STARTED
- FRONT PANEL
- Power on/off button
- AC/DC power indicators
- SOURCE Encoder Knob
- SAMPLE RATE Encoder Knob
- DA Mode
- EDIT indicator
- AUDIO Channel Edit Select Buttons
- Triple Display
- DIMMER Knob
- HD Select Encoders
- VARISPEED Select Button
- SPLIT Mode
- USA pull up/pull down (+/-0.1%)
- Notes:
- European pull up/pull down (+/- 4%)
- Status LEDs
- INFO Button
- HD Pull Down Select Buttons
- SD Video Select Button
- REAR PANEL
- AC Power Socket
- DC Power Connection
- Word Clock Inputs 1 & 2
- AES/EBU Input
- S/PDIF Input
- Video Input
- Atomic Input
- Audio Channel A - Word Clock Outputs 1 to 6
- Audio Channel A - AES/EBU Outputs 1 & 2 (male)
- Audio Channel A - S/PDIF Outputs 1 & 2
- Audio Channel A 256x Word Clock Outputs 1 & 2
- Audio Channel B Word Clock Outputs 1 to 4
- Audio Channel B AES/EBU Output (male)
- Audio Channel B S/PDIF Output
- Audio Channel C Word Clock Outputs 1 to 4
- Audio Channel C AES/EBU Output (male)
- Audio Channel C S/PDIF Output
- USB
- HD Video Outputs
- SD Video Outputs
- TRINITY GEARBOXING MODE
- Appendix A
- Appendix B
- Appendix C
- Solution 1
- Solution 2
- Solution 3
- INSTALLATION AND CONNECTION
- CALIBRATION MODE:
- TECHNICAL SPECIFICATIONS
- Full-speedUSB:
- Outputs:
- NOTES
Brand : Antelope
Model : Isochrone Trinity
Category : Horloge maître