AMO 40 B - Oven ARCTIC COOLING - Free user manual and instructions
Find the device manual for free AMO 40 B ARCTIC COOLING in PDF.


| Product Type | Built-in Electric Oven |
| Brand | Arctic Cooling |
| Model | AMO 40 B |
| Installation | Built-in |
| Energy Source | Electric |
| Power Consumption | 3.0 kW |
| Voltage | 220-240 V, 50/60 Hz |
| Oven Capacity | 67 Liters |
| Dimensions (HxWxD) | 595 x 595 x 568 mm |
| Net Weight | 34 kg |
| Functions | Convection, Grill, Defrost, Light, Fan-assisted, Top and Bottom Heat |
| Temperature Range | 50-250 °C |
| Cleaning Method | Enamel coating, manual cleaning recommended |
| Safety Features | Child lock, Overheat protection, Cool-touch door |
| Spare Parts Availability | Heating elements, thermostat, door gasket, fan motor, control board |
| Repairability Index | 7.5 / 10 (estimated) |
| Accessories Included | 2 oven racks, drip tray, broil rack |
| Control Type | Rotary knobs and digital timer |
| Door Type | Triple-glazed, removable inner glass |
| Energy Efficiency Class | A+ |
Frequently Asked Questions - AMO 40 B ARCTIC COOLING
User questions about AMO 40 B ARCTIC COOLING
0 question about this device. Answer the ones you know or ask your own.
Ask a new question about this device
Download the instructions for your Oven in PDF format for free! Find your manual AMO 40 B - ARCTIC COOLING and take your electronic device back in hand. On this page are published all the documents necessary for the use of your device. AMO 40 B by ARCTIC COOLING.
USER MANUAL AMO 40 B ARCTIC COOLING
Cuptor Electric Table Top Electric Oven
arctic
INSTRUCTIUNI DE UTILIZARE
OPERATING INSTRUCTIONS
natural_image
Close-up of a metal grating or rack structure with grid lines, no visible text or symbols
natural_image
Interior view of an oven with metal grating and rack (no text or symbols visible)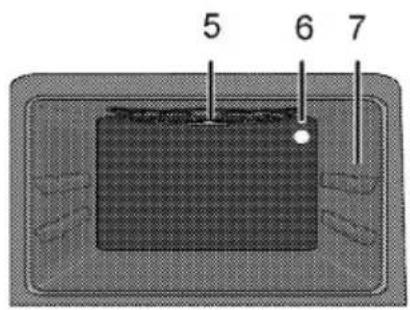
natural_image
Exterior view of a square baking tray with no text or symbols3. Grilaj metallic
natural_image
Line drawing of a rectangular metal grate or rack structure (no text or symbols)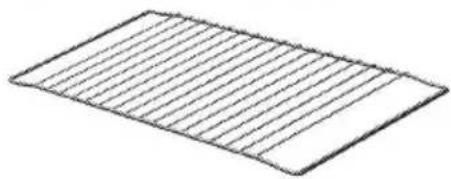
natural_image
Isometric view of a rectangular grid pattern with horizontal lines, no text or symbols present
natural_image
Line drawing of a grid-patterned rectangular object with horizontal lines and a small rectangular extension on top (no text or symbols)4. Tavă rotundă
natural_image
Circular metallic baking pan with textured surface (no text or symbols)Specificatii tehnice
natural_image
Close-up of a metal grate with horizontal lines and a circular label 'A' on the wall (no other text or symbols)
natural_image
Close-up of a mechanical component with a hexagonal cutout and labeled point B (no readable text or symbols)natural_image
Close-up of a hand holding a circular object over a mechanical component (no visible text or symbols)natural_image
Mechanical component with rotational arrows indicating motion (no text or symbols)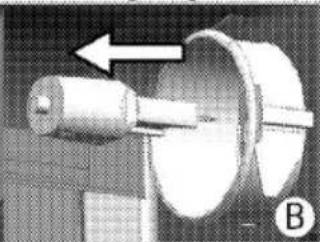
natural_image
Mechanical component with a cylindrical shaft and circular housing, showing an arrow indicating direction (no text or symbols)Please read this user manual first!
Dear Customer,
Thank you for purchasing this Arctic product. We hope that you get the best results from your product which has been manufactured with high quality and state-of-the-art technology. Therefore, please read this entire user manual and all other accompanying documents carefully before using the product and keep it as a reference for future use. If you handover the product to someone else, give the user manual as well. Follow all warnings and information in the user manual.
Remember that this user manual is also applicable for several other models. Differences between models will be identified in the manual.
Explanation of symbols
Throughout this user manual the following symbols are used:

Important information or useful hints about usage.

Warning of hazardous situations with regard to life and property.

Warning of electric shock.

Warning of risk of fire.
Warning of hot surfaces.
1 Important instructions and warnings for safety and environment 4
General safety 4
Electrical safety 4
Product safety 5
Intended use 7
Safety for children....8
Disposing of the old product 8
Package information 8
2 General information 9
Overview 9
Package contents 10
Technical specifications 10
3 Installation 11
Before installation....11
Installation and connection....11
Future Transportation....12
4 Preparation 13
Tips for saving energy 13
Initial use....13
First cleaning of the appliance 13
Initial heating....13
5 How to operate the oven 14
General information on baking, roasting and grilling14
How to operate the electric oven 14
Operating modes....15
Using the oven clock 15
Cooking times table....16
How to operate the grill.... 16
Cooking times table for grilling....17
6 Maintenance and care 18
General information....18
Cleaning the control panel 18
Cleaning the oven 18
Replacing the oven lamp.... 19
7 Troubleshooting 20
1 Important instructions and warnings for safety and environment
This section contains safety instructions that will help protect from risk of personal injury or property damage. Failure to follow these instructions shall void any warranty.
General safety
- This appliance can be used by children aged from 8 years and above and persons with reduced physical, sensory or mental capabilities or lack of experience and knowledge if they have been given supervision or instruction concerning use of the appliance in a safe way and understand the hazards involved.
Children shall not play with the appliance. Cleaning and user maintenance shall not be made by children without supervision.
- The appliance is not to be used by persons (including children) with reduced physical, sensory or mental capabilities, or lack of experience and knowledge, unless they have been given supervision or instruction. Children being supervised not to play with the appliance.
- If the product is handed over to someone else for personal use or second-hand use purposes, the user manual, product labels and
other relevant documents and parts should be also given.
- Installation and repair procedures must always be performed by Authorized Service Agents. The manufacturer shall not be held responsible for damages arising from procedures carried out by unauthorized persons which may also void the warranty. Before installation, read the instructions carefully.
- Do not operate the product if it is defective or has any visible damage.
- Ensure that the product function knobs are switched off after every use.
Electrical safety
- If the product has a failure, it should not be operated unless it is repaired by an Authorized Service Agent. There is the risk of electric shock!
- Only connect the product to a grounded outlet/line with the voltage and protection as specified in the “Technical specifications”. Have the grounding installation made by a qualified electrician while using the product with or without a transformer. Our company shall
not be liable for any problems arising due to the product not being earthed in accordance with the local regulations.
- Never wash the product by spreading or pouring water onto it! There is the risk of electric shock!
- Never touch the plug with wet hands! Never unplug by pulling on the cable, always pull out by holding the plug.
- The product must be disconnected during installation, maintenance, cleaning and repairing procedures.
- If the power connection cable for the product is damaged, it must be replaced by the manufacturer, its service agent or similarly qualified persons in order to avoid a hazard.
- The appliance must be installed so that it can be completely disconnected from the mains supply. The separation must be provided by a switch built into the fixed electrical installation, according to construction regulations.
- Rear surface of the oven gets hot when it is in use. Make sure that the electrical connection does not contact the rear surface; otherwise, connections can get damaged.
- Do not trap the mains cable between the oven door and frame and do not route it over hot surfaces. Otherwise, cable insulation may melt and cause fire as a result of short circuit.
- Any work on electrical equipment and systems should only be carried out by authorized and qualified persons.
- In case of any damage, switch off the product and disconnect it from the mains. To do this, turn off the fuse at home.
• Make sure that fuse rating is compatible with the product.
Product safety
- WARNING: The appliance and its accessible parts become hot during use. Care should be taken to avoid touching heating elements. Children less than 8 years of age shall be kept away unless continuously supervised.
- Never use the product when your judgment or coordination is impaired by the use of alcohol and/or drugs.
- Be careful when using alcoholic drinks in your dishes. Alcohol evaporates at high temperatures and may cause fire since it can ignite when it comes into contact with hot surfaces.
- Food Poisoning Hazard: Do not let food sit in oven for more than 1
hour before or after cooking. Doing so can result in food poisoning or sickness.
- Do not place any flammable materials close to the product as the sides may become hot during use.
- During use the appliances becomes hot. Care should be taken to avoid touching heating elements inside the oven.
- Keep all ventilation slots clear of obstructions.
- Do not heat closed tins and glass jars in the oven. The pressure that would build-up in the tin/jar may cause it to burst.
- Do not place baking trays, dishes or aluminium foil directly onto the bottom of the oven. The heat accumulation might damage the bottom of the oven.
- The accessible surfaces of the appliance get very hot. Never touch the hot surfaces.
- Pay attention to the information in the section Installation. The Appliance becomes very hot, it must not be installed in built-in unit.
- This appliances is intended to be used in household and similar applications such as: -staff kitchen areas in shops, offices and others working environments;
-farm houses; -by clients in hotels, motels and other residential type environments; -bed and breakfast type environments.
- Do not use harsh abrasive cleaners or sharp metal scrapers to clean the oven door glass since they can scratch the surface, which may result in shattering of the glass.
- Do not use steam cleaners to clean the appliance as this may cause an electric shock.
- (Varies depending on the product model.)
Placing the wire shelf and tray onto the wire racks properly It is important to place the wire shelf and/or tray onto the rack properly. Slide the wire shelf or tray between 2 rails and make sure that it is balanced before placing food on it (Please see the following figure).

natural_image
Close-up of a metal rack with grid lines, no visible text or symbols
natural_image
Interior view of an oven with a metal rack and ventilation duct (no text or symbols visible)- Do not use the product if the front door glass removed or cracked.
- Do not use the oven handle to hang towels for drying. Do not hang up towel, gloves, or similar textile products when the grill function is at open door.
- Always use heat resistant oven gloves when putting in or removing dishes into/from the hot oven.
- Place the baking paper into the cooking pot or on to the oven accessory (tray, wire grill etc) together with the food and then insert all into the preheated oven. Remove the excess parts of the baking paper overflowing from the accessory or the pot in order to prevent the risk of touching the oven's heating elements. Never use the baking paper in an operating temperature higher than the indicated value for the baking paper. Do not place the baking paper directly on the base of the oven.
- WARNING: Ensure that the appliance is switched off before replacing the lamp to avoid the possibility of electric shock.
- The appliance must not be installed behind a decorative door in order to avoid overheating.
- Product must be placed directly on the floor. It must not be placed onto a base or a pedestal.
Prevention against possible fire risk!
- Ensure all electrical connections are secure and tight to prevent risk of arcing.
- Do not use damaged cables or extension cables.
- Ensure liquid or moisture is not accessible to the electrical connection point.
Intended use
- This product is designed for domestic use. Commercial use will void the guarantee.
- This appliance is for cooking purposes only. It must not be used for other purposes, for example room heating.
-
This product should not be used for warming the plates under the grill, drying towels, dish cloths etc. by hanging them on the oven door handles. This product should also not be used for room heating purposes.
-
The manufacturer shall not be liable for any damage caused by improper use or handling errors.
- The oven can be used for defrosting, baking, roasting and grilling food.
Safety for children
- WARNING: Accessible parts may become hot during use. Young children should be kept away.
- The packaging materials will be dangerous for children. Keep the packaging materials away from children. Please dispose of all parts of the packaging according to environmental standards.
- Electrical products are dangerous to children. Keep children away from the product when it is operating and do not allow them to play with the product.
- Do not place any items above the appliance that children may reach for.
- When the door is open, do not load any heavy object on it and do
not allow children to sit on it. It may overturn or door hinges may get damaged.
Disposing of the old product
Compliance with the WEEE Directive and Disposing of the Waste Product:

This product complies with EU WEEE Directive (2012/19/EU). This product bears a classification symbol for waste electrical and electronic equipment (WEEE).
This product has been manufactured with high quality parts and materials which can be reused and are suitable for recycling. Do not dispose of the waste product with normal domestic and other wastes at the end of its service life. Take it to the collection center for the recycling of electrical and electronic equipment. Please consult your local authorities to learn about these collection centers.
Compliance with RoHS Directive:
The product you have purchased complies with EU RoHS Directive (2011/65/EU). It does not contain harmful and prohibited materials specified in the Directive.
Package information
- Packaging materials of the product are manufactured from recyclable materials in accordance with our National Environment Regulations. Do not dispose of the packaging materials together with the domestic or other wastes. Take them to the packaging material collection points designated by the local authorities.
2 General information
Overview


1 Control panel
2 Wire shelf
3 Door
4 Handle
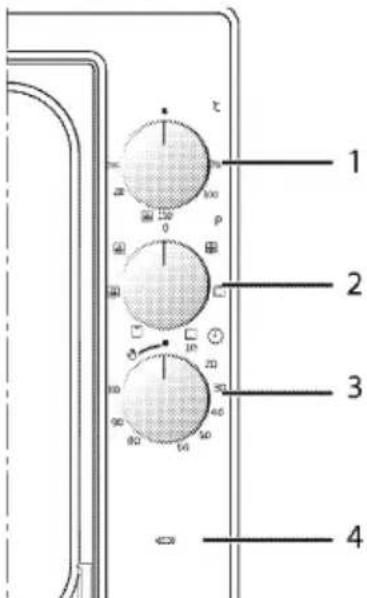
1 Thermostat knob
2 Function knob
3 Mechanical timer
4 Thermostat lamp
5 Top heating element
6 Lamp
7 Shelf positions
Package contents

Accessories supplied can vary depending on the product model. Not every accessory described in the user manual may exist on your product.
1. User manual
2. Oven tray
Used for pastries, frozen foods and big roasts.

natural_image
Exterior view of a square baking tray with a mesh pattern (no text or symbols)3. Wire Shelf
Used for roasting and for placing the food to be baked, roasted or cooked in casserole dishes to the desired rack.

natural_image
Line drawing of a rectangular metal grate with slats (no text or symbols)
natural_image
Pure geometric diagram of a rectangular plate with horizontal slats (no text or symbols)
natural_image
Line drawing of a rectangular grid with horizontal lines and two side handles (no text or symbols)4. Round tray
Used for pastries and cakes. This tray is placed on the wire shelf.

natural_image
Circular metallic baking pan with textured surface (no text or symbols)Technical specifications
| External dimensions (height / width / depth) | 290 mm /600 mm/565 mm |
| Voltage / frequency | 220-240 V ~ 50 Hz |
| Total power consumption | 1.64 kW |
| Fuse | min. 16 A |
| Cable type / section | min.H05V2V2-F 3 × 1,5 mm^2 |
| Main oven | Multifunction oven |
| Net volume # | 40 lt |
| Inner lamp | 15/25 W |
| Grill power consumption | 0.8 kW |
Basics: Information on the energy label of electrical ovens is given in accordance with the EN 60350-1 / IEC 60350-1 standard. Those values are determined under standard load with bottom-top heater or fan assisted heating (if any) functions.
Energy efficiency class is determined in accordance with the following prioritization depending on whether the relevant functions exist on the product or not. 1-Cooking with eco-fan, 2-Turbo slow cooking, 3-Turbo cooking, 4-Fan assisted bottom/top heating, 5-Top and bottom heating.

Technical specifications may be changed without prior notice to improve the quality of the product.

Figures in this manual are schematic and may not exactly match your product.

Values stated on the product labels or in the documentation accompanying it are obtained in laboratory conditions in accordance with relevant standards. Depending on operational and environmental conditions of the product, these values may vary.
3 Installation
Product must be installed by a qualified person in accordance with the regulations in force. The manufacturer shall not be held responsible for damages arising from procedures carried out by unauthorized persons which may also void the warranty.

Preparation of location and electrical installation for the product is under customer's responsibility.

DANGER:
The product must be installed in accordance with all local electrical regulations.

DANGER:
Prior to installation, visually check if the product has any defects on it. If so, do not have it installed. Damaged products cause risks for your safety.
Before installation
This product is intended for use only on a counter.

Do not use the product in a closed cabinet or on the floor level.
The kitchen floor must be able to carry the weight of the appliance plus the additional weight of cookware and bakeware and food.
If the range is placed on a base, measures have to be taken to prevent the appliance slipping from the base. The appliances must not be installed behind a decorative door in order to avoid overheating.
- Any kitchen furniture next to the appliance must be heat-resistant (100 °C min.).
Installation and connection
Product can only be installed and connected in accordance with the statutory installation rules.

Do not install the product next to refrigerators or freezers. The heat emitted by the product will increase the energy consumption of cooling appliances.

Do not use the door and/or handle to carry or move the product. The door, handle or hinges get damaged.
Electrical connection
Connect the product to a grounded outlet/line protected by a fuse of suitable capacity as stated in the "Technical specifications" table. Have the grounding installation made by a qualified electrician
while using the product with or without a transformer. Our company shall not be liable for any damages that will arise due to using the product without a grounding installation in accordance with the local regulations.

DANGER:
The product must be connected to the mains supply only by an authorised and qualified person. The product's warranty period starts only after correct installation. Manufacturer shall not be held responsible for damages arising from procedures carried out by unauthorised persons.

DANGER:
The power cable must not be clamped, bent or trapped or come into contact with hot parts of the product. A damaged power cable must be replaced by a qualified electrician. Otherwise, there is risk of electric shock, short circuit or fire!
The mains supply data must correspond to the data specified on the type label of the product. The rating plate is either seen when the door or the lower cover is opened or it is located at the rear wall of the unit depending on the unit type.
Power cable of your product must comply with the values in "Technical specifications" table.

Power cable plug must be within easy reach after installation (do not route it above the hob).

DANGER:
Before starting any work on the electrical installation, disconnect the product from the mains supply. There is the risk of electric shock!
Connect the power cable into the socket.
- Push the product towards the kitchen wall.
Final check
- Check electrical functions.
Future Transportation
- Keep the product's original carton and transport the product in it. Follow the instructions on the carton. If you do not have the original carton, pack the product in bubble wrap or thick cardboard and tape it securely.
- To prevent the wire grill and tray inside the oven from damaging the oven door, place a strip of cardboard onto the inside of the oven door that lines up with the position of the trays. Tape the oven door to the side walls.
- Do not use the door or handle to lift or move the product.
4 Preparation
Tips for saving energy
The following information will help you to use your appliance in an ecological way, and to save energy:
- Use dark coloured or enamel coated cookware in the oven since the heat transmission will be better.
- While cooking your dishes, perform a preheating operation if it is advised in the user manual or cooking instructions.
- Do not open the door of the oven frequently during cooking.
- Try to cook more than one dish in the oven at the same time whenever possible. You can cook by placing two cooking vessels onto the wire shelf.
- Cook more than one dish one after another. The oven will already be hot.
- You can save energy by switching off your oven a few minutes before the end of the cooking time. Do not open the oven door.
• Defrost frozen dishes before cooking them.
Initial use
First cleaning of the appliance

The surface might get damaged by some detergents or cleaning materials. Do not use aggressive detergents, cleaning powders/creams or any sharp objects during cleaning. Do not use harsh abrasive cleaners or sharp metal scrapers to clean the oven door glass since they can scratch the surface, which may result in shattering of the glass.
- Remove all packaging materials.
- Wipe the surfaces of the appliance with a damp cloth or sponge and dry with a cloth.
Initial heating
Heat up the product for about 30 minutes and then switch it off. Thus, any production residues or layers will be burnt off and removed.
WARNING
Hot surfaces cause burns!
Product may be hot when it is in use. Never touch the hot burners, inner sections of the oven, heaters and etc. Keep children away. Always use heat resistant oven gloves when putting in or removing dishes into/from the hot oven.
Electric oven
- Take all baking trays and the wire grill out of the oven.
- Close the oven door.
- Select Static position.
- Select the highest oven power; See How to operate the electric oven, page 14.
- Operate the oven for about 30 minutes.
- Turn off your oven; See How to operate the electric oven, page 14
Grill oven
- Take all baking trays and the wire grill out of the oven.
- Close the oven door.
- Select the highest grill power; see How to operate the grill, page 16.
- Operate the grill about 30 minutes.
- Turn off your grill; see How to operate the grill, page 16

Smoke and smell may emit for a couple of hours during the initial operation. This is quite normal. Ensure that the room is well ventilated to remove the smoke and smell. Avoid directly inhaling the smoke and the smell that emits.
5 How to operate the oven
General information on baking, roasting and grilling
WARNING
Hot surfaces cause burns!
Product may be hot when it is in use. Never touch the hot burners, inner sections of the oven, heaters and etc. Keep children away. Always use heat resistant oven gloves when putting in or removing dishes into/from the hot oven.

DANGER:
Be careful when opening the oven door as steam may escape.
Exiting steam can scald your hands, face and/or eyes.
Tips for baking
- Use non-sticky coated appropriate metal plates or aluminum vessels or heat-resistant silicone moulds.
• Make best use of the space on the rack. - Place the baking mould in the middle of the shelf.
- Select the correct rack position before turning the oven or grill on. Do not change the rack position when the oven is hot.
- Keep the oven door closed.
Tips for roasting
- Treating whole chicken, turkey and large piece of meat with dressings such as lemon juice and black pepper before cooking will increase the cooking performance.
- It takes about 15 to 30 minutes longer to roast meat with bones when compared to roasting the same size of meat without bones.
• Each centimeter of meat thickness requires approximately 4 to 5 minutes of cooking time. - Let meat rest in the oven for about 10 minutes after the cooking time is over. The juice is better distributed all over the roast and does not run out when the meat is cut.
- Fish should be placed on the middle or lower rack in a heat-resistant plate.
Tips for grilling
When meat, fish and poultry are grilled, they quickly get brown, have a nice crust and do not get dry. Flat pieces, meat skewers and sausages are particularly suited for grilling as are vegetables with high water content such as tomatoes and onions.
- Distribute the pieces to be grilled on the wire shelf or in the baking tray with wire shelf in such a way that the space covered does not exceed the size of the heater.
- Slide the wire shelf or baking tray with grill into the desired level in the oven. If you are grilling on the wire shelf, slide the baking tray to the lower rack to collect fats. Add some water in the tray for easy cleaning.

Foods that are not suitable for grilling carry the risk of fire. Only grill food which is suitable for intensive grilling heat.
Do not place the food too far in the back of the grill. This is the hottest area and fatty food may catch fire.
How to operate the electric oven
Select temperature and operating mode
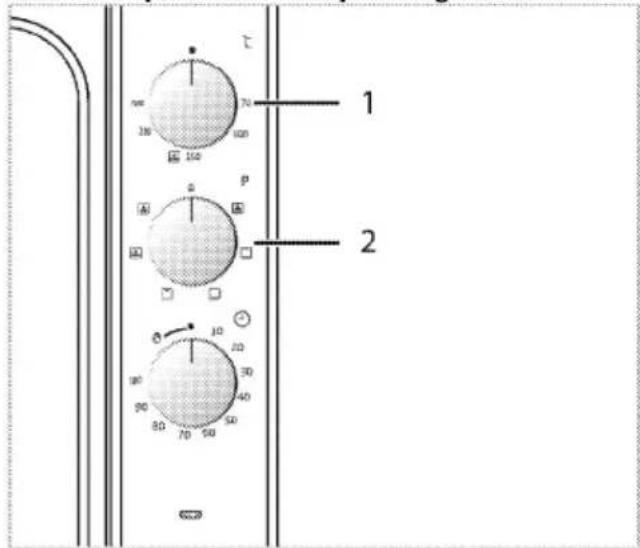
1 Thermostat knob
2 Function knob
-
Set the oven timer to the desired cooking time; see Using the oven clock, page 15.
-
Set the Function knob to the desired operating mode.
-
Set the Temperature knob to the desired temperature.
» Oven heats up to the adjusted temperature and maintains it. During heating, temperature lamp stays on.
Switching off the electric oven
Switch the oven timer to off position.

When the timer is set to a certain time, it will turn off automatically; see Using the oven clock, page 15
Turn the function knob and temperature knob to off (upper) position.
Operating modes
The order of operating modes shown here may be different from the arrangement on your product.
Top and bottom heating

Top and bottom heating are in operation. Food is heated simultaneously from the top and bottom. For example, it is suitable for cakes, pastries, or cakes and casseroles in baking moulds. Cook with one tray only.
Bottom heating

Only bottom heating is in operation. It is suitable for pizza and for subsequent browning of food from the bottom.
Fan supported bottom/top heating

Top heating, bottom heating plus fan (in the rear or side wall) are in operation. Hot air is evenly distributed throughout the oven rapidly by means of the fan. Cook with one tray only.
Fan assisted bottom heating

Bottom heating and the fan (in the rear or side wall) are in operation. Hot air is distributed better with fan when compared to the situation where only bottom heating is in operation.
Cozonac Function

The cooking function specially optimized for cake (cozonac), will provide an uniform baking by activating two heating elements, top and bottom. Effortlessly prepare cake (cozonac), pastries or sweets for you and your family.
Grill
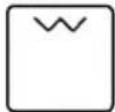
Small grill at the ceiling of the oven is in operation. Suitable for grilling.
- Put small or medium-sized portions in correct shelf position under the grill heater for grilling.
- Set the temperature to maximum level.
• Turn the food after half of the grilling time.
Using the oven clock

Starting the cooking

In order to operate the oven, you must select cooking mode and the desired temperature and set the time. Otherwise, the oven will not operate.
- Turn the Time Adjustment knob clockwise to set the cooking time.
- Put your dish into the oven.
- Select operation mode and temperature; see. How to operate the electric oven, page 14.
» The oven will be heated up to the preset temperature and will maintain this temperature until the end of the cooking time you selected. - Once the cooking time is over, Time Setting knob will automatically rotate counterclockwise. A warning sound indicating that the set time is over is heard and the power is cut.

If you do not want to use the timer function, turn the knob counterclockwise towards the hand symbol.
- Turn off the oven with the Time Setting knob, function knob and temperature knob.
Turning off the oven before the set time
- Turn the Time Adjustment knob counterclockwise until it stops.
- Turn off the oven with the Function knob and Temperature knob.
Cooking times table

The timings in this chart are meant as a guide. Timings may vary due to temperature of food, thickness, type and your own preference of cooking.
Baking and roasting

1st rack of the oven is the bottom rack.
| Dish | Cooking vessel | Rack position | Temperature (°C) | Cooking time (approx. in min.) | ||
| Cakes in mould | Cake mould 18 ... 22 cm | 1 | 1 | 160 ... 175 | 55 ... 75 | 50 ... 70 |
| Cookies | Oven tray | 1 | 1 | 170 ... 190 | 20 ... 30 | 20 ... 30 |
| Crispy mille-feuille | Oven tray | 1 | 1 | 180 ... 190 | 20 ... 30 | 20 ... 30 |
| Donut | Oven tray | 1 | 1 | 170 ... 180 | 20 ... 30 | 20 ... 30 |
| Pastries | Oven tray | 1 | 1 | 200 | 25 ... 35 | 25 ... 35 |
| Leaven | Oven tray | 1 | 1 | 200 | 35 ... 45 | 30 ... 40 |
| Rich pastry | Oven tray | 1 | 1 | 180 ... 190 | 20 ... 30 | 20 ... 30 |
| Dough pastry | Oven tray | 1 | 1 | 190 ... 200 | 35 ... 45 | 30 ... 40 |
| Lasagna | Oven tray | 1 | 1 | 170 ... 180 | 35 ... 45 | 30 ... 40 |
| Pizza | Oven tray | 1 | 1 | 200 ... 220 | 20 ... 30 | 20 ... 30 |
| Steak | Oven tray | 1 | 1 | 15 min. 250/max * | 90 ... 100 | 90 ... 100 |
| Leg of lamb | Oven tray | 1 | 1 | 15 min. 250/max * | 90 ... 100 | 90 ... 100 |
| Roasted chicken (1,5-2 kg) | Oven tray | 1 | 1 | 15 min. 250/max ** | 65 ... 75 | 60 ... 70 |
| Turkey (1,5-2 kg) | Oven tray | 1 | 1 | 25 min. 220 ** | 90 ... 100 | 80 ... 90 |
| Fish | Oven tray | 1 | 1 | 200 | 15 ... 25 | 15 ... 25 |
| * then 170** then 190 | ||||||
*** It is suggested to perform preheating for all foods.
How to operate the grill
WARNING
Close oven door during grilling. Hot surfaces may cause burns!
- Turn the Time Adjustment knob counter clockwise to Hand symbol when grilling.
Switching on the grill
- Turn the Function knob to the desired grill symbol.
-
Then, select the desired grilling temperature.
-
If required, perform a preheating of about 5 minutes.
» Temperature light turns on.
Switching off the grill
- Tum the Function knob to Off (top) position.

Foods that are not suitable for grilling carry the risk of fire. Only grill food which is suitable for intensive grilling heat.
Do not place the food too far in the back of the grill. This is the hottest area and fatty food may catch fire.
Cooking times table for grilling
Grilling with electric grill
| Food | Insertion level | Grilling time (approx.) |
| Fish | 2 | 30...40 min. # |
| Sliced chicken | 2 | 40...50 min. |
| Lamb chops | 2 | 35...40 min. |
| Roast beef | 2 | 35...40 min. # |
| Veal chops | 2 | 35...40 min. # |
| "depending on thickness | ||
6 Maintenance and care
General information
Service life of the product will extend and the possibility of problems will decrease if the product is cleaned at regular intervals.
DANGER:
Disconnect the product from mains supply before starting maintenance and cleaning works.
There is the risk of electric shock!
DANGER:
Allow the product to cool down before you clean it.
Hot surfaces may cause burns!
- Clean the product thoroughly after each use. In this way it will be possible to remove cooking residues more easily, thus avoiding these from burning the next time the appliance is used.
- No special cleaning agents are required for cleaning the product. Use warm water with washing liquid, a soft cloth or sponge to clean the product and wipe it with a dry cloth.
- Always ensure any excess liquid is thoroughly wiped off after cleaning and any spillage is immediately wiped dry.
- Do not use cleaning agents that contain acid or chloride to clean the stainless or inox surfaces and the handle. Use a soft cloth with a liquid detergent (not abrasive) to wipe those parts clean, paying attention to sweep in one direction.

The surface might get damaged by some detergents or cleaning materials.
Do not use aggressive detergents, cleaning powders/creams or any sharp objects during cleaning.
Do not use harsh abrasive cleaners or sharp metal scrapers to clean the oven door glass since they can scratch the surface, which may result in shattering of the glass.

Do not use steam cleaners to clean the appliance as this may cause an electric shock.
If a round tray is supplied with the product:
- Clean the tray with liquid dishwashing detergent before initial use.
• Pay attention to clean after every use.
• Use lemon or vinegar for persistent stains.
Cleaning the control panel
Clean the control panel and knobs with a damp cloth and wipe them dry.

Do not remove the control buttons/knobs to clean the control panel.
Control panel may get damaged!
Cleaning the oven
To clean the side wall
(This feature is optional. It may not exist on your product.)
- Remove the front section of the side rack by pulling it in the opposite direction of the side wall.
- Remove the side rack completely by pulling it towards you.

Catalytic walls
(This feature is optional. It may not exist on your product.)
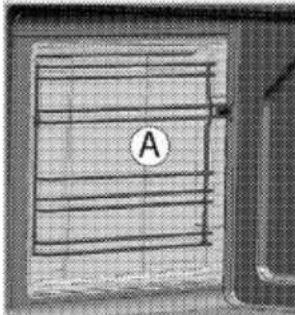
The inner side walls (A) and/or the rear wall (B) of your product may be coated with catalytic enamel. Catalytic walls have a light matte colour and a porous surface. Catalytic walls of the oven should not be cleaned. Porous surfaces of the catalytic walls are automatically cleaned by absorbing and converting the spilled oil (steam and carbon dioxide).
natural_image
Close-up of a grid-patterned panel with a circular label 'A' on the left side (no readable text or symbols beyond the label)
natural_image
Top-down view of a mechanical component with hexagonal cutout and labeled point B (no text or symbols beyond label)Clean oven door
To clean the oven door, use warm water with washing liquid, a soft cloth or sponge to clean the product and wipe it with a dry cloth.

Don't use any harsh abrasive cleaners or sharp metal scrapers for cleaning the oven door. They could scratch the surface and destroy the glass.
Replacing the oven lamp

DANGER:
Before replacing the oven lamp, make sure that the product is disconnected from mains and cooled down in order to avoid the risk of an electrical shock. Hot surfaces may cause burns!

The oven lamp is a special electric light bulb that can resist up to 300 °C. See Technical specifications, page 10 for details. Oven lamps can be obtained from Authorised Service Agents or technician with licence.

Position of lamp might vary from the figure.

The lamp used in this appliance is not suitable for household room illumination. The intended purpose of this lamp is to assist the user to see foodstuffs.

The lamps used in this appliance have to withstand extreme physical conditions such as temperatures above 50 °C.
If your oven is equipped with a round lamp:
- Disconnect the product from mains.
- Turn the glass cover counter clockwise to remove it.

natural_image
Illustration of a hand holding a circular object over a mechanical component (no text or symbols visible)- If your oven lamp is of type (A) shown in the figure below, remove it by rotating as shown and replace it. If it is of type (B), pull and remove it as shown in the figure and replace it.

natural_image
Mechanical component with rotational arrows indicating motion (no text or symbols)
natural_image
Mechanical component with a shaft and circular housing, no visible text or symbols- Install the glass cover.
7 Troubleshooting
Oven emits steam when it is in use.
- It is normal that steam escapes during operation. >>> This is not a fault.
Product emits metal noises while heating and cooling.
- When the metal parts are heated, they may expand and cause noise. >>> This is not a fault.
Product does not operate.
- The mains fuse is defective or has tripped. >>> Check fuses in the fuse box. If necessary, replace or reset them.
• Product is not plugged into the (grounded) socket. >>> Check the plug connection.
Oven light does not work.
- Oven lamp is defective. >>> Replace oven lamp.
- Power is cut. >>> Check if there is power. Check the fuses in the fuse box. If necessary, replace or reset the fuses.
Oven does not heat.
- Function and/or Temperature are not set. >>> Set the function and the temperature with the Function and/or Temperature knob/key.
- In models equipped with a timer, the timer is not adjusted. >>> Adjust the time. (In products with microwave oven, timer controls only microwave oven.)
- Power is cut. >>> Check if there is power. Check the fuses in the fuse box. If necessary, replace or reset the fuses.
(In models with timer) Clock display is blinking or clock symbol is on.
- A previous power outage has occurred. >>> Adjust the time / Switch of the product and switch it on again.

Consult the Authorised Service Agent or technician with licence or the dealer where you have purchased the product if you can not remedy the trouble although you have implemented the instructions in this section. Never attempt to repair a defective product yourself.
- Cuptor Electric Table Top Electric Oven
- arctic
- Grilaj metallic
- Tavă rotundă
- Please read this user manual first!
- Explanation of symbols
- Important instructions and warnings for safety and environment 4
- General information 9
- Installation 11
- Preparation 13
- How to operate the oven 14
- Maintenance and care 18
- Troubleshooting 20
- Important instructions and warnings for safety and environment
- General safety
- Electrical safety
- Product safety
- Intended use
- Safety for children
- Disposing of the old product
- Compliance with the WEEE Directive and Disposing of the Waste Product:
- Compliance with RoHS Directive:
- Package information
- General information
- Package contents
- User manual
- Oven tray
- Wire Shelf
- Round tray
- Basics: Information on the energy label of electrical ovens is given in accordance with the EN 60350-1 / IEC 60350-1 standard. Those values are determined under standard load with bottom-top heater or fan assisted heating (if any) functions.
- Installation
- DANGER:
- Before installation
- Installation and connection
- Electrical connection
- Final check
- Future Transportation
- Preparation
- Tips for saving energy
- Initial use
- First cleaning of the appliance
- Initial heating
- WARNING
- Electric oven
- Grill oven
- How to operate the oven
- General information on baking, roasting and grilling
- Tips for baking
- Tips for roasting
- Tips for grilling
- How to operate the electric oven
- Select temperature and operating mode
- Switching off the electric oven
- Operating modes
- Top and bottom heating
- Bottom heating
- Fan supported bottom/top heating
- Fan assisted bottom heating
- Cozonac Function
- Grill
- Using the oven clock
- Starting the cooking
- Turning off the oven before the set time
- Cooking times table
- Baking and roasting
- How to operate the grill
- Switching on the grill
- Switching off the grill
- Maintenance and care
- General information
- If a round tray is supplied with the product:
- Cleaning the control panel
- Cleaning the oven
- To clean the side wall
- Catalytic walls
- Clean oven door
- Replacing the oven lamp
- If your oven is equipped with a round lamp:
- Troubleshooting
- Oven emits steam when it is in use.
- Product emits metal noises while heating and cooling.
- Product does not operate.
- Oven light does not work.
- Oven does not heat.
- (In models with timer) Clock display is blinking or clock symbol is on.
Brand : ARCTIC COOLING
Model : AMO 40 B
Category : Oven