
EGR204MCCB - Cooker Element - Free user manual and instructions
Find the device manual for free EGR204MCCB Element in PDF.


| Product Type | Freestanding Electric Cooker |
| Brand | Element |
| Model | EGR204MCCB |
| Width | 60 cm |
| Depth | 60 cm |
| Height | 85 cm |
| Weight | 55 kg |
| Power Supply | 220-240 V ~ 50/60 Hz |
| Total Power Rating | 10.5 kW |
| Oven Type | Electric with fan and grill |
| Oven Capacity | 70 L |
| Number of Hob Zones | 4 |
| Hob Type | Radiant electric rings |
| Control Type | Knobs and digital display |
| Energy Class | A |
| Cleaning Method | Standard enamel interior, removable door |
| Safety Features | Child lock, overheat protection, auto shut-off |
| Spare Parts Availability | Available from manufacturer |
| Repairability | Moderate – DIY possible with tools |
| Included Accessories | Grill pan, oven shelf, baking tray |
| Warranty | 1 year |
Frequently Asked Questions - EGR204MCCB Element
User questions about EGR204MCCB Element
0 question about this device. Answer the ones you know or ask your own.
Ask a new question about this device
Download the instructions for your Cooker in PDF format for free! Find your manual EGR204MCCB - Element and take your electronic device back in hand. On this page are published all the documents necessary for the use of your device. EGR204MCCB by Element.
USER MANUAL EGR204MCCB Element
EN 20-Inch Gas Range
natural_image
Line drawing of a simple kitchen oven with four handles and front panel (no text or symbols)EGR204MCCW
EGR204MCCB
EGR204MCCS
CONTENTS
1.SAFETY INSTRUCTIONS....4
1.1 General Safety Warnings .... 4
1.2 Installation Warnings ....9
1.3 During Use....9
1.4 During Cleaning and Maintenance 12
2.INSTALLATION AND PREPARATION FOR USE....13
2.1 Instructions for the Installer 13
2.2 Installation of the Cooker.... 14
2.3 Gas Connection.... 15
2.4 Gas Conversion (if available) 16
2.5 Electrical Connection and Safety.... 18
2.6 Anti-tilting kit 19
2.7 Adjusting the feet.... 19
3.PRODUCT FEATURES....20
4.USE OF PRODUCT 21
4.1 Use of Gas Burners 21
4.2 Hob Controls.... 21
4.3 Oven Controls....22
4.4 Use of the Mechanical Minute Minder Timer 24
4.5 Accessories 24
5.CLEANING AND MAINTENANCE 25
5.1 Cleaning 25
5.2 Maintenance....27
6.TROUBLESHOOTING&TRANSPORT 29
6.1 Troubleshooting....29
6.2 Transport 30
7.TECHNICAL SPECIFICATIONS.... 31
7.1 Injector Table 31
Warranty & page 32
Thank you for choosing this product.
This User Manual contains important safety information and instructions on the operation and maintenance of your appliance.
Please take the time to read this User Manual before using your appliance and keep this book for future reference.

WARNING: If the information in these instructions are not followed exactly, a fire or explosion may result causing property damage, personal injury or death.
- Do not store or use gasoline or other flammable vapors and liquids in the vicinity of this or any other appliance.
- WHAT TO DO IF YOU SMELL GAS
- Do not try to light any appliance.
- Do not touch any phone in your building.
- Immediately call your gas supplier from a neighbor's phone. Follow the gas supplier's instructions.
- If you cannot reach your gas supplier, call the fire department.
- Installation and service must be performed by a qualified installer, service agency or the gas supplier.

WARNING:
Never Operate the Top Surface Cooking Section of this Appliance Unattended
Failure to follow this warning statement could result in fire, explosion, or burn hazard that could cause property damage, personal injury, or death.
If a fire should occur, stay away from the appliance and immediately call your fire department.
DO NOT ATTEMPT TO EXTINGUISH AN OIL/GREASE FIRE WITH WATER.
| Icon Type | Meaning | |
| 80127313 | Certification Refer to your serial plate for applicable agency certifications. | |
| WARNING Serious injury or death risk | ||
| RISK OF ELECTRIC SHOCK Dangerous voltage risk | ||
| FIRE | Warning:Risk of fire / flammable materials | |
| CAUTION Injury or property damage risk | ||
| IMPORTANT / NOTE Operating the system correctly | ||
1. SAFETY INSTRUCTIONS
- Read all instructions before using this appliance.
- This manual contains important safety symbols and instructions. Please pay attention to these symbols and follow all instructions given.
- Do not attempt to install or operate your appliance until you have read the safety precautions in this manual. Safety items throughout this manual are labeled with a WARNING or CAUTION statement based on the risk type.
- Warnings and important instructions appearing in this guide are not meant to cover all possible conditions and situations that may occur. Common sense, caution, and care must be exercised with installing, maintaining, or operating your appliance.
1.1 GENERAL SAFETY WARNINGS
- When installed in the United States, this range must be installed in accordance with local regulations or, in the absence of local codes, the most recent version of the National Fuel Gas Code (ANSI Z223.1).
- Underwriters Laboratories has approved the design of this series. There are several safety measures you should take, just as with any gas-powered equipment that produces heat. The Use & Care Guide contains them; be sure to read it thoroughly.
- This range must be electrically grounded in accordance with local codes or, in the absence of such codes, with the National Electrical Code ANSI/NFPA No.70—latest edition when installed in the United States.
-
Be sure your range is installed and grounded properly by a qualified installer or service technician.
-
Do not restrict the passage of combustion air at the oven vent, at the base, or under the lower front panel of the range.
- Ensure that the wall coverings surrounding the range can resist the heat produced by the range. When the oven is running, avoid touching the vent ports or any surrounding surfaces since they can get hot.
- Air curtain or other overhead range hoods, which operate by blowing a downward air flow onto a range, shall not be used in conjunction with gas ranges unless the hood and range have been designed, tested, and listed for use in combination by an independent test laboratory. This range needs fresh air for proper burner combustion.
- This appliance can be used by children aged from 8 years and above and by persons with reduced physical, sensory or mental capabilities or lack of experience and knowledge if they have been given supervision or instruction concerning use of the appliance in a safe way and understand the hazards involved. Children should not play with the appliance. Cleaning and user maintenance should not be made by children without supervision.
WARNING: The appliance and its accessible parts become hot during use. Care should be taken to avoid touching heating elements. Keep children less than 8 years of age away unless they are continually supervised.
WARNING: Unattended cooking on a hob with fat or oil can be dangerous and may result in fire. NEVER try to extinguish such a fire with water, but switch off the appliance and cover the flame with a lid or a fire blanket.
⚠️ CAUTION: The cooking process has to be supervised. A short term cooking process has to be supervised continuously
WARNING: Danger of fire: Do not store items on the cooking surfaces.
⚠️ ⚠️ WARNING: If the surface is cracked, switch off the appliance to avoid the possibility of electric shock.
- For models which incorporate a hob lid, clean any spillages off the lid before use and allow the cooker to cool before closing the lid.
- Do not operate the appliance with an external timer or separate remote-control system.
WARNING:
Tip Over Hazard
• A child or adult can tip the
- range and be killed.
- Verify the anti-tip device has been installed to floor or wall.
- Ensure the anti-tip device re-engaged to floor or wall when the range is moved.
- Do not operate the range without the anti-tip device in place and engaged.
- Failure to follow these instructions can result in death or serious burns to children and adults.
- To check if the anti-tip bracket is installed properly, use both arms to grasp the rear edge of the range back. Carefully attempt to tilt range forward. When properly installed, the range should not tilt forward.
- Refer to the anti-tip bracket installation instructions supplied with your range for proper installation.

natural_image
Warning sign depicting a person pulling a large object inside a triangle (no text or symbols)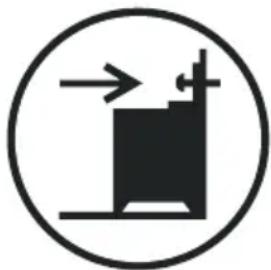
natural_image
Simple black-and-white icon of a building with arrows indicating airflow or movement (no text or symbols)⚠️ WARNING: To avoid the possibility of electric shock, make sure that the appliance is switched off before replacing the lamp.
⚠️ CAUTION: Accessible parts may be hot when cooking or grilling. Keep young children away from the appliance when it is in use.
- Your appliance is produced in accordance with all applicable local and international standards and regulations.
- Maintenance and repair work should only be carried out by authorized service technicians. Installation and repair work that is carried out by unauthorized technicians may be dangerous. Do not alter or modify the specifications of the appliance in any way. Inappropriate hob guards can cause accidents.
- Before connecting your appliance, make sure that the local distribution conditions (nature of the gas and gas pressure or electricity voltage and frequency) and the specifications of the appliance are compatible. The specifications for this appliance are stated on the label.
⚠️ CAUTION: This appliance is designed only for cooking food and is intended for indoor domestic household use only. It should not be used for any other purpose or in any other application, such as for non-domestic use, in a commercial environment or for heating a room.
- Do not use the oven door handles to lift or move the appliance.
- This appliance is not connected to a ventilation device. It should be installed and connected in accordance with current installation regulations. Particular attention shall be given to the relevant
requirements regarding ventilation.
- If the burner has not lit after 15 seconds, stop operating the device and open the compartment door. Wait at least 1 minute before attempting to ignite the burner again.
- These instructions are only valid if the correct country symbol appears on the appliance. If the symbol does not appear on the appliance, refer to the technical instructions which describe how to modify the appliance to match the conditions of use of the country.
- All possible measures have been taken to ensure your safety. Since the glass may break, care should be taken while cleaning to avoid scratching. Avoid hitting or knocking the glass with accessories.
- Make sure that the supply cord is not trapped or damaged during installation. If the supply cord is damaged, it must be replaced by the manufacturer, its service agent or similarly qualified persons in order to prevent a hazard.
- Do not let children climb on the oven door or sit on it while it is open.
- If your appliance is provided with a cooking hotplate made of glass or glass ceramic:
CAUTION: "In case of hotplate glass breakage":
- immediately shut off all burners and any electrical heating element and isolate the appliance from the power supply
- do not touch the appliance surface
- do not use the appliance.
- Please keep children and animals away from this appliance.
1.2 INSTALLATION WARNINGS
- Do not operate the appliance before it is fully installed.
- The appliance must be installed by an authorized technician. The manufacturer is not responsible for any damage that might be caused by incorrect placement and installation by unauthorized people.
- When the appliance is unpacked, make sure that it is has not been damaged during transportation. In the case of a defect do not use the appliance and contact a qualified service agent immediately. The materials used for packaging (nylon, staplers, styrofoam, etc.) may be harmful to children and they should be collected and removed immediately.
- Protect your appliance from the atmosphere. Do not expose it to sun, rain, snow, dust or excessive humidity.
- Materials around the appliance (i.e. cabinets) must be able to withstand a minimum temperature of 212 °F.
- The appliance must not be installed behind a decorative door, in order to avoid overheating.
1.3 DURING USE
- When you first use your oven you may notice a slight smell. This is perfectly normal and is caused by the insulation materials on the heater elements. We suggest that, before using your oven for the first time, you leave it empty and set it at maximum temperature for 45 minutes. Make sure that the environment in which the product is installed is well ventilated.
• Take care when opening the oven door during or after cooking. The hot steam from the oven may
cause burns.
- Do not put flammable or combustible materials in or near the appliance when it is operating.
- Do not spray aerosols in the vicinity of this appliance while it is in operation.
• Always use oven gloves to remove and replace food in the oven. - Under no circumstances should the oven be lined with aluminium foil as overheating may occur.
- Do not place dishes or baking trays directly onto the base of the oven whilst cooking. The base becomes very hot and damage may be caused to the product.
Do not leave the cooker unattended when cooking with solid or liquid oils. They may catch fire under extreme heating conditions. Never pour water on to flames that are caused by oil, instead switch the cooker off and cover the pan with its lid or a fire blanket.
• Always position pans over the center of the cooking zone, and turn the handles to a safe position so they cannot be knocked.
- If the product will not be used for a long period of time, turn the main control switch off. Turn the gas valve off when gas appliances are not in use.
- Make sure the appliance control knobs are always in the “0” (stop) position when the appliance is not in use.
- The trays incline when pulled out. Take care not to spill or drop hot food when removing it from the oven.
⚠️ CAUTION: The use of a gas cooking appliance results in the production of heat, moisture and products of combustion in the room in which it is
installed. Ensure that the kitchen is well ventilated especially when the appliance is in use, keep natural ventilation holes open or install a mechanical ventilation device (mechanical extractor hood).
- Prolonged intensive use of the appliance may call for additional ventilation, such as opening a window, or for more effective ventilation, for example by increasing the level of mechanical ventilation where present.
- While using the grill burner, keep the oven door open and always use the grill deflector shield supplied with the product. Never use the grill burner with the oven door closed.
- Do not place anything on the oven door when it is open. This could unbalance the oven or damage the door.
- Do not place heavy or flammable items (e.g. nylon, plastic bags, paper, cloth, etc.) into the drawer. This includes cookware with plastic accessories (e.g. handles).
⚠️ CAUTION: The inside surface of the storage compartment may get hot when the appliance is in use. Avoid touching the inside surface.
- Do not hang towels, dishcloths or clothes from the appliance or its handles.
1.4 DURING CLEANING AND MAINTENANCE
- Make sure that your appliance is turned off at the mains before carrying out any cleaning or maintenance operations.
- Do not remove the control knobs to clean the control panel.
- To maintain the efficiency and safety of your appliance, we recommend you always use original spare parts and to call our authorised service agents when needed.
2. INSTALLATION AND PREPARATION FOR USE

WARNING : This appliance must be installed by an authorized service person or qualified technician, according to the instructions in this guide and in compliance with the current local regulations.
- Prior to installation, ensure that the local distribution conditions (electricity voltage and frequency and/or nature of the gas and gas pressure) and the adjustments of the appliance are compatible. The adjustment conditions for this appliance are stated on the label.
- The laws, ordinances, directives and standards enforced in the country of use are to be followed (safety regulations, proper recycling in accordance with the regulations, etc.).
- If the product contains removable shelf guides (wire racks) and the user manual includes recipes like yogurt, the wire racks shall be removed and the oven operated in the defined cooking mode. Removal of the Wire Shelf information is included in the CLEANING AND MAINTENANCE section.
2.1 INSTRUCTIONS FOR THE INSTALLER Ventilation Requirements
- For rooms with a volume of less than 175 ft^3 ( 5 ~m^3 ), permanent ventilation of 15.5 inch^2 ( 100 ~cm^2 ) free area is required.
- For rooms with a volume of between 175ft^3 (5m^3) and 350ft^3 (10m^3) , permanent ventilation of 7.75inch^2 (50 cm^2 ) free area will be required, unless the room has a door which opens directly to outside air in which case no permanent ventilation is required.
- For rooms with a volume greater than 350 ft^3 ( 10 ~m^3 ), no permanent ventilation is required.

Important: Regardless of room size, all rooms containing the appliance must have direct access to outside air in openable window or equivalent.
Emptying of Burned Gases from the Environment
Gas appliances expel burned gas waste to the outside air, either directly or via a cooker hood with a chimney. If it is not possible to install a cooker hood, install a fan on the window or wall that has access to fresh air. The fan must have the capacity to change the volume of air in the kitchen a minimum of 4-5 times per hour.
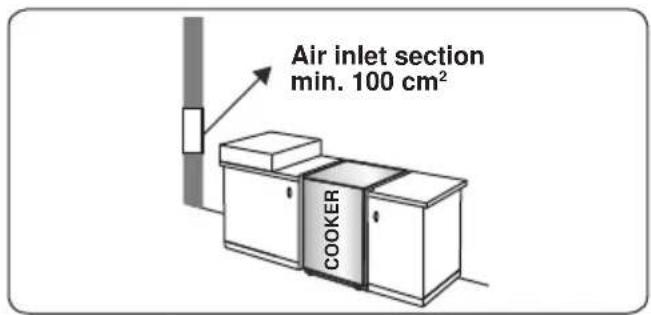
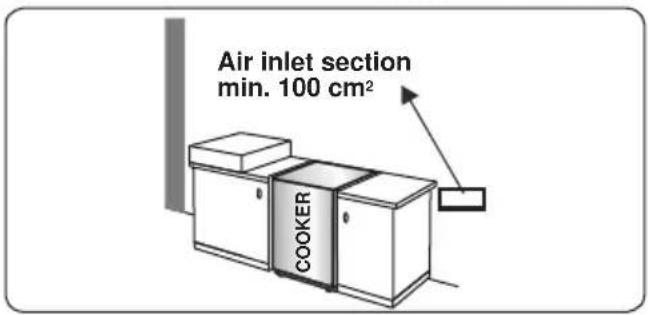
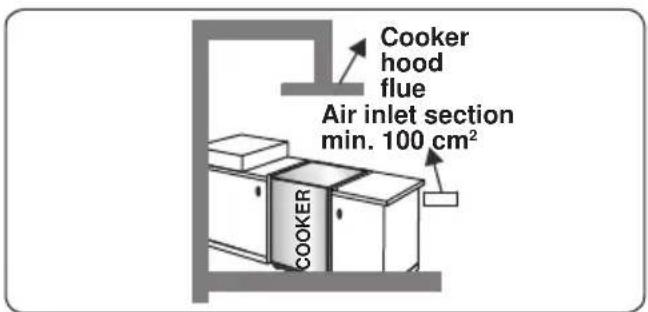
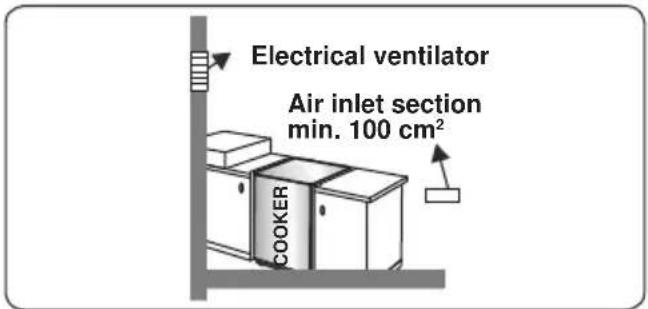
General Instructions
• After removing the packaging material from the appliance and its accessories, ensure that the appliance is not damaged. If you suspect any damage, do not use it and contact an authorized service person or qualified technician immediately.
• Make sure that there are no flammable or combustible materials in the close vicinity, such as curtains, oil, cloth etc. which may catch fire.
- The countertops and furniture surrounding the appliance must be made of materials resistant to temperatures above 212 °F.
• The appliance should not be installed next to a dishwasher, fridge, freezer, washing machine or clothes dryer.
- The appliance can be placed close to other furniture on condition that in the area where the appliance is set up, the furniture's height does not exceed the height of the cooktop.
2.2 INSTALLATION OF THE COOKER
• A qualified installer must perform installation and service.
- Important: Save for use by the neighborhood electrical inspector.
- Read and capture these guidelines for later reference.
Dimensions and Clearances
• Make sure there is enough space between the range and any nearby flammable materials.
- Location-Confirm the installation site for
the range. Verify the stability of the floor and the appropriateness of the electrical supply.
- The specified dimensions must be used. Minimum clearance is provided by the given dimensions. A stable and flat contact surface is required.
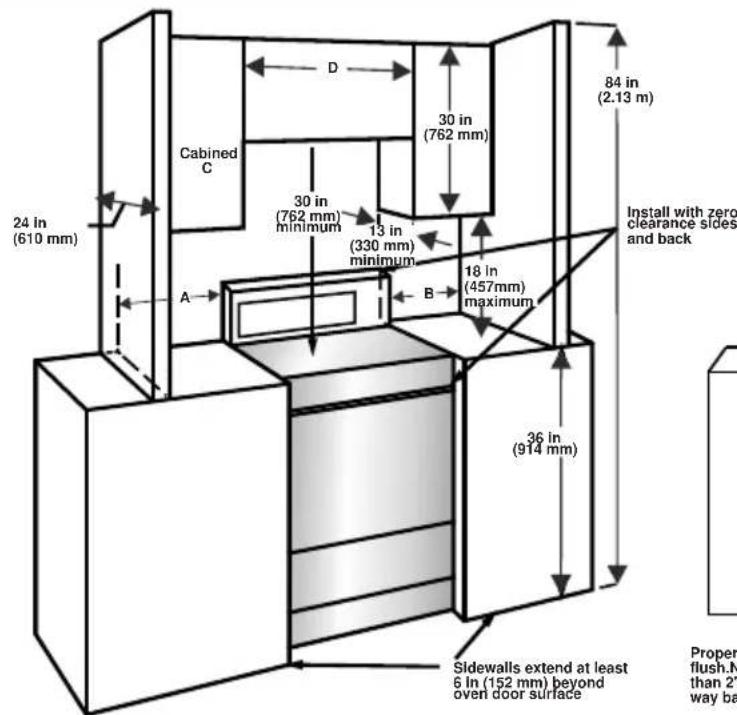
- Avoid cabinet storage space located above the surface units to eliminate the risk of burns or fire by reaching over heated surface units. The risk can be reduced by installing a range hood that projects horizontally a minimum of 5" (127 mm) beyond the bottom of the cabinets if cabinet storage is to be provided.
- If the kitchen furniture is higher than the cooktop, the kitchen furniture must be at least 4 inches (10 cm) away from the sides of appliance for air circulation.
- If a cooker hood or any cupboard is to be installed above the appliance, the safety distance between cooktop and any cupboard/cooker hood should be as shown below.
| A (min) 20" | |
| B (min) 17" | |
| D Product Width |
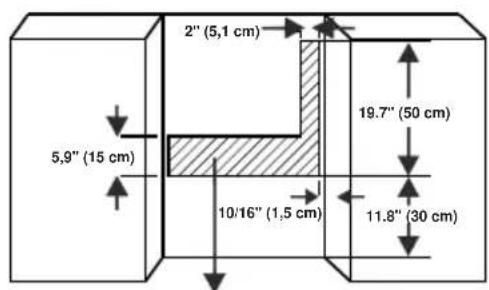
Proper positioning of the gas and electric outlet must be flush. Nothing located in shaded area can extend more than 2" (5.1 cm) form wall or range will not slide all the way back.
2.3 GAS CONNECTION
Assembly of Gas Supply and Leakage Check
Connect the appliance in accordance with applicable local and international standards and regulations. First, check what type of gas is installed on the cooker. This information is available on a sticker on the back of the cooker. You can find the information related to appropriate gas types and appropriate gas injectors in the technical data table. Check that the feeding gas pressure matches the values on the technical data table, to be able to get the most efficient use and to ensure the minimum gas consumption. If the pressure of used gas is different than the values stated or is not stable in your area, it may be necessary to assemble an available pressure regulator on the gas inlet. You should contact an authorized service center to make these adjustments.
Points that must be Check During Flexible Hose Assembly
- If the gas connection is made by a flexible hose fixed onto the gas inlet of the hob, it must be fixed on by a pipe collar.
- Connect your appliance with a short and durable hose that is as close as possible to the gas source.
- The permitted maximum length of the hose is 36 inches (90 cm).
- The device should be connected in line with the relevant local gas standards.
- The hose must be kept clear of areas that may heat up to temperatures of more than 194^ (90 °C).
- The hose must not be cracked, torn, bent or folded.
- Keep the hose clear of sharp corners and objects that could move.
- Before you assemble the connection, you must make sure the hose is not damaged. Use bubbly water or leakage fluids to perform the check. Do not use a naked flame to check for gas leakage.
- All metal items that are used during gas connection must be free from rust. Check the expiration date of any components used for connection.
Points that must be Check During Fixed Gas Connection Assembly
This appliance has been tested in accordance the following standards :
• ANS Z21.1 : Household Cooking Appliances
• CSA 1.1 : Household Cooking Appliances
• CAN / CSA-C 22.2 No 61-M89 Household Cooking Ranges
- In Canada : Installation shall be in accordance with CAN 1-B149.1 and CAN 1-B149.2 Installation Codes for Gas Burning Appliances and or local codes.
- It is the responsibility of the owner and the installer to determine if additional requirements, such as local codes and/or standards, apply to specific installations. The installation shall conform with local codes or, in the absence of local codes, with th National Fuel Gas Code, ANSI Z223.1/NFPA 54 or, in Canada, the Natural Gas and Propane Installation Code, CSA B149.1.
- The method used to assemble a fixed gas connection (gas connection made by threads, e.g. a nut) varies according to the country you are in. The most common parts for your country will be supplied with your appliance. Any other parts required can be supplied as spare parts.
- During connection, always keep the nut on the gas manifold fixed while rotating the counter-part. Use appropriately-sized spanners for a safe connection. For surfaces between different components always use the seals provided in the gas conversion kit.
- The seals used during connection should also be approved to be used in gas connections. Do not use plumbing seals for gas connections.
- Remember that this appliance is ready to be connected to the gas supply in the country for which it has been produced. The main country of destination is marked on the rear cover of the appliance. If you need to use it in another country, any of the connections in the figure below may be required. In such a case, contact local authorities to learn the correct gas connection.
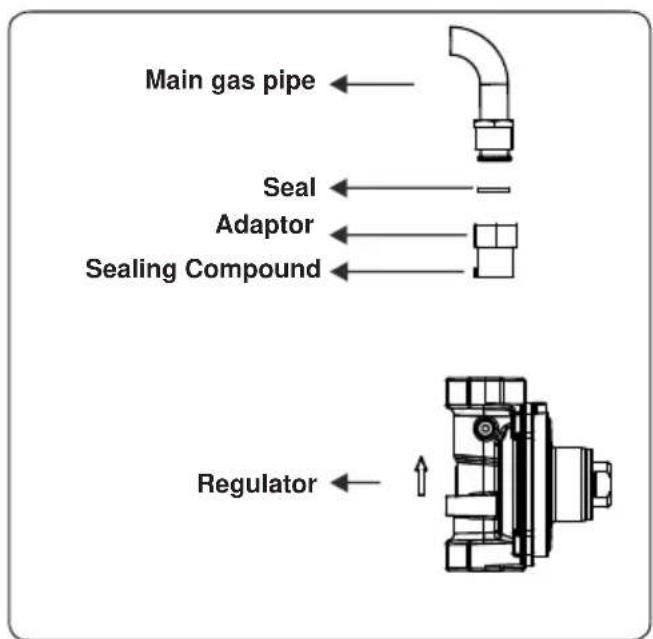
Note: Use pipe joint sealant on all male (outside) pipe threads to stop leaks. When tightening fittings, avoid allowing the gas pressure regulator to turn on the pipe.
a. Construct an accessible place outside of the range and attach an external manual gas shut-off valve to the gas supply line.
Make sure you are aware of where and how to turn off the range's gas supply.
b. Attach the 1/2" flare union adapter to the gas pressure regulator with a maximum torque of 15 ft-lbs.
natural_image
Cross-sectional diagram of a mechanical component with no visible text or symbols
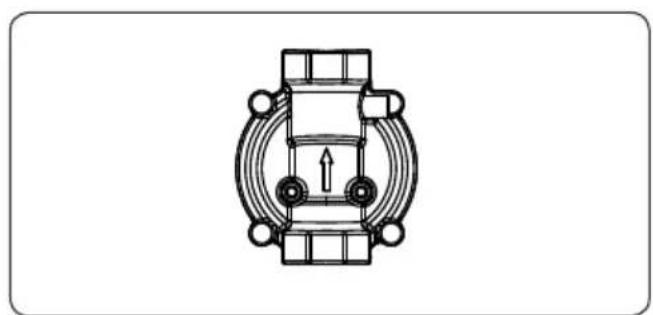
WARNING: Please assemble the regulator to the appliance in the arrow direction shown on the regulator.
The Cooker must be installed and maintained by a suitably qualified gas registered technician in accordance with current safety legislation.

WARNING: Do not use a naked flame to check for gas leaks.
Gas Pressure Regulator
The gas pressure regulator that is supplied with this appliance must be used. The inlet pressure to the regulator should be as follows for proper operations :
Natural Gas (NG - Methane) :
Minimum pressure: 5" W.C.
Maximum pressure: 13" W.C.
Propane Gas (LP) :
Minimum pressure : 12" W.C.
Maximum pressure: 13" W.C.
2.4 GAS CONVERSION (IF AVAILABLE)
Your appliance is designed to be operated with LP/NG gas. The gas burners can be adapted to different types of gas, by replacing the corresponding injectors and adjusting the minimum flame length suitable to the gas in use. For this purpose, the following steps should be performed.
Changing Pressure Setting of The Regulator
The regulator of the appliance is shipped to operate on NG. The inlet pressure of the gas supply shall be in accordance with the nominal inlet pressure of the regulator used on the range or 13" W.C. maximum.
- WARNING: Before performing the conversion, be sure to shut off the gas and electrical power supply of the appliance.
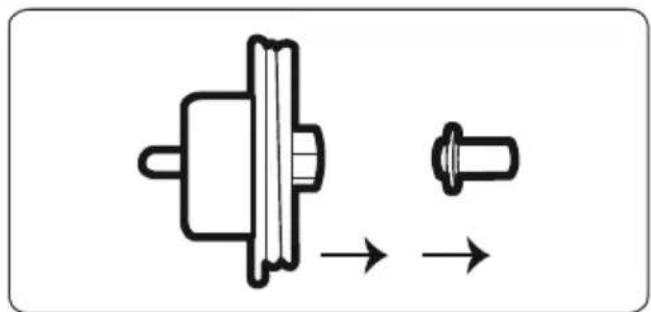
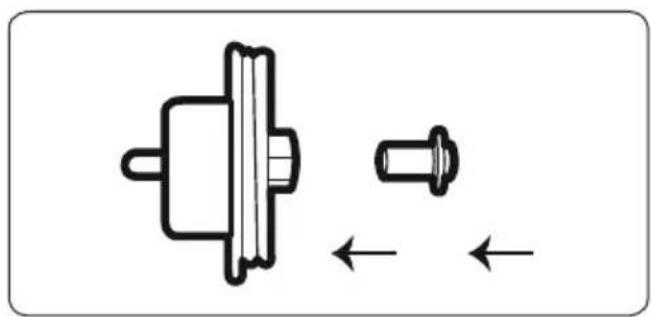
- Twist the cap to get the adjustment rod out. When the letter "NG" on the adjustment rod faces upward. The regulator outlet pressure is set to NG.
natural_image
Pure mechanical component diagram with no text or symbols- To convert it from NG to LP, change direction of the adjustment rod. When the letter "LP" on the adjustment rod faces upward. The regulator outlet pressure is set to LP.
natural_image
Mechanical component diagram showing a shaft and nut assembly with directional arrows indicating movement (no text or symbols)- Replace the cap back on the regulator.
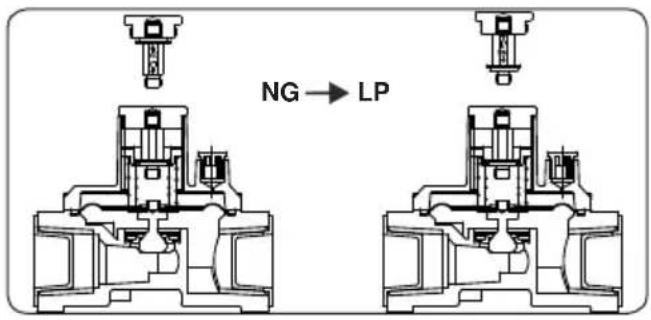
Changing Injectors Hob Burners
- Cut off the main gas supply and unplug the appliance from the mains electrical supply.
- Remove the burner caps and the adapters.
- Use a 9/32" (7 mm) spanner to unscrew the injectors.
- Replace the injector with the ones from the gas conversion kit, with the correct diameters for the type of gas that is going to be used, according to the gas injector table.
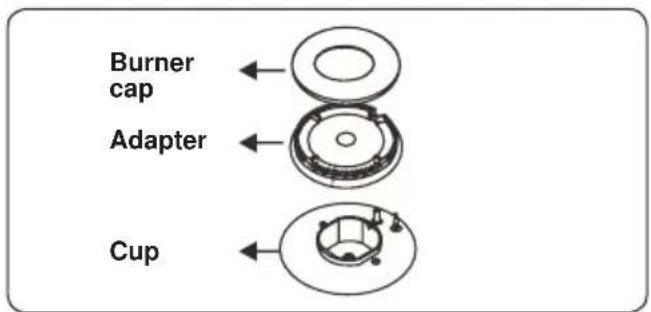
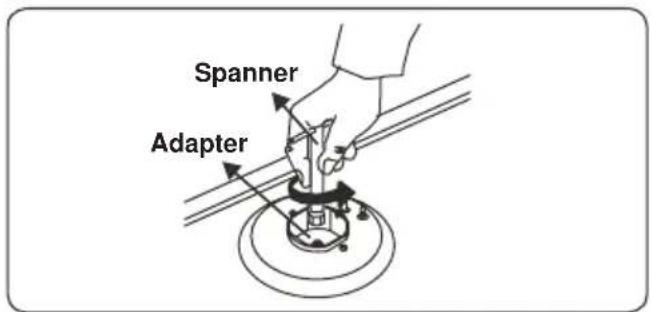
Oven/Grill Injectors (if available)
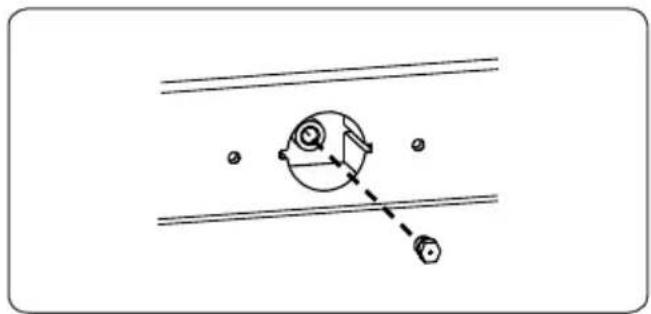
- The oven and grill injectors are held in position by a single screw on the tip of the burner.
- For oven burners, open the drawer compartment and locate the assembly screw below the burner. Remove the screw, move the burner diagonally and the injector will be revealed on the rear side of the
burner box.
- For grill burners, the screw is already visible. Remove the screw, pull the grill burner towards you and the injector will be visible on the rear surface of the oven cavity.
natural_image
Simple line drawing of a mechanical component with two holes and a dashed alignment line (no text or symbols)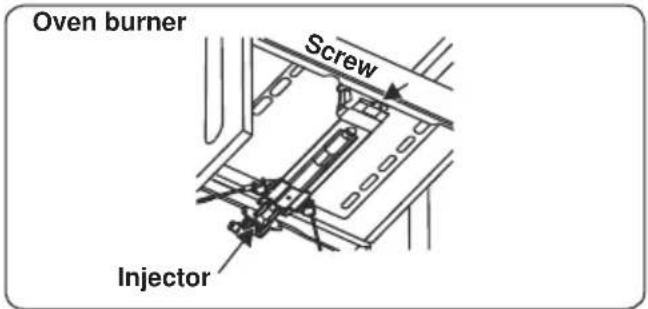
- Remove the injectors using a 9/32" (7 mm spanner and replace the injector with the ones from the spare set. Make sure you use corresponding diameters suitable to the type of gas that is going to be used, according to the information chart (which is also supplied in the gas conversion kit.
Adjusting the minimum flame position
First of all, make sure that the appliance is unplugged from the main electrical supply and that the gas feed is open. The minimum flame position is adjusted with a flat screw located on the valve. As shown in the figures below; for valves with a flame failure safety device, the screw is located on the side of the valve spindle and for valves without a flame failure safety device, the screw is located inside the valve spindle. To make adjusting the flame position easier, we recommend that you remove the control panel (and the micro switch if your model has one) during the alteration. The bypass screw must be loosened for conversion from LP to natural gas. For conversion from natural gas to LP, the bypass screw must be tightened.
Valve
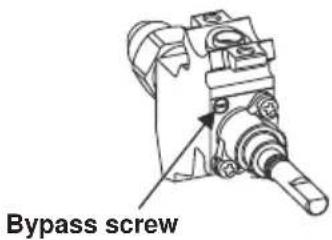
Determining the Minimum Flame Position
To determine the minimum position, ignite the burners and leave them on in the minimum position. Remove the knobs to gain access to the screws. With the help of a small screwdriver, fasten or loosen the bypass screw by around 90 degrees. When the flame has a length of at least 5/32" (4 mm), the gas is well distributed. Make sure that the flame does not die out when passing from the maximum position to the minimum position. Create an artificial wind with your hand towards the flame to see if the flames are stable. For the oven burner, operate the oven burner at the minimum position for 5 minutes, then open and close the oven door 2-3 times to check the flame stability of the burner.
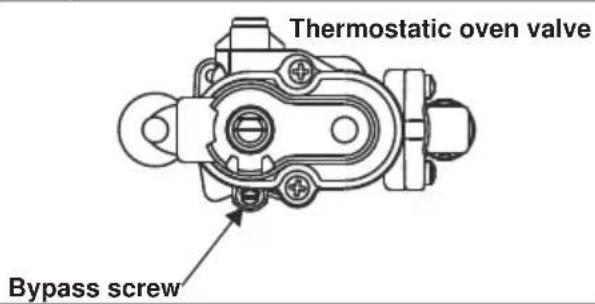
2.5 ELECTRICAL CONNECTION AND SAFETY

WARNING: The electrical connection of this appliance should be carried out by an authorized service person or qualified electrician, according to the instructions in this guide and in compliance with the current local regulations.

WARNING: THE APPLIANCE MUST BE EARTHED.
- Before connecting the appliance to the power supply, the voltage rating of the appliance (stamped on the appliance identification plate) must be checked for correspondence to the available main supply voltage, and the main electric wiring should be capable of handling the appliance's power rating (also indicated
on the identification plate).
- During installation, please ensure that isolated cables are used. An incorrect connection could damage your appliance. If the maincable is damaged and needs to be replaced this should be done by a qualified person.
- Do not use adaptors, multiple sockets and/or extension leads.
- The supply cord should be kept away from hot parts of the appliance and must not be bent or compressed. Otherwise the cord may be damaged, causing a short circuit.
- If the appliance is not connected to the main with a plug, a all-pole disconnector (with at least 1/8" (3 mm) contact spacing) must be used in order to meet the safety regulations.
- The appliance is designed for a power supply of 110-120 V. If your supply is different, contact the authorized service personnel or qualified electrician.
- The power cable must be long enough to be connected to the appliance.
- The fused switch must be easily accessible once the appliance has been installed.
- Ensure all connections are adequately tightened.
- Fix the supply cable in the cable clamp and then close the cover.
- The terminal box connection is placed on the terminal box.
- CAUTION: Risk of Electric Shock. If the cord or plug becomes damaged, disconnect the appliance from the power supply and replace only with a cord or plug of the same type.
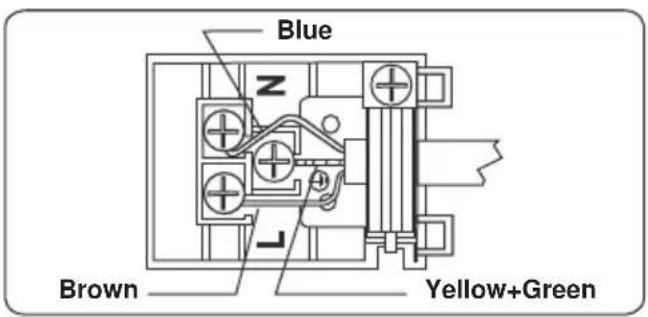
2.6 ANTI-TILTING KIT
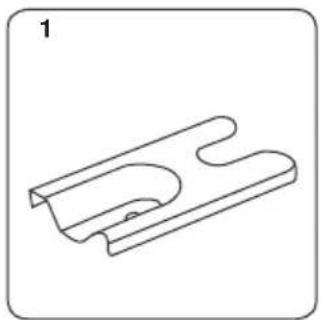
natural_image
Line drawing of a mechanical component with a curved cutout and flange (no text or symbols)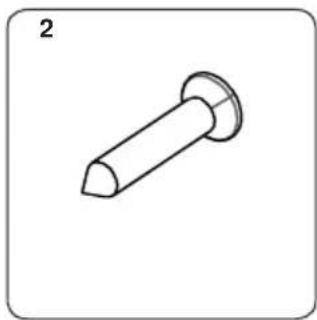
natural_image
Simple line drawing of a bolt with a flanged end (no text or symbols)The document bag contains an anti-tilting kit. Loosely attach the anti-tilting bracket (1) to the ground using the screw (2) and wall plug (3) as shown in the figure below. Push the appliance towards the bracket making sure that the anti-tilting bracket is inserted into the foot on the appliance.
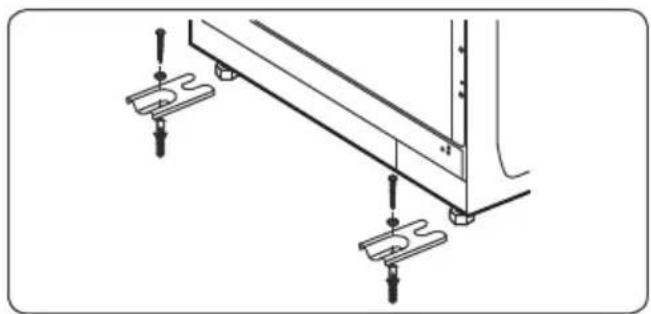
natural_image
Technical diagram of a mechanical assembly with mounting brackets and fasteners (no text or symbols)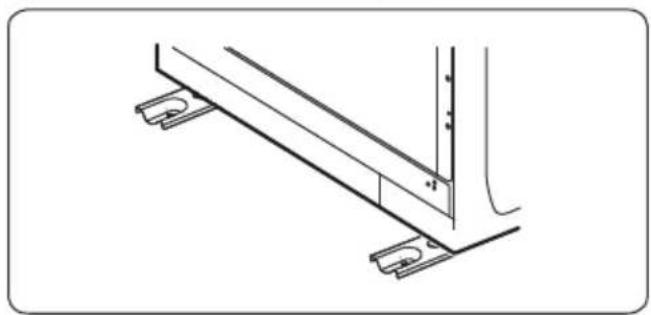
natural_image
Technical line drawing of a structural bracket with mounting feet (no text or symbols)2.7 ADJUSTING THE FEET
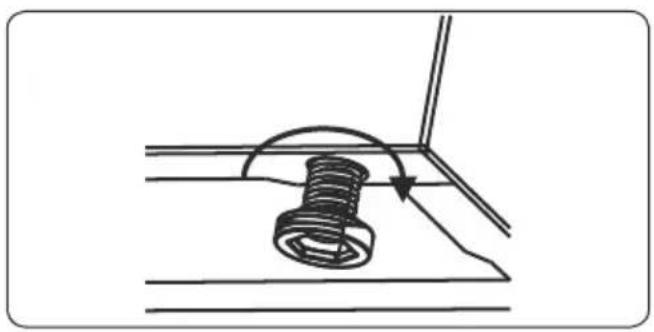
- Your product stands on four adjustable feet. For safe operation, it is important that your appliance is correctly balanced. Make sure the appliance is level prior to cooking. To increase the height of the appliance, turn the feet counterclockwise. To decrease the height of the appliance, turn the feet clockwise.
- It is possible to raise the height of the appliance up to 1.18" (30 mm) by adjusting the feet. The appliance is heavy and we recommend that a minimum of 2 people lift it. Never drag the appliance.
natural_image
Diagram of a mechanical assembly with a spring and rotating arrow (no text or symbols)3. PRODUCT FEATURES

Important: Specifications for the product vary and the appearance of your appliance may differ from that shown in the figures below.
List of Components
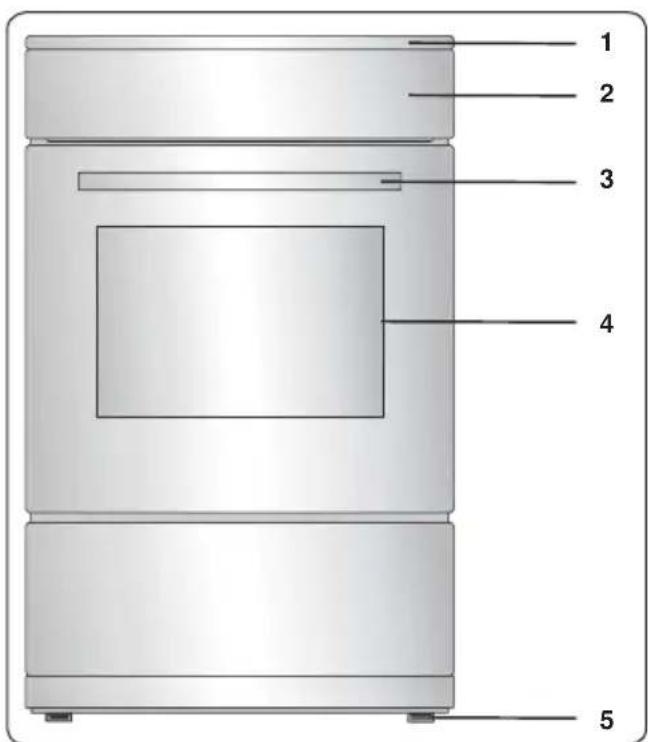
- Cooktop
- Control Panel
- Oven Door Handle
- Oven Door
- Adjustable Feet
Control Panel
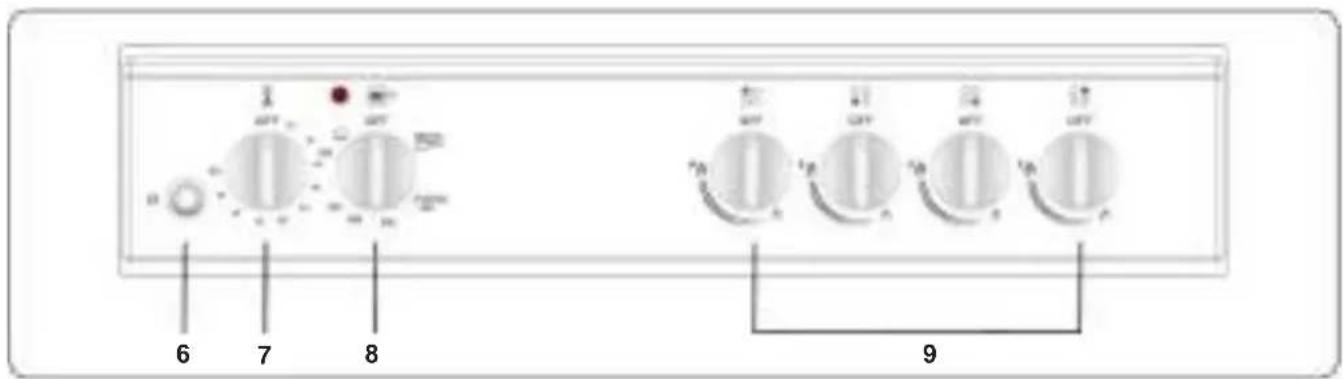
- Button (Ignition)
- Timer
- Oven Control Knob
- Hob Control Knob
4. USE OF PRODUCT
Ignition of the Burners
The position symbol above each control knob indicates the burner that the knob controls.
Manual Ignition of the Gas Burners
If your appliance is not equipped with an ignition aid, or in case there is a failure in the electric network, follow the procedures listed below.
For Hob Burners: Push in the knob of the burner you wish to ignite and keep it pressed while turning it anti-clockwise until the knob is in the 'maximum' position. Continue pressing the knob and hold a lit match, taper or other manual aid to the upper circumference of the burner. Move the ignition source away from the burner as soon as you see a stable flame.
For Oven Burner: Push in and turn the oven control knob anti-clockwise until the knob is in the 'maximum' position. Hold a lit match, taper or other manual aid to the ignition hole that is located on the front left corner of the burner. Move the ignition source away as soon as you see a stable flame.
Electrical Ignition by Control Knob
Push in the knob of the burner you wish to ignite and keep it pressed while turning it anti-clockwise until the knob is in the 90 degrees position. The microswitch under the knob will create sparks through the spark plug for as long as the control knob is pressed. Press the knob until you see a stable flame on the burner.
Flame Safety Device
Hob Burners
- Hobs equipped with a flame failure device provide security in case of an accidentally extinguished flame. For this reason, during ignition, keep the knob pressed until you see stable flames.
- Hold down the control for approximately 10 to 15 seconds after the burner has lit. Releasing the control too soon will extinguish the flame.
- If such a case occurs, the device will block the burners gas lines and will avoid any accumulation of unburned gas. Wait 90 seconds before re-igniting an extinguished gas burner.
Oven/grill burners (if available)
- Regardless of the model of your appliance, all oven burners are equipped with a gas safety device. For this reason, during ignition, keep the oven knob pressed until you see stable flames.
- Hold down the control for approximately 10 to 15 seconds after the burner has lit. Releasing the control too soon will extinguish the flame.
- If the flames are cut out after you release the knob, repeat the ignition procedure. If the oven burner does not ignite after you keep the burner knob pressed for 30 seconds, open the oven door and do not attempt re-ignition for at least 90 seconds. If the oven flames go out accidentally, repeat the same procedure.
4.2 HOB CONTROLS
Hob Burner
- The knob has 3 positions: off (0), maximum (big flame symbol) and minimum (small flame symbol). Ignite the burner with the knob in the 'maximum' position; you can then adjust the flame length between the 'maximum' and 'minimum' positions. Do not operate the burners when the knob is between the 'maximum' and 'off' positions.
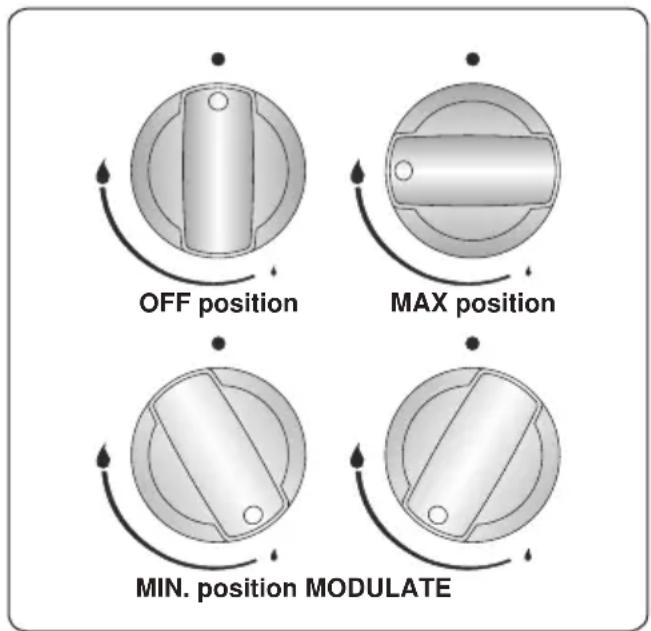
• After ignition, visually check the flames. If you see a yellow tip, lifted or unstable flame, switch the gas flow off, then check the assembly of burner caps and crowns once they have cooled. Make sure there is no liquid in the burner caps. If the burner flames go out accidentally, switch the burners off, ventilate the kitchen with fresh air and wait at least 90 seconds before
attempting re-ignition.
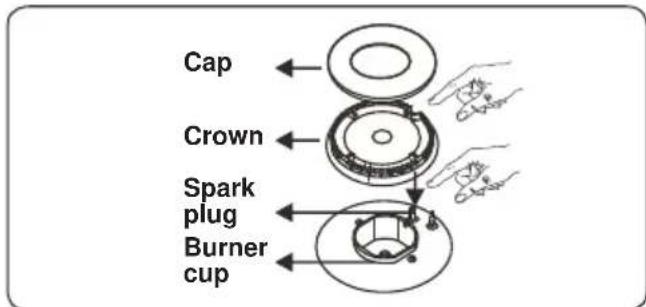
- To switch the hob burners off, turn the hob burner knob clockwise to the '0' position or so that the marker on the hob burner knob points upwards.
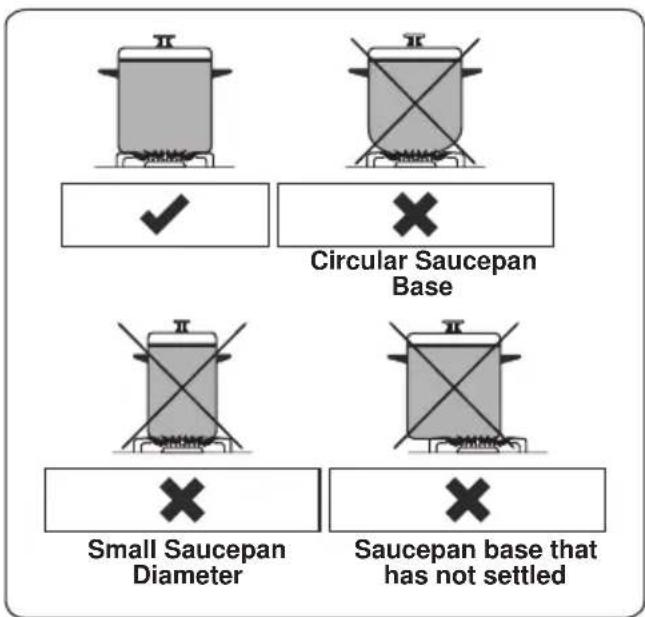
- Your hob has burners of different diameters. You will find that the most economical way of using gas is to choose the correct size gas burner for your cooking pan size and to bring the flame to the 'minimum' position once boiling point is reached. We recommend that you always cover your cooking pan to avoid heat loss.
• To obtain maximum performance from the main burners, we suggest you use pots with the following flat bottom diameters. Using pots smaller than the minimum dimensions shown below will cause energy loss.
| Rapid / Wok Burner | 8.66" - 10.24"(22-26 cm) |
| Semi-rapid Burner | 5.51" - 8.66"(14-22 cm) |
| Auxiliary Burner | 4.72" - 7.09"(12-18 cm) |
• Make sure that the tips of the flames do not spread out from the outer circumference of the pan, as this may harm plastic accessories, such as handles.
- Switch the main gas control valve off when the burners are not in use for prolonged periods of time.

WARNING:
- Only use flat-bottomed pans with thick bases.
• Make sure the bottom of the pan is dry before placing it on the burner. - The temperature of accessible parts may become high while the appliance is operating. It is imperative that children and animals are kept well away from the burners during and after cooking.
• After use, the hob remains very hot for a
prolonged period of time. Do not touch it and do not place any object on top of it.
- Never place knives, forks, spoons and lids on the hob as they will get hot and could cause serious burns.
- Do not allow pan handles or any other cooking utensils to project over the edge of the cooker top.
4.3 OVEN CONTROLS
Oven Burner Controls
• After you ignite the oven burner, you can adjust the temperature inside the oven, as required, using the numbers on the control panel or knob. The higher numbers provide higher temperatures, while smaller numbers provide lower temperatures.
| Function Description | |
| 300-500 Max PUSH | Turn the control anti-clockwise to set to the Gas Mark as required. |
| Turn the control clockwise to set the Electric Grill. | |
- Do not operate the appliance between the "Off" position and the first temperature marker in the anti-clockwise direction. Always use the oven between the maximum and minimum settings. When switching the oven off, turn the knob in the clockwise direction to the "0" position.
Preheating
We recommend you preheat your oven for 10 minutes. For recipes needing high
temperatures, such as bread, pastries, scones or soufflés, best results are achieved if the oven is preheated first. For best results when cooking from frozen or cooking chilled ready meals, always preheat the oven first.
| For 20" - 24" Appliances | |
| Position Temperature (°F) | |
| 300 300 °F | |
| 350 350 °F | |
| 400 400 °F | |
| 450 450 °F | |
| 500 500 °F | |
Cooking
- Ensure that food is placed centrally on the shelf and that there is sufficient room around the baking tray / dish to allow for maximum circulation.
- Stand dishes on a suitably sized baking tray on the shelf to prevent spillage onto the oven base and to help reduce the amount of cleaning required.
- The material and finish of the baking tray and dishes used will affect base browning. Enamel, dark, heavy or non-stick utensils increase base browning. Shiny aluminum or polished steel trays reflect the heat away and give less base browning.
- When cooking more than one dish in the oven, place dishes centrally on different shelves rather than cluster several dishes on one shelf, this will allow the heat to circulate freely for the best cooking results.
- If you are cooking more than one tray of similar items, for example cakes or biscuits, swap the trays during cooking or remove the top tray when the food is cooked and move the lower tray to the higher shelf to finish cooking.
- Do not place baking trays directly on the oven base as it interferes with the oven air circulation and can lead to base burning. Use the lower shelf position.
Electric Grill Broiler
- This function is used to grill food. It operates in a single mode to create a constant heat source.
- Turn the knob of the grill heater in a clockwise direction to the designated symbol for the grill.
- Preheat for 5 minutes, then place the food onto the wire grid and onto the top shelf of the oven. Place a tray on the shelf below to collect the fat or oils that may drop from the food.
- Once you have finished grilling, ensure the knob is turned to the '0' position.
- Ensure the oven is left to cool down, and that children are kept well away during this period.
- The control panel lamp will illuminate when the grill heater is on.
Cooking
- The grill burner creates a constant heat source and cannot be adjusted between the maximum and minimum positions. When switching the grill burner off, turn the knob in a clockwise direction to the "0" position.
- Place a tray on the shelf below the grid in order to collect any dripping fat or oil during grilling.
- Place the wire grid on the topmost shelf, provided that the food does not touch the grill burner.
- Preheat the grill on a full setting for a few minutes before sealing steaks or toasting. The food should be turned, as required, during cooking.
- Food should be thoroughly dried before grilling to minimize splashing. Brush lean meats and fish lightly with a little oil or melted butter to keep them moist during cooking.
- Food should be placed in the center of the grid to allow for maximum circulation of air.
- If your appliance has a grill pan and handle set as an accessory, refer to the accessories section for its usage.
Fan Controls (Convection Mode) (If available)
- In convection mode, the fan at the back of the oven compartment creates horizontal, forced air circulation.
- An advantage of convection cooking is the uniform distribution of heat throughout the oven cavity (meat no longer needs to be turned while roasting). To activate the convection fan, use the button on the
control panel.
- You do not need to preheat the oven when using the convection mode, although for delicate pastry baking we recommend that you heat the oven before inserting the pastry trays.

WARNING: In convection mode, the temperatures could be different than the values indicated in the "Oven er Controls" section.

WARNING: Do not operate the convection mode when the grill is in use.
Oven Lamp

There is an oven lamp inside the oven to illuminate the cooking area. Press the lamp button to switch the lamp on or off.
4.4 USE OF THE MECHANICAL MINUTE MINDER TIMER
| Function Description | |
| 0......100 | Operating by adjusting the timer |
Turn the Timer knob clockwise to set the desired cooking time. When the timer reaches zero, an audible warning will sound. The oven will remain switched on until the oven control is switched off.
4.5 ACCESSORIES
The EasyFix Wire Rack
Clean the accessories thoroughly with warm water, detergent and a soft clean cloth on first use.
- Insert the accessory to the correct position inside the oven.
- Allow at least a 1 cm space between the fan cover and accessories.
• Take care removing cookware and/or accessories out of the oven. Hot meals or accessories can cause burns.
• The accessories may deform with heat. Once they have cooled down, they will
recover their original appearance and performance.
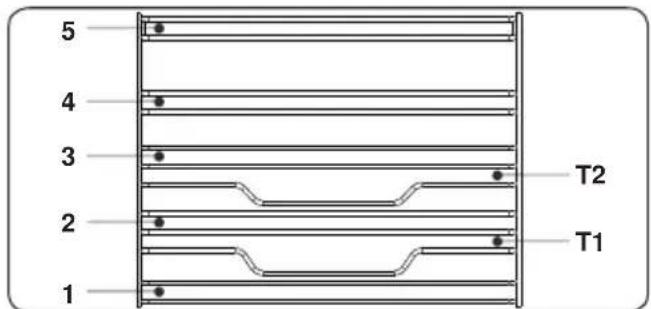
- Trays and wire grids can be positioned on any level from 1 to 5.
- Telescopic rails can be positioned on levels T1, T2, 3, 4, 5.
- Level 3 is recommended for single level cooking.
- Level T2 is recommended for single level cooking with the telescopic rails.
- The turnspit wire grid must be positioned on Level 3.
- Level T2 is used for the turnspit wire grid positioning with telescopic rails.
****Accessories may vary depending on the model purchased.
The Flap Drawer
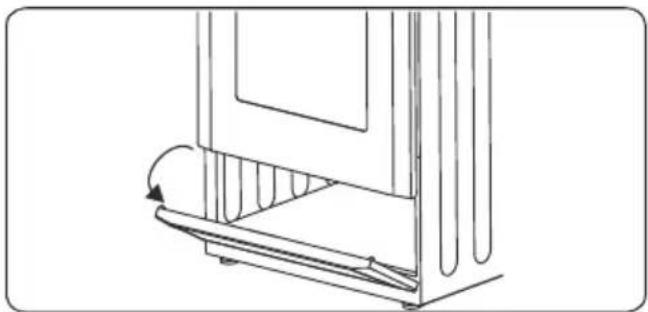
Your appliance includes a drawer for storing accessories such as trays, shelves, grids, or small pots and pans.

WARNING: The inner surface of the drawer may become hot during use. Do not store any food, plastic or nable materials in the drawer.
natural_image
Technical line drawing of a mechanical component with a curved arrow indicating rotation (no text or symbols)The Grill Pan and Handle Set
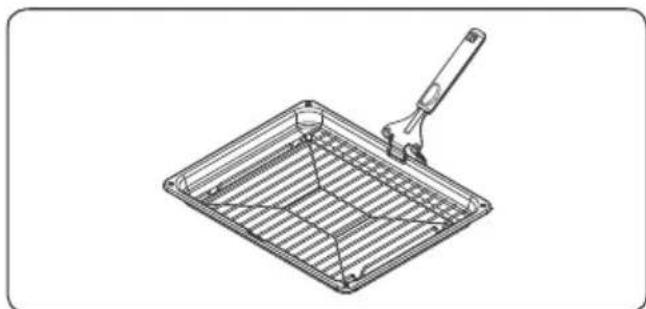
The grill pan set is best used for grilling steaks and similar foods.

WARNING: The grill pan has a detachable handle. Make sure when using the grill pan handle that it is realized and secure, as shown in the e. Do not leave the handle in tion while grilling is in operation.
natural_image
Line drawing of a square grater with a handle and mesh grille (no text or symbols)The Shallow Tray
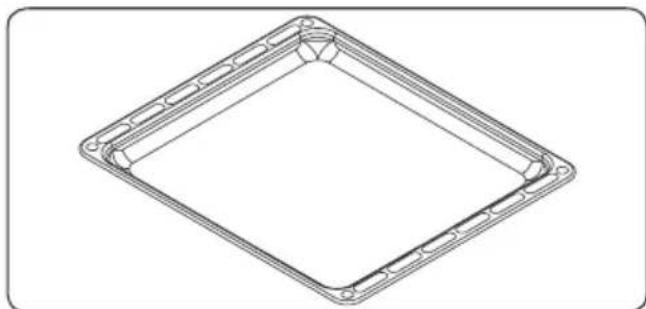
• The shallow tray is best used for baking pastries.
- Put the tray into any rack and push it to the end to make sure it is correctly placed.
natural_image
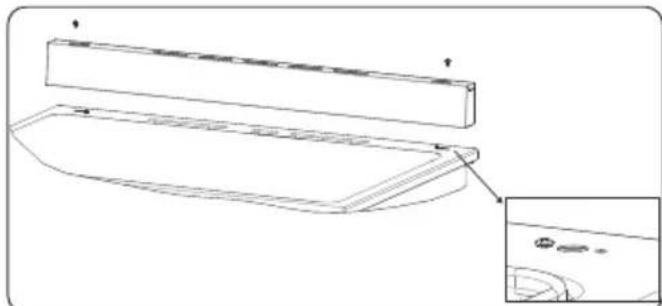
Technical line drawing of a square frame with rounded corners and mounting holes (no text or symbols)The Splashback
The splashback is attached to the cooktop with two screws.
natural_image
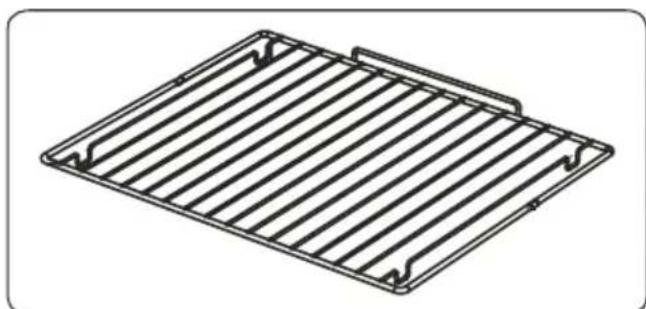
Technical line drawing of a mechanical component with an inset detail view (no text or symbols)The Wire Grid
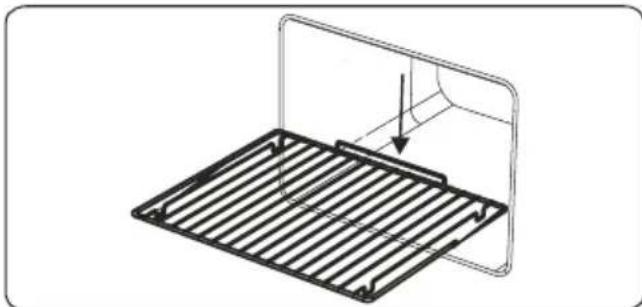
The wire grid is best used for grilling or for processing food in oven-friendly containers.
natural_image
Technical line drawing of a metal grate plate with slats and mounting brackets (no text or symbols)WARNING Place the q
Place the grid to any corresponding rack in the oven cavity correctly and push it to the end.
natural_image
Technical line drawing of a metal rack with an arrow indicating force or movement (no text or symbols)5. CLEANING AND MAINTENANCE
5.1 CLEANING
WARNING: Switch off the appliance and allow it to cool before cleaning is carried out.
General Instructions
- Check whether the cleaning materials are appropriate and recommended by the manufacturer before use on your appliance.
- Use cream cleaners or liquid cleaners which do not contain particles. Do not use caustic (corrosive) creams, abrasive cleaning powders, rough wire wool or hard tools as they may damage the cooker surfaces.
Do not use cleaners that contain particles, as they may scratch the glass, enamelled and/or painted parts of your appliance.
- Should any liquids overflow, clean them immediately to avoid parts becoming damaged.
Do not use steam cleaners for cleaning any part of the appliance.
Cleaning the Inside of the Oven
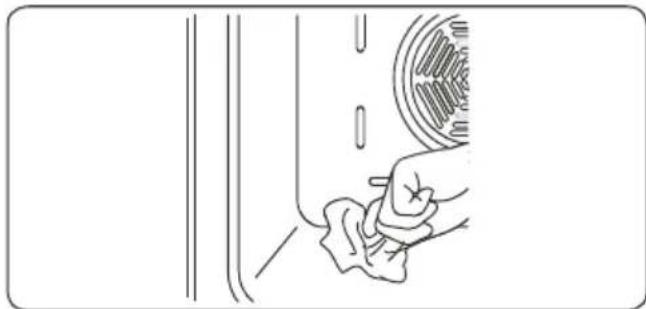
• The inside of enamelled ovens are best cleaned while the oven is warm.
- Wipe the oven with a soft cloth soaked in soapy water after each use. Then, wipe the oven over again with a wet cloth and dry it.
- You may need to use a liquid cleaning material occasionally to completely
clean the oven.
natural_image
Line drawing of a hand cleaning a car window with a circular object on the wall (no text or symbols)Cleaning the Gas Hob
- Clean the gas hob on a regular basis.
• Take off the pan supports, caps and crowns of the hob burners. - Wipe the hob surface with a soft cloth soaked in soapy water. Then, wipe the hob surface over again with a wet cloth and dry it.
- Wash and rinse the hob-burner caps. Do not leave them wet. Dry them immediately with a dry cloth.
• Make sure you re-assemble all parts correctly after cleaning. - The surfaces of the pan supports may become scratched over time due to use. This is not a production fault.

Do not use a metal sponge for cleaning any part of the hob.

Make sure no water gets into the burners as this may block the injectors.
Cleaning the Glass Parts
- Clean the glass parts of your appliance on a regular basis.
- Use a glass cleaner to clean the inside and outside of the glass parts. Then, rinse and dry them thoroughly with a dry cloth.
Cleaning the Enamelled Parts
- Clean the enamelled parts of your appliance on a regular basis.
- Wipe the enamelled parts with a soft cloth soaked in soapy water. Then, wipe them over again with a wet cloth and dry them.

Do not clean the enamelled parts while they are still hot from cooking.

Do not leave vinegar, coffee, milk, salt, water, lemon or tomato juice on the enamel for a long time.
Cleaning the Stainless Steel Parts (if available)
- Clean the stainless steel parts of your appliance on a regular basis.
- Wipe the stainless steel parts with a soft cloth soaked in only water. Then, dry them thoroughly with a dry cloth.

Do not clean the stainless steel parts while they are still hot from cooking.

Do not leave vinegar, coffee, milk, salt, water, lemon or tomato juice on the stainless steel for a long time.
Cleaning Painted Surfaces (if available)
- Spots of tomato, tomato paste, ketchup, lemon, oil derivatives, milk, sugary foods, sugary drinks and coffee should be cleaned with a cloth dipped in warm water immediately. If these stains are not cleaned and allowed to dry on the surfaces they are on, they should NOT be rubbed with hard objects (pointed objects, steel and plastic scouring wires, surface-damaging dish sponge) or cleaning agents containing high levels of alcohol, stain removers, degreasers, surface abrasive chemicals. Otherwise, corrosion may occur on the powder painted surfaces, and stains may occur.
Removal of the Inner Glass
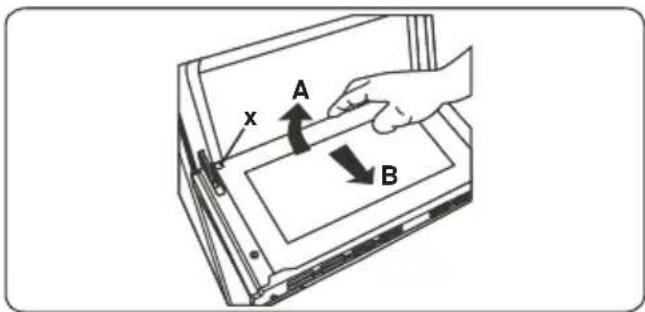
You must remove the oven door glass before cleaning, as shown below.
- Push the glass in the direction of B and release from the location bracket (x). Pull the glass out in the direction of A.
To replace the inner glass:
- Push the glass towards and under the location bracket (y), in the direction of B.
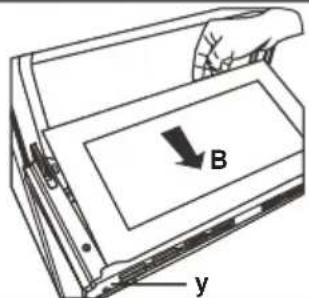
- Place the glass under the location bracket (x) in the direction of C.
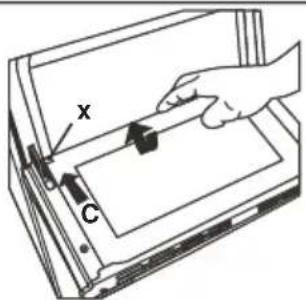

If the oven door is a triple glass oven door, the third glass layer can be removed the same way as the second's layer.
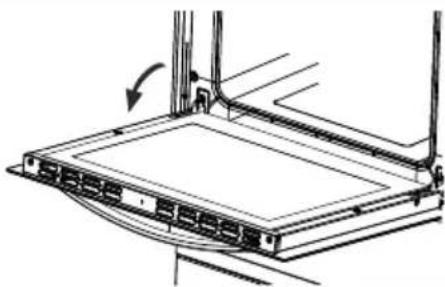
Removal of the Oven Door
Before cleaning the oven door glass, you must remove the oven door, as shown below.
- Open the oven door.
natural_image
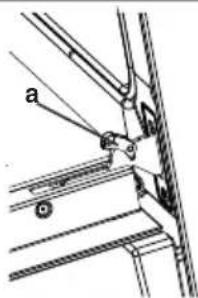
Technical line drawing of a mechanical assembly with no visible text or symbols- Open the locking catch (a) (with the aid of a screwdriver) up to the end position.
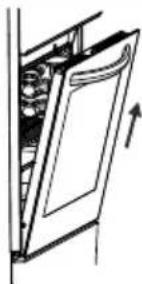
- Close the door until it almost reaches the fully closed position and remove the door by pulling it towards you.
natural_image
Diagram of a door with internal compartments and an arrow indicating direction (no text or symbols)Removal of the Wire Shelf
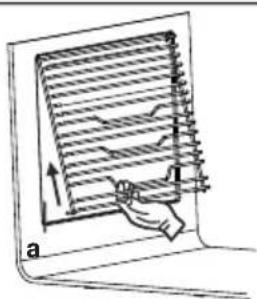
To remove the wire rack, pull the wire rack as shown in the figure. After releasing it from the clips (a), lift it up.
natural_image
Diagram of a computer monitor with a hand interacting with the screen, showing no text or symbols.5.2 MAINTENANCE
WARNING: The maintenance of this appliance should be carried out by an authorized service person or qualified technician only.
Changing the Oven Lamp
WARNING: Switch off the appliance and allow it to cool before cleaning your appliance.
- Remove the glass lens, then remove the bulb.
- Insert the new bulb (resistant to 572^ - 300^ ) to replace the bulb that you removed (110 V, 15-25 Watt, Type E14).
- Replace the glass lens, and your oven is ready for use.
• The product contains a light source of energy efficiency class G.
• Light source cannot be replaced by end user. After sales service is needed.
- The included light source is not intended for use in other applications.
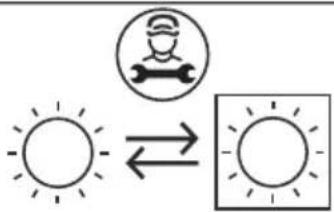
Replaceable light source by a professional

The lamp is designed specifically for use in household cooking appliances. It is not suitable for household room ination.
MAINTENANCE

WARNING: The maintenance of this appliance should be carried out by an authorized service person or qualified physician only.
Other Controls
• Periodically check expiration date of the gas connection pipe.
• Periodically check the gas connection pipe. If a defect is found, contact an authorized service provider to have it changed.
- If a defect is found while operating the control knobs of the appliance, contact an authorized service provider.
6. TROUBLESHOOTING & TRANSPORT
6.1 TROUBLESHOOTING

If you still have a problem with your appliance after checking these basic troubleshooting steps, please contact an authorised service person or qualified technician.
| Problem Possible Cause Solution | ||
| Oven and/or grill (if available) do not work. | The oven and/or grill may be in the "off" position. Supply gas pressure may not be correct. Power (if the appliance has an electric connection) is switched off. The feet have not been assembled. The battery (if applicable) may be depleted. | Check the position of the control knob. Check the gas supply and gas pressure. Check whether there is power supplied. Also check that other kitchen appliances are working. Make sure that there is no block at the bottom of the appliance. The battery may need replacing. |
| Oven is not cooking evenly. | Wrong shelf position being used. Your appliance has been installed by an unauthorized technician. Fan (if applicable) may be in the "off" position. | Check the shelf positions, cooking period and heat values according to the manual. Check that the appliance is correctly installed. Ensure that the fan is working. |
| Oven temperature is too high or too low. | Wrong shelf position or wrong heat setting being used. Supply gas pressure may be improper. | Check that the recommended temperatures and shelf positions are being used. Be prepared to adjust the temperature up or down slightly to achieve the results you want. Check the gas supply and gas pressure. |
| Hob burners do not light. | Burner cap and crown are not assembled correctly. Supply gas pressure may not be correct. LPG cylinder (if applicable) may be depleted. Power (if the appliance has an electric connection) is switched off. The battery (if applicable) may be depleted. | Ensure the burner parts have been placed correctly. Check the gas supply and gas pressure. LPG cylinder may need replacing. Check whether there is power supplied. Also check that other kitchen appliances are working. The battery may need replacing. |
| Flame color is orange/yellow. | Burner cap and crown are not assembled correctly. Different gas compositions. | Ensure the burner parts have been placed correctly. Due to the design of the burner, the flame can appear to be orange/yellow in certain areas of the burner. If you operate the appliance with natural gas, city natural gas may have different compositions. Do not operate the appliance for a couple of hours. |
| Burner is not igniting or only partially lighting. | Burner parts may not be clean or dry. | Ensure that parts of the appliance are dry and clean. |
| Burner sounds noisy. | - | This is normal. The noise may reduce as they heat up. |
| Noise - | It is normal for some metal parts on the cooker to produce noise when in use. | |
| Oven light (if available) does not operate. | Lamp has failed. Electrical supply is disconnected or switched off. | Replace lamp according to the instructions. Make sure the electrical supply is switched on at the wall socket outlet. |
6.2 TRANSPORT
- If you need to transport the product, use the original product packaging and carry it using its original case. Follow the transport signs on the packaging. Tape all independent parts to the product to prevent damaging the product during transport.
- If you do not have the original packaging, prepare a carriage box so that the appliance, especially the external surfaces of the product, is protected against external threats.
7. TECHNICAL SPECIFICATIONS
7.1 INJECTOR TABLE
| GENERAL | |
| Voltage / Frequency 110 - 120 V ~ 60 Hz | |
| Cable Type / Section / Length DTR 3x18 AWG / 5.25 ft | |
| Fuse Protection Min. 9A | |
| Gas Type / Pressure Natural Gas 5” / LP Gas 10” | |
| BURNERS | |
| Front Left Rapid Buner | |
| Power 11000 Btu/h - 11000 Btu/h | |
| Injector 1.55 mm - 0.96 mm | |
| Rear Left Semi Rapid Burner | |
| Power 8000 Btu/h - 8000 Btu/h | |
| Injector 1.18 mm - 0.82 mm | |
| Rear Right Semi Rapid Burner | |
| Power 8000 Btu/h - 8000 Btu/h | |
| Injector 1.18 mm - 0.82 mm | |
| Front Right Auxiliary Burner | |
| Power 3500 Btu/h - 3500 Btu/h | |
| Injector 0.90 mm - 0.55 mm | |
| Oven Burner Gas Thermostat Oven Burner | |
| Power 10000 Btu/h - 8500 Btu/h | |
| Injector 1.55 mm - 0.76 mm | |
| Total Power Consumption 40500 Btu/h - 39000 Btu/h | |
| Broil | Electric Broiler |
| Power 1000 W | |
| Inner Lamp | 15-25 W |
Element Appliance Limited Warranty
(the "Products" or "Product" when referencing a singular product herein)
This Product (including any accessories included in the original packaging) as supplied and distributed in new condition, is warranted by Element Appliance Company, LLC ("Element") to the original customer who purchases the Product from an authorized Element retailer (the "Original Customer" or "you") against defects in material and workmanship under proper use, maintenance, and care according to the owner's manual, warnings, and instructions accompanying the Product ("Warranty") as follows:
* PLEASE NOTE – Proof of purchase evidencing the date of purchase by the Original Purchaser from an authorized Element retailer (“Valid Proof of Purchase”) is required for all Warranty service. The express Warranty set forth herein is subject to all terms and conditions set forth below.
1. WARRANTY SERVICE:
A. ONE-YEAR WARRANTY: Except as provided in subpart 1.B below, for a period of one (1) year from the date of purchase by the Original Customer (the "Warranty Period"), if the parts or components covered by this Warranty are determined by Element or Element's authorized service provider to be defective in material or workmanship, Element will, at its sole and absolute discretion and option: (i) repair the defective part or component at no charge to the Original Customer, (ii) replace the defective Product with a new Product of similar or better quality, at no charge to the Original Customer, or (iii) refund the documented purchase price paid by the Original Customer (excluding tax) to the Original Customer upon return of the defective Product as directed by Element. After the Warranty Period expires, the Original Customer must pay for all parts, components, shipping and handling, labor, and replacement costs associated with the Product or any part or component thereof, regardless of any defects in the Product or any part or component thereof.
B. LIMITED EXTENDED WARRANTY THROUGH PRODUCT REGISTRATION: If and only if the Original Customer registers the Product at www.elementetelectronics.com within ninety (90) days of the date of purchase by the Original Customer, then the Warranty Period discussed in subpart 1.A. above shall be extended an additional one (1) year to a new Warranty Period equaling two (2) years from the date of purchase by the Original Customer. If the Product is not registered as provided for in this subpart 1.B, then the standard one-year Warranty Period set forth in subpart 1.A shall apply.
C. TIMING AND PROCEDURE: Before Warranty service can commence, the Original Customer must contact either (i) the retailer from whom the Original Customer purchased the Product, or (ii) Element directly, in either case for problem determination and service procedures. Valid Proof of Purchase evidencing that the Product is within the Warranty Period MUST be presented by Original Customer in order to obtain the requested Warranty service. Please have your model and serial number available, along with your date of purchase of the Product. To remain eligible for Warranty service, Original Customer may not return the Product or any part or component thereof to the retailer or Element without Element's prior written consent.
2. EXCLUSIONS AND LIMITATIONS TO WARRANTY SERVICE
The Warranty covers manufacturing defects in materials and workmanship of the Product encountered in the normal, non-commercial use of the Product, and does not cover (a) damages or malfunctions resulting from improper or unreasonable use or maintenance, abuse, negligence, failure to follow instructions contained in any written materials that accompany the Product, deterioration by reason of excess moisture, corrosive atmosphere, lightning, power surges, connections to improper voltage supply, unauthorized alteration, or other external causes such as extremes in temperature or humidity, modifications, scratches or discoloration; (b) any damage caused by using non-authorized parts or service facilities for repair of Products (however, for avoidance of doubt, using non-authorized parts or service facilities will not, in and of itself, void the Warranty); (c) transportation, shipping, delivery, pickup, insurance, installation, or set-up costs; (d) ordinary wear and tear, cosmetic damage, or damage due to acts of nature, including but not limited to, water, floods, wind, storm, tornado, earthquake, or fire, or due to damage caused by extraordinary impact events, such as dropping, crushing, demolition or other extraordinary damage; (e) commercial use of the Product, or use of the Product for anything other than single-family household or residential use; or (f) modification of the Product or any part of the Product.
This Warranty is made to the Original Customer only and does not cover Products sold AS IS or WITH ALL FAULTS. The Warranty is invalid if the factory-applied serial number has been altered or removed from the Product. This Warranty is valid only in the United States, and only applies to Product if it was purchased and serviced in the United States. The addition of equipment or features to the Product that are not manufactured or recommended by Element could affect the intended function of the Product, and therefore may void the Warranty. Furthermore, the exposure of the Product to chemicals, heat, cold, humidity, or other elements can affect the Product components, and therefore, the Warranty does not cover discoloration, fading, cosmetic changes, rust, or any damages or failure related to any such items. The Warranty is contingent upon the proper use, maintenance, and care of the Product. The Warranty may be void if the Product has been used in a manner contradictory to, or in violation of, the terms of the user's manual, warnings, or instructions accompanying the Product.
THIS WARRANTY IS MADE IN LIEU OF AND SUPERSEDES ALL OTHER WARRANTIES OR CONDITIONS OF MERCHANTABILITY OR FITNESS FOR A PARTICULAR PURPOSE OR GENERAL USE, WHETHER EXPRESS, IMPLIED, COLLATERAL, STATUTORY, OR PROVIDED BY COMMON LAW, THE UNIFORM COMMERCIAL CODE, OR OTHERWISE. ELEMENT FURTHER DISCLAIMS ALL WARRANTIES AFTER THE END OF THE WARRANTY TERM DEFINED ABOVE. NO OTHER EXPRESS WARRANTY OR GUARANTY GIVEN BY ANY OTHER PERSON, FIRM, OR ENTITY WITH RESPECT TO THE PRODUCT SHALL BE BINDING ON ELEMENT. REPAIR, REPLACEMENT, OR REFUND OF THE ORIGINAL PURCHASE PRICE, AT ELEMENT'S SOLE DISCRETION, ARE THE EXCLUSIVE REMEDIES OF THE CUSTOMER.
ELEMENT SHALL NOT BE LIABLE FOR ANY INCIDENTAL OR CONSEQUENTIAL DAMAGES CAUSED BY THE USE, MISUSE, OR INABILITY TO USE THE PRODUCT. THESE INCLUDE, BUT ARE NOT LIMITED TO, ANY DAMAGES IN THE FORM OF LOST PROFITS, LOSS OF USE, LEGAL FEES, ECONOMIC LOSS, PERSONAL INJURIES, OR ANY OTHER DAMAGES CAUSED BY CIRCUMSTANCES BEYOND THE CONTROL OF ELEMENT. NOTWITHSTANDING THE FOREGOING, ELEMENT'S AGGREGATE LIABILITY TO ANY CUSTOMER SHALL NOT EXCEED THE ORIGINAL PURCHASE PRICE OF THE PRODUCT. THIS WARRANTY SHALL NOT EXTEND TO ANYONE OTHER THAN THE ORIGINAL CUSTOMER WHO PURCHASED THE PRODUCT, AND IS NOT
TRANSFERRABLE. NO PERSON IS AUTHORIZED TO ALTER, EXTEND, OR WAIVE THIS WARRANTY OR ANY OF ITS TERMS OR CONDITIONS.
Some states do not allow the exclusion or limitation of incidental or consequential damages, or allow limitations on warranties, so the above limitations or exclusions may not apply to you. This Warranty gives you specific rights, and you may have other rights, which vary from state to state. The exclusions and limitations to the Warranty apply to the maximum extent permitted by law and unless restricted or prohibited by law. Where any term of this Warranty is prohibited by applicable law, it shall be null and void, but the remainder of this Warranty shall remain in effect.
PLEASE DIRECT ALL CORRESPONDENCE TO:
Element Appliance Company, LLC
customerservice@elementelectronics.com
(888) 842-3577
https://elementelectronics.com
Element Trademark & Disclaimers (for appliance cartons) - last update January 2024:
Element, the Element Logo, and Bring it home are trademarks of Element Brand Holding, LLC. All other trademarks are the property of their respective owner, who has not sponsored, endorsed, or approved this product. ©2024 Element Appliance Company, LLC. All rights reserved.
Distributed by Element Appliance Company, LLC Augusta, GA 30909
For service, support and warranty information: Call 888.842.3577, email us at customerservice@elementelectronics.com or visit www.elementetelectronics.com
- EN 20-Inch Gas Range
- CONTENTS
- Thank you for choosing this product.
- WARNING:
- SAFETY INSTRUCTIONS
- GENERAL SAFETY WARNINGS
- Tip Over Hazard
- INSTALLATION WARNINGS
- DURING USE
- DURING CLEANING AND MAINTENANCE
- INSTALLATION AND PREPARATION FOR USE
- INSTRUCTIONS FOR THE INSTALLER Ventilation Requirements
- Emptying of Burned Gases from the Environment
- General Instructions
- INSTALLATION OF THE COOKER
- Dimensions and Clearances
- GAS CONNECTION
- Assembly of Gas Supply and Leakage Check
- Points that must be Check During Flexible Hose Assembly
- Points that must be Check During Fixed Gas Connection Assembly
- Gas Pressure Regulator
- Natural Gas (NG - Methane) :
- Propane Gas (LP) :
- GAS CONVERSION (IF AVAILABLE)
- Changing Pressure Setting of The Regulator
- Changing Injectors Hob Burners
- Oven/Grill Injectors (if available)
- Adjusting the minimum flame position
- Determining the Minimum Flame Position
- ELECTRICAL CONNECTION AND SAFETY
- WARNING: THE APPLIANCE MUST BE EARTHED.
- ANTI-TILTING KIT
- ADJUSTING THE FEET
- PRODUCT FEATURES
- List of Components
- Control Panel
- USE OF PRODUCT
- Ignition of the Burners
- Manual Ignition of the Gas Burners
- Electrical Ignition by Control Knob
- Flame Safety Device
- Hob Burners
- HOB CONTROLS
- Hob Burner
- OVEN CONTROLS
- Oven Burner Controls
- Preheating
- Cooking
- Electric Grill Broiler
- Fan Controls (Convection Mode) (If available)
- Oven Lamp
- USE OF THE MECHANICAL MINUTE MINDER TIMER
- ACCESSORIES
- The EasyFix Wire Rack
- The Flap Drawer
- The Grill Pan and Handle Set
- The Shallow Tray
- The Splashback
- The Wire Grid
- WARNING Place the q
- CLEANING AND MAINTENANCE
- CLEANING
- Cleaning the Inside of the Oven
- Cleaning the Gas Hob
- Cleaning the Glass Parts
- Cleaning the Enamelled Parts
- Cleaning the Stainless Steel Parts (if available)
- Cleaning Painted Surfaces (if available)
- Removal of the Inner Glass
- Removal of the Oven Door
- Removal of the Wire Shelf
- MAINTENANCE
- Changing the Oven Lamp
- MAINTENANCE
- Other Controls
- TROUBLESHOOTING & TRANSPORT
- TROUBLESHOOTING
- TRANSPORT
- TECHNICAL SPECIFICATIONS
- INJECTOR TABLE
- Element Appliance Limited Warranty
- WARRANTY SERVICE:
- EXCLUSIONS AND LIMITATIONS TO WARRANTY SERVICE
- TRANSFERRABLE. NO PERSON IS AUTHORIZED TO ALTER, EXTEND, OR WAIVE THIS WARRANTY OR ANY OF ITS TERMS OR CONDITIONS.
- PLEASE DIRECT ALL CORRESPONDENCE TO:
- Element Trademark & Disclaimers (for appliance cartons) - last update January 2024:
Brand : Element
Model : EGR204MCCB
Category : Cooker