iLounge - Baby product Lorelli - Free user manual and instructions
Find the device manual for free iLounge Lorelli in PDF.


| Type | Baby bouncer/rocker |
| Brand | Lorelli |
| Model | iLounge |
| Dimensions (L x W x H) | Approx. 50 x 30 x 40 cm |
| Weight | 2.5 kg |
| Recommended age | 0-6 months |
| Maximum baby weight | 9 kg |
| Power source | None (manual rocking) |
| Vibration feature | Requires 2x AA batteries (not included) |
| Toy bar | Removable with 2 soft toys |
| Reclining positions | 2 positions (sitting and reclining) |
| Harness type | 3-point safety harness |
| Frame material | Metal tube with non-toxic paint |
| Seat fabric | Polyester, removable and washable |
| Cleaning instructions | Wipe with damp cloth; seat cover machine washable at 30°C |
| Safety standards | EN 12790:2009 |
| Assembly required | Yes, simple tool-free assembly |
| Spare parts availability | Contact Lorelli customer service |
| Warranty | 2 years |
Frequently Asked Questions - iLounge Lorelli
User questions about iLounge Lorelli
0 question about this device. Answer the ones you know or ask your own.
Ask a new question about this device
Download the instructions for your Baby product in PDF format for free! Find your manual iLounge - Lorelli and take your electronic device back in hand. On this page are published all the documents necessary for the use of your device. iLounge by Lorelli.
USER MANUAL iLounge Lorelli
natural_image
Black-and-white illustration of a baby crib with children inside, featuring a 'iLOUNG' blanket and a hanging scale (no text or symbols on the main subject)Premium range
MANUAL INSTRUCTION
natural_image
Cross-sectional view of a layered material with a white dome-like structure and an arrow pointing to a feature (no text or symbols)фиг./fig. 4

natural_image
Close-up of a car's front wheel and side panel, showing a white arrow pointing to the wheel (no text or symbols visible)фиг./fig. 5
natural_image
Exterior view of a modern office building (no signage)фиг./fig. 6
фиг./fig. 7

natural_image
Close-up of a metallic object with a flat surface and rounded edges (no visible text or symbols)фиг./fig. 8

natural_image
Close-up of a fabric or garment with visible seam details and stitching (no text or symbols)natural_image
Close-up of a dark, curved container with internal mesh pattern (no visible text or symbols)фиг./fig. 10
natural_image
Close-up of hands holding a pen and ruler over a medical or surgical drape (no visible text or symbols)фиг./fig. 15

natural_image
Close-up of a textured fabric surface with no visible text or symbolsфиг./fig. 16

natural_image
Simple curved line with a black arrow pointing left, no text or symbols presentфиг./fig. 17

natural_image
Simple curved line drawing without any text, numbers, or symbolsфиг./fig. 18

natural_image
Grayscale close-up of a textured, rounded object with no visible text or symbolsфиг./fig. 20
фиг./fig. 21

natural_image
Exterior view of a rectangular container with internal compartments and a handle (no text or symbols visible)фиг./fig. 23

natural_image
Close-up of a mechanical component with a circular inset showing a small circular feature (no visible text or symbols)natural_image
Close-up of a hand holding a piece of paper with a ruler, no visible text or symbolsфиг./fig. 25

natural_image
Line drawing of a mechanical tool or robotic arm (no text or symbols)фиг./fig. 27

natural_image
Diagram of a mechanical linkage or support system with no visible text or symbolsфиг./fig. 28

natural_image
Close-up of a mechanical component with internal structure and alignment lines (no visible text or symbols)фиг./fig. 29
natural_image
Close-up of a mechanical component with a diagonal line indicating alignment or measurement (no visible text or symbols)фиг./fig. 30

natural_image
Close-up of a thin rod inserted into a textured surface, with an arrow pointing to a small object (no visible text or symbols)фиг./fig. 31
шнур/drawstring
natural_image
Cross-sectional view of a layered material with two directional arrows indicating movement (no text or symbols)фиг./fig. 32
- WARNING! Be aware of the risk of open fire and other sources of strong heat, such as electric bar fires, gas fires, etc. in the near vicinity of the cot.
- WARNING! Do not use the cot if any part is broken, torn or missing and use only spare parts approved by the manufacturer.
- WARNING! Do not leave anything in the cot or place the cot close to another product which could provide a foothold or present a danger of suffocation or strangulation, e.g. strings, blind/curtain cords etc.!
- WARNING! The lowest position is the safest and the base should always be used in that position as soon as the baby is old enough to sit up.
- WARNING! When choosing a mattress, keep in mind that:
- the distance between the surface of the mattress and the edge of the cot must be at least 500 mm when the base is in the lowest position and 200 mm when is in the highest position!
- WARNING! The length and width of the mattress to be used with the cot, shall be such that the gap between the mattress and the sides and ends does not exceed 30 mm.
- A cot is ready for use only when the locking mechanisms are engaged. Check carefully that they are fully engaged before using the folding cot!
- All assembly fittings should always be tightened properly, should be checked regularly and retightened as necessary.
- To prevent injury from falls when the child is able to climb out of the cot, the cot shall no longer be used for that child.
EN 716-1, 2:2008
MAINTENANCE AND CARE
ATTENTION! If you use the cot outdoors, please clean all parts throughly after each use.
Cleaning. To clean use soapy water or soft cleaning detergent. Handwash the bag with soapy water. Do not iron. Do not bleach.
ATTENTION! Do not put bulk objects in the cot that can help the baby to jump out from the cot. Do not place the cot near heating devices because it will damage the plastic and fabrics.
ATTENTION! Use the cot regarding to these instructions!
PARTS
Please, unpack the product and make sure the following parts are in the package:
- Baby Cot Frame - 1 pc.
- Second Level of the cot -1 pc.
- Diapers changing mat - 1 pc.
- Toybar - 1 pc.
- Bottles and accessories tray - 1 pc.
- Wheels -2 pcs.
- Baby Cot Legs -2 pcs.
- Auxiliary Supports - 2 pcs.
- Rocking function's pipes -2 pcs.
- Fixing pipes of the second level - 2 pcs.
- Support pipes of the second level -4 pcs.
- Big pipes of the diapers changing mat - 2 pcs.
- Small pipes of the diapers changing mat -2 pcs.
- Fixing elements of the diapers changing mat - 2 pcs.
- Mattress - 1 pc.
ASSEMBLING OF THE COT
UNFOLDING
- Unpack the cot from the bag.
- Put away the mattress which is placed around the cot by unsticking the three sticking plasters. (figure 1)
- Unfold the cot at half.
- Catch the middle part of the long upper pipe and lift it up till the mechanism situated in the middle of the pipe is locked. In the same time the vertical pipes (baby cot legs) should be close to each other at its lower end which provides the easy locking of mechanism. (figure 2 and 3)
- Repeat the same procedure with the rest of the upper pipes. Check if the lockers of each one are well locked by slightly pressing downwards the middle part of the pipe. (figure 4)
- Press downwards the middle of the bottom of the cot till the lower pipes are straightened and locked. Then the all sides are straightened and stabled. (figure 5)
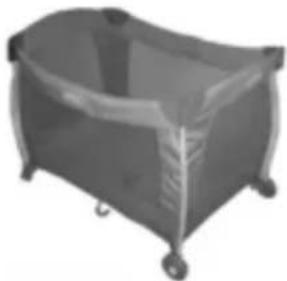
- Correctly unfolded cot should look as the same way shown on figure 6.
PLACING THE MATTRESS
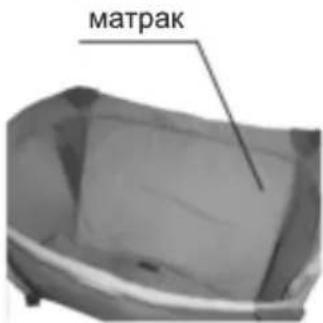
- Unfold the mattress and put it on the bottom of the cot as shown on figure 7 and 8.
MOUNTING THE SECOND LEVEL OF THE COT
- Unfold the net of the second level and fix it to the pipes of the cot by the clips. (figure 9 and 10)
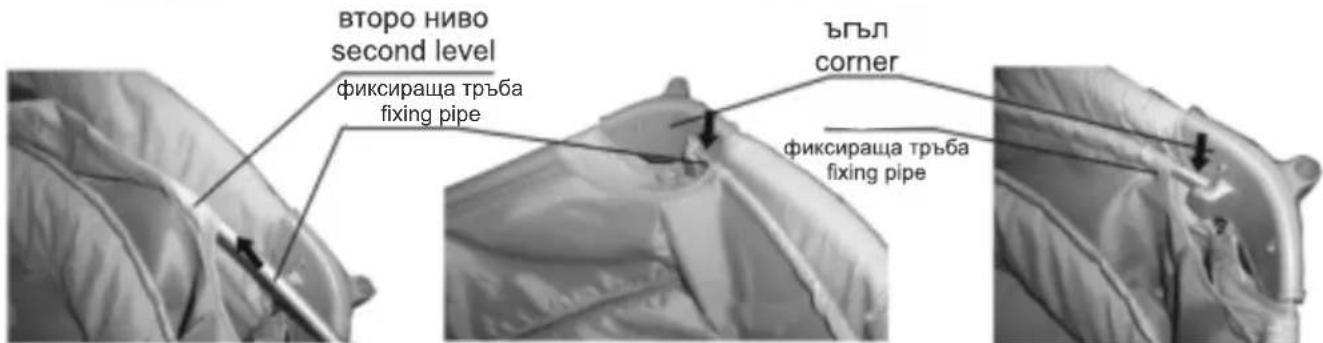
- As shown on fig. 11 insert the fixing pipes of the second level of the cot into the corresponding openings on the fabric cover. Then, insert the both ends of the fixing pipes into the corresponding openings on each corner of the cot. (figure 12 and 13)
- As shown on fig. 14 insert the both support pipes into the corresponding openings on the fabric cover of the second level of the cot and make sure the pipe with reduced diameter on its one end and the pipe without blocking end are facing inwards.
- As shown on fig. 15 hold the both support pipes with hands and push them out until they are connected with each other.
- Insert the pipe with reduced diameter into the pipe without blocking end as shown on fig. 16. Make sure the four support pipes are all installed correctly.
PLACING THE MATTRESS
- Unfold the mattress and put it on the bottom of the second level of the cot.
INSTALLATION AND USAGE OF THE DIAPERS CHANGING MAT
- Assembling of the big pipes of the diapers changing mat:
- As shown on fig. 17 piece together the big pipes of the diapers changing mat to the piecing together shown on fig. 18. Make sure the metal element is out of the opening.
- Installation of the big pipes of the diapers changing mat:
- As shown on fig. 19 insert the big pipe into the corresponding opening on the fabric cover of the diapers changing mat (note that the opening on the fabric cover on this side is long and pay attention to the direction of bending of the pipe).
- Installation of the small pipes of the diapers changing mat:
- As shown on fig. 20 insert the small pipe into the corresponding opening on the fabric cover of the diapers changing mat (note that the opening on the fabric cover on this side is short and pay attention to the direction of bending of the pipe).
Correctly installed pipes of the diapers changing mat should look as the same way shown in fig. 21. - Installation of the supports of the diapers changing mat:
- As shown on fig. 22 insert the big and small pipes of the diapers changing mat into the corresponding openings of the supports of the diapers changing mat. (See fig. 23)
- Installation/Uninstallation of the diapers changing mat:
- As shown on fig. 24 install the assembled diapers changing mat to the corresponding openings on each corner of the cot to mount it.
- As shown on fig. 25 hold down the plastic element located in the inside of the support pipes and pull the diapers changing mat out of the corners of the cot to remove it.
Note: During the installation the arrow on the small pipe should point to the inside of the cot.
INSTALLATION/UNINSTALLATION OF THE ROCKING FUNCTION'S PIPES
- To install the rocking function's pipes attach the pipes to the pipes on the bottom of the cot as shown on figure 26.
- To swing please, turn the pipe of the rocking mechanism to the position shown on figure 26A.
- To fix the cot please, turn the pipe of the rocking mechanism to the position shown on figure 26B.
- To uninstall the rocking function's pipes from the cot pull the plastic element out as shown on figure 27 until the pipe is out. Then turn the pipe of the rocking function's pipes downward as shown on figure 28 and release the plastic element at the other end of the pipe.
Note: Unmount the rocking function's pipes before holding the cot!
Warning:
- Do not leave the child unattended when the rocking function is active!
- WHEN THE PIPES ARE ACTIVE THE COT IS ROCKING EASILY. THIS IS DANGEROUS FOR THE BABIES THAT CAN PUSH AND RISE THEMSELVES.
INSTALLATION/UNINSTALLATION OF THE TOYBAR
- To install the toybar attach the plastic element on the bottom of the toybar to the pipe of the cot.
- To remove the toybar from the cot catch the plastic element on the bottom of the toybar and pull it up.
INSTALLATION/UNINSTALLATION OF THE BOTTLES AND ACCESSORIES TRAY
- To install the bottles and accessories tray to the cot use the both plastic elements by which to attach the tray to the cot. The bottles and accessories tray may be mount as shown on the picture and on the opposite side.
- To remove the bottles and accessories tray from the cot catch the plastic elements on its both sides and pull them up.
USAGE
MOVING OF THE COT
- To move the cot from one place to another catch the side with the wheels of the cot and lift it up. Then (by pushing or pulling) the cot can be moved to the respective place and to be placed there.
FOLDING AND UNFOLDING OF THE DIAPERS CHANGING MAT
- As shown on fig. 29 push the indicated button, hold the big pipe of the diapers changing mat and turn it around the supports of the diapers changing mat to the limit as shown on fig. 30.
- Follow the reverse of the above procedures to unfold the diapers changing mat.
REPLACING THE BATTERIES OF THE MUSICAL TOY
Remove the toy from the tray. Unscrew the three screws by using a screwdriver. Remove the cover. Remove the white box and remove her bottom. Remove the plate and gently push the two batteries from their slots. Replace the batteries with a new ones. It is recommended both batteries to be replaced at the same time. Use lithium batteries /Lr41/. Close the covers and screw the screws. Disassembled toy must be keep away from children.
FOLDING
- To dismantling the cot, repeat the same steps as in mounting in the reverse order:
- remove the mattress;
- lift the bottom by using the knot in the middle (figure 31);
- pull the trigger's mechanism to unlock it (for both pipes), then release the arm downward (figure 32);
- fold the cot to the position shown on fig. 2;
- wrap the mattress around the cot to the position shown on fig. 1;
ATTENTION!
For easier unlock of the mechanism by pressing the buttons you need to lift the tube up. The hard pushing of the tube downward with locked mechanism leads to serious damage!

lorelli®
Дидис ООД, България
Шумен 9700, "Правда" 1
Тел.: 054/850 830
Факс: 054/850 839
e-mail: office@didis-ltd.com
Didis LTD, Bulgaria
Shumen 9700, "Pravda" 1 Str.
Tel.: +359 54 850 830
Fax: +359 54 850 839
e-mail: office@didis-ltd.com
- MANUAL INSTRUCTION
- MAINTENANCE AND CARE
- PARTS
- ASSEMBLING OF THE COT
- UNFOLDING
- PLACING THE MATTRESS
- MOUNTING THE SECOND LEVEL OF THE COT
- INSTALLATION AND USAGE OF THE DIAPERS CHANGING MAT
- INSTALLATION/UNINSTALLATION OF THE ROCKING FUNCTION'S PIPES
- Warning:
- INSTALLATION/UNINSTALLATION OF THE TOYBAR
- INSTALLATION/UNINSTALLATION OF THE BOTTLES AND ACCESSORIES TRAY
- USAGE
- MOVING OF THE COT
- FOLDING AND UNFOLDING OF THE DIAPERS CHANGING MAT
- REPLACING THE BATTERIES OF THE MUSICAL TOY
- FOLDING
- ATTENTION!
- lorelli®
Brand : Lorelli
Model : iLounge
Category : Baby product