NexStar NST-D200SU - Hard Drive Enclosure Vantec - Free user manual and instructions
Find the device manual for free NexStar NST-D200SU Vantec in PDF.


| Product Type | External Hard Drive Enclosure |
| Brand | Vantec |
| Model | NexStar NST-D200SU |
| Compatible Drive Size | 2.5 inch SATA HDD/SSD |
| Interface | USB 3.0 (SuperSpeed, up to 5 Gbps) |
| Internal Connector | Serial ATA (SATA) III |
| Power Source | USB bus-powered (no external adapter required) |
| Data Transfer Rate | Up to 5 Gbps (USB 3.0) |
| Supported Systems | Windows, Mac OS, Linux |
| Enclosure Material | Aluminum and plastic |
| Dimensions (WxDxH) | Approx. 130 x 80 x 15 mm |
| Weight | Approx. 150 g |
| Color | Black (typical) |
| LED Indicator | Power and activity LED |
| Plug and Play | Yes, no driver needed |
| Hot Swappable | Yes |
| UASP Support | Yes (USB Attached SCSI Protocol for faster performance) |
| Ventilation | Passive cooling through enclosure |
| Maintenance | Wipe with dry cloth; keep away from moisture |
| Safety | Avoid dropping; protect from static electricity |
Frequently Asked Questions - NexStar NST-D200SU Vantec
User questions about NexStar NST-D200SU Vantec
0 question about this device. Answer the ones you know or ask your own.
Ask a new question about this device
Download the instructions for your Hard Drive Enclosure in PDF format for free! Find your manual NexStar NST-D200SU - Vantec and take your electronic device back in hand. On this page are published all the documents necessary for the use of your device. NexStar NST-D200SU by Vantec.
USER MANUAL NexStar NST-D200SU Vantec
NexStar® Dual Bay Hard Drive Dock
User's Manual
Model: NS T-D 200 SU
www.vantecusa.com
SATA to eSATA & USB 2.0
All Registered Trademarks Belong To Their Respected Companies.
Copyright © 2008 Vantec Thermal Technologies. All Rights Reserved.
NexStar®
Dual Bay Hard Drive Dock
Table of Contents
- Introduction ...... 1
- System Requirements .... 1
- Features/Specifications.... 2
4.Installation....4 - Removal 7
6.Driver Installation 9
Windows 2000/XP/VISTA 9
Windows ME 9
Mac OS 9.0 or later 10
Mac OS 8.6....10 - Warranty 11
NexStar®
Dual Bay Hard Drive Dock
1. Introduction
The Vantec NexStar Dual Bay Hard Drive Dock is a complete and easy way to add or swap hard drives to your computer. It gives you the flexibility of connecting two SATA I/II hard drive to your computer via USB 2.0 or eSATA connection without opening up your computer case or installing into an enclosure. Simply insert up to two 2.5" or 3.5" SATA I/II hard drives into the NexStar Dual Bay Hard Drive Dock and you are ready to transfer, copy, or backup files. Quick and easy, the Vantec NexStar Dual Bay Hard Drive Dock is the perfect solution to access your hard drives in seconds.
2. System Requirements
■ Intel Pentium II 350 MHz-compatible or Mac G3 processor & greater
■ Microsoft Windows ME/2000/XP/Vista or Mac OS 8.6 & greater
■ USB or SATA-equipped system.
■ For USB 2.0 speeds, the system must support USB 2.0 specifications.
■ For eSATA, the system must support Port Multiplier (PM) specifications for dual hard drives.
NexStar®
Dual Bay Hard Drive Dock
3. Features/Specifications
Features :
■ Install and Access Hard Drives in Seconds
■ Simple to Use Design
■ Eject Button for Easy Removal of Hard Drive
■ Supports two 2.5"/3.5" SATA I/II Hard Drive up to 3 TB
■ Add Storage to Any System with USB or eSATA
■ Plug & Play
■ Attractive Blue LED Power & HDD Activity Light
■ Transfer Rates Up to 480Mbps w/USB 2.0
■ Transfer Rates Up to 3Gb/s w/SATA
■ Conveniently store and copy the data from disk to disk
NexStar®
Dual Bay Hard Drive Dock
Specifications :
■ Model : NST-D200SU
■ Device Support : SATA I/II Hard Drive
■ Device Size : 2.5" or 3.5"
■ Internal Interface : SATA
■ External Interface : USB 2.0 & eSATA
■ Material : Plastic
■ Dimension : 140 x 118 x 88 mm
■ HDD Capacity : Up to 2TB
■ Power Supply : Dual 5V/12V 3A
Package Includes :
■ NexStar Dual Bay Hard Drive Dock
■ USB Cable
■ eSATA Cable
■ SATA to eSATA Bracket
■ Power Adapter
■ Power Cable
■ User Manual
NexStar®
Dual Bay Hard Drive Dock
4. Installation
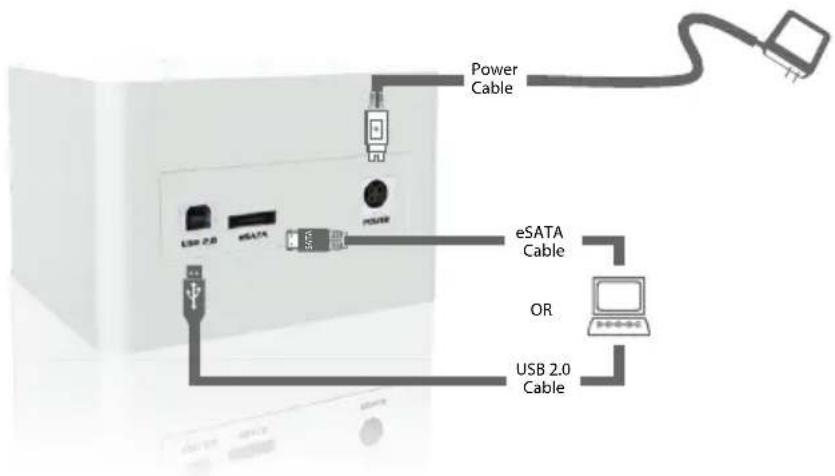
- Connect the power adapter to the NexStar Dual Bay Hard Drive Dock.
- Connect the USB or eSATA Cable to the NexStar Dual Bay Hard Drive Dock and attach the other end to your computer.
Note: For eSATA connections, the system must support Port Multiplier (PM) specifications to read both hard drives.
NexStar®
Dual Bay Hard Drive Dock
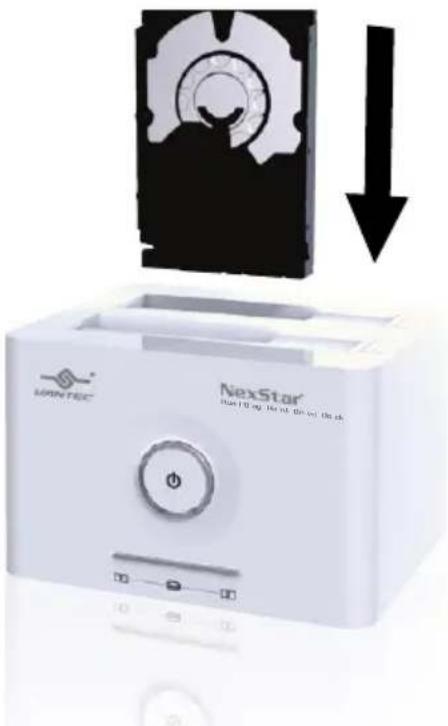
- Insert 2.5" or 3.5" SATA HDD into the slot.
natural_image
White NexStar printer with a gear icon and a black arrow indicating compression or disassembly (no text or symbols on the device itself)NexStar®
Dual Bay Hard Drive Dock
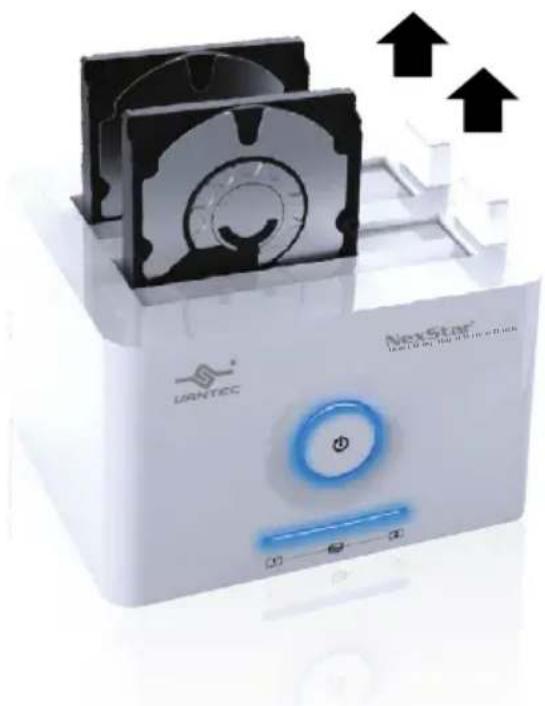
3-1. When the eject button is upright, the NexStar Dual Bay Hard Drive Dock is ready for use.
natural_image
White electronic device labeled 'NewStar' with a blue indicator light and upward arrows, no readable text or symbols beyond branding.NexStar®
Dual Bay Hard Drive Dock
5. Removal
Push down the button to eject the HDD.
(Stabilize the HDD with your hard).
Warning: Please power down the Hard Drive Dock by pressing the power button to ensure safe removal of the hard drive(s). Do not remove the hard drive(s) when the disc is reading or writing.

natural_image
White Lumen TEC device with black fan and power button, showing external components and downward arrows (no readable text or symbols)NexStar®
Dual Bay Hard Drive Dock
- Remove the HDD from the Hard Drive Dock.

natural_image
White NaStar printer with a gear icon and upward arrow, no visible text or symbols on the device itself.NexStar®
Dual Bay Hard Drive Dock
6.DriverInstallation
Windows 2000/XP/VISTA
No drivers are necessary when using Windows 2000/XP/VISTA. If the hard drive does not appear under My Computer, be sure to enter disc management in your control panel to partition your hard drive.
Windows ME
- The first time you plug in the NexStar Dual Bay Hard Drive Dock into a USB port of your computer, the "Add New Hardware Wizard" dialog box will appear.
- Click on [Next]. Check the [Search for the best driver for your device] and click on [Next] again.
- After the needed files are copied into your system, click on [Finish].
- You should now be able to see the new hard drives under My Computer. A green Unplug or Eject hardware icon will appear in the system tray as well. If the drive does not appear, you may need to partition your hard drive first.
NexStar®
Dual Bay Hard Drive Dock
Mac OS 9.0 or later
No drivers are necessary when using Mac OS 9.0 above. If the hard drive does not appear on the desktop, be sure to partition your hard drive.
Mac OS 8.6
- Unplug the NexStar Dual Bay Hard Drive Dock if you currently have it connected.
- USB Mass Storage Support 1.3.5 must be installed on your system. If it is not, you can download the USB Mass Storage Support 1.3.5 from the Apple Software Updates website: http://www.apple.com/support.
- Follow the direction associated with the USB Mass Storage Support driver to install.
- Repeat the steps listed under "Connecting the NexStar Dual Bay Hard Drive Dock to your computer".
NexStar®
Dual Bay Hard Drive Dock
7. Warranty
The NexStarHardDriveDock comes with a 1 year limited warranty (90 day parts). If your unit become defective within that time frame, please go to http://www.vantecusa.com for information on how to receive warranty exchange or repair. Cosmetic defects and missing parts are not covered under this warranty. Please check the contents of the unit to make sure you received all parts. Also, check for any cosmetic flaws. If any parts are missing or if there are cosmetic defects, please contact the retailer from which you purchased the unit immediately and ask for a replacement.
Vantec Thermal Technologies
43951 Boscell Rd. Fremont, CA 94538
tel: 510-668-0368 fax: 510-668-0367
website: www.vantecusa.com
- NexStar® Dual Bay Hard Drive Dock
- User's Manual
- NexStar®
- Dual Bay Hard Drive Dock
- Table of Contents
- Introduction
- System Requirements
- Features/Specifications
- Features :
- Specifications :
- Package Includes :
- Installation
- Removal
- 6.DriverInstallation
- Windows 2000/XP/VISTA
- Windows ME
- Mac OS 9.0 or later
- Mac OS 8.6
- Warranty
Brand : Vantec
Model : NexStar NST-D200SU
Category : Hard Drive Enclosure