Navigator-12 - Gps Xomax - Free user manual and instructions
Find the device manual for free Navigator-12 Xomax in PDF.


| Product Type | GPS Navigation Software |
| Brand | Xomax |
| Model | Navigator-12 |
| Category | GPS Navigation System |
| Compatibility | Windows Mobile 5/6, Windows CE 4.2/5/6, Android 2.3+, Windows XP/Vista/7/8, Pocket PC 2003 |
| Navigation Modes | 2D/3D, Day/Night, Auto-zoom, Lane Assistant |
| POI Database | Points of Interest with categories (6 groups) |
| Address Search | Address, town, postcode, street, house number with auto-suggest |
| Route Calculation | Fastest, Shortest, Cheapest; multiple waypoints; avoid tolls, charge roads, congestion zones |
| Voice Guidance | Text-to-speech, multiple languages |
| TMC Traffic | Real-time traffic info, auto-recalculation or manual |
| Favourites | Save locations in groups, manage from editor |
| Odometer | Track private/business mileage, record journeys |
| Night Mode | Separate colour scheme for night driving |
| Vehicle Tracking | Track up to 10 vehicles (requires VTU unit) |
| Camera Warnings | Speed camera alerts with adjustable distances |
| Remote Communication | TCP/IP and serial commands for messaging, control |
| Map Formats | Free OpenStreetMap and commercial maps with truck attributes |
| Language Support | Interface and voice in multiple languages |
| Updates | Via Setup Utility, automatic update monitor available |
Frequently Asked Questions - Navigator-12 Xomax
User questions about Navigator-12 Xomax
0 question about this device. Answer the ones you know or ask your own.
Ask a new question about this device
Download the instructions for your Gps in PDF format for free! Find your manual Navigator-12 - Xomax and take your electronic device back in hand. On this page are published all the documents necessary for the use of your device. Navigator-12 by Xomax.
USER MANUAL Navigator-12 Xomax
© 2012 ... Directions Ltd
Table of Contents
Foreword 0
Part I Introduction 4
1 Welcome 4
Part II Installing Navigator for PDA 6
1 Overview 6
Installing Navigator 6
Installing Maps 13
Part III Using Navigator 21
1 Connecting your GPS receiver.... 21
2 Setting your destination 27
Address 28
POI 31
Nearest 34
Favourites 36
Searching on the Internet 38
3 Navigating 38
Part IV Using the map 43
Part V Navigator Menu 47
Part VI Favourites 49
1 Adding Favourites .... 50
2 Using Favourites .... 51
3 Favourites Editor 53
Part VII Odometer 55
Part VIII Routing 57
Part IX Nightmode 62
Part X Communication 64
Part XI Work Status 66
Part XII Saving and Replaying your journeys 69
Part XIII Settings 72
1 GPS 72
2 Navigation 75
3 TMC 78
4 Tracking 80
5 Camera Warnings 81
6 Application 82
Colour schemes 82
Keyboard 83
Metric and Imperial units 83
Language 84
Select Regions 84
Map colour schemes....84
Select POI Types 84
Product key 84
7 Remote Communication 85
Part XIV Import 87
Part XV Vehicle Tracking 89
1 Adding and managing vehicles....90
2 Tracking your vehicles....91
Part XVI Entering special characters with the on screen keyboard 94
Part XVII TCP/IP communication 96
Part XVIII Command line arguments 103
Part XIX Solving Problems 105
Part XX Updates 107
Index 0
Part

1 Introduction
1.1 Welcome
Thank you for choosing Navigator. This software is designed to make your life easier, taking you door to door across most of Europe, USA, Canada and many more countries.
Navigator supports platforms:
- Pocket Navigator is designed for PDA's running Pocket PC 2003, Windows Mobile 5 / 6 or WindowsCE.NET 4.2 / 5 / 6 and Android 2.3 and newer.
- PC Navigator is for computers running Windows XP / Vista / Windows 7 / Windows 8 (laptops, TabletPC, CarPC, UMPC an similar) and Windows 7
Part
I
2 Installing Navigator for PDA
2.1 Overview
Navigator is available on media or as a download installation from the Internet.
Installation comes in two parts, program and map data.
2.1.1 Installing Navigator
Once you insert the CD/DVD in your drive the Pocket Navigator Installer should auto run.
If you downloaded the setup utility from the Internet then open it.
When running the installer for the first time then you will be asked for your product key.
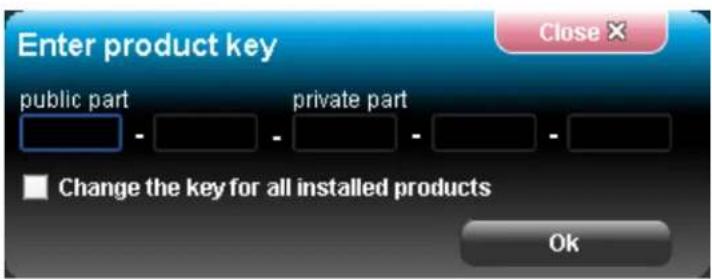
Once you enter the key the Setup utility will pop up.

Click the Install Application icon.

Now select the application you want to install. Note that, depending on your product key, all the choices may not be available.
If you select PC Navigator you will be taken through the PC Navigator Setup Wizard.

If you select Pocket Navigator you will be asked to select a device you want to install to.
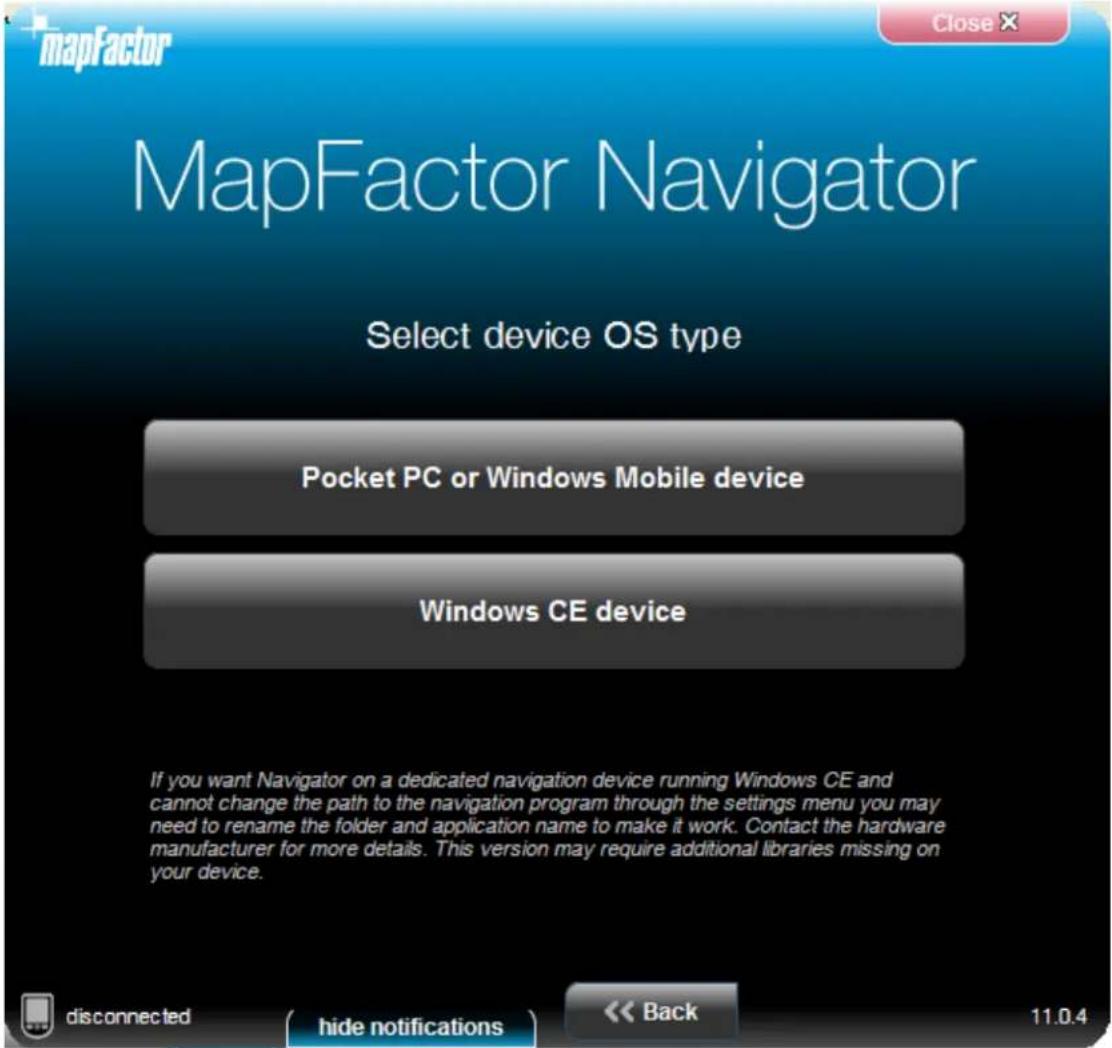
Select Pocket PC or Windows Mobile for PDA's and phones with the Windows Mobile operating system (up to version 6.5). Please note that Navigator does not currently run or Windows Phone 7.
If you have a dedicated PND then chances are that it runs Windows CE OS in which case select the second option.

If your device is connected to your PC using ActiveSync or Windows Mobile Centre you can install directly to your device. Otherwise the program or cab file will be copied to an SD card.
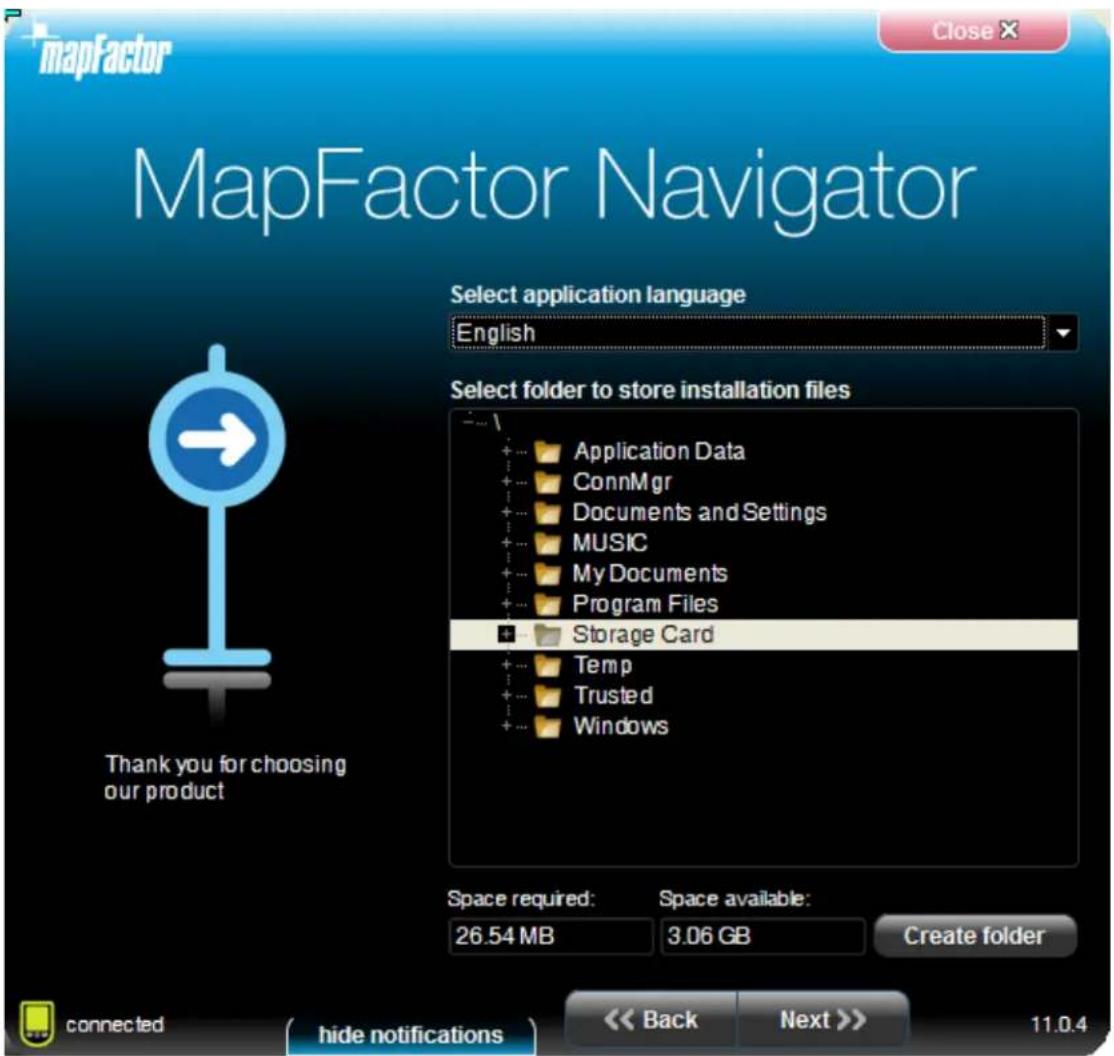
Now select the destination of the cab file (Pocket PC install file). If your PDA is connected to the PC you can select a folder directly on the device, Install to your device.
Click Next >>

Once the application installation is finished click Ok. You will be taken back to the main menu. Here you select which maps you want to install.
2.1.2 Installing Maps
You can add remove maps using the Setup Utility.

Click the Install map data icon.

Now select the destination of the map files. If your PDA is connected to the PC you can select a folder directly on the device, Install to your device. Alternatively, if you use a card reader to transfer files to your PDA then select the Install maps to memory card option. If you want to download new maps from the internet select Manage map downloads. New map downloads will automatically show up in PC Navigator but have to be installed to a mobile device.
Click Next >>
Select a destination folder and click Next >>.

The Setup Utility will now search for a previous installation.

There are two types of maps available - free Open Street Maps and commercial maps. The commercial maps are better suited to navigation and have truck attributes.
Select the maps you want to install (maps with a lock icon need an additional license).
Click Next >>

Select in which language you want Navigator to talk to you.
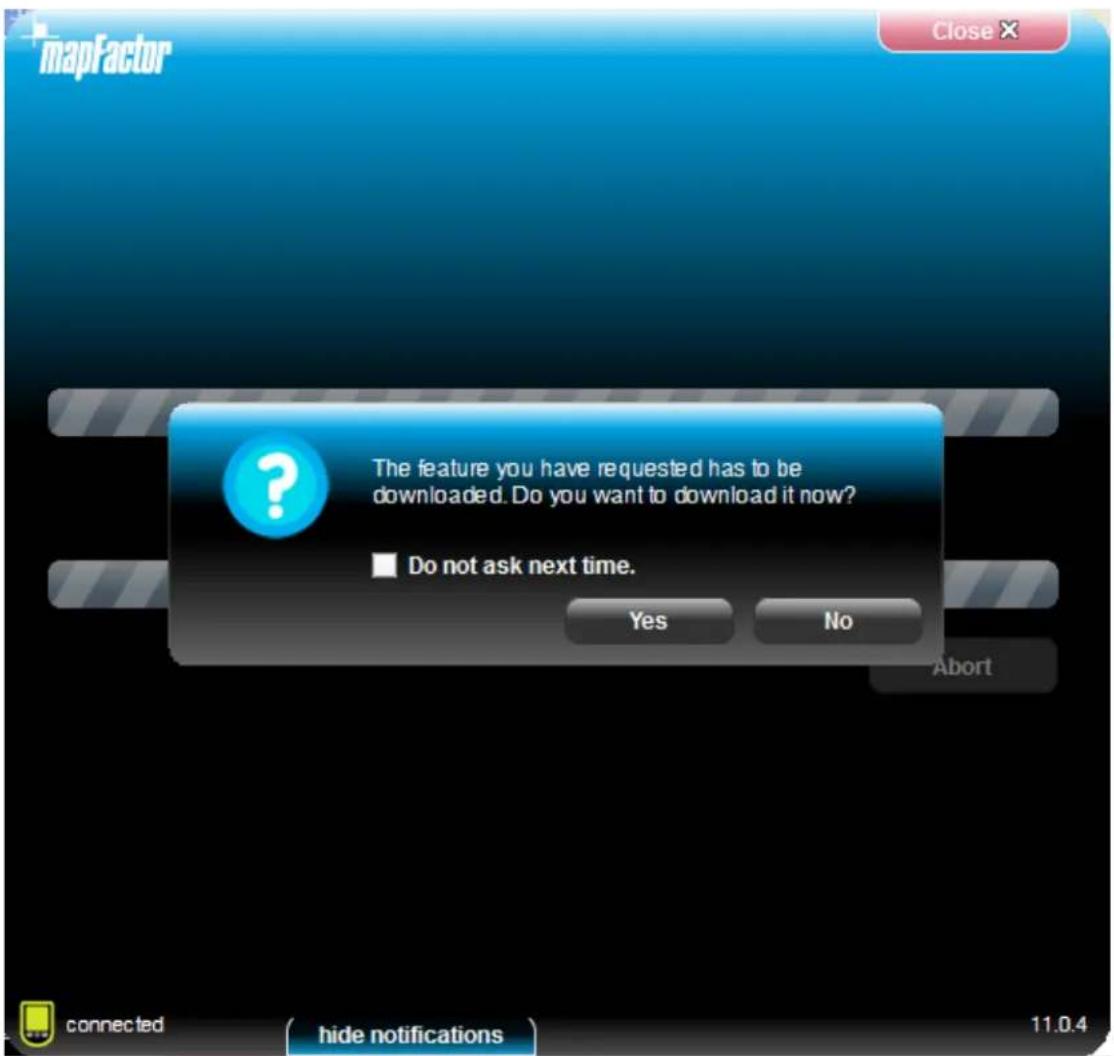
If you are using the online install the Setup Utility may have download the map data first.

Maps will now be copied.
Part

3 Using Navigator
To start Navigator on your PDA, tap Start then Programs. Now tap on the Navigator icon.
Please note that operating your PDA while driving can be dangerous and we recommend that you prepare your journey in advance.
Now you will be presented with an overview map of the region you have installed.
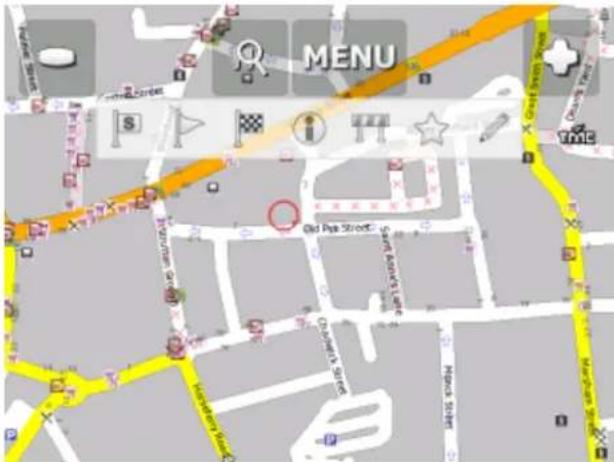
Before you start navigating you must first set up your GPS.
To move from one screen to another or scroll down a list simply swipe the mouse or your finger scross the screen.
3.1 Connecting your GPS receiver
Notes for PC Navigator Users:
If you want to connect to a BlueTooth GPS you must pair the device first.
If you are connecting to a USB GPS device you must install the correct drivers first. Drivers for the most popular GPS devices are on the Navigator DVD (in the GPS_drivers folder)
Tap the Menu button at the top of the map screen. You will see the following menu:

Tap the Settings button. Now you are in the settings menu.

Tap the GPS button.

Now tap the Configuration button.

Navigator will now configure the GPS for you automatically.
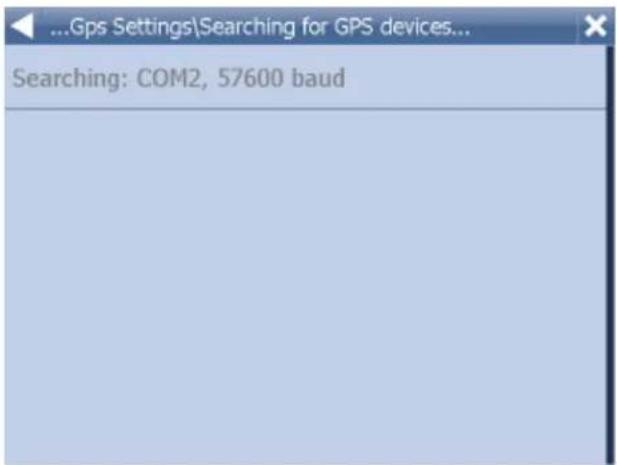
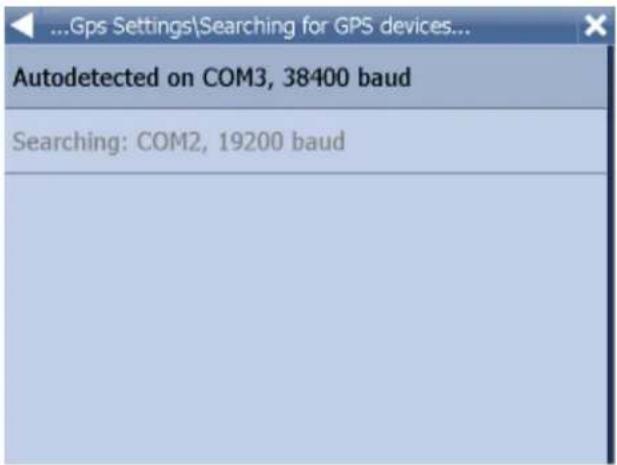
If autodetection has been successful click on the detected GPS.
Now you should see a GPS information window. If all is well you will see information about signal and
position data coming from the receiver.
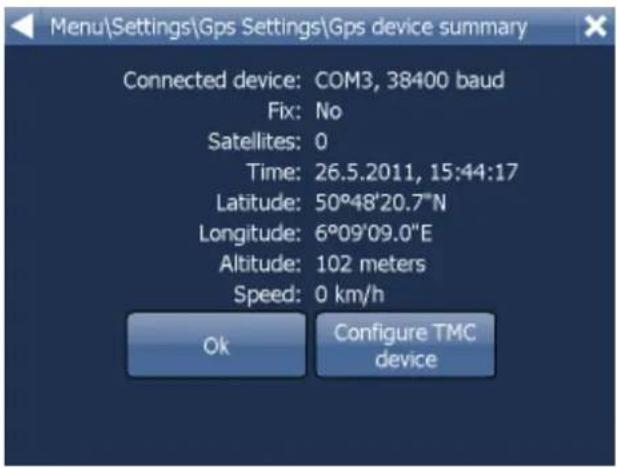
If you have a TMC receiver tap the TMC button, else tap Ok.
Setting up a TMC Receiver
1) Integrated GPS/TMC receiver
Select the first option with the current GPS setting

Now select your communication protocol

Click next
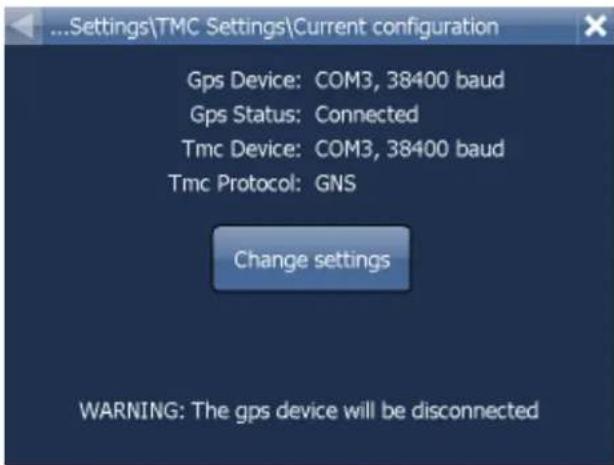
2) Stand alone TMC receiver
Select Setup COM port manually and enter the COM port number and speed. After that follow the same procedure as above.
PROBLEMS CONFIGURING GPS
If the automatic detections fails to find a GPS receiver you can choose manual configuration.

Select Setup COM port manually
Now you will see a list of all available COM ports on your system
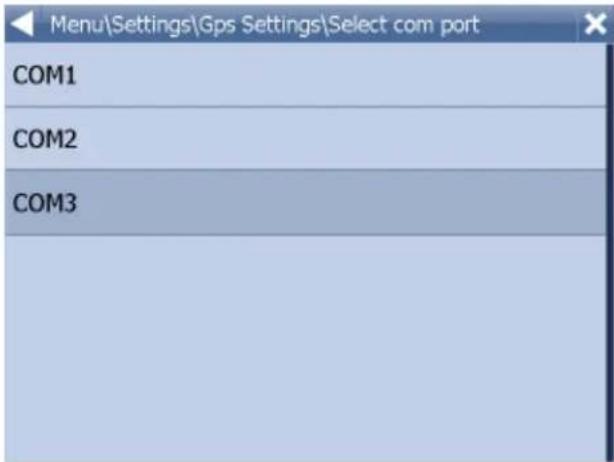
Select the port to which you GPS is attached

Most GPS receivers work on baud rate of 4800 (but not all). The exact speed should be available in the manufacturers documentation.

To exit click the [] button.
You are now ready to set your navigation preferences.
3.2 Setting your destination
You can set a destination in several ways, from the map, from the search menu or from one of your favourites.
From the Map
Tap the position on the map where you want to set your destination. The following menu will appear:

Select the destination icon

From the Search menu
Select Find & Navigate from the Main Menu or Tap the search icon in map view

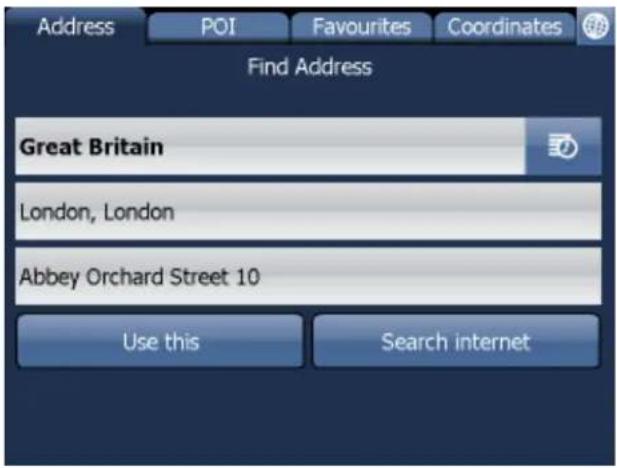
There are several database types to choose from: Address, POI (Points of Interest), Favourites and Nearest.
To make a change to any detail tap the textbox it is in. If you have entered search text before, you may see it on the following screen. If you begin typing the old text will be overwritten.
You can also set a destination from that last search performed or from imported data.
3.2.1 Address
If you know the street (and optionally the house number) tap Address.
To see a history of previous searches click

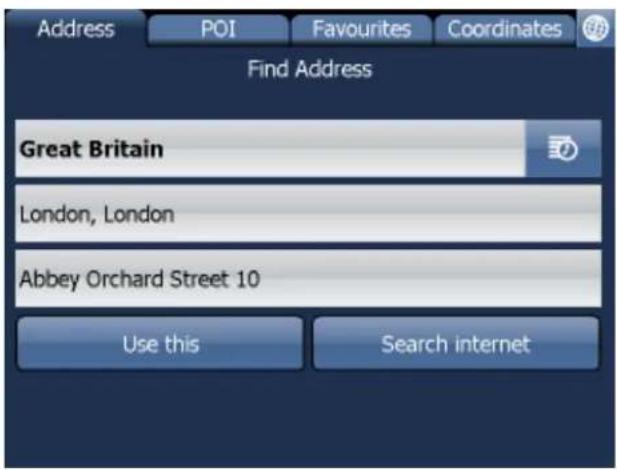
First select the country.
You will now be prompted for the town or region name or postcode.

You can type using the on-screen keyboard. As you type Navigator will automatically search for nearest matches and list them underneath.
Once you see your town in the list tap it.

You must now type the street you are going to (or select TOWN CENTRE).
Once you see your street in the list tap it.
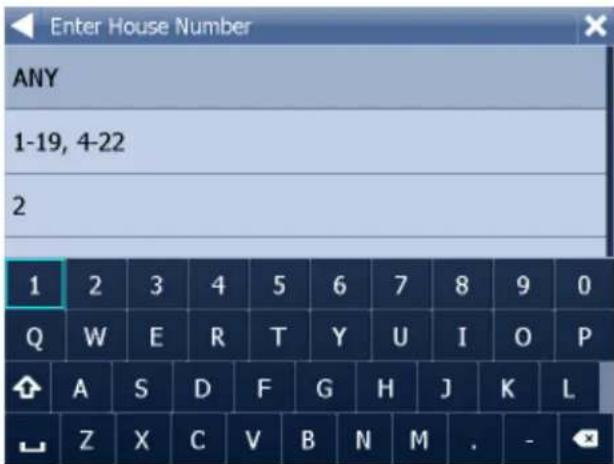
You will now be asked to select a house number from the ranges shown in the list.
If you do not know the house number tap ANY. This will allow you to select a destination on the crossroad with another street. A list of all intersecting street will be shown.
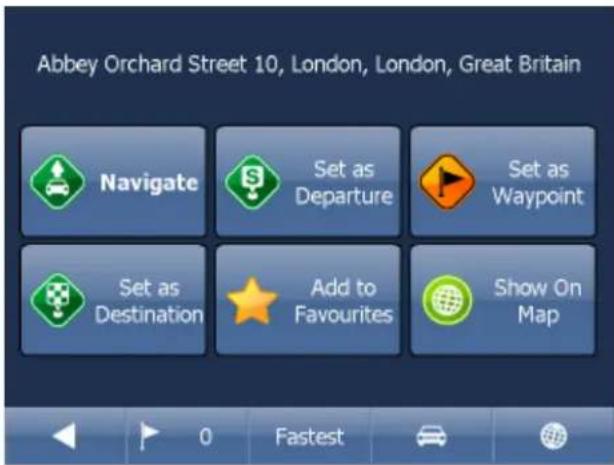
You will now be shown the following screen

Now tap Navigate and your journey will be calculated.
You have also the following options:
Set as departure - Set the start of your journey (only necessary if you want to calculate a route without GPS)
Set as waypoint - Add it as a stop along your journey Set as destination - Set the destination point without starting navigation immediately Add to favourites - Add your selection to your favourites Show on Map - Show the result on the map
In the bar at the bottom of the screen you can see some important routing parameters:

- the number of waypoints on the journey

- the routing mode (fastest, shortest, cheapest)

- the car type selected.
You can change any of these parameters by clicking on them.
To restart your search simply click the left arrow.
3.2.2 POI
If you want to go to a point of interest tap the POI tab.
To see a history of previous searches click


First select the country you want to search in.
Next select the town, region or postcode area. If you want to search the entire country select ANY.
Now you can select the POI type.
Points of interest are divided into six groups.

Now select the type of POI you are looking for. If you want to search through all points of interest tap ANY.

Now type the name of the POI you are looking for.
You can type using the on-screen keyboard. As you type Navigator will automatically search for nearest matches and list them underneath.
The icon to the right of the name tells you what type POI is listed.
Once you see your POI in the list tap it.
You will now be shown the following screen

Now tap Navigate and your journey will be calculated.
You have also the following options:
Set as departure - Set the start of your journey (only necessary if you want to calculate a route without GPS)
Set as waypoint - Add it as a stop along your journey
Set as destination - Set the destination point without starting navigation immediately
Add to favourites - Add your selection to your favourites
Show on Map - Show the result on the map
In the bar at the bottom of the screen you can see some important routing parameters:

- the number of waypoints on the journey

- the routing mode (fastest, shortest, cheapest)

- the car type selected.
You can change any of these parameters by clicking on them.
To restart your search simply click the left arrow.
3.2.3 Nearest

This is a location based search useful for finding closest points of interest to:
Current Map Position - nearest to the centre of the current map view
Current GPS Position - nearest you current position
At Destination - nearest to your navigation destination
Along Route - nearest points of interest along your route
Select one of the options.
Now you can select the POI type.
Points of interest are divided into six groups.

Now select the type of POI you are looking for. If you want to search through all points of interest tap ANY.
You will now see the location of the closest points of interest along with their direct distance


indicates that the POI is along your route.
indicates that the POI does not lie on your route.
Select one or more POI's by using the checkboxes on the left.
You will now be shown the following screen
Now tap Navigate and your journey will be calculated.
You have also the following options:
Set as departure - Set the start of your journey (only necessary if you want to calculate a route without GPS)
Set as waypoint - Add it as a stop along your journey
Set as destination - Set the destination point without starting navigation immediately
Add to favourites - Add your selection to your favourites
Show on Map - Show the result on the map
In the bar at the bottom of the screen you can see some important routing parameters:

- the number of waypoints on the journey

- the routing mode (fastest, shortest, cheapest)

- the car type selected.
You can change any of these parameters by clicking on them.
To restart your search simply click the left arrow.
3.2.4 Favourites
Using favourites you can quickly access locations and set as navigation destinations.

Tap on a favourite and you will be taken to the following screen. To expand a group tap on it.

Now tap Navigate and your journey will be calculated.
You have also the following options:
Set as departure - Set the start of your journey (only necessary if you want to calculate a route without GPS)
Set as waypoint - Add it as a stop along your journey Set as destination - Set the destination point without starting navigation immediately Add to favourites - Add your selection to your favourites Show on Map - Show the result on the map
In the bar at the bottom of the screen you can see some important routing parameters:

- the number of waypoints on the journey

- the routing mode (fastest, shortest, cheapest)

- the car type selected.
You can change any of these parameters by clicking on them.
To restart your search simply click the left arrow.
Favourite Journeys are set in Main Menu/My routes
[ ]
Load Set - load a route you saved previously Save Set - saves the current route as favourite Delete Set - delete a saved route
3.2.5 Searching on the Internet
If you have a device that has a connection to the Internet you will see an extra button in the Address Search section.
If you can't find an address in the Navigator database you can search it online with Google or Yahoo.
3.3 Navigating
You should now be in navigation mode. Your journey will be highlighted on the map.
You will see something like

or

depending on whether you selected 2D or 3D mode.
Instructions about your next maneuver are displayed in the opaque bar at the bottom of the screen.
If you have added one or more waypoint to your journey you will see the following screen:

Here you can deselect waypoints that you no longer want to route through by using the checkboxes on the left of the screen.
To change the order of the waypoints simply drag them to e new position using your finger or mouse.
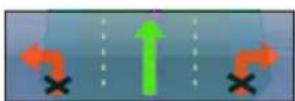
On major roads navigator will often activate the lane assistant which helps you get in the right lane for the next manoeuvre. Correct lanes are shown in green, others red with crosses.
If you stray from your route Navigator will automatically recalculate your journey.
Tapping on the map screen reveals four hidden buttons - zoom in, menu, zoom out and in the bottom right of the map the route overview button.
Tap the route overview button to see the whole length of you journey. You can now operate the map without it centring on your GPS position. This is useful if you want to find other place on the map or find an alternative route.
To get back to navigation mode tap the route overview button again.

Tap the blue directional sign expand it, tap it again.
to shrink it to a couple of lines. To
To see the full itinerary of your route tap the manoeuvre arrow on the left of the screen. To see the itinerary you can go from Menu - Route - Itinerary.
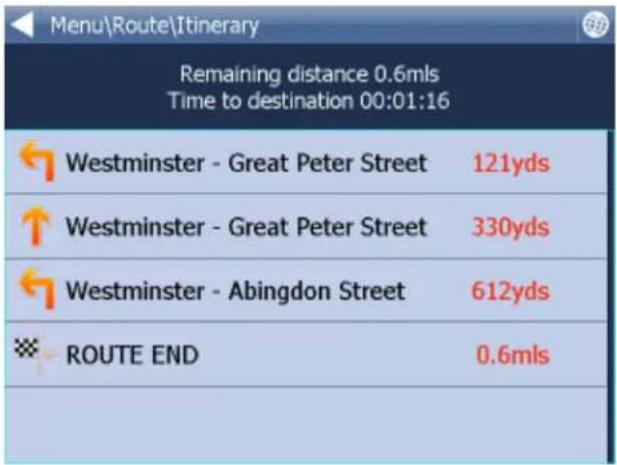
Here you can see driving instructions for the whole journey.
Tap to select any entry in the itinerary. Tap the right arrow to show the following menu.

Here you can select to show the select link on the map, add it to favourites or disable it from the routing engine. Once a link is disabled it will not be used in future route calculations.
Tap on any navigation panel on the right of the screen to change what it displays.
A screen with several option will appear. Tap one to select it.
Here you can set what type of information you want to see in the navigation panel at the right of the screen as you drive. Possibilities are:
DST - Distance to destination - how far away you are in km or miles TTA - Time to destination - the approximate time left before you reach your destination ETA - Time in destination - the approximate time you will arrive at your destination TTM - Time to maneuver - the approximate time before your next maneuver ALT - Altitude, SPD - Speed, AZI - Course, SAT - Number of satellites, GPS - Position, TIM - Time and DAT - Date give you data about your current position and the Satellite signal. TTW - Time to the nearest waypoint - the approximate time left before you reach the nearest waypoint DTW - Distance to the nearest waypoint - how far is the nearest waypoint SPL - Speed limit - the speed limit on the current road
Note that the number of navigation panels that is displayed can be changed in navigation settings.
Part
IV
4 Using the map
When you start Navigator you will see a screen like this.

There are three buttons along the top of the screen

- zoom in

- access to the Navigator menu's (searching, routing, settings etc.)

If you keep pressing a zoom button you will keep zooming continuously.
You can move the map by dragging it around.
If you have set a destination already then you can use the car icon in the bottom right corner of the map to start navigation.

Tapping the map will reveal a choice of six functions:

These functions relate to the circled point on the map.

- set as start point

- set as waypoint. If you click on an existing waypoint the icon will show as 📄. Select this you want to delete it.

- set as navigation destination

- information about the map layers under the circled point

- block a road from routing (it will not be used by the routing engine during navigation). A block
road is highlighted on the map in purple. To unblock it follows the same procedure but click the icon.


- add as favourite

- edit routing parameters of the selected link, like average speed and maximum speed. In the
Truck version you can additionally edit weight, height and width limits and other large vehicle attributes. Changes are saved in a file called link_params.xml in C:\Documents and Settings[\user name]\Application data\Navigator\12.0. You can copy this file to make the same changes in other copies of the software.
When you tap on an object on the map and select the information icon details about it should appear as shown below.


The dialog shows details of the object you clicked on. Because the map is made up of layers, you may have clicked over several objects. In this case there are four in the list.
Tap the Find nearest icon to perform a search for the nearest Points of Interest. Tap the Add to Favourites icon to add the point to favorites.
If you have a connection to the Internet you will additionally see the Google Maps button. Click it to see the locality on Google maps.
Tap the cross button to get back to the map.
Part

5 Navigator Menu
When you tap the Menu button on the map screen you will get to the Navigator menu system.
The Main menu is usually split into two pages (on screens with resolutions different to VGA or QVGA the number may be different)

To get back to map view tap the bottom of the screen.

button. To change between the pages tap the arrows at the
To move from one screen to another simply swipe the mouse or your finger scross the screen.
Part
VI
6 Favourites
Use favorites to create your own database of favorite locations which you can quickly access and set as navigation destinations.
You can add a favorite in two ways, from the map or from the Find & Navigate menu.
Favourites can be organised into different groups to make them easier to browse. Before you start adding lots of favourites it would be sensible to add some groups.
From the Main menu 2 tap on Favourites Editor.

Tap Add Group.

Type the group name, for example Personal. To type capital letters tap and hold on a key (on the soft keyboard) for 1 second.
Tap Ok.
This will take you back to the Favourites dialog. Tap

6.1 Adding Favourites
Adding a favourite from the map
If you want to add a favourite from the map make sure you first move and zoom to the right place.
Tap on the point where you want to add the favourite.
Select the button from the toolbox that appears.
Now enter the name of the favourite.

Type a name for the favourite. If you want to add it to an existing group tap Select Group. A list of all available groups will appear below.
Tap Add to finish.
The favourite will be saved and you will be returned to the map.
Adding a favourite from the Find & Navigate menu
Once you have performed a search for an Address, POI (Points of Interest).

Now tap Add to Favorites.
Now enter the name of the favourite.
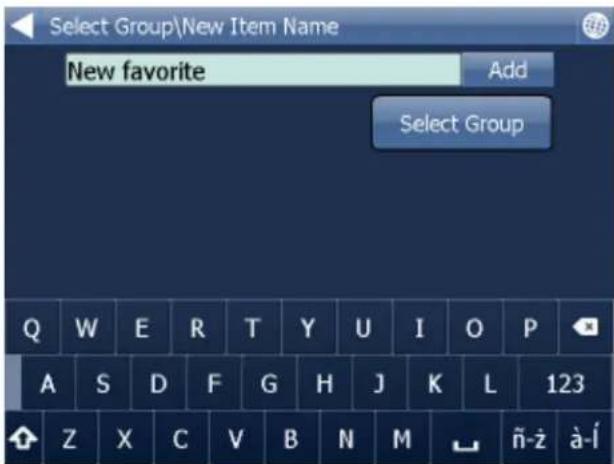
Type a name for the favourite. If you want to add it to an existing group tap Select Group. A list of all available groups will appear below.
Tap Add to finish.
You will be returned to the search result menu.
6.2 Using Favourites
Using favourites you can quickly access locations and set as navigation destinations.
From the first menu tap Find & Navigate and then select the Favourites tab.

Tap on a favourite and you will be taken to the following screen. To expand a group tap on it.

Now tap Navigate and your journey will be calculated.
You have also the following options:
Set as departure - Set the start of your journey (only necessary if you want to calculate a route without GPS)
Set as waypoint - Add it as a stop along your journey Set as destination - Set the destination point without starting navigation immediately Add to favourites - Add your selection to your favourites Show on Map - Show the result on the map
In the bar at the bottom of the screen you can see some important routing parameters:
- the number of waypoints on the journey

- the routing mode (fastest, shortest, cheapest)

- the car type selected.
You can change any of these parameters by clicking on them.
To restart your search simply click the left arrow.
6.3 Favourties Editor
From the Main menu tap Favourites Editor.
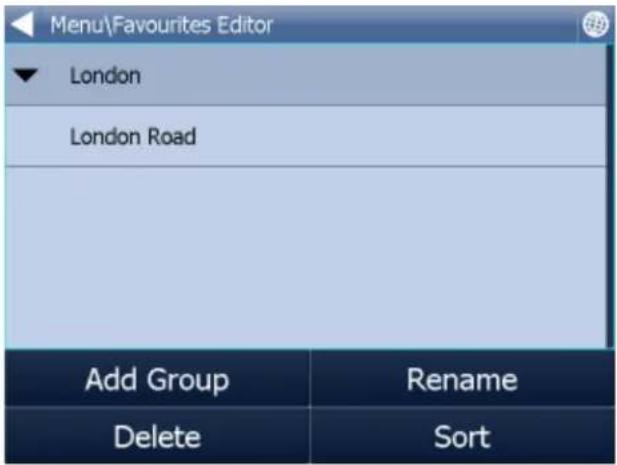
You can move favourites between groups by dragging them around.
There are three functions available.
Add Group - Add a new favourites group.
Rename - change the name of
Delete - delete the selected favourite or group.
Now tap Edit group.

to exit back to the main menu.
Part
VII
7 Odometer
Odometer is a tool that lets you measure distances as you drive and further splits them between private and business mileages.
From the main menu tap Odometer.

Here you can see the total distance traveled for both private and business journeys.
Select the check box next to the Private or Business items to toggle between the Private counter and Business counter. Note that you can only use one counter at a time, i.e. it is impossible to record a journey as both private and business.
To set either of the counters back to 0 select it and tap the Reset button at the bottom of the screen.
Tap

to exit back to the map.
Part

8 Routing
In Navigator it is possible to calculate routes without using Navigation.
You can set your routing points (departure, destination and waypoints) in the same way as setting your destination.
Review your route points by tapping on Route in Main menu.
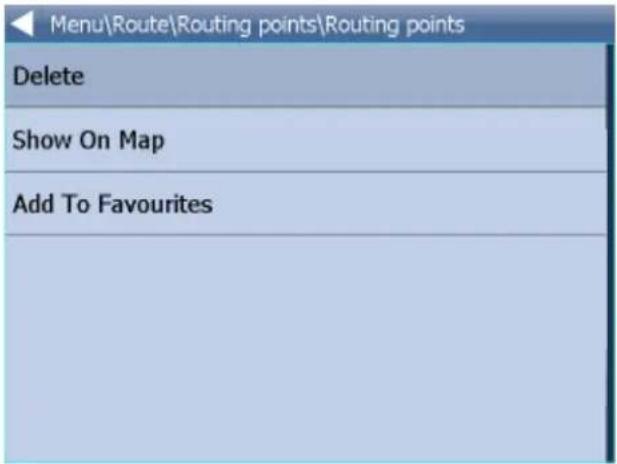
Now tap Routing points.

Delete all - deletes all waypoints in the list
Reverse route - reverse the order of the route points, plan a route back from the destination to the departure
Optimise - if you have selected more than one waypoint you Navigator will sort them to make your route faster
To change the order of the waypoints simply drag them to new position using your finger or mouse.
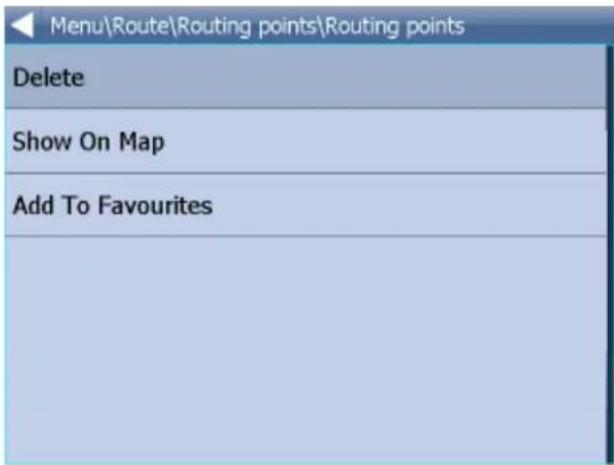
Tap a routing point to see another menu.
Delete - deletes the currently selected waypoint
Show on map - shows the currently selected waypoint on the map
Add To Favorites - saves the currently selected waypoint as a favourite
Tap [] to exit back to the Routing menu.
Once you are satisfied with your routing points tap Calculate Route.
The route will be highlighted on the map. To review the itinerary tap Menu, then Route and then tap Itinerary.

Here you can see driving instructions for the whole journey as well as the total distance.
You can perform actions on the junctions in the list by tapping on them.
This will bring up the following menu.
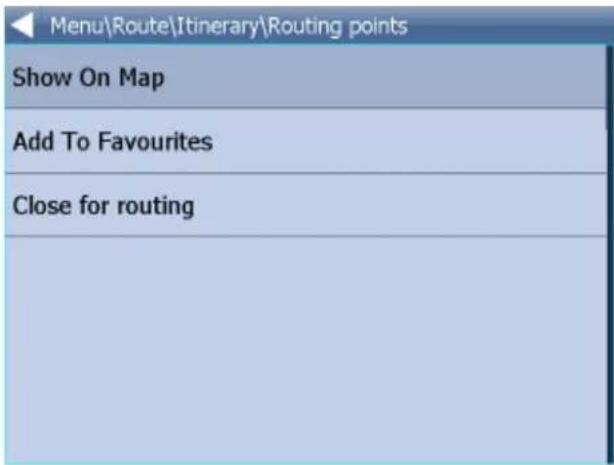
Show on map - show the manoeuvre in close up view on the map.
Add to favourites - add the position to favourites.
Close for routing - avoid this junction when calculating the route. If you close a manoeuvre from routing then you must recalculate the route by tapping Calculate Route in the Route. To permit a junction back again go to the Route menu and tap Disabled streets.
If you want to keep the itinerary of a route but want to de-highlight it from the map then go to Main menu, Route and tap Hide route.
TMC
Here you can see a list of all traffic warning and their distance from you. You can access this menu
quickly by clicking the icon in map view.
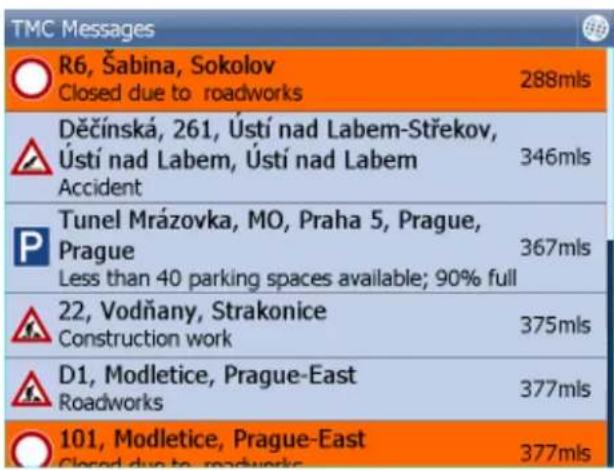
Click any item to see it on the map.

Part
IX
9 Nightmode
In Navigator it is possible to switch to a different map colour scheme for use at night. This mode is easier on the eyes when driving at night.
To switch between night and day mode go to Main Menu 1.
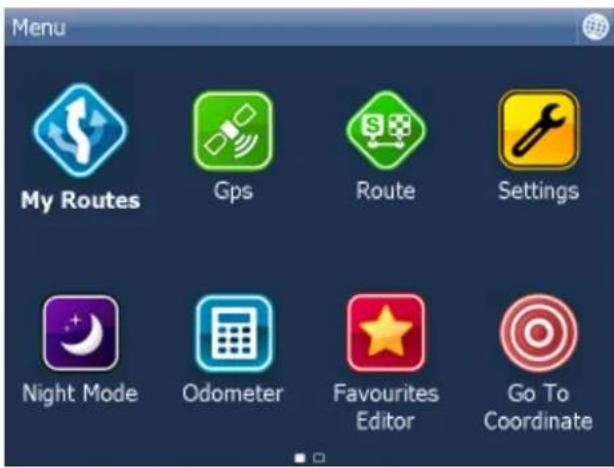
Tap the Day mode or Night mode icon.
Part
X
10 Communication
If your device has an Internet connection you can send remote commands and messages to navigator from MapExplorer.
One way to achieve this is to use Actis 7 in combination with the VTU vehicle tracking system.
The communication window looks as follows:

At the top you see the current conversation.
Use the keyboard to write messages and click Send to send the message. For quick answers use the Yes/No/Select buttons. The Select button will show a list of pre-defined messaged. To add/remove your own pre-defined messages click Select and then Add/Remove.
Part
XI
11 Work Status
Here you can enter information about your journey status.
- Driver name
- Journey status
- Journey purpose
- Start/End journey
- Refuel

If Navigator has an internet connection, or if you are using Actis 7 with the VTU10 tracker, then this information is sent back to HQ. Information is sent the moment you leave this dialog.
You select your status from a list, to which you can add custom entries. For example:

Refuelling:

This information is used in generating a log book or file in MapExplorer.
Part
XII
12 Saving and Replaying your journeys
In Navigator it is possible to save your GPS journeys to file and replay them at a later date.
Saving your Journeys
To save your journey go to Odometer in Main Menu 1

Now tap the Record Journey button.
Select where to save the journey file, e.g. Storage card or Object Store (Internal Memory).

You are now asked to enter a name for the saved file. A name based on date and time is automatically suggested for you, but you can change it if you wish.
Tap Ok.
The GPS data is now being saved to file. To stop recording tap the Stop journey saving button.
Replaying your Journeys
If you want to replay a journey from file simply tap the Replay Journey button in the Odometer dialog. A list of all available journey files will displayed.

Select one by tapping on it and then tap Ok.
If you exit back to the map view you will see your journey replayed.
Part

13 Settings
You can access Navigator settings in Main Menu 2.

Tap the Settings Icon.

There are several options here Gps, Navigation, Tracking, Camera warnings, Product Key and TMC.
13.1 GPS
Note for PC Navigator users:
If you want to use a Blue Tooth GPS you must set it up in Windows first.
Adding a USB GPS requires installation of drivers provided by the manufacturer of the GPS device.
Most drivers are available on the setup DVD in the GPS_DRIVERS folder.

Now tap the Configuration button.

Navigator will now configure the GPS for you automatically.
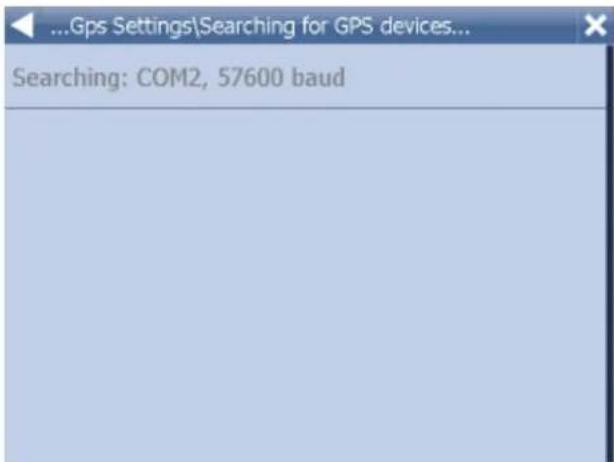
If autodetection has been successful click on the detected GPS.
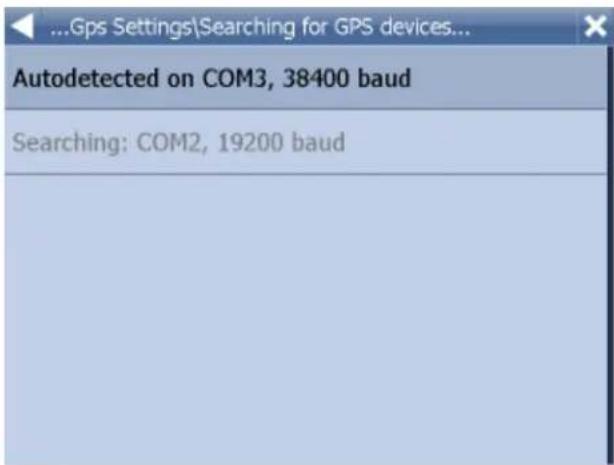
Now you should see a GPS information window. If all is well you will see information about signal and position data coming from the receiver.

If you have a TMC receiver tap the TMC button, else tap Ok.

Tap
to go back to Gps Settings.
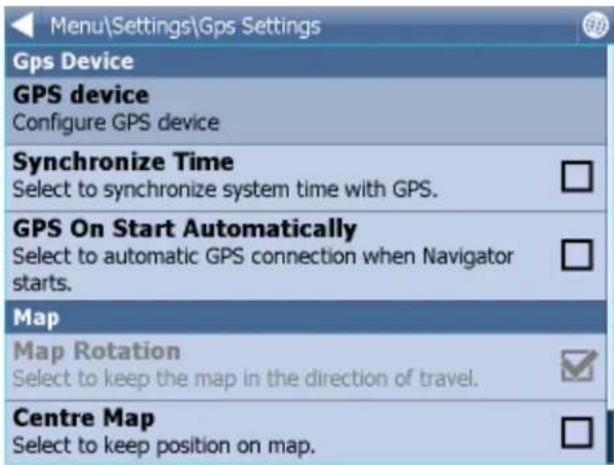
You can now configure how your journey will be displayed on the map.
Select Map Rotation Off to keep the map north up regardless of which direction you are driving in. Select Map Rotation On to keep the map in the direction of travel (i.e. you will always be driving towards the top of the screen).
Select Centre Map Off to stop the map from automatically adjusting to your position. Select Centre Map On to keep your position on the screen at all times.
Note that in Navigation mode Rotate and Centre map are automatically enabled. When navigation is turned off these settings reset to the previous state.
Select GPS On Start to toggle automatic GPS connection when Navigator starts. Use the Synchronize Time option if you want to keep your system time updated from the GPS.
Selecting Lock on Target will add an arrow to the GPS icon which points (as a direct line) to your destination.
13.2 Navigation

You are now in the Navigation Settings menu.
Tap Autozoom to toggle the Autozoom feature on or off. Autozoom will automatically adjust the map zoom as your drive, zooming out when between manoeuvres and zooming in as you approach the next junction.
Tap 3D View/Plane View to toggle between 3D and 2D maps as you drive.
Tap Routing mode to select your preferred route type.
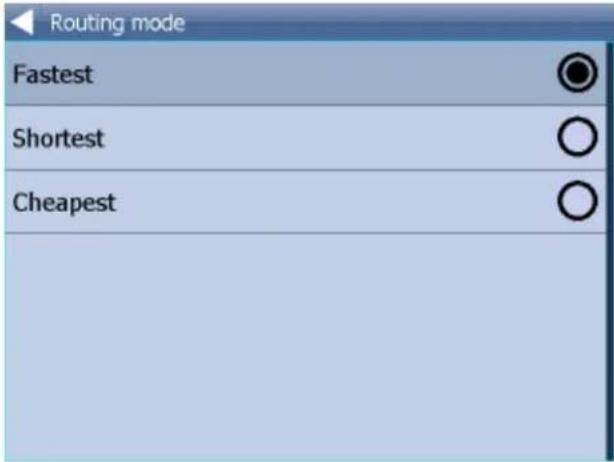
Fastest - this is the default route mode. It takes your to your destination in the quickest time. Shortest - this mode calculates the route with the shortest travelling distance. Cheapest - calculates the most petrol efficient route.
Tap Detail nav on/off to toggle detailed navigation. Detailed navigation gives you extra instructions when going straight along a road.
Tap Snap GPS on/off to enable or disable GPS snapping to the road as you are navigating. Snapping keeps you glued to the road and in the direction of your route at all times.
Tap Vehicle type to set the type of vehicle you are driving. In the standard version on Navigator you can change speeds of your vehicle. In the Truck version it Navigator takes into account restrictions such as narrow lanes, bridge heights, length of vehicle and so on. Select Pedestrian if you want to work out a route as you walk.
- Truck -In the standard version of navigator this only changes vehicle speed attributes. A more accurate truck mode is available in the Navigator Truck version where bridge heights, weight limits and vehicle lengths are taken into account. To define your own commercial vehicle click Add new. Now enter a name for your vehicle, the type and its dimensions and weight.

If you want to restrict certain road types from navigation for this particular vehicle you can do so here. Please note that journeys may be considerably longer and occasionally impossible to complete.

Clicking on the right-hand side of a row you can modify the average and maximum speeds of a class of road.
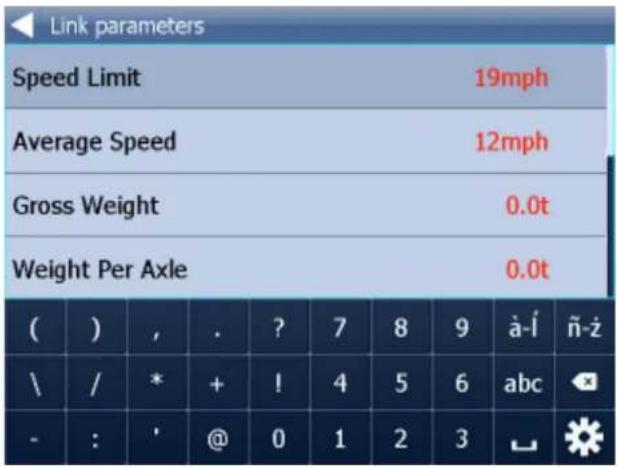
Toll Rd Allowed/Prohibited - if you prohibit toll roads, Navigator will work out journey avoiding tolls altogether. Please note that journeys may be considerably longer and occasionally impossible to complete.
Charge Rd Allowed/Prohibited - if you prohibit charge roads, Navigator will work out journey avoiding roads where charges (mainly taxes) apply. Charge roads differ from toll roads in that you are often required to buy a display a special license to use them. An example is the Czech Republic where you must buy and display a special tax sticker to be able to use motorways - (you may use all other roads free of charge). Please note that journeys may be considerably longer and occasionally impossible to complete.
Congestion Charge Allowed/Prohibited - if you prohibit congestion charge areas, Navigator will work out journey avoiding roads where congestion charges apply (e.g. London). Please note that journeys may be considerably longer and occasionally impossible to complete.
Show signposts - toggle blue directional signs on and off. These signs give information about directions to major towns, cities and roads.

If you want to use TMC - actual traffic information, during the navigation, you have to set the TMC protocol and TMC assistant.
In menu Settings tap the TMC button.

TMC protocol - choose which protocol your TMC receiver uses.

TMC Advisor - Once you have set up the right protocol you can select how Navigator responds to traffic information on your journey.
On - Automatically recalculate journeys if there is a tailback
Off - Do not recalculate
Ask - Asks for confirmation before recalculating
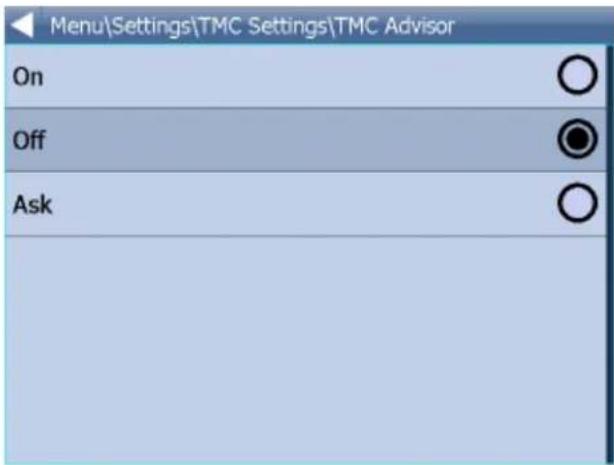
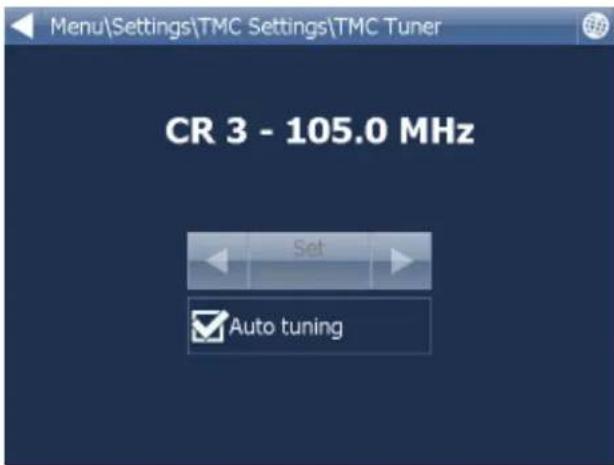
When using TMC receivers with the GNS protocol you can manually tune the FM frequency.
13.4 Tracking
Note: These settings should only be used by customers who have purchased the VTU008 / VTU009 /VTU010 GPRS tracking unit.

To be able to track vehicles on Navigator you must first register at https://gprs.mapfactor.com and obtain a user name and password. If you have already done this for use in Navigator 4.4 on a PC then use the same user name and password.
Set the following values:
Server IP/Name - gprs.mapfactor.com
Server port - 5555
User name - user name registered at https://gprs.mapfactor.com
Password - password registered at https://gprs.mapfactor.com
13.5 Camera Warnings
If you have imported a database (like speed cameras) or it was included with you navigation software then you can use the Scout function to give you advanced warnings as you approach the imported points.

Warning can be set at 100, 500 and 1000 metres/yards from an object. Tap any of the icons to set the warnings on/off for a particular distance. Turn all off to disable Scout completely.
Source - here you can select your own imported database for audible warnings.
Databases for use with Scout can be imported using the MapExplorer software on the DVD. See the import section of the MapExplorer manual for more details.
You can also enable warnings when you break the speed limit. You can set how quickly the warning is given when you exceed the speed limit and what sound is played.
13.6 Application
Here you can set preferences that affect the general use of Navigator.

13.6.1 Colour schemes
Here you can change the appearance of the of the menu and navigation interface.
13.6.2 Keyboard
In Navigator there are several on screen keyboard modes - the standard QWERTY/QWERTZ layout that is on your PC keyboard, an alphabetical layout ABCDEF as well as several international layouts.
This is purely a personal preference and you should select the layout that most suits you.
Here is what the different layouts look like.

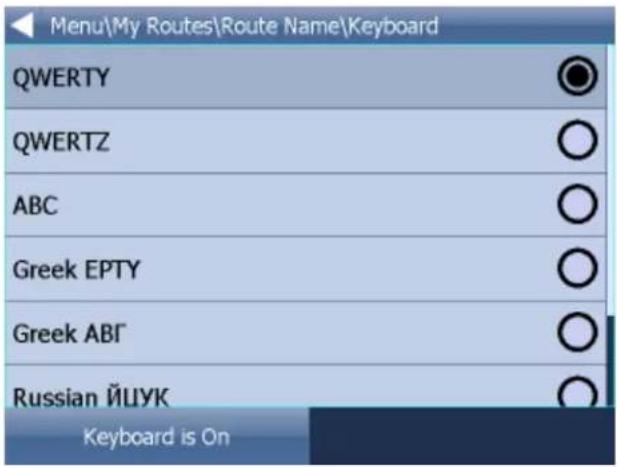
Keyboard On/Off - If you have a device with a hardware keyboard (like the HTC Universal, O2 Exec etc.) you may wish to use this setting not to display the on-screen keyboard.
13.6.3 Metric and Imperial units
Tap Metric Units to view distances and speeds in Km and meters. The voice guidance will automatically switch to using metric prompts (e.g. turn left in 500 metres).
Tap Imperial Units to view distances and speeds in Miles and yards. The voice guidance will automatically switch to using imperial prompts (e.g. turn left in 500 yards).
13.6.4 Language
This option lets you select a language for the Navigator interface and the voice guidance.
Note: You can only select the voice languages that you have installed. More may be available on the DVD.
13.6.5 Select Regions
Here you add and remove maps from your map.
Regions with a green tick will be shown on the map, those with a red cross will be closed.
Changes here require an application restart.
Please note that Pocket Navigator only sees regions that have been installed. If a region is missing from the list please first install it as described here.
13.6.6 Map colour schemes
Change the map colours to a different scheme.
13.6.7 Select POI Types
Here you can select which Points of Interest are displayed on the map.
13.6.8 Product key
There may be times when you need to replace the Navigator product key. For example, if you want to upgrade from a time limited version or if you want to enable vehicle tracking on your PDA.
Tap the Product key icon in Settings.

You will now be asked to confirm that you want to change your key. Tap Ok to proceed.

You will be asked for a new product key. The change will not take effect until the next time you start Navigator.
Tap Ok
13.7 Remote Communication
Here you can set up remote communication with Navigator.
Communication can be enabled through a serial port (COM) or a TCP/IP connection.
When using Actis 7 and VTU use COM 8 baud 4800.
Part

14 Import
You can import your own points, lines and shapes databases easily, using the MapExplorer or by diggerQt.exe. More information can be found in the MapExplorer documentation.
If you are using Pocket Navigator you must copy the resulting database to your memory card. Imported databases can be found in C:\Program Files\NavigatorX\MapExplorer\import\ and can be copied anywhere on your memory card.
Part

15 Vehicle Tracking
In Navigator it is possible to track vehicles fitted with the VTU008 / VTU009 / VTU 10 tracking unit connected through GPRS.
There are 3 things to know about vehicle tracking:
- You can only add a maximum of 10 vehicles
- You can only track one vehicle at a time
- You must establish an Internet connection manually (3G, GPRS, WiFi etc.) before tracking a vehicle.
Before you begin tracking your vehicles you must set up access to the server.
To access vehicle tracking go to Main Menu 2
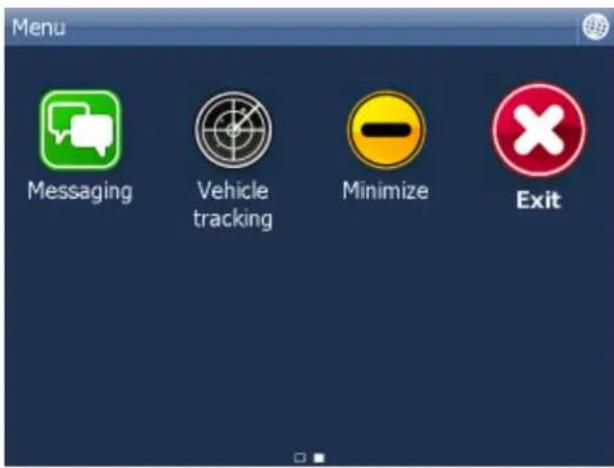
Now tap the Vehicle tracking icon.
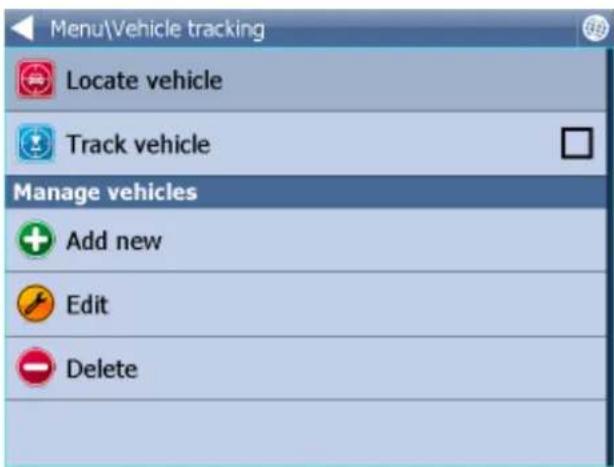
15.1 Adding and managing vehicles
Adding a Vehicle
Tap the Edit vehicle icon.

Tap Add new.

Enter a name for your vehicle and tap Ok. You can choose any name you like here.

You are now asked to enter the serial number of the VTU008 / VTU009 tracking unit. This number is printed on the underside of the tracking unit.
Tap Ok.
The vehicle will now be added.
Managing Vehicles
To edit a vehicle tap Edit existing.
Now select a vehicle icon and following the same steps as above.
To delete a vehicle tap Delete existing.
Now tap on a vehicle that you wish to delete from Navigator.
15.2 Tracking your vehicles
There are two methods for showing a vehicle on the map - Locate and Track.
Locate only shows the last position of the vehicle and then disconnects from the server.
Tack will keep the connection to the server and update the map every time it receives a new position from the unit.

Tap Locate vehicle or Track vehicle.

Now select which vehicle you want to show on the map.
Navigator will switch back to map view and display the position of the vehicle.
If you have selected to track then you disconnect by going back to Main Menu, tap Vehicle Tracking and then tap Stop Vehicle tracking.
Part

16 Entering special characters with the on screen keyboard
It is possible to input special characters using the on screen keyboard. Use the □ and □-2 keys (bottom right of the keyboard) to switch to other international characters.
Some international characters can be entered using the standard keyboard.
| char | transcript |
| å | aa |
| æ | ae |
| ä | ae |
| ø | oe |
| œ | oe |
| ö | oe |
| ü | ue |
| β | ss. |
Characters not in the above table can be substituted for a character without accent. For example,
| char | transcript |
| á | a |
| č | c |
| ř | r |
| ů | u |
| ...... |
Part

17 TCP/IP communication
TCP/IP communication can be used for remote messaging with and control of navigator based products - for example as a solution for communication between driver and controller. It can also be used for integration with third party software.
To activate communication in Navigator go to Menu2 / Settings2 / Remote Communication. Starting from the command line, as in previous versions, is no longer possible.
TCP/IP commands:
Every command starts with '\$' and ends with '\n' or "\r\n".
DISPLAY A TEXT MESSAGE
Format:
\$message="message"
Description:
- shows a message on remote device
Protocol version:
- 1.0.0 or later
Availability:
- tcp/ip or com
Parameters:
- parameter is a text enclosed in quotation marks to display on remote device
Return values:
- "ok" on success or "error" when failed
- "busy" when the remote device is busy responding to another command
DISPLAY A QUESTION
Format:
\$message="message";ask
Description:
- shows a question on remote device (can be answered with "yes" or "no")
Protocol version:
- 1.0.0 or later
Availability:
- tcp/ip or com
Parameters:
- parameter is a text enclosed in quotation marks to display on remote device
Return values:
- "yes" or "no" as the answer to question on success or "error" when failed
- "busy" when the remote device is busy responding to another command
DISPLAY A CHAT MESSAGE
Format:
\$chat="message"
Description:
- sends a new message to chat window
Protocol version:
- 2.0.0 or later
Availability:
- tcp/ip or com
Parameters:
- parameter is a text enclosed in quotation marks to display on remote device
Return values:
- none
SEND DESTINATION AND/OR WAYPOINT(S) AND/OR DEPARTURE
Format:
destination=50.074525,14.409428;...;50.074421,14.409226;"Text";ask;navigate;departure destination=clear
Description:
- sends routing points with possible text message/question and possibility to start navigation on remote device
- clear to clear all waypoints
Protocol version:
- 1.0.0 or later
- 1.4.1 or later for \$destination=clear
- 2.0.1 or later departure parameter added (first coordinate is departure point)
Availability:
- tcp/ip or com
Parameters:
- route points order is waypoint1;...;waypointN;destination
- use parameter "Text" to display text
- use parameters "Text"; ask to display question
- parameter "navigate" to start navigation on remote device
Return values:
- for a message "ok" on success or "error" when failed
- for a question "yes" or "no" as the answer to question on success or "error" when failed
- "busy" when the remote device is busy responding to another command
STOP NAVIGATION
Format:
\$stop_navigation
Description:
- stops navigation on remote device
Protocol version:
- 1.2.0 or later
Availability:
- tcp/ip or com
Parameters:
- none
Return values:
- "ok" on success or "error" when failed
- "busy" when the remote device is busy responding to another command
GET LAST KNOWN GPS POSITION
Format:
\$last_position
Description:
- get last known gps data from remote device
Protocol version:
- 1.2.0 or later
Availability:
- tcp/ip or com
Parameters:
- none
Return values:
- when last position is known:
latitude(degrees),longitude(degrees),altitude(meters),speed(km/h),course(degrees)
- when last position is unknown: "unknown"
- "error" when an error occurred
- "busy" when the remote device is busy responding to another command
NAVIGATION SOUND
Format:
\$sound_volume=volume
Description:
- set sound volume on remote device
Protocol version:
- 1.2.0 or later
Availability:
- tcp/ip or com
Parameters:
- "on" - system volume does not change and navigation messages are played
- "off" - system volume does not change and navigation messages are not played
- volume values from 0 to 100 set operation system sound volume to 0-100 percent
Return values:
- "ok" on success or "error" when failed
- "busy" when the remote device is busy responding to another command
SOUND WARNINGS
Format:
\$sound_warning=start
\$sound_warning=stop
Description:
- request to send warning before a sound is played
Protocol version:
- 1.2.0 or later
Availability:
- tcp/ip or com
Parameters:
- start - starts sending sound warning
- stop - stops sending sound warning
Return values:
- "ok" on success or "error" when failed
- "busy" when the remote device is busy responding to another command
CHANGE APPLICATION WINDOW SIZE
Format:
\$window=left,top,width,height,[border|noborder]
Description:
- set remote device application window size
Protocol version:
- 1.0.0 or later
Availability:
- tcp/ip or com
Parameters:
- values are in pixels
Return values:
- "ok" on success or "error" when failed
- "busy" when the remote device is busy responding to another command
MINIMIZE APPLICATION WINDOW
Format:
\$minimize
Description:
- minimize remote device application window
Protocol version:
- 1.0.0 or later
Availability:
- tcp/ip or com
Parameters:
- none
Return values:
- "ok" on success or "error" when failed
- "busy" when the remote device is busy responding to another command
MAXIMIZE APPLICATION WINDOW
Format:
\$maximize
Description:
- maximize remote device application window
Protocol version:
- 1.0.0 or later
Availability:
- tcp/ip or com
Parameters:
- none
Return values:
- "ok" on success or "error" when failed
- "busy" when the remote device is busy responding to another command
RESTORE MINIMIZED/MAXIMIZED APPLICATION WINDOW SIZE
Format:
\$restore
Description:
- restore remote device minimized or maximized application window
Protocol version:
- 1.1.0 or later
Availability:
- tcp/ip or com
Parameters:
- none
Return values:
- "ok" on success or "error" when failed
- "busy" when the remote device is busy responding to another command
START/STOP SENDING GPS POSITIONS
Format:
\$gps_sending=start;nmea
\$gps_sending=stop
Description:
- start/stop sending current nmea data
Protocol version:
- 1.2.0 or later
Availability:
- tcp/ip or com
Parameters:
- start;nmea: start sending gps positions in nmea format
- stop: stop sending gps positions
Return values:
- for start;nmea: gps positions in nmea format or "error" when failed
- for stop: "ok" on success or "error" when failed
- "busy" when the remote device is busy responding to another command
START/STOP RECEIVING GPS POSITIONS
Format:
\$gps_receiving=start
\$gps_receiving=stop
Description:
- start/stop receiving nmea data
Protocol version:
- 1.3.0 or later
Availability:
- tcp/ip or com
Parameters:
- start: start receiving gps positions in nmea format
- stop: stop receiving gps positions
Return values:
- "ok" on success or "error" when failed
- "busy" when the remote device is busy responding to another command
SET APPLICATION MODE
Format:
\$set mode=day
\$set_mode=night
Description:
- set application mode
Protocol version:
- 1.2.0 or later
Availability:
- tcp/ip or com
Parameters:
- day: show application in day mode colors
- night: show application in night mode colors
Return values:
- "ok" on success or "error" when failed
- "busy" when the remote device is busy responding to another command
MAP ICONS
Format:
\$icon_new=42;50.074525,14.409428;"C:\My Pictures\Icons\icon1.ico"
\$icon_new=42;50.074525,14.409428;"C:\My Pictures\Icons\icon1.ico";"Text"
\$icon move=42;50.074800,14.409627
\$icon_move=42;50.074800,14.409627;"Text"
\$icon_delete=42
\$icon_delete=all
Description:
- create, move and delete an icon on map
Protocol version:
- 1.4.0 or later
Availability:
- tcp/ip or com
Parameters:
- icon_new command : icon number, coordinate, path, [text]
- icon_move command : icon number, coordinate
- icon delete command : icon number
- icon delete command : "all" to remove all icons
Return values:
- "ok" on success or "error" when failed
- "busy" when the remote device is busy responding to another command
GET REMOTE SOFTWARE VERSION
Format:
\$software_version
Description:
- returns remote device application software version
Protocol version:
- 1.0.0 or later
Availability:
- tcp/ip or com
Parameters:
- none
Return values:
- software version (e.g. 8.0.42) or "error" when failed
- "busy" when the remote device is busy responding to another command
GET COMMUNICATION PROTOCOL VERSION
Format:
\$protocol_version
Description:
- returns communication protocol version
Protocol version:
- 1.0.0 or later
Availability:
- tcp/ip or com
Parameters:
- none
Return values:
- protocol version (e.g. 1.0.0) or "error" when failed
- "busy" when the remote device is busy responding to another command
Testing communication can be done by using a telnet client.
Start Navigator in command mode
Activate communication in Navigator - go to Menu2 / Settings2 / Remote Communication.
Wait a few seconds while an automatic scan takes place. Now select Setup TCP/IP connection manually.
Enter the following IP address 127.0.0.1 and port 4242.
Now commands can be sent to 127.0.0.1 port 4242.
To confirm it is working start Command Prompt by clicking on Start/Run and typing cmd. Now in command prompt type:
telnet 127.0.0.1 4242
and then
\$message="Hello"
Part

18 Command line arguments
Window size and border
--window_border=yes/no --window_position=left,top,width,height
Example:
--window_border=yes --window_position=100,100,800,600
On some small or wide resolutions button can be too large. In that case try the following parameter --nohires
Example:
--window_border=no --window_position=100,100,480,272 --nohires
Start with default settings
--default
Start from an alternate settings file
--configset=...
Remote communication (see TCP/IP communication)
-tcpserver=ipaddr:port or
-tcpserver=port or
-tcpserver
where ipaddr is an ip address or "any" (default is "127.0.0.1"); default port is 4242)
for communication through a COM port.
-comserver=comx
where comx is com port number (i.e. com1, com2, ...)
Part

19 Solving Problems
1. Problem starting Navigator
Solution: In most cases the problem is caused by corrupt configuration files. Go to the folder where Navigator is installed and tap the file ResetToDefaults. This will initialise Navigator with factory defaults. Existing data files will be moved to the ConfigBackup folder. Help us to analyse the problem by emailing your old config files to support@directions.ltd.uk
2. On application startup Navigator reports an error "Cannot initialise routing! Not enough memory(?) Exit?(recommended)"
Solution: Exit the application and uninstall maps of countries/regions that you do not need. Alternatively, free more program memory on your device.
3. Route calculation takes too long (10 minutes)
Solution: Go to Settings / Select Regions and close regions which you do not need. Free up as much program memory as possible.
Sending an error report
If your problem persists then please send an error log to technical support support@mapfactor.com along with a brief description of your problem.
This file can be located in C:\Documents and Settings[\user name]\Application data\Navigator\12.0\ You can also send this file automatically by running START / Programs / Navigator / LogSender
Part

20 Updates
You can download updates easily by using the Navigator Setup Utility.
Click on Product Updates and then Check for new updates.
If you want to be notified automatically of new updates then in the Setup Utility go to Settings and enable Use update monitor. This will enable notification through system tray.
- Table of Contents
- Part I Introduction 4
- Part II Installing Navigator for PDA 6
- Part III Using Navigator 21
- Part IV Using the map 43
- Part V Navigator Menu 47
- Part VI Favourites 49
- Part VII Odometer 55
- Part VIII Routing 57
- Part IX Nightmode 62
- Part X Communication 64
- Part XI Work Status 66
- Part XII Saving and Replaying your journeys 69
- Part XIII Settings 72
- Part XIV Import 87
- Part XV Vehicle Tracking 89
- Part XVI Entering special characters with the on screen keyboard 94
- Part XVII TCP/IP communication 96
- Part XVIII Command line arguments 103
- Part XIX Solving Problems 105
- Part XX Updates 107
- Index 0
- Part
- Introduction
- Welcome
- Installing Navigator for PDA
- Overview
- Installing Navigator
- Installing Maps
- Using Navigator
- Connecting your GPS receiver
- Setting up a TMC Receiver
- PROBLEMS CONFIGURING GPS
- Setting your destination
- From the Map
- From the Search menu
- Address
- POI
- Nearest
- Favourites
- Searching on the Internet
- Navigating
- IV
- Using the map
- Navigator Menu
- VI
- Favourites
- Adding Favourites
- Adding a favourite from the map
- Adding a favourite from the Find & Navigate menu
- Using Favourites
- Favourties Editor
- VII
- Odometer
- Routing
- TMC
- IX
- Nightmode
- X
- Communication
- XI
- Work Status
- XII
- Saving and Replaying your journeys
- Saving your Journeys
- Replaying your Journeys
- Settings
- GPS
- Navigation
- Tracking
- Camera Warnings
- Application
- Colour schemes
- Keyboard
- Metric and Imperial units
- Language
- Select Regions
- Map colour schemes
- Select POI Types
- Product key
- Remote Communication
- Import
- Vehicle Tracking
- Adding and managing vehicles
- Adding a Vehicle
- Managing Vehicles
- Tracking your vehicles
- Entering special characters with the on screen keyboard
- TCP/IP communication
- DISPLAY A TEXT MESSAGE
- DISPLAY A QUESTION
- DISPLAY A CHAT MESSAGE
- SEND DESTINATION AND/OR WAYPOINT(S) AND/OR DEPARTURE
- Format:
- Description:
- Protocol version:
- Availability:
- Parameters:
- Return values:
- STOP NAVIGATION
- GET LAST KNOWN GPS POSITION
- NAVIGATION SOUND
- SOUND WARNINGS
- CHANGE APPLICATION WINDOW SIZE
- MINIMIZE APPLICATION WINDOW
- MAXIMIZE APPLICATION WINDOW
- RESTORE MINIMIZED/MAXIMIZED APPLICATION WINDOW SIZE
- START/STOP SENDING GPS POSITIONS
- START/STOP RECEIVING GPS POSITIONS
- SET APPLICATION MODE
- MAP ICONS
- GET REMOTE SOFTWARE VERSION
- GET COMMUNICATION PROTOCOL VERSION
- Command line arguments
- Solving Problems
- Problem starting Navigator
- On application startup Navigator reports an error "Cannot initialise routing! Not enough memory(?) Exit?(recommended)"
- Route calculation takes too long (10 minutes)
- Sending an error report
- Updates
Brand : Xomax
Model : Navigator-12
Category : Gps