
SCO 08D - Pan SCHNEIDER - Free user manual and instructions
Find the device manual for free SCO 08D SCHNEIDER in PDF.


| Product Type | Electric Pressure Cooker |
| Brand | Schneider |
| Model | SCO 08D |
| Capacity | 8 liters |
| Dimensions (approx.) | 325 x 325 x 350 mm |
| Weight (approx.) | 6 kg |
| Power | 1200 W |
| Voltage | 220-240 V ~ 50/60 Hz |
| Temperature Range | 60°C to 215°C |
| Pressure Range | 0 to 90 kPa |
| Preset Programs | Rice (9 min), Fish/Poultry (12 min), Cakes (15 min), Soup/Broth (20 min), Meat/Beans (25 min) |
| Timer | 24-hour programmable delay start |
| Display | Digital LED |
| Inner Pot Material | Non-stick coating |
| Outer Shell Material | Stainless steel |
| Safety Features | Pressure valve, floating valve, overheating protection, thermal fuse |
| Accessories Included | Measuring cup, spoon |
| Additional | Recipes book included (Spanish) |
Frequently Asked Questions - SCO 08D SCHNEIDER
User questions about SCO 08D SCHNEIDER
0 question about this device. Answer the ones you know or ask your own.
Ask a new question about this device
Download the instructions for your Pan in PDF format for free! Find your manual SCO 08D - SCHNEIDER and take your electronic device back in hand. On this page are published all the documents necessary for the use of your device. SCO 08D by SCHNEIDER.
USER MANUAL SCO 08D SCHNEIDER
natural_image
Illustration of a rice cooker with digital display and control panel (no text or symbols)INDICE
natural_image
Technical line drawing of a circular mechanical component with a knob and handle (no text or symbols)natural_image
Diagram of a circular mechanical component with a pointer and mounting bracket (no text or symbols)natural_image
Simple line drawing of a circular mechanical component with a central handle and arrow indicator (no text or symbols)natural_image
Illustration of hands holding a small mechanical component with a downward arrow indicating force or motion (no text or symbols)natural_image
Diagram of a hand holding a circular device with a knob and a plus sign, no text or symbols presentnatural_image
Line drawing of a hand holding a cooking pot with a handle, showing a black arrow indicating rotation (no text or symbols)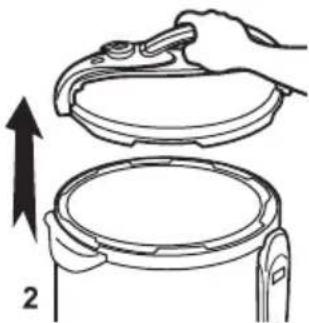
natural_image
Illustration of a hand holding a lid above a circular container, with an upward arrow indicating motion (no text or symbols)natural_image
Line drawing of a hand holding a cooking pot with a handle, showing a right-hand rule (no text or symbols)natural_image
Symbol of a trash bin crossed with no visible text or labelsPlacing the cooker 03
This is an electric device 03
Overview 04
Components 04
The Lid 04
The Body 07
03. Usage Instructions 09
The Control Panel 09
Overview 09
The display 09
Functions buttons 10
Preset menu buttons 11
Quick Guide 12
FAQs 13
Lemon sponge cake: Usage example 15
04. Maintenance 17
Cleaning 17
Cleaning the inner pot 17
Cleaning the Lid 17
Cleaning the Body 17
Problem solving 18
¿What if it doesn't reach enough pressure? 18
¿What if the steam comes out of the borders? 19
¿What if it doesn't open up? 19
¿What if any component is damaged or worn down? 19
Security Systems 19
Error codes 19
Technical services 20
Circuit diagram 20
Warranty 21
Disposal instructions 21
SPECIFICATIONS
Thank you for trusting Schneider.
This is an easy to use electric pressure cooker with amount outstanding energy savings up to 60% and one touch functions that will allow you to make delicious stew, beans, rice, fish, soup....
With its 24h programmer it will cook for you and have your meal ready when you get home at any time.
The following are the main specifications of this pressure cooker:
©Timer
©24th programmer
©High resistance mom stick inner post
©5 preset functions
©Accessories: Spoon and measure cup
©Recipes book included (in Spanish)
This user manual provides information to the electric pressure cooker models is easier SC0 04D4D, SCO 06D and SCO 08D. The following specifications are unique to each of these pressure cooker models (check your model name on the product packaging):
| Model Cap | Capita Dimer | Bionsn | Bioner Diameter | Temp. | Dissurer | Temp. | Pressure |
| SCO 04D 4 | litres 280 x | 2800x2980mm2 | 8700Wn20 | c8060/80° | 20-70KPa | 60-80°C | 0-70KPa |
| SCO 06D 6 | litres 295 x | 2955x3295mm3 | 31000W 22 | t0060/8 | 220-70KPa | 60-80°C | 0-70KPa |
| SCO 08D 8 | litres 325 x | 3255x3505mm3 | 51200W 24 | t2060/8 | 240-70KPa | 60-80°C | 0-70KPa |
Maximum temperature: 215°C - Maximum pressure: 90KPa
This pressure cooker is part of the following Schneider products family:

If you wish to discover more fantastic Schneider products you are welcome to visit our online catalogue at:
www.schneiderespana.es
BEFORE USE
CAUTION
First of all make sure you take off all packaging material. Keep your children away form it.
This product is intended for domestic interior use only.
⚠ For their own safety, children and people with physical, mental or sensorial disabilities should not use or manipulate this device.
⚠️ Carefully read and follow all instructions contained in this booklet.
⚠️ Never open the lid until all pressure is released.
In order to avoid injuries stay away from the cooker while it releases steam.
During the cooking process cooker surfaces may become hot. Do not touch it and keep it away from flammable materials.
⚠️ If you need to carry it, hold it always by both side handles.
⚠️ If you notice any kind of damage or malfunction please contact immediately Schneider technical services. Never try to repair it by your own means.
This device is not water resistant. Do not plunge it. Only the inner pot can be washed normally in the sink.
⚠️ Risk of electric shock. Do not touch this device with your hands wet.
⚠️ Always keep this device away from fire or other heating elements.
△ Third party accessories may damage the cooker, voiding Schneider's official warranty.
INSTALLATION
Placing the cooker
Place the cooker in a fresh, dry, interior room, well ventilated and away from heating sources. Put it on a flat, solid surface. It must be easy to reach, and comfortable to manipulate.
This is an electric device
Check the rating label information at the back of the cooker and make sure that your home electrical system matches its requirements. Make sure also that you comply with your local regulations related to electrical installations.
The mains plug and cable have to be in perfect conditions, not smashed or folded, and away from liquids and heating sources. Don't let the cable hang. Plug always first the cable to the cooker and then to the mains. To plug or unplug the cable grab it by the plug itself, not the cable.
Always unplug the device if you are not using it.
OVERVIEW
COMPONENTS
The Lid
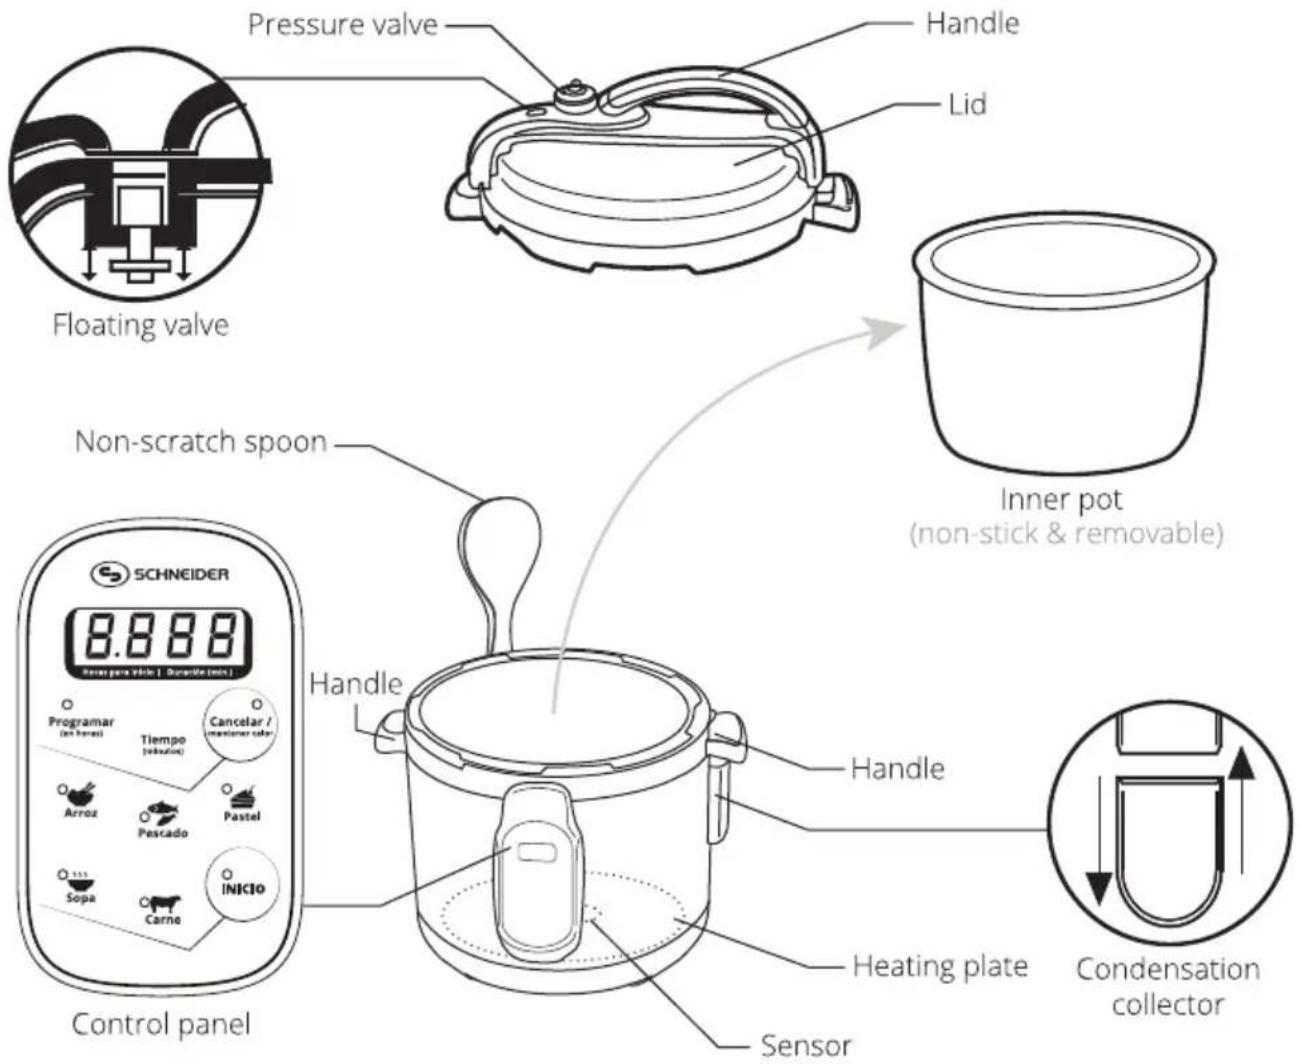
The lid of this cooker includes 2 security valves (pressure valve & floating valve), a handle and an hermetic closure system for pressure cooking that includes a sealing rubber ring.
△ You can cook taking the lid off. It will not be pressure cooking, but it will heat anyway.
△ If steam leaks out of the lid border, unplug the cooker, let it cool down and take it to SAT.
Pressure valve
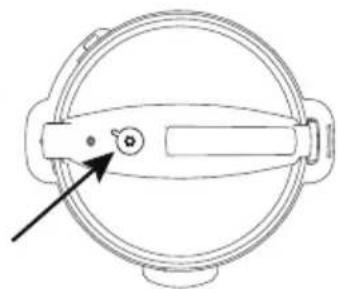
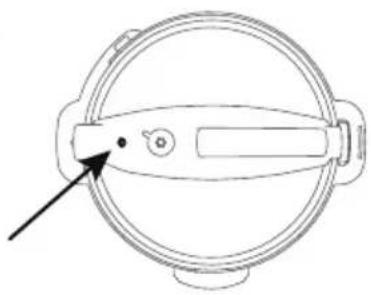
It is the black cylinder with a strange cap on top of the lid. It has 2 positions: "Cierre hermético" and "Salida Vapor". "Cierre hermético" position locks the steam inside the pot, increasing pressure. With pressure the food is cooked faster. When in "Cierre hermético" position the valve is lower compared to "Salida vapor". "Salida vapor" position releases steam and, therefore, pressure. Release always all pressure before opening the lid.
natural_image
Technical line drawing of a circular mechanical component with a knob and handle (no text or symbols)To select the valve position look for a small vertical line around the pressure relief valve. This line should match the selected position dot on top of the valve cap.
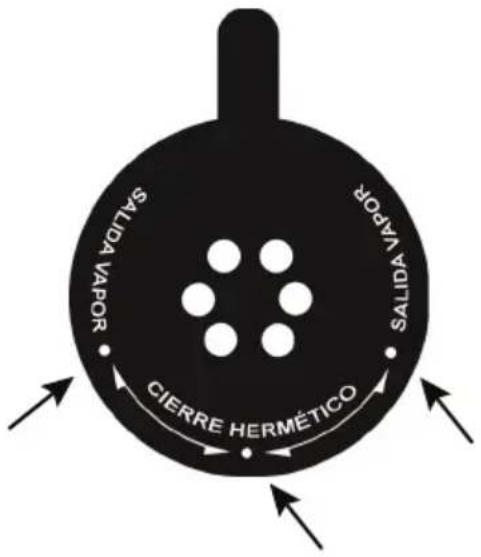
In the inside of the lid we can find the opposite side opposite end of the pressure valve covered by a protective shell that prevents the valve from getting blocked with leftovers. Take this shell off by simply pulling it. You should wash it every time you use the cooker. You can put the shell back in by simply pressing on it.
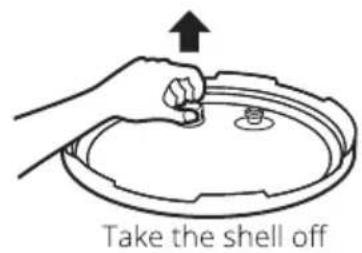
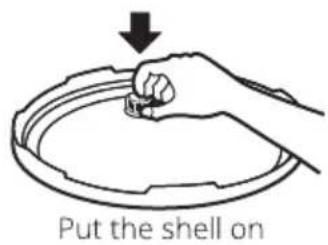
Do not place anything over the pressure relief valve. Use only the original valve.
⚠️ Stay away from the pressure valve while it is releasing steam.
Do not place over the cooker clothes or anything else that could block or divert the steam escape.
Floating valve
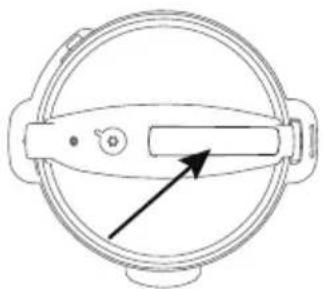
It is a blocking valve next to the pressure relief valve. When it is lifted by the inner pressure it will lock the lid and the pressure cooking will start. You will not be able to open the lid until you release the pressure and this valve comes down again.
Do not try to force the lid to open while the floating valve is lifted.
▲ Often clean the floating valve rubber sealing join in the inner side of the lid, preferably every time you use this cooker.
The floating valve is not lifted if there is not enough pressure inside the pot. This may occur when there is not enough food or water in the pot, or because of a system failure, a power cutoff, the lid not being correctly closed, a damaged sealing system, etc.
natural_image
Technical line drawing of a circular mechanical component with a pointer and mounting bracket (no text or symbols)Lid handle
The lid handle of this Schneider cooker will let us easily put the lid on and off. It should not be used to carry the whole cooker. Please use the side handles for that purpose.
Do not touch the cooker surface (the lid most of all) while it is cooking. It can get very hot.
natural_image
Simple line drawing of a circular mechanical component with a handle and arrow indicator (no text or symbols)Sealing rubber ring
In the inner side of the lid there is a metal ring. Surrounding it you can find the rubber ring that seals the lid. You should keep it always well placed and in perfect conditions. This is the correct way to place it:
We press to affix it between the metal ring and the lid
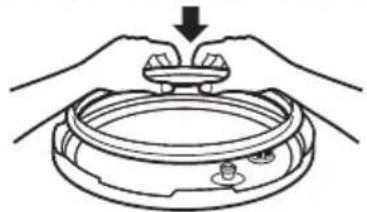
natural_image
Illustration of hands holding a small component with a downward arrow indicating force or motion (no text or symbols)We pull to take it off
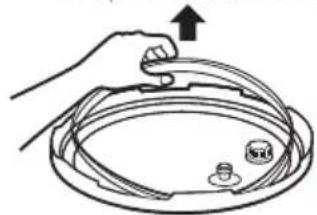
natural_image
Hand holding a circular tray with a small knob and an arrow indicating upward motion (no text or symbols)⚠ Si the rubber ring or the metal ring around it are damaged or misplaced, or they don't fit, do not cook with the lid on and contact with our technical services to replace them.
Open and close the lid
Before opening the lid we have to fully release pressure. To do so we put the pressure valve in "Salida vapor" position:
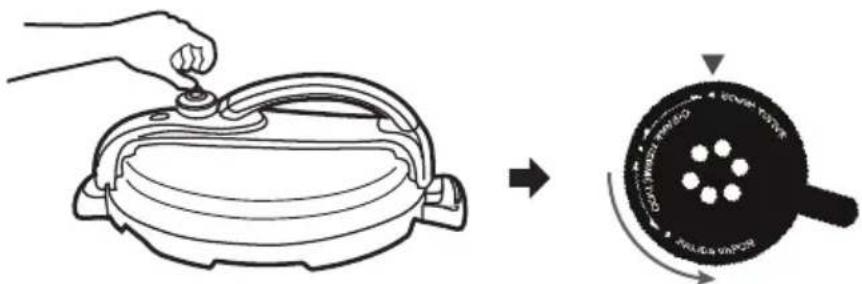
When enough steam has been released the floating valve will go down. We wait 2 minutes to make sure most steam have come out and we can open the lid. Grab the lid handle and push down a bit while turning it clockwise until it let the lid loose. With the other hand we should be holding the cooker by one of the side handles. Then we can pull slow and firmly (paying attention to the remaining steam) to take the lid off:
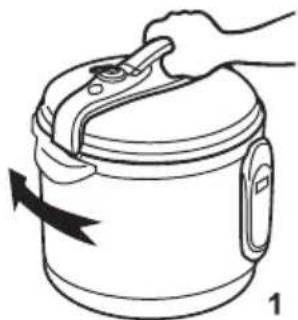
natural_image
Line drawing of a hand holding a cooking pot with a black arrow indicating rotation (no text or symbols)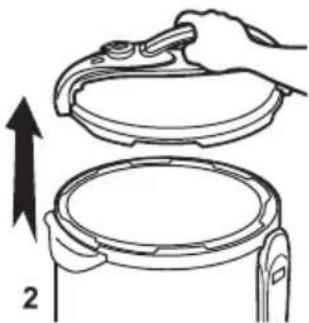
natural_image
Illustration of a hand holding a lid above a circular container, with an arrow indicating upward motion (no text or symbols)When you open the pressure relief valve it will immediately release very hot steam. Take appropriate precautions to void burns.
⚠️ If you cannot turn the lid to open it do not force it. Unplug the cooker from the mains and wait for the device to cool down again to room temperature. If you cannot open it by then please contact our technical services.
When you open the lid it will free remaining steam and hot air from the inner pot. Take appropriate precautions to void burns.
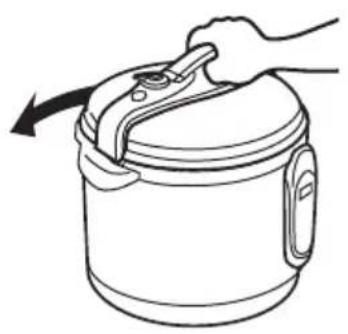
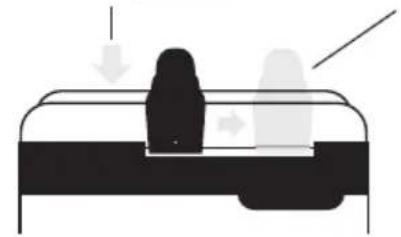
Before closing the ring make sure that both valves and the sealing ring are correctly placed and in perfect conditions. Check that you can turn the sealing ring around the metal ring. Then put the lid on the cooker body in the position shown in below right drawing. Push down first and then turn it anti-clockwise until you hear a click.
natural_image
Line drawing of a hand opening a cylindrical container with a handle, showing a curved arrow indicating rotation (no text or symbols)Push down the lid in this position
natural_image
Diagram of a mechanical or electrical component with arrows indicating direction (no text or symbols)Side view
Turn the lid anti-clockwise
After you close the lid and before you start cooking check that the pressure valve is in the desired position, either open or closed.
The body
Your Schneider cooker body includes the following components: A base, an outer shield and a detachable inner pot.
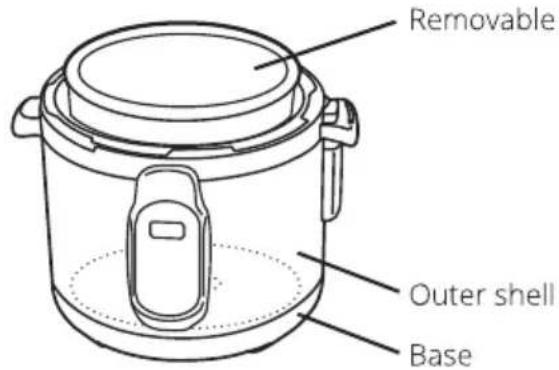
The cooker base
Here you can find the temperature and pressure sensors, the heating plate and the cable inlet.
The outside is made of degradable materials so it should never be in contact with fire. Neither should it be subject to high humidity conditions, extreme cold or heat, as the electronic components might get damaged.
This is an electric device, so in contact with water or humidity it may cause sparks, short-circuits, electric shocks or, even fire. Please take all due precautions.
It is important that you always keep in perfect conditions the contact surface between the heating plate and the inner pot.
Keep the cable away from the hot parts of the cooker. Always unplug the cooker when you are not using it.
Nonstick, removable, inner pot
The inner pot is where you place the food that you want to cook. It is a great advantage for you. On one hand it is the only part that you have to wash in the sink after use as it is detachable. On the other hand it will be very easy to wash because of its nonstick coating. Depending on the cooker model the inner pot capacity can be 4, 6 or 8 litres.
You should never fill the inner pot over its capacity, which is 4/5 (or 80%) for food that does not increase its volume with the cooking (like meat, vegetables, etc.), and 3/5 (or 60%) that does increase its volume with the cooking (pasta, rice, beans, etc.)
You should not either fill the inner pot under its minimum capacity, which is 1/5 (20%):
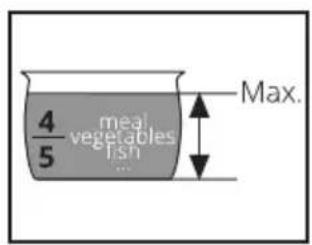
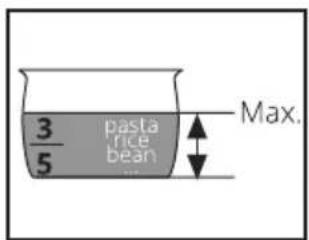
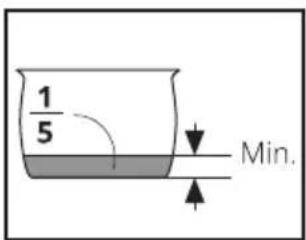
To take off the inner pot just pull it slightly to the top. If it is still hot protect your hands with gloves or clothes to void burns.
Before putting it back in place make sure that the heating plate and the support area are clean. Then just place it in the same position it was originally. If correctly placed it should not be put out of the cooker body more than 2cm over its top.
In the inside the inner pot is covered by a nonstick coating that could be damaged if you do not take the appropriate precautions. Use always heat resistant soft material tools (wood, plastic, silicone..). To wash it in the sink use the soft side of the scouring pad or use nonstick pan coating ready scouring pads.
⚠ Use the inner pot only with this Schneider cooker, and never with other heating sources. If you need to replace it contact Schneider technical services. Use only Schneider original parts for this cooker.
⚠ It is recommended that you wash the inner pot by hand in the sink, what will make it last longer and in better conditions, but still you can also wash it in the dishwasher if you prefer so.
Outer shell
The outer shell is made of high resistance stainless steel. On top of the shell you have two side handles that you should use to carry the whole cooker. It includes also a control panel, that will be explained in detail in the next chapter, and a water deposit to collect condensed steam. This deposit can be easily removed by simply pulling it down.
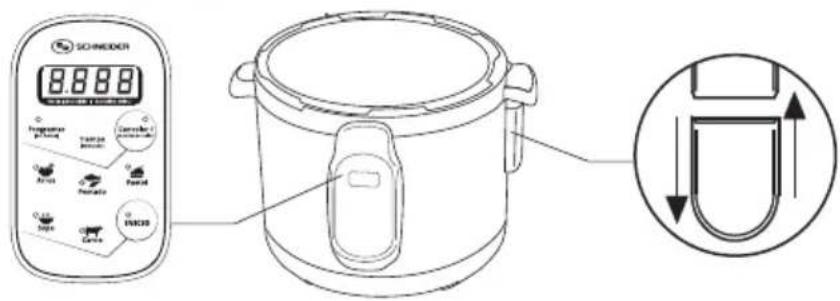
USAGE INSTRUCTIONS
THE CONTROL PANEL
Overview
At the front side of the cooker we can see its control panel. It is a digital control panel with 9 buttons and an alphanumeric digits display. Buttons are distributed in two areas: On top you can find the functions buttons and the rest are preset menu buttons (apart from the Start button INICIO).
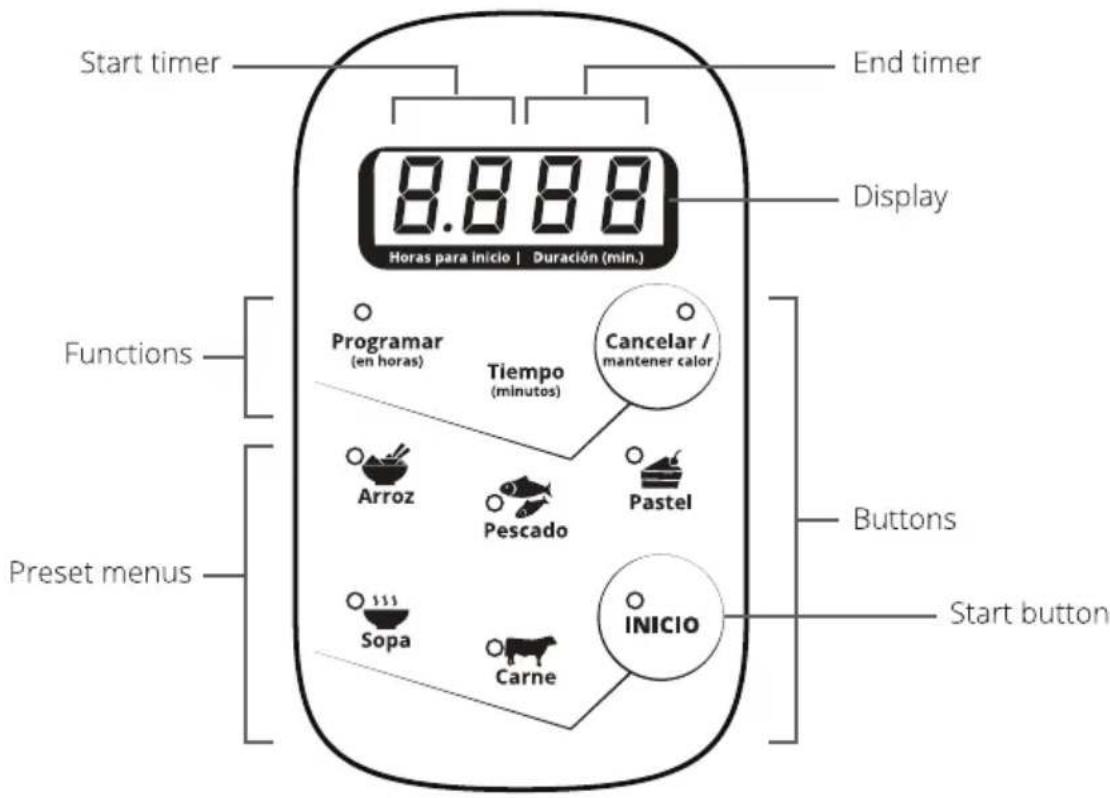
The display will show four digits: Two of them are red and the other two are green. When we turn on the cooker it will start in stand by mode and the display will show "0000" waiting for instructions.
The first 2 digits (in red) indicate the hours left to start cooking. For example, "0.5" means that the cooker will start cooking in half an hour, "1.0" means 1 hour left, "1.5" one and a half hours, etc. From 9 and a half hours (9.5) time increases 1h at a time. ("8.5", "9.0", "9.5", "10", "11", "12"......"24"). When pressure cooking starts it shows a "P" (i.e. "OP 12").
The last 2 digits (in green) indicate the remaining pressure cooking time in minutes. The countdown will not start until there is enough pressure and a "P" shows up in the left side of the display (once started the countdown/program will continue even if you release pressure).
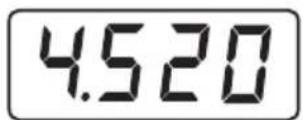
Here the cooker will start in 4 and a half hours and then it will pressure cook for 20 minutes
Functions buttons
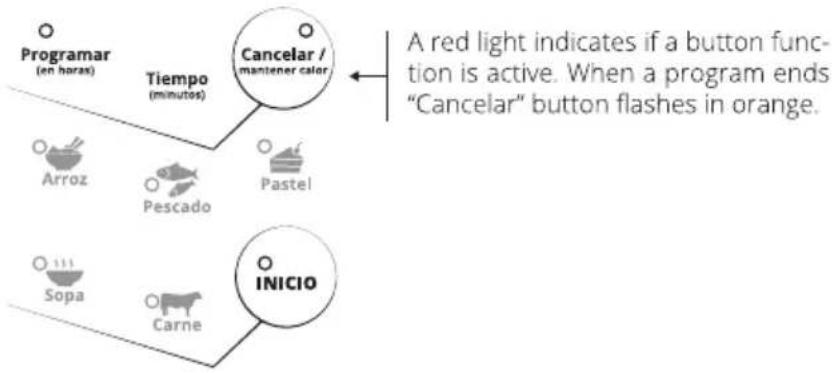
The usage of this pressure cooker is very simple. The pressure is set automatically, so you only need to choose the start time first and, then, the pressure cooking time. To do so you have 2 options: Manual setting or preset menus. For manual setting you can use the following function buttons (in black):
flowchart
graph TD
    A["Programar (en horas)"] --> B["Tiempo (minutes)"]
    B --> C["Cancelar / mantener calor"]
    C --> D["Inicio"]
    D --> E["Sopa"]
    D --> F["Carne"]
    E --> G["Arroz"]
    E --> H["Pescado"]
    E --> I["Pastel"]
    style A fill:#f9f,stroke:#333
    style B fill:#ccf,stroke:#333
    style C fill:#cfc,stroke:#333
    style D fill:#fcc,stroke:#333
    style E fill:#cff,stroke:#333
    style F fill:#ffc,stroke:#333
    note right of C: A red light indicates if a button function is active. When a program ends "Cancelar" button flashes in orange.
Programar
With this button you can set the start timer, in a countdown format. Every time you press Programar the time will increase half an hour. So if you press it for instance 3 times in a row the screen will show the following digits: 1500 , meaning that it will start cooking in one hour and a half (1.5 - not the same as 15, which means 15 hours -), and the pressure cooking time has not been selected yet (00).
Every time you press Programar the cooker waits for you to keep pressing or to select a pressure cooking time / preset menu. If you do not take any action for 10 seconds the cooker cancels the start timer setting and goes back to stand by mode.
The start timer is optional. You can start cooking immediately if you prefer.
Select always first the start time and only then the cooking time / preset menu, unless you select the cooking time manually. Then you can invert the selection order if you want.
You can set the start time up to 24 hours before.
You can directly press INICIO (Start) after selecting a start time, without selecting a cooking time. This is for non pressure cooking only. So open the lid or the pressure valve and once started you will have to manually stop the cooker by pressing Cancelar / mantener calor.
Tiempo
Once selected the cooking time, or if you prefer to start cooking immediately, you have to choose the cooking time. You can do it selecting a preset menu or manually by pressing this button: Tiempo. Every time you press it the pressure cooking time will increase 1 minute up to 99 minutes. If you need to modify your time selection press Cancelar / mantener calor.
Selected time is pressure cooking time, so the countdown will not start until the pot reaches enough pressure inside.
INICIO
Once selected the start time and/or the pressure cooking time press INICIO to start the start countdown or the cooking process.
Cancelar / mantener calor
Press this button to cancel the current setting or cooking program in execution.
In stand by mode press it to keep warm the food in the pot. When a cooking program ends the "Keep warm" function starts automatically. You can stop it by pressing this button ("Keep warm" mode may last up to 8h., but it is not recommended for more than 6h.)
Preset menu buttons
You can cook by just pressing one button in two ways:
a) By pressing INICIO (without pressure / lid). It will start cooking immediately. You will have to stop it manually by pressing Cancelar / mantener calor when you think the meal is ready.
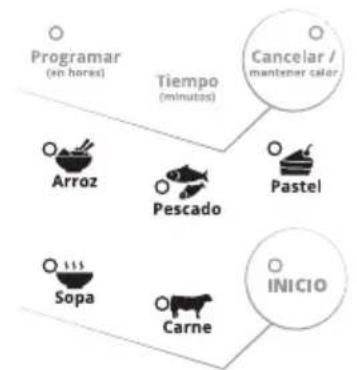
b) By pressing any of the preset menu buttons. In this case cooking time is preset. When it finishes you will hear a beep and the Cancelar button flashes. Then "Keep warm" function starts automatically. Then you only have to stop this function and serve. These are (in black) preset menu buttons:
flowchart
graph TD
    A["Programar (en horas)"] --> B["Tiempo (minutes)"]
    B --> C["Cancelar / mantener color"]
    A --> D["Arroz"]
    A --> E["Pescado"]
    B --> F["Pastel"]
    A --> G["Sopa"]
    A --> H["Carne"]
    A --> I["INICIO"]
| Arroz (Rice) | 9 min. |
| Pescado (Fish/Poultry) | 12 min. |
| Pastel (Cakes) | 15 min. |
| Sopa (Soup/Broth) | 20 min. |
| Carne (Meat/Beans) | 25 min. |
Pressure cooking times. You have to add the time the cooker needs to reach the appropriate pressure
These preset menu times are intended for a standard amount of food cooked just to what we consider the perfect point of doneness, everybody has different needs and preferences, like a more (or less) soupy rice, well done (or medium) meat, more (or less) quantity... Most inexperienced users will probably choose the convenience and ease of use of the preset menus. Experienced users instead will probably choose instead for manual time selection, which gives them more control (Tiempo button).
Arroz (9 min.)
This menu can be used for different types of rice cooking but, mainly, for risotto. You can use it also for a perfect rice pudding. As a short program you can use it also for light or precooked soup.
Pescado (12 min.)
For chopped chicken or other poultry, fish, precooked meat, shellfish, etc. For a whole chicken it is advised to use menu Carne instead.
Pastel (15 min.)
Cooking a cake usually takes around 30 minutes, depending on the kind of cake you are baking. This is a 15 minutes program so you can release steam and, if necessary turn the cake down before cooking 15 more minutes to finish the program.
Sopa (20 min.)
Good for soups or meat broths, or long cooking vegetables such as potatoes or carrots. For light or precooked soups it is advised to use menu Arroz. For pasta soup it will be enough to manually set 5 minutes pressure cooking.
Carne (25 min.)
You can use this menu either for long cooking meat, some molluscs and beans. When you cook beans please keep in mind that they increase a lot their size during the cooking process.
Quick guide (control panel)
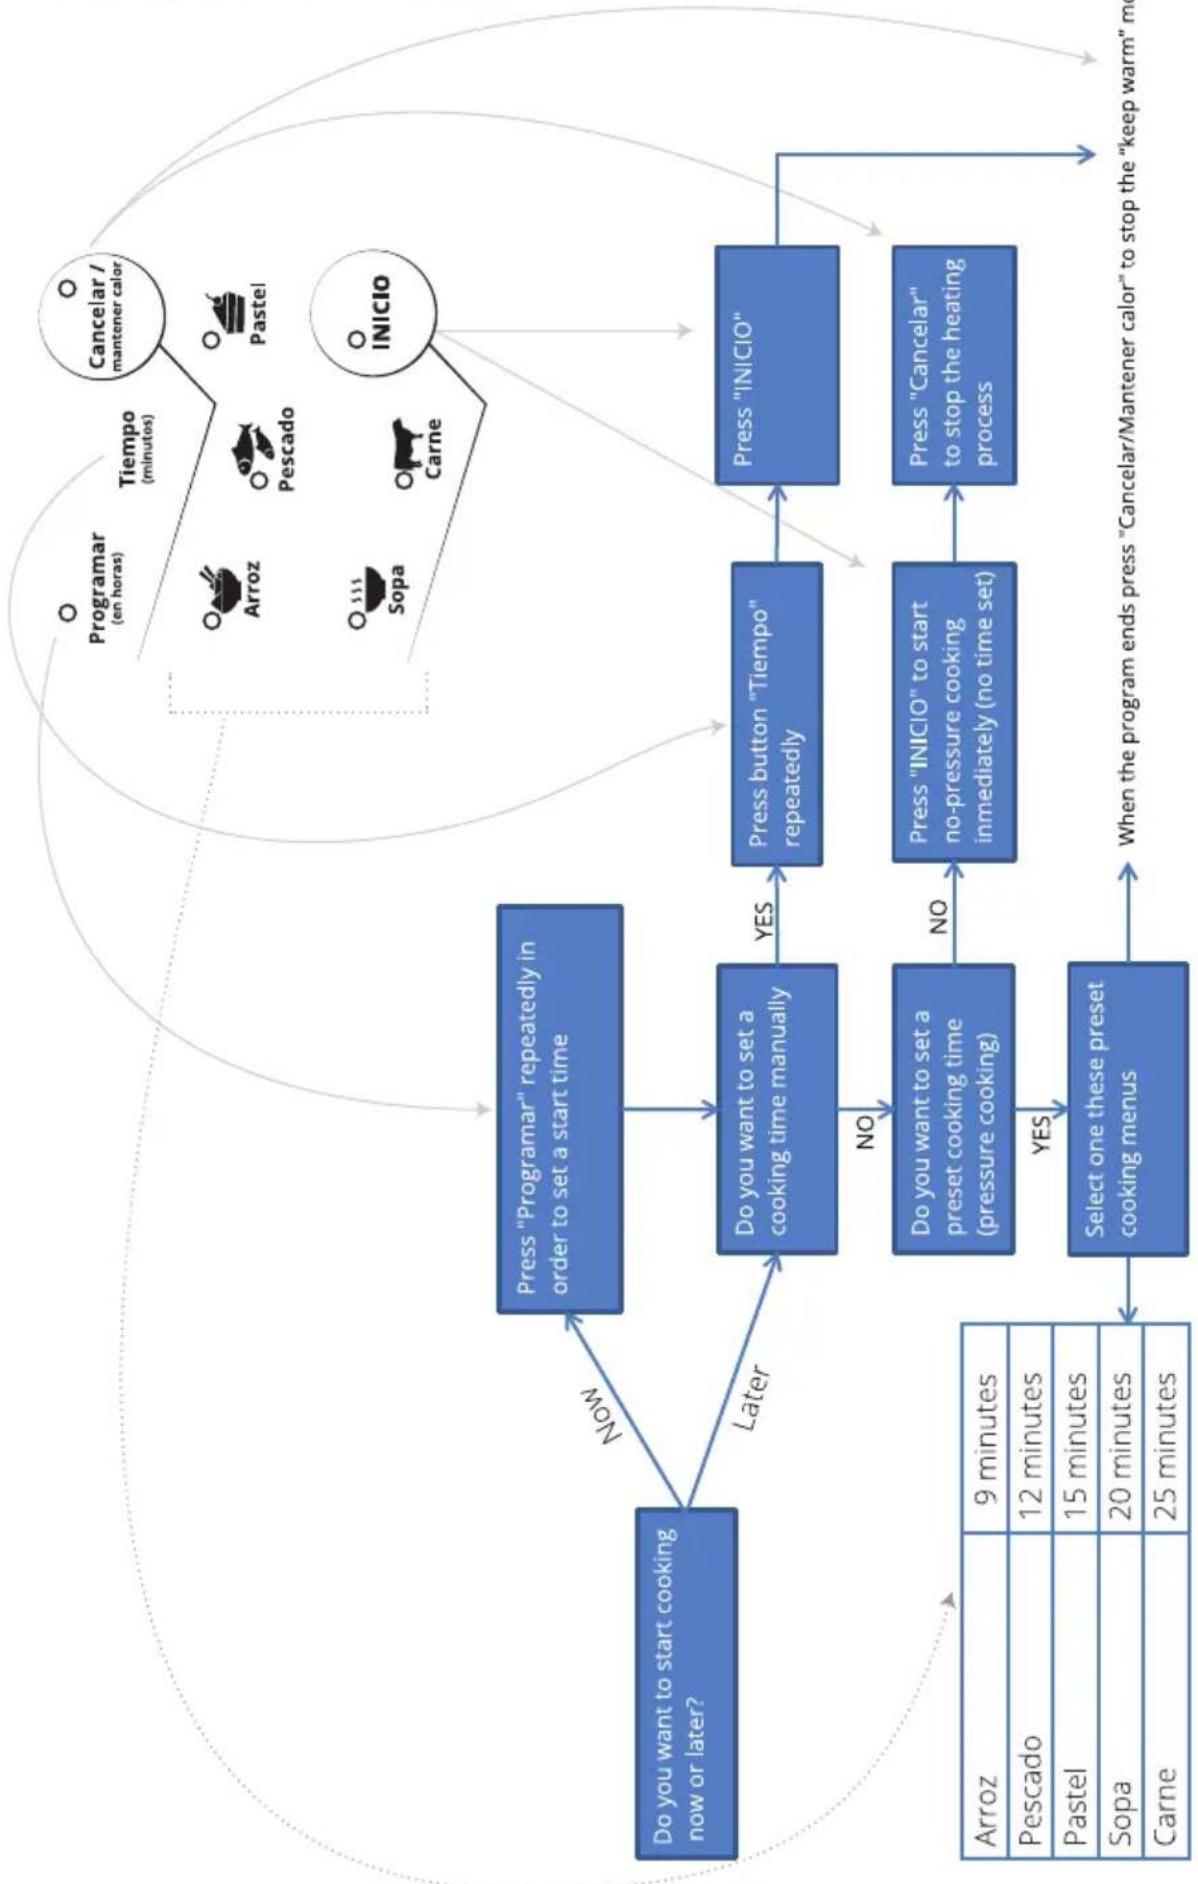
flowchart
graph TD
    A["Do you want to start cooking now or later?"] --> B["Press "Programar" repeatedly in order to set a start time"]
    B --> C["Do you want to set a cooking time manually"]
    C --> D{YES}
    C --> E{NO}
    D --> F["Press button "Tiempo" repeatedly"]
    E --> G["Do you want to set a preset cooking time (pressure cooking)"]
    G --> H{NO}
    G --> I{YES}
    H --> J["Select one these preset cooking menus"]
    I --> J
    J --> K["When the program ends press "Cancelar/Mantener calor" to stop the "keep warm" meal"]
    L["Programar (en horas)"] --> M["Tiempo (minutos)"]
    M --> N["Stop the heating process"]
    O["Cancelar / mantener calor"] --> P["Stop the heating process"]
    Q["Arroz"] --> R["9 minutes"]
    S["Pescado"] --> T["12 minutes"]
    U["Pastel"] --> V["15 minutes"]
    W["Sopa"] --> X["20 minutes"]
    Y["Carne"] --> Z["25 minutes"]
    AA["Inicio"] --> AB["Stop the heating process"]
FREQUENTLY ASKED QUESTIONS:
When cooking please keep always in mind the following considerations:
Can I cook with and without lid?
You can use this cooker:
- With lid and pressure
- With lid and without pressure (opened pressure valve)
- Without lid and, therefore, without pressure
For instance you can stir-fry a bit of garlic and onion with a bit of oil. In this case you would prefer tu use the cooker without lid. Or if you cook beans you would prefer to cook with lid and pressure so it finishes cooking as soon as possible. Or maybe you want to tenderize meat with slow cooking, in this case it is convenient to open the pressure valve so it will cook without pressure, but at a higher temperature and homogeneity than cooking without lid.
Can I fry with this cooker?
This cooker is designed to reach certain temperature levels over which it cannot operate. This means that you should not try to fry normally, like fries or nuggets with this cooker - but you can stir-fry if you do not use much oil. The limit is stablished by the temperature that the oil reaches and the amount of it. In any case, for a long life of your cooker, it is advised not to use this cooker for frying.
What if the meal is not cooked as I want it to be?
Lets say that you have used menu Arroz and, when finished, the rice was overcooked. This is a 9 minutes menu because most of the times it is the perfect time to cook rice. But it is not always like this. It is not the same time to cook risotto than soapy rice, or just rice instead of heavily seasoned rice, or 200 gr instead of 300gr.
So your rice might be overcooked but you do not need to worry. It is not always going to be like this because next time you cook the same quantities you have 2 options: Either you can set manually less than 9 minutes, either you can use again menu Arroz but opening this time earlier the pressure valve. If instead of being overcooked it is undercooked you can just set manually less 9 minutes next time.
I pressed INICIO and the countdown does not start. What now?
When the cooking process starts the cooker heats the food but it needs a few minutes to reach enough pressure for pressure cooking. First you notice that the floating valve comes up and later a letter "P" shows up at the left side of the display (0.P 09). Only then the countdown starts, as it counts only the pressure cooking time left.
It might happen that after a long while the floating valve does not come up and the cooker does not get enough pressure. In this case the countdown will not start. You need to check the following list:
- Can you feel any heat from the cooker?
- Are the floating valve, the pressure valve and the sealing ring in perfect conditions?
- Are they correctly placed?
- Is the pressure valve in cierre hermético (down) position?
- Did you put a minimum content of 1/5 of the inner pot volume?
Can I only cook the recipes from the recipes book?
Not at all. You have got endless possibilities. Consider this cooker as a traditional pressure cooker with many advantages. You can cook all the same recipes that you would usually cook in a traditional steam cooker or an ordinary pot and, also, you can adapt any recipe or check the Schneider pressure cookers specialized recipes blog by Patricia, a happy Spanish user who shares her delicious recipes here:
http://recetasollaschneider.com
Patricia has not got any direct relation to Schneider, but she provides you with her recipes, included in attached recipes book and we strongly recommend you to take a look at her interesting blog, mainly during the first period of use of the cooker.
Can I use this cooker for steam cooking?
Yes, you can use this cooker for steam cooking. To do so you will need an accessory to keep the food above the water level. It has to be made in a material that does not scratch the inner pot coating. You should not fill with water over a half of the inner pot. Schneider does not provide this accessories, but you can easily find them in specialized shops.
Can I use this cooker for bain-marie cooking?
Same as for steam cooking you can use this cooker for bain-marie cooking, using a refractory container inside the inner pot. This container should be resistant to high temperatures and pressure and it is not provided by Schneider. Put it in the middle of the inner pot and put water in the pot (you should not cover the container). This is a good method for cooking Spanish "flan". Trick: Put a rack over the container and you can also steam cook some food over it while bain-marie cooking.
How can I prevent the food to stick at the bottom?
Even if Schneider cookers inner pot is covered by a high quality non-stick coating sometimes the food might get stuck or overcooked at the bottom. You can void it following these instructions:
Use a shorter program for such amount of food
Check that the cooker reaches enough pressure
Put more water than you use to
Depending on the type of food you may put parchment paper at the bottom of the pot. If possible spread butter on the coating surface
Once I selected a preset menu, ¿May I increase or decrease the cooking time?
If you press any of the preset menu buttons a default pressure cooking time is set. If you want that time to be shorter or longer than the default one just press Cancelar / Mantener calor button. The counter resets to "0" and then you can stablish any pressure cooking time manually by pressing Tiempo button repeatedly.
What is the difference between cooking pressing INICIO and pressing Cancelar / Mantener calor? By pressing INICIO the cooker will heat at high power until it reaches pressure enough for pressure cooking. At that point it stops and goes to "Keep warm" mode. It is better to use this procedure with the pressure valve opened or taking off the lid. This way the cooker will keep heating until you stop it, as it never reaches pressure.
By pressing instead Cancelar / Mantener calor the cooker will lounch the "Keep warm" mode, which indeed keeps the food warm, but it does not cook it correctly.
In both cases you should manually stop "Keep warm" mode by pressing Cancelar / Mantener calor.
LEMON SPONGE CAKE: USAGE EXAMPLE
1. Making the dough
For this example we will use time and quantities referred to our 6L. cooker model (SCO 06D). For our 4L and 8L models you can adapt the values according to each size.
Put in a container a lemon yoghurt and use its cup as a measure cup for all other ingredients. Add to the container 1 measure cup or olive oil, 2 measure cups of sugar, 3 measure cups of strong flour, 3 eggs, a small bag of leavening and a small punch of salt. If you want you can add to the mixture some lemon zest to give it a stronger lemon taste.
Whip and knead until the dough becomes uniform and compact.
2. Make sure the cooker is perfectly clean
Check that the floating valve is clean and can easily come up and down. Check also the floating valve and its protecting shell inside the lid.
Check the sealing ring and verify that the heating plate and the inner pot are clean and in perfect conditions.
3. Place the dough in the inner pot and the inner pot inside the cooker
Spread some butter on the coating surface of the inner pot and sprinkle a bit of flour onto it. Then put the dough in the inner pot (maximum quantity: 1/3 of the pot. Minimum quantity: 1/5 of the pot). NOTE: If the dough is consistent enough you can place parchment paper at the bottom of the inner pot to protect the sponge cake base.
Put the pot in the cooker and close the lid as previously explained in this user manual
4. Program the start time (optional)
If you do not wish to start cooking the sponge cake immediately, but you prefer to start it later you can set a start time by pressing Programar repeatedly until the display shows the remaining time (hours) in red. If you press three times for instance the display shows on the left 1.5 and the cooking process will start in one hour and a half.
In any case if the dough is ready it is better if you cook it immediately.
5. Start cooking the dough
A Option: Preset menu
Plug the cooker and press Pastel button. When pressed the little LED in the button lights. Wait for two seconds (or press INICIO), a beep sounds and the button Cancelar / Mantener calor lights while the two green digits turn from 00 to 15.
B Option: Manual time setting
Plug the cooker and press 15 time Tiempo button. Every time you press it you can hear a beep and the time shown in green increases by one unit. When the screen shows 15 in green it means that the pressure cooking will last 15 minutes. Then press INICIO and this button lights. Wait a couple of seconds for a beep, then the Cancelar / Mantener calor button lights up.
Pressure cooking time is set now and the cooker starts heating.
C Option: No time selection
Take off the lid or open the pressure valve and plug the cooker. Then press INICIO. This button lights up. Wait for two minutes. The cooker beeps and the Cancelar / Mantener calor button lights up too. If you choose Option C you will have to keep an eye on the cake to stop to cooker manually when it is ready. Time will be longer as this is not pressure cooking.
Whatever of the 3 options you choose the cooker starts heating. C does not count down. A and B will take a few minutes until it takes pessure and then starts the countdown. When it starts, a "P" (for pressure) shows up on display.
Fifteen minutes after the cooker gets pressure "Pastel" program ends. A beep sounds and "Keep warm" mode starts. Cancelar / Mantener calor button flashes, letting you know that the cooker will keep your cake warm until you stop it. In this case you do not need this function so just stop it by pressing Cancelar / Mantener calor button. Then we open the pressure valve to release all the steam.
"Pastel" program lasts 15 minutes so you can check the cooking and, if necessary, turn it upside down at half of the process. At this point, the sponge cake should have risen already and have a good consistency. You can check it with a rib. If you consider that your cake is consistent enough, you should turn it upside down, so all its surface is browned. To check the consistency you have to open the lid once the pressure is fully released. If you are not sure whether the dough has risen or not it is advised not to open the lid and continue with the next cooking cycle, as the temperature would drop very quickly inside the inner pot and, if this happens and the dough did not rise yet, it would not rise any more. If you decide not to open the lid take into consideration that the top of the sponge cake will not be browned but it will be still very good to eat. You can improve its aspect with chocolate for example. If you decide to open the lid keep in mind all the advises mentioned in this user manual to void burns.
6. Start a second cycle
When you complete previous step, close back the lid as previously explained in this user manual (in case you opened it), put the pressure valve in "Salida vapor" position (which is the highest one) to let the steam out of the cooker, and press INICIO. Two seconds later you will hear a beep and the cooker will restart heating. The sponge cake should be ready in about 15 minutes. This is not pressure cooking so there is no countdown this time. You will have to keep an eye on the time. Open the lid and check the cake with a rib. If it comes out clean you may stop the cooker by pressing Cancelar / Mantener calor, if not wait for a few more minutes. When ready take out the inner pot using kitchen gloves or clothes to void burns and remove the cake from the inner pot.
At this point you should take into consideration that there are many factors that make vary the point of doneness such as the size of your cooker (there are 3 different models), amount of dough, amount and type of each ingredient, dough consistency, kind of leavening and flour, etc. For this reason we cannot give you an exact reference. 15 Minutes without pressure should be fine in most cases, but not in others. If you use pressure cooking in the second cycle it could happen that the cooker exceeds the temperature limit. In this case it gets locked for security reasons and shows E3 on screen. You just need to wait for it to cool down in this case.
In any case you should use your own experience to adapt your cooking times and ingredients quantities for better results suiting your taste.
Unplug the cooker and wait for it to cool down at room temperature before cleaning.
Remember you can cook traditional recipes too. Everything you can cook in a traditional pressure cooker you can cook in this appliance too.
MAINTENANCE
CLEANING
Cleaning the inner pot
Being the inner pot the container where you cook the food it is the cooker part that needs more cleaning. It has a great advantage which is that it is non-stick coated so cleaning becomes much easier. Same as with pan coating you should be careful not to damage the coating, in order to make last longer.
Before cleaning let the appliance cool down. It could be very hot and cause burns. Use a non-scratching scourer with soapy water to clean the inner pot. Void using the dishwasher to wash the inner pot as it might damage the inner coating.
Even with the inner coating some food may stick to the inner pot. To take it off do not use a scraper or metal (or any hard material) tools that could scratch the coated surface. You can use instead, very carefully, the spoon provided with the appliance or other plastic or wood made kitchen tools. You should take always all due precautions in order not to scratch the inner coating. Use only dish soap type and rinse it well.
When finished dry immediately the inner pot with a, soft, clean cloth and let it expose to the air for, at least, one hour before putting it back in the cooker.
Cleaning the lid
Before cleaning the lid you should unmount it and take the inner rubber ring and the pressure valve cover off the lid. You can find instructions on how to do this in previous chapters of this book. Wash all components separately. Wash the rubber ring with water only. You can wash the pressure valve cover with a scourer, dish soup and hot water.
The lid is made of stainless steel and plastic material so you can wash it carefully in the sink. y materiales plásticos, por lo que puede lavarla con cuidado en el fregadero. Same as the pressure valve cover you can wash it with a scourer, dish soup and hot water. Pay special attention when cleaning both valves, letting a stream of water into them and cleaning the inside with a cotton swab. In any case please make sure that none of the valves is blocked with dirt and they freely move up and down.
When finished dry all components with a soft, dry and clean cloth, put back the rubber ring and the pressure valve cover and place the lid back on top of the cooker.
Cleaning the body
Unplug the cooker, take the lid off, take the inner pot off and clean the inside with a slightly wet and clean cloth. Dry immediately when finished with a dry, clean cloth and let it expose to the air for, at least, two hours. Take off the condensation collector and wash it appart in the sink.
Never sink or damp the cooker. Do not use toxic or abrasive products to clean it as it could harm you and / or damage the cooker.
PROBLEM SOLVING
What if the cooker does not reach enough pressure?
Normally the cooker does not reach enough pressure for pressure cooking until a few minutes after you start the program. When that happens the floating valve comes up and you can see it. One or two minutes later the screen shows that the cooker has reached the pressure point by showing a P at the left side of the screen (for example: 0.P 25) Until this moment the countdown does not start.
It may happen that time pass and the floating valve never comes up, and, therefor, the cooker does not reach enough pressure for pressure cooking. The countdown will not start. What to do then? This check list may help you:
1. Is the cooker heating?
Take off the lid and check whether heat is coming out of the cooker or not. If you do not feel any heat at all:
a) Wait for 10 minutes and check again.
b) Is there a blackout? Is the cooker plugged? Did you press Inicio or any menu button?
c) If everything is correct but it is still not heating contact our technical services.
2. Is the pressure valve closed (down)?
Check for an embossed vertical line on the plastic part around the valve. You will clearly feel it when you touch it. On top of the valve there is also a dot marked with the words "cierre hermético" that should be inline with this embossed line for pressure cooking. If correctly closed the pressure valve should be in a slightly lower position compared with its position when it is open.
3. Is there a minimum of 1/5 of the inner pot filled with liquid?
The cooker need enough liquid to produce the required steam for pressure cooking. If you don't cook with enough liquid you may overheat the cooker and / or burn your food. Remember to fill at least 1/5 of the cooker capacity.
4. Is the sealing ring correctly placed?
check for a metal ring along the inner border of the lid. Between this metal ring and the lid itself there must be a rubber ring, which seals the cooker once closed. If correctly placed the rubber ring fits perfectly between the metal ring and the lid and the center of the concavity of the rubber ring matches the metal ring.
5. Is the lid correctly sealed?
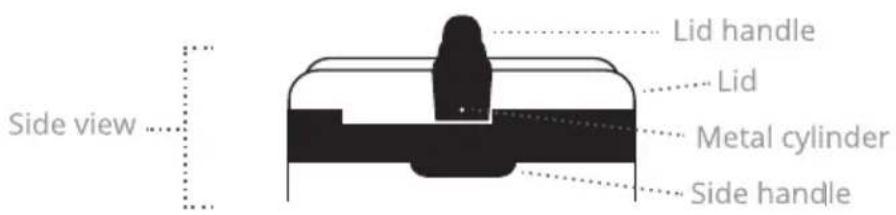
Check first if the lid handle and the cooker body side handles are aligned. They must be aligned for a correct hermetic closure of the lid. Check the black plastic part of the lid. At the closest side to the floating valve you can find a small metal cylinder, this cylinder must be entirely inside the lid. If it does stand out (even a little bit) turn the lid counterclockwise until it gets in completely.
Check that the lid is in the following position:
What if the steam comes out of the borders?
If the steam comes out of the cooker borders while cooking it means that the cooker is probably not correctly closed or the closure system is damaged. In case it is not correctly closed unplug the cooker and stay away from it until it cools down. If then you verify that it is correctly closed contact our technical services in case the cooker is damaged.
What if it doesn't open up?
When the cooker reaches enough pressure the floating valve comes up, locking the lid so it cannot be opened while there is steam pressure in the cooker. This means that if you cannot open the lid the cooker probably still has too much pressure and you should not open it. Press Cancelar / Mantener calor to stop any active program (if any) and unplug the cooker. Put the pressure valve in "Salida vapor" position and wait until the steam is fully released. Wait a few minutes after the floating valve goes down before opening the lid as some steam still remains inside and you could get burnt with it.
If still you cannot open the lid contact our technical services.
What if any component is damaged or worn down?
If you need to repair your cooker or replace any part of it please contact directly any of our technical services offices in Spain. You can find your closest office in our website schneiderespana.es. They can provide you also with replacements such as an inner pot or a lid. Use always original parts from Schneider.
Never try to repair the cooker by your own means nor use third party parts.
Security systems
For your own safety this cooker includes different security systems. More than you can find in a regular cooker. These security systems are among them:
a) The pressure will not rise if the cooker is not correctly sealed.
b) If the pressure is high you cannot open the lid.
c) If inner pressure and temperature are too high the pressure valve releases heat automatically.
d) If pressure sensor fails and pressure exceeds security limits the cooker will release liberará pressure from the lid borders.
e) If temperature limit is exceeded the cooker stops and gets locked (E3)
f) SIf temperature sensor fails a fuse cuts the current.
Error codes
In case of system failure one of the following error codes will be shown:
Pressure sensor failure. Process stopped for caution.
Electric failure / Blackout. The process will continue when the electricity is back.
Temperature exceeded security limit (215°). Process stopped for caution.
Temperature sensor failure. Process stopped for caution.
Technical services
If you find any cooker malfunction, distortion, damage, or if you need to replace any product part, you should contact our technical services. Schneider technical services offices are all along Spanish geography.
You can find your local technical service office at the map of the Asistencia area of Schneider website (click on "Resto de productos):
You can also access this map by writing directly the following URL address:
http://schneiderespana.es/index.php/asistencia-tecnica/sat-electronica
If any problem you can write us at postventa@schneiderespana.es
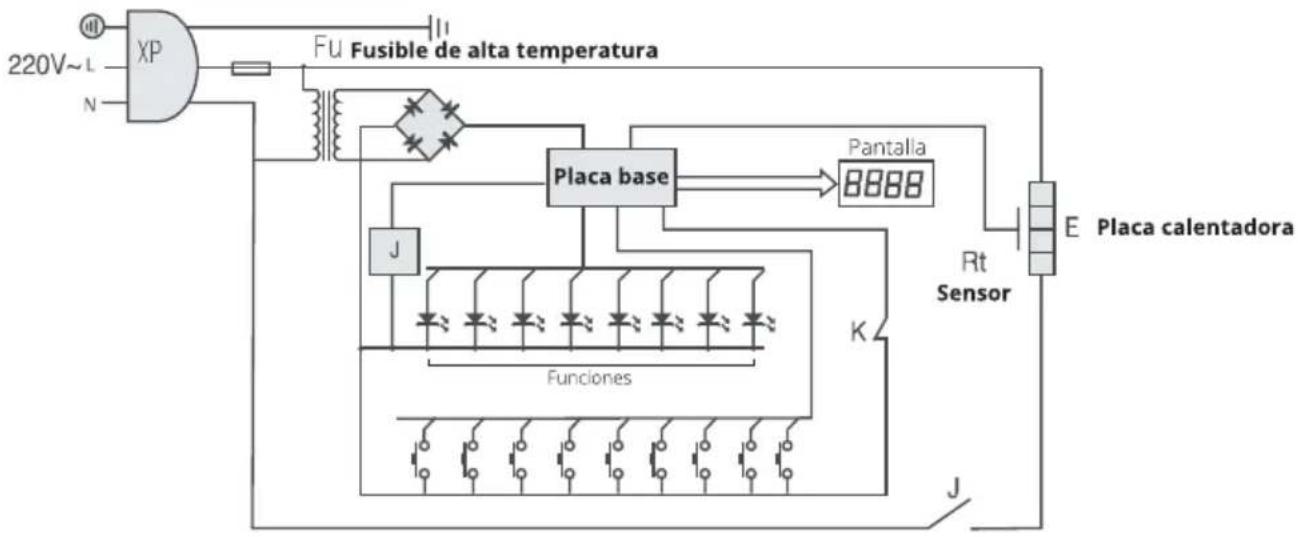
Circuit diagram
The following diagram could be required by your local technical services:
flowchart
graph TD
    A["220V~L N"] --> B["XP"]
    B --> C["Fusible de alta temperatura"]
    C --> D["Placa base"]
    D --> E["Pantalla 8888"]
    E --> F["E Placa calentadora"]
    F --> G["Rt Sensor"]
    G --> H["Funciones"]
    H --> I["K"]
    I --> J["J"]
DISPOSAL INSTRUCTIONS
natural_image
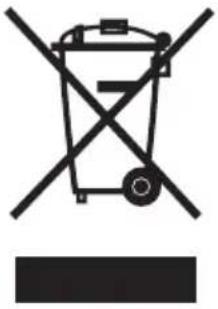
Symbol of a trash bin crossed with no visible text or labelsThis marking indicates that this product should not be disposed with other household wastes throughout the EU. To prevent possible harm to the environment or human health from uncontrolled waste disposal, recycle it responsibly to promote the sustainable reuse of material resources. To return your used device, please use the return and collection systems or contact the retailer where the product was purchased. They can take this product for environmental safe recycling.
All informations contained in this user manual are subject to change without any prior notice. All images are only for reference.
Schneider España de I. S.A., C/ Verano 18-20, Torrejón de Ardoz, Madrid. Made in P.R.C.
www.schneiderespana.es
- INDICE
- Usage Instructions 09
- Maintenance 17
- SPECIFICATIONS
- BEFORE USE
- CAUTION
- INSTALLATION
- Placing the cooker
- This is an electric device
- OVERVIEW
- COMPONENTS
- The Lid
- Pressure valve
- Floating valve
- Lid handle
- Sealing rubber ring
- Open and close the lid
- The body
- The cooker base
- Outer shell
- USAGE INSTRUCTIONS
- THE CONTROL PANEL
- Functions buttons
- Programar
- Tiempo
- INICIO
- Cancelar / mantener calor
- Preset menu buttons
- Arroz (9 min.)
- Pescado (12 min.)
- Pastel (15 min.)
- Sopa (20 min.)
- Carne (25 min.)
- FREQUENTLY ASKED QUESTIONS:
- http://recetasollaschneider.com
- LEMON SPONGE CAKE: USAGE EXAMPLE
- Making the dough
- Make sure the cooker is perfectly clean
- Place the dough in the inner pot and the inner pot inside the cooker
- Program the start time (optional)
- Start cooking the dough
- A Option: Preset menu
- B Option: Manual time setting
- C Option: No time selection
- Start a second cycle
- MAINTENANCE
- CLEANING
- Cleaning the inner pot
- Cleaning the lid
- Cleaning the body
- PROBLEM SOLVING
- What if the cooker does not reach enough pressure?
- Is the cooker heating?
- Is the pressure valve closed (down)?
- Is there a minimum of 1/5 of the inner pot filled with liquid?
- Is the sealing ring correctly placed?
- Is the lid correctly sealed?
- What if the steam comes out of the borders?
- What if it doesn't open up?
- What if any component is damaged or worn down?
- Security systems
- Error codes
- Technical services
- Circuit diagram
- DISPOSAL INSTRUCTIONS
Brand : SCHNEIDER
Model : SCO 08D
Category : Pan