
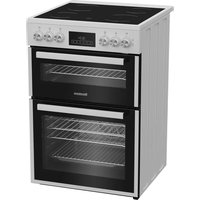
HGN 1430 - Cooker BLOMBERG - Free user manual and instructions
Find the device manual for free HGN 1430 BLOMBERG in PDF.


| Product Type | Freestanding Cooker |
| Brand | Blomberg |
| Model | HGN 1430 |
| Energy Source | Gas Hob, Electric Oven |
| Dimensions (H x W x D) | 85 cm x 60 cm x 60 cm |
| Weight | 54 kg |
| Power Supply | 220-240 V, 50-60 Hz |
| Number of Gas Burners | 4 |
| Oven Type | Conventional with Grill |
| Oven Capacity | 65 Liters |
| Oven Functions | Conventional, Grill, Defrost |
| Hob Control | Knob Controls |
| Oven Control | Thermostat Knob and Timer |
| Cleaning | Enamel Interior, Easy-Clean Hob |
| Safety Features | Flame Failure Device, Cool Touch Door |
| Child Lock | Yes |
| Spare Parts Availability | Via Authorized Service Centers |
| Repair Index | 7.5/10 |
| Warranty | 2 Years |
| Energy Efficiency Class | A |
Frequently Asked Questions - HGN 1430 BLOMBERG
User questions about HGN 1430 BLOMBERG
0 question about this device. Answer the ones you know or ask your own.
Ask a new question about this device
Download the instructions for your Cooker in PDF format for free! Find your manual HGN 1430 - BLOMBERG and take your electronic device back in hand. On this page are published all the documents necessary for the use of your device. HGN 1430 by BLOMBERG.
USER MANUAL HGN 1430 BLOMBERG
STOP : Cooking terminating time adjustment button
natural_image
Interior view of a microwave oven with ventilation slots and a perforated door (no text or symbols visible)natural_image
Close-up of a metallic frame with horizontal grooves and rivets (no visible text or symbols)natural_image
Two-panel illustration showing a hand holding a transparent plastic tray and a small rectangular object on a surface, with no visible text or symbols.natural_image
Simple diagram showing a curved arrow pointing downward from a rectangular block to a horizontal beam, with no text or symbols present.natural_image
Close-up of a hand holding a circular component, possibly a knob or knob switch (no visible text or symbols)natural_image
Two-panel illustration showing a hand holding a switch inside a cabinet, and a close-up of hands operating the control panel (no text or symbols visible)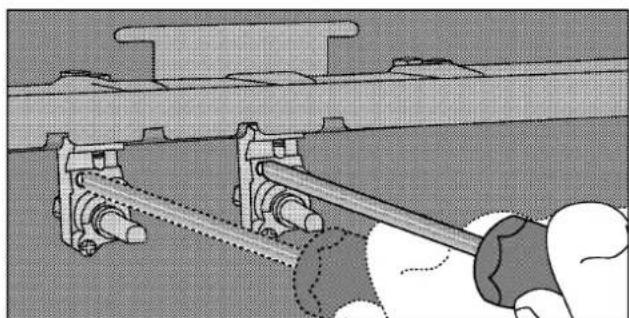
natural_image
Technical illustration of a mechanical assembly with no visible text or symbolsIt is our ultimate desire that you achieve the best results from our product, which has been passed through meticulous quality control checks and is manufactured in modern facilities.
We would therefore like to recommend you to read the entire guide carefully before operating the product and keep it handy as a reference guide.
CONTENTS

Part 1:
Safety precautions and important information

Part 2:
Important information on the installation and preparation of your oven

Part 3: Technical specifications

Part 4: Operating the top heaters
4.1 Operating the gas burners

Part 5: Operating the oven
5.1 Setting the electronic timer
5.2. Operating the oven part with electronic timer

Part 6: Operating the grill

Part 7: Important Do's and Dont's

Part 8: Maintenance and cleaning

Part 9: Future transportation
Part 1: Safety precautions and important information
The current value of the fuse in your home must be suitable to the current drawn by your cooker.
- Our company shall not be held responsible for any damage caused by the utilization of the cooker without ground cabling.
Before your appliance is connected to the main electricity supply, check to ensure that the voltage and the frequency shown in the rating label corresponds with your power supply.
Before applying to Authorized Service, have the electrical wiring of your home ready for connection.
Before using your product, remove all packaging materials. Do not forget to remove the cartons near the tray and wire grill and the polysthrene stick to the front door glass.
- The packaging materials can cause danger for the children.
- Ensure that children are kept away whilst the appliance is in use and until the appliance has cooled down, as accessible parts of the appliance will become very hot.
- Do not put heavy objects on the open front door and do not allow children to sit on it.
- A steam cleaner is not to be used for cleaning oven.
Only for solid hotplate with lid.
Before opening the lid, any spillage should be removed and hob surce sholud be allowed to cool before closing the lid.
Warning!
- Ensure that the appliance is switched off before replacing the lamp to avoid the possibility of electric shock.
During use this appliance becomes hot. Care should be taken to avoid touching heating elements inside the oven.
● Always switch off the appliance from the mains when not in use, before cleaning or in the unlikely event of a product failure becoming apparent.
The mains lead must not come in contact with any part of the appliance during operation.
Do not squeeze the supply cord inside the oven door, because the cable isolation can be damaged.
Do not attempt to move the appliance by pulling the door and/or handles.
- This cooker must only be used for its intended purpose i.e. the cooking of domestic food.
- If the oven is placed on a base, measures have to be taken to prevent the appliance slipping from the base.
- Means for disconnection must be incorporated in the fixed wiring (min 3 mm contact opening for each pole).
- If your product is equipped with a timer; always adjust the timer before the first operation or after any interruptions of the electric supply. Otherwise, your oven will not operate
When using the grill function the oven door must be closed.
Always use oven gloves when removing the grill rack and dishes from inside the oven when in use.
Surfaces of the inox models closed to the burners may in the course of time change their color because of the excessive heat.
If the steam produced whilst cooking contacts with cool surfaces on the outside of the appliance, it will condense and produce water droplets.
This is quite normal and is not a fault. Please wipe it with a dry cloth.
Preparation and burning off Important for asthmatic sufferers
The protective coatings need to be burnt off before the first use of your appliance. Fumes will be emitted but this is quite normal.
Ensure the room is very well aired during the burn-off-process. Avoid direct inhalation of the fumes generated during this process.
- The meals should be cooked in closed pans with a little amount of water added depending on cooking type.
- The burners should be switched to simmering position after meal is boiled.
- Residual heat of the burners should be used in order to save energy.
- The usage of a steam pressure pot is favourable and should take place as often as possible.
- If it is not absolutely necessary, do not preheat the oven.
- Spare parts needed to make the product work properly will be supplied for 10 years.
- Stand by energy consumption of the oven is 3 Watts

Adjacent side walls above the appliance must not be nearer to the cooker than 150 mm and should be of heat resistant material. Leave at least 750 mm clearance above the hotplates.
The appliance should be located on a level surface.
The two front feet can be adjusted as required. To ensure that your appliance is standing level adjust the two front feet by turning clockwise or anticlockwise until the product is in firm contact with the floor.
Part 2: Installation and preparation
Electrical connection
Before your appliance is connected to the main electricity supply, check to ensure that the voltage and the frequency shown in the data plate correspond with your power supply. You can find the rating plate cavity bottom face.
Warning!
This appliance must be earthed!
This product must only be installed by a qualified electrician, eg. local electricity company to a suitable double pole control unit with a minimum contact clearance of 3 mm in all poles which should be adjacent to (but not above) the cooker in accordance with IEE regulation. Failure to observe this instruction may result in operational problems and invalidation of the product warranty. If the appliance is connected by a plug, this plug must easily be accessible after installation (but not above the hob).
The cable length should be 2 m. max for isolation safety.
Our company shall not be held responsible for any damage caused by utilization of the oven without proper grounding.
Before applying to Authorized Service, have the electrical wiring of your home ready for connection.
In mix models a cable supplied with a plug with your oven (H05 V V-F 3G 1.5 mm2)
Gas connection (for gas models)
*Before your appliance is connected to the gas supply, check the ensure that the gas category and pressure specifications shown in the data plate corresponds with your gas supply. If necessary call authorized service for adjusting to gas category.
*This appliance shall be installed in accordance with the regulations in force and only used in a well ventilated space. Read the instructions before installing or using this appliances. In the interest of safety this appliances must be installed and/or serviced by a competent person as stated in the gas safety regulations current editions.
* Please refer to the data plate for details about gas supply and pressures.
* The appliance must not be installed in a room without a window or other controllable opening. If is installed in a room without a door which opens directly to tohe outside, a permanent opening is required.
The air circulation should be 2 m3/h per kW of burners.
Connection of the gas hose to the oven
Convenient position is selected by interchanging the hose nozzle and plug according to the location of the main gas inlet valve.
If you make a connection with a flexible metal hose , locate a seal between the main gas pipe. The inner diameter of the flexible hose, which the butane hose nozzle is connected, should be 6mm for the house-type gas tubes. The inner diameter of the flexible hose, which the natural hose nozzle is connected, should be 15mm. The plastic hose end is soaked in hot water for one minute to soften and inserted fully into the hose nozzle. The hose should tightly be fitted to the hose nozzle by squeezing with a clamp. The clamp is fastened securely by a screw driver. The other end of the hose is connected to the gas valve with the same operation.
The hose should be replaced before its last expiry date.

Caution!
Make the oven connection to the gas inlet valve, the hose length must be short and be sure that there is no leakage. The hose used should not be longer than 125 cm for safety.
Gas leakage control
During control, be sure that the control knobs are closed and the gas inlet valve is open. Apply soap bubbles to the connections for leakage control. In case leakage exists, bubble will appear. In such case, check the gas connection immediately. Do not control gas leaks by using fire.

Caution!
Never use lighter or match flame, for controlling the gas lackage.

Part 3: Technical specifications
- Top heaters
- Control panel
- Front door
- Handle
- Storage compartment
- Tray
- Grill shelf


pie
HGN-1430 A | Category | Value (kW) | |---|---| | Circle | 2.0 | | Circle | 1.0 | | Circle | 2.9 | Gas burnersThere may also be plate location other than the ways shown in the figures.
Hi-light, extended and dual plates burn with that brilliant light when they are first ON.
Rapid heating solid plates are as denoted by a red spot in the centre of the plate.
The voltage, frequency and maximum powers shown in the rating label.
Remove any boiled over material from the surface before opening the cover. Allow the cooking top to cool down before closing the cover.
| Multi-function 3 D | Multi-function | |
| Grill wattage | 1100/2300 | |
| Oven wattage | 2700 W | |
| Turbo wattage | 2100 W | |
| Turbo motor | YES | |
| Lamp | 15 W/ 25 W | |
| External dimensions | H: 850W: 600D: 600 |
Part 4: Operating the top burners
4.1 Operating the gas burners
To obtain maximum efficiency
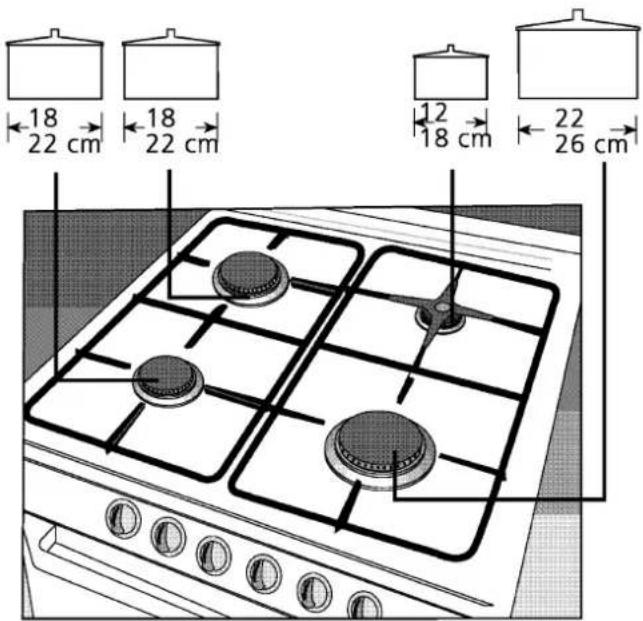
A correct use to burner results in gas saving and better out put. Therefore we recommend to use saucepans whose base completely cover the flames. Four saucepans with much smaller diameters to be put auxiliary burner, use the pan support adaptor.
Use of top gas burners
Turn the relevant knob by slightly pressing in counter clockwise direction. The large flame on the knob corresponds to maximum capacity position and the small flame corresponds to minimum capacity position.
Ignition from the knob
You should turn the knob to counter-clockwise direction by pressing. The spark occurs itself immediately on the burners till you take your hand off the knobs.
After you release the knob, if the ignition does not continue repeat the same process by keeping the knob pressed for 15 seconds. If still no ignition occurs, wait for 1 minute and repeat again.
Warning : Do not keep the knob in pressed position more than 15 seconds.
If your cooker has flame failure device on gas burners;
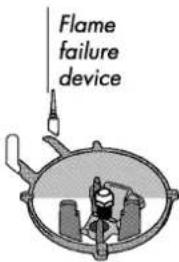
In case of any flame failures with any reasons in the top burners, the flame failure device immediately cuts of the gas flow.
It is also a safety device for the wrong use of the children. You should turn the knob to the counter-clockwise direction by pressing. You should ignite by pressing the knob and wait for its ignition. You should keep the knob at pressed position for 3-5 seconds after you see the flame around the burner. Repeat the sequence of operations if the flame does not continues.
Cooking guidelines
Choice of saucepans
For best results, we recommend the use of good quality saucepans with smooth flat bases. Aluminium pans with coloured vitreous enamelled bases absorb heat and are therefore more efficient in use. Never use recessed or ridged base utensils. Ideally the base of the saucepan should be approximately the same size as the heating area. Use pans with sufficient capacity for the amount of food cooked. This reduces soiling caused by excessive spillage.
Safety recommendations for deep frying
- Use a deep pan, large enough to completely cover the appropriate heating elements.
- Never fill more than the one-third of the pan with fat or oil.
- Never leave oil or fat unattended during the heating or cooking period.
- Do not fry too much food at the same time especially frozen food. This only lowers the temperature of the oil or fat too much resulting in greasy food.
-
Always dry food throughly before frying and lower it slowly into the hot oil or fat. Frozen foods in particular will cause frothing and spitting if added too quickly.
-
Never heat fat or fry with a lid on the pan.
- Keep the outside of the pan clean and free from streaks of oil or fat.
In the unfortunate event of a chip pan fire, or other pan fire:
- Switch off the electricity supply.
- Smother flames with a fire blanket or damp cloth. Picking up the burning pan and rushing outside with it will almost invariably cause burns and injuries.
Warning: Do not use water to extinguish the fire. Leave the pan to cool down for at least 30 minutes.

Part 5: Operating the oven (If your cooker has a timer)
5.1. Operating the clock/programmer
You should adjust the electronic timer prior to using the oven. Otherwise your oven will not operate.
The electrical current for the heating elements flows through the electronic timer. The timer must be set in order for the heating elements to come into operation.

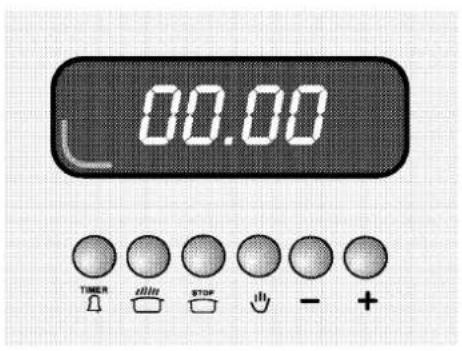
TIMER
: Programming button for warnings
[NO TEXT]
: Cooking period adjustment button
STOP
: Cooking terminating time adjustment button
[NO TEXT]
: Manual adjustment button
- +
(non-programmed cooking)
: Time adjustment buttons
Your oven's electronic timer operates similar to a normal timer. Your oven's electronic timer will be reset if the electricity is cut-off. The electronic timer will run slowly if the frequency of your supply power is less than 50 Hz. (This malfunction is not due to your timer. In such cases, you must readjust your timer).
The timer of your oven ;
- You can adjust cooking durations between 00.00 - 24.00 hours.
- You may also use it as a chiming alarm between 00.00 - 24.00 hours.
- You can run fully-automatic, semi-automatic and non-programmed (manual) a cooking programmes. (The heating elements inside the oven are connected to the electronic timer and are programmable.)
The following functions are available on your programmable timer;
* Automatic, semi automatic or manual modes,
* Current time clock display in 24h format,
* Timer alarm that can be used as a minute minder.
Please note
* The timer controls the oven-heating element only and the current time of day must be set before the oven will function.
* If the timer has been set to an automatic or semi automatic programme, the daily time cannot be readjusted, the semi or auto programme, must be cancelled to do so. See "How to cancel automatic programme".
How to set the current time of day
The clock display uses a 24 hour configuration; so 8:30 pm = 20:30.
* Press and hold 🔊 buttons at the same time.
* Press "+" button to increase or "-" to decrease the time.
* Adjust using the "+" or "-" button to set the current time. If "Auto" flashes, see "How to cancel automatic programme".
* Release the buttons, the clock will now start.
Manual cooking (Or to cancel a programme)
* Press 📋 button, press the "-" button until 0:00 is displayed.
* Press the 🔊 button.
The "Auto" and sign will disappear.
* Set the oven knob to the required cooking temperature and the function selection knob to the desired position.
* The oven will switch on. The Amber oven indicator will light.
* At the end of cooking process, switch off by resetting the oven thermostat knob to the “•” (off) mark.
Note: The timer will not switch off the oven. To switch the oven off, turn the oven thermostat and selection knob to the “•” (off) mark.
Semi-automatic programming
This mode allows a manual start time but an automatic switch off time, which is very useful to prevent the food from over cooking.
* Press button. Press the "+" (or "-" button, to set the cooking period ("Auto" and will be displayed) in minutes.
* Set the oven thermostat knob to the required temperature and the function selection knob to the desired position.
* The oven will switch on and cooking will commence.
* The programmer will switch the oven off at the end of the preset cooking time. "Auto" will flash and the timer alarm will bleep. To turn off the alarm press the button.
* Set the oven thermostat knob to the “•” (off) mark.
* Press ⏻ button to cancel "Auto".

Automatic programming
The programmer will switch the oven on and off at the required times.
Ensure the oven thermostat is in “•” (off) position, and the correct time has been set.
* Press the ⏻ button to cancel any program stored. (Auto and 📋 symbol will not be displayed)
* Press the ☐ button and press "+" (or "-" button to set the stop time required. (☐ and "Auto" will be displayed)
* Press the ☐ button and press "-" button to set the required cooking period.
* Set the oven knob to the required cooking temperature and place your food in the oven.
* The oven will switch on at the required time, cook the food and switch off at the predetermined time.
* At the end of cooking process the alarm will bleep and "Auto" will flash. To turn off the alarm press the 📋 button.
Press button to cancel "Auto".
* Set the oven thermostat and function selection knob to the "I" (off) mark.
Note: Make sure you follow the food manufacturer's instructions.
* Press the 🔔 button to view the remaining cooking time during cooking.
Timer alarm
The timer alarm can be adjusted to bleep between 0 and 23 hours 59 minutes. i.e. as a minute minder to remind you to switch off a hob heating zone.
* Press the "TM" button, press the "+" or "-" buttons to set the desired alarm time.
* The timer alarm will when the set time elapsed.
* To turn off the alarm press the STOP button.
How to cancel an automatic programme
* Press 📋 button, press "-" button until the clock display reads 0:00.
* Press ⏻ button, the programme has now been cancelled.
* The current time can then be reset.
Activating the Demo mode/Key lock
The Demo mode is conditionally applicable as key lock. If it is activated, the relays remain open all the time. Thus, the timer can be operated as usual but the connected appliance or appliance module remains unaffected. This means that your child can select a cooking program but the program will not be activated and thus the connected appliance or appliance module will not be switched on.
To activate the demo mode/key lock:
-
Make sure that the clock is in manual mode and cancel any active programs.
-
Hold the "TMER" button and the "☐" button down simultaneously for approx. 8 seconds. The display will read "On".
-
Press the "+" button.
The display reads "OFF" and the "☐" symbol appears.
After approx. 5 seconds the time reappears next to the "♀" symbol. The key lock is not activated.
To deactivate the demo mode/key lock:
-
Make sure that the clock is in manual mode and cancel any active programs.
-
Hold the "TMER" button and the "☐" button down simultaneously for approx. 8 seconds.
The display will read "OFF".
- Press the "+" button.
The display reads "ON" and the "¶" symbol disappears.
After approx. 5 seconds the time reappears on the display.
The key lock is now deactivated.
5.2 Operating the oven part for digital timer models
Oven heat control knob
This knob is used together with the "function selection" knob. Select the desired stage with the "function selection" knob. Then rotate the "oven heating control" knob clockwise. The lamp and the relevant heating elements for the selected stage or the fan will come on. A thermostat senses the temperature in the oven. The thermostat switches off the heating element and the thermostat light when the set temperature level is reached inside the oven. When the temperature falls below the set temperature thermostat comes back on and the thermostat light illuminates. This way, the set temperature level is maintained throughout the whole cooking period.
Function selection knob
This knob allows you to select functions and carry out checks. The functions and their stages are explained below. In order to operate the stages, you need to bring the "function selection" knob together with the "oven heat control" knob to the desired temperature and adjust the timer if provided. If your cooker has a timer; refer to the description of timer usage.

Ensure you stand back from the appliance when opening the oven door to allow any build up of steam or heat to escape.
If, whilst cooking, steam produced comes in to contact with cool surfaces on the outside of the appliance, it will condense and produce water droplets. This is quite normal and is not a fault. Please wipe it with a dry cloth.
The kinds of food you want to cook, thermostat positions, shelf positions and recommended cooking times are given at the cooking table.
- Set the oven heat control and function selection knobs to the desired position.
- Preheat the oven for 10 minutes with oven door closed.
After preheating, place the food you want to cook into the oven.
- After cooking, reset the knob to the "0" position.
- You may use booster function for preheating to reach the desired oven temperature more rapidly. See using booster function.
Booster function (if available)
- Adjust the "heat control knob" to the desired oven temperature.
- Turn the "function selection knob" to the booster stage.
- Your ovens immediately start to operate and thermostat light will be ON.
- When the oven reaches to selected temperature the thermostat light will go OFF.
- After thermostat light goes off reset the "function selection knob" to desired oven cooking mode.
Don't forget that the Booster mode is just for preheating. Don't use this mode for cooking proposes.
3 D function
Circular heating element and fan runs with top and bottom heating elements. By using this function you can cook 3 trays of food simultaneously with best quality.
While you are opening the door of the oven, be careful with hot parts and make sure not to touch any hot parts.

The stages of the function selection knob
HGN 1430 A

Fan (defrost)

Top and bottom

Fan heating with top and bottom

Fan heating with ring heater

Bottom

Low grill + fan

Strong grill

3 D function (top+bottom+ fan heating with ring heater
In models with Telescopic shelf (sliding rack)
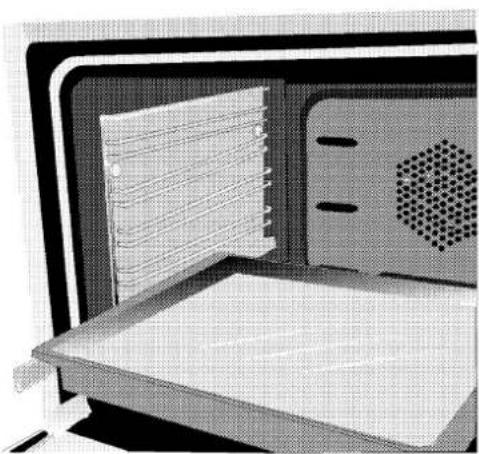
Telescopic shelf is located at 1. shelf. Telescopic shelf should be used with bigger tray. This system provide easy usage for locating trays. Be sure that, telescopic shelf pins and holes in front sides of tray are connected correctly.
natural_image
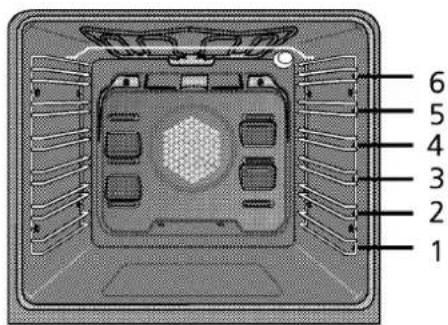
Interior view of a microwave oven with a door and ventilation grille (no text or symbols visible)Shelf positions for conventional ovens
Shelf positions for multi-function and fan assisted ovens
Cooking table
| Foods | COOKING PAN | SHELF POSITIONS | THERMOSTAT POSITION | COOKING TIME (min) | ||||||
| Fan with ring heater | 3 D | Top and bottom | Fan with Top and bottom | Fan with ring heater | 3 D | Top and bottom | Fan with Top and bottom | |||
| Short bread (Serves 8) | 24-26 cm bread mould | 3 | 3 | 2-3 | 3 | 170-180 | 15-25 | 15-25 | 25-35 | 20-25 |
| Cake in mould (Serves 5 ) | 18-22 cm cake mould | 3 | 3 | 2-3 | 3 | 170-180 | 20-30 | 20-30 | 25-35 | 20-25 |
| Cookie (Serves 12 ) | Cooking sheet | 4 | 4 | 2-3 | 3 | 170-190 | 20-30 | 20-30 | 25-35 | 20-25 |
| Flaky pastry (Serves 12) | Cooking sheet | 4 | 4 | 2-3 | 3 | 180-190 | 20-30 | 20-30 | 25-35 | 20-25 |
| Brioche | Cooking sheet | 4 | 4 | 2-3 | 3 | 160-180 | 20-30 | 20-30 | 25-35 | 20-25 |
| Pastry (Serves 8) | Big tray | 4 | 4 | 2-3 | 3 | / :180-190 | 35-45 | 35-45 | 40-50 | 30-40 |
| / :190-200 | ||||||||||
| Yeasted dough (Serves 18) | Big tray | 4 | 4 | 2-3 | 3 | / :190-200 | 25-35 | 25-35 | 35-45 | 25-35 |
| / :200-220 | ||||||||||
| Biscuits (Serves 10) | Cooking sheet | 4 | 4 | 2-3 | 3 | 170-180 | 15-25 | 15-25 | 20-30 | 18-22 |
| Cake (Serves 20) | Big tray | 4 | 4 | 2-3 | 3 | 170-180 | 20-30 | 20-30 | 25-35 | 20-25 |
| Milleteuille pastry (Serves 8) | Big tray | 4 | 4 | 2-3 | 3 | 200-210 | 20-30 | 20-30 | 25-35 | 20-25 |
| Lasagne (Serves 8) | Lasagne dish | 4 | 4 | 2-3 | 3 | 170-180 | 35-45 | 35-45 | 40-50 | 30-40 |
| Pizza (Serves 8) | Big tray | 4 | 4 | 2-3 | 3 | 200-220 | 20-30 | 20-30 | 30-35 | 25-30 |
| Roast beef (Serves 8) | Roasting dish | 4 | 4 | 2-3 | 3 | 250 (15min)* | 90-120 | 90-120 | 110-120 | 100-110 |
| Lamb shoulder (Serves 8) | Roasting dish | 4 | 4 | 2-3 | 3 | 250 (15min)* | 65-80 | 65-80 | 70-90 | 60-75 |
| Roasted chicken | Roasting dish | 4 | 4 | 2-3 | 3 | 250 (15min)* | 55-65 | 55-65 | 60-70 | 50-60 |
| Roasted turkey (5,5 kg) | Big tray | 4 | 4 | 2-3 | 3 | 220 (25min)* | 170-220 | 170-220 | 180-240 | 150-210 |
| Fish | Roasting dish | 4 | 4 | 2-3 | 3 | 200 | 15-20 | 15-20 | 15-25 | 15-20 |
3 D Fan with ring heater + top and bottom heater (IF AVAILABLE)
Shelf position (In fan with Fan with ring heater
Top and bottom heater
图
Fan with Top and bottom heater
3D
Fan with ring h bottom heater
model)
For 3 trays : 2 - 4 - 6 For 2 trays : 4 - 6 For 1 trays : 4
- The values listed in the table are the results obtained from laboratory testing. - You may find different flavours of the food according to your own cooking and usage practices. - If you wish, you can add the time it takes to pre-heat the oven to the values listed in the table.

Part 6: Operating the grill
- Preheat the grill at ☐ (grill setting) for approximately 5 minutes. For this period the heat control knob shall be at the max setting and the door must be closed.
The indicator light will illuminate to show that the grill is switched on.
Apply oil on the grill shelf to prevent meat from sticking on the bars.
- Put a tray on one of the bottom shelves in order to collect oil and for easy cleaning put some water in it.
- Do not allow children to sit or stand on the oven door when the door is open.
- Accessible part may become hot when the grill is in use. Don'allow children to be close.
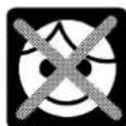
- Ensure the food is correctly positioned under the grill element.
- Food which requires browning only should either be placed under the hot grill in the grill pan, or on the floor of the grill compartment, according to the depth of the dish. The grill pan wire grid may be removed.
- Do not line the grill pan with aluminium foil as the increase in heat is a fire hazard.
- Plates and dishes placed on the floor of the grill compartment will be heated when the main oven is in use.
• Always keep the oven door closed when grilling.
| Grill | ||
| Shelf position | Cooking duration (min.) | |
| Lamb | 4 - 5 | 12-15 |
| Lambc hops | 4 - 5 | 12-15 |
| Beef | ||
| Veal chops | 4 - 5 | 15-25 (1) |
| Mutton chop | 4 - 5 | 15-25 (1) |
(1) Depending on the thickness
If your cooker has rotisserie function
Rotisserie motor can be rotated in clockwise or counter-clockwise directions.
* After operating your oven in grill position, locate the chicken to the rotisserie spit, and insert the spit to the rotisserie spit housing.
* While performing the rotisserie function, keep the oven door closed.

Part 7: Important do's and don'ts
Don'ts
- Don't leave children unsupervised where the cooker is installed and in use as all surfaces will get hot when the appliance is in operation.
- Don't allow niether children to sit or stand on the open oven door nor anyone to sit or stand on part of the appliance.
- Don't use large preserving pans or fish kettles across two hotplates as this will damage the hob.
- Don't store items children may attempt to reach above the cooker.
Don't use water to extinguish oil or fat fires.
- Don't use the cooker as space heater or dryer.
- Don't heat up unopened food containers as pressure can build up causing the container to burst.
- Don't place flammable or plastic items on or near the hob, and never place wet cloths etc. on the hob.
- Don't use biological washing powder, harsh abrasives or chemical cleaners to clean the inner panels of the oven.
- Don't leave any empty hotplate switched on for long periods. Spillage should be dealt with as soon as it occurs, taking due care as the hob surface may be hot.
Any spillage left on the surface after cooking should be cleaned off before the hob is switched on again to prevent baking on.
- Don't store flammable materials, aerosol etc. in adjacent cabinets.
Don't cover ventilation slots in any way.
- Don't use the handles to hang towels, dishcloths etc.
- Don't use round-bottomed (traditional) Woks. Use flat-bottomed types.
- Don't place dishes, pans, trays directly onto the oven compartment base.
- Don't cover oven shelves with aluminium foil as the air circulation in the oven will be disrupted.
Don't line grill pan with aluminium foil.
Don't attempt to grill with the door opened.
Don't use the grill to warm plates.
Do's
- Have your appliance installed by a qualified engineer or a technician.
Make sure you understand the controls prior to using your appliance.
- Ensure that no flammable materials are adjacent to the appliance as the sides of the appliance become hot during operation.
- Keep children away from the cooker at all times when in use as surfaces will get extremely hot.
- Always turn off the electricity supply at the wall switch before cleaning.
- Check all controls on the appliance are switched off after cooking.
Keep all ventilation slots clear of obstructions.
Remember that the oven and the utensil will be very hot when in use.
Note that times and temperatures in this book are for guidance only.
- Ensure meat and poultry is thoroughly defrosted before cooking.
Take care when removing utensils from the grill as they may be hot.
Take care when opening the door. Let steam and hot air escape before removing the food.
- Use quality oven gloves for removing hot food utensils from the oven/grill.
- Select the correct shelf position before turning on the oven or grill.
- Clean your cooker regularly, ideally after each use.
- Allow the appliance to cool down before cleaning.
- Always refer servicing to a qualified appliance service engineer.
Turn off the main switch off before cleaning.
Before switching on again ensure that all controls are in the OFF position.
We recommended immediate cleaning of acidic substances such as oil, lemon etc..
- Use a damp cloth to clean the interior and exterior. Never use any sharp instruments, abrasive household cleaner, or detergents for cleaning. For hard stains use suitable washing liquid.
Burners
The pan supports can be removed and the top burner plate can be cleaned with soapy water and rinsed with a dry cloth.
Wash and rinse the gas burner caps and the pan supports with soapy water. Never wash them in a dishwasher. For the dirt and stains on the burner heads that does not wash off, use a propriety metal surface cleaner.
Control panel
Wipe over the control panel with a damp cloth and polish with a dry cloth. Do not use oven cleaners or aerosols, scouring pads or abrasive powder for cleaning the plastic knobs as damage will occur. Do not attempt to remove any of the control knobs from the panel as this may cause damage and is a safety hazard.
Vitreous enamel hob surround
Clean with a cloth wrung out in soapy water. Stubborn stains can be removed with a cream, paste or liquid cleaner. Check that the cleaning agent used is approved by the Vitreous Enamel Development Council.
- Never clean the cooker surface by using materials such as hurd brushes, steel pads or knives, as these can easily scratch the enamelled and stainless steel surfaces.
- Commercially available special cleaners may be used after carefully reading of the warning labels written on them. Do not use cleaning agents containing acid or chlorine.
●Cleaning can be accomplished using a soft piece of cloth wetted with soapy water or with commercially available special surface cleaners and a soft piece of cloth. Especially use liquid paste or cream type cleaners.
Oven interior
Before switching on again, ensure that all controls are in the OFF position. Remove all trays and the grill from the oven. Clean the interior with a piece of moist, soapy cloth. Then, clean it once more with a wet piece of cloth and let it dry.
Do not use dry powder agents for cleaning.
Commercially available special cleaners may be used after careful reading of the warnings written on the labels.
Warning!
Never clean the inside of the oven and trays with hard brushes, steel pads or knives.
Commercially available special cleaners may be used after careful reading of the warnings written on the labels.
- Catalytic-enamelled models (if available);
The oven interior of this model is coated with catalytic enamel. Since the catalytic enamel is self-cleaning, you do not have to perform an extra cleaning after the cooking operation.
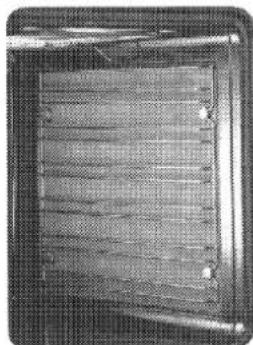
If your oven contains a steel rack; To clean the steel rack, unscrew the 4 screws. After cleaning, assemble the steel rack back to the oven body again.
natural_image
Close-up of a wooden panel with horizontal grooves and a flat metal frame (no text or symbols visible)Lowering the heating element Warning!
Make sure that the heating element is sufficiently cool before you start cleaning.
- Unlock the heating element by loosening the screw at the seiling of the oven cavity.
Warning!
Never switch on the heating element or place any weight on it when the heating element is in the lowered position.
- After cleaning, move the heating element upwards and screw it back to the ceiling of the oven cavity.

natural_image
Two-panel illustration showing a hand holding a transparent plastic tray above and below a close-up of the tray with a small object, both without any visible text or symbols.For the square-shaped lamp models:
There are 2 square-shaped lamps at right and left side of the oven inside. Both lamps are on and off at the same time.
Replacing the Oven Lamp
Disconnect the appliance from the supply Take out screws on the side shelf Take out Lens of the oven lamp by means of the flat screwdriver Replace defective lamp with the new one. Reinstall lens and side sheelf. Lamp type is 220-230V, 15/25W E14,T300°C

Replacing the oven door


natural_image
Simple diagram showing a curved arrow pointing downward from a rectangular block to a horizontal surface, with no text or symbols present.- Open the front door to 90°

-
Open the latches placed on the hinges both sides of the front door until they touch the support pins.
-
Close the front door till touching the latches.

- Hold the oven door slightly at
the handle, close slightly; pull upwards and close until there is an aperture of few centimeters are left. Then you can detach the hinges from the housing.
To mount the door;
Proceed according to the above instructions in reverse order.
Attention: Assure that hinges are placed appropriately in the housings, do not target to close to the latches.
Replacing the oven lamp (In models with lamp):
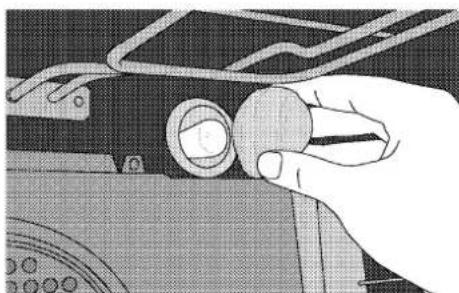
natural_image
Hand holding a circular knob on a mechanical component (no text or symbols visible)- Unplug the power cable.
- Then, remove the protective glass cover of the lamp inside your oven by turning it counter clockwise.
- Then, remove the bulb by turning it counter clockwise.
- After installing the correct bulb obtained from an Authorized Service, reinstall the protective glass of the lamp.
Part 9: Gas conversion
Your cooker can operate both Natural Gas and LPG. You can convert by changing the gas source and the top burner, oven and grill injectors. The replacement procedure of the injectors are explained below.
Call authorized Service for gas conversion.
Replacement of the top burner injector
Take off the burner head and burner cap before starting this procedure. Then:
- Remove the injector inside the top burner with a suitable bit. Later, install the new injector by covering the injector threads
with leakage preventing material.

Reduced Tap Flow
Removal of the control panel
- Open the front door.
- Unscrew the two screws of the control panel and take the control panel bottom sheet.
- Release the control panel from the two notches at the top, slightly pull it to the bottom front and keep it free with its cables connected.
Ignite the burner that should be adjusted, turn the knob to the reduced position, pull and take the knob off.
- With a screwdriver, make the tap reduced flow adjustment from the injector that is on the gas tap (only the head is visible with the bolt shape).
It is sufficient to tight to screw completely, in butane/propane gas.
For the natural gas, you should turn the screw counter-clockwise
once. The normal length of a straight flame in the reduced position should be 6–7mm.
If the flame is higher than the desired position, turn the screw clockwise. If its smaller to the opposite.
For the last control of the burning of the cooker, bring the cooker high-flame and reduced positions and check whether the flame is on or off.

natural_image
Close-up of a hand holding a small mechanical component, possibly a tool or knob, against a dark background (no text or symbols visible)
natural_image
Illustration of a hand inserting a control panel into a door (no text or symbols visible)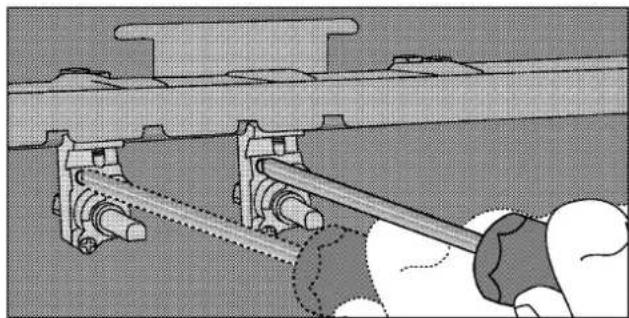
natural_image
Mechanical assembly diagram showing a hand operating a tool with attached components (no text or symbols visible)
Part 10: Future transportation
Transporting the oven;
Store the original box of your oven. Transport the oven in its original carton. Follow the guidance marks printed on the carton.
To prevent the wire grill and tray inside the oven from damaging the oven door, place a strip of cardboard or paper of 1 to 1.5 cm onto the inside of the oven door that lines up with the position of the trays. Tape the oven door to the sidewalls.
If you do not have the original carton;
Take the necessary precautions in order to prevent the exterior panels, and the glass surfaces of the oven from being damaged.
Pack the oven in bubble wrap or thick cardboard and tape it securely in order to prevent damage during transportation.
The oven must be transported in an upright position. Do not place other items on the top of the cooker.

- CONTENTS
- Part 1:
- Part 2:
- Part 1: Safety precautions and important information
- Warning!
- Preparation and burning off Important for asthmatic sufferers
- Part 2: Installation and preparation
- Electrical connection
- This appliance must be earthed!
- The cable length should be 2 m. max for isolation safety.
- Gas connection (for gas models)
- Connection of the gas hose to the oven
- Caution!
- Gas leakage control
- Part 3: Technical specifications
- Part 4: Operating the top burners
- Operating the gas burners
- To obtain maximum efficiency
- Use of top gas burners
- Ignition from the knob
- If your cooker has flame failure device on gas burners;
- Cooking guidelines
- Choice of saucepans
- Safety recommendations for deep frying
- In the unfortunate event of a chip pan fire, or other pan fire:
- Warning: Do not use water to extinguish the fire. Leave the pan to cool down for at least 30 minutes.
- Part 5: Operating the oven (If your cooker has a timer)
- Operating the clock/programmer
- The timer of your oven ;
- Please note
- How to set the current time of day
- Manual cooking (Or to cancel a programme)
- Semi-automatic programming
- Automatic programming
- Timer alarm
- How to cancel an automatic programme
- Activating the Demo mode/Key lock
- To activate the demo mode/key lock:
- To deactivate the demo mode/key lock:
- Operating the oven part for digital timer models
- Oven heat control knob
- Function selection knob
- Booster function (if available)
- D function
- The stages of the function selection knob
- HGN 1430 A
- In models with Telescopic shelf (sliding rack)
- Part 6: Operating the grill
- If your cooker has rotisserie function
- Part 7: Important do's and don'ts
- Don'ts
- Do's
- Turn off the main switch off before cleaning.
- Burners
- Control panel
- Vitreous enamel hob surround
- Oven interior
- Do not use dry powder agents for cleaning.
- - Catalytic-enamelled models (if available);
- Lowering the heating element Warning!
- For the square-shaped lamp models:
- Replacing the Oven Lamp
- Replacing the oven door
- To mount the door;
- Replacing the oven lamp (In models with lamp):
- Part 9: Gas conversion
- Replacement of the top burner injector
- Reduced Tap Flow
- Part 10: Future transportation
- Transporting the oven;
- If you do not have the original carton;
Brand : BLOMBERG
Model : HGN 1430
Category : Cooker