
351R - Receiver CAMBRIDGE - Free user manual and instructions
Find the device manual for free 351R CAMBRIDGE in PDF.


| Product Type | AV Receiver |
| Brand | Cambridge |
| Model | 351R |
| Power Output | 100W per channel (8 ohms, 20Hz-20kHz, 0.05% THD) |
| Number of Channels | 5.1 |
| Speaker Impedance | 4 - 8 ohms |
| Audio Formats | Dolby Digital, DTS, PCM |
| HDMI Inputs | 4 (HDMI 2.0) |
| HDMI Output | 1 (ARC supported) |
| Optical Inputs | 2 |
| Coaxial Input | 1 |
| Analog Audio Inputs | 2 RCA pairs |
| Subwoofer Pre-out | 1 |
| Headphone Output | 1 (6.3mm) |
| FM/AM Tuner | Yes |
| Dimensions (W x H x D) | 430mm x 150mm x 330mm |
| Weight | 8.5 kg |
| Power Consumption | 400W (max), <0.5W standby |
| Power Supply | AC 120V/240V, 50/60Hz |
| Remote Control | Included (batteries not included) |
| Maintenance and Cleaning | Wipe with a soft dry cloth. Do not use liquids or aerosols. |
| Safety | Do not open the device. Keep away from heat sources and moisture. |
| Spare Parts and Reparability | Contact Cambridge customer service for authorized repairs. Spare parts available for 5 years after production. |
| General Information | Designed for home theater use. Compatible with 4K video pass-through. |
Frequently Asked Questions - 351R CAMBRIDGE
User questions about 351R CAMBRIDGE
0 question about this device. Answer the ones you know or ask your own.
Ask a new question about this device
Download the instructions for your Receiver in PDF format for free! Find your manual 351R - CAMBRIDGE and take your electronic device back in hand. On this page are published all the documents necessary for the use of your device. 351R by CAMBRIDGE.
USER MANUAL 351R CAMBRIDGE
azur
351R

Cambridge Audio
Your music + our passion
Make sure you register your purchase.
Visit: www.cambridge-audio.com/sts
By registering, you'll be the first to know about:
• Future product releases
- Software upgrades
• News, events and exclusive offers plus competitions!
This guide is designed to make installing and using this product as easy as possible. Information in this document has been carefully checked for accuracy at the time of printing; however, Cambridge Audio's policy is one of continuous improvement, therefore design and specifications are subject to change without prior notice.
This document contains proprietary information protected by copyright. All rights are reserved. No part of this manual may be reproduced by any mechanical, electronic or other means, in any form, without prior written permission of the manufacturer. All trademarks and registered trademarks are the property of their respective owners.
Incognito and Incognito Ready are trademarks of Cambridge Audio Ltd. All rights reserved.
© Copyright Cambridge Audio Ltd 2012
Manufactured under license from Dolby Laboratories. "Dolby" and the double D symbol are trademarks of Dolby Laboratories.
Manufactured under license under U.S. Patent #s: 5,451,942; 5,956,674; 5,974,380; 5,978,762; 6,226,616; 6,487,535; 7,212,872; 7,333,929; 7,392,195; 7,272,567 & other U.S. and worldwide patents issued & pending. DTS is a registered trademark and the DTS logos, Symbol, DTS-HD and DTS-HD Master Audio are trademarks of DTS, Inc. © 1996-2011 DTS, Inc. All Rights Reserved.
"HDMI", "HDMI logo" and "High-Definition Multimedia Interface" are trademarks or registered trademarks of HDMI Licensing LLC.
Contents
Introduction ....3
Before connecting....3
Important safety instructions....4
Limited warranty....5
Front panel connections....6
Rear panel connections....7
Remote control....8
Front panel display....9
Aerial connections....9
Loudspeaker connections....9
Analogue audio connections....10
Digital audio connections.... 10
HDMI input connections....11
Video output connection (HDMI)....11
351R setup....12
-
Speaker configuration .... 12
-
Speaker setup....13
Speaker Delay 13
Level calibration....13
CAMCAS Auto speaker setup for Distance/Level.... 13
- Source setup....15
Surround sound modes.... 15
Operating instructions ....16
Selecting the source ....16
DSP modes....16
Stereo/Stereo + Sub....16
Other modes....16
Analogue Stereo Direct....16
Multi Channel PCM 16
Decode modes....17
Using the Tuner 18
Storing stations 18
Radio Data Systems (RDS)....18
Lip sync....18
Audio Return Channel....18
Advanced setup....19
Sub crossovers and bass management....19
Tone/Sub configuration 19
OSD setup....20
Dolby/DTS adjustments....20
-
Panorama mode 20
-
Centre Width 20
-
Dimension 20
-
Dynamic range control 20
Custom installation (C.I.) use 20
Reset/Back-up memory....20
Troubleshooting....21
Technical specifications....21
Introduction Before connecting
Thank you for purchasing this 351R AV Receiver. We are confident that you will enjoy many years of listening pleasure from it. Like all Cambridge Audio products the 351R adheres to our three core principles – stunning performance, ease of use and incredible value.
As such, the five audiophile grade amplifiers are kept as separate as possible from the processing and input stages and feature a large power supply with a low flux toroidal transformer.
This careful design of the amplifier stages ensure that the 351R can reproduce the dynamics and scale required for modern movie soundtracks whilst also being able to reproduce a genuinely musical performance with either stereo or multichannel music sources.
A full range of HDMI, digital and analogue inputs are fitted. These allows the connection of suitably equipped Blu-ray players, DVD players, satellite/set-top boxes and game consoles for decoding into stereo, stereo + sub or various digital surround formats.
The latest formats are supported including Dolby True HD, Dolby Digital Plus, DTS-HD Master Audio and DTS-HD High Resolution Audio in their 5.1 variants. In particular, support for the true lossless Dolby True HD and DTS-HD Master Audio formats provides unprecedented audio fidelity from Blu-ray discs.
Various HDMI 1.4 features are supported including 3D TV and deep-colour pass-through from suitable sources.
An Audio Return channel is also featured that allows audio to be passed back from a Smart TV to the 351R via the HDMI output.
The 351R is also capable of decoding encoded analogue or digital stereo sources in Dolby Pro Logic® II or DTS Neo:6 for a convincing and effective 5.1 surround experience from a matrix encoded stereo source.
Conventional analogue stereo inputs allow the connection of audiophile CD players and the like, and an Analogue Stereo Direct mode with no processing ensures the very best possible stereo reproduction for these.
An RS232 port and IR Emitter In also make it easy to integrate the 351R into a Custom Install situation.
All this proprietary engineering is housed within our low resonance, acoustically damped chassis.
Remember your 351R can only be as good as the system it is connected to. Please do not compromise on your source equipment, speaker package or video and audio cabling. Naturally we particularly recommend our Blu-ray players, digital and analogue iPod docks, Network and CD players from the Cambridge Audio Azur range, which have been designed to the same exacting standards as our receivers. Your dealer can also supply excellent quality Cambridge Audio interconnects to ensure your system realises its full potential.
Thanks for taking the time to read this manual, we do recommend you keep it for future reference.

Matthew Bramble
Cambridge Audio Technical Director
and the 351R design team
The process of setting up the 351R is first to make all the connections to your speakers and source equipment and then set the unit up via its On-Screen Display (OSD) as there are various settings and adjustments that need to be made before the 351R can be used.
However before you actually decide which connections to make or perform any adjustments it is strongly advised that you read through the '351R setup' section of this manual first, starting on page 12.
A lot of explanation is included that will help you to choose the right connection types for both your sources and TV.
● Cambridge Audio
Important safety instructions
For your own safety please read the following important safety instructions carefully before attempting to connect this unit to the mains power supply. They will also enable you to get the best performance from and prolong the life of the unit:

- Read these instructions.
- Keep these instructions.
- Heed all warnings.
- Follow all instructions.
- Do not use this apparatus near water.
- Clean only with a dry cloth.
- Do not block any ventilation openings. Install in accordance with the manufacturer's instructions.
- Do not install near any heat sources such as radiators, heat registers, stoves, or other apparatus (including amplifiers) that produce heat.
- Do not defeat the safety purpose of the polarized or grounding-type plug. A polarized plug has two blades with one wider than the other. A grounding-type plug has two blades and a third grounding prong. The wide blade or the third prong are provided for your safety. If the provided plug does not fit into your outlet, consult an electrician for replacement of the obsolete outlet.
- Protect the power cord from being walked on or pinched, particularly at plugs, convenience receptacles and the point where they exit from the apparatus.
- Only use attachments/accessories specified by the manufacturer.
- Use with only the cart, stand, tripod, bracket, or tab specified by the manufacturer, or sold with the apparatus. When a cart is used, use caution when moving the cart/ apparatus combination to avoid injury from tip-over.
- Unplug this apparatus during lightning storms or when unused for long periods of time.
- Refer all servicing to qualified service personnel. Servicing is required when the apparatus has been damaged in any way, such as the power-supply cord or plug having been damaged, liquid has been spilled or objects have fallen into the apparatus, the apparatus has been exposed to rain or moisture, does not operate normally, or has been dropped.
WARNING
- To reduce the risk of fire or electric shock, do not expose this unit to rain or moisture.
- Batteries (battery pack or batteries installed) shall not be exposed to excessive heat such as sunshine, fire or the like.
The unit must be installed in a manner that makes disconnection of the mains plug from the mains socket outlet (or appliance connector from the rear of the unit) possible. Where the mains plug is used as the disconnect device, the disconnect device shall remain readily operable. Only use the mains cord supplied with this unit.
Please ensure there is ample ventilation (at least 10cm clearance all round). Do not put any objects on top of this unit. Do not situate it on a rug or other soft surface and do not obstruct any air inlets or outlet grilles. Do not cover the ventilation grilles with items such as newspapers, tablecloths, curtains, etc.
This unit must not be used near water or exposed to dripping or splashing water or other liquids. No objects filled with liquid, such as vases, shall be placed on the unit.

The lightning flash with the arrowhead symbol within an equilateral triangle is intended to alert the user to the presence of un-insulated 'dangerous voltage' within the product's enclosure that may be of sufficient magnitude to constitute a risk of electric shock to persons.
The exclamation point within an equilateral triangle is intended to alert the user to the presence of important operating and maintenance instructions in the service literature relevant to this appliance.

The symbol on this product indicates that it is of CLASS II (double insulated) construction.

WEEE symbol
The crossed-out wheeled bin is the European Union symbol for indicating separate collection for electrical and electronic equipment. This product contains electrical and electronic equipment which should be reused, recycled or recovered and should not be disposed of with unsorted regular waste. Please return the unit or contact the authorised dealer from whom you
purchased this product for more information.

CE mark
This product complies with European Low Voltage (2006/95/EC), Electromagnetic Compatibility (2004/108/EC) and
Environmentally-friendly design of Energy-related Products (2009/125/EC) Directives when used and installed according to this instruction manual. For continued compliance only Cambridge Audio accessories should be used with this product and servicing must be referred to qualified service personnel.

C-Tick mark
This product meets the Australian Communications Authority's Radio communications and EMC requirements.

Gost-R mark
This product meets Russian electronic safety approvals.
FCC regulations
NOTE: THE MANUFACTURER IS NOT RESPONSIBLE FOR ANY RADIO OR TV INTERFERENCE CAUSED BY UNAUTHORIZED MODIFICATIONS TO THIS EQUIPMENT. SUCH MODIFICATIONS COULD VOID THE USER AUTHORITY TO OPERATE THE EQUIPMENT.

This equipment has been tested and found to comply with the limits for a Class B digital device, pursuant to Part 15 of the FCC Rules. These limits are designed to provide reasonable protection against harmful interference in a residential installation. This
equipment generates, uses and can radiate radio frequency energy and, if not installed and used in accordance with the instructions, may cause harmful interference to radio communications. However, there is no guarantee that interference will not occur in a particular installation.
If this equipment does cause harmful interference to radio or television reception, which can be determined by turning the equipment off and on, the user is encouraged to try to correct the interference by one or more of the following measures:
- Re-orient or relocate the receiving antenna.
- Increase the separation between the equipment and receiver.
- Connect the equipment into an outlet on a circuit different from that to which the receiver is connected.
- Consult the dealer or an experienced radio/TV technician for help.
Ventilation
IMPORTANT - The unit will become hot when in use. Do not stack multiple units on top of each other. Do not place in an enclosed area such as a bookcase or in a cabinet without sufficient ventilation.
Ensure that small objects do not fall through any ventilation grille. If this happens, switch off immediately, disconnect from the mains supply and contact your dealer for advice.
Positioning
Choose the installation location carefully. Avoid placing it in direct sunlight or close to a source of heat. No naked flame sources, such as lighted candles, should be placed on the unit. Also avoid locations subject to vibration and excessive dust, cold or moisture. The unit can be used in a moderate climate.
This unit must be installed on a sturdy, level surface. Do not place in a sealed area such as a bookcase or in a cabinet. Do not place the unit on an unstable surface or shelf. The unit may fall, causing serious injury to a child or adult as well as serious damage to the product. Do not place other equipment on top of the unit.
Due to stray magnetic fields, turntables or CRT TVs should not be located nearby due to possible interference.
Electronic audio components have a running in period of around a week (if used several hours per day). This will allow the new components to settle down and the sonic properties will improve over this time.
Power sources
The unit should be operated only from the type of power source indicated on the marking label. If you are not sure of the type of power-supply to your home, consult your product dealer or local power company.
This unit can be left in Standby mode when not in use and will draw <0.5W in this state. To turn the unit off, switch off at the rear panel. If you do not intend to use this unit for a long period of time, unplug it from the mains socket.
Overloading
Do not overload wall outlets or extension cords as this can result in a risk of fire or electric shock. Overloaded AC outlets, extension cords, frayed power cords, damaged or cracked wire insulation and broken plugs are dangerous. They may result in a shock or fire hazard.
Be sure to insert each power cord securely. To prevent hum and noise, do not bundle the interconnect leads with the power cord or speaker leads.
Cleaning
To clean the unit, wipe its case with a dry, lint-free cloth. Do not use any cleaning fluids containing alcohol, ammonia or abrasives. Do not spray an aerosol at or near the unit.
Battery disposal
Batteries may contain substances harmful to the environment. Please dispose of any discharged batteries with due consideration and in accordance with local environmental/electronic recycling guidelines.
Loudspeakers
Before making any connections to loudspeakers, make sure all power is turned off and only use suitable interconnects.
Servicing
These units are not user serviceable. Never attempt to repair, disassemble or reconstruct the unit if there seems to be a problem. A serious electric shock could result if this precautionary measure is ignored. In the event of a problem or failure, please contact your dealer.
IMPORTANT
If the unit is run at a very high level, a sensor will detect a temperature rise and show "PROTECTION OVERLOAD" on the display. The unit will then go into Standby mode. It cannot be switched on again until the temperature has fallen to a more normal level.
Limited warranty
Cambridge Audio warrants this product to be free from defects in materials and workmanship (subject to the terms set forth below). Cambridge Audio will repair or replace (at Cambridge Audio's option) this product or any defective parts in this product. Warranty periods may vary from country to country. If in doubt consult your dealer and ensure that you retain proof of purchase.
To obtain warranty service, please contact the Cambridge Audio authorised dealer from which you purchased this product. If your dealer is not equipped to perform the repair of your Cambridge Audio product, it can be returned by your dealer to Cambridge Audio or an authorised Cambridge Audio service agent. You will need to ship this product in either its original packaging or packaging affording an equal degree of protection.
Proof of purchase in the form of a bill of sale or receipted invoice, which is evidence that this product is within the warranty period, must be presented to obtain warranty service.
This Warranty is invalid if (a) the factory-applied serial number has been altered or removed from this product or (b) this product was not purchased from a Cambridge Audio authorised dealer. You may call Cambridge Audio or your local country Cambridge Audio distributor to confirm that you have an unaltered serial number and/or you purchased from a Cambridge Audio authorised dealer.
This Warranty does not cover cosmetic damage or damage due to acts of God, accident, misuse, abuse, negligence, commercial use, or modification of, or to any part of, the product. This Warranty does not cover damage due to improper operation, maintenance or installation, or attempted repair by anyone other than Cambridge Audio or a Cambridge Audio dealer, or authorised service agent which is authorised to do Cambridge Audio warranty work. Any unauthorised repairs will void this Warranty. This Warranty does not cover products sold AS IS or WITH ALL FAULTS.
REPAIRS OR REPLACEMENTS AS PROVIDED UNDER THIS WARRANTY ARE THE EXCLUSIVE REMEDY OF THE CONSUMER. CAMBRIDGE AUDIO SHALL NOT BE LIABLE FOR ANY INCIDENTAL OR CONSEQUENTIAL DAMAGES FOR BREACH OF ANY EXPRESS OR IMPLIED WARRANTY IN THIS PRODUCT. EXCEPT TO THE EXTENT PROHIBITED BY LAW, THIS WARRANTY IS EXCLUSIVE AND IN LIEU OF ALL OTHER EXPRESS AND IMPLIED WARRANTIES WHATSOEVER INCLUDING, BUT NOT LIMITED TO, THE WARRANTY OF MERCHANTABILITY AND FITNESS FOR A PRACTICAL PURPOSE.
Some countries and US states do not allow the exclusion or limitation of incidental or consequential damages or implied warranties so the above exclusions may not apply to you. This Warranty gives you specific legal rights, and you may have other statutory rights, which vary from state to state or country to country.
For any service, in or out of warranty, please contact your dealer.
Plug fitting instructions (UK only)
The cord supplied with this appliance is factory-fitted with a UK mains plug fitted with a 5-amp fuse inside. If it is necessary to change the fuse, it is important that a 5-amp fuse is used. If the plug needs to be changed because it is not suitable for your socket, or becomes damaged, it should be cut off and an appropriate plug fitted following the wiring instructions below. The plug must then be disposed of safely, as insertion into a mains socket is likely to cause an electrical hazard. Should it be necessary to fit a 3-pin BS mains plug to the power cord, the wires should be fitted as shown in this diagram. The colours of the wires in the mains lead of this appliance may not correspond with the coloured markings identifying the terminals in your plug. Connect them as follows:
The wire which is coloured BLUE must be connected to the terminal which is marked with the letter 'N' or coloured BLACK.
The wire which is coloured BROWN must be connected to the terminal which is marked with the letter 'L' or coloured RED.
The wire which is coloured GREEN/YELLOW must be connected to the terminal which is marked with the letter 'E' or coloured GREEN.

If a standard 13-amp (BS 1363) plug is used, a 5-amp fuse must be fitted or, if any other type of plug is used, a 5-amp fuse must be fitted, either in the plug or adaptor, or on the distribution board.
● Cambridge Audio
Front panel connections
![Cambridge Audio DOLBY Tues DOLBY Tues/Video 1 DOLBY Tues/Video 2 DRDS 6 7 8 9 10 11 dts.se dts Digital Audio Rack [MOD] HOMI FM Tuner BD/DVD CD/Video 1 Video 2 Aust/TV Analog Stereo Direct Standby/On Pharma Testing + Mode/Store 134 2 12 13 14 Info Multi Digitally Processed Modes Audio Input Type Shore Modes Surround Modes 15 16 Volume Mio In 17 19 azur 351R AV Receiver](/content/2026/05/994863/images/305d8d70080865294334f9d42b440f6d33e80d038b058edda92a31f039391b55.jpg)
① Standby/On
Switches the unit between Standby mode (indicated by a dim power LED) and On (indicated by a bright power LED). Standby is an eco-friendly <0.5W low power mode. The unit may be left in Standby mode when not in use.
Note: This product has APD (Auto Power Down) enabled as default. After a period of inactivity, the product will automatically switch to Standby.
② Phones
Allows for the connection of stereo headphones with a 6.35mm/1/4" Jack plug. Headphones with an impedance of between 32 and 600 ohms are recommended.
Note: Plugging in headphones will automatically mute the main output and select a 2-channel stereo down-mix to be created for headphone use.
③ Tuning +/-
Used to tune FM frequencies and skip presets for the built-in FM Tuner.
④ Mode/Store
Press to cycle between Tuner modes. Press and hold for storing presets (refer to the 'Operating Instructions' of this manual for more information).
⑤ Display
Displays the status of the unit.
⑥ FM tuner
Press to select the built-in FM tuner.
⑦ BD/DVD
Press to select the source equipment connected to the BD/DVD input.
⑧ CD/Video 1
Press to select the source equipment connected to the CD/Video 1 Input.
⑨ Video 2
Press to select the source equipment connected to the Video 2 input.
⑩ Aux/TV
Press to select the source equipment connected to the Aux input.
With ARC enabled (see later section), press again to select Audio Return Channel from a suitable TV.
⑪ Analogue stereo direct
Press to listen directly to the analogue inputs for the current source directly with no analogue to digital conversion or DSP processing for highest possible stereo sound quality.
- Note: The 351R remembers the audio and video input type and processing mode for each individual source input. These are recalled each time a source is selected.
-⑫ Audio input type
Press this button to select between analogue, digital (optical/coaxial) or HDMI input types as the source of the audio for the currently selected source input.
The choices available depend on the inputs that have been assigned to that source, see later section.
-13 Stereo modes
Press to listen to a source in either digitally processed stereo or stereo and sub modes.
-⑭ Surround modes
Press to select Dolby Digital or DTS surround modes (with suitably encoded digital source material), or various Pro Logic II or DTS Neo:6 modes for matrix encoded analogue or digital material.
15 Info
Press to re-display the current decoding mode.
16 Mute
Press to mute the sound from the main outputs of the 351R. Press again to cancel mute.
Note: Selecting a new source always cancels mute.
⑰ Infrared sensor
Receives IR commands from the supplied remote control. A clear, unobstructed line of sight between the remote control and the sensor is required.
⑱ Volume
Use to increase/decrease the level of the sound from the outputs of the 351R.
⑲ Mic input
Used for the CAMCAS auto setup. Use the supplied microphone only!
Rear panel connections

① Service/Normal
For dealer use only - Switches the 351R between normal (default) mode and Service mode. Do not change the mode to service or make RS232 connections to it in service mode as damage may result!
② Digital inputs
S/P DIF or Toslink digital inputs.
These inputs can be freely assigned, see later section on assigning the digital inputs.
③ & ④ HDMI
Inputs and output to a suitable TV/Monitor.
⑤ RS232C
Used for control of the 351R in Custom Install situations. A full protocol is available for the 351R on our website.
⑥ FM antenna
The tuner antenna connection is made here. Refer to the 'Antenna Connection' section of this manual for more information.
⑦ & ⑨ Analogue audio inputs
For use with the line level outputs of CD players, BD/DVD players etc.
⑧ Record Out
These output sockets can be connected to a tape deck or to the analogue Record In sockets on a MiniDisc or CD recorder.
⑩ Subwoofer Out
For connection of a powered subwoofer.
⑪ Speaker terminals
Connect to loudspeakers with an impedance of 8 ohms.
⑫ Power On/Off
Switches the unit on and off.
⑬ Mains voltage selector switch
Switches the mains voltage between 115V and 220-230V. For use by installer/dealer only.
⑭ Mains power lead
Once you have completed all connections, plug the AC power lead into an appropriate mains socket. The AV receiver is now ready for use.
● Cambridge Audio
Remote control
The 351R is supplied with a dedicated remote control. Insert the supplied AAA batteries to use. For full details of the various adjustment functions available from the remote, refer to the later sections of this manual.
The handset buttons function as described in the following paragraphs.

Mute
Mutes the audio on the AV Receiver. Press again to cancel mute.

Standby/On
Switches the unit between Standby mode and On.


Press the corresponding button to change the input source.
Pressing the Aux/TV button a second time if ARC is enable selects TV-ARC (Audio Return Channel). See later section.

Stereo mono
When listening to the FM tuner, press to alternate between stereo and mono modes.

Store
Press to store the current frequency when in Tuner mode.

Mode
Press to select Auto/Manual or Preset tuning when in Tuner mode.

Info
Press to view the current source material and decoding mode. When listening to FM with RDS, press to cycle round various RDS information modes.

On-Screen Display (OSD)
Press to turn on and off the on-screen setup menus for display on your monitor/screen.

Stereo modes
Selects Stereo or Stereo + Sub modes for Analogue or Digital sources (digitally processed).

Surround modes
Selects digital surround processing modes and various matrix encoded surround processing modes for analogue or digital sources (digitally processed).


Audio In type
Switches the audio between the types available for the current source. Depending on the source selected and whether you have assigned a digital input to it, Analogue, Digital and HDMI can be available.

Lip sync
Press to activate and adjust the lip sync delay function if the audio and video appear out of sync. While the Lip sync delay status is shown on the units display, use the Volume buttons to adjust the delay time. Adjusting the value to zero causes lip sync delay to be turned off. See later section in this manual.

Bass/Treble
Press for bass/treble adjustment, using the Volume up/down buttons.
Note: Bass/Treble is bypassed in analogue stereo direct mode.

Analogue stereo direct
Directly selects a stereo analogue input for the current source with no A/D conversion or DSP processing.


Volume Up/Down
Volume adjustment.
◀▶Tune/Left & Right
Press the right arrow to increase tuner frequency/change preset. Press the left arrow to decrease tuner frequency/change preset. Also used to scroll left/right in the OSD setup menus.

Enter
Used in the OSD setup menus.
Front panel display Loudspeaker connections

① HDMI inputs
Indicates the current HDMI source input.
② TONE
Indicates whether the Tone controls are in use.
③ PCM
Indicates the 351R is receiving two channel or multi-channel PCM.
④ Surround decoding mode indicators (PCM, Dolby Digital, DTS etc)
Shows the current decoding mode, Dolby Digital, DTS etc. In conjunction with the Output Channel indicators these give full details of the current processing mode.
⑤ Main information display
Shows the current source selected, also the surround mode and station name/frequency when in tuner mode etc.
⑥ Output channel indicators
Shows the currently active channels depending on decoding mode and source material. Channel icons lit indicate channels in the source material. Icons with a box around them indicate channels being output by the 351R.
Display examples

Indicates a 5.1 DTS master audio source being played back. The lit LFE indicates a low frequency effects channel is present in the source material. When this icon isn't boxed it indicates the LFE channel is not being sent to a subwoofer but will be mixed into the front left and right instead.

Indicates a 2.1 output created in the digital domain from analogue input material.
Aerial connections
FM aerial
Connect an aerial to the FM 75 ohm socket (a simple wire aerial is supplied only for temporary use). Extend the lead and move the aerial around until you get the best reception. For continued use, we strongly recommended using a 75ohm outdoor FM aerial.

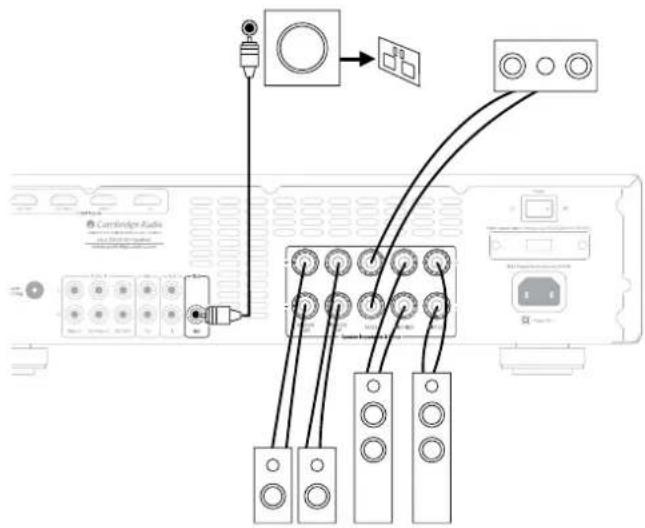
To avoid damaging the speakers with a sudden high-level signal, be sure to switch the power off before connecting the speakers. Check the impedance of your speakers. Speakers with an impedance of 8 ohms (each) are recommended.
The coloured speaker terminals are positive (+) and the black speaker terminals are negative (-). Make sure correct polarity is maintained at each speaker connector or the sound can become weak and "phasey" with little bass.
Prepare the speaker cords for connection by stripping off approximately 10mm (3/8") or less (no more than 10mm, as this could cause a short-circuit) of the outer insulation. Twist the wire tightly together so there are no loose ends. Unscrew the speaker terminal knob, insert the speaker cable, tighten the knob and secure the cable.
Note: All connections are made via loudspeaker cable, except if using an active subwoofer which would be connected via a standard RCA phono cable. Banana Plugs (4mm standard) connected to the speaker cable are recommended for direct insertion into the speaker terminals.
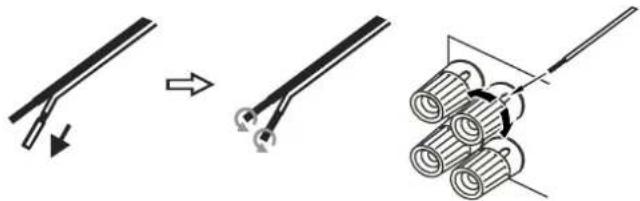
Please refer to the 'Speaker Configuration' section of this manual for more information on 5.1 speaker setups.
● Cambridge Audio
Analogue audio connections
Note: Do not plug in the mains power lead or turn the unit on until all connections have been made.
Connect to source equipment using stereo phono/RCA cables (stereo 2RCA-2RCA). Tape/MD/CDR recorder/players require two sets of stereo phono/RCA cables, one for recording, one for listening.

Digital audio connections
Two types of digital audio connections can be made to the 351R:
① Optical (Toslink)
② Coaxial (S/P DIF)
See later section on how to assign the digital inputs to specific sources.

HDMI input connections
HDMI (High-Definition Multi-Media Interface) is an all digital connection that can carry both audio and video in one cable. Direct digital transfer of audio and video and support for various types of High Definition video content and high resolution audio make this the best connection type to use.

Video output connection (HDMI)
Connection to the TV is by HDMI.

● Cambridge Audio
351R setup
The setup of the 351R is a reasonably simple 3 stage process. The speaker setup process (stage 2.) can either be performed manually or via the CAMCAS (Cambridge Audio Microphone Controlled Auto Setup) procedure.
The procedure is as follows:
- Speaker configuration.
- Speaker setup (Speaker delay and Level calibration)
- Source setup
flowchart
graph TD
    A["1"] --> B["2"]
    B --> C["3"]
    C --> D["4"]
    D --> E["5"]
    E --> F["6"]
    F --> G["7"]
    G --> H["8"]
    H --> I["9"]
    I --> J["10"]
    J --> K["11"]
    K --> L["12"]
    L --> M["13"]
    M --> N["14"]
    N --> O["15"]
    O --> P["16"]
    P --> Q["17"]
    Q --> R["18"]
    R --> S["19"]
    S --> T["20"]
1. Speaker configuration
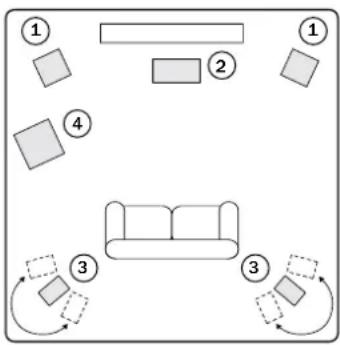
First tell the unit what kind of speaker package you have. The 351R can support up to a 5.1 speaker setup which means 5 speakers (Front Left, Front Right, Centre, Surround Left, Surround Right,) plus a mains powered Subwoofer (the .1).
Refer to the diagram above for a typical example of a 5.1 loudspeaker setup. Always adjust the speakers and listening positions until you are happy with the sound. Please refer to your loudspeaker and subwoofer manuals for more detailed positioning information.
1. Front Left and Right speakers
For stereo and multi-channel sound.
2. Centre speaker
For dialogue and centre sounds. Ideally position at a similar height to the front left and right speakers (above or below the TV/monitor). Using a centre speaker from the same manufacturer/range as used for the front left and right speakers is advisable. This "timbre matching" allows surround effects to flow more naturally from left to right without obvious transitions between the speakers.
3 Surround Left and Right speakers
For ambient and multi-channel sound. Floorstanding speakers should be angled towards the listening position. Bookshelf/standmount speakers should be wall mounted or used with dedicated speaker stands, positioned at or above ear height.
4 Subwoofer
For improving the bass in your system, as well as reproducing dedicated LFE (Low Frequency Effects) cinema effects when playing Dolby Digital or DTS encoded discs. Your subwoofer can often be placed almost anywhere in the room as bass is less directional, but experimentation with positioning is recommended.
In each case the 5.1 in fact relates to the maximum number of speakers that can be used, as the Centre, Sub and Surround speakers can all be deleted if required (although of course performance is reduced). For example, if you choose not to use a Centre Channel speaker you can set this to 'None' in the settings, as shown later and the 351R will automatically redirect the centre channel audio information into the Left and Right Front channels, creating what is known as a 'Phantom Centre'.
Similarly, you might decide not to use a subwoofer if your main Left and Right speakers are capable of reproducing enough bass for a satisfying music/movie experience. The 351R will then automatically re-direct the bass from the Subwoofer/Low Frequency Effect channel to the Left and Right Front Speakers.
Note: This setup is very important as the 351R will also automatically use this information to select appropriate Dolby and DTS decoding modes dependant not only on the source material but also the speaker package it knows you have.
To tell the unit the type of package you have, turn on the On-Screen Display via the remote button as shown. Highlight the 'Speaker Config.' menu by using volume ▲ and ▼ on the remote then go to it by pressing Enter:
![Audio Level Select Time/Sub Config. Speaker Config. Speaker Distance Speaker Level Speaker Level Auto Setup Enable/DCB Setup USB Setup Fruit L/X Large () Center Small () Surs. L/X Small () Subarray On () Quit: [7/0] Enter: [SW86]](/content/2026/05/994863/images/5ce54dc267a6ab547f22cfbf66b8788d032238f4e58e68523560e77e599d2e4f.jpg)
Now move down and by highlighting each speaker in turn and using the Left and Right arrows select from 'Large' or 'Small' for each speaker. 'Large' or 'Small' are used to describe each speaker in terms of bass response, they do not necessarily reflect the actual physical size of the speaker.
Large = Speakers with an extended low frequency response of approximately 20-40Hz to 16-20kHz (floorstanders or high quality larger stand-mounted speakers).
Small = Speakers with a less extended low frequency response of approximately 80-100Hz to 16-20kHz (small stand-mounted, bookshelf or satellite speakers).
Setting each speaker allows the 351R to perform what is called Bass Management and to direct low frequency bass from music and the Low Frequency Effects channel of surround sound material to those speakers best able to reproduce it. If you do not wish to use any of the speakers set its setting to 'None'.
The Subwoofer output can also be set to On or Off. If no sub is being used, make sure this setting is set to Off to allow the 351R to re-direct the bass information in this channel to other speakers.
Note: The 351R will force some speakers to certain settings in the following circumstances!
The Front Left and Right speakers may be 'Large' or 'Small' but not 'No' as they are always required for any type of music/movie reproduction.
Bass must always be reproduced by either the Front Left and Right or Subwoofer channel (or both). Setting the Front Left and Right to 'Small' will result in the Subwoofer automatically being set to 'Yes'. Setting the Subwoofer to 'No' will automatically result in the Front Left and Right being set to 'Large'.
If the Front Left and Right cannot reproduce low frequency bass a Subwoofer must be used. i.e. If the Front Left and Right are set as 'Small' the Sub must be Set to 'Yes'.
Also, setting the Front Left and Right as 'Small' will always set the other speakers as 'Small' (and the Sub to 'Yes'). This is because LFE/ bass information should not be redirected to the surround channels.
To store the setting simply come back out of the OSD (pressing the 1/0 button always moves back one menu item, and then exits and stores from the main menu screen).
2. Speaker setup
The following two sections can be performed by Cambridge Audio CAMCAS procedure so you can if you wish jump straight to that section. However, it is recommended that you do read these sections to understand the reasons for these settings and their implications.
Speaker Delay
Because the speakers in a surround sound system are usually different distances from the listener the 351R incorporates the ability to apply a variable digital delay to each of the channels so that the sound from each arrives at the same time at the listening position for best surround-sound effect.

flowchart
graph TD
    A["1 23"] --> B[" "]
    A --> C[" "]
    A --> D[" "]
    A --> E[" "]
    A --> F[" "]
    G["6"] --> H[" "]
    H --> I[" "]
    J["4"] <--> K[" "]
    L["5"] <--> M[" "]
1 = Front Left speaker
2 = Front Right speaker
3 = Centre speaker
4 = Surround Left speaker
5 = Surround Right speaker
6 = Subwoofer (can be placed almost anywhere)
To set the delay times automatically, refer to the "Auto setup" section of this manual.
To set the delay times manually, simply measure the distances from the listening position to each speaker as shown in the following diagram:
No delay setting for the subwoofer is necessary.
Set the distances in the OSD Speaker Distance menu to the nearest value in metres or feet (1 foot = 0.3 metres). The speed of sound is approx 340 metres per second, the 351R thus introduces approx 3mS of delay per meter of distance set.
Go to the 'Speaker Distance' and highlight each speaker in turn. Set the distance to the nearest value to that which you measured by using the Left and Right arrows (the values do not need to be exact):
| azur 351R | ||
| Audio In. Select | Unit | Meters <> |
| Tone/Sub config. | Front L | 2.9 <> |
| Speaker config. | Front R | 2.9 <> |
| Speaker Distance | Center | 2.9 <> |
| Speaker Level | Surr. L | 2.0 <> |
| Speaker Xover | Surr. R | 2.0 <> |
| Auto Setup | ||
| Dolby/DTS Setup | ||
| OSD Setup | ||
Quit : [I/O] Enter : [ENTER]
Press the 1/0 button to exit the menu.
Level calibration
The 351R allows level calibration to match the acoustic level between different types/sizes or even manufacturers of speaker that may be being used for each channel. This is achieved by adjusting the relative level of each speaker. This can be done manually through the 'Level Calibration' menu in the OSD or automatically, see the following Auto setup section of this manual.
The basic process for manual adjustment is to listen to or measure with a Sound Pressure Level (SPL) meter (more accurate and recommended but not essential) the level of sound produced by each speaker and set relative levels for each speaker so that they all sound the same loudness at the normal listening position. The 351R incorporates a Test Signal Generator (broadband white noise) to facilitate this.
Press the 1/0 button on the remote control to turn on the OSD then select the 'Speaker Level' menu. Now turn on the test signal by highlighting this item and pressing the Left or Right arrows:
| Audio In. Select | Test Signal | Off <> |
| Tone/Sub Config. | Front L | 0dB <> |
| Speaker Config. | Front R | 0dB <> |
| Speaker Diatanca | Surr. L | 0dB <> |
| Speaker Level | Surr. R | 0dB <> |
| Speaker Xover | Center | 0dB <> |
| Auto Setup | Subwoofer | 0dB <> |
| Dolby/DTS setup | ||
| OSD Setup |
You can now move up and down the channels using Volume ▲/▼ on the remote. Each time a new channel is selected the test signal will be heard to move to that channel. Compare the loudness of all channels as heard at the listening position.

flowchart
graph TD
    A["Input Box"] --> B["Output Box"]
    C["Input Box"] --> B
    D["Input Box"] --> B
    E["Input Box"] --> B
    F["Input Box"] --> B
    G["Input Box"] --> B
    H["Input Box"] --> B
    I["Input Box"] --> B
    J["Input Box"] --> B
    K["Input Box"] --> B
    L["Input Box"] --> B
    M["Input Box"] --> B
    N["Input Box"] --> B
    O["Input Box"] --> B
    P["Input Box"] --> B
    Q["Input Box"] --> B
    R["Input Box"] --> B
    S["Input Box"] --> B
    T["Input Box"] --> B
    U["Input Box"] --> B
    V["Input Box"] --> B
    W["Input Box"] --> B
    X["Input Box"] --> B
    Y["Input Box"] --> B
    Z["Input Box"] --> B
    AA["Input Box"] --> B
    AB["Input Box"] --> B
    AC["Input Box"] --> B
    AD["Input Box"] --> B
    AE["Input Box"] --> B
    AF["Input Box"] --> B
    AG["Input Box"] --> B
    AH["Input Box"] --> B
    AI["Input Box"] --> B
    AJ["Input Box"] --> B
    AK["Input Box"] --> B
    AL["Input Box"] --> B
    AM["Input Box"] --> B
    AN["Input Box"] --> B
    AO["Input Box"] --> B
    AP["Input Box"] --> B
    AQ["Input Box"] --> B
    AR["Input Box"] --> B
    AS["Input Box"] --> B
    AT["Input Box"] --> B
    AU["Input Box"] --> B
    AV["Input Box"] --> B
    AW["Input Box"] --> B
    AX["Input Box"] --> B
    AY["Input Box"] --> B
A "rushing" or "hissy" sound should be heard.
Now adjust the channels so they all sound the same (in terms of loudness only, channels of different frequency responses can sound different in terms of the "tone" of the sound i.e. more or less hissy).
Pick the channel that sounds most different and select it to listen to the test signal. Now adjust the relative level in dB (using the ◀/▶ buttons on the remote) and continue comparing it to other channels until it is of equal loudness. The level can be adjusted up to + or - 10dB in 1dB steps. Repeat the process with the next most different channel. Once all channels sound the same in terms of loudness, press the OSD button again to save the settings and exit the menu.
CAMCAS Auto speaker setup for Distance/Level
The 351R includes our simple automatic speaker setup system called 'CAMCAS' (Cambridge Audio Mic Controlled Auto Setup). The system performs two sets of tests firstly checking which speakers are connected and whether they are wired correctly and in phase then a second automatically measuring and adjusting the speaker delay timings (i.e. distance setting) and levels.
Before activating this feature the 'Decode Mode' (i.e. type of speaker package e.g. 5.1) and Large/Small/None status of each speaker must be set correctly as per section 1. This is important as the unit will only look for and check the speakers you have told it you have.
● Cambridge Audio
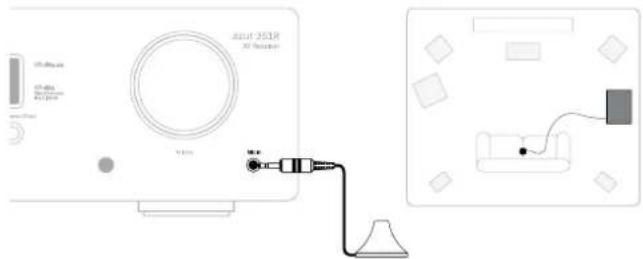
To perform the Auto Setup function, first connect the supplied microphone to the front panel 'Mic In' input and place it at your normal listening position in the room. It should also be placed at normal listening height.
Press the I/O button on the remote control to access the OSD and then select the Auto Setup Menu. This will access the "Auto Setup Menu" as below.
| Audio In. Select tone/sub config.Speaker Config.Speaker DistanceSpeaker LevelSpeaker Xover | Please press ENTER to start auto setup |
| Auto Setup | |
| Dolby/DTS SetupOSD Setup |
quit : [1/0] enter : [ENTER]
Follow the on-screen instructions and press 'Enter' on the remote control when ready to start the Auto Setup function.
| Auto Setup Menu |
| Plug the microphone into the Mic. input on the front panel and place the microphone at normal listening position and height |
Once activated the OSD will display the message below and the word 'AUTOSETUP' will also be displayed on the front panel of the 351R to confirm.
| Auto Setup Menu |
| The unit is now checking which speakers are connected and their phase |
| Please wait... |
A series of test signals will now be output from all of the connected speaker terminals of the 351R (including the Subwoofer output).
Once finished the unit will display a screen similar to the one below reporting which speakers were found and any that appear out of phase.
| arur JS1R |
| The speakers that have been found are: |
| L C R SL SR LA RA SW |
| All speakers are in phase |
If any speakers appear unconnected or out of phase carefully check the connections on the speaker and the back of the unit. Also check any bi-wiring links that might be present on the speaker. For any out of phase speakers check that the relevant + terminal of the 351R goes to the + terminal of that speaker and similarly the - terminal of the 351R goes to the - terminal of the speaker for that channel.
If necessary press the button to perform a retest or press Enter to start the second part of the auto setup procedure as below.
| Auto Setup Menu |
| The unit is now measuring the Distance and Level settings for your speakers |
| Please wait...... |
Again a series of test signals will now be output from all of the connected speaker terminals and subwoofer. The 351R uses these to measure the levels and distances (and hence introduce the correct delays) appropriate to your speakers and room characteristics.
When the auto setup of the 351R is completed successfully, the 351R will return to the Speaker Setup Menu.
| Audio In, SelectTons/Sub Config.Speaker Config.Speaker DistanceSpeaker LavalSpeaker Xover | Please press ENTER to start autosetup |
| Auto Setup | |
| Dolby/DSS SetupOSD Setup |
The Speaker Distance and Level Calibration settings for each speaker will have been updated.
It is of course now possible to go into the Speaker Delay and Level Calibration menus if you want to manually check/adjust the settings made by the CAMCAS system, and it is always advisable to check them as no system can be totally foolproof.
To exit the auto setup menu of the 351R continue to press the button on the remote control to exit all menus or until 'OSD' is no longer displayed on the front panel. You can now unplug the microphone and put it away for future use.
Note: If the auto setup of the 351R is unsuccessful for some reason a 'Fail' message will appear on the OSD. Included in this message will be details of the speaker channel or channels which have not been successfully adjusted. If this is the case, please again check that the speaker or speakers detailed in the OSD as 'failed' are connected correctly & have not been wired out of phase. Also check the microphone connection and any other external issues that could have affected the tests such as noise in the room etc.
Note: Like all such systems CAMCAS has some limitations. Speakers that exhibit very strong phase angles or deliberately wire some drive units out of phase can of course appear to the system as an out of phase speaker when correctly connected. If a speaker is reported as out of phase but is correctly wired please consult the speakers manufacturer in case this is the case.
Similarly bi-polar speakers which radiate in more than one direction can make it difficult to measure the distance and sometimes level accurately as you might expect.
In all cases it is always advisable to manually check the settings CAMCAS has made for a 'reality check' to ensure there are no obvious errors.
3. Source setup
The next step is to select each source input in turn on the 351R and tell the unit:
- The type of audio connection you want to use for that source (Analogue, Digital or HDMI).
- The processing mode for that source.
The 351R remembers these settings individually for every source input and automatically recalls them as and when you change source input.
Select the 'Audio In. Select' menu. Highlight each source in turn and select either analogue, digital or HDMI input types (use the ◀ and ▶ arrows):
Each source always has a dedicated HDMI input and a dedicated pair of Analogue Stereo sockets associated with it on the back panel.
| Audio In. Select | BD/DVD | HDMI <> |
| Tone/Sub Config. | CD | HDMI <> |
| Speaker Config. | Video | Analog <> |
| Speaker Distance | Aux | Analog <> |
| Speaker Level | ||
| Speaker Xover | HDMI TV ARC | Enabled <> |
| Auto Setup | ||
| Dolby/DTS Setup | ||
| QSD Setup |
quit : [I/O] Enter : [ENTER]
In addition, there are two S/P DIF (Co-Axial) and one toslink (Optical) digital inputs available that can be freely assigned to any source.
For each source, pressing the Audio Input Type button thus scrolls through the following options: HDMI, Analogue, Co-Ax1, Co-Ax2 and Opt.
HDMI and Analogue refer to the dedicated sockets for that source, Co-Ax1, Co-Ax2 and Opt refer to the three assignable sockets that any source can select.
These digital inputs should only be selected (assigned) to one source each.
Analogue inputs will require a stereo phono/RCA to phono/RCA cable connection to the 351R. Digital inputs will require either a 75ohm digital type phono/RCA to phono/RCA co-axial cable (S/P DIF) or an optical fibre cable (TOSLINK).
Note: HDMI TV ARC is covered in a later section of this manual.
Once you have set the audio types exit the OSD to save.
This setting can also be changed at any time without using the OSD by pressing the Audio Input Type button on the front panel or remote, this will then cycle between analogue, digital or HDMI input types where available for the currently selected source, as usual they will then be remembered the next time you return to that source.
Surround sound modes
The 351R supports several music and home-cinema listening modes. The output the 351R can provide, depends both on the source signal present, the speaker setup selected and the decode mode selected. Before we describe how to operate the 351R, below is a brief guide to the Surround Sound formats that the 351R is compatible with for reference:
DOLBY TRUEHD
Dolby's lossless audio technology developed primarily for high capacity Blu-ray discs/players. Dolby True HD delivers theoretically bit-for-bit sound identical to the studio master by the use of 100% lossless encoding. Previous formats such as Dolby Digital 5.1 or EX have used lossy encoding where some data (that is theoretically less audible) is always lost in the encoding process to reduce the storage capacity needed on the disc. This is a new format that supports 5.1 full-range channels of 24-bit/96 kHz audio or two channels of 24/192 kHz via Blu-ray discs and is not backwards compatible with earlier schemes. The format can either be transmitted as a 'bitstream' to the 351R for internal decoding (recommended) or can be decoded by some Blu-ray players internally and sent to the 351R as multi-channel PCM. In both cases an HDMI connection is required to the 351R and a suitable Blu-ray player as Dolby True HD is only ever transmitted over HDMI.
DOLBY DIGITAL PLUS
An encoding scheme based on the original Dolby Digital CODEC, but with enhancements to improve coding efficiency and improved audio quality. These Dolby Digital Plus bitstreams are not backward compatible with legacy Dolby Digital decoders but require an AV Receiver developed to decode them (such as the 351R) and an HDMI connection as Dolby Digital Plus is currently only transmitted over HDMI. It is however a requirement that any Dolby Digital Plus enabled Blu-ray player must also be able transform the Dolby Digital Plus into a backwards compatible Dolby Digital 5.1 output for playback on legacy Dolby Digital systems. The 351R is however fully compatible with Dolby Digital Plus.
dts-HD Master Audio
A new lossless audio codec from DTS, rather than being incompatible with earlier versions, DTS-HD Master Audio is transmitted as an extension to a normal DTS bitstream. A second embedded stream is sent which contains the "difference" between the original studio master and the lossy compressed DTS. DTS-HD Master Audio enabled devices (such as the 351R) are able to use this difference information to recreate a bit for bit lossless version of the original data. Devices which do not support the Master Audio extension simply decode the original 5.1 DTS stream and ignore the Master Audio extension providing backwards compatibility.
dts-HD DTS-HD High Resolution Audio
Known also as DTS-HR an extension to the original DTS audio format. DTS-HD High Resolution Audio supports fully discrete channels compared to DTS's 5.1. As with DTS-HD Master Audio a second embedded stream is sent which contains the "difference" between the original studio master and the lossy compressed DTS, however in this case the extra stream is also formed by lossy compression.
DOLBY DIGITAL
Known also as DD (3/2) or DD 5.1, provides (up to) 5.1 output from suitable encoded Dolby Digital material, with 5 main channels (Front Left, Front Right, Centre, Surround Left, Surround Right) and a Low Frequency Effects Channel for the subwoofer, all discretely encoded. Decoding Dolby Digital requires a Dolby Digital encoded DVD disc and a digital connection from the source equipment (Such as a DVD player) to the 351R.
Note: Dolby Digital and DTS formats can sometimes carry less channels than their maximum such as Dolby Digital (2/0) which means a Dolby Digital encoded signal which is actually only carrying a two channel stereo signal (other channels inactive).
dts Digital Surround
Known also as DTS (3/2) or DTS 5.1, DTS provides (up to) 5.1 output from suitable encoded DTS material, with 5 main channels (Front Left, Front Right, Centre, Surround Left, Surround Right) and a Low Frequency Effects Channel for the subwoofer, all discretely encoded. Decoding DTS requires a suitably encoded DTS disc and a digital connection from the source equipment to the 351R.
● Cambridge Audio
Surround sound modes cont.
DOLBY
PRO LOGIC II
The replacement for the original ProLogic, Pro Logic II is a technology where 5 channels (Front Left, Front Right, Centre, Surround Left, Surround Right) are encoded into a Stereo mix by an analogue matrix process. Dolby Pro Logic II material can be played back by normal Stereo equipment (as Stereo) or decoded into 5 channel surround-sound.
Dolby Pro Logic II is compatible with the earlier 4 channel (Left, Centre, Right and mono Surround) Dolby Pro Logic system (which was the decoding counterpart to Dolby Surround encoding) as used widely on Video tapes, TV broadcasts and earlier films.
Note: Pro Logic does not include a Low Frequency Effects channel for the Subwoofer, but the 351R can create a Subwoofer output (for 5.1) via Bass management. Refer to the 'Tone/Sub/LFE configuration' section in the 'Operating instructions' part of this manual.
dts
A DTS technology which is able to recreate 5 or 6 channels (Left Front, Right Front, Centre, Left Surround, Right Surround plus optional Surround Back) surround sound from suitable analogue matrix encoded stereo source material. DTS Neo:6 material can be played back by normal Stereo equipment (as Stereo) or decoded into 5.1 as on the 351R by sending the Surround Back decode to the both the Surround Back Left and Right speakers.
Note: Neo:6 does not include a Low Frequency Effects channel for the Subwoofer, but the 351R can create a Subwoofer output via Bass management. Refer to the 'Tone/Sub/LFE configuration' section in the 'Operating instructions' part of this manual.
dts Digital Surround | 96/24
A DTS technology that provides 5.1 channels of 96kHz / 24bit audio (along with video if required) on DVD-Video and DVD-Audio (video zone) discs (when suitably encoded in DTS 96/24). DVD players which allow 'DTS digital out' pass the DTS 96/24 bitstream over S/P DIF or HDMI for decoding in the 351R.
DSP modes
These modes allow a surround-sound experience from source material that has no encoding at all. The surround sound effect is achieved by Digital Signal Processing of the Analogue or Digital stereo source used. Five modes are possible: Movie, Music, Room, Theatre and Hall.
Stereo/Stereo + Sub
Only the Front Left and Front Right speakers (and subwoofer if selected) have output in this mode. If an analogue source is selected it will be converted to digital via 24 bit A/D converters to allow digital domain sub creation and bass/treble controls.
If a digital source is selected the 351R will be processing either LPCM stereo (from the digital outputs of a CD player for instance) or a Stereo downmix of DD or DTS material (from the digital output of a DVD player for instance).
Other modes
Analogue Stereo Direct
Selects the analogue inputs for the current source directly with no A/D conversion, DSP processing, Bass/Treble or subwoofer channel active. Provides the very best fidelity for analogue hi-fi source equipment. In this mode the 351R is acting just like a normal hi-fi integrated amplifier.
Multi Channel PCM
Some playback devices (in particular Blu-ray players) are able to decode some of the above formats themselves internally and then output the decoded audio as Multi Channel PCM to the 351R. In addition Blu-ray disks can support native unencoded Multi Channel PCM soundtracks on the disc itself. In either case if your player can output these over HDMI the 351R is able to receive them in Multi-Channel PCM mode.
Operating instructions
To activate the 351R, switch the Power button on the rear panel to On then press the Standby/On button on the front panel.
Selecting the source
- Select the desired source by pushing the corresponding source button on the front panel or remote control.


- If necessary, press the Audio Input Type button to select the input mode of the source equipment, either analogue, digital or HDMI (depending on the connection made on the rear panel). You may have already assigned this in the 'Audio In. Select Menu' in the OSD.

The digital, analogue or HDMI icons on the display show which is the currently selected input type.
Note: The 351R stores the input type for each source so that it is automatically recalled when that source is selected again.
Select an appropriate mode for the source material/type you are listening to by pressing the Stereo or Surround Modes button and cycling through sub-modes where available.


- Selects 2 channel Stereo operation for stereo material, pressing again selects Stereo + Sub mode.
This is a digitally processed mode that allows bass and treble controls, and sub generation if required. The input can be either analogue (in which case it will be turned into digital by 24 bit A/D conversion) or natively digital.
- Selects a range of digital surround modes for the appropriately digitally encoded material.
Some Surround Sound types (such as the Dolby True HD and DTS HD Master Audio) are available only from Blu-ray disc over HDMI.
Pressing the Surround Modes button will cause the 351R to lock onto the incoming bitstream and select the first available mode for the current bitstream type.
In some circumstances (see tables) pressing the button again will switch to an alternative decoding option.
Dolby Pro Logic and Neo:6 are both available in various guises to decode appropriately encoded soundtracks. Additionally DSP modes are available to process sources with no encoding at all. Due to the matrix encoding process none of these modes incorporate flags that tell the 351R the type of encoding used in the source material. Thus you must manually select these modes.
Pressing the Surround Modes button when the 351R has locked to a DD/DTS bitstream will present more options where possible including Post-Processed modes.
These are modes that allow extra processing to be applied after the main surround-sound decoding. For instance Dolby Digital (2/0) + Pro Logic II Music. Which adds a 5.1 ProLogic decode to a Stereo Dolby Digital decode to turn 2 channel stereo into 5.1.
Surround channel description for reference:
(1/0) - Mono, Centre channel only
(2/0) - Left/Right stereo
(2/0).1 - Left/Right stereo and LFE (Sub)
(2/2) - Left/Right stereo and Left/Right surround
(3/0) - Left, Centre, Right
(3/0).1 - Left, Centre, Right and LFE (Sub)
(3/2).1 - 5.1: Left, Right, Centre, Left Surround, Right Surround and LFE (Sub)
Decode modes


Surround
Modes
| Incoming Native Modes available Output audio channel channels format resolution | |||
| PCM | 2 | PCM | |
| PCM + Dolby Pro Logic II Movie >5.1 | |||
| PCM + Dolby Pro Logic II Music >5.1 | |||
| PCM + Dolby Pro Logic II Game >5.1 | |||
| PCM + Neo:6 Cinema | >5.1 | ||
| PCM + Neo:6 Music | >5.1 | ||
| Hall, Room, Stadium or Theatre | >5.1 | ||
| Dolby Digital (2/0) | 2 | Dolby Digital (2/0) | 2 ◆ |
| Dolby Digital (2/0) + Dolby Pro Logic II Movie | >5.1 | ||
| Dolby Digital (2/0) + Dolby Pro Logic II Music | >5.1 | ||
| Dolby Digital (2/0) + Dolby Pro Logic II Game | >5.1 | ||
| Dolby Digital (2/0) + Neo:6 Cinema | >5.1 | ||
| Dolby Digital (2/0) + Neo:6 Music | >5.1 | ||
| Hall, Room, Stadium or Theatre | >5.1 | ||
| Dolby Digital | 5.1 | Dolby Digital (3/2).1 | 5.1 |
| DTS (2/0) | 2 | DTS (2/0) | 2 ◆ |
| DTS (2/0) + Dolby Pro Logic II Movie | >5.1 | ||
| DTS (2/0) + Dolby Pro Logic II Music | >5.1 | ||
| DTS (2/0) + Dolby Pro Logic II Game | >5.1 | ||
| DTS (2/0) + Neo:6 Cinema | >5.1 | ||
| DTS (2/0) + Neo:6 Music | >5.1 | ||
| Hall, Room, Stadium or Theatre | >5.1 | ||
| DTS | 5.1 | DTS (3/2).1 | 5.1 |
| DTS 96/24 | 5.1 | DTS 96/24 | 5.1 |
| Multi Channel PCM | 5.1 ★ | Multi PCM (3/2).1 | 5.1 |
| Dolby Digital Plus | 5.1 ★ | Dolby Digital Plus (3/2).1 | 5.1 |
| Dolby True HD | 5.1 ★ | Dolby True HD (3/2).1 | 5.1 ▼ |
| DTS HD High Resolution | 5.1 ★ | DTS-HD HR (3/2).1 | 5.1 |
| DTS Master Audio | 5.1 ★ | DTS-HD MA (3/2).1 | 5.1 ▼ |
Key symbols
5.1< Indicates a 5.1 decode of 6.1 or 7.1 material (phantom back centre).
5.1 Indicates a 5.1 output created by a 2.0 decode post processed to 5.1.
◆ Stereo or Stereo + Sub, Press Stereo Modes Button to change.
■ Digital Signal Processing created modes for signals with no encoding.
★ Available via HDMI inputs only.
▼ Lossless encoded format.
Note: Bold entries are being output in their native resolution/format.
In all cases, pressing the Stereo Modes button always cycles round:
| Stereo Modes | Output channels |
| Stereo | 2 |
| Stereo + Sub | 2.1 |
Either native Stereo or downmix of DD/DTS 5.1/6.1/7.1 etc.
Pressing a mode button will first cause the 351R to scroll the current decode mode across the front panel display. Pressing the mode button again whilst text is scrolling on the display or within 4 seconds of it finishing will select and display the next available mode.
● Cambridge Audio
Operating instructions continued
Using the Tuner

- Press the FM Tuner button on the front panel or remote control to select Tuner mode.
- Press the Mode/Store button on the front panel (or Mode button on the remote control) to select automatic tuning, manual tuning or preset mode.
- Press the Tuning + and Tuning - buttons (or the ◀ and ▶ arrow buttons on the remote) to select the station you want to listen to.
In automatic tuning mode the unit scans to the next strong station. In manual tuning mode the user can step manually through the frequencies. In preset mode the unit cycles through the presets only.
Two FM modes are available, stereo and mono - Press the Stereo Mono button on the remote to alternate between Stereo mode and Mono mode. If the Display button is pressed, the RDS station names of FM stations will be displayed if available.
Storing stations
- Tune in a station you wish to store as explained previously.
- Press and hold the Mode/Store button (or use the Store button on the remote) for 5 seconds.
- Use the Tuning+/- buttons to select a preset station number (1-15). The station number will be displayed on the screen.
- Press the Mode/Store button (or use the Store button on the remote) to memorise the frequency.
Radio Data Systems (RDS)
RDS is a method for the transmission of additional information from local radio stations. RDS will only work if the local broadcasting stations have RDS transmission and the signal is strong enough.
Press the Info button on the remote and go through the displayed functions. There are functions for PS, PTY, CT and RT:
PS (Station Name) - current station name will be shown
PTY (Program Type) - current name type of the program will be shown
CT (Clock/Time) - current time from Radio Station will be displayed.
Note: Clock/Time will be only transmitted from local radio station once a minute. If the Clock - Time is not available the message "NO CT" will appear briefly on the display.
RT (Radiotext) - Some Text messages will be shown.
Lip sync
The 351R can if required apply a small delay to the audio playback to resynchronise it to any video playback which appears to be behind the audio in time.
This can sometimes happen if the video is slightly delayed by a player or TV performing a lot of video processing.

Pressing the Lip Sync button on the remote will bring up the current Lip Sync value on the 351Rs main display and allow adjustments in 10mS (10 thousandths of a second) increments.
Setting the Lip sync value to 0 causes Lip Sync delay to be turned off.

Note: The Lip sync value is stored and recalled separately for each source.
Audio Return Channel
The 351R supports an Audio Return Channel (ARC) function from TVs that also support this function (which must feature an HDMI1.4 input and have actually implemented the ARC feature, see your TVs manual).
ARC allows a TV to send audio back down its incoming HDMI lead to the 351Rs HDMI output socket.
This function allows the 351R to play back the audio from a TVs built-in terrestrial cable or satellite tuner whilst you watch it's picture.
azur 3518
| Audio In. Select | BD/DVD | HDMI <> |
| Tone/Sub Config. | CD | HDMI <> |
| Speaker Config. | VIDEO | HDMI <> |
| Speaker Distance | AUX | HDMI <> |
| Speaker Level | ||
| Speaker Xover | HDMI TV ARC | Enabled <> |
| Auto Setup | ||
| Dolby/DTS Setup | ||
| OSD Setup |
Quit : [I/O] Enter : [ENTER]
To enable the use of ARC, press the OSD button on the remote and navigate to the 'Audio In. Select' menu, select the HDMI TV- ARC and use the ◀/▶ buttons to select the Enabled setting.
Using ARC
ARC can be started in one of two ways. If your TV supports it there may be a menu item to start ARC on your TV.
Your TV then sends commands to the 351R which cause it to start an ARC session and 'TV-ARC' will appear on the front panel display automatically.
Some TVs may also start an ARC session whenever you select the in-built tuner and stop when you select another source.
Note: On many TVs their CEC/HDMI Link (which is often renamed as Vieralink or AnyNet etc.) must be turned on for ARC to function
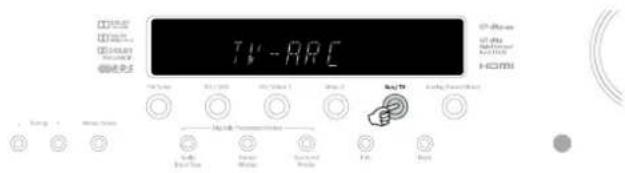
Alternatively you can start ARC by pressing the Aux/TV button twice on the 351R (as long as TV-ARC has been enabled in the 351Rs OSD as above).
The first press selects Aux/TV, the second selects ARC and 'TV-ARC' appears on the front panel display. The 351R will then send commands to the TV over HDMI to try to start an ARC session.
To finish ARC simply disengage it on your TV or press a different source button on the 351R.
Advanced setup
For most users the basic three stage setup process should be sufficient for normal use. However, the 351R also features many more advanced settings for users who wish to further customise the settings and operation to personal preference.
Sub crossovers and bass management
As covered in the '351R Setup' section the 351R performs bass management for any speaker that is set to 'Small' in the OSD. This means that bass for speakers that are unable to reproduce bass effectively is instead routed to the subwoofer.
| azur 351R | ||
| Audio In. Select | Front L/R | 80Hz <> |
| Tuna/Sub Config. | Center | 80Hz <> |
| Speaker Config. | Surr. L/R | 80Hz <> |
| Speaker Distance | ||
| Speaker Level | ||
| Speaker Xover | ||
| Auto Setup | ||
| Dolby/DTS Setup | ||
| OSD Setup | ||
The crossover adjustments in the Speaker crossover menu are used to determine the point as which this transition is made. In other words they set the frequency below which bass is routed away from any 'Small' speakers and into the subwoofer channel. It should be understood that bass sent to the subwoofer by bass management is different to bass encoded into the surround-sound material as a dedicated Low Frequency Effects channel.
If the source material contains a separate LFE channel (i.e. DD or DTS material) this is always routed to the subwoofer (if it is On) and is not affected by the crossover setting. Some encoding types (Such as Dolby Dolby Pro Logic II and Neo:6) do not actually have a LFE channel.
The default setting for all bass management crossovers is 80Hz and is a good global starting point. If you do not wish to make any adjustments simply leave all crossovers at this default setting.
Note: These settings are actually only used for speakers that have been set to Small in the Speaker Configuration Menu.
For advanced users it is however possible to adjust the speaker crossovers used for any speakers set as 'Small' independently to allow for the fact that you may wish to direct bass away from front floorstanding speakers (and to the Subwoofer) at perhaps 50Hz but away from Surround Left and Rights at perhaps 100Hz. If you wish to make these adjustments it is best to consult your loudspeaker manufacturers documentation or contact your dealer to determine the frequency response of your system and where each speaker types bass response starts to tail off (often called the 3dB or 6dB roll off/cutoff point). This would be approximately the point the corresponding crossover should be set to.
Tone/Sub configuration
Select the 'Tone/Sub Config.' menu:
| azur 351R | ||
| Audio In. Select | Bass | 0dB <> |
| Tone/Sub Config. | Trable | 0dB <> |
| Speaker Config. | LFE Trim | 0dB <> |
| Speaker Distance | DD/DTS Sub Trim | 0dB <> |
| Speaker Level | DD/DTS Bass Aug. | Off <> |
| Speaker Xover | PLII Sub Trim | 0dB <> |
| Auto Setup | PLII Bass Aug | Off <> |
| Dolby/DTS Setup | Stereo+Sub Trim | 0dB <> |
| OSD Setup | ||
quit : [I/O] Enter : [ENTER]
The Bass response can be adjusted +/- 10dB @ 100Hz (shelving). The Treble response can be adjusted +/-10dB @ 10kHz (shelving). The "Tone" icon will light up on the display if these controls are adjusted away from 0dB (flat). The subwoofer crossover point can also be adjusted from 40 to 150Hz in 10Hz steps and also to 200Hz.
The 351R incorporates a couple of advanced Bass Management features. The overall Sub Level for DD/DTS modes, Dolby Pro Logic II/Neo:6 modes and Stereo + Sub mode can be set to different levels. This can be useful if you prefer to have a high level of Sub operation whilst watching movies but a lower level for music playback. The three levels are simply adjusted by up to +/-5dB in the OSD. The second feature is that the way Bass Management is applied can be changed.
In normal operation (Bass Augment Off) if the Front speakers are set to 'Small' (in the 'Speaker Config' menu) their bass is re-directed by high-pass filtering the Fronts and sending that bass to the Sub channel (i.e. bass is removed from the Fronts and sent to the Sub). If they are set to 'Large' no filtering takes place and no bass is sent from them to the Sub channel.
However with the Bass Augment function On and the Front speakers set to 'Large', bass from the Front Left and Right is now sent to the Sub channel without any filtering of the Front Left and Right taking place (i.e. these channels remain full range). In other words, the bass in the Sub channel is augmented by extra bass from the Front Left and Right channels. If the Front Left and Right are set 'Small', Bass Augment has no effect and operation is the same as for Bass Augment Off.
Bass Augment can be On or Off separately for DD/DTS or Dolby Pro Logic II/Neo:6 operation.
There is no Bass Augment function for Stereo + Sub mode because in this mode if the Front speakers are set to 'Large' they will actually always be unfiltered.
Bass Augment can be a useful function with Dolby Pro Logic II and Neo:6 material because these encoding types do not include an LFE Channel. This would normally mean that if all the speakers in your setup were set to 'Large', the subwoofer would in fact be inactive (as no bass has been re-directed plus there is no LFE channel). If it is desired to have the subwoofer running with all Large Speakers and these encoding types, enable Bass Augment for Dolby Pro Logic II/Neo6 and then set the Crossover points and levels by ear. A Sub channel will now be created from the Front Left and Right channels without filtering them. As with all adjustments it is a good idea to experiment to determine what works best with your particular setup.
Note: These adjustments work in all digitally processed Stereo or Surround modes but not in Analogue Stereo Direct mode.
The LFE channel (for DD / DTS material) can also be trimmed by up to 10dB in 1dB steps useful for late night listening or other situations where it might be desired to reduce the low frequency effect level perhaps temporarily.
Remember the LFE is the Low Frequency Effects channel encoded into the disc and is different to the over all sub level which can include bass management from the other speakers.
Bass and Treble adjustments can also be made from the remote handset without entering the OSD by pressing the Bass/Treble button on the remote and then using the volume up and down buttons.
OSD setup
On-Screen Display is available on all video outputs.
| azur 351R | ||
| Audio In. Select | Language | English <> |
| Tone/Sub Config. | OSD Format | 576P |
| Speaker Config. | Software Version | 1.2 E |
| Speaker Distance | ||
| Speaker Level | ||
| Speaker Xover | ||
| Auto Setup | ||
| Dolby/DTS Setup | ||
| OSD Setup | ||
Quit : [I/O] Enter : [ENTER]
The OSD can be shown in several different languages. To change the OSD language highlight the 'Language' menu and use the Left and Right arrows to select between English, Dutch, French, German, Spanish, Italian, Norwegian, Swedish and Danish. Press the OSD button again to exit and save the options.
The OSD format can also be set to 576P PAL at 50Hz or 480P NTSC at 60Hz. Note, incorrect setting of the output can cause loss of picture on TVs that do not support the selected output type.
The last item is the software version, it may be useful to quote this in the event of contacting our support centre.
Dolby/DTS adjustments
| Audio In. Select | Panorama | Off <> |
| Tone/sub Config. | Center width | 0 <> |
| Speaker Config. | Dimension | 3 <> |
| Speaker Distance | DRC | Off <> |
| Speaker Level | ||
| Speaker Xovar | ||
| Auto Setup | ||
| Dolby/DTS Setup | ||
| OSD Setup |
Quit : [I/O] Enter : [ENTER]
The first three adjustments affect Dolby Pro Logic II processing (or post-processing) in Music mode only. Movie and Game modes where available are preset as part of their specification to match the encoding or provide a specific effect. These adjustments have no affect in these modes.
1. Panorama mode
A Dolby Pro Logic II mode that extends the front Stereo image to the surround sound speakers for a more enveloping experience. This mode can be either On or Off.
2. Centre Width
Allows gradual adjustment of the centre image from being produced only by the Centre speaker (Setting 0) through levels of being spread between the centre channel and Left and Right speakers to finally being produced by the Front Left and Right speakers only (Phantom Centre, Setting 7). Useful in optimising the Front/Centre/Right soundfield for best integration of the 3 speakers. Best tuned by ear.
3. Dimension
Adjusts the soundfield to be gradually shifted from the front of the room to the back to suit taste, speaker positioning and size of room. Setting 0 has the image furthest forward, 6 furthest back.
All three adjustments are a matter of personal preference, experiment for the settings that you prefer when you are using Dolby Pro Logic II decoding.
4. Dynamic range control
This setting controls the dynamic range of Dolby Digital movie soundtracks by compressing the audio to limit the difference in level between loud and quiet passages in the movie.
This can be a useful feature when watching movies late at night for instance. Three settings are possible:
| Audio In. Select | Panorama | Off <> |
| Tone/Sub Config. | Center Width | 0 <> |
| Speaker Config. | Dimension | 3 <> |
| Speaker Distance | DRC | Auto <> |
| Speaker Level | ||
| Speaker Xovar | ||
| Auto Setup | ||
| Dolby/Dts setup | ||
| OSD Setup | ||
Quit : [I/O] Enter : [ENTER]
Auto - Compression is always applied for Dolby Digital and Dolby Digital Plus soundtracks. The application and amount of compression to Dolby True HD soundtracks is dictated by the soundtrack itself.
Off - No Compression (normal full dynamic range playback)
On - Compression is always applied for all Dolby soundtracks (reduced dynamic range playback)
Custom installation (C.I.) use
An RS232 port is featured which allows the 351R to be controlled by C.I. systems.
A full code table and RS232 protocol for this product is available on the Cambridge Audio website at www.cambridge-audio.com.
Reset/Back-up memory
The 351R has a function that preserves the preset memory and other settings. In the event of a power failure, or if the power cord of the unit is disconnected from the mains outlet, the back-up memory will preserve the preset memory for approximately one week. If the power supply is interrupted for 7 days or longer, the memory settings will be erased.
If it is desired to reset all settings to their factory defaults (or in the unlikely event that the unit locks up due to an electrical discharge etc), with the unit on and out of Standby mode, press and hold the FM Tuner and Analogue Stereo Direct buttons on the front panel for three seconds.
"RESET" will appear briefly on the front panel display before returning to Standby mode.

Troubleshooting
A low hum or buzz sound can be heard
Power cords or lighting placed near this product.
Analogue inputs not connected securely.
Sound is not audible from one or more channels
Speaker connections disconnected.
Speaker set to "None" in OSD setup menu.
Sound cuts off when listening to music or there is no sound even though power is ON
Speaker impedance is less than prescribed for the 351R.
The unit is not adequately ventilated and may be overheating.
Low bass or "phasey" response
Speaker polarity (+/-) of one or more speakers is reversed.
An unusual hissing noise is heard when listening to a radio broadcast in stereo, but not heard when listening in mono
A slight noise may be heard because the method used for modulation of FM stereo broadcasts is different than that used for mono broadcasts.
Aerial quality also effects the level of hiss heard.
Noise is excessive in both stereo and monaural radio broadcasts
Poor location and/or direction of the antenna.
Transmitting station is too far away.
No sound from the rear speakers
Source being played is not recorded in surround sound.
Speaker/s set to "None" in OSD setup menu.
A stereo mode has been selected.
No sound from the centre speaker
Centre speaker has been set to "None" in OSD setup menu.
A stereo mode has been selected.
No sound from the subwoofer
Sub has been set to 'Off' in the OSD setup menu or via the remote.
DTS Neo:6, DD Dolby Pro Logic II modes (which have no LFE channel) have been selected with all speakers set to "Large" (and bass augment off).
Remote control is not working
The batteries are flat.
The remote is too far from the receiver or out of the effective range.
No sound from speakers when connected to a digital input or HDMI
Audio input type is set to analogue (check display). Press the Audio Input Type button to switch to digital or HDMI.
No sound from speakers when connected to an analogue input
Audio input type is set to digital. Press the Audio Input Type button to switch to analogue (check display).
Audio input type can also be set in the Input/Output Setup menu of the OSD.
Technical specifications
Audio
Power Output All Channels : 70 watts rms per channel, 8 ohms (two channels driven)
All Channels: 50 watts rms per channel, 8 ohms (all 5 channels driven)
THD <0.006% @1kHz
Crosstalk <-60dB @ 1kHz
Frequency response 10Hz - 20kHz -1dB
S/N Ratio >80dB 'A' weighted
Audio Input Impedance / 47kOhms / 175mV or greater Sensitivity
Digital Input Impedance 75 ohms (Coaxial/S/P DIF)
Tone Control
Bass +/-10dB @ 100Hz
Treble +/-10dB @ 10kHz
Tuner
- FM mode 87.5-108MHz, 75 ohm coaxial aerial
HDMI
HDMI 1.4
EIA/CEA - 861D
HDCP 1.1
All audio modes supported except reception of native Direct Stream Digital (DSD).
ARC and 3D-TV/deep colour pass through supported.
CEC and HEC not supported. (except as necessary for ARC)
General
Architecture Cirrus Logic CS42518 24 Bit 192kHz
capable CODEC for surround channels +
24 Bit 2 channel A/D conversion
Cirrus Logic CS497024 Dual 32 Bit DSP
for surround decoding
Audio Inputs 4 Line Level Analogue, FM Tuner, 2 Digital
Co-axial, 1 Digital Optical
Video Inputs 4 HDMI (1.4a)
Main Audio Outputs 5 Amplified Speaker Outputs
1 RCA/Phono subwoofer output
Main Video Output 1 HDMI (1.4a)
Recording Audio Outputs 1 Line Level Analogue
Other connections 1 14 " / 6.35mm Headphone Output
(32 To 600 ohms recommended)
1 RS232C
1 IEC type mains inlet
Standby power consumption <0.5w
Max power consumption 500w
Dimensions - H x W x D 100 x 430 x 330mm
Weight 8.2kg (18lbs)
Cambridge Audio is a brand of Audio Partnership Plc
Registered Office: Gallery Court, Hankey Place
London SE1 4BB, United Kingdom
Registered in England No. 2953313
www.cambridge-audio.com

natural_image
Line drawing of a computer monitor with ventilation slots and buttons (no text or symbols)
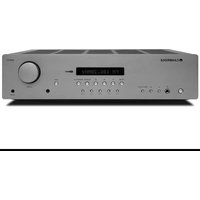
- azur
- Cambridge Audio
- Make sure you register your purchase.
- Visit: www.cambridge-audio.com/sts
- By registering, you'll be the first to know about:
- Contents
- Introduction Before connecting
- ● Cambridge Audio
- Important safety instructions
- WARNING
- WEEE symbol
- CE mark
- C-Tick mark
- Gost-R mark
- FCC regulations
- Ventilation
- Positioning
- Power sources
- Overloading
- Cleaning
- Battery disposal
- Loudspeakers
- Servicing
- IMPORTANT
- Limited warranty
- Plug fitting instructions (UK only)
- Front panel connections
- ① Standby/On
- ② Phones
- ③ Tuning +/-
- ④ Mode/Store
- ⑤ Display
- ⑥ FM tuner
- ⑦ BD/DVD
- ⑧ CD/Video 1
- ⑨ Video 2
- ⑩ Aux/TV
- ⑪ Analogue stereo direct
- -⑫ Audio input type
- -13 Stereo modes
- -⑭ Surround modes
- Info
- Mute
- ⑰ Infrared sensor
- ⑱ Volume
- ⑲ Mic input
- Rear panel connections
- ① Service/Normal
- ② Digital inputs
- ③ & ④ HDMI
- ⑤ RS232C
- ⑥ FM antenna
- ⑦ & ⑨ Analogue audio inputs
- ⑧ Record Out
- ⑩ Subwoofer Out
- ⑪ Speaker terminals
- ⑫ Power On/Off
- ⑬ Mains voltage selector switch
- ⑭ Mains power lead
- Remote control
- Mute
- Standby/On
- Stereo mono
- Store
- Mode
- Info
- On-Screen Display (OSD)
- Stereo modes
- Surround modes
- Audio In type
- Lip sync
- Bass/Treble
- Analogue stereo direct
- Volume Up/Down
- ◀▶Tune/Left & Right
- Enter
- Front panel display Loudspeaker connections
- ① HDMI inputs
- ② TONE
- ③ PCM
- ④ Surround decoding mode indicators (PCM, Dolby Digital, DTS etc)
- ⑤ Main information display
- ⑥ Output channel indicators
- Aerial connections
- Analogue audio connections
- Digital audio connections
- HDMI input connections
- Video output connection (HDMI)
- 351R setup
- Speaker configuration
- Front Left and Right speakers
- Centre speaker
- Surround Left and Right speakers
- Subwoofer
- Speaker setup
- Speaker Delay
- Level calibration
- CAMCAS Auto speaker setup for Distance/Level
- Source setup
- Surround sound modes
- DOLBY TRUEHD
- DOLBY DIGITAL PLUS
- dts-HD Master Audio
- dts-HD DTS-HD High Resolution Audio
- DOLBY DIGITAL
- dts Digital Surround
- DOLBY
- PRO LOGIC II
- dts
- dts Digital Surround | 96/24
- DSP modes
- Stereo/Stereo + Sub
- Other modes
- Multi Channel PCM
- Operating instructions
- Selecting the source
- Decode modes
- Key symbols
- Using the Tuner
- Storing stations
- Radio Data Systems (RDS)
- Audio Return Channel
- Using ARC
- Advanced setup
- Sub crossovers and bass management
- Tone/Sub configuration
- OSD setup
- Dolby/DTS adjustments
- Panorama mode
- Centre Width
- Dimension
- Dynamic range control
- Custom installation (C.I.) use
- Reset/Back-up memory
- Troubleshooting
- A low hum or buzz sound can be heard
- Sound is not audible from one or more channels
- Low bass or "phasey" response
- An unusual hissing noise is heard when listening to a radio broadcast in stereo, but not heard when listening in mono
- Noise is excessive in both stereo and monaural radio broadcasts
- No sound from the rear speakers
- No sound from the centre speaker
- No sound from the subwoofer
- Remote control is not working
- No sound from speakers when connected to a digital input or HDMI
- No sound from speakers when connected to an analogue input
- Technical specifications
- Audio
- HDMI
- General
Brand : CAMBRIDGE
Model : 351R
Category : Receiver