
B-505 - Wall storage furniture Bobrick - Free user manual and instructions
Find the device manual for free B-505 Bobrick in PDF.


| Product Type | Commercial Washroom Dispenser (Uncategorized) |
| Brand | Bobrick |
| Model | B-505 |
| Dimensions (H x W x D) | 12 x 10 x 5 inches (approx.) |
| Weight | 3.5 lbs (approx.) |
| Material | Stainless Steel (Type 304) |
| Finish | Satin or Polished Chrome |
| Mounting | Wall-mounted with included hardware |
| Capacity | Holds standard refill rolls/packs |
| Power Source | Manual operation (no batteries) |
| Compliance | ADA compliant for accessibility |
| Installation | Requires basic tools; instructions included |
| Maintenance | Wipe with damp cloth; mild detergent |
| Warranty | 1 year limited warranty |
| Country of Origin | USA (typical for Bobrick) |
Frequently Asked Questions - B-505 Bobrick
User questions about B-505 Bobrick
0 question about this device. Answer the ones you know or ask your own.
Ask a new question about this device
Download the instructions for your Wall storage furniture in PDF format for free! Find your manual B-505 - Bobrick and take your electronic device back in hand. On this page are published all the documents necessary for the use of your device. B-505 by Bobrick.
USER MANUAL B-505 Bobrick
INSTALLATION INSTRUCTIONS
BOBRICK MODEL B-505 SPECIMEN PASS-THRU CABINET
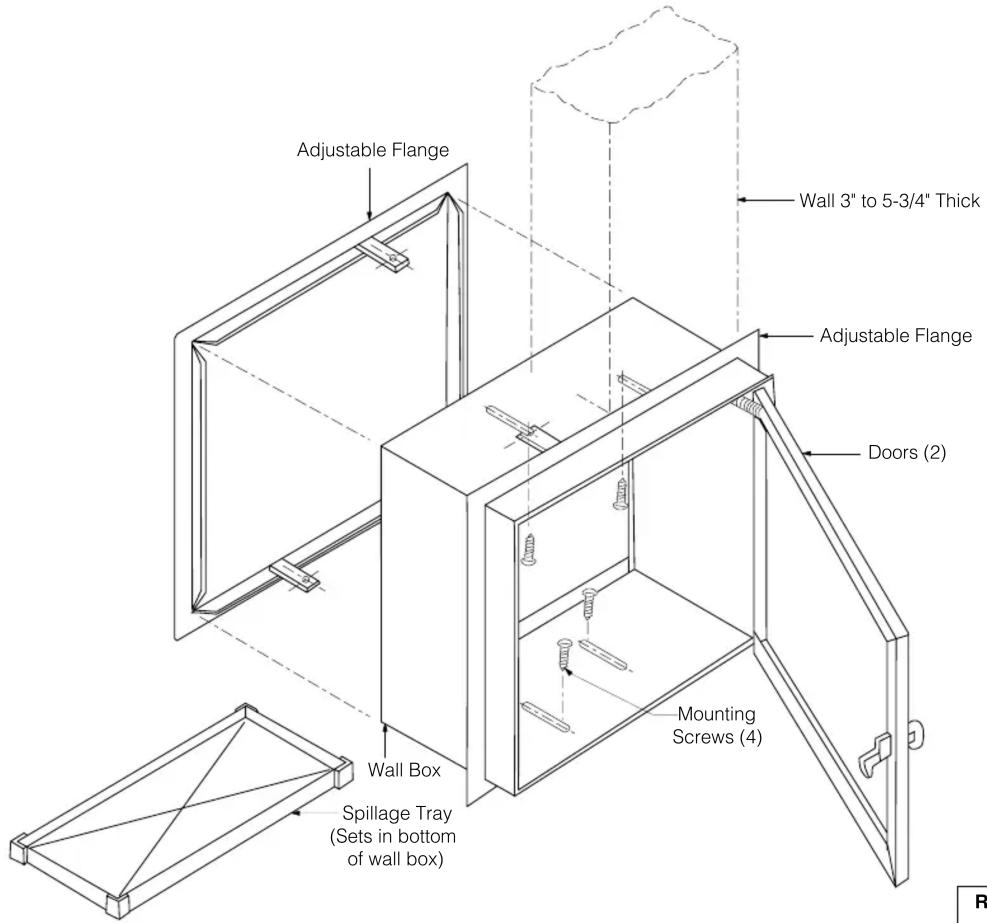
This unit is designed to be mounted within the wall between a restroom and the test lab or other room into which the specimen is to be received. Flanges adjust to fit from 3" to 5-3/4" (75 to 145mm) thick walls. Doors are interlocked so that when one door is opened, the opposite door is lo cked. Supply four (4) #10 x 1/4" (4.8 x 6.4mm) mounting screws to secure unit.
INSTALLATION INSTRUCTIONS
Rough Wall Opening
11-1/2" (290mm) wide
10-7/8" (275mm) high
3" to 5-3/4"
(75 to 145mm)
recessed depth
1. Prepare framed rough wall opening 11-1/2" wide x 10-7/8" high (290 x 275mm).
2. Open one of the doors and remove the spillage tray.
3. Slide one flange over the wall box so that holes in mounting tabs are aligned with slots in wall box.
4. Position wall box and flange so that bottom of wall box is level and unit is centered in wall. See diagram above.
5. Slide second flange into place, aligning tabs and screw holes.
6. Install mounting screws through wall box and flange tabs, into framing. Caution: Do not overtighten screws or rack wall box.
7. Check the door latching mechanism to assure that both doors are unlocked when both doors are closed. Also check to see that each door locks when opposite door is opened.
8. Install spillage tray inside cabinet. The spillage tray is removable for cleaning.

© 2006 by Bobrick Washroom Equipment, Inc.
Form No. 505-69 Revised 7/06 Printed in U.S.A.
In the U.S.A.: BOBRICK WASHROOM EQUIPMENT, INC.
200 Commerce Drive, Clifton Park, New York 12065-1350 • Tel: (518) 877-7444 • FAX: 518-877-5029 11611 Hart Street, North Hollywood, California 91605-5882 • Tel: (818) 982-9600 • FAX: 818-503-1102 225 Bobrick Drive, Jackson, Tennessee 38301-5635 • Tel: (901) 424-7000 • FAX: 901-424-7800
In Canada: BOBRICK WASHROOM EQUIPMENT COMPANY
45 Rolark Drive, Scarborough, Ontario M1R 3B1 • Tel: (416) 298-1611 • FAX: 416-298-6351
Brand : Bobrick
Model : B-505
Category : Wall storage furniture