
Trooper PLUS 3-in-1 - Car seat Baby Trend - Free user manual and instructions
Find the device manual for free Trooper PLUS 3-in-1 Baby Trend in PDF.


| Product Type | 3-in-1 Car Seat (Rear-facing, Forward-facing, Booster) |
| Brand | Baby Trend |
| Model | Trooper PLUS 3-in-1 |
| Weight Range (Rear-facing) | 5 to 40 lbs (2.3 to 18.1 kg) |
| Height Range (Rear-facing) | 19 to 40 inches (48.3 to 101.6 cm) |
| Weight Range (Forward-facing) | 22 to 65 lbs (10 to 29.5 kg) |
| Height Range (Forward-facing) | 29 to 49 inches (73.7 to 124.5 cm) |
| Weight Range (Booster) | 40 to 100 lbs (18.1 to 45.4 kg) |
| Height Range (Booster) | 43 to 57 inches (109.2 to 144.8 cm) |
| Dimensions (Overall) | Approx. 20 x 18 x 25 inches (51 x 46 x 63.5 cm) |
| Weight of Seat | Approx. 20 lbs (9.1 kg) |
| Installation Method | 5-point harness, LATCH system, or vehicle seat belt |
| Harness Type | 5-point harness with adjustable straps |
| Harness Adjustability | 4 harness heights, 2 buckle positions |
| Recline Positions | Multiple recline positions for rear- and forward-facing |
| Cup Holders | 2 retractable cup holders |
| Padding | Removable, washable body pillow and headrest |
| Cleaning Instructions | Hand wash seat pad with mild soap, air dry; wipe plastic with damp cloth |
| Safety Standards | Meets or exceeds US Federal Safety Standards (FMVSS 213) |
| Expiration | 6 years from date of manufacture |
| Warranty | 1 year limited warranty against defects |
| Spare Parts Availability | Contact Baby Trend customer service for replacement parts |
Frequently Asked Questions - Trooper PLUS 3-in-1 Baby Trend
User questions about Trooper PLUS 3-in-1 Baby Trend
0 question about this device. Answer the ones you know or ask your own.
Ask a new question about this device
Download the instructions for your Car seat in PDF format for free! Find your manual Trooper PLUS 3-in-1 - Baby Trend and take your electronic device back in hand. On this page are published all the documents necessary for the use of your device. Trooper PLUS 3-in-1 by Baby Trend.
USER MANUAL Trooper PLUS 3-in-1 Baby Trend
Store this manual in the pocket provided on the underside of the seat cover as illustrated above.
⚠ WARNING
Carefully read and understand all instructions and warnings in this manual. Failure to properly use this Car Seat increases the risk of SERIOUS INJURY or DEATH in a sudden stop or crash.
KEEP INSTRUCTIONS FOR FUTURE USE.
Store this manual in the pocket provided on the side of the car seat base.
Trooper™ PLUS 3-in-1
Convertible Car Seat
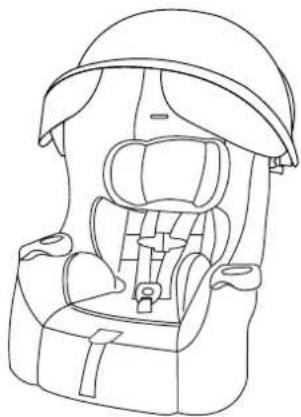
natural_image
Line drawing of a car seat with a helmet and seatbelt (no text or symbols)
Scan QR Code for Trooper™ how to videos
OWNER'S MANUAL
Table of Contents Table of Contents
1.0 General Warnings and Information .... 3
2.0 Use Recommendations .... 5
2.1 Rear facing seat requirements.... 5
2.2 Forward facing seat requirements.... 6
3.0 Car Seat Parts....7
4.0 Selecting a Vehicle Seating Location....9
4.1 Overall Considerations In Selecting A Location....9
4.2 Proper Use And Requirements....11
4.3 Safe Vehicle Seat Belt Systems.... 12
4.4 Locking Clip Installation 15
4.5 Unsafe Vehicle Seat Belt Systems.... 16
4.6 Preparation for Installation in Vehicle.... 18
4.7 Installation with LATCH.... 19
4.8 LATCH - Top Tether Anchor Locations 20
5.0 Installation and Use 21
5.1 Child Placement In Car Seat 22
5.1.1 Installation Diagrams.... 23
5.2 Rear Facing Installation with Lap/shoulder Belt 24
5.3 Rear Facing Installation with Lap Belt 26
5.4 LATCH - Rear Facing Installation with LATCH Lower Anchor..... 28
5.5 Forward Facing Installation with Lap/Shoulder Belt and Top Tether 30
5.6 Forward Facing Installation with Lap Belt and Top Tether...... 32
5.7 LATCH - Forward Facing Installation with Lower Anchor and Top Tether 34
5.8 Aircraft Installation.... 35
5.9 Child Placement In The Car Seat 36
5.10 Shoulder Height Adjustment.... 38
5.11 Crotch Buckle Adjustment.... 39
5.12 Seat Fabric Removal and laundering.... 40
5.13 Low Birth Weight Harness Shortening Routing.... 41
5.14 Pillow, Insert and Harness Covers Use 45
5.15 Harness Hip and Buckle Use Positions.... 45
5.16 Cup Holder Removal Installation and Cleaning 47
5.17 Securing The Pillow 48
5.18 Pool Noodle/Rolled Towel Elevation 48
5.19 Canopy Use Positions 49
5.20 Canopy Installation and Removal 50
5.21 Canopy Retention Installation 50
6.0 Safety Checklist/Safe Practices.... 51
6.1 Safety Checklist....51
7.0 Additional Information.... 52
7.1 Certification 52
7.2 Aircraft Use 52
7.3 Vehicle Seat Protection....52
7.4 Instruction Manual Storage 52
7.5 Car Seat Useful Life.... 52
8.0 Registration Information 53
9.0 Care and Cleaning....54
9.1 Removing The Seat Fabric, Insert and Pillow.... 54
9.2 Cleaning The Seat Fabric, Insert and Pillow.... 54
9.3 Cleaning Seat Parts and Buckles.... 54
9.4 Replacement Parts.... 54
10.0 Warranty....55

Scan QR Code for Baby Trend™ Trooper™ how to videos.
Copyright © 2024, Baby Trend, Inc. Copyright © 2024, Baby Trend, Inc.
1.0 General Warnings and Information 1
WARNING!
DEATH or SERIOUS INJURY can occur:
- Failure to follow these instructions and car seat labels can result in injury or death to a child from striking the vehicle's interior during a sudden stop or crash.
- Even if the car seat seems easy to use on your own, it is important to read these instructions and the vehicle owner's manual for details you might miss.
- The instructions in this manual and in your vehicle owner's manual must be followed carefully. If there is a conflict between the two, the vehicle owner's manual must be followed if it relates to the vehicles seat belt, LATCH or airbags.
- Failure to use the vehicle seat belt or to adjust it properly can result in your child striking the vehicle's interior during a sudden stop or crash. Serious injury or death can occur.
- DO NOT allow others (babysitters, friends, grandparents, etc.). To use this car seat unless they read and understand the instructions and labels and can demonstrate proper use to your satisfaction.
- Use only car seat accessories manufactured by Baby Trend®. Accessories can affect your child's safety in a sudden stop or crash.
- DO NOT modify or attach any toys, seat fabric, or other items to this car seat. Untested modifications could result in injury in a crash.
neral Warnings and Information
- Secure this car seat with the vehicle seat belt or LATCH Lower anchor connectors at all times (even when there is no child in it). An unsecured car seat can injure others if a crash occurs.
- Direct sunlight can make car seat surfaces hot enough to burn your child. Use caution and check the vehicle and car seat on hot, sunny days.
- NEVER leave child unattended under any circumstance.
- DO NOT use this car seat if it has been in a crash. (There may be hidden damage and it must be replaced). Your insurance company may provide some assistance replacing this car seat.
- DO NOT use this car seat if it is damaged in any way or has missing parts.
- STOP USING THIS car seat AND PROPERLY DISPOSE after the date on the back of the seat. PROPERLY DISPOSE in a dark trash bag. DO NOT sell to a thrift or consignment shop, at garage sales or flea markets.
- NEVER use this car seat in the home, on boats, in a motor home with side facing seat, low speed vehicles, golf carts, all terrain or other non certified uses. Only use the car seat in Vehicles and Aircraft.
- NEVER use this car seat in any vehicle seating position equipped with an active air bag. Read your vehicle's owners manual to see how to turn off your airbag if you have no back seat or a child must ride in the front seat covers. For side airbags see section 4.1 (Page 11).
The National Highway Traffic Safety Administration (NHTSA) recommends that children remain in a rear-facing car seat until they reach the height or weight limit set by the car seat's manufacturer, which is usually up to age 3.
Copyright © 2025, Baby Trend, Inc. Copyright © 2025, Baby Trend, Inc.
2.0 Use Recommendations 2.0 Use Record
The American Academy of Pediatrics and Baby Trend recommend children remain in a rear-facing car seat for as long as possible, until they reach the highest weight or height allowed by their seat.
2.1 Rear facing seat requirements
Weight and Height Requirements:
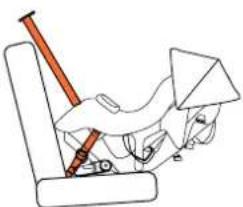
- The car seat, in a rear facing position (Fig. 5a) is designed for use by children whose:
- Weight is between 4 and 40 lbs (1.81 and 18.1 kg), and
- Height is 40 inches (102 cm) or less.
- Top of head has NOT reached 1" from top of seatback (Fig. 5b).
Child MUST meet ALL of these requirements to use this car seat rear facing.
natural_image
Simple line drawing of a hand using a tool to lift a person's arm, no text or symbols presentFig. 5a
1in. (2.54 cm)
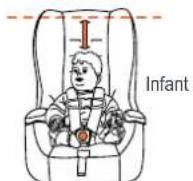
Fig. 5b
dations
2.2 Forward facing seat requirements Weight and Height Requirements:
- This car seat, installed in a forward facing position, is designed for use by children whose:
- Weight is between 30 to 65 lb (13.6 to 29.5 kg), and
- Height is 50 inches (127 cm) or less.
- Age is 2 years old.
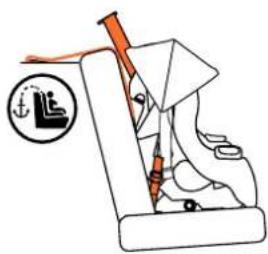
- The top of the child's ears must be at or below the top of the car seat (Fig. 6a).
Child MUST meet ALL of these requirements to use the car seat forward facing.
Baby Trend recommends children remain in a rear-facing car seat for as long as possible, until they reach the highest weight or height allowed by their seat and are at least 2 years of age.
Baby Trend requires the use of the top tether for installation if the vehicle is equipped with a tether anchor. Please refer to the vehicle owner's manual for tether anchor locations.
Copyright © 2025. Baby Trend, Inc. Copyright © 2025. Baby Trend, Inc.
natural_image
Illustration of a mechanical device with a tool and a circular symbol (no text or labels)Top Ears Max Height
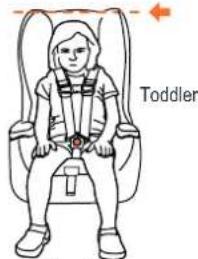
Fig. 6a
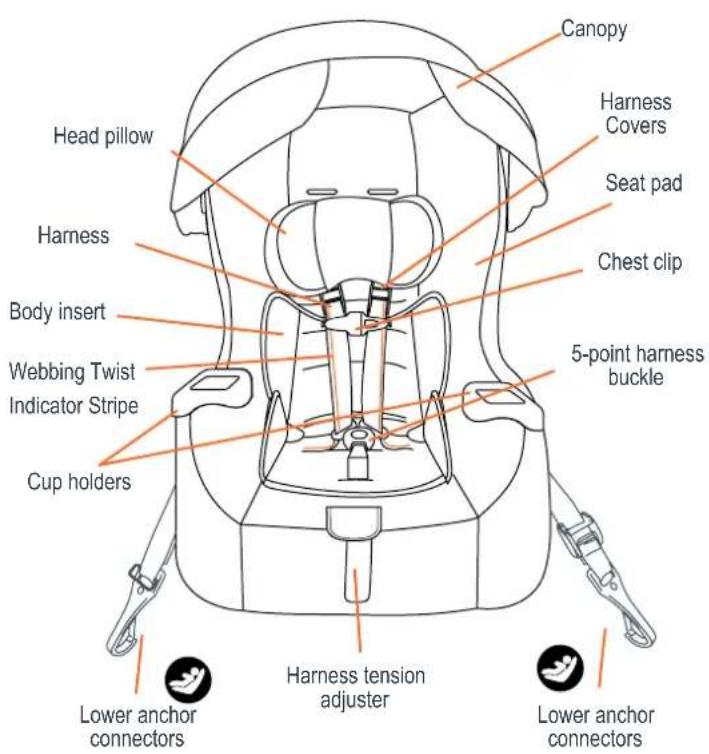
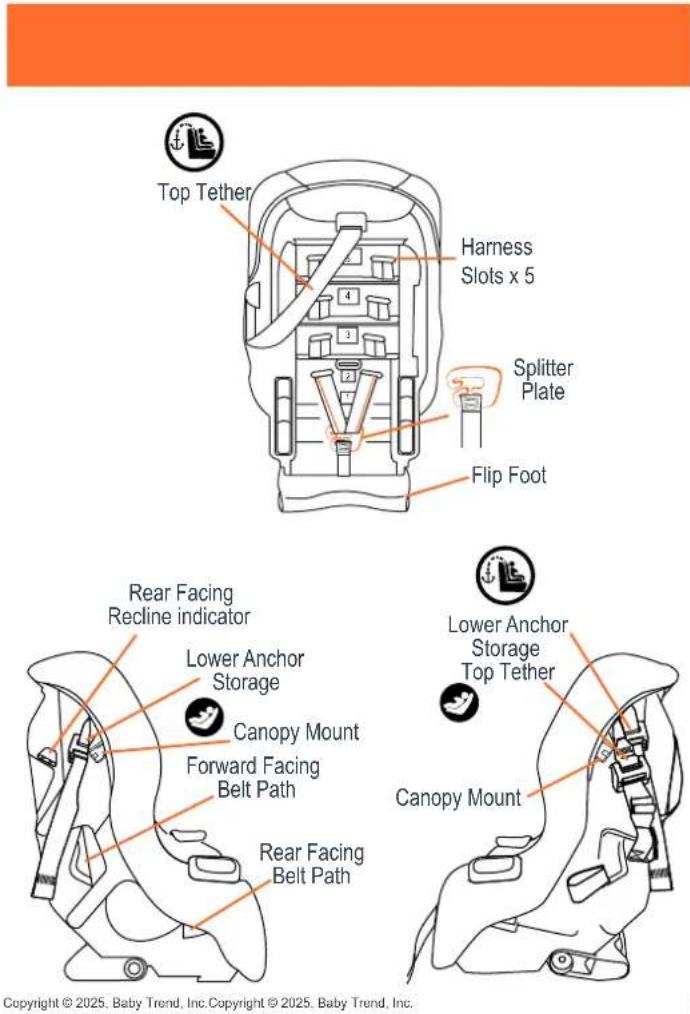
3.0 Car Seat Parts 3.0 Car Seat Parts
Copyright © 2025. Baby Trend, Inc. Copyright © 2025. Baby Trend, Inc.
4.0 Selecting a Vehicle Seating Location
WARNING!
DEATH or SERIOUS INJURY can occur:
• IMPROPER PLACEMENT OF THE CAR SEAT INCREASES THE RISK OF SERIOUS INJURY OR DEATH.
WARNING!
- Not every location within an vehicle may be safe for the installation of this car seat. Car seat must be tightly secured and remain tightly secured at all time. Some vehicles have no seating position installation of a car seat. Improper placement or use of a car seat that is not tightly secured in a vehicle will increase the risk of death or serious injury.
- Please follow the instructions in this manual and in your vehicle owner's manual carefully to ensure proper location and installation of the car seat. If you are uncertain about the proper location of the car seat within the vehicle, contact your vehicle manufacturer directly or through their dealer before using the car seat. You are also invited to call Baby Trend at 1-800-328-7363 for additional information or assistance.
4.1 Overall Considerations in Selecting a Location
- According to accident statistics, children are safer when properly restrained in rear vehicle seating positions, rather than front seating positions.
lecting a Vehicle Seating Location
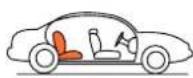
Whenever possible, this car seat should be secured in the rear center, seating position. The rear seat directly behind the front seats NOT in a third row rear seat (Fig. 10a).
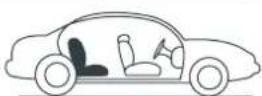
Fig. 10a
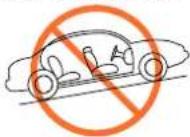
- ONLY place in a forward-facing vehicle seat. DO NOT place this car seat in any vehicle seat that faces to the rear (Fig. 10b).
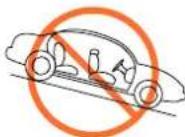
- DO NOT place this car seat in any vehicle seat that faces to either side of the vehicle (Fig. 10c).
• We recommend that you use the center rear seat position as the safest location for the car seat. In addition, whenever possible, have an adult ride in the rear with the child in order to monitor the child.
NOTE: LATCH system may not be available in the center rear seat position. Install with a vehicle seat belt if LATCH is not available.
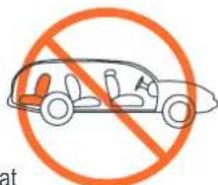
Fig. 10b
- If the driver is the only adult in the vehicle and the child requires constant monitoring, then a vehicle front seating position may be used if there is no passenger side Active Frontal Air bag and all of the following requirements are met for this location.
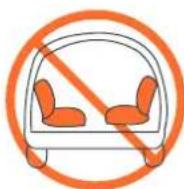
Fig. 10c
4.0 Selecting a Vehicle Seating Location
4.2 Check that the Vehicle Seat Meets the Following Requirements
WARNING!
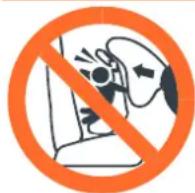
DO NOT place rear-facing child seat on front seat with active frontal air bag. DEATH OR SERIOUS INJURY can occur. The back seat is the safest place for children 12 and under.
- NEVER place this car seat in a vehicle seating location that has an Active Frontal Air Bag! Active Air Bags inflate with great force! An inflating Air Bag can strike a car seat with enough force to cause death or serious injury to your child. If your vehicle is equipped with a front passenger side active air bag, please refer to the vehicle's owner's manual for additional information about active air bags and child car seat installation.
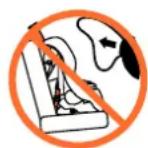
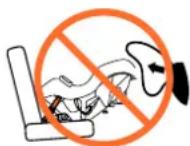
Forward-FacingRear-Facing
- DO NOT use this car seat in a vehicle that has a vehicle seatback that does not lock into place. A seatback that folds forward must have a latch or locking mechanism to prevent it from flying forward and striking the child in a sudden stop or accident.
lecting a Vehicle Seating Location
- Please review your vehicle owner's manual to determine the best location for the car seat or to determine if any locations are unsafe for car seat installation. If you do not have the vehicle owner's manual or the owner's manual does not address child car seat installation, please contact the vehicle manufacturer to obtain this information before using this car seat.
VEHICLE SEAT BELT REQUIREMENTS
WARNING!
DEATH or SERIOUS INJURY can occur:
- THE CAR SEAT MUST BE TIGHTLY SECURED BY THE VEHICLE SEAT BELT AT ALL TIMES. A VARIETY OF VEHICLE SEAT BELT SYSTEMS ARE AVAILABLE IN VEHICLES. SOME OF THESE VEHICLE SEAT BELT SYSTEMS ARE NOT SAFE FOR USE WITH THE CAR SEAT.
Even newer vehicles can have seat belts systems that are NOT safe for use with the car seat. These systems may look safe but their method of operation precludes their use with the car seat. If you are unsure if the vehicle seat belt is safe for use with the car seat, check the vehicle owner's manual or contact the vehicle manufacturer, or your vehicle dealer for additional information.
4.3 SAFE Vehicle Seat Belt Systems
The following vehicle seat belt systems CAN BE USED with the car seat provided that all of the other requirements prescribed in these instructions, including seat position, secure installation and all instructions provided by your vehicle owner's manual, are followed.
Copyright © 2025, Baby Trend, Inc. Copyright © 2025, Baby Trend, Inc.
4.0 Selecting a Vehicle Seating Location
Lap Belts (Manually Adjusted) A lap belt that is manually adjusted and will remain tightly adjusted around the car seat while the vehicle is in motion is suitable for use with the car seat. Pulling the belt through the buckle after the buckle is fastened tightens this type of seat belt (Fig.13a).
Lap Belts with Automatic Locking Retractor (ALR) A lap belt that cannot be lengthened once it is fastened is suitable for use with the car seat. These seat belts often have an automatic locking retractor (ALR) that will allow the belt to be lengthened but once fastened, must be unbuckled and allowed to retract fully before allowing the belt to be lengthened again (Fig. 13b).
Combination Lap/Shoulder Belt with Locking Latch Plate A lap/shoulder combination seat belt with a latch plate that locks the lap belt into position is suitable for use with the car seat (Fig. 13c). Once this type of seat belt is fastened, the latch plate prevents the lap belt from loosening. This combination seat belt does not require a Locking Clip.
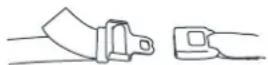
Fig. 13a
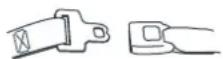
Fig. 13b
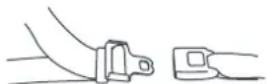
Fig. 13c
4.0 Selecting a Vehicle Seating Location
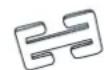
Combination Lap/Shoulder Belt with Sliding Latch Plate A combination lap/shoulder belt with a latch plate that can slide freely along the belt (Fig. 14a), is suitable for use with this car seat when the belt is locked to prevent movement of the car seat. If the vehicle belt includes a lockable retractor, the retractor MUST be locked or a locking clip MUST be used. If the vehicle belt does not include a lockable retractor then a locking clip (Fig. 14b), MUST always be used.
Please refer to the vehicle owner's manual to determine if your vehicle lap/shoulder belt includes a lockable retractor and how to lock it.
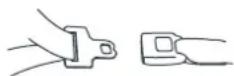
Fig. 14a
Locking clip
Fig. 14b
Contact Baby Trend at 1-800-328-7363 to obtain a Locking Clip.
4.0 Selecting a Vehicle Seating Location
4.4 Locking Clip Installation
Contact Baby Trend 1-800-328-7263 to acquire an approved Locking Clip. Locking Clip can be stored under the seat cover of the car seat (Fig. 15a).
- Route the combination lap shoulder belt through vehicle belt path on car seat and buckle vehicle seat belt.
- Tighten the buckled seat belt by pulling upward on the shoulder belt while pushing down on the car seat.
-
While maintaining downward pressure on the car seat, squeeze the vehicle shoulder belt and lap belt together just above the buckle to prevent it from moving. Unbuckle the vehicle seat belt, being careful to prevent movement of the buckle.
-
Secure the vehicle shoulder belt to the lap belt by using the Locking Clip 1.25 cm (1/2") from the buckle (Fig. 15b).
-
Re-buckle the seat belt and check that the seat belt is tightly adjusted and stays tight. Ensure that locking clip is secure on both belts.
Locking Clip can be stored under the seat cover next to instruction manual.
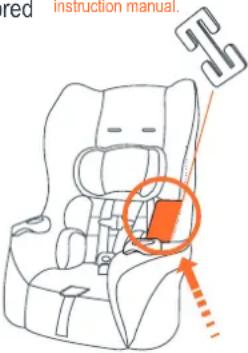
Fig. 15a
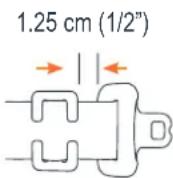
Fig. 15b
Test installation to make sure car seat is secure. If NOT secure, additional belt tightening is required. Repeat steps above until secure.
4.0 Selecting a Vehicle Seating Location
4.5 UNSAFE Vehicle Seat Belt Systems
DO NOT use the following types of seat belt systems with the car seat. These belt systems will not hold the car seat securely in place at all times. In addition, a Locking Clip used with this car seat will NOT make these belt systems safe to use. NEVER USE unsafe vehicle belts systems!
NOTE: LATCH can be used IN PLACE OF the following unsafe vehicle seat belts systems if your vehicle is equipped with LATCH anchorage system.
Lap Belts with Emergency Locking Retractor (ELR) DO NOT use a lap belt that stays loose after installed and locks only in a crash or sudden stop. These lap belts utilize an Emergency Locking Retractor (ELR) and are often found in combination with motorized shoulder belts. Because these belts will allow the car seat to move about on the vehicle seat, the chance of the car seat being out of the proper position in a crash is very high. Accordingly, DO NOT use the car seat with this type of seat belt system. Please see your vehicle's dealer or owner's manual for information on converting this seat belt system to one that is acceptable for use with a car seat (Fig. 16a).
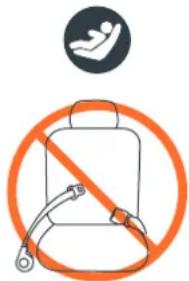
Fig. 16a
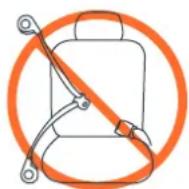
Fig. 16b
Combination Lap/Shoulder Belt with Retractor
DO NOT use a lap/shoulder belt system if the lap belt and shoulder belt each have retractors at one end. This type of seat belt system will not adequately restrain the car seat (Fig. 16b).
Copyright © 2025, Baby Trend, Inc. Copyright © 2025, Baby Trend, Inc.
4.0 Selecting a Vehicle Seating Location
Passive Restraint – Lap or Shoulder Belt Mounted on Door DO NOT use a seat belt that is connected to the door in any way. These types of seat belts are designed to automatically surround the occupant when the door is closed. This type of seat belt will NOT adequately restrain the car seat (Fig. 17a).
Passive Restraint – Lap Belt with Motorized Shoulder Belt DO NOT use a shoulder belt that moves along a track. These systems typically move to surround the occupant when the door is closed. This type of belt system will NOT adequately restrain the car seat (Fig. 17b).
Lap Belts Forward of Seat Crease DO NOT use a seat belt that is anchored on the seat more than 2 inches forward of the crease between the seat bottom and the seatback. This type of seat belt anchors the car seat too far forward and the car seat will not be safely restrained in the vehicle (Fig. 17c).
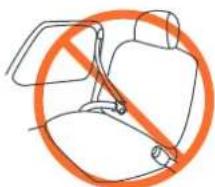
Fig. 17a
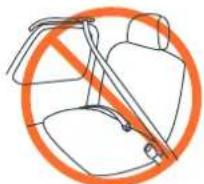
Fig. 17b
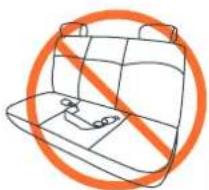
natural_image
Simple line drawing of a car seat with no text or symbolsFig. 17c
lecting a Vehicle Seating Location
4.6 Preparation for Installation in Vehicle
When available, LATCH is the recommended method of securing the car seat in the vehicle.
WARNING!
DEATH or SERIOUS INJURY can occur:
- FAILURE TO PROPERLY SECURE THE CAR SEAT IN YOUR VEHICLE INCREASES THE RISK OF SERIOUS INJURY OR DEATH IN THE EVENT OF A SUDDEN STOP, SHARP TURN OR CRASH.
- National Highway Traffic Safety Administration (NHTSA) alerts vehicle owners that, according to accident statistics, children under age 13 are safer when properly restrained in the rear seating positions rather than in front seating positions.
-
Use car seats in a vehicle's rear seat location whenever possible.
-
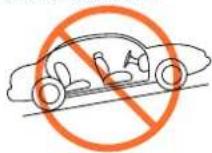
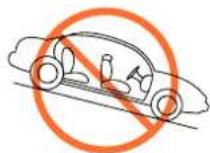
Park your vehicle on a level surface so that the Seat Angle Indicator located on the left side of the car seat will properly indicate the proper angle of recline of the seat.
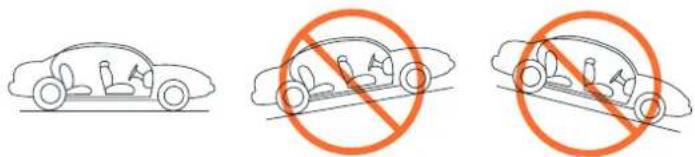
- Make sure you have selected an acceptable location for the car seat as instructed in Section 4.0 Selecting A Vehicle Seat Location.
4.0 Selecting a Vehicle Seating Location
- Check again for any active frontal air bags. DO NOT use a location that has an active frontal air bag or is adjacent to an Active Air bag such that, when deployed, the Active Air bag may come into contact with the car seat. Many passenger side frontal air bags are designed to deploy to protect the passenger side as well as the center front seating position. Please see the active air bag warnings in your vehicle owner's manual to help determine unsafe locations in the vehicle.
- If the front seat position is used, slide the vehicle seat as far to the rear as possible to prevent the car seat from striking the dash in a crash. If the rear seat position is used, slide the vehicle seat directly in front of the car seat forward enough to prevent the car seat from striking the vehicle seatback in a crash.
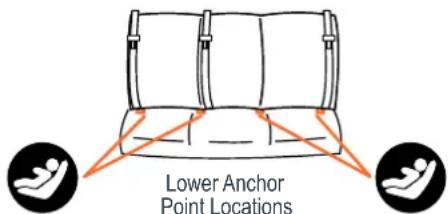
4.7 Preparation for Installation with LATCH
Consult your vehicle owner's manual or manufacturer for location and availability of LATCH anchor points. NOT all vehicles have the same locations or maximum weight requirements for LATCH!
4.0 Selecting a Vehicle Seating Location
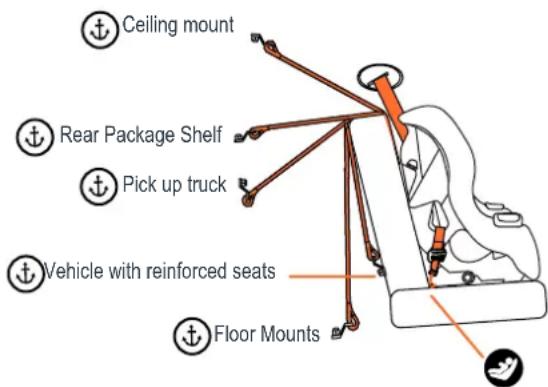
4.8 LATCH - Top Tether Anchor Locations
Top Tether Locations are indicated by the following symbol:

LATCH Top Tether symbol:

Baby Trend requires the use of the top tether for installation if the vehicle is equipped with a tether anchor. Please refer to the vehicle owner's manual for tether anchor locations.
Consult your vehicle owner's manual for your vehicle's exact LATCH locations, anchor identification and usage requirements.
Maximum Child Weight for LATCH:
Lower Anchor 55 lbs (24.94 kg),
Top Tether 65 lbs (29.48 kg).
Vehicle LATCH Top Tether locations may vary:
Copyright © 2025, Baby Trend, Inc. Copyright © 2025, Baby Trend, Inc.
5.0 Installation and Use 5.0 Installation an
The American Academy of Pediatrics and Baby Trend recommend children remain in a rear-facing car seat as long as possible, until they reach the highest weight or height allowed by their seat.
WARNING!
DEATH or SERIOUS INJURY can occur:
- Use only in a rear facing position when using the car seat with an infant weighing less than 30 lbs. (13.6 kg).
- Use only with children who weigh between 4 - 65 lbs. (1.81 - 29.48 kg) and whose height is 50 inches (127 cm) or less. Forward facing 2 years and 30 to 65 lb (13.6 to 29.5 kg)
- Snugly adjust the belts (Harness) provided with the car seat around your child. Snug means you can not pinch webbing once buckled.
- Secure the top anchorage strap provided with this car seat.
- Secure this child seat with the vehicle's child restraint Anchorage system (LATCH) if available or with a lap/shoulder belt
- Follow all instructions on the car seat and in the written instructions located on the back of the seat. Do not use without instructions. Call 1-800-328-7363 to obtain instructions.
- Use vehicles seat belt (not LATCH) for children weighing more than 55 lbs (24.9 kg).
- Register your car seat with Baby Trend.
- DO NOT place rear facing child seat in a front seat that has an active airbag.
- NEVER leave child unattended under any circumstance.
5.1 Child Placement in The Car Seat
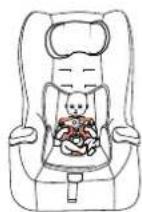
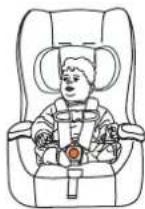
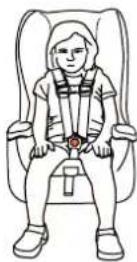
- Place child in the car seat with the child's back flat against the back of the car seat and the child's bottom touching the seat.
- Place harness straps over the child's shoulders. NOTE: Check the height of the harness straps at the child's shoulders.
- Place the crotch buckle in appropriate position. See section 5.15 page 46.
- Insert the buckle tongues into the crotch buckle. NOTE: Pull up and test buckle tongues to be sure they are secure.
- Place chest clip at arm pit level. Insert chest clip tab and press together. Pull outward on chest clip's ends to be sure it is secure.
- Pull on harness adjuster to tighten harness straps. A snug strap should not allow any slack. It lies in a relatively straight line without sagging. It does not press on to the child's skin or push the child's body into an unnatural position.
5.0 Installation and Use 5.0 Installation an
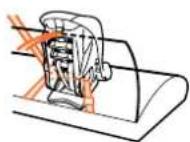
5.1.1 Installation Diagrams
Routing paths for Rear Facing installation
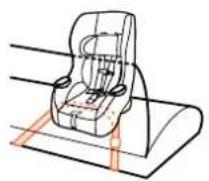
Lap belt
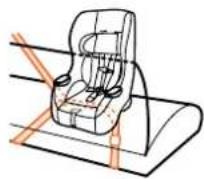
Lap/Shoulder belt
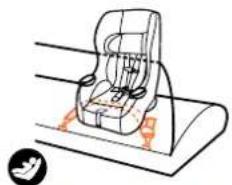
natural_image
Line drawing of a car seat assembly with orange connectors and a small circular icon (no text or symbols)Lower anchor (LATCH)
Routing paths for Forward Facing installation
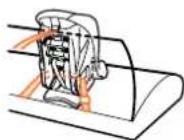
Lap belt with top tether
Lap/Shoulder belt with top tether
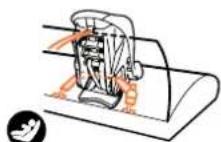
Latch Lower anchor with top tether
WARNING!
- Never use a Top Tether connector in a rear facing installation!!
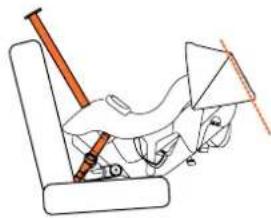
5.2 Rear Facing Installation with Lap/Shoulder Belt
See section 2.1 for requirements.
• Weight is 4 - 40 lbs (1.81 - 18.1 kg).
• Height is 40 inches (102 cm) or less.
- Top of head has NOT reached 1" from top of seatback.
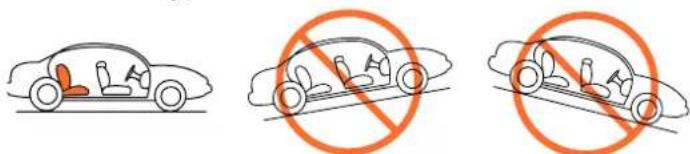
- Always adjust the recline foot to the recline position when rear facing. Angling the car seat will keep the baby's head back and airway open.
natural_image
Line drawing of a person lying on a chair with a tool, no text or symbols present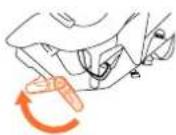
- Make sure vehicle is parked on level ground then, place the car seat in a rear seating position and ensure vehicle is level.
- Route Lap/Shoulder Belt through the rear facing belt paths and under the seat fabric. NOTE: Remove any twist in webbing to ensure the webbing lies flat before securing the car seat to the vehicle.
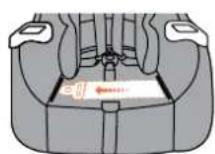
Fig. 24a
Copyright © 2025. Baby Trend, Inc. Copyright © 2025. Baby Trend, Inc.
5.0 Installation and Use 5.0 Installation an
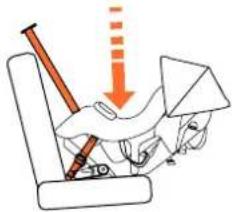
- Use body weight or apply weight in seat with hand to compress the vehicle seat cushion then insert the seat buckle tongue into the buckle and pull seat belt tight as possible (Fig. 25a). Pull excess webbing at buckle tongue to tighten.
- Pull up on buckle to ensure the buckle is secure. Please refer to the vehicle owner's manual to determine if your vehicle lap/shoulder belt includes a lockable retractor and how to lock it.
- Ensure the angle indicator bubble is centered between the lines for children 4-22 lbs. (1.81 - 9.97 kg) to keep the child's airway open. Ensure the angle indicator line is level with the ground for children 23-40 lbs. (10.43 - 18.14 kg) to keep the child's airway open (Fig. 25b).
- Check for movement of the car seat at the safety belt path. The car seat should not move more than 1 inch in any direction. If the car seat moves more than 1 inch, repeat all steps until all safety steps are met.
natural_image
Illustration of a hand using a tool to lift a car, with an orange arrow indicating downward motion (no text or symbols)Fig. 25a
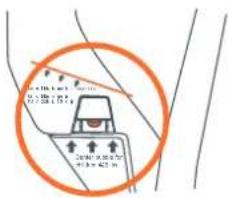
Fig. 25b
5.3 Rear Facing Installation with Lap Belt.
See section 2.1 for requirements.
• Weight is 4 - 40 lbs (1.81 - 18.1 kg).
• Height is 40 inches (102 cm) or less.
- Top of head has NOT reached 1" from top of seatback.
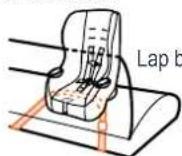
Lap belt
natural_image
Simple line drawing of a person sitting on a bench with a ruler and triangular object (no text or symbols)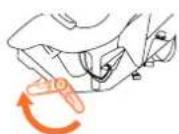
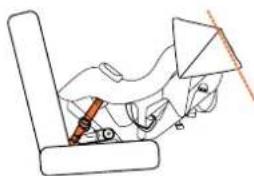
- Always adjust the recline foot to the recline position when rear facing. Angling the car seat will keep the baby's head back and airway open.
- Make sure vehicle is parked on level ground then, place the car seat in a rear seating position and ensure vehicle is level.
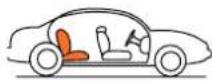
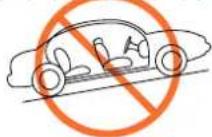
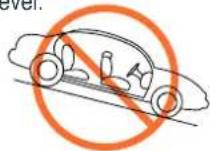
- Route Lap Belt through the rear facing belt paths and under the seat fabric (Fig. 26a). NOTE: Remove any twist in webbing to ensure the webbing lies for securing the car seat to the vehicle.
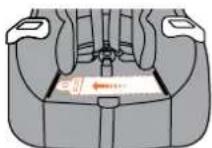
Fig. 26a
Copyright © 2025. Baby Trend, Inc. Copyright © 2025. Baby Trend, Inc.
5.0 Installation and Use 5.0 Installation an
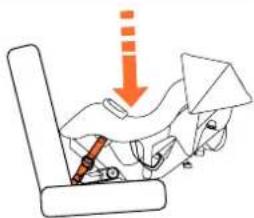
- Use body weight or apply weight in seat with hand to compress the vehicle seat cushion then insert the seat buckle tongue into the buckle and pull seat belt tight as possible (Fig. 27a). Pull excess webbing at buckle tongue to tighten.
- Pull up on buckle to ensure the buckle is secure.
- Ensure the angle indicator bubble is centered between the lines for children 4-22 lbs. (1.81 - 9.97 kg) to keep the child's airway open. Ensure the angle indicator line is level with the ground for children 23-40 lbs. (10.43 - 18.14 kg) to keep the child's airway open (Fig. 27b).
- Check for movement of the car seat at the safety belt path. The car seat should not move more than 1 inch in any direction. If the car seat moves more than 1 inch, repeat all steps until all safety steps are met.
natural_image
Illustration of a hand using a device to lift a car seat, with an orange arrow indicating downward motion (no text or symbols)Fig. 27a
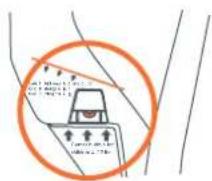
Fig. 27b
5.4 Rear Facing Installation with LATCH Lower Anchors
Requirements. See section 2.1:
• Weight is 4 - 40 lbs (1.81 - 18.1 kg).
• Height is 40 inches (102 cm) or less.
- Top of head has NOT reached 1" from top of seatback.
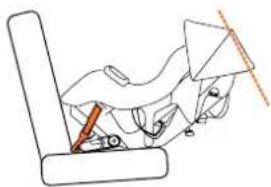
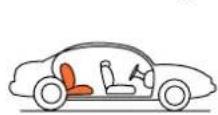
- Place this car seat in a rear seating position designated as LATCH Lower Anchor compatible. Refer to your vehicle owner's manual for LATCH locations.
natural_image
Line drawing of a person sitting in a chair with a pencil and ruler, no text or symbols present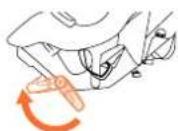
- Always adjust the recline foot to the recline position when rear facing. Angling the car seat will keep the baby's head back and airway open.
- Make sure vehicle is parked on level ground then, place the car seat in a rear seating position and ensure vehicle is level.
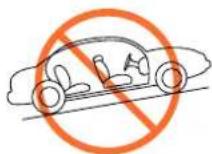
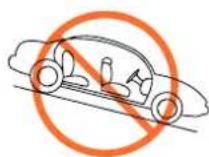
- Route LATCH Lower Anchor through the rear facing belt paths and under the seat fabric (Fig. 28a).
NOTE: Remove any twist in webbing to ensure the webbing lies for securing the car seat to the vehicle.
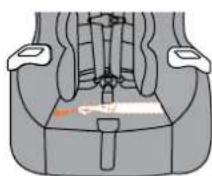
Fig. 28a
Copyright © 2025. Baby Trend, Inc. Copyright © 2025. Baby Trend, Inc.
5.0 Installation and Use 5.0 Installation an
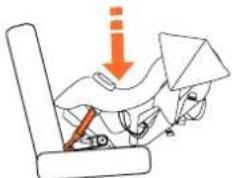
- Use body weight or apply weight in seat with hand to compress the vehicle seat cushion then insert the lower anchor connector onto the vehicle anchor point (Fig. 29a). Tighten the lower anchor connector by pulling up on the webbing end through opening in seat fabric (Fig. 29b). Pull up on the lower anchor connector to ensure the lower anchor is securely fastened.
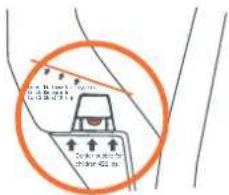
- Ensure the angle indicator bubble is centered between the lines for children 4-22 lbs. (1.81 - 9.97 kg) to keep the child's airway open. Ensure the angle indicator line is level with the ground for children 23-40 lbs. (10.43 - 18.14 kg) to keep the child's airway open (Fig. 29c).
- Check for movement of the car seat at the safety belt path. The car seat should not move more than 1 inch in any direction. If the car seat moves more than 1 inch, repeat all steps until all safety steps are met.
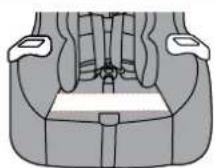
Fig. 29a
natural_image
Illustration of a person seated in a chair with a downward arrow and a small object on the floor (no text or symbols)Fig. 29b
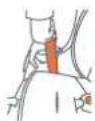
Fig. 29c
5.5 Forward Facing Installation with Lap/shoulder Belt and Top Tether
See section 2.2 for requirements.
• Weight is 30 to 65 lb (13.6 to 29.5 kg).
• Height is 50 inches (127 cm) or less.
- Age is 2 years old.
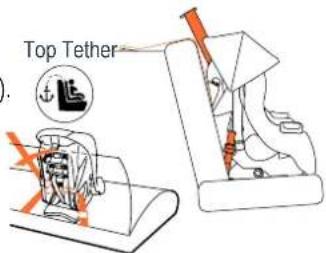
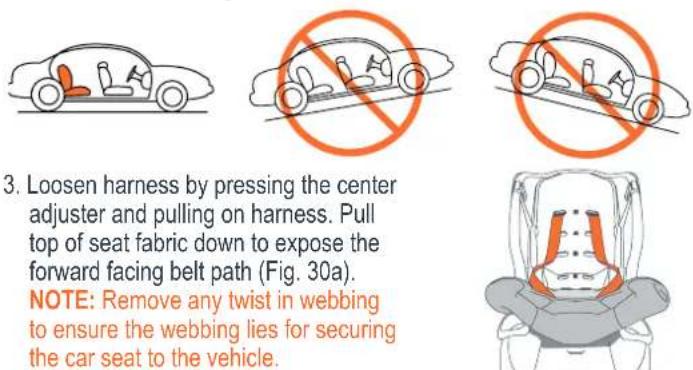
- Place this car seat in a rear seating position. Always adjust the recline foot to the upright position when forward facing.
- Ensure vehicle is level and that the car seat is placed flat, and rests on the front outer edge of the vehicle seat.
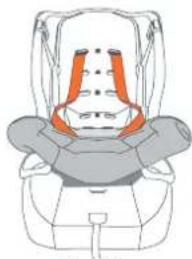
- Loosen harness by pressing the center adjuster and pulling on harness. Pull top of seat fabric down to expose the forward facing belt path (Fig. 30a). NOTE: Remove any twist in webbing to ensure the webbing lies for securing the car seat to the vehicle.
natural_image
Line drawing of a person wearing a seatbelt and orange safety straps (no text or symbols)Fig. 30a
5.0 Installation and Use 5.0 Installation an
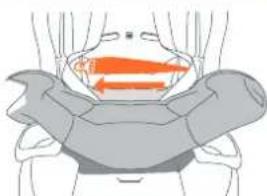
- Route seat belt through forward facing belt path (Fig. 31a).
- Put weight in seat with hand to compress the vehicle seat cushion then insert the buckle tongue into the buckle and adjust seat belt as tight as possible (Fig. 31b).
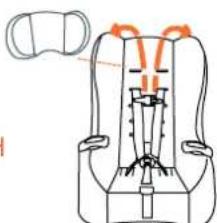
- Pull seat fabric up and over the top of the car seat. Then, install the pillow (Fig. 31c).
- Pull up on buckle as to ensure the buckle is secure. Please refer to the vehicle owner's manual to determine if your vehicle lap/shoulder belt includes a lockable retractor and how to lock it.
- Attach Top Tether to a designated anchor point. Pull Top Tether strap until webbing strap is snug (Fig. 31d).
NOTE: Your vehicle owner's manual will give the anchor locations and maximum weight of the car seat's occupant for LATCH connections.
- Check for movement of the car seat at the safety belt path. The car seat should not move more than 1 inch in any direction. If the car seat moves more than 1 inch repeat all steps until all safety steps are met.
natural_image
Illustration of a human head with orange arrows indicating pressure or force direction (no text or symbols)Fig. 31a
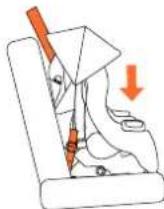
Fig. 31b
natural_image
Line drawing of a car seat with orange motion arrows indicating movement or force (no text or symbols)Fig. 31c
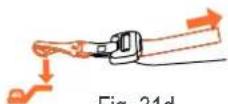
Fig. 31d
5.6 Forward Facing Installation with Lap Belt and Top Tether
Requirements. See section 2.2:
• Weight is 30 to 65 lb (13.6 to 29.5 kg)
• Height is 50 inches (127 cm) or less.
- Age is 2 years old.
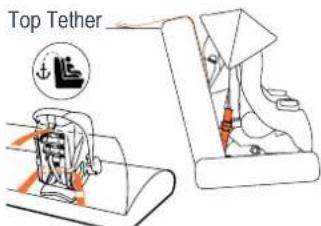
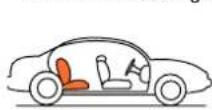
- Place the car seat in a rear seating position. Always adjust the recline foot to the upright position when forward facing.
- Ensure vehicle is level and that the car seat is placed and rests on the front outer edge of the vehicle seat.
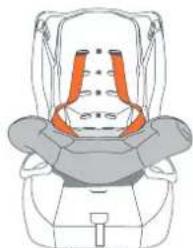
- Loosen harness by pressing the center adjuster and pulling on harness. Pull top of seat fabric down to expose the forward facing belt path (Fig. 32a).
natural_image
Line drawing of a car seat with orange straps and gray seats (no text or symbols)Fig. 32a
Copyright © 2025, Baby Trend, Inc. Copyright © 2025, Baby Trend, Inc.
5.0 Installation and Use 5.0 Installation an
- Route seat belt through forward facing belt path (Fig. 33a).
- Put weight in seat with hand to compress the automobile seat cushion then insert the buckle tongue into the buckle and adjust seat belt as tight as possible (Fig. 33b).
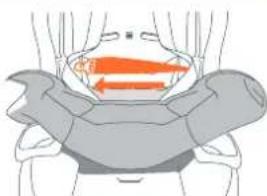
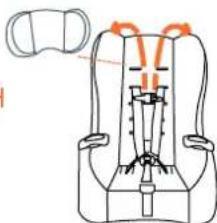
- Pull seat fabric up and over the top of the car seat. Then, install the pillow (Fig. 33c).
- Pull up on buckle as to ensure the buckle is secure.
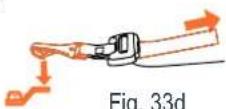
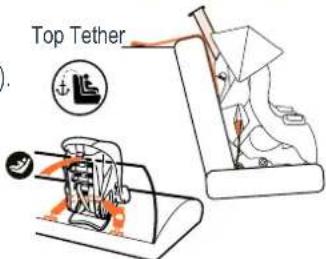
- Attach Top Tether to a designated anchor point. Pull Top Tether strap until webbing strap is snug (Fig. 33d). NOTE: Your vehicle owner's manual will give the anchor locations and maximum weight of the car seat's occupant for LATCH connections.
- Check for movement of the car seat at the safety belt path. The car seat should not move more than 1 inch in any direction. If the car seat moves more than 1 inch repeat all steps until all safety steps are met.
natural_image
Illustration of a human torso with orange arrows indicating movement or force direction (no text or symbols)Fig. 33a
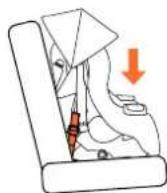
Fig. 33b
natural_image
Diagram of a car seat assembly with orange arrows indicating motion or force direction (no text or labels)Fig. 33c
5.7 LATCH - Forward Facing Installation with Lower Anchor and Top Tether
See section 2.2 for requirements.
• Weight is 30 to 65 lb (13.6 to 29.5 kg).
• Height is 50 inches (127 cm) or less.
- Age is 2 years old.
DO NOT install by this method for a child weighing more than 55 lbs. (24.9 kg.). DO NOT use the lower anchors of the child restraint
anchorage system (LATCH system) to attach this child restraint when restraining a child weighing more than 55 lbs (24.9 kg).
- Place the car seat in a rear seating position. Always adjust the recline foot to the upright position when forward facing.
- Ensure vehicle is level and that the car seat is placed and rests on the front outer edge of the vehicle seat.
- Loosen harness by pressing the harness adjuster and pulling on harness. Pull top of seat fabric down to expose the forward facing belt path (Fig. 34a).
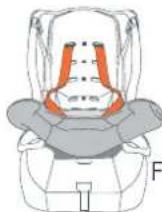
Fig. 34a
Copyright © 2025. Baby Trend, Inc. Copyright © 2025. Baby Trend, Inc.
5.0 Installation and Use 5.0 Installation an
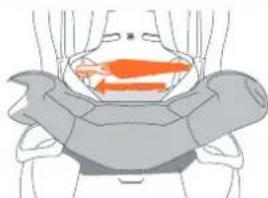
- Route lower anchors through forward facing belt path (Fig. 35a).
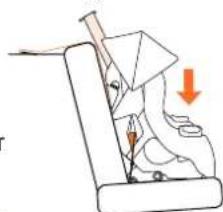
- Put weight in seat with hand to compress the vehicle seat cushion then insert the lower anchor connector on to the vehicle connector anchor point. Tighten the lower anchor connector by pulling up on the webbing end. Pull up on the lower anchor connector to ensure the lower anchor is securely fastened (Fig. 35b).
- Pull seat fabric up and over the top of the car seat. Then, install the pillow (Fig. 35c).
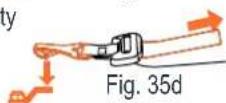
- Attach Top Tether to a designated anchor point. Pull Top Tether strap until webbing strap is snug (Fig. 35d).
NOTE: Your vehicle owner's manual will give the anchor locations and maximum weight of the car seat's occupant for LATCH connections.
- Check for movement of the car seat at the safety belt path. The car seat should not move more than 1 inch in any direction. If the car seat moves more than 1 inch repeat all steps until all safety steps are met.
5.8 Aircraft installation
- Follow the seat belt installation for use in an Aircraft.
- Consult your airline for requirements to use the car seat.
natural_image
Illustration of a human torso with orange highlighted areas indicating specific regions (no text or symbols present)Fig. 35a
natural_image
Illustration of a person using a sewing machine with a downward arrow indicating motion (no text or symbols)Fig. 35b
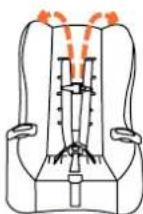
Fig. 35c
5.9 Child Placement In The Car Seat
- Place child in the car seat with the child's back against the back of the car seat and the child's bottom touching the seat (Fig. 36a).
- Rear Facing - Harness Strap should be located in the nearest position at or below the shoulder (Fig. 36b).
Forward Facing - Harness Strap Height should be located in the slot at or slightly above the child's shoulder (Fig. 36c). NOTE: Use slots 3,4 and 5 for forward facing.
Then place harness straps over the child's shoulders (Fig. 36d).
- The car seat has been safety tested with the insert and pillow (Fig. 36e) that are included with this car seat. DO NOT use pillow if child's head falls forward.
• Head Pillow can be used in Forward facing (See Section 2.2).
- ONLY use the insert with children who weigh between 4-18 lbs (1.81 - 8.16 kg).
- Rear facing use only.
5.0 Installation and Use 5.0 Installation an
- Insert the buckle tongues into the buckle (Fig. 37a). NOTE: Pull up and test buckle tongues to be sure they are secure.
- Place chest clip at arm pit level (Fig. 37b). Insert chest clip tabs and press together. Pull outward on chest clip's ends to be sure it is secure.
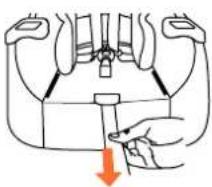
- Pull on the harness tension adjuster to tighten harness straps. The strap should not allow any slack. The strap should not press on to the child's skin or push the child's body into an unnatural position. Harness Covers are required in all forward facing and rear facing position except the Low Birth weight harness routing (Fig. 37c).
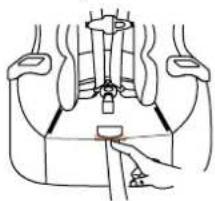
To Loosen Harness System Tension, push the harness tension adjuster button (Fig. 37d) located underneath the seat fabric and gently pull on the harness straps over the child's shoulder.
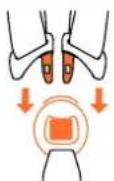
Fig. 37a
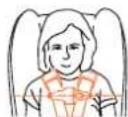
Fig. 37b
natural_image
Diagram of a hand using a tool to adjust or install a mechanical component (no text or symbols present)Fig. 37c
natural_image
Simple line drawing of a mechanical or electrical component with no text, numbers, or symbolsFig. 37d
5.10 Shoulder Height Adjustment
- Shoulder Height Positions Facing Direction Rear Facing: Positions 1, 2 and 3. Forward Facing: Positions 3, 4 and 5 (Fig. 38a).
Height Adjustment
- Loosen harness, unfasten harness end loops from splitter plate. Pull harness end loops through seatback. Thread harness end loops through desired shoulder position (Fig. 38b).
- Fasten harness end loop to splitter plate. Ensure the harness strap ends are fully hooked on the splitter plate. Both sides must be threaded in the same position (Fig. 38c).
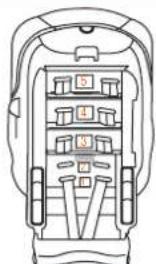
Fig. 38a
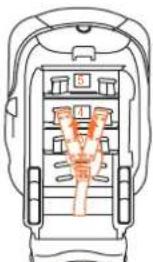
Fig. 38b
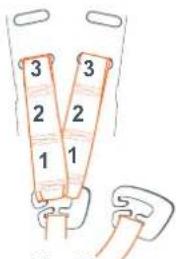
Fig. 38c
5.0 Installation and Use 5.0 Installation an
5.11 Crotch Buckle Adjustment
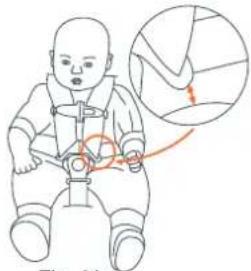
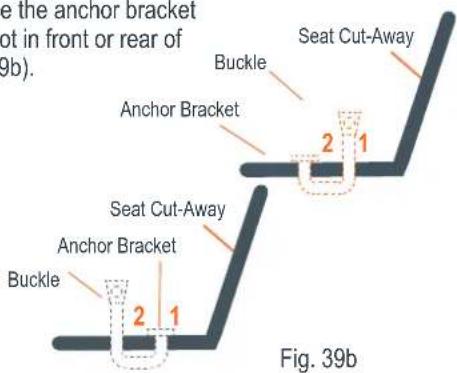
If the gap between the buckle and thigh is not between 1/2" and 1". The crotch strap length should be adjusted such that a gap of 1/2" to 1" is present between the ears of the buckle, and the top of the child's thigh, disregarding any clothing or diaper (Fig. 39a). Your child will grow very quickly so always check that the buckle is the proper height whenever placing your child in the Safety seat. The crotch strap length is adjusted as follows:
1/2 to 1 inch above thigh
natural_image
Illustration of a baby wearing a seatbelt with an inset showing a hand holding a wheel (no text or symbols)Fig. 39a
- To shorten the length of the buckle webbing, place the anchor bracket through the slot in front or rear of buckle (Fig. 39b).
5.12 Seat Fabric Removal And Laundering
Seat Fabric Removal
-
Unfasten harness end loops from metal plate and pull harness through the seatback.
-
Unbuckle crotch buckle.
-
Unbuckle chest clip.(Fig. 40a).
-
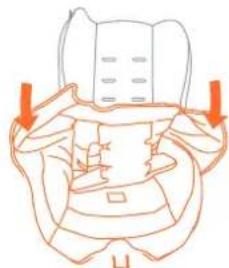
Pull up and out on seat fabric and feed harness, buckle tongues and chest clip through slots on seat fabric (Fig. 40b).
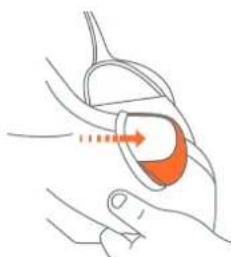
- Slip seat fabric over cup holders (Fig. 40c).
-
To clean only use mild soap or detergent and warm water on a sponge or clean cloth.
-
Do Not machine wash.
- Do Not dry clean
- Do Not bleach
- Do Not iron.
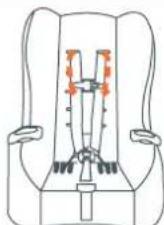
Fig. 40a
natural_image
Line drawing of a person in a seat with arrows pointing to the seat (no text or symbols)Fig. 40b
natural_image
Illustration of a hand holding a small orange object with a red arrow indicating direction (no text or symbols)Fig. 40c
5.0 Installation and Use 5.0 Installation an
5.13 Low Birth Weight Harness Shortening Routing
- Remove the head pillow and set aside (Fig. 41a).
- Remove the harness loop ends from the splitter plate and pull harness through the seat back. See section (5.10 Page 38).
- Remove harness cover, chest clip and buckle tongue on one side and set aside. Remove the cup holders and set aside (Fig. 41b).
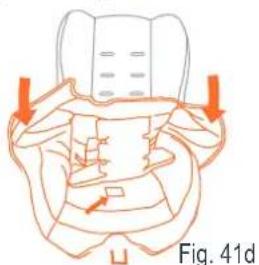
- Pull harness webbing through the insert. Remove the seat insert and set aside.
- Lift seat fabric from the top and pull crotch buckle through while removing the complete seat fabric.
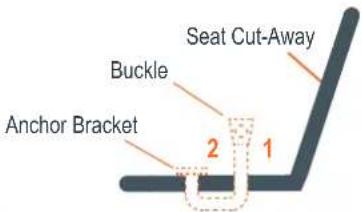
- Must use crotch buckle in position 1. Always put crotch buckle and place into position 1 (Fig. 41c).
- Pull the crotch buckle anchor through to position 2 (Fig. 41c).
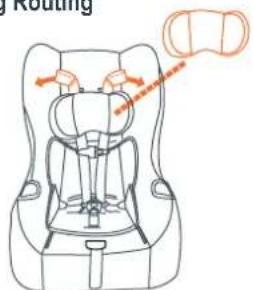
Fig. 41a
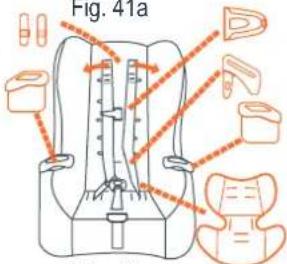
Fig. 41b
natural_image
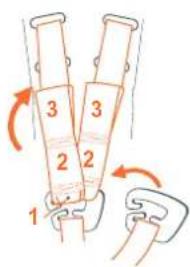
Anatomical illustration of a human head with arrows indicating movement or force direction (no text or labels)5.13 Low Birth Weight Harness Shortening Routing cont.
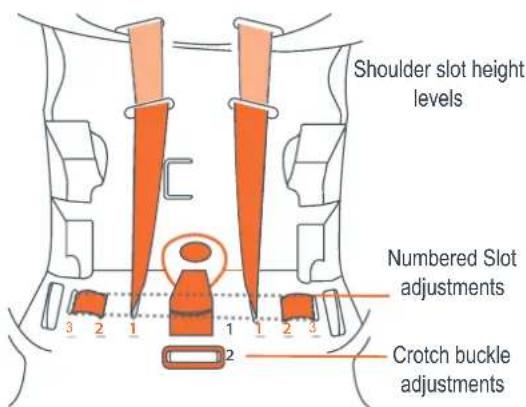
- From top side feed harness loop down though bottom of seat slot (1).
- Turn car seat over and feed harness loop end back through slot (2).
- Turn car seat upright and feed through harness slot (3).
- On opposite side, Turn seat over and feed harness loop through slot number (3).
- From top side feed harness loop end down through slot number (2).
- Turn seat over and feed harness end up through slot number (1).
Copyright © 2025, Baby Trend, Inc. Copyright © 2025, Baby Trend, Inc.
5.0 Installation and Use 5.0 Installation an
5.13 Low Birth Weight Harness Shortening Routing cont.
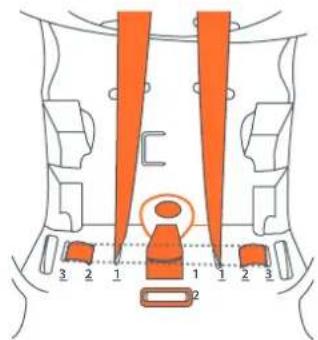
- From the top side pull harness end loop to pull excess webbing from bottom side.
- Grasp both sides of harness end loops and pull up to equalize the harness length.
- Ensure the harness end loops are the same length.
- If harness length is not equal, pull webbing from long side of webbing to equalize length.
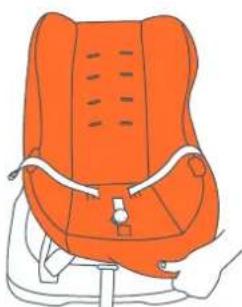
- Place seat fabric on shell threading harness end loops through the inner most slots on the bottom seat fabric.
natural_image
Illustration of an orange children's seat with white trim and seatbelt (no text or symbols)Fig. 43a
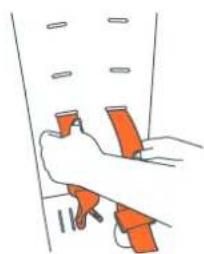
5.13 Low Birth Weight Harness Shortening Routing cont.
- Thread buckle through the seat fabric.
- Install seat fabric insert. Seat fabric insert use is not required.
- Insert buckle tongue into crotch buckle on child's left side.
- Feed harness end loop from the back side of the buckle tongues.
- Feed chest clip through harness end loops on child's left side.
- Pull up on webbing end loops to ensure the webbing end loops are equalized.
- Feed harness end loops and crotch buckle through appropriate slots on seat insert.
- Thread harness end loops through appropriate slot No. 1 or 2. Shoulder slots must at or below child's shoulder.
- Thread loop number 1 (inner most) through splitter plate.
- DO NOT use harness covers with Low Birth Weight Routing.
- DO NOT use pillow with Low Birth Weight Routing.
- Place child in seat and confirm harness is at or below child's shoulder.
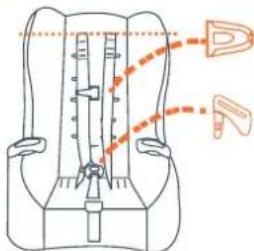
Fig. 44a
natural_image
Illustration of a hand holding orange objects with a tool, no text or symbols presentFig. 44b
5.0 Installation and Use 5.0 Installation an
5.13 Low Birth Weight Harness Shortening Routing cont.
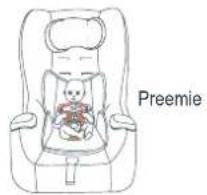
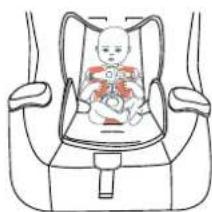
- Child in car seat with insert, without pillow and harness covers. NEVER use pillow or harness covers in the Low Birth Weight Harness Routing (Fig. 45a). NOTE: Pillow can be stored / attached in harness position #5 when not in use.
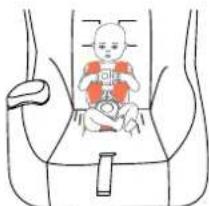
- Child in car seat without insert, pillow and harness covers. NEVER use pillow or harness covers in the Low Birth Weight Harness Routing (Fig. 45b). NOTE: Pillow can be stored / attached in harness position #5 when not in use.
natural_image
Line drawing of a baby car seat with seats and seatbelt (no text or symbols)Fig. 45a
natural_image
Line drawing of a baby sitting inside a car seat, no text or symbols presentFig. 45b
5.14 Pillow, Insert and Harness Covers Use
1. Pillow Use
- Use is not mandatory
• DO NOT use in the Low Birth Weight Harness Routing option. - DO NOT use Pillow and Harness in same harness slot. Discontinue use when the child requires use of harness position 5.
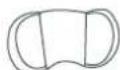
Pillow
5.14 Pillow, Insert and Harness Covers Use cont.
2. Insert Use
- Use is not mandatory.
- YOU MAY use in the Low Birth Weight Harness Routing option.
• ONLY use the insert with children who weigh between 4-18 lbs (1.81 - 8.16 kg). - Rear facing use only.
3. Harness Covers
• DO NOT use in the Low Birth Weight Harness Routing option.
- Must Be Used In All Other Modes.
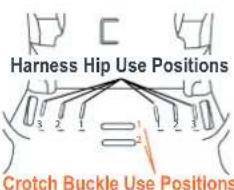
5.15 Harness Hip and Buckle Use Positions
Crotch Buckle Use Positions:
1- Rear Facing and Forward facing use.
2- Rear Facing and Forward facing use.
NOTE: The Buckle should be at the crotch but not under.
Harness Hip Positions:
1- Low Birth Weight Harness Shortening Routing Only.
2- Up to 40 lbs (18.1 kg). 3- Above 40 lbs (18.1 kg)
NOTE: The Harness should be at or out from the hip but not under.
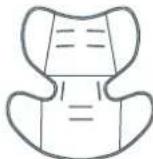
Insert
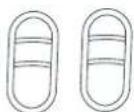
Harness Covers
5.0 Installation and Use 5.0 Installation an
5.16 Cup holders Removal, Installation and Cleaning.
Removal
- Press tab on bottom of cup holder to release cup holders and pull up to remove (Fig. 47a).
Installation
- Pull car seat cover back to expose cup holders receptacle (Fig. 47b).
- Align cup holders and press into place. Pull up on cup holders to ensure
the cup holders is secured (Fig. 47c). - Fit car seat cover over the front of the cup holders and fit the car seat cover over the cup holders (Fig. 47d).
Cleaning
- Wipe with mild solution of soap and water.
- Rinse with clean water.
- Never use "household" detergents
47 48 or solvents.
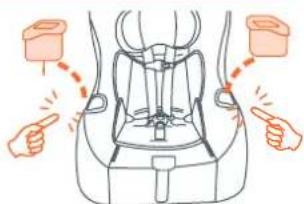
natural_image
Illustration of a car seat with hands pointing to the seat (no text or symbols)Fig. 47a
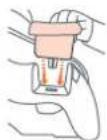
Fig. 47b
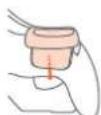
Fig. 47c
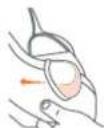
Fig. 47d
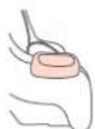
5.17 Securing Pillow
- Insert pillow attachment straps through the appropriate shoulder belt position (Fig. 48a).
- Secure attachment straps with the hook and loop fasteners (Fig. 48b).
5.18 Pool Noodle or Rolled Towel Use Extra Elevation
- A pool noodle or rolled towel can be used for extra elevation.
- Place the noodle or rolled towel where the seat bottom and seat back meet for additional recline elevation (Fig. 48c).
- Place the noodle or rolled towel at back of the car seat bottom for additional incline elevation (Fig. 48d).
- Multiple pool noodles or towels maybe secured together for elevation (Fig. 48e).
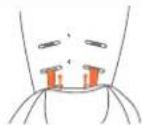
Fig. 48a
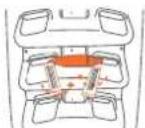
Fig. 48b
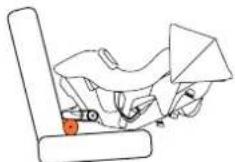
Fig. 48c
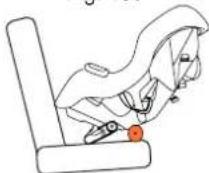
Fig. 48d
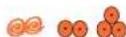
Fig. 48e
5.0 Installation and Use
WARNING!
DEATH or SERIOUS INJURY can occur:
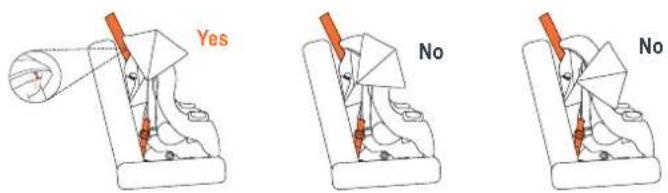
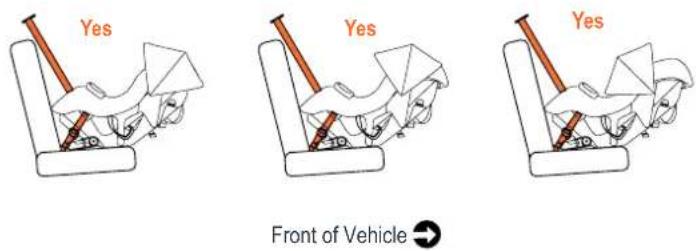
- Canopy use is Optional.
- Discontinue Canopy use when harness and child's shoulders are at the top harness slot #5.
• Only use Canopy in position 1 in the Forward Facing Position - Always secure canopy with lanyard in the Forward Facing Position (5.21).
5.0 Installation and Use
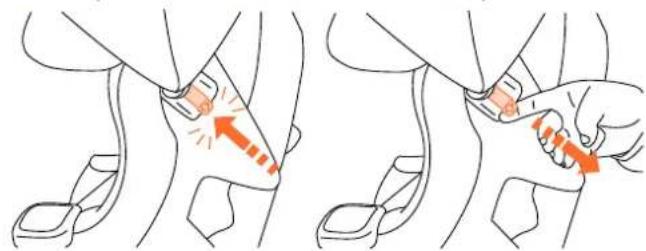
5.20 Canopy Installation and Removal 5.19 Canopy Use Positions
natural_image
Illustration showing two-step instructions for a hand holding a small object, with arrows indicating motion or force direction (no text or symbols present)Lift tab to remove canopyBe sure to push bl
into canopy mount slot on both sides
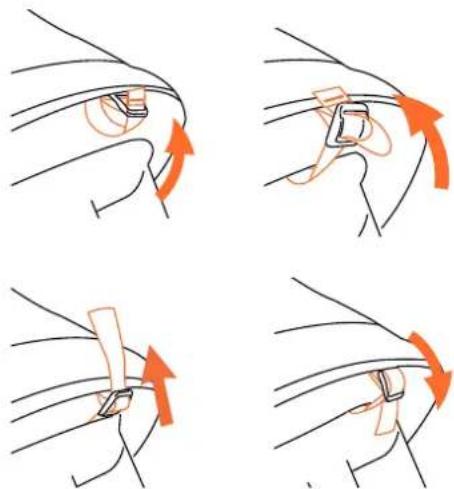
5.21 Canopy Retention Installation
natural_image
Four-panel diagram showing hand positioning and rotation of a device, no text or symbols presentCopyright © 2025, Baby Trend, Inc. Copyright © 2025, Baby Trend, Inc.
6.0 Safety 7.0 Additional Information
6.1 Safety Checklist:
√ Did you read and understand these instructions and labels on the car seat?
√ Is the child the proper weight and height for the seat in the rear facing position?
√ If the child is in the rear facing position, are the shoulder straps at or below the child's shoulders?
√ Have you checked the proper seat angle for the rear facing position?
√ Is the child the proper weight and height for the seat in the forward facing position?
√ Baby Trend requires the use of the top tether for installation if the vehicle is equipped with a tether anchor. Please refer to the vehicle owner's manual for tether anchor locations
√ If the child is in the forward facing position, are the shoulder straps at or above the child's shoulders?
√ Did you pull the harness adjustor tight? You should not be able to pinch the harness if the harness is properly tightened.
√ Is the car seat buckled in the automobile with either the LATCH system or the auto safety belt system?
√ Discontinue use of this Car seat after 7 years from the date of manufacture printed on the label on the bottom of the seat?
√ Has the airbag been deactivated in a vehicle with a front only seat?
Please Drive Safely
7.1 Certification
The car seat system conforms to all applicable Federal Motor Vehicle Safety Standards for use in motor vehicles. This Car seat is for use in motor vehicles.
7.2 Aircraft Use:
This Restraint is Certified for Use in Aircraft.
7.3 Vehicle Seat Protection:
Protect vehicle seat. Use a thin car seat mat, thin towel, or thin blanket under and behind the Car seat.
7.4 Instruction Manual Storage:
Store this manual in the pocket provided on the underside of the seat cover.
7.5 Car Seat Useful Life:
DO NOT use this Car seat after date on back of seat. Parts may be missing, damaged, or the Car seat may have been in a crash.
Registration Information 9.0 Care and Cle
REGISTER YOUR CAR SEAT
Please complete the following information. The model number and manufactured in (date) can be found on a label on the bottom of the Car seat.
Model Number: ____
Manufactured in: ____
Purchase Date: ____
Please fill out the prepaid registration post card attached to the harness straps and mail it today.
Car seats could be recalled for safety reasons. You must register the car seat to be reached in a recall. Send your name, address, e-mail address if available, and the car seat's model number and manufacturing date to:
Baby Trend®, Inc, 13048 Valley Blvd. Fontana CA 92335 or call 1-800-328-7363 or register online at:
https://babytrend.com/pages/car-seat-product-registration
For recall information, call the U.S. Government's Vehicle Safety Hot line at 1-888-327-4236 (TTY: 1-800-424-9153), or go to: https://www.nhtsa.gov.
If You Need Help
Please contact our Customer Service Department with any questions concerning your car seat. When you contact us, please have the model and manufactured in (date) ready. The model number and manufactured in (date) can be found on a white label located on the bottom of the car seat.
USA Toll Free: 1-800-328-7363
8:00 a.m. to 4:30 p.m. (PST) Monday - Friday
or www.babytrend.com
9.1 Removing The Seat Fabric, Insert and Pillow:
- Follow directions in section 5.12.
9.2 Cleaning The Seat Fabric, Insert and Pillow:
- To clean only use mild soap or detergent and warm water on a sponge or clean cloth.
- Do Not machine wash.
- Do Not dry clean
- Do Not bleach
- Do Not iron.
9.3 Cleaning Car Seat Parts and Buckles:
- Wipe with mild solution of soap and water. Avoid wetting labels.
- Rinse with clean water.
- Never use "household" detergents or solvents.
9.4 Replacement Parts
If You Need Help or Replacement Parts, please call our Customer Service Department at 1-800-328-7363 between the hours of 8:00 am and 4:30 PM, Standard Time, Monday through Friday or visit us online at www.babytrend.com
10.0 Warranty 10.0 GARANTIA
WARRANTY
DO NOT RETURN YOUR PRODUCT TO THE STORE. PLEASE CONTACT BABY TREND® FOR REPLACEMENT PARTS, SERVICE AND REPAIR.
The Baby Trend®. warranty covers workmanship defects within the first year of purchase. Any product which has been subjected to misuse, abuse, abnormal use, excessive wear and tear, improper assembly, negligence, environmental exposure, alteration or accident, or has had its serial number altered or removed invalidates all claims against the manufacturer. Any damage to property during installation is the sole responsibility of the end user. The Customer Service Department can be contacted at 1 (800) 328-7363 Monday through Friday between 8:00 a.m. and 4:30 p.m. (PST). Return Authorizations are required prior to returning product(s) to Baby Trend®.
GARANTIA
NO DEVUELVA SU PRODUCTO A LA TIENDA. POR FAVOR CONTACTE A BABY TREND® PARA PIEZAS DE REPUESTO, SERVICIO Y REPARACION.
- ⚠ WARNING
- OWNER'S MANUAL
- Table of Contents Table of Contents
- General Warnings and Information 1
- WARNING!
- DEATH or SERIOUS INJURY can occur:
- neral Warnings and Information
- Use Recommendations 2.0 Use Record
- Rear facing seat requirements
- dations
- Forward facing seat requirements Weight and Height Requirements:
- Selecting a Vehicle Seating Location
- Overall Considerations in Selecting a Location
- lecting a Vehicle Seating Location
- Check that the Vehicle Seat Meets the Following Requirements
- VEHICLE SEAT BELT REQUIREMENTS
- SAFE Vehicle Seat Belt Systems
- Locking Clip Installation
- UNSAFE Vehicle Seat Belt Systems
- Preparation for Installation in Vehicle
- Preparation for Installation with LATCH
- LATCH - Top Tether Anchor Locations
- Installation and Use 5.0 Installation an
- Child Placement in The Car Seat
- Installation Diagrams
- Rear Facing Installation with Lap/Shoulder Belt
- Rear Facing Installation with Lap Belt.
- Rear Facing Installation with LATCH Lower Anchors
- Requirements. See section 2.1:
- Forward Facing Installation with Lap/shoulder Belt and Top Tether
- See section 2.2 for requirements.
- Forward Facing Installation with Lap Belt and Top Tether
- Requirements. See section 2.2:
- LATCH - Forward Facing Installation with Lower Anchor and Top Tether
- Aircraft installation
- Child Placement In The Car Seat
- Shoulder Height Adjustment
- Height Adjustment
- Crotch Buckle Adjustment
- Seat Fabric Removal And Laundering
- Seat Fabric Removal
- Low Birth Weight Harness Shortening Routing
- Low Birth Weight Harness Shortening Routing cont.
- Pillow, Insert and Harness Covers Use
- Pillow Use
- Pillow, Insert and Harness Covers Use cont.
- Insert Use
- Harness Covers
- Harness Hip and Buckle Use Positions
- Cup holders Removal, Installation and Cleaning.
- Removal
- Installation
- Cleaning
- Securing Pillow
- Pool Noodle or Rolled Towel Use Extra Elevation
- Installation and Use
- Canopy Installation and Removal 5.19 Canopy Use Positions
- Canopy Retention Installation
- Safety 7.0 Additional Information
- Safety Checklist:
- Please Drive Safely
- Certification
- Aircraft Use:
- Vehicle Seat Protection:
- Instruction Manual Storage:
- Car Seat Useful Life:
- Registration Information 9.0 Care and Cle
- REGISTER YOUR CAR SEAT
- If You Need Help
- Removing The Seat Fabric, Insert and Pillow:
- Cleaning The Seat Fabric, Insert and Pillow:
- Cleaning Car Seat Parts and Buckles:
- Replacement Parts
- Warranty 10.0 GARANTIA
- WARRANTY
- GARANTIA
Brand : Baby Trend
Model : Trooper PLUS 3-in-1
Category : Car seat