
PD-TR7 - Treadmills PURE - Free user manual and instructions
Find the device manual for free PD-TR7 PURE in PDF.


| Product Type | Treadmill |
| Brand | Pure |
| Model | PD-TR7 |
| Dimensions (L x W x H) | 170 x 80 x 130 cm |
| Folded Dimensions (L x W x H) | 100 x 80 x 40 cm |
| Weight | 70 kg |
| Max User Weight | 120 kg |
| Power Supply | 220-240V, 50/60Hz, 10A |
| Motor Power (Peak) | 3.0 HP DC |
| Speed Range | 0.5 - 16 km/h |
| Incline Range | 0 - 12% |
| Running Belt Area (L x W) | 140 x 50 cm |
| Display Type | LCD with backlight |
| Display Metrics | Time, Distance, Speed, Calories, Heart Rate (hand grip) |
| Preset Programs | 12 |
| Folding Mechanism | Soft drop folding with hydraulic assistance |
| Transport Wheels | Yes, 2 wheels |
| Safety Features | Safety key, emergency stop, child lock |
| Maintenance | Lubricate belt every 3 months; clean with damp cloth |
| Spare Parts Available | Motor, belt, rollers, control board, safety key |
| Warranty | 2 years home use |
Frequently Asked Questions - PD-TR7 PURE
User questions about PD-TR7 PURE
0 question about this device. Answer the ones you know or ask your own.
Ask a new question about this device
Download the instructions for your Treadmills in PDF format for free! Find your manual PD-TR7 - PURE and take your electronic device back in hand. On this page are published all the documents necessary for the use of your device. PD-TR7 by PURE.
USER MANUAL PD-TR7 PURE
natural_image
Line drawing of a treadmill with adjustable arms and front panel (no text or symbols)PureDesignFitness
Address:104 Yale Drive
Epping VIC 3076
Ph: 02 9898 1405
Email: @puredesignfitness.com.au
PLEASE READ THIS INSTRUCTION MANUAL BEFORE YOU BEGIN EXERCISING
ITEM NO. PD-TR7
THANKYOU
Thanks for purchasing this product .The product will help you keep fitter, healthier and better easy way.
User Guide
- Always connect the power plug to a socket with a grounded circuit and the socket must special circuit to avoid sharing with other electrical equipment.
- Ensure the treadmill stable on the ground before use.
- Check if its function normal or not before running.
- Stand on two side rails when the treadmill starts
- Clipped the safety key to your clothes when upcoming to control any emergency.
- Press the "start" button to get the treadmill started.
- Follow the running belt with left leg to do preparation before trial run. Only when you feel it right, then to run with two legs on the treadmill with proper running posture.
- The treadmill is FOR ONE PERSON ONLY. Overload is not allowed.
- You can adjust speed if necessary.
- After running, you can stop the treadmill by pulling out the safety key or pressing the "stop" button.
- Remember to turn off the power and pull out the plug when you finish exercising.
Safety precaution:
◆ Place the treadmill indoors to avoid any water and no heavy stuff.
When using the fitness device, wear comfortable clothing and preferably sports or aerobic shoes.
◆ Keep children away from the treadmill to avoid any accident.
◆ No overload to give damages to motor, controller, roller and running belt. Make routine maintenance to the treadmill.
◆ Keep less indoor dust and a certain extent of humidity to avoid interference of console and controller.
◆ Keep the household treadmill continuously running no more than 2 hours.
◆ Keep good air circulation when running.
◆ There should be 2000x1000mm safe space at the end of treadmill when running.
◆ Stop running if any discomfort and consult the doctor.
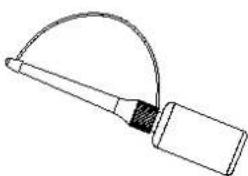
◆ Reserve the silicon bottle to some place that children cannot reach, to avoid serious mistake.
◆ Prohibit the user jumping off the treadmill directly after use.
◆ Pull out the power plug gently from the socket.
◆ Stop the machine if anything wrong and cut the power immediately.
◆ Ask local distributor to handle any issue or provide service. Dismantle the components personally is not allowed.
DANGER!
To reduce accidents or harm, please check following rules.
◆ Ensure your clothes zipped up before running.
◆ Do not wear clothes that easily hooked.
◆ Keep power cord away from hot objects.
◆ Keep children away from the treadmill.
◆ If something wrong, support the handle bar to push up and leave running belt.
◆ Do not use the treadmill outdoor.
◆ Cut off the power before move of the treadmill.
◆ Do not open motor and roller cover unless professionals.
◆ This machine can be used under 10A circuit.
◆ Ensure that only one person at a time uses the fitness device.
◆ The HRC testing may be not as exact as medical devices so its results for reference only.
◆ Stop exercising immediately should you feel unwell or if you feel pain in your joints or muscles. In particular, keep an eye on how your body is responding to the exercise program. Dizziness is a sign that you are exercising too intensively with the device. At the first signs o lay down on the ground until you feel better.
Warning!
Prohibit!
◆ Following patients under treatment need to get use of the treadmill after approval of professional doctor.
(1) The person with backache or used to get hurt in the leg, waist, neck. Those with numbness of legs, waist, neck and hands (those with chronic diseases such as intervertebral disc protrusion, spinal slip, cervical vertebra protrusion, etc.)
(2) The patient with deformational arthritis, rheumatism or gout.
(3) The patient with osteoporosis.
(4) The patient with a bad circulatory system like heart disease, vascular disorders and vascular hypertension.
(5) The patient with respiratory disturbance.
(6) The patient with Artificial heart rhythm problem.
(7) The patient with malignant tumors.
(8) The patient with thrombosis.
(9) The patient with diabetes-caused perceptual disturbance.
(10) The person with skin injury.
(11) The patient with a high fever above 38^ C.
(12) The person with bent back bone.
(13) The person with pregnancy or in (menstrual) period.
(14) The person feels discomfortable.
(15) The person is obviously in a bad condition.
(16) The person for the purpose of rehabilitation.
(17) The person having abnormal physical features.
-Above cases may cause accident or poor health
◆ Stop exercising immediately should you feel unwell like pain in your joints or muscles, dizziness, numb, and abnormal heart beat, and consult the doctor as soon as possible.
◆ Keep children away from this product.
- Children may get hurt if you ignore this.
◆ Told the children that this is not a toy.
- Children may get hurt if you ignore this.
◆when using, taking out, putting back or moving this product, please make sure there is nobody or pets around.
Prohibit!
◆ stop use this product when the cover cracked (inner parts come out) or welded parts drop off. -may cause danger or injury.
◆ Do not jump up or down from the treadmill when running.
- may fall down and get injury.
◆ Do not use or reserve the treadmill outdoor or near bathroom to avoid water.
◆ Do not use or reserve the treadmill in the area exposed to direct sunlight, and avoid high temperature places like electric blanket and warmer.
- may cause electric leakage or fire.
◆ Do not use when the power line or plug damaged, or the socket is loose.
- may cause electric shock, short circuit or fire.
◆ Do not damage or twist the power cord, also do not put heavy things on it.
- may cause fire or electric shock.
◆ Only for one person at a time, tell people around not too close.
- may fall down and cause injury.
◆ people who is not conscious or can't operate by himself can not use the treadmill.
- may cause accident or get injury.
◆ disassemble, repair, change by customer themselves are forbid absolutely.
- may cause mechanical breakdown and injury.
To avoid water
◆ the main body and operating components can not meet with water or drink.
- may cause electric shock and fire.
Prohibit!
◆ Do not exercise too much if you are not a regular sportspeople.
◆ Do not use the treadmill after meals or when feel tired.
- may cause damage to your health.
◆ This product is for home use. It cannot be used in school or gymnasium where are lots of unspecific users.
- may cause injury.
◆ Do not use the product while you are having meals or doing other activities.
◆ Do not use the product when you feel the body become slow after drink.
- may cause accident or injury.
◆ Do not use the product when you have hard object in your pocket.
- may cause accident or injury.
◆ the power plug cannot be attached with needle, waste or water.
- may cause electric shock, short circuit and fire.
◆ Do not pull out the plug or switch the power to "off" while operating.
- may cause injury.
Do not operate with wet hands!
◆ Do not pull out or insert the plug with wet hands.
- may cause electric shock or injury.
Remember to pull out the plug!
◆Remember to pull out the plug when not using.
- Dust and dampness can damage insulation and then cause electric leakage and fire.
◆ Pull out the plug when maintenance.
- may cause electric shock and injury.
◆ stop using immediately when the product can not start or have something abnormal, pull out the plug and make a trouble call.
- may cause electric shock and injury.
◆ pull out the plug when meet with power failure suddenly.
- may cause accident and injury when power resumption.
◆ You should hold the plug not the wire when pulling out the plug.
- may cause short circuit, electric shock and fire.
Ground connection instruction!
◆ the product must have grounded connection. The grounded connection can provide a channel with least resistance for the current when the product is malfunction, thus can reduce the danger of electric shock.
◆ The product is equipped with electric wire for grounding conductor and grounding plug. The plug must insert into the socket that conformed to the local regulations.
Danger!
◆ incorrect connection of grounding conductor may cause electric shock. If you are not sure about the grounding connection, please ask a professional electrician to check if the plug of the product is not match your socket, you should ask for an electrician to install a correct socket.
◆ the product have grounding plug. Please confirm that you have the matched socket first. Socket adapter is not allowed.
Exploding drawing:
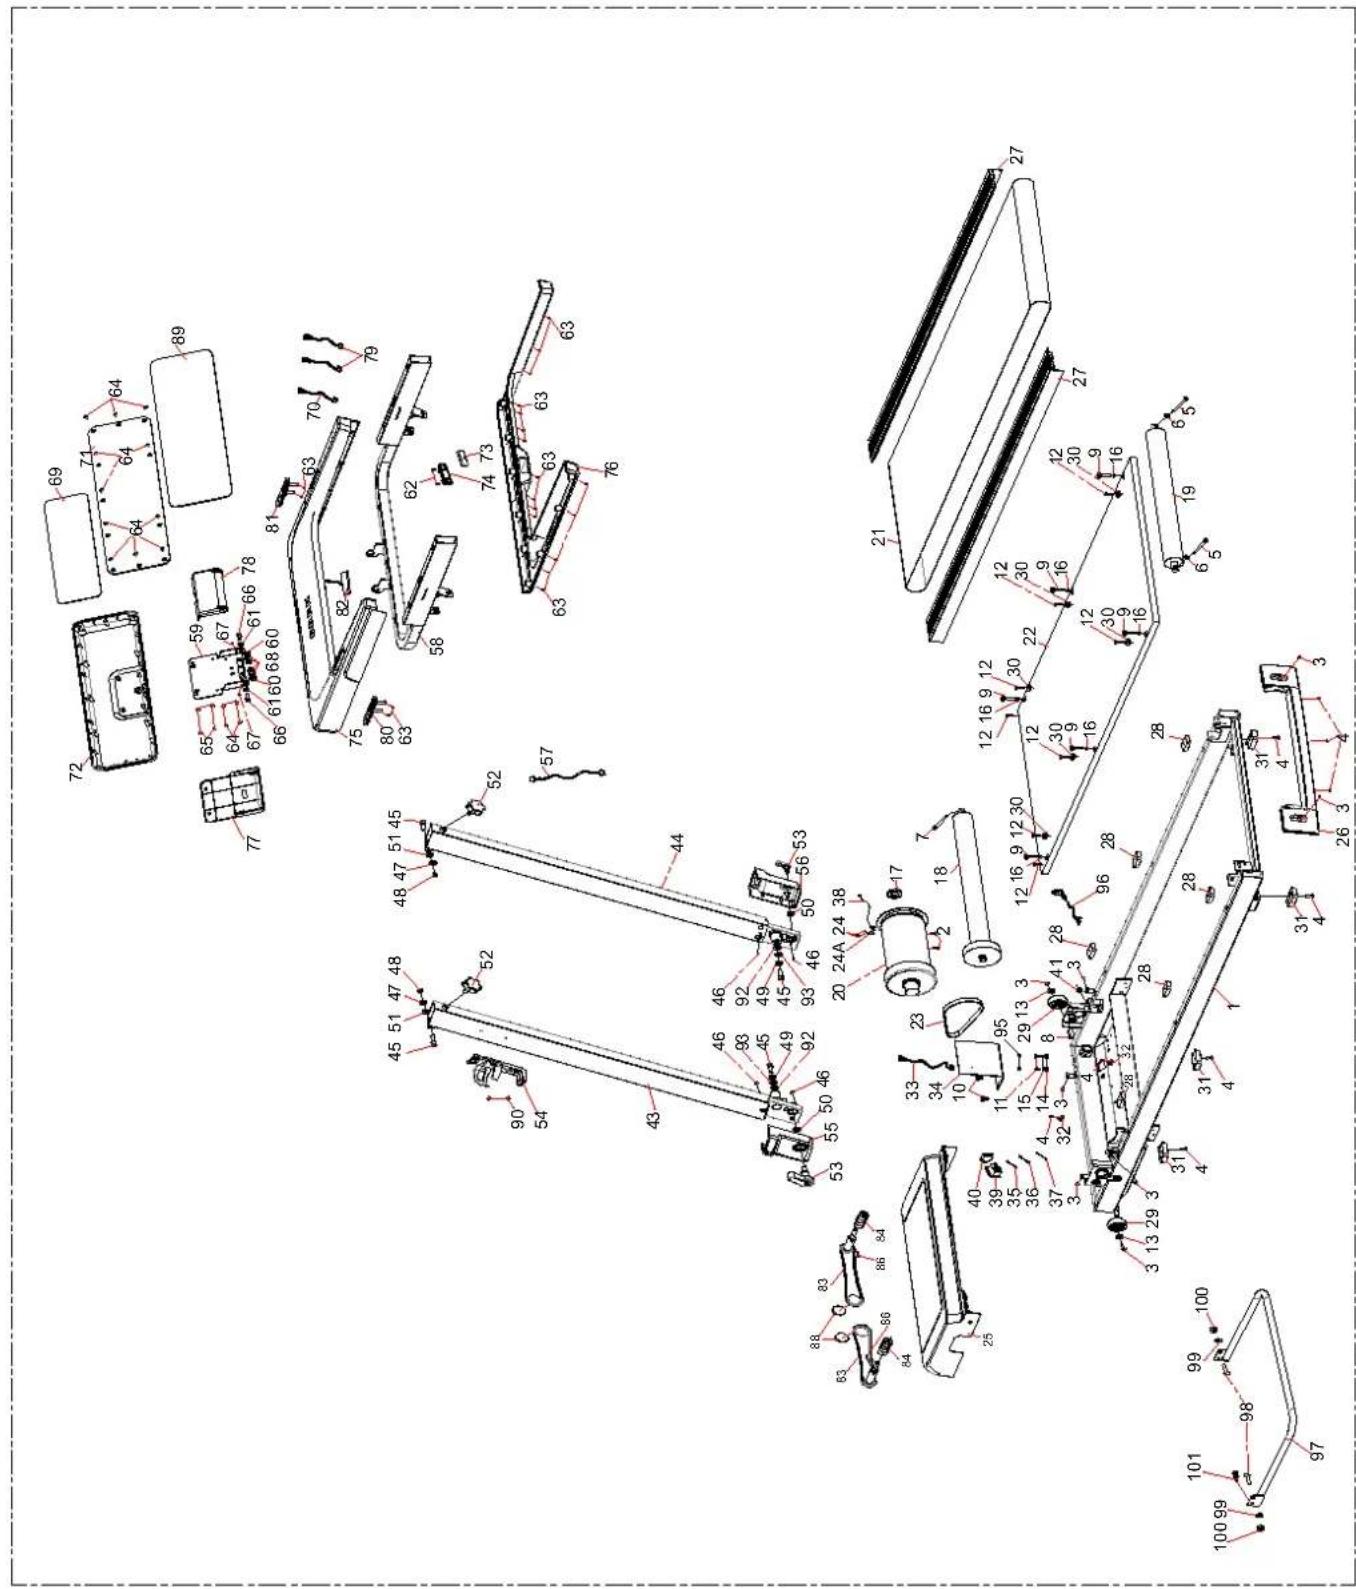
Part list:
| No. | Part Name | specification | Qty |
| 1 | Main frame | 1 | |
| 2 | Allen C.K.S. full thread bolt | M8*20 | 2 |
| 3 | Philips C.K.S. full thread bolt | M5*10 | 8 |
| 4 | Philips C.K.S. self-tapping bolt | ST4*16 | 9 |
| 5 | Allen Cylinder full thread bolt | M8*75 | 2 |
| 6 | Flat washer | Φ8 | 2 |
| 7 | Allen Cylinder full thread blot | M6*45 | 1 |
| 8 | Philips C.K.S. self-tapping bolt | ST4*10 | 2 |
| 9 | Allen sunk full thread bolt | M6×55×Φ16 | 6 |
| 10 | Philips C.K.S. full thread bolt | M4*16 | 2 |
| 11 | Philips C.K.S. full thread bolt | M4*10 | 2 |
| 12 | Philips sunk self-tapping bolt | ST4*15 | 8 |
| 13 | Flat washer | Φ5 | 2 |
| 14 | Outer serrate lock washer | Φ5 | 2 |
| 15 | Spring washer | Φ5 | 2 |
| 16 | Plastic flat pad (PVC) | Φ12×Φ6×t1.0 | 6 |
| 17 | Magnet ring | 1 | |
| 18 | Front roller | 1 | |
| 19 | Rear roller | 1 | |
| 20 | Motor | 1 | |
| 21 | Running belt | 1 | |
| 22 | Running board | 1 | |
| 23 | Motor belt | 174(442)PJ6 | 1 |
| 24 | Philips Pan head full thread bolt | M4*8 | 2 |
| 25 | Motor cover | 1 | |
| 26 | Rear cover | 1 | |
| 27 | Side rail | 2 | |
| 28 | Square cushion | 6 | |
| 29 | wheels | 2 | |
| 30 | Round edge guide block | 6 | |
| 31 | Square feet pad | 4 | |
| 32 | cable clamp | 2 | |
| 33 | Communication wire | 1 | |
| 34 | controller | 1 | |
| 35 | Power connection wire | 1 | |
| 36 | Power connection wire | 1 | |
| 37 | Power connection wire | 1 | |
| 38 | Speed sensor | 1 | |
| 39 | Ship type switch | 1 | |
| 40 | Self-reset switch | 1 | |
| 41 | Power cable buckle | 1 | |
| 42 | Metal support for speed sensor | 1 | |
| 43 | Standpost left | 1 | |
| 44 | Standpost right | 1 | |
| 45 | Allen Cylinder full thread bolt | M8*20 | 4 |
| 46 | Philips C.K.S. self-tapping bolt | ST4*10 | 4 |
| 47 | Flat washer | Φ8 | 2 |
| 48 | Hexagon lock nut | M8 | 2 |
| 49 | Flat washer | 32 × 8.5 × t2.0 | 2 |
| 50 | Plastic pad | 24 × 16 × t2.0 | 2 |
| 51 | Plastic pad | 18 × 8.5 × t2.0 | 2 |
| 52 | Quincuncial knob | 35 × M8 × 20 | 2 |
| 53 | L-shape knob | 2 | |
| 54 | Bottle holder | 1 | |
| 55 | Standpost cover left | 1 | |
| 56 | Standpost cover right | 1 | |
| 57 | Communication wire | 1 | |
| 58 | Console frame | 1 | |
| 59 | Console fixing plate | 1 | |
| 60 | Papilionaceous Spring | 12.5 × 6.2 × 0.7 | 4 |
| 61 | M6 step pad | 16 × 8 × 4.7 | 2 |
| 62 | Philips C.K.S. self-tapping bolt | ST4*10 | 2 |
| 63 | Philips C.K.S. self-tapping bolt | ST4*16 | 20 |
| 64 | Philips sunk self-tapping bolt | ST4*10 | 16 |
| 65 | Philips sunk self-tapping bolt | ST4*15 | 4 |
| 66 | Hexagon full thread bolt | M6*25 | 2 |
| 67 | Philips C.K.S. full thread bolt | M4*10 | 2 |
| 68 | Hexagon lock nut | M6 | 4 |
| 69 | Console | 1 | |
| 70 | Communication wire | 1 | |
| 71 | Console panel | 1 | |
| 72 | Console back cover | 1 | |
| 73 | Safety key socket | 1 | |
| 74 | Safety key | 1 | |
| 75 | Sundry basket upper | 1 | |
| 76 | Sundry basket lower | 1 | |
| 77 | Console front decoration cover | 1 | |
| 78 | Console rear decoration cover | 1 | |
| 79 | Handle pulse wire | 2 | |
| 80 | Start/stop handle pulse set | 1 | |
| 81 | Speed handle pulse set | 1 | |
| 82 | Touch button wire | 1 | |
| 83 | Folding bracket frame | 2 | |
| 84 | Ordinary cylindrical spiral compression spring | 14 × 1.5 × 20 | 2 |
| 86 | Philips Pan head full thread bolt | M5*15 | 2 |
| 88 | EVA pad | 2 | |
| 89 | Acrylic console sticker | 1 | |
| 90 | Philips C.K.S.sharp full thread bolt | 2 | |
| 91 | papilionaceous Spring | 8 × 4.2 × 0.4 | 4 |
| 92 | papilionaceous Spring | 40 × 20.4 × t2.0 | 2 |
| 93 | D hole spacer | t4.0 × Φ 40 | 2 |
| 96 | Power cord | 1 | |
| 97 | Rear support tube | 1 | |
| 98 | Allen C.K.S. full thread bolt | M8×20 | 2 |
| 99 | Flat washer | Φ8 | 2 |
| 100 | Hexagon lock nut | M8 | 2 |
| 101 | Elastic thread bolt | 1 |
None #85 or #87.
Treadmill instruction
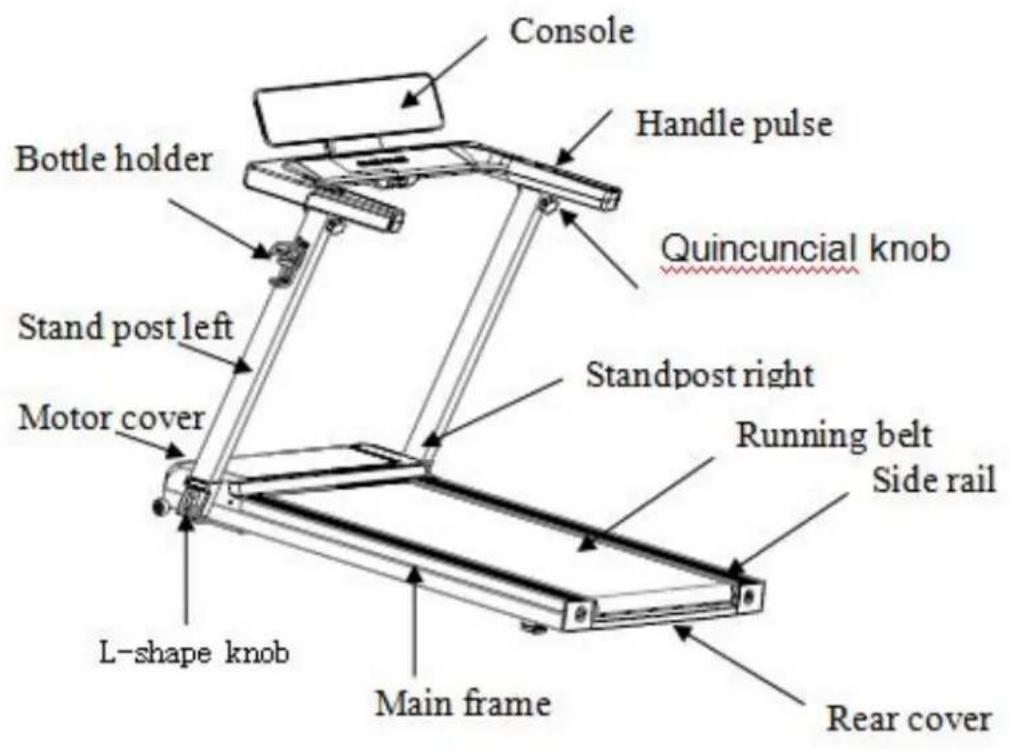
Technical information
| Dimension | Fold: 265*780*1530 mm |
| Unfold: 1530*780*1250 mm | |
| Running surface | 1220*450mm |
| Speed | 1.0-16.0km/h |
Remark: WE RESERVE THE RIGHT TO AMEND THE PRODUCT WITHOUT PRIOR NOTICE.
Packing List
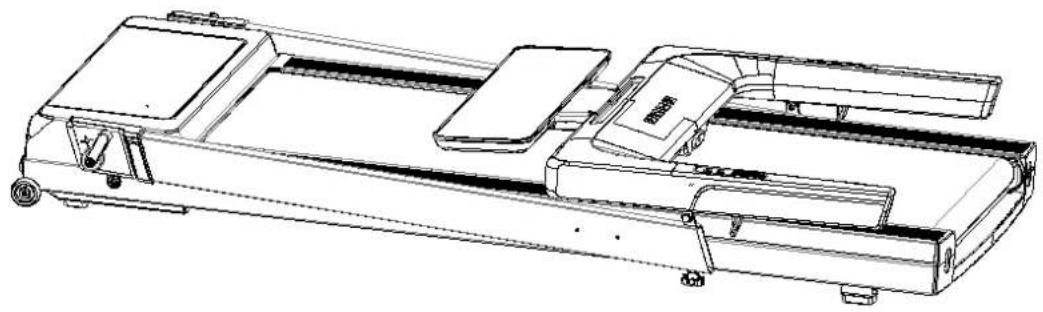
natural_image
Technical line drawing of a mechanical device with no visible text or symbolsMachine
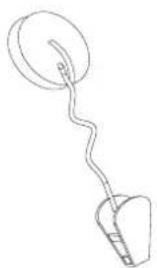
natural_image
Simple line drawing of a coiled spring or wire with a circular head and base (no text or symbols)Safety key
natural_image
Simple line drawing of a tool with a curved handle and a segmented handle (no text or symbols)Silicon bottle
Manual
Manual
natural_image
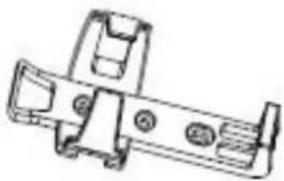
Technical line drawing of a mechanical bracket or bracket (no text or symbols)Bottle holder
Hardware
Hardware kit
Hardware list
natural_image
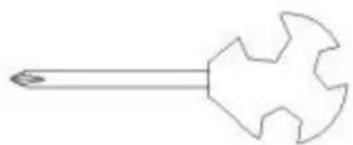
Simple line drawing of a hammer with a five-pronged handle (no text or symbols)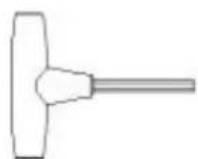

Philips Open Wrench 14x17x75 T-shape Wrench 6mm Philips C.K.S. sharp full thread bolt M
| No. | Part | Qty |
| 1 | Philips C.K.S. sharp full thread bolt M4×16 | 2 |
| 2 | Philips Open Wrench 14x17 x75 | 1 |
| 3 | T-shape Wrench (6mm) | 1 |
ASSEMBLY INSTRUCTIONS
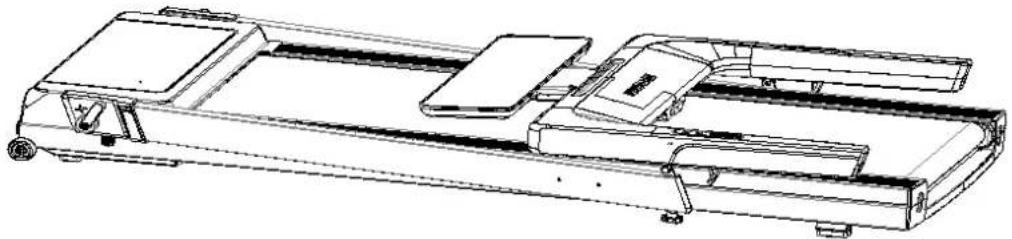
Step 1: Take the machine out of carton box, and put it on the flat floor (see the picture above), remove all PE bags and packing belts wrapping on the machine.
natural_image
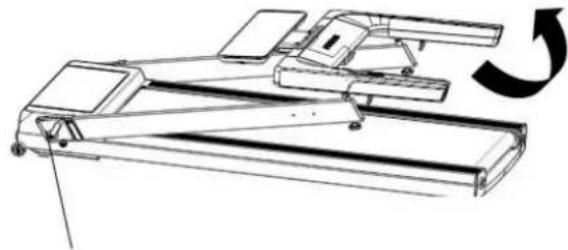
Technical line drawing of a mechanical device with no visible text or symbolsStep 2: Loose two L-shape knobs on bottom of standposts, then raise the standposts.
natural_image
Technical line drawing of a mechanical device with no visible text or symbols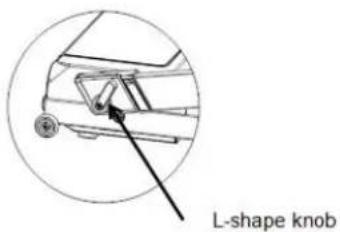
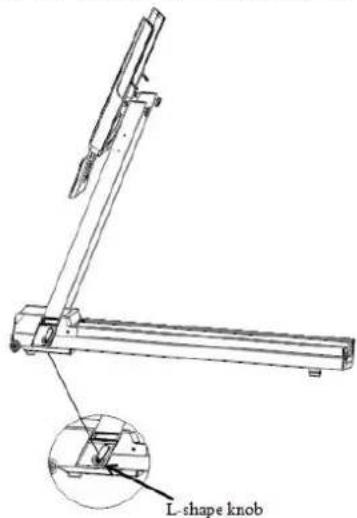
Step 3: Raise the stand post to top position, then lock the L-sharp knob.
Step 4: Loose the quincuncial knob by two sides, adjust the console frame to suitable position, then lock the quincuncial knobs.
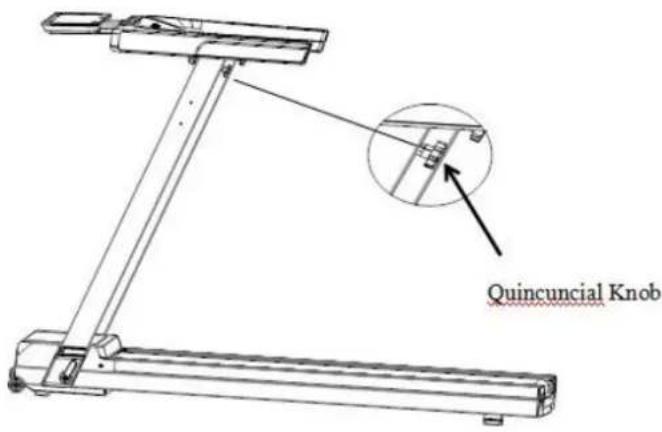
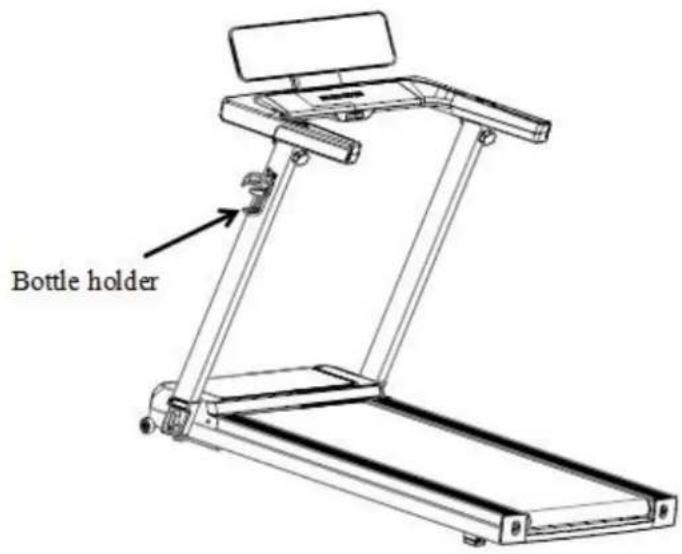
Step 5: Adjust the console to suitable position, assemble the bottle holder to left stand post by Philips C.K.S. sharp full thread bolt M4*16. Double check whether the L-shape knobs and quincuncia are locked well, the assembly is finished.
FOLDING INSTRUCTIONS
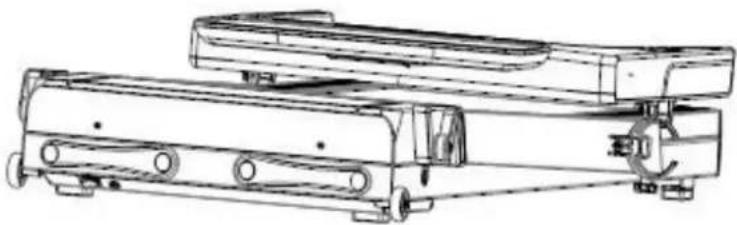
Step 1: Fold the treadmill by opposite procedure of assembly, put the console flat, hold the console frame by one hand, then loose the quincuncial knobs by the other hand to fold the console frame. Hold the stand post by one hand, then loose the L-shape knob by the other hand to fold the s finally to lock the L-shape knob. Treadmill is folded, which can be moved or/and stored.
natural_image
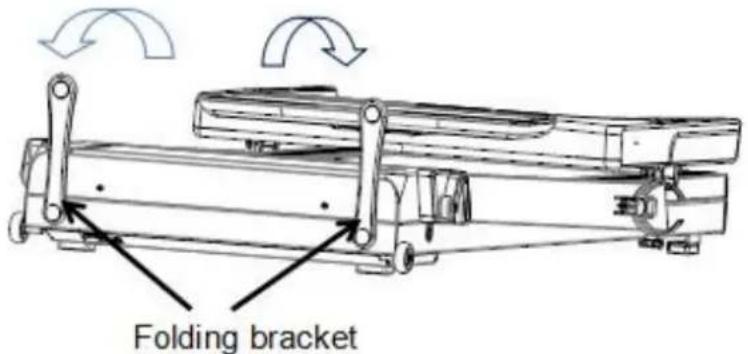
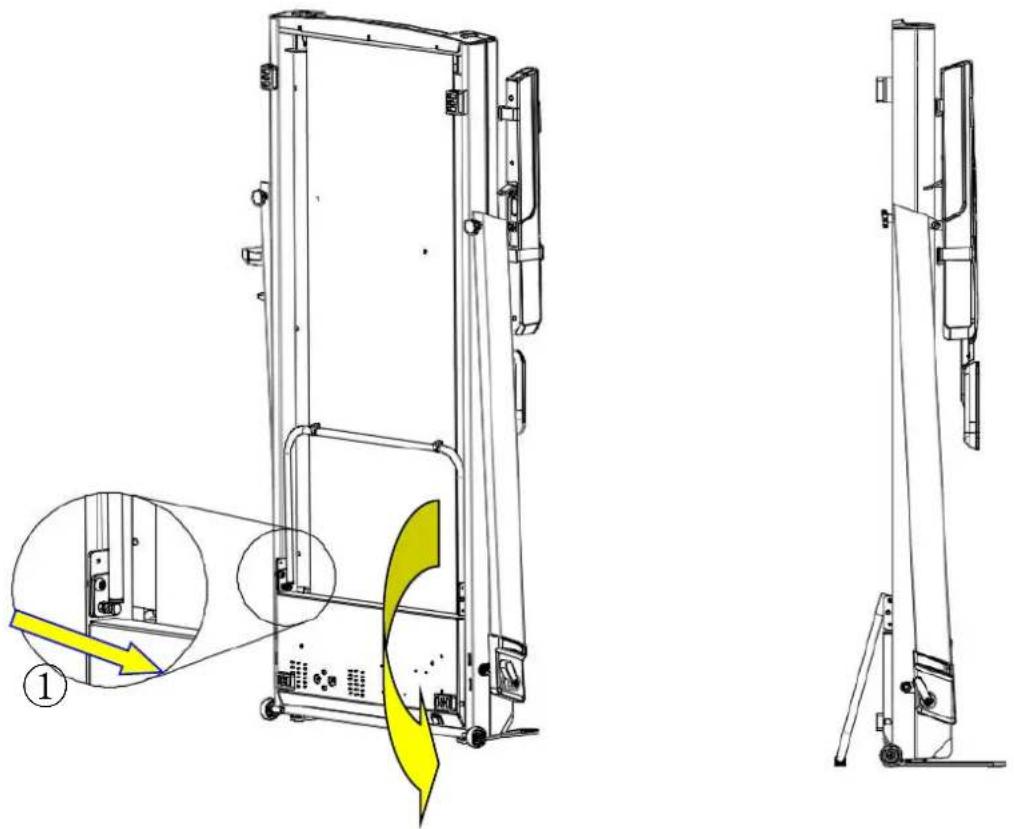
Line drawing of a two-wheeled truck with wheels and side-mounted roof (no text or symbols)Step 2: Rotate the folding brackets, according to direction of below pictures.
Step 3: let the treadmill stand by itself.
Step 4: Put the support tube down.
(1) After folding according to the first three steps, pull out the left bolt at the bottom of the put the support tube down until you hear the sound of the bolt in place.
natural_image
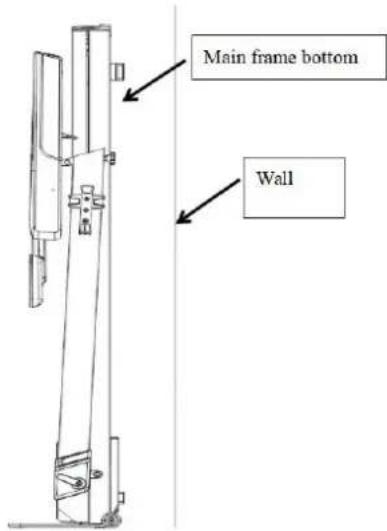
Technical line drawing of a vertical lift or lift mechanism with highlighted internal components and directional arrows (no text or symbols)Remark: Treadmill should stand close the wall, keep away from children, in case of unexpected
General fitness tips
1. Warm-up
Do not hold your breath before warming up for 5-10 minutes before each warm-up.
2. Breathe
Usually when you are preparing to restore your breath, inhale with your nose and spit out your breath with your mouth. The breathing and movement should be coordinated, such as breathing too fast. The movement should be stopped immediately
3. Frequency
The same part of the muscle should have a rest of that is, the same part can only be trained every other day.
4. Load
According to the individual physical condition determine the amount of training, then according to the principle of asymptotic load to practice, the initial training of muscle soreness is a normal phenomenon, as long as continue to practice, soreness can be eliminated.
5. Relax
Do 5 minutes of exercise after each exercise, especially the stretching and relaxation of the muscles of the foot, to long-term muscle condensation, maintain a muscle flexible diet
6. Diet
In order to protect the digestive system, one hour after meals before exercise, training should be at least half an hour before eating, exercise less water, especially drinking water, so as not to increase the heart, kidney burden
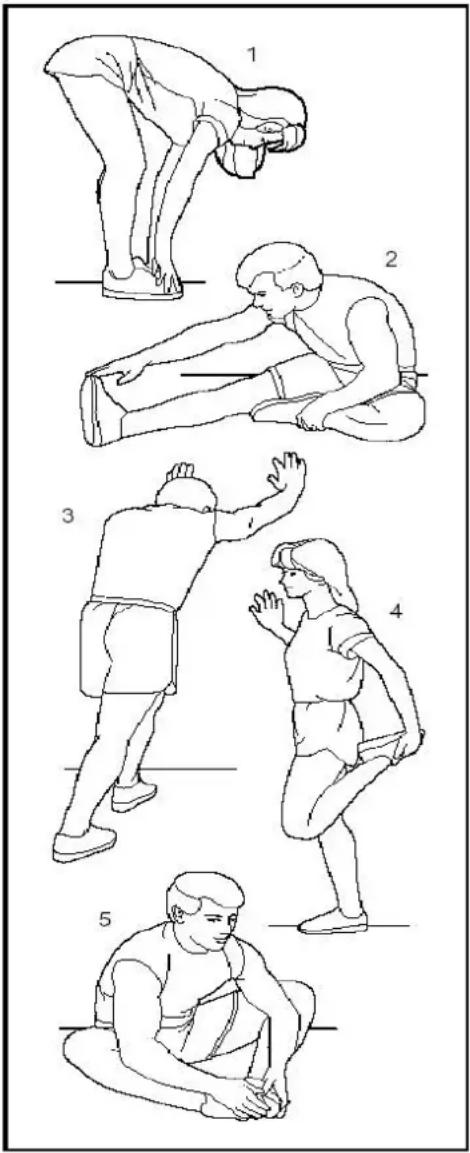
Stretching exercises
No matter how fast you walk, it's best to do stretching exercises first. Warm muscles are easier to stretch, so take a 5-10 minute warm-up. Then stop and do the stretching as follows: 5 times, each step for 10 seconds or more; do it again after the workout.
1. Stretch down
The knees are slightly curved, the body slowly bends forward, let the back and shoulders relax, and the hands try to touch the toes. Keep pit for 10\~15 seconds, then relax. Repeat 3 times (As picture 1 shown).
2. Tendon stretching
Sit on a clean seat cushion and straighten one leg. Put the other leg inward so that it fits against the inside of the straight leg. Try to touch the toes with your hands. Keep it for 10\~15 seconds, then relax. Repeat 3 times for each leg (As picture 2 shown).
3. Calf and heel stretch
Hold the wall or tree with both hands and one foot behind. Keep your hind legs upright and your heels on the ground, leaning in the direction of the wall or tree. Keep it for 10\~15 seconds, then relax. Repeat 3 times for each leg (As picture 3 shown).
4. Quadriceps stretching
Grasp the balance with your left hand or the table, then extend your right hand backward your right ankle and slowly pull it toward your hips until you feel the muscles in front of y
tense. Keep it for 10\~15 seconds, then relax. Repeat 3 times for each leg (As picture 4 sl 5. The sartorius muscle (muscle inside the thigh) stretches
The soles of the feet are opposite and the knees sit down. Grasp your feet with both han them in the direction of the groin. Keep it for 10\~15 seconds, then relax. Repeat 3 times. (As picture 5 shown).
Product using instructions
(Console function description, treadmill using instructions)
Instructions of Console panel:
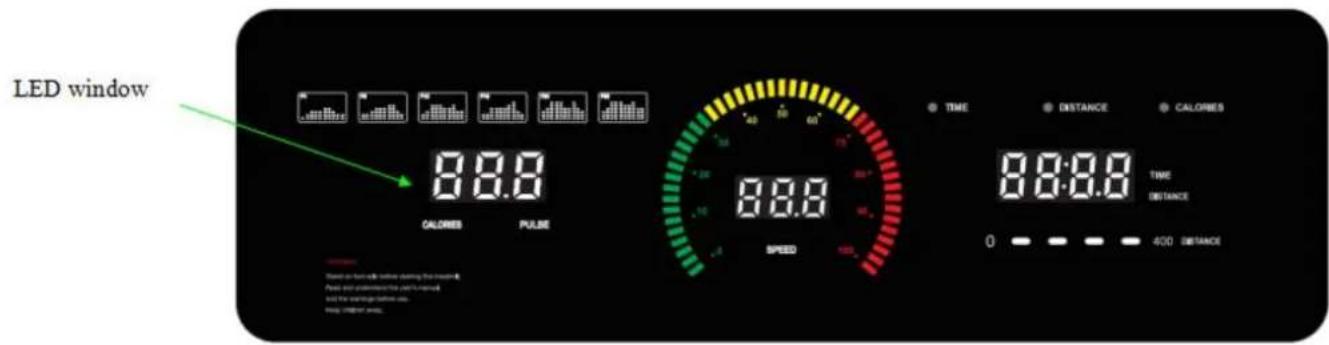
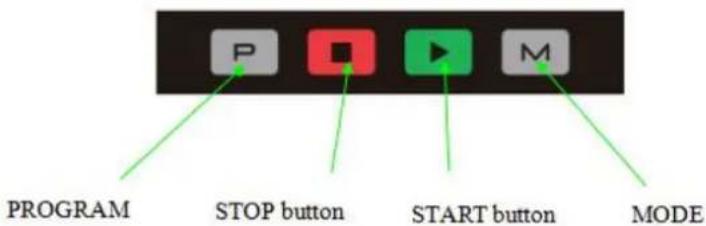
Console function description:
- P0 is to set the training program for the user, P1-P36 is the built-in automatic training program, threeUSER program and BMI.
- LED display, 4 operation keys;
- Speed and distance window, kilometre and mile conversion function
- Operating speed range: 1.0\~16.0KM/H;
- Overload, over-current protection, explosion-proof, anti-speed, anti-electromagnetic interference and other safety protection functions;
- System self-test, abnormal information prompt function.
- Three custom functions;
- ERP function;
- Buzzer mute function.
Safety Guide:
Insert the power cord plug into the 10A power socket with safety ground, turn on the switch, the console screen is fully displayed, and then identify the safety key;
✿ P lace the safety key in the position on the console and clip the clothespin to the clothes on the chest;
The electronic control system is in safety monitoring at any time. As long as any abr is found, the running treadmill stops urgently, and the screen displays an abnormal information prompt with a prompt tone;
W hen the screen displays an abnormal information, un plug the safety key or switch to clear the fault information.
Display and button description:
- Display window instruction: LED display.
* "DISTANCE" "TIME" window: display the value of the distance and time;
✿ " CALORIES" PULSE" window: shows the value of calorie and pulse;
✨ "SPEED" window: display speed value;
- Conversion function between kilometers and miles:
A. Take off safety key, then press "PROGRAM" and "MODE" buttons together for few seconds, display show 0.6, which means the kilometers are converted to miles.
B. Take off safety key, then press "PROGRAM" and "MODE" buttons together for few seconds, display show 1.0, which means the miles are converted to kilometers.
- Function button description:
A. Program key: Program key: "P" is the program button: In standby state, press this key to select 36 different running programs from manual mode "1.0" to "P1-P36". Manual mode is the default running mode of the system, the default speed of manual mode is 1.0KM/H, and the maximum running speed is 16km/h.
B. Mode button: "M" is the mode button: when in standby state, press this key to select three different countdown operation modes. H Time countdown mode, distance countdown mode and calorie countdown mode. Speed add-subtract key can be used to set the relevant countdown value when choosing various modes. After setting, press START key to start the treadmill.
C. START is the start/pause key. When the treadmill is down, press the start/pause key and the treadmill starts at the lowest speed.
In the running state of the treadmill, press the start/pause key, and the treadmill will stop
running temporarily. Pressing the start/pause key again in the pause mode will gradually return to the running mode before the pause.
D. Stop button: "STOP" is the stop button. The treadmill will stop running if it press the stop key in the running or pausing state.
E. Speed button: "SPEED+" and "SPEED -" are speed add-subtract keys: adjust the se when parameterizing the treadmill.
After the treadmill is started, it can be used to adjust the speed, stepping 0.1/time. When holding down more than 2 seconds, it will increment or decrement automatically.
4. Safety key function description:
The safety key is composed of magnetic inductor, clothes clip and nylon rope. It has function of safety precaution against emergency shutdown. In any state, as long as the lock is out of position, the treadmill stops running, the keyboard of the electronic watch is forbidden to operate, and the screen displays "E-07" with prompt sound. Every time the security lock is placed, the screen will display for 2 seconds, and then enter the default working state of the system.
5. Program/startup instructions:
A: Program description:
1: A manual program P0: normal mode, time countdown, distance countdown, calorie countdown mode.
2: 36 setting programs: P01, P02, P03, P04, P05, ..., P36;
3: Three custom programs U01\~U03;
B: Start-up instructions:
1 : Attach the safety key to the safety key switch position on the panel, the console will display for 2 seconds, then enter the manual program.
2: Press the start button, the time window displays: 5-4-3-2 -1, and the buzzer will beep once every minus one time, and the treadmill will be started when it is reduced to 1; the initial treadmill is 1KM/h.
3: While the treadmill is running, press the stop button to stop the treadmill and the treadmill data is cleared.
Manual mode:
1: How to enter the manual program:
A: Turn on the power switch and go directly to the normal mode in the manual program.
B: In the stop state, press the program key to enter the normal mode in the manual pro
2: Three setting functions in the manual program: time setting, distance setting, calorie setting; after entering the normal mode in the manual program, press the mode button "MODE" in the state to select various modes. After finishing setting, press the "START" button to start the treadmill; the speed of the training is set by the user. Default: Speed: 1KM/H.
Only one mode can be set among normal mode, countdown time, countdown distance, countdown calories. Operating according the last mode, and counted down from the setting value, and t displays positive count.
A: When starting the manual program, the display time of time window is 0:00. The time, distance, calories are counted, and the setting function is turned off. While the motor is running, press "STOP" button and the motor will slowly decelerate until it stops smoothly, and all settings with the default state.
B: In time countdown mode, press the mode button "MODE" in the standby mode to enter the time countdown mode. In the setting state, the time window displays the time and flashes. The initial time is: 30:00 minutes, press the speed a dd-sub-trad button "+" and "-" can set the countdown. Time setting range is: 5:00-99:00. The different is 1:00 minutes. Default value is 30:00.
C: In the distance countdown mode, press the mode button "MODE" in the standby mode to enter the distance countdown mode, and the distance window flashes. Initial 1.0 km, press the speed add-subtract button "+" and "-" to set the distance, the setting range is 1.0-99.0 km. Increase 1.0km each time. Default value is 1.0KM.
D: In the distance countdown mode: press the mode button "MODE" in the standby mode to enter the calorie countdown mode, and the calorie window flashes. The initial calorie display: 50 cal, press the add-subtract button of speed "+" and "-" to set the calorie setting range is: 20-990 cal. Increase 10 cal each time. Default value is 50 cal.
3: Manual program operation:
A: Press start, the time counts down to 5 seconds, then the motor starts running, the initial speed is 1 km/h.
B: In the running state, press the “+”, “-” button or “QUICKSPEED” button to adjust the tread mill speed;
C: D: When the calorie setting is decremented to zero, the speed slowly decreases until it stops, then returns to the manual mode state.
E: When the set distance is decremented to zero, the speed decreases slowly until it stops, and then returns to the manual mode state.
F: When the set time decreases to zero, the speed decreases slowly until it stops, and then returns to the manual mode state.
Program mode
1 : P1-P36" is the system setting program. It is only suitable for the countdown time mod setting state, the time window displays the time and flashes. Press "+" or "-" to modify the Press "MODE" to reset to the default value. Initial time Set 30 minutes, and only time can setting range is: 5:00-99:00. Press the add-subtract button of speed to adjust the set value;
2 : After setting the training mode, press the "START" button, the screen will start to display the 5 second countdown, accompanied by 5 beeps. After the countdown to 1, the treadmill will sta slowly accelerate to the displayed speed, and then smoothly and constant speed. Run accord the speed and slope of the program.
3 : In the running state, press the "+", "-" button or "QUICK SPEED" button to adjust the treadmill speed;
4 : When the motor is running, press "STOP" button, the motor slows down slowly until it stops smoothly, accompanied by a long stop prompt sound, and all settings are restored to the de
Body fat test program:
Body mass index (FAT) is a measure of a person's height and weight, not the proportion body. FAT is suitable for any male and female, together with other health indicators to prov with the basis for weight adjustment. The ideal FAT should be between 18-24, if less than too thin, if it is between 25 and 28 it is overweight, and if it exceeds 29 it is considered data is for reference only and cannot be used as medical data.)
1: When the treadmill stop, press the program key "PROG" to adjust to the body mass program "FAT", select the body fat test program, and enter the body fat test. Press the "M" to select the item number, press the "+" and "-" buttons to set the parameters.
2: After entering the body fat test function, the "Pulse" window displays: F1, indicating that Sex is entered at this time, and "Calories" window displays 01, indicating that this is for ma the add-subtract button of speed to select input: 01 (male), 02 (female).
4: Press the mode button "MODE", "Pulse" window displays: F2, indicating entering the Age "Calories" window showing 25 years old (default value), press add-subtract button of speed to the age (the setting range is: 1-99 years old)
5: Press the mode button "MODE", "Pulse" window displays: F3 means to enter the Heig "Calories" window displays 170cm (67inch), press add-subtract button of speed to adjust the (the setting range is: 100-220cm (39-87inch)).
6: Press the mode button "MODE" and "Pulse" window displays: F4, which indicating the
set. “Calories” window shows 70kg (154 lbs), press add-subtract button of speed to adjust th (Setting range is: 20 -150kg (44-330 lbs)).
7: Press the mode button "MODE" and "Pulse" window displays: F5 (BMI), which indicating that enter the test body fat function, and the Calories window is displayed---. Please put hands on the sensor for testing heartbeat of handle bar. The window will display the body fat value (BMI) subject within 8 seconds.
Based on Asian standards, fat test results:
FAT ≤18 -- Under weight
18<FAT≤24 -- Normal weight
25<FAT ≤28 -- Over weight
FAT≥29 -- Obesity
This data is only used as a motion reference
Safety key function :
The safety key consists of a tact switch, a clothes peg and a nylon cord, and has a safety feature for emergency stop.
- In any state, the safety key is pulled off and the time window displays "E-07" with a sound. If the motor is running, the motor is stopped urgently and the console keypad ban to operate.
2 Each time the safety key is placed, the screen will be fully displayed for 2 seconds. Then enter the system default working state. All counters are deared and the set value is reset. The treadmill is in the positive timing mode of the manual program P0.
Custom program:
The USER mode has three U01\~U03. In the USER mode, the user can retrieve or set this own unique motion program. Press the "PROG" button to adjust to "U01\~U03". Then press the "MODE" button to set and press the "+/-" button to adjust the movement time (range is 5-99 minutes). Press the START button to start the movement.
USER mode setting: Press "MODE" to set the user's exclusive 0-16% speed and lifting program. Press add-subtract button to set the user's expected speed value from 1km to 20km. You can also use the speed instant key to select quickly. When setting the lift, press the up and down button to set the user's expected slope. The range is 0%-15%. You can also use the lift instant key to select quickly. After setting the current number, press the MODE button to enter the next step. The set value is automatically saved when the last parameter is set. Continue to press the MODE button to select the exercise time. The default is 30:00 minutes. Press the add-subtract button to adjust the time setting.
After setting, the user can start motion by pressing “START”, and the user's exclusive program saved. When the customer uses this training mode next time, he can directly enter the correct mode and press the start button to run.
Heart rate function
When the treadmill is powered on, the heart rate display is displayed within 5 seconds of heartbeat. The initial value is the actual measured heart rate, and the display range is: 50-200 beats/min. There is a heart-shaped graphic flashing during the test heartbeat. This data is for reference only and cannot be used as medical data.
Value display range:
| Initial | Set initial value | Predetermined area | Display range | |
| Time (minutes:seconds) | 0:00 | 30:00 | 5:00-99:00 | 0:00~99:59 |
| Speed (km/h) | 0.0 | N/A | N/A | 1—16KM |
| slope(%) | 00 | N/A | N/A | 0 |
| Distance (km) | 0.0 | 1.00 | 1.0—99.0 | 0.0—99.9 |
| Calorie (kcal) | 0 | 50 | 20—990 | 0—999 |
When setting a parameter, it can be adjusted by adding or subtracting the "+" and "-" symbols. For example: the time setting range is 5:00-99:00. When set to 99:00, press the +" button again, back to 5:00 can continue to cycle.
ERP function:
The default is ERP mode. When treadmill is not operated after 4.5 minutes, it will enter do to saving power consumption by itself. User can press any key to wake up the system. In standby status, user can press "MODE" button around 3 seconds to cancel ERP function, while the console will show "2222"; Then press around 3 seconds again back to ERP mode, while the console will show "1111".
Buzzer mute function :
The default is with buzzer working. In standby status, press "PROGRAM" and "STOP" buttons together, when the display show "bz off", the buzzer is closed; Then to press "PROGRAM" and "STOP" buttons again, when the display show "bz off' again", the buzzer is open again.
Any run bluetooth function (optional):
Download website: http://api.sunwayelectronic.com/oma/web/Download, requiring hardware system configuration: IOS system 7.0 or above, compatible with lphone, ipad, etc.
Auto ma tic progra m P1-P3 6 metri c spe ed tab l e :
| LevelProg Sort | 1 | 2 | 3 | 4 | 5 | 6 | 7 | 8 | 9 | 10 | |
| P1 | SPEED | 1.0 | 3.0 | 5.0 | 5.0 | 5.0 | 7.0 | 7.0 | 5.0 | 3.0 | 2.0 |
| P2 | SPEED | 2.0 | 3.0 | 5.0 | 8.0 | 5.0 | 5.0 | 6.0 | 8.0 | 4.0 | 3.0 |
| P3 | SPEED | 2.0 | 3.0 | 7.0 | 8.0 | 5.0 | 5.0 | 5.0 | 8.0 | 4.0 | 3.0 |
| P4 | SPEED | 2.0 | 2.0 | 5.0 | 8.0 | 8.0 | 8.0 | 8.0 | 5.0 | 3.0 | 2.0 |
| P5 | SPEED | 3.0 | 4.0 | 8.0 | 9.0 | 10.0 | 10.0 | 10.0 | 7.0 | 4.0 | 3.0 |
| P6 | SPEED | 3.0 | 4.0 | 6.0 | 7.0 | 7.0 | 7.0 | 9.0 | 10.0 | 5.0 | 3.0 |
| P7 | SPEED | 3.0 | 4.0 | 4.0 | 10.0 | 4.0 | 9.0 | 4.0 | 11.0 | 3.0 | 2.0 |
| P8 | SPEED | 3.0 | 5.0 | 7.0 | 9.0 | 3.0 | 5.0 | 7.0 | 5.0 | 11.0 | 5.0 |
| P9 | SPEED | 3.0 | 7.0 | 10.0 | 4.0 | 7.0 | 11.0 | 5.0 | 4.0 | 12.0 | 6.0 |
| P10 | SPEED | 3.0 | 5.0 | 9.0 | 10.0 | 6.0 | 6.0 | 9.0 | 6.0 | 11.0 | 3.0 |
| P11 | SPEED | 4.0 | 5.0 | 11.0 | 9.0 | 6.0 | 8.0 | 9.0 | 11.0 | 6.0 | 5.0 |
| P12 | SPEED | 4.0 | 6.0 | 10.0 | 10.0 | 10.0 | 7.0 | 7.0 | 10.0 | 6.0 | 5.0 |
| P13 | SPEED | 2.0 | 4.0 | 6.0 | 6.0 | 6.0 | 8.0 | 8.0 | 6.0 | 4.0 | 3.0 |
| P14 | SPEED | 3.0 | 4.0 | 6.0 | 9.0 | 6.0 | 6.0 | 7.0 | 9.0 | 5.0 | 4.0 |
| P15 | SPEED | 3.0 | 4.0 | 8.0 | 9.0 | 6.0 | 6.0 | 6.0 | 9.0 | 5.0 | 4.0 |
| P16 | SPEED | 3.0 | 3.0 | 6.0 | 9.0 | 9.0 | 9.0 | 9.0 | 6.0 | 4.0 | 3.0 |
| P17 | SPEED | 4.0 | 5.0 | 9.0 | 10.0 | 11.0 | 11.0 | 11.0 | 8.0 | 5.0 | 4.0 |
| P18 | SPEED | 4.0 | 5.0 | 7.0 | 8.0 | 8.0 | 8.0 | 10.0 | 11.0 | 6.0 | 4.0 |
| P19 | SPEED | 4.0 | 5.0 | 5.0 | 11.0 | 5.0 | 10.0 | 5.0 | 12.0 | 4.0 | 3.0 |
| P20 | SPEED | 4.0 | 6.0 | 8.0 | 10.0 | 4.0 | 6.0 | 8.0 | 6.0 | 12.0 | 6.0 |
| P21 | SPEED | 4.0 | 8.0 | 11.0 | 5.0 | 8.0 | 12.0 | 6.0 | 5.0 | 12.0 | 7.0 |
| P22 | SPEED | 4.0 | 6.0 | 10.0 | 11.0 | 7.0 | 7.0 | 10.0 | 7.0 | 12.0 | 4.0 |
| P23 | SPEED | 5.0 | 6.0 | 12.0 | 10.0 | 7.0 | 9.0 | 10.0 | 12.0 | 7.0 | 6.0 |
| P24 | SPEED | 5.0 | 7.0 | 11.0 | 11.0 | 11.0 | 8.0 | 8.0 | 11.0 | 7.0 | 6.0 |
| P25 | SPEED | 3.0 | 5.0 | 7.0 | 7.0 | 7.0 | 9.0 | 9.0 | 7.0 | 5.0 | 4.0 |
| P26 | SPEED | 4.0 | 5.0 | 7.0 | 10.0 | 7.0 | 7.0 | 8.0 | 10.0 | 6.0 | 5.0 |
| P27 | SPEED | 4.0 | 5.0 | 9.0 | 10.0 | 7.0 | 7.0 | 7.0 | 10.0 | 6.0 | 5.0 |
| P28 | SPEED | 4.0 | 4.0 | 7.0 | 10.0 | 10.0 | 10.0 | 10.0 | 7.0 | 5.0 | 4.0 |
| P29 | SPEED | 5.0 | 6.0 | 10.0 | 11.0 | 12.0 | 12.0 | 12.0 | 9.0 | 6.0 | 5.0 |
| P30 | SPEED | 5.0 | 6.0 | 8.0 | 9.0 | 9.0 | 9.0 | 11.0 | 12.0 | 7.0 | 5.0 |
| P31 | SPEED | 5.0 | 6.0 | 6.0 | 12.0 | 6.0 | 11.0 | 6.0 | 12.0 | 5.0 | 4.0 |
| P32 | SPEED | 5.0 | 7.0 | 9.0 | 11.0 | 5.0 | 7.0 | 9.0 | 7.0 | 12.0 | 7.0 |
| P33 | SPEED | 5.0 | 9.0 | 12.0 | 6.0 | 9.0 | 12.0 | 7.0 | 6.0 | 12.0 | 8.0 |
| P34 | SPEED | 5.0 | 7.0 | 11.0 | 12.0 | 8.0 | 8.0 | 11.0 | 8.0 | 12.0 | 5.0 |
| P35 | SPEED | 6.0 | 7.0 | 12.0 | 11.0 | 8.0 | 10.0 | 11.0 | 12.0 | 8.0 | 7.0 |
| P36 | SPEED | 6.0 | 8.0 | 12.0 | 12.0 | 12.0 | 9.0 | 9.0 | 12.0 | 8.0 | 7.0 |
Common faults and maintenance:
| Problem and Code | Reason | Maintenance |
| System didn't work | A、no power | Plug into socket or turn the power s the "NO" position |
| B、safety key isn't in the right position | Replace the safety key | |
| C、The transformer is not plugged in transformer is bad | Check and connect the transformer or replace the transformer | |
| D、switch off | Check system input and output and communication lines | |
| Stop abruptly under normal state | A、Safety key drop out | Replace the safety key |
| B、broken system | Ask serviceman to repair it | |
| The keys malfunction | broken keys | 1. Change the key board and wire;2. 2.Change the main board;3.Change the console |
| E-01 | A、The communication wire is abnormal | Make sure each core is completely inserted. Check the connection wire, it was broken, change it. |
| B、broken console | Change console | |
| C、broken transformer | Check and change transformer | |
| D、broken controller | Change controller | |
| E-02 | A、Broken motor wire and motor | Change motor |
| B、bad connection between motor connection wire and controller or bad controller. | Check and connect the wire again or change controller. | |
| E-03 | A、incorrect installation of photoelectric sensor | Check and assembly again |
| B、bad photoelectric sensor | Change photoelectric sensor | |
| C、bad connection between photoelectric sensor and controller | Check and reconnect | |
| D、bad controller | Change controller | |
| E-05 | A、controller was damaged | Change controller |
| B、motor was damaged | Change motor | |
| C、mechanical failure | Check/add the lubricating oil of running belt, or rollers are blocked | |
| E-07 | No safety key signal | Check safety key, replace safety key or console |
| LCD display no value of pulse | A、The handle communication wire di plug well or broken handle wire | Check and connect the wire well or handle wire. |
| B、Broken wire of console system | Change the console | |
| Console incomplete display or lack of strokes | A、LED Digital tube | Change the main PCB board |
| B、Broken system | Change the console |
Using instruction:
Treadmill folding and moving:
1、Folding
Cut off the power when plan to fold the treadmill.
2、Unfolding
- When a folding the treadmill, you should choose one place where around 1m away from the power socket, and the ground is flat without any barriers.
3、moving
First you need be \$e following things before moving:
1: the power is off;
2: the plughas been pulled out from the osket;
3: the treadmill has been folded;
Then you can catch the end of treadmill with one hand, and catch the handlebar at the same side with another hand, tilt 40\~50°up to chest to move the treadmill slowly.
Grounding guide:
This product must have grounding. If error and damage occurred to the treadmill, grounding wire can form one circuit with lowest resistance, the current can be guided into the ground to reduce the danger of electric shock. This product is equipped with one cable, which has one grounding conductor and grounding plug. The treadmill must be grounded with correct socket that is compatible with local rules.
Danger:
If you do not know whether the equipment is properly grounded, please consult a qualified electrician or maintenance personnel. Please do not change the plug attached to this product without authorization. If the plugs inconsistent with the socket, let a qualified electrician install a suitable socket.
It should be under 220-240V and matches with this kind of socket as shown.
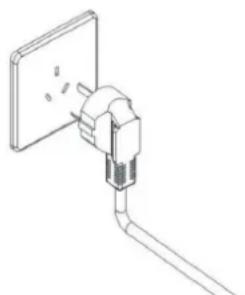
natural_image
Line drawing of a wall socket connected to a plug, showing installation details (no text or symbols)Using instruction of treadmill
- Turn the power on, keep the treadmill spread out at its lowest position and check is normal.
- Clip the safety key cord with your clothes.
- Ensure and check its function and stability before using.
Standing on the Running belt to get it started is not allowed.
The correct way to start is standing on side rails with hands on the handle bar. After normal working, you can exercise with the treadmill.
Hold the handle bar when press the "START" key, the treadmill running at the speed of 1.0km/h after 5 seconds. Then press "+ "Key to 2.5-3.5 km/h which is the comfort speed for running.
Both of hands are supposed to catch handle bar at the same time and feet step to the running belt successively to start running. Run at the same pace as your running belt.
-
After several minutes, you can speed up by pressing "+" key or slow down by "-" key meanwhile holding the hand bar.
-
When running, press speed value, you can enter into the fixed speed you want.
-
Pressing "stop" key to make the motor stop.
Pre-setting Use
Connect the power. Tum the power on.
Press "choose" key to select what mode you want.
Press "starts" key to get started in your selected mode.
You can press “+” or “-” to change the speed or “stop” key to make it stop.
HRC testing: After the treadmill is powered on, hold your hands on the metal pulse sensors, then you can see HRC value on the display window.
Note: When safety key pull out, the treadmill will stop immediately.
And the computer can not work, the window shows “_”
Proper maintenance is very important to ensure a faultless and operational condition of the treadmill. Improper maintenance can cause damage to the treadmill or shorten the life of product.
All parts of the treadmill must be checked and tightened regularly. Worn out parts must replaced immediately.
LUBRICATION
The treadmill is factory-lubricated. However, it is recommended to check the lubrication of treadmill regularly to ensure an optimal operation of the treadmill. Suggestions:
Using time less than 3 hours every week lubrication once every 5 months
Using time equal to 4-7 hours every week lubrication once every 2 months Using time more than 7 hours every week lubrication once every month
No excessive lubrication. Note: the important factor of increase the lifetime for treadmill is proper lubrication. The way of checking whether the running belt need lubrication is, lift the side soft the treadmill and feel the central back of the belt, as far as possible. If traces of silicon spray are found, lubrication is not necessary. If the surface is dry, the belt needs lubrication.
natural_image
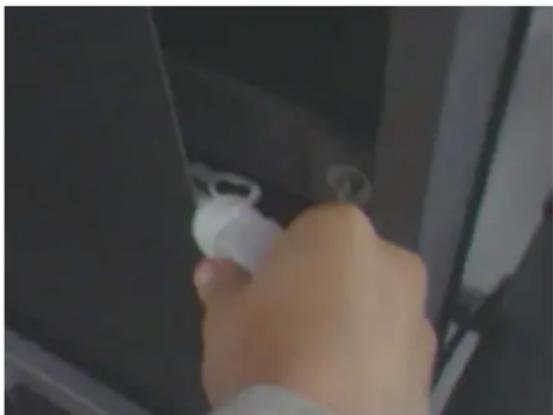
Close-up of a hand holding a small white object against a dark background, possibly part of a vehicle or device (no visible text or symbols)Application of lubricant on the belt:(as shown)
- Stop the running belt, and fold the treadmill. Put up the belt of back main frame so can reach the middle position.
- Spraying silicone oil on the inner side of the running belt and coating silicone oil on both sides of the running belt.
- Run the treadmill at a speed of 1km/h to apply silicone evenly. And tread lightly on the running belt from left to right.
- Wait several minutes to let the silicon spray spread, before starting the machine.
CLEANING:
Regular cleaning of the striding belt ensures a long product life.
- Warning: The treadmill must be turned off to avoid electrical shocks. The power cord pulled out of the socket, before starting the cleaning or maintenance.
- After training: Wipe the console and other surfaces with a clean soft and damp cloth to remove sweat residues.
Caution: Do not use any abrasives or solvents. To avoid damage to the computer, keep any liquids away. Do not expose the computer to direct sunlight.
- Weekly: To make the cleaning easier it is recommended to use a mat for the treadmill. Shoescanleavedirtonthestridingbeltthatcanfallbeneaththetreadmill. Clean the mat under the treadmill once a week.
STORAGE :
Store your treadmill in a clean and dry environment. Ensure the master powers witch is off and is un-plugged from the electrical wall outlet.
BELT ADJUSTMENT
All running belts are properly set at the factory and after assembly. However, slack may occur after a period of use. Such as : pause and slip may occur when running. When this
phenomenon occurs, adjust the running belt and screw in half a turn left and right. If I belt is loose, the running belt and the roller will slip in turn. But too tight is also not is easy to increase the load of the motor and damage the motor, running belt and roll
ADJUSTING THE BELT DEMATION:
All running belts are properly set at the factory and after assembly. But after a period, the belt have the possibility for deviation. The reasons can be listed as follows.
- The treadmill is unstable.
- Feet didn't in the central of the running belt when running.
- Feet exert uneven force.
If deviation caused by manual, No - load rotation for a few minutes can return to normal.
Adjusting step by step in half a turn with a 6mm Allen wrench that is equipped randomly for unable to restore automatically.
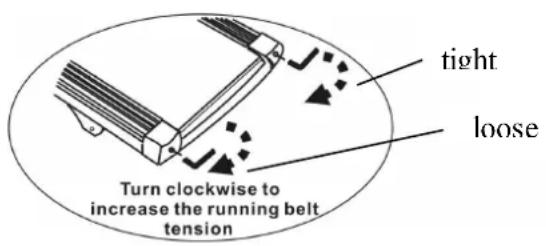
Such as left deviation of running belt. Adjust the left screw clockwise or the right screw anti-clockwise.
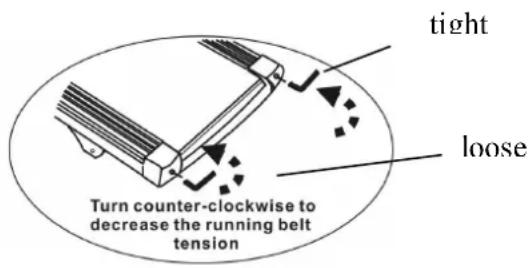
Such as right deviation of running belt. Adjust the right screw clockwise or the left screw anti-clockwise.
Running belt deviation is not covered by the warranty, and is mainly maintained by users according to the instructions. Running deviation can seriously damage the running belt. It be found and corrected in time.
Adjustment of the motor's belt
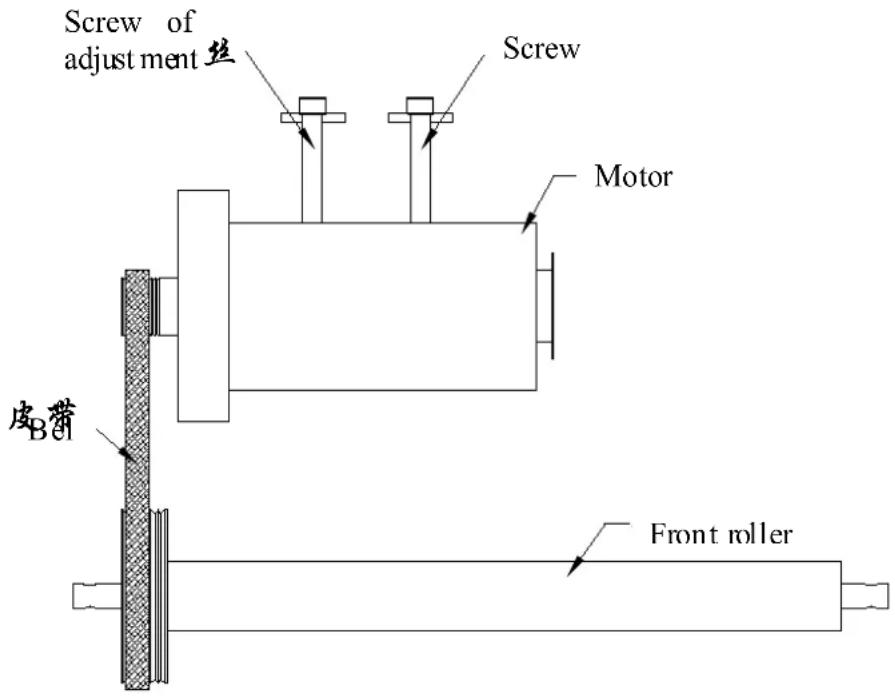
All the motor belt of treadmill must be adjust in the factory and after assembly. However, after a period of use, there may be slack or slip phenomenon.
The step of adjustment: 1. Turn the adjusting screw counterclockwise with wrench.
-
The adjustment range shall be subject to the belt load not slipping.
-
Noted: Regular cleaning of belts and pulley grooves
Trouble shooting and maintenance
Treadmill
| Item | Reason | Maintenance |
| Treadmill didn't work | a no power | Plug into socket |
| b safety key isn't in the right position | Replace the safety key | |
| c broken circuit signal system | Check the controller input and signal wire | |
| d switch off | Place the power switch in the “NO”position. | |
| e fuse burnt out | Change the fuse | |
| The running belt does not run smoothly. | a no enough lubrication | Use the Silicone id |
| b running belt too tight | Adjust the tightness of running belt | |
| Running belt slips | a running belt too loose | Adjust the tightness of running belt |
| b motor belt too loose | Adjust the tightness of motor belt | |
| The keys malfunction | a broken keys | 1. Change the keyboard and wire;2. Change the main board;3. Change the console |
| Stop abruptly unde normal state | a. Safety key drp out | Replace the safety keyAsk serviceman to repair it |
| b. broken system |
Console
| Item | Reason | Maintenance |
| System didn't work | A、No power | Plug into socket, input with power |
| B、safety key isn't in the position | Put the safety key in right position | |
| C、transformer isn't inserted right, or transformer is defected | Check and connect the transformer correctly, or replace the transformer | |
| D、broken circuit | Check the system input and output terminal communication lines | |
| Stop suddenly in a normal state | A、Safety key fall off | Assemble the safety key correctly |
| B、abnormal system | Contact the after-sales team for service | |
| Buttons didn't work | A、Some buttons are damaged or invalid | Replace the buttons |
| B、All buttons are invalid | 1. Change the key board and wire;2. Change the main board;3. Change the console | |
| E1 | A、Poor connection of communication wires | Reconnect the communication line once again check whether the port is plugged in place, replace the communication line |
| B、Console is defected | Replace console | |
| C、Transformer is defected | Check and replace transformer | |
| D、Controller is defected | Replace controller | |
| E2 | A、Motor wire or motor is defected | Check and replace motor wire or motor |
| B、Poor connection between motor wire and controller or controller is defected | Check and connect the wire correctly, or rep controller | |
| E3 | A、Speed sensor isn't assembled correctly | Check and assemble it correctly |
| B、Speed sensor is defected | Replace speed sensor | |
| C、Poor connection between Speed sensor and controller | Check and connect it correctly | |
| D、Controller is defected | Replace controller | |
| E5 | A、Controller is defected | Replace controller |
| B、Motor is defected | Replace motor | |
| E7 | No safety key signal was detected on console | 1、Check whether the safety key is in right position;2、Reinstall the safety lock mechanism to en that the hole is in the middle and the black bean rebound in place, Replace the console. |
| Not heart rate data is shown | A、Handle pulse wire isn't assembled well, or handl pulse wire is defected. | Check and connect it well, or replace the ha pulse wire |
| B、Electronic system line fa | Replace the console | |
| Electronic display is incomplete or missing strokes | A、Screws of displace boa loosen | Lock and fix the screws |
| B、System failure | Replace the console |
Important notes
- The device corresponds to current safety standards. The device is only suitable for hor. Any other use is impermissible and possibly even dangerous. We cannot be held liable damages that were caused by improper usage.
- Please consult your GP before starting your exercise session to clarify whether you are in suitable physical health for exercising with this device. The doctor's diagnose is should be the basis for the structure of your exercise program. Incorrect or excessive training could be harmful to your health.
- Carefully read through the following general fitness tips and the exercise instructions. If you have pain, shortness of breath, feel unwell or have other physical complaints, break off the exercise immediately. Consult a doctor immediately if you have prolonged pain.
- This fitness device is not suitable for professional or medical use, nor may it be used for therapeutic purposes.
- The pulse sensor is not a medical device. it is meant for your information purposes only and is designed to give an average pulse rate. It is not intended to offer medical advice nor will it measure pulse accurately every time, due to differing environmental and human conditioning factors.
- THANKYOU
- User Guide
- Safety precaution:
- DANGER!
- Warning!
- Prohibit!
- Do not operate with wet hands!
- Remember to pull out the plug!
- Treadmill instruction
- Technical information
- Packing List
- Hardware list
- ASSEMBLY INSTRUCTIONS
- FOLDING INSTRUCTIONS
- General fitness tips
- Warm-up
- Breathe
- Frequency
- Load
- Relax
- Diet
- Stretching exercises
- Stretch down
- Tendon stretching
- Calf and heel stretch
- Quadriceps stretching
- Product using instructions
- Console function description:
- Safety Guide:
- Display and button description:
- Safety key function description:
- Program/startup instructions:
- Manual mode:
- Program mode
- Body fat test program:
- Safety key function :
- Custom program:
- Heart rate function
- ERP function:
- Buzzer mute function :
- Any run bluetooth function (optional):
- Using instruction:
- Treadmill folding and moving:
- 1、Folding
- 2、Unfolding
- 3、moving
- Grounding guide:
- Danger:
- Using instruction of treadmill
- Pre-setting Use
- LUBRICATION
- Application of lubricant on the belt:(as shown)
- CLEANING:
- STORAGE :
- BELT ADJUSTMENT
- ADJUSTING THE BELT DEMATION:
- Adjustment of the motor's belt
- Trouble shooting and maintenance
- Important notes
Brand : PURE
Model : PD-TR7
Category : Treadmills