COS-RFFV183RS - Fridge Cosmo - Free user manual and instructions
Find the device manual for free COS-RFFV183RS Cosmo in PDF.


| Product Type | Refrigerator |
| Brand | Cosmo |
| Model | COS-RFFV183RS |
| Total Capacity | 18 cu. ft. |
| Dimensions (W x D x H) | 30" x 30" x 66" |
| Weight | 150 lbs |
| Voltage / Frequency | 120V / 60Hz |
| Annual Energy Consumption | 450 kWh |
| Main Functions | Adjustable glass shelves, humidity-controlled crisper drawers, separate freezer compartment, ice maker, reversible door hinge |
| Temperature Control | Electronic thermostat with digital display |
| Defrost Type | Frost-free (auto defrost) |
| Cooling System | Compressor-based forced air circulation |
| Ice Maker | Built-in, automatic, with water line connection |
| Water Filter | Integrated, replaceable (model WF-1) |
| Shelves | Tempered glass, spill-proof edge, adjustable |
| Door Storage | Adjustable door bins (gallon capacity) |
| Lighting | LED interior lighting |
| Noise Level | ≤ 40 dB |
| Installation Requirements | Level surface, clearance for ventilation (sides and back), water line for ice maker |
| Maintenance | Clean condenser coils every 6 months; replace water filter every 6 months; defrost freezer as needed (auto defrost reduces frequency) |
| Safety Features | Overload protection, child lock (optional), automatic door alarm |
| Spare Parts Available | Shelves, door bins, crisper drawers, water filter, ice maker parts, condenser coils |
| Repairability Index | 6/10 (moderately repairable, common parts available) |
| Warranty | 1 year parts and labor, 5 year compressor |
Frequently Asked Questions - COS-RFFV183RS Cosmo
User questions about COS-RFFV183RS Cosmo
0 question about this device. Answer the ones you know or ask your own.
Ask a new question about this device
Download the instructions for your Fridge in PDF format for free! Find your manual COS-RFFV183RS - Cosmo and take your electronic device back in hand. On this page are published all the documents necessary for the use of your device. COS-RFFV183RS by Cosmo.
USER MANUAL COS-RFFV183RS Cosmo
natural_image
Line drawing of a double-door refrigerator with two vertical doors and a front panel (no text or symbols)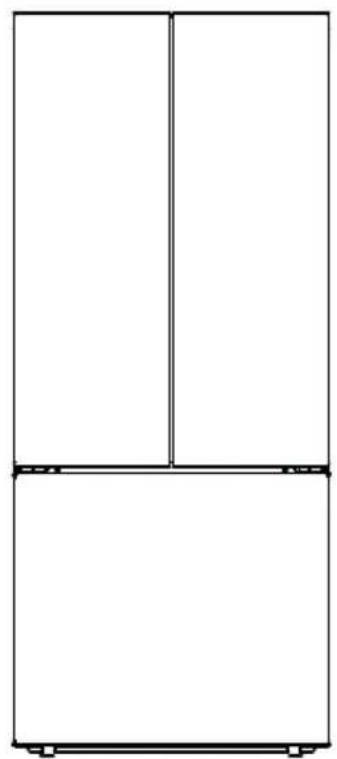
natural_image
Simple line drawing of a two-panel cabinet or enclosure with no text, numbers, or symbolsFRENCH DOOR REFRIGERATOR
OWNER'S MANUAL
IMPORTANT: READ AND SAVE THESE INSTRUCTIONS.
FOR RESIDENTIAL USE ONLY.
INSTALLER: PLEASE LEAVE THESE INSTRUCTIONS WITH THIS UNIT FOR THE OWNER.
OWNER: PLEASE RETAIN THESE INSTRUCTIONS FOR FUTURE REFERENCE.
THANK YOU FOR YOUR PURCHASE
Thank you for your purchase. We know that you have many brands and products to choose from and we are honored to know that you have decided to take one of our products into your home and hope that you enjoy it.
COSMO Appliances are designed according to the strictest safety and performance standard for the North American market. We follow the most advanced manufacturing philosophy. Each appliance leaves the factory after thorough quality inspection and testing. Our distributors and our service partners are ready to answer any questions you may have regarding how to install, use and care for your products. We hope that this manual will help you learn to use the product in the safest and most effective manner.
Before using this product, please read through this manual carefully. Keep this user manual in a safe place for future reference. Please ensure that other persons using this product are familiar with these instructions as well.
If you have any questions or concerns, please contact the dealer from whom you purchased the product, or contact our Customer Support at:
1-888-784-3108
Reach us online at:
www.cosmoappliances.com
TABLE OF CONTENTS
REFRIGERATOR SAFETY 4
Important Safety Instructions....5
PRODUCT OVERVIEW 10
Refrigerator Layout 10
INSTALLATION INSTRUCTIONS....12
Before Installing 12
Unpacking the Refrigerator 13
Choosing the Proper Location ....14
Dimensions and Clearances....15
Assembling/Removing Door Handles 17
Connecting to the House Water Line 18
Completing Installation 24
Start/Stop the Icemaker 24
Leveling 25
OPERATION 27
Before Use 27
Energy Saving Tips....29
Control Panel 30
Control Buttons....31
Display....33
Temperature Mode....33
Icemaker 34
MAINTENANCE & CARE 36
General Cleaning 36
TROUBLESHOOTING....40
LIMITED WARRANTY 50
REFRIGERATOR SAFETY
READ ALL INSTRUCTIONS BEFORE USING THE APPLIANCE
Your safety and the safety of others are very important.
We have provided many important safety messages in this manual and on your appliance. Always read and obey all safety messages.
This is the safety alert symbol.
This symbol alerts you to potential hazards that can kill or hurt you and others.
All safety messages will follow the safety alert symbol and either the word "WARNING" or "CAUTION." These words mean:
! WARNING
You can be killed or seriously injured if you don't follow instructions.
! CAUTION
A potentially hazardous situation which, if not avoided, could result in minor or moderate injury.
All safety messages will tell you what the potential hazard is, tell you how to reduce the chance of injury, and tell you what can happen if the instructions are not followed.
California Proposition 65 Warning

WARNING:
Cancer and Reproductive Harm - www.P65Warnings.ca.gov
IMPORTANT SAFETY INSTRUCTIONS

WARNING
To reduce the risk of fire, explosion, electric shock, or injury when using your refrigerator, follow these basic safety precautions:
- This refrigerator must be properly installed and located in accordance with the installation instructions before it is used.
- Unplug the refrigerator before making repairs or cleaning.
NOTE: Power to the refrigerator cannot be disconnected by any setting on the control panel.
NOTE: Repairs must be performed by a qualified service professional.
- Replace all parts and panels before operating.
- Do not use an extension cord.
- Do not store or use gasoline or other flammable vapors and liquids in the vicinity of this or any other appliance.
- Do not store explosive substances such as aerosol cans with a flammable propellant in this appliance.
- To prevent suffocation and entrapment hazards to children, remove the fresh food and freezer doors from any refrigerator before disposing of it or discontinuing its use.
• To avoid serious injury or death, children should not stand on, or play in or with the appliance.
• Children and persons with reduced physical, sensory or mental capabilities or lack of experience and knowledge can use this appliance only if they are supervised or have been given instructions on safe use and understand the hazards involved.
- This appliance is intended to be used in household and similar applications such as: staff kitchen areas in shops, offices and other working environments; farm houses; by clients in hotels, motels, bed & breakfast and other residential environments; catering and similar non-retail applications.
- Do not apply harsh cleaners to the refrigerator. Certain cleaners will damage plastic which may cause parts such as the door or door handles to detach unexpectedly.
READ AND SAVE THESE INSTRUCTIONS
IMPORTANT SAFETY INSTRUCTIONS

CAUTION
To reduce the risk of injury when using your refrigerator, follow these basic safety precautions:
- Connect to potable water supply only. A cold water supply is required for automatic icemaker operation. The water pressure must be between 20 and 100 psi (140 - 690 kilo-Pascals).
- Do not clean glass shelves or covers with warm water when they are cold. Glass shelves and covers may break if exposed to sudden temperature changes or impact, such as bumping or dropping. Tempered glass is designed to shatter into many small pieces if it breaks.
- Do not use a hair dryer to dry the inside of the refrigerator.
- Do not light a candle to remove odors in the refrigerator.
-
Keep fingers out of the "pinch point" areas; clearances between the doors and between the doors and cabinet are necessarily small. Be careful closing doors when children are in the area.
-
Do not refreeze frozen foods which have thawed completely.
- Use caution consuming popsicles or ice cubes straight from the freezer as this can cause freezer burn to the mouth and lips.
- Do not touch the cold surfaces in the freezer compartment when hands are damp or wet, skin may stick to these extremely cold surfaces.
- Don't store bottled or canned drinks (especially carbonated drinks) in the freezer compartment. Bottles and cans may explode.
- In refrigerators with automatic icemakers, avoid contact with the moving parts of the ejector mechanism, or with the heating element that releases the cubes. Do not place fingers or hands on the automatic ice making mechanism while the refrigerator is plugged in.
READ AND SAVE THESE INSTRUCTIONS
IMPORTANT SAFETY INSTRUCTIONS
CONNECTING ELECTRICITY

ELECTRICAL SHOCK HAZARD
Plug into a grounded 3-prong outlet.
Do not remove the ground prong.
Do not use an adapter or an extension cord.
Failure to do so can result in death, fire, or electrical shock.
Do not, under any circumstances, cut or remove the third (ground) prong from the power cord. For personal safety, this appliance must be properly grounded.
- The power cord of this appliance is equipped with a 3-prong (grounding) plug which mates with a standard 3-prong (grounding) wall outlet to minimize the possibility of electric shock hazard.
- Have the wall outlet and circuit checked by a qualified electrician to make sure the outlet is properly grounded.
- A 115 Volt AC, 60 Hz, 15- or 20-Amp fused, grounded electrical supply is required. This provides the best performance and also prevents overloading house wiring circuits which could cause a fire hazard from overheated wires.
- Never unplug your refrigerator by pulling on the power cord. Always grip plug firmly and pull straight out from the outlet.
- Where a standard 2-prong wall outlet is encountered, it is your personal responsibility and obligation to have it replaced with a properly grounded 3-prong wall outlet.
- The refrigerator should always be plugged into its own individual electrical outlet which has a voltage rating that matches the rating plate.
- Immediately discontinue use of a damaged supply cord. If the supply cord is damaged, it must be replaced by a qualified service professional with an authorized service part from the manufacturer.
- When moving the refrigerator away from the wall, be careful not to roll over or damage the power cord.
READ AND SAVE THESE INSTRUCTIONS
IMPORTANT SAFETY INSTRUCTIONS
PROPER DISPOSAL OF YOUR OLD REFRIGERATOR
SUFFOCATION AND ENTRAPMENT HAZARD
Failure to follow these disposal instructions can result in death or serious injury.
IMPORTANT: Child entrapment and suffocation are not problems of the past. Junked or abandoned refrigerators are still dangerous even if they will sit for "just a few days." If you are getting rid of your old refrigerator, please follow the instructions below to help prevent accidents.
Before You Throw Away Your Old Appliance
• Take off the fresh food and freezer doors.
- Leave the shelves in place so that children may not easily climb inside.
REFRIGERANT AND FOAM DISPOSAL
Dispose of appliance in accordance with Federal and Local Regulations. Flammable insulation material used requires special disposal of your appliance. Contact your local authorities for the environmentally safe disposal of your appliance.
READ AND SAVE THESE INSTRUCTIONS
IMPORTANT SAFETY INSTRUCTIONS
FLAMMABLE REFRIGERANT
Check the rating label for refrigerant type. If R600a, follow the warning instructions below.

WARNING

FIRE AND EXPLOSION HAZARD
This appliance contains isobutane refrigerant, also known as R600a, a natural gas with high environmental compatibility. However, it is also combustible. Adhere to the warnings below to reduce the risk of injury or property damage.
- When handling, installing and operating the appliance, care should be taken to avoid damage to the refrigerant tubing.
- Service shall only be performed by authorized service personnel. Use only manufacturer-authorized service parts.
-
Dispose of refrigerator in accordance with the Federal and Local Regulations. The flammable refrigerant and insulation material used in this product require special disposal procedures. Contact your local authorities for the environmentally safe disposal of your refrigerator.
-
Keep ventilation openings in the appliance enclosures or in the built-in structure clear of obstruction.
• To remove frost, scrape with a plastic or wood spatula or scraper. Do not use an ice pick or a metal or sharp-edged instrument as it may puncture the freezer liner and then the flammable refrigerant tubing behind it. - Do not use electrical appliances inside the food storage compartment of the appliance.
- Do not use any electrical device to defrost your freezer.
READ AND SAVE THESE INSTRUCTIONS
PRODUCT OVERVIEW
REFRIGERATOR LAYOUT
The images in this guide may be different from the actual components and accessories, which are subject to change by the manufacturer without prior notice for product improvement purposes.
EXTERIOR
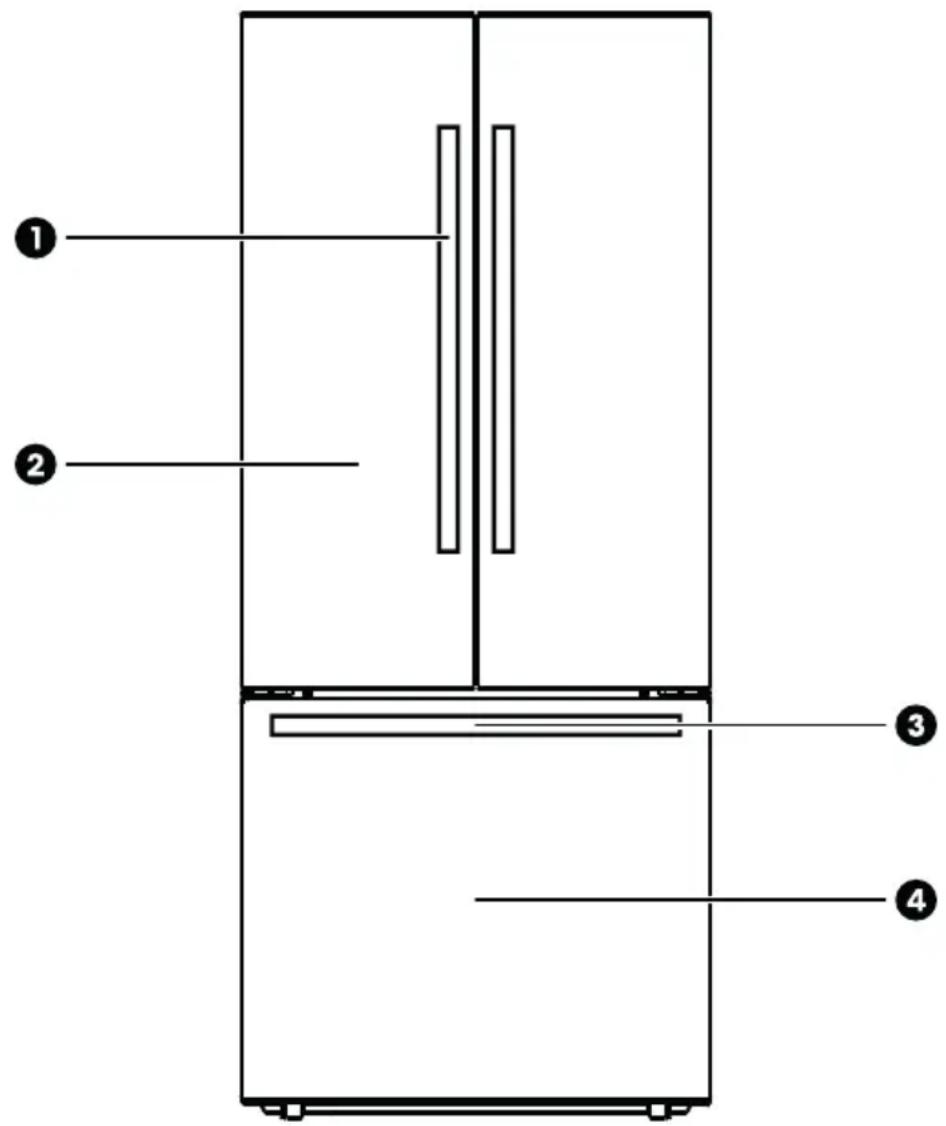
-
Door handle (COS-RFFV183GHS only)
-
Refrigerator door
-
Drawer handle (COS-RFFV183GHS only)
-
Freezer drawer
INTERIOR
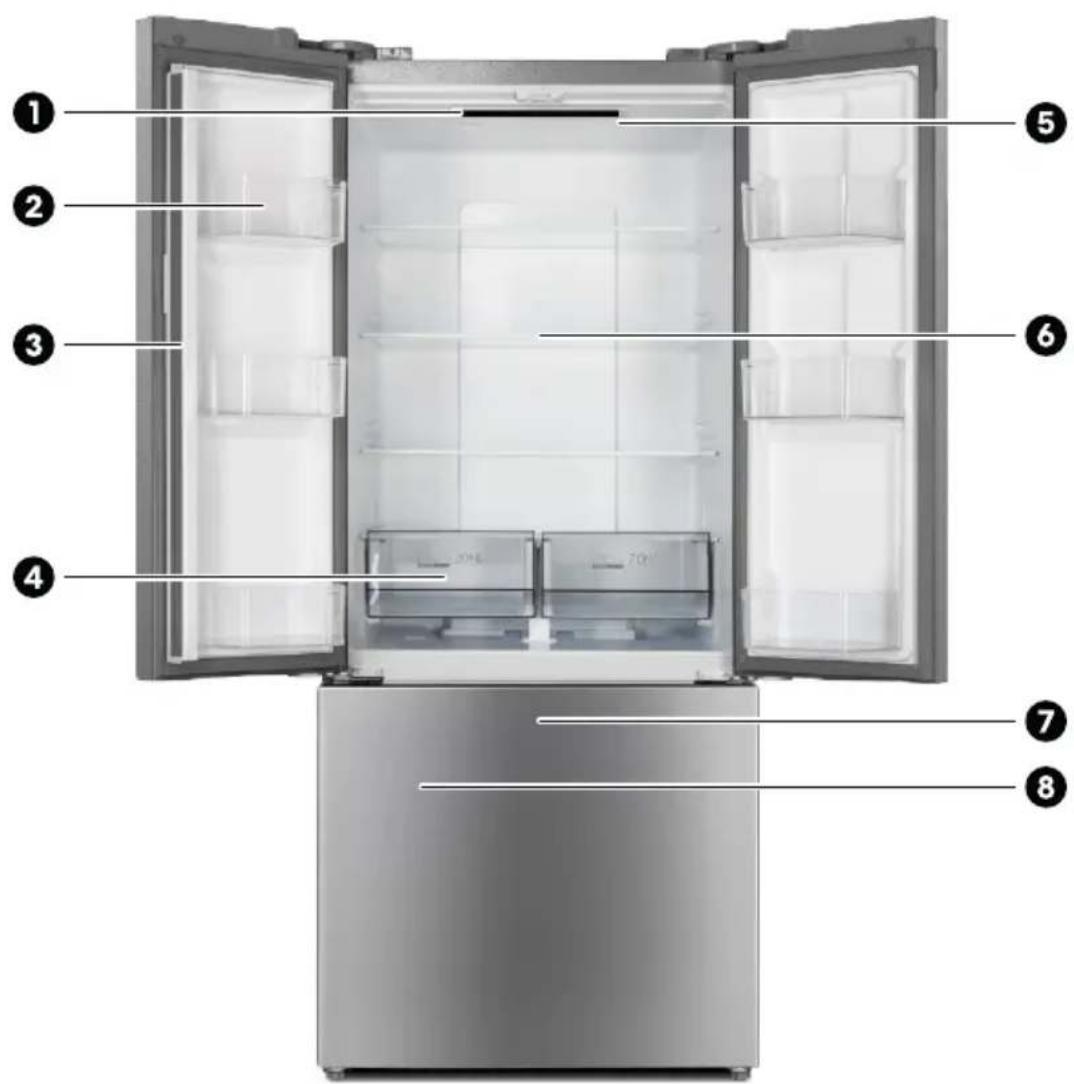
- Control panel and display
- Door bin
- Door mullion
-
Fruit and vegetables crisper
-
LED light
- Shelf
- Freezer drawer
- Ice bin (inside drawer)
INSTALLATION INSTRUCTIONS
BEFORE INSTALLING
Read these instructions completely and carefully.
- IMPORTANT: Observe all governing codes and ordinances. Save these instructions for local inspector's use.
- Note to Installer – Be sure to leave these instructions with the Consumer.
- Note to Consumer – Keep these instructions for future reference.
- Skill level – Installation of this appliance requires basic mechanical skills.
- This product should not be recessed or built-in an enclosed cabinet. It is designed for freestanding installation only.
- Proper installation is the responsibility of the installer.
- Product failure due to improper installation is not covered under the Warranty.
INSTALLATION OVERVIEW
- Unpacking the Refrigerator
- Choosing the Proper Location
- Disassembling/Assembling
- Connecting the Water Line
- Leveling
PARTS SUPPLIED
For COS-RFFV183GHS only:
• Refrigerator door handles (2)
- Freezer drawer handle
- Handle mounting fasteners (6)
- Handle set screws (6 + 4 spare)
- Hex key
UNPACKING THE REFRIGERATOR

WARNING
EXCESSIVE WEIGHT HAZARD
- Use two or more people to move and install the refrigerator. Failure to do so can result in back injury or other injury.
- The refrigerator is heavy. Protect the floor when moving the refrigerator for cleaning or service. Always pull the refrigerator straight out when moving it. Do not wiggle or walk the refrigerator when trying to move it, as floor damage could occur.
• The rollers, which are not casters, should be only used for forward or backward movement. Moving the refrigerator sideways may damage your floor and the rollers.
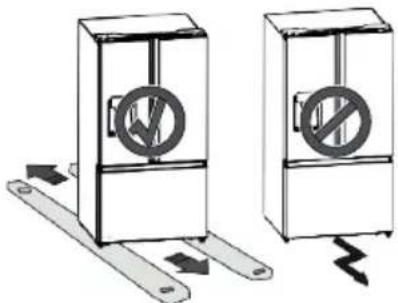
- Remove tape and any temporary labels from your refrigerator before using. Do not remove any warning labels or the model and serial number label.
- To remove any remaining tape or glue, rub the area briskly with your thumb. Tape or glue residue can also be easily removed by rubbing a small amount of liquid dish soap over the adhesive with your fingers. Wipe with warm water and dry.
- Do not use sharp instruments, rubbing alcohol, flammable fluids, or abrasive cleaners to remove tape or glue. These products can damage the surface of your refrigerator.
- Reinstall or adjust shelves as needed. Refrigerator shelves are installed in the shipping position. Reinstall shelves according to your individual storage needs.
The refrigerator must be located where a cold water supply can be connected for the icemaker.
NOTE:
- The water pressure must be between 20 - 100 psi (140 - 690 kPa). If the refrigerator is installed in an area with low water pressure (below 20 psi or 140 kPa), you can install a booster pump to compensate for the low pressure.
- Connect to potable water supply only. New hose-sets supplied with the appliance are to be used, and that old hose-sets should not be reused.
- If your water line is not drinkable, please add an external water filter.
- Turn the icemaker OFF if the refrigerator will be used before or without the water line is connected.
ELECTRICITY
Use an individual, grounded outlet: 110 - 115 Volts, 60 Hz, AC, Single Phase
NOTE:
- The refrigerator should always be plugged into its own individual electrical outlet which has a voltage rating that matches the rating plate.
- Do not overload house wiring and cause a fire hazard by plugging in multiple appliances in the same outlet with the refrigerator.
- To reduce the risk of electric shock, do not install the refrigerator in a wet or damp area.
FLOORING
For proper installation, this refrigerator must be placed on a level surface of hard material that is the same height as the rest of the flooring. This surface should be strong enough to support a fully loaded refrigerator. If required, adjust the leveling legs to compensate for the unevenness of the floor.
AMBIENT TEMPERATURE
Install this appliance in an area where the temperature is between 32 °F ( 0 °C ) and 110 °F ( 43 °C ). If the temperature around the appliance is too low or high, cooling ability may be adversely affected.
Stand your appliance in a dry place to avoid high moisture damage. Keep the appliance out of direct sunlight, rain or frost. Stand the appliance away from heat sources such as stoves, fires or heaters.
DIMENSIONS AND CLEARANCES
This refrigerator is designed to be free standing only, and should not be recessed or built-in an enclosed cabinet.
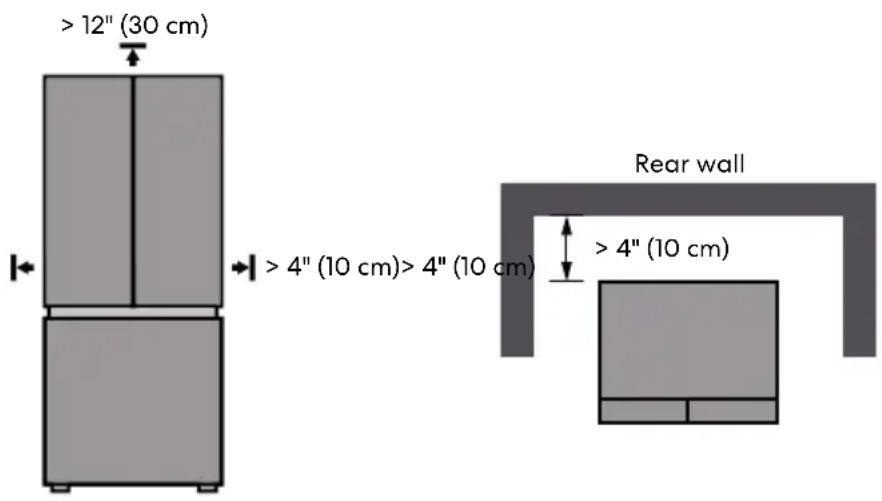
In order to improve efficiency of the cooling system and save energy, it is necessary to maintain good ventilation around the appliance for the dissipation of heat. For this reason, sufficient clear space should be available around the refrigerator.
Allow at least 4" (10 cm) of clearance from the back of the fridge to the wall, at least 12" (30 cm) of clearance from its top, at least 4" (10 cm) from its side to the wall, and a clear space in front to allow the doors to open 145°.
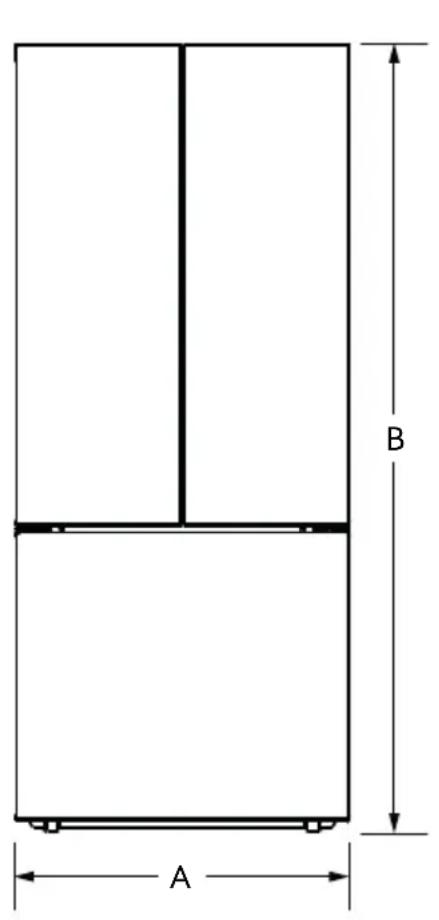
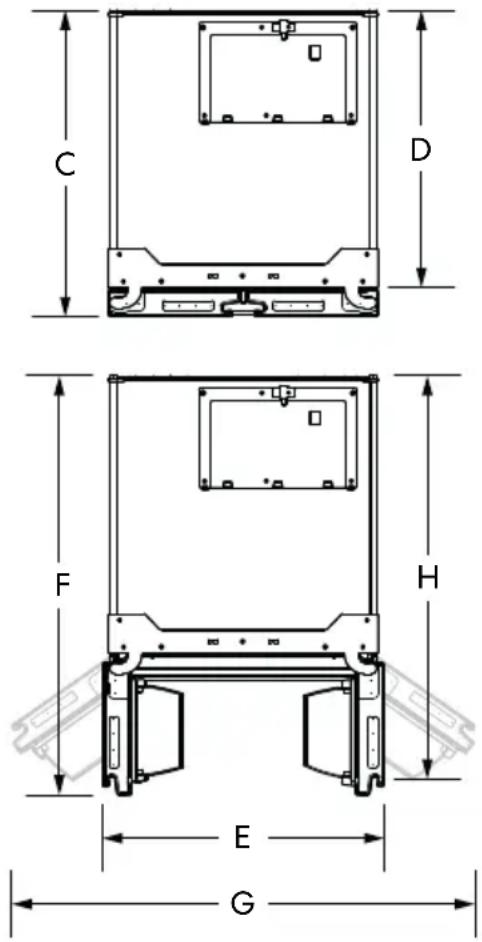
| Item | Dimension | COS-RFFV183GHS / COS-RFFV183RS |
| A | Overall Width 29 78" (75.9 cm) | |
| B | Overall Height | 70 116" (178.0 cm) |
| C | Overall Depth (without Handle) 29 316" (74.2 cm) | |
| D | Case Depth | 25 116" (65.0 cm) |
| E | Width with Door Open (90°) 31 14" (79.4 cm) | |
| F | Depth with Door Open (90°) 47" (119.4 cm) | |
| G | Width with Door Fully Open (145°) | 51 516" (130.3 cm) |
| H | 45" (114.3 cm)Depth |
with Doc
ASSEMBLING/REMOVING DOOR HANDLES
(FOR COS-RFFV183GHS ONLY)
Be very careful not to scratch the doors or the drawers. The appearance of the handles may vary from what is shown in the manual.
Tool Needed
• Phillips-head screwdriver
• Hex key (provided)
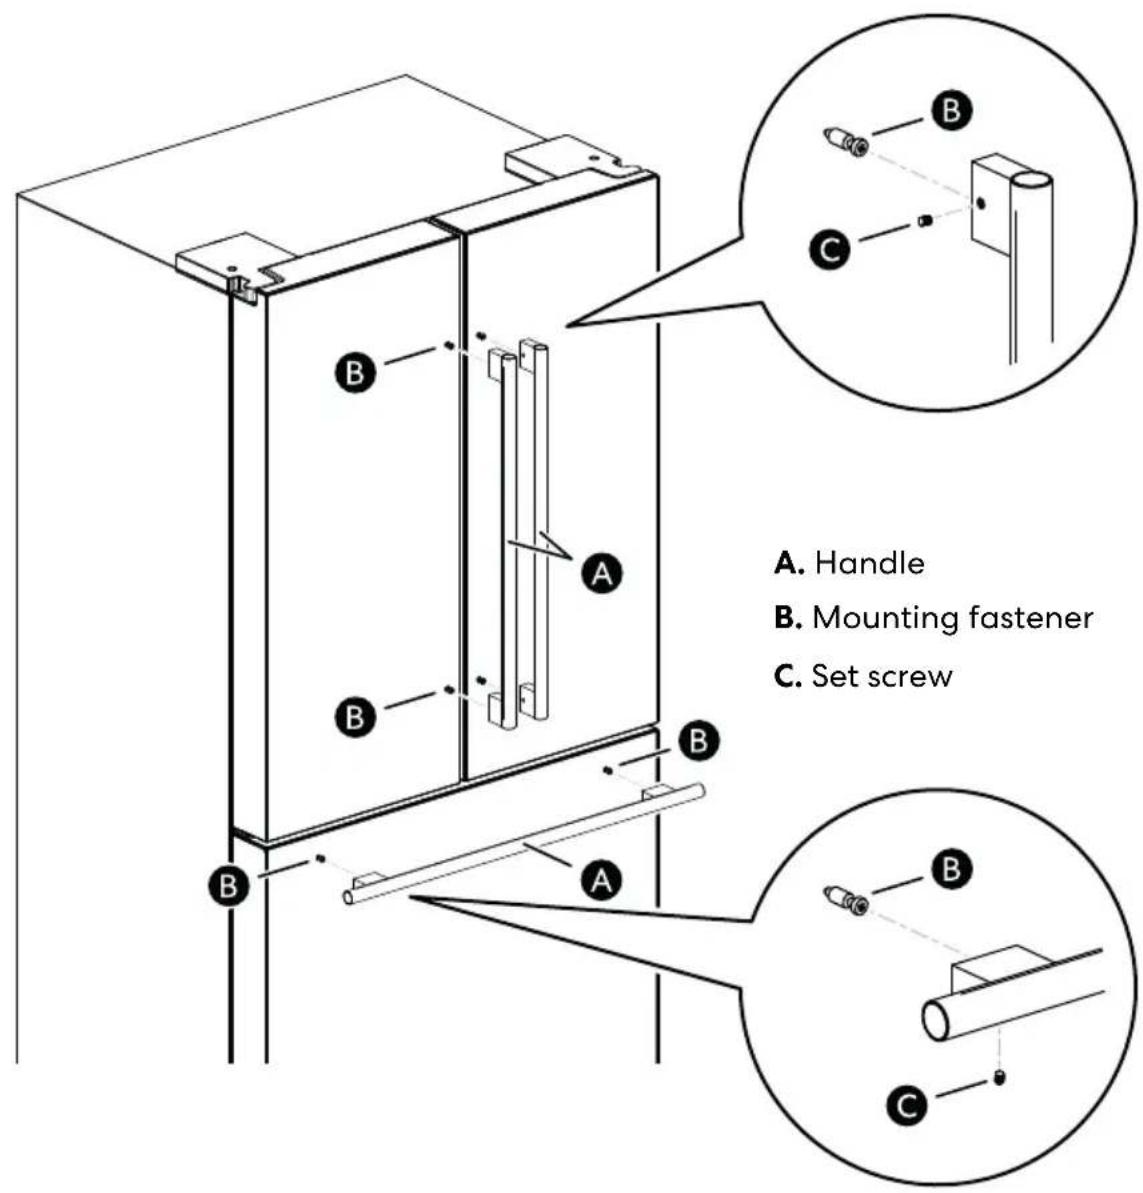
ASSEMBLING DOOR HANDLES
-
Assemble the mounting fasteners on each door/drawer with a Phillipshead screwdriver.
-
Partially insert a set screw in the end caps of each handle.
- For each handle, place the handle on the door/drawer by fitting the handle footprints over the mounting fasteners, and tighten the set screws while supporting the handle.
REMOVING DOOR HANDLES
- Locate the set screw in the end caps of each handle.
- Loosen the set screws with a Phillips-head screwdriver while supporting the handle.
- Remove the handle from the mounting fasteners on the door/drawer and set aside.
- If needed, loosen and remove the mounting fasteners.
CONNECTING TO THE HOUSE WATER LINE

WARNING
- Connect to potable water supply only.
- A cold water supply is required for automatic icemaker operation.
- The water pressure must be between 20 - 100 psi (140 - 690 kPa). Operation outside the water pressure range may cause malfunction, severe and damaging water leaks.
- If the refrigerator is installed in an area with low water pressure (below 20 psi or 140 kPa), you can install a booster pump to compensate for the low pressure.

WARNING

TRIC SHOCK HAZARD
- Attach tubing clamp using existing hole only. DO NOT drill into the refrigerator.
- When using any electrical device (such as a power drill) during installation, be sure the device is battery-powered, double-insulated or grounded in a manner that will prevent the hazard of electric shock.
BEFORE BEGINNING
The water connection must be made by a qualified plumber. This water line installation is not covered by the refrigerator warranty. Follow these instructions carefully to minimize the risk of expensive water damage.
If necessary, call a qualified plumber to correct water hammer before installing the water supply line to the refrigerator. Water banging in the pipes (water hammer) in residential plumbing can cause damage to refrigerator parts and lead to water leakage or flooding.
- A water line is required in order for the icemaker to operate properly.
- To prevent burns and product damage, only connect the refrigerator water line to a cold water supply.
- Turn the icemaker OFF if the refrigerator will be used before the water line is connected.
- Do not install the icemaker tubing in areas where the ambient temperatures fall below freezing.
- Wear eye protection during installation to prevent injury.
- Before making the connection to the refrigerator, be sure the refrigerator power cord is not plugged into the wall outlet.
- Before connecting the water line to the house, purge the house line for at least 2 minutes.
SUPPLIES NEEDED
- A copper or approved flexible universal refrigerator tubing kit or ice-maker install kit with 1/4" outer diameter to connect the refrigerator to the water supply. If using copper, be sure both ends of the tubing are cut square.
- A cold water supply. The water pressure must be between 20 - 100 psi (140 - 690 kPa).
- Power drill.
- 1/2" or adjustable wrench.
- Straight and Phillips blade screwdriver.
- Two 1/4" outer diameter compression nuts and two ferrules (sleeves) to connect the copper tubing to the shutoff valve and the refrigerator water valve, OR you can find kits that come with all parts included such as Stop Tee and compressing fittings.
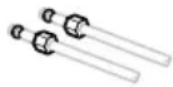
- If your existing copper water line has a flared fitting at the end, you will need an adapter (available at plumbing supply stores) to connect the water line to the refrigerator, OR you can cut off the flared fitting with a tube cutter and then use a compression fitting.
- Shutoff valve to connect to the cold water line. The shutoff valve should have a water inlet with a minimum inner diameter of 5/32" at the point of connection to the cold water line. Saddle-type shutoff valves are included in many water supply kits. Before purchasing, make sure a saddle-type valve complies with your local plumbing codes.
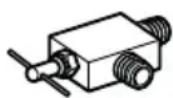
NOTE:
- Only use approved plastic universal tubing if not using copper tubing. Cross linked High Density Polyethylene (PEX) hose is extremely durable and is becoming increasingly preferred.
• Install a shutoff valve on the nearest frequently used drinker water line. - A self-piercing saddle type water valve should not be used.
WATER LINE INSTALLATION INSTRUCTIONS
- Shut off the main water supply.
- Then turn on the nearest faucet long enough to clear the line of water.
- Choose the valve location.
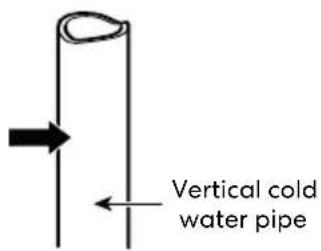
- Choose an easily accessible location on the cold water pipe for the shutoff valve. It is best to connect into the side of a vertical water pipe. When it is necessary to connect into a horizontal water pipe, make the connection to the top or side, rather than at the bottom, to avoid drawing off any sediment from the water pipe.
- Drill the hole for the valve.
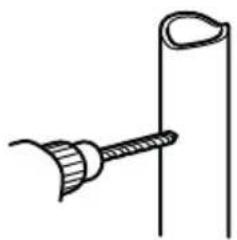
- Drill a 1/4" hole in the water pipe (even if using a self-piercing valve) using a sharp bit. Be cautious not to allow water to drain into the drill. Remove any burrs resulting from drilling the hole in the pipe. Failure to drill a 1/4" hole may result in reduced ice production or smaller cubes.
natural_image
Simple line drawing of a tool interacting with a cylindrical object (no text or symbols)- Fasten the shutoff valve.
- Fasten the shutoff valve to the cold water pipe with the pipe clamp.
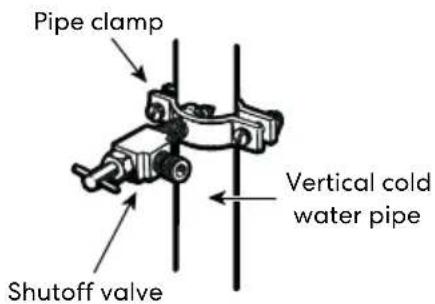
NOTE:
• Commonwealth of Massachusetts Plumbing Codes 248CMR shall be adhered to. Saddle valves are illegal and use is not permitted in Massachusetts. Consult with your licensed plumber.
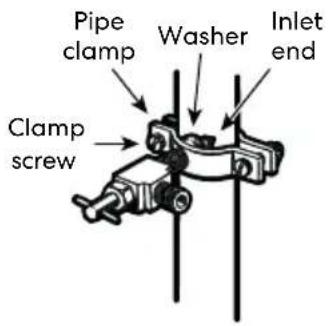
- Tighten the pipe clamp.
- Tighten the clamp screws until the sealing washer begins to swell.
NOTE:
- Do not over tighten or you may crush the tubing.
- Route the water line tubing.
- Route the tubing between the cold water line and the refrigerator. Route the tubing through a hole drilled in the wall or floor (behind the refrigerator or adjacent the base cabinet) as close to the wall as possible.
- Connect to shutoff valve.
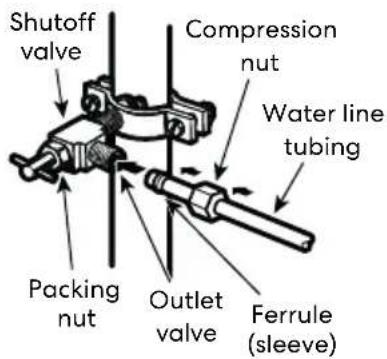
- Place the compression nut and ferrule (sleeve) onto the end of the water line tubing and connect it to the shutoff valve. Make sure the tubing is fully inserted into the valve. Tighten the compression nut securely.
NOTE:
• Over tightening may cause leaks.
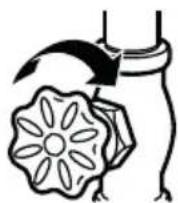
- Flush the water line tubing
- Turn on the main water supply and flush out the tubing until the water is clear. Shut off the water at the water valve after about 1 quart (1 Liter), or 2 minutes, of water has been flushed through the tubing.
- Connect the water line tubing to the refrigerator.
NOTE:
- Before making the connection to the refrigerator, be sure that the refrigerator power cord is not plugged into the wall outlet.
- Ensure that the water line tubing does not get pinched or bent when installing.
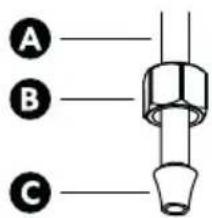
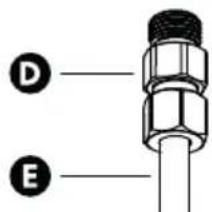
A. Water line tubing (1/4")
B.Compression nut
C.Ferrule (sleeve)
D.Brass union fitting
E. Refrigerator water inlet
- Place the compression nut and ferrule (sleeve) onto the free end of the water line tubing.
- Insert the free end of the tubing as far as possible into the brass union fitting of the refrigerator water inlet on the back of the refrigerator.
- Slide the compression nut over the ferrule (sleeve) and tighten the compression nut onto the brass union fitting. Confirm the connection is secure by gently pulling on it.
- Turn the water on at the shutoff valve. Tighten any connections that leak.
! CAUTION
- Check to see if leaks occur at the water line connections.
COMPLETE INSTALLATION
- Make sure the plug is disconnected for at least 5 minutes when reconnecting power, or it could cause freezer operation issues.
-
Turn the icemaker OFF if the refrigerator will be used before or without the water line connected.
-
Plug the refrigerator's power cord into a 3-prong grounded outlet.
NOTE:
- Connect to a rated power outlet.
- Have a certified electrician check the wall outlet and wiring for proper grounding.
- Do not damage or cut off the ground terminal of the power plug.
START/STOP THE ICEMAKER
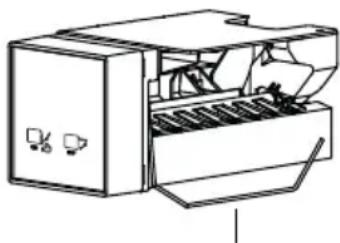
The icemaker is located inside the freezer compartment. The icemaker will automatically begin to operate when the freezer compartment reaches its low operating temperature of 5 °F (-15 ^ ) or below if it is turned on.
- To turn the icemaker on, lower the shut-off arm (metal rod) if the water line is connected.
- To turn the icemaker off, raise the shut-off arm (metal rod).
NOTE:
- A newly installed refrigerator may take 12 hours or longer to provide the first batch of ice.
natural_image
Line drawing of a computer printer with open lid and internal components (no text or symbols)Shut-off arm (on position)
POSITION THE REFRIGERATOR

WARNING EXCESSIVE WEIGHT HAZARD
- Use two or more people to move and install the refrigerator. Failure to do so can result in back injury or other injury.
- The refrigerator is heavy. Protect the floor when moving the refrigerator for cleaning or service. Always pull the refrigerator straight out when moving it. Do not wiggle or walk the refrigerator when trying to move it, as floor damage could occur.
-
The rollers, which are not casters, should be only used for forward or backward movement. Moving the refrigerator sideways may damage your floor and the rollers.
-
Arrange the coil of tubing so that it does not vibrate against the back of the refrigerator or against the wall.
-
Carefully push the refrigerator into the final position.
LEVELING
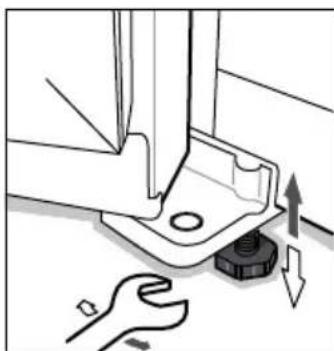
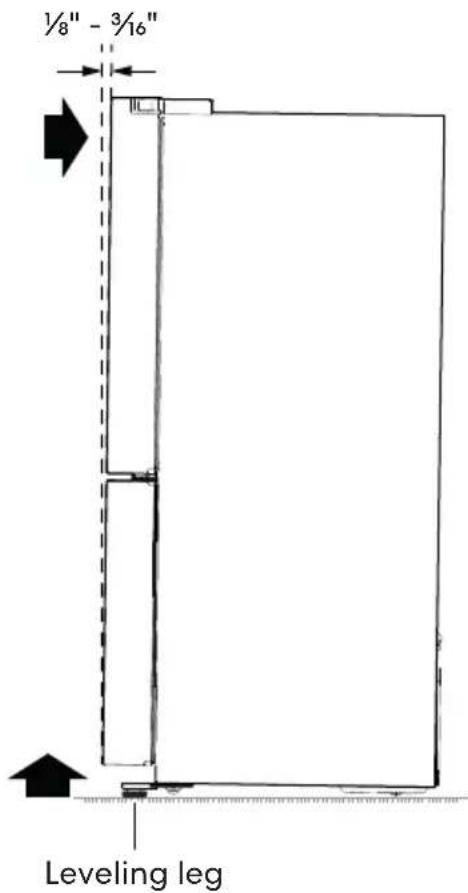
The refrigerator has two front leveling legs. After moving the refrigerator to its final location, adjust the leveling legs to alter the tilt from front-to-back or side-to-side. The front should be slightly higher than the rear to aid in door closing. If the refrigerator seems unsteady, or the doors do not close easily, adjust the refrigerator's tilt using the instructions below:
- Turn the leveling leg to the left (clockwise) to raise that side of the refrigerator or to the right (counterclockwise) to lower it. It may take several turns of the leveling leg to adjust the tilt of the refrigerator.
NOTE:
- Do not over-tighten.
natural_image
Mechanical assembly diagram showing a wrench and nut inserted into a housing component (no text or symbols)2.Open both doors and check to make sure that they close easily. If the doors do not close easily, tilt the refrigerator slightly more to the rear by turning both leveling legs to the left (clockwise). It may take several more turns, and be sure to turn both leveling legs the same amount.
OPERATION
BEFORE USE
- Intended use
This appliance is intended to be used in household and similar applications such as staff kitchen areas in shops, offices and other working environments; farm houses and by clients in hotels, motels and other residential type environments; bed and breakfast type environments; catering and similar non-retail applications.
If the appliance is used commercially or for purposes other than cooling food, please note that the manufacturer cannot accept any liability for any damage.
Modifications or alterations to the unit are not permitted for safety reasons.
- Reserve doors and drawer(s) clearances.
Make sure to leave enough space to allow for the doors and drawers to be opened without obstruction for your safety and convenience.
- Clean the refrigerator.
Remove all protective film and adhesive tapes as well as any adhesive residues with cleaning solvent. Clean the refrigerator thoroughly and wipe off all dust that accumulated during shipping.

CAUTION
- Do not scratch the refrigerator with a sharp object or use a detergent that contains alcohol, a flammable liquid or an abrasive when removing any tape or adhesive from the refrigerator. Remove adhesive residue by wiping it off with your thumb or dish detergent.
- Do not peel off the model or serial number label or the technical information on the rear surface of the refrigerator.
- Open refrigerator doors and freezer drawers to ventilate the interior.
The inside of the refrigerator may smell like plastic at first. Remove any adhesive tape from inside the refrigerator and open the refrigerator doors and the freezer drawers for ventilation.
- Connect the power supply.
Check if the power supply is connected before use.
- Turn off the icemaker.
Turn off the icemaker if the refrigerator is not yet connected to the water supply.
- Wait for the refrigerator to cool.
Allow the refrigerator to run for at least two to three hours before putting food in it. Check the flow of cold air in the freezer compartment to ensure proper cooling.
Storage of too much food after initial connection to power may adversely affect the freezing effect of the refrigerator.

CAUTION
- Putting food in the refrigerator before it has cooled could cause the food to spoil, or a bad odor to remain inside the refrigerator.
- The refrigerator makes a loud noise after initial operation.
This is normal. The volume will decrease as the temperature decreases.
ENERGY SAVING TIPS
- The appliance should be located in the coolest area of the room, away from heat producing appliances or heating ducts and out of direct sunlight.
- Ensure that there is sufficient ventilation at the base of the appliance, on the sides of the appliance, and at the back of the appliance. Never cover ventilation openings.
- Open the doors only as briefly as necessary to minimize cold loss.
- Check and clean the door gaskets regularly to make sure there is no debris and the doors close properly.
- Let hot foods cool to room temperature before placing in the appliance. Overloading forces the compressor to run longer. Foods that freeze too slowly may lose quality or spoil.
- Be sure to wrap foods properly and wipe containers dry before placing them in the appliance. This cuts down on frost build-up inside the fridge.
- Allow frozen food to defrost in the refrigerator. The coldness of the frozen food reduces energy consumption in the refrigerator compartment.
- An evenly filled refrigerator or freezer compartment contributes to optimal energy use. Therefore, avoid empty or half-empty compartments.
- Appliance storage bin should not be lined with aluminum foil, wax paper or paper towels. Liners interfere with cold air circulation making the appliance less efficient.
- Organize and label food to reduce door opening and extended searches. Remove as many items needed at one time and close the door as soon as possible.
NOTE:
- When either the refrigerator or the freezer door is left open for more than 60 seconds, the alarm tone will sound to let you know that the door is open.
- When you close the door, the door alarm will stop.
CONTROL PANEL
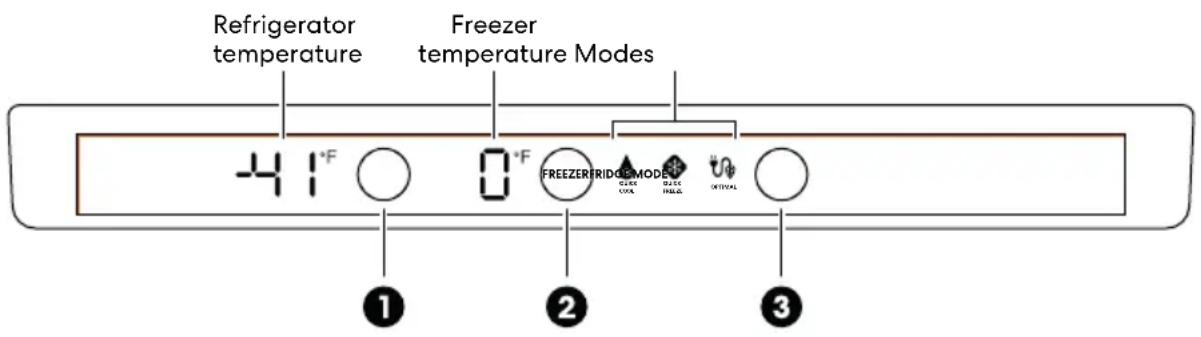
| Item Button Description | ||
| 1 FRIDGE | To adjust refrigerator temperature. | |
| 2 | FREEZER | To adjust freezer temperature. |
| 3 | MODE | To activate and deactivate Quick Cool, Quick Freeze, or Optimal modes. |
| To change the temperature mode from °F to °C or vice versa. | ||
CONTROL BUTTONS
FRIDGE
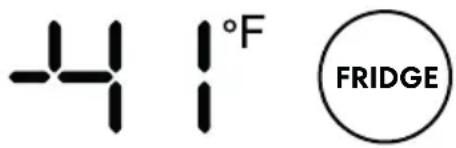
• Refrigerator Temperature Setting
Adjust the refrigerator (fresh food cabinet) target temperature.
- Press the FRIDGE button repeatedly to adjust the refrigerator temperature between 35 °F (2 °C) and 46 °F (8 °C).
- Each time you press the FRIDGE button, the temperature setting will drop to next level and cycle from the lowest back to the highest available temperature.
- Default refrigerator temperature: 41 °F (5 °C)
FREEZER
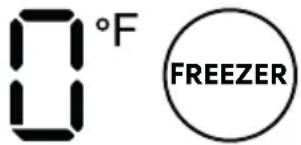
• Freezer Temperature Setting
Adjust the freezer target temperature.
- Press the FREEZER button repeatedly to adjust the freezer temperature between -10 °F (-23 °C) and 5 °F (-15 °C).
- Each time you press the FREEZER button, the temperature setting will drop to next level and cycle from the lowest back to the highest available temperature.
- Default freezer temperature: 0 °F (-18 °C)
MODE
- Quick Cool
Automatically set the refrigerator (fresh food cabinet) to 35^ F ( 2^ C) the lowest refrigerator temperature available for 2 hours and 30 minutes to help cool new or large grocery loads faster.
When deactivating this mode, the set temperature of the refrigerator will return to the set temperature before this mode was activated.
- Press the MODE button repeatedly until the QUICK COOL icon light turns on or off to activate or deactivate respectively.
- Quick Cool and Quick Freeze can be activated simultaneously.

QUICK COOL
- Quick Freeze
Automatically set the freezer to low temperature for 24 hours or until the temperature reaches -18 °F (-28 °C) to help freeze new or large grocery loads faster.
When deactivating this mode, the set temperature of the freezer will return to the set temperature before this mode was activated.
- Press the MODE button repeatedly until the QUICK FREEZE icon light turns on or off to activate or deactivate respectively.
- Quick Cool and Quick Freeze can be activated simultaneously.

QUICK FREEZE
•Optimal
Automatically set the refrigerator (fresh food cabinet) and the freezer to 41 °F (5 °C) and 0 °F (-18 °C) the recommended temperatures to ensure optimal performance.
When deactivating this mode, the set temperatures of the refrigerator and the freezer will return to the set temperatures before this mode was activated.
- Press the MODE button repeatedly until the OPTIMAL icon light turns on or off to activate or deactivate respectively.

OPTIMAL
DISPLAY
Under normal circumstances, the set temperatures of refrigerator and freezer are shown.
TEMPERATURE MODE
The temperature scale is set to Fahrenheit (°F) by default.
- Press and hold the MODE button for 5 seconds to change the temperature mode between °F and °C.
NOTE:
- The displayed temperature is the target temperature, and not the actual temperature of the refrigerator. The actual refrigerator temperature depends on the food inside the refrigerator.
ERROR CODES
When a non-numeric set temperature of refrigerator or freezer appears on the display screen, it indicates a problem with the refrigerator. Your refrigerator may seem to continue to operate normally even if there is a fault present, but you should contact a technician immediately regarding the error.
ICEMAKER
BEFORE USING THE ICEMAKER

CAUTION
- Throw away the first bin full of ice after installation. The first batch of ice produced may include particles or odor from the water supply line.
- This is also necessary if the refrigerator has not been used for a long time.
- In the event of a power outage, throw away the ice stored in the ice bin.
NOTE:
- A newly installed refrigerator may take 12 hours to provide the first batch of ice.
- If discolored ice is produced, check the external water filter and water supply. If the problem continues, contact the manufacturer customer service center or a local licensed plumber. Do not use the ice until the problem is corrected.
- The sound of ice dropping into the ice bin is normal.
- If the ice bin is completely filled with ice, ice production will stop.
USING THE ICEMAKER
The icemaker is located inside the freezer compartment. The amount of ice produced may vary according to the environment (ambient temperature around the appliance, frequency of the door being opened, amount of food stored in the appliance, etc.).
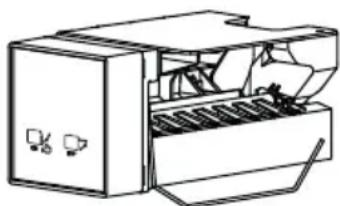
- To turn the icemaker on, lower the shut-off arm (metal rod) if the water line is connected.
- To turn the icemaker off, raise the shut-off arm (metal rod).
natural_image
Line drawing of an open industrial machine with internal components (no text or symbols)Shut-off arm (on position)
NOTE:
- Ice cubes which are stored in the ice bin for a long time may clump together and be difficult to separate. If this happens, empty the ice bin completely and clean it before reinstalling it.
CRISPERS
The crispers provide fresher tasting fruit and vegetables by keeping moist air in the crisper drawer. (Separate fruit and vegetables to avoid over ripening due to ethylene release by certain fruit.)
REFRIGERATOR SHELVES
Some shelves in the refrigerator can be raised to meet individual storage needs. Adjusting the shelves to fit items of different heights will make finding the exact item you want easier.
DOOR BINS
The door bins are removable for easy cleaning and adjustment. These are the warmest areas of the fridge as room temperature air gushes in every time the doors are opened. Put your least perishable items on the door, like ketchup, mustard, soy sauce and other condiments with longer shelf lives.
Detaching/Assembling the Door Bin
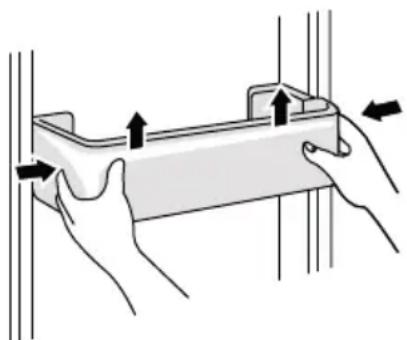
• To remove the bin, grab and squeeze both sides, then lift the bin up and pull straight out.
- To assemble the bin, slide it in above the desired support and push down until it snaps into place.
natural_image
Illustration of hands holding a rectangular object with arrows indicating force or movement (no text or symbols)MAINTENANCE & CARE
GENERAL CLEANING

WARNING
- Use non-flammable cleaner. Failure to do so can result in fire, explosion, or death.

CAUTION
- Do not use sharp objects to clean as they can scratch the surface.
-
Do not use an abrasive cloth or sponge when cleaning the interior and exterior of the refrigerator.
-
Clean the dust on top, behind, and under the refrigerator regularly.
- Wipe up spills immediately.
- Unplug the refrigerator or disconnect power before cleaning.
- Remove all removable parts, such as shelves.
- Use a clean sponge or soft cloth and a mild detergent in warm water. Do not use abrasive or harsh cleaners.
- Hand wash, rinse and dry all surfaces thoroughly.
EXTERIOR
- For products with a standard stainless steel exterior, use a damp microfiber cloth and rub in the direction of the grain. Dry with a paper towel to avoid streaks.
- For stubborn stains and fingerprints, use a few drops of liquid dish soap in water, and rinse with hot water before drying. Do not use abrasive or harsh cleaners.
INSIDE WALLS
- To help remove odors, use a clean sponge or soft cloth to wipe the inside of the refrigerator with a mixture of baking soda and warm water. Mix 2 tablespoons of baking soda to 1 quart of water (26 g soda to 1 liter water.) Be sure the baking soda is completely dissolved so it does not scratch the surfaces of the refrigerator.
DOOR BINS
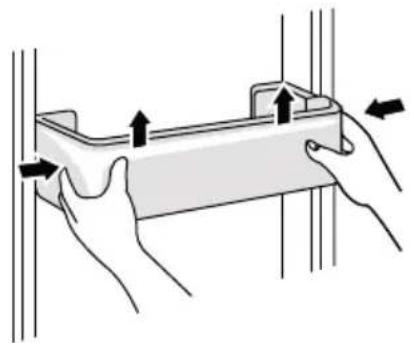
- Remove all items from door bin, grab and squeeze both sides, then lift the bin up and pull straight out.
- Hand wash door bin and install back in place or adjust height as desired.
natural_image
Illustration of hands holding a rectangular object with arrows indicating force or movement (no text or symbols)SHELVES
- Open the refrigerator doors fully, and remove the upper door bins if necessary.
- Pull shelf out.
- Hand wash using a clean sponge or soft cloth and a mild detergent in warm water. Do not use glass cleaners, abrasive cleansers, or flammable fluids. These can scratch or damage the material.
• To replace shelf, insert the shelf in place.
FREEZER BASKETS
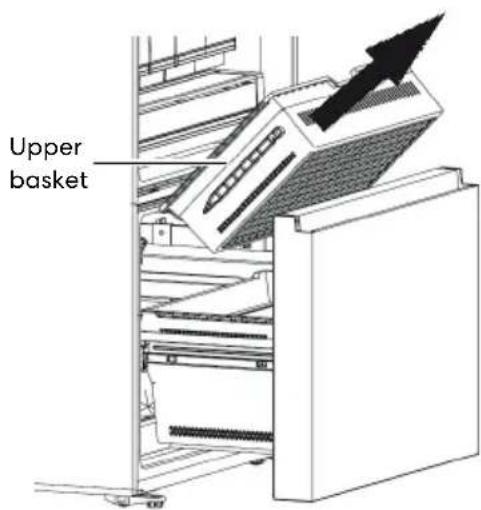
• To remove the upper basket, lift the front of basket up and pull it straight out.
- Allow basket to warm up so the cloth will not stick.
• Refer to "Inside Walls" section above for cleaning suggestions on both upper and lower baskets.
- To replace the upper basket, lift the front of basket up and align the basket with the rails on both sides, then gently close the drawer.
- Use a clean sponge or soft cloth and a mild detergent in warm water. Do not use cleaning waxes, concentrated detergents, bleaches, or cleaners containing petroleum on plastic refrigerator parts.
COMPARTMENT LED LIGHT
Replacing the LED Light
Service should be performed by a qualified technician.
- Unplug the refrigerator.
- Lift and pull out the light cover.
- Press and hold the connector latch, and pull out the LED light.
- Install a replacement LED light on the connector.
- Replace the light cover.
DEFROSTING
The refrigerator defrosts automatically, but frost may still form with change of season or temperature. Unplug the refrigerator or disconnect power and wipe clean with a dry towel.
POWER FAILURE
In case of power failure, foods inside the refrigerator can be kept for several hours. During the power failure, minimize opening the doors and do not place any fresh food inside until power is restored.
EXTENDED PERIODS OF NON-USE
The appliance should be unplugged and then cleaned; the doors should be left open to prevent odor buildup.
MOVING
- Before the refrigerator is moved, take all objects out of the inside, fix the glass partitions, vegetable holder, freezer drawers, etc. with tape and tighten the leveling feet.
- Close the doors and seal them with tapes.
- During move, do not lay the appliance upside down or horizontally or subject it to excessive vibration. Do not allow it to stand inclined more than 45^ during move.
- Handle only from the sides of the refrigerator.
- Be sure the refrigerator stays in an upright position during moving.
PREPARING FOR VACATION
- Remove food from the refrigerator.
• Turn off the icemaker. - Empty ice bin.
- Unplug the refrigerator or disconnect power.
- Turn off water supply.
- Clean the refrigerator. (Refer to the "General Cleaning" section.)
- Leave the doors and drawers open.
- Upon returning from vacation, turn on water supply and run 2 gallons of water through the cold water dispenser (about 5 minutes) to flush the water lines.
NOTE:
- The ice bin should be emptied any time the icemaker is turned off.
- If the ambient temperature will drop below freezing, have a qualified technician drain the water supply system to prevent serious property damage due to flooding caused by ruptured water lines or connections.
TROUBLESHOOTING
BEFORE CALLING FOR SERVICE
Save time and money! Review this section on the following pages first and you may not need to call for service.
| Problem Possible Cause & Solution | |
| Refrigerator is not cooling or has no power. | A fuse in your home may be blown or the circuit breaker tripped. Or the appliance is connected to a GFCI (Ground Fault Circuit Interrupter) outlet, and the outlet's circuit breaker has tripped.Check the main electrical box and replace the fuse or reset the circuit breaker. Do not increase fuse capacity. If the problem is a circuit overload, have it corrected by a qualified electrician.Reset the circuit breaker on the GFCI. If the problem persists, contact an electrician. |
| Refrigerator is in the defrost cycle.During the defrost cycle, the temperature of each compartment may rise slightly. Wait 30 minutes and confirm the proper temperature has been restored once the defrost cycle has completed. | |
| Refrigerator was recently installed.It may take up to 24 hours for each compartment to reach the desired temperature. | |
| Refrigerator was recently relocated.If the refrigerator was stored for a long period of time or moved on its side, it is necessary for the refrigerator to stand upright for 24 hours before connecting it to power. | |
| Cooling system runs too much. | Refrigerator is replacing an older model.·Modern refrigerators require more operating time but use less energy due to more efficient technology. |
| Refrigerator was recently plugged in or power restored.·The refrigerator will take up to 24 hours to cool completely. | |
| The door is opened often or a large amount of food / hot food was added.·Adding food and opening the door warms the refrigerator, requiring the compressor to run longer in order to cool the refrigerator back down. In order to conserve energy, try to get everything you need out of the refrigerator at once, keep food organized so it is easy to find, and close the door as soon as the food is removed. | |
| Doors are not closed completely.·Firmly push the doors shut. | |
| Refrigerator is installed in a hot location.·The compressor will run longer under warm conditions. At normal room temperatures (70 °F or 21 °C) expect your compressor to run about 40 % to 80 % of the time. Under warmer conditions, expect it to run even more often. The refrigerator should not be operated above 110 °F (43 °C). | |
| Problem | Possible Cause & Solution |
| Interior moisture buildup. | Doors are opened often or for long periods of time.When the doors are opened often or for long periods of time, warm, humid air enters the compartment. This raises the temperature and moisture level within the compartment. To lessen the effect, reduce the frequency and duration of door openings. |
| Doors are not always closed completely.Firmly push the doors shut. | |
| Weather is humid.Humid weather allows additional moisture to enter the compartments when the doors are opened leading to condensation or frost. Maintaining a reasonable level of humidity in the home will help to control the amount of moisture that can enter the compartments. | |
| Defrost cycle recently completed.During the defrost cycle, the temperature of each compartment may rise slightly and condensation may form on the back wall. Wait 30 minutes and confirm that the proper temperature has been restored once the defrost cycle has completed. | |
| Food is not packaged correctly.Food stored uncovered or unwrapped, and damp containers can lead to moisture accumulation within each compartment. Wipe all containers dry and store food in sealed packaging to prevent condensation and frost. | |
| Problem Possible Cause & Solution | |
| Food is freezing in the refrigerator compartment. | Food with high water content was placed near an air vent.Rearrange items with high water content away from air vents. |
| Refrigerator temperature control is set incorrectly.If the temperature is too cold, adjust the control one increment at a time and wait for the temperature to stabilize. | |
| Refrigerator is installed in a cold location.When the refrigerator is operated in temperature below 41 °F (5 °C), food can freeze in the refrigerator compartment. The refrigerator should not be operated in temperature below 55 °F (13 °C). | |
| Refrigerator or Freezer section is too cold. | Incorrect temperature control settings.If the temperature is too cold, adjust the control one increment at a time and wait for the temperature to stabilize. |
| Frost or ice crystals form on frozen food (inside of sealed package). | Condensation from food with a high water content has frozen inside of the food package.This is normal for food items with a high water content. |
| Food has been left in the freezer for a long period of time.Do not store food items with high water content in the freezer for a long period of time. | |
| Frost or ice crystals form on frozen food (outside of package). | Door is opened frequently or for long periods of time.When the doors are opened often or for long periods of time, warm, humid air enters the compartment. This raises the temperature and moisture level within the compartment. Increased moisture will lead to frost and condensation. To lessen the effect, reduce the frequency and duration of door openings. |
| Doors are not always closed completely.Firmly push the doors shut. | |
| Refrigerator or Freezer section is too warm. | Refrigerator was recently installed.It may take up to 24 hours for each compartment to reach the desired temperature. |
| The air vents are blocked. Cold air circulates from the freezer to the fresh food section and back again through air vents in the wall dividing the two sections.Locate air vents by using your hand to sense airflow and move all packages that block vents and restrict airflow. Rearrange items to allow air to flow throughout the compartment. | |
| Doors are opened often or for long periods of time.When the doors are opened often or for long periods of time, warm, humid air enters the compartment. This raises the temperature and moisture level within the compartment. To lessen the effect, reduce the frequency and duration of door openings. | |
| Unit is installed in a hot location.The refrigerator should not be operated in temperatures above 110 °F (43 °C). | |
| A large amount of food or hot food was added to either compartment.Adding food warms the compartment requiring the cooling system to run. Allowing hot food to cool to room temperature before putting it in the refrigerator will reduce this effect. | |
| Doors are not always closed completely.Firmly push the doors shut. | |
| Temperature control is not set correctly.If the temperature is too warm, adjust the control one increment at a time and wait for the temperature to stabilize. | |
| Icemaker is not making enough ice. | House water supply is not connected, valve is not turned on fully, or valve is clogged.·Connect the refrigerator to a cold water supply with adequate pressure and turn the water shutoff valve fully open. If the problem persists, it may be necessary to contact a plumber. |
| Water filter has been exhausted on models with a water filter.·Replacing the water filter is recommended:- Approximately every six months.- When the water filter indicator turns on.- When the water dispenser output decreases.- When the ice cubes are smaller than normal. | |
| Low house water supply pressure.·The water supply pressure must be between 20 - 100 psi (140 - 690 kPa). If the problem persists, it may be necessary to contact a plumber. | |
| Tubing connecting refrigerator to house supply valve is kinked.·The tubing can kink when the refrigerator is moved during installation or cleaning resulting in reduced water flow. Straighten or repair the water supply line and arrange it to prevent future kinks. | |
| Doors are opened often or for long periods of time.·If the doors of the unit are opened often, ambient air will warm the refrigerator which will prevent the unit from maintaining the set temperature. Lowering the refrigerator temperature can help, as well as not opening the doors as frequently. | |
| Doors are not always closed completely.·If the doors are not properly closed, ice production will be affected. | |
| Icemaker is not making ice. | Refrigerator was recently installed or icemaker recently connected.It may take up to 24 hours for each compartment to reach the desired temperature and for the icemaker to begin making ice. |
| Icemaker is not turned on.Locate the icemaker ON/OFF and confirm that it is turned on. | |
| The refrigerator is not connected to a water supply or the supply shutoff valve is not turned on.Connect the refrigerator to the water supply and turn the water shutoff valve fully open. | |
| Reverse osmosis water filtration system is connected to your cold water supply.Reverse osmosis filtration systems can reduce the water pressure below the minimum amount and result in icemaker issues. | |
| Ice has bad taste or odor. | Water supply contains minerals such as sulfur.A water filter may need to be installed to eliminate taste and odor problems. NOTE: In some cases, a filter may not help. It may not be possible to remove all minerals/odor/taste in all water supplies. |
| Icemaker was recently installed.Ice that has been stored for too long will shrink, become cloudy, and may develop a stale taste. Throw away old ice and make a new supply. | |
| The food has not been stored properly in either compartment.Rewrap the food. Odors may migrate to the ice if food is not wrapped properly. | |
| The interior of the refrigerator needs to be cleaned.See the Maintenance & Care section for more information. | |
| The ice storage bin needs to be cleaned.Empty and wash the bin (discard old cubes). Make sure that the bin is completely dry before reinstalling it. | |
| Doors are difficult to open. | The gaskets are dirty or sticky.Clean the gaskets and the surfaces that they touch. Rub a thin coat of appliance polish or kitchen wax on the gaskets after cleaning. |
| Door was recently closed.When you open the door, warmer air enters the refrigerator. As the warm air cools, it can create a vacuum. If the door is hard to open, wait one minute to allow the air pressure to equalize, then see if it opens more easily. | |
| Refrigerator wobbles or seems unstable. | Leveling legs are not adjusted properly.Refer to the Leveling and Door Alignment section. |
| Floor is not level.It may be necessary to add shims under the leveling legs or rollers to complete installation. | |
| Lights do not work. | LED interior lighting failure.The refrigerator compartment lamp is LED interior lighting, and service should be performed by a qualified technician. |
| Refrigerator has an unusual odor. | Food is not tightly wrapped.Wrap odorous food tightly.Store food in sealed packaging.Check whether there is any rotten food. |
| The refrigerator needs to be cleaned.Refer to the "General Cleaning" section. | |
| The interior of the refrigerator is covered with dust or soot. | The refrigerator is located near a fire source, such as a fireplace, chimney, or candle.Make sure that the refrigerator is not located near a fire source, such as a fireplace, chimney or candle. |
| Rattling noises. | Rattling noises may come from the flow of refrigerant, the water line on the back of the unit, or items stored on top of or around the refrigerator.Normal Operation |
| Refrigerator is not resting solidly on the floor.Floor is weak or uneven or leveling legs need to be adjusted. | |
| Refrigerator with linear compressor was jarred while running.Normal Operation | |
| Whooshing noises. | Evaporator fan motor is circulating air through the refrigerator and freezer compartments.·Normal Operation |
| Air is being forced over the condenser by the condenser fan.·Normal Operation | |
| Gurgling noises. | Refrigerant flowing through the cooling system.·Normal Operation |
| Popping noises. | Contraction and expansion of the inside walls due to changes in temperature.·Normal Operation |
| Sizzling noises. | Water dripping on the defrost heater during a defrost cycle.·Normal Operation |
| Vibrating noises. | If the side or back of the refrigerator is touching a cabinet or wall, some of the normal vibrations may make an audible sound.·To eliminate the noise, make sure that the sides and back cannot vibrate against any wall or cabinet. |
| Dripping noises. | Water running into the drain pan during the defrost cycle.·Normal Operation |
| Pulsating or high-pitched sound | Your refrigerator is designed to run more efficiently to keep your food items at the desired temperature. The high efficiency compressor may cause your new refrigerator to run longer than your old one, but it is still more energy efficient than previous models. While the refrigerator is running, it is normal to hear a pulsating or high-pitched sound.·Normal Operation |
| Non-numeric temperature appears in display | This is an error code. Write down error code and contact a qualified service provider for repairs. |
LIMITED WARRANTY
WARRANTY AND SERVICE
TO RECEIVE WARRANTY SERVICE, YOUR PRODUCT MUST BE REGISTERED.
TO REGISTER AND REVIEW FULL WARRANTY DETAILS, VISIT:
WWW.COSMOAPPLIANCES.COM/WARRANTY
SCAN TO REGISTER
CUSTOMER SUPPORT
TO CHAT WITH US LIVE FOR ASSISTANCE, VISIT:
WWW.COSMOAPPLIANCES.COM/CHAT
SCAN TO CHAT

IMPORTANT
Do Not Return This Product To The Store
If you have a problem with this product, please contact COSMO Customer Support at
+1 (888) 784-3108
DATED PROOF OF PURCHASE, MODEL #, AND SERIAL # REQUIRED FOR WARRANTY SERVICE.
IMPORTANT
natural_image
Symbol of a trash bin crossed with two crossed arms, no text or labels presentCorrect disposal of this product:
This marking indicates that this appliance should not be disposed with other household wastes. To prevent possible harm to the environment or human health from uncontrolled waste disposal, recycle it responsibly to promote the sustainable reuse of material resources.

APPLIANCES
Cosmo is constantly making efforts to improve the quality and performance of our products, so we may make changes to our appliances without updating this manual.
- FRENCH DOOR REFRIGERATOR
- OWNER'S MANUAL
- THANK YOU FOR YOUR PURCHASE
- TABLE OF CONTENTS
- REFRIGERATOR SAFETY 4
- PRODUCT OVERVIEW 10
- INSTALLATION INSTRUCTIONS....12
- OPERATION 27
- MAINTENANCE & CARE 36
- TROUBLESHOOTING....40
- LIMITED WARRANTY 50
- REFRIGERATOR SAFETY
- READ ALL INSTRUCTIONS BEFORE USING THE APPLIANCE
- Your safety and the safety of others are very important.
- ! WARNING
- ! CAUTION
- California Proposition 65 Warning
- WARNING:
- IMPORTANT SAFETY INSTRUCTIONS
- WARNING
- READ AND SAVE THESE INSTRUCTIONS
- CAUTION
- CONNECTING ELECTRICITY
- ELECTRICAL SHOCK HAZARD
- Do not, under any circumstances, cut or remove the third (ground) prong from the power cord. For personal safety, this appliance must be properly grounded.
- PROPER DISPOSAL OF YOUR OLD REFRIGERATOR
- SUFFOCATION AND ENTRAPMENT HAZARD
- Before You Throw Away Your Old Appliance
- REFRIGERANT AND FOAM DISPOSAL
- FLAMMABLE REFRIGERANT
- FIRE AND EXPLOSION HAZARD
- PRODUCT OVERVIEW
- REFRIGERATOR LAYOUT
- INTERIOR
- INSTALLATION INSTRUCTIONS
- BEFORE INSTALLING
- INSTALLATION OVERVIEW
- PARTS SUPPLIED
- For COS-RFFV183GHS only:
- UNPACKING THE REFRIGERATOR
- EXCESSIVE WEIGHT HAZARD
- NOTE:
- ELECTRICITY
- FLOORING
- AMBIENT TEMPERATURE
- DIMENSIONS AND CLEARANCES
- ASSEMBLING/REMOVING DOOR HANDLES
- (FOR COS-RFFV183GHS ONLY)
- Tool Needed
- ASSEMBLING DOOR HANDLES
- REMOVING DOOR HANDLES
- CONNECTING TO THE HOUSE WATER LINE
- TRIC SHOCK HAZARD
- BEFORE BEGINNING
- SUPPLIES NEEDED
- WATER LINE INSTALLATION INSTRUCTIONS
- COMPLETE INSTALLATION
- START/STOP THE ICEMAKER
- POSITION THE REFRIGERATOR
- WARNING EXCESSIVE WEIGHT HAZARD
- LEVELING
- OPERATION
- BEFORE USE
- - Intended use
- - Reserve doors and drawer(s) clearances.
- - Clean the refrigerator.
- ENERGY SAVING TIPS
- CONTROL PANEL
- CONTROL BUTTONS
- FRIDGE
- • Refrigerator Temperature Setting
- FREEZER
- • Freezer Temperature Setting
- MODE
- - Quick Cool
- - Quick Freeze
- •Optimal
- DISPLAY
- TEMPERATURE MODE
- ERROR CODES
- ICEMAKER
- BEFORE USING THE ICEMAKER
- USING THE ICEMAKER
- CRISPERS
- REFRIGERATOR SHELVES
- DOOR BINS
- Detaching/Assembling the Door Bin
- MAINTENANCE & CARE
- GENERAL CLEANING
- EXTERIOR
- INSIDE WALLS
- SHELVES
- FREEZER BASKETS
- COMPARTMENT LED LIGHT
- Replacing the LED Light
- DEFROSTING
- POWER FAILURE
- EXTENDED PERIODS OF NON-USE
- MOVING
- PREPARING FOR VACATION
- TROUBLESHOOTING
- BEFORE CALLING FOR SERVICE
- LIMITED WARRANTY
- WARRANTY AND SERVICE
- CUSTOMER SUPPORT
- IMPORTANT
- Correct disposal of this product:
- APPLIANCES
Brand : Cosmo
Model : COS-RFFV183RS
Category : Fridge