
DVD-V645K - DVD/VCR Combo SAMSUNG - Free user manual and instructions
Find the device manual for free DVD-V645K SAMSUNG in PDF.


| Brand | Samsung |
| Model | DVD-V645K |
| Product Type | DVD Player / VCR Combo |
| Dimensions (W x H x D) | 430 x 85 x 280 mm |
| Weight | 4.5 kg |
| Power Supply | 110-240V AC, 50/60Hz |
| Power Consumption | 25 W |
| Playback Formats | DVD-Video, DVD+R/RW, DVD-R/RW, CD, CD-R/RW, MP3, JPEG |
| VCR Features | VHS recording and playback, timer recording, auto repeat |
| Connections | RF antenna in/out, Composite video out, S-Video out, Audio L/R out |
| Remote Control | Included (batteries not included) |
| Care and Cleaning | Wipe with soft dry cloth; do not use liquid cleaners or solvents |
| Safety Precautions | Do not block ventilation slots; use only supplied power cord; avoid moisture |
| Spare Parts and Repairability | Contact Samsung authorized service center; no user-serviceable parts inside |
| General | Combo unit for playing DVDs and VHS tapes; supports NTSC/PAL |
Frequently Asked Questions - DVD-V645K SAMSUNG
User questions about DVD-V645K SAMSUNG
0 question about this device. Answer the ones you know or ask your own.
Ask a new question about this device
Download the instructions for your DVD/VCR Combo in PDF format for free! Find your manual DVD-V645K - SAMSUNG and take your electronic device back in hand. On this page are published all the documents necessary for the use of your device. DVD-V645K by SAMSUNG.
USER MANUAL DVD-V645K SAMSUNG
Safety Instructions .... 3
Disc Type and Characteristics ..... 4
◆DVD-VCR Overviews
Front View of the DVD-VCR 5
Rear View of the DVD-VCR 5
Accessories 5
Display In dicators 6
◆Connecting Your DVD-VCR
Inserting Batteries in the Remote Control .... 6
Connecting DVD-VCR to the TV
using the A/V Cable 6
Connecting DVD-VCR to a Satellite
Receiver or Other Equipment 7
Deck Control Keys 7
Copying from DVD to VCR 8
Setting the Date and Time 8
◆Setting Up Your DVD-VCR
Selecting the Colour Mode 9
Intelligent Picture Control 9
Auto Power off 10
Screen Messages 10
Selecting the Cassette Type ..... 11
Repeat Play 11
◆Recording Television Broadcasts
Selecting the Recording Speed ..... 11
S-VHS Play 11
Recording a Programme Immediately ..... 12
Protecting a Recorded Cassette ..... 12
Recording a Programme with Automatic Stop 12
◆ Playing Back
Playing a Cassette 13
Adjusting Picture Alignment Manually ..... 13
Selecting the Audio Output Mode
★(DVD-V645K only) 13
Playing a Cassette in Slow Motion ..... 14
Playing a Sequence Frame by Frame ..... 14
Playing a Sequence at Variable Speeds .... 14
Searching for a Specific Sequence ..... 15
Using the Tape Counter ..... 16
Recording from Another VCR or Camcorder . 16
◆KARAOKE Functions (VCR)
Using the KARAOKE Function ..... 17
SCORE Function 17
KARAOKE SEARCH Function ..... 17
◆DVD Functions
Choosing a Connection ..... 17
Setting Up the Language Features ..... 18
Setting Up the Audio Options ..... 19
Setting Up the Display Options ..... 20
Setting Up the Parental Control ..... 21
Special Playback Features 22
A/V Receiver Connections ..... 22
Component Connections (for DVD) ..... 23
Adjusting the Aspect Ratio (EZ View) ..... 24
Using the Display Function 25
Changing the Camera Angle 26
Selecting the Subtitle Language .....26
Repeat Play 27
Selecting the Audio Language ..... 27
Using the Mark Function 28
MP3/WMA Play 29
Program Play & Random Play .... 30
Picture CD Playback 31
DivX/XviD/MPEG4
Special Playback Features .... 32
DivX/XviD/MPEG4 Playback 33
◆KARAOKE Functions (DVD)
Beginning Karaoke Functions 34
Key Control 34
Reserving a Song 34
Cancellation of reservation 35
Vocal Fader 35
Guide Melody 35
Score Function 35
Types of Karaoke disc 35
◆Solving Problems
Technical Specifications 36
Problems and Solutions (VCR) 37
Troubleshooting Guide (DVD) 38
Safety Instructions
The following illustrations represent precautions.

The lightning bolt is a warning sign alerting you to dangerous voltage inside the product.
DO NOT OPEN THE DVD-VCR. Refer to service personnel.
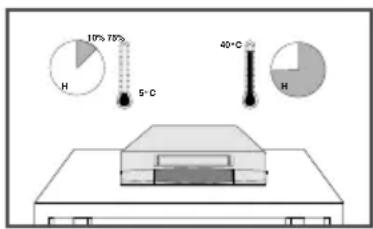
Do NOT expose the DVD-VCR to extreme temperature conditions (below 5°C and above 40°C) or to extreme humidity conditions (less than 10% and more than 75%).
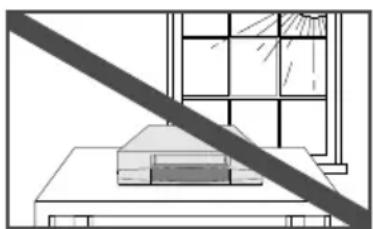
natural_image
Simple line drawing of a building on a table with a diagonal line and window frame (no text or symbols)Do NOT expose the DVD-VCR to direct sunlight.
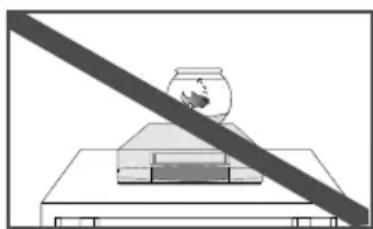
natural_image
Simple line drawing of a fishbowl on a platform with a diagonal line (no text or symbols)Do NOT expose the DVD-VCR to any liquids.
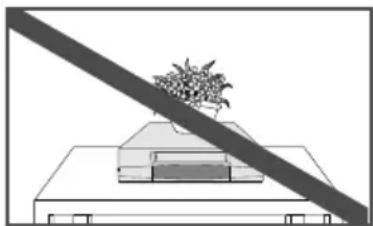
natural_image
Simple line drawing of a roof structure with a diagonal line crossing over it, no text or symbols present.Do NOT place any objects on the DVD-VCR or remote control.
natural_image
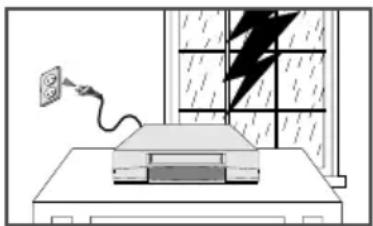
Simple line drawing of a desk with a power plug and lightning bolt, no text or symbols presentDuring a storm and/or lightning, unplug the DVD-VCR from the mains socket and aerial.

natural_image
Illustration of a box with an open lid and two cylindrical batteries above it, showing a rotation arrow (no text or symbols)If the remote control is not used for a long period of time, remove the batteries and store it in a cool, dry place.
THIS DEVICE IS NOT FOR USE IN INDUSTRIAL ENVIRONMENTS
This product incorporates copyright protection technology that is protected by method claims of certain U.S. patents and other intellectual property rights owned by Macrovision Corporation and other rights owners.
Use of this copyright protection technology must by authorized by Macrovision Corporized by Macrovision Corporation, and is intended for home and other limited viewing uses only unless otherwise authorized by Macrovision Corporation. Reverse engineering or disassembly is prohibited.
Disc Type and Characteristics
This DVD player is capable of playing the following types of discs with the corresponding logos :
| Disc Types (Logos) | Recording Types | Disc Size | Max. Playing Time | Characteristics |
DVD | Audio+Video | 12 Cm | Single-sided 240 min.Double-sided 480 min. | • DVD contains excellent sound and video due to Dolby Digital and MPEG-2 system.• Various screen and audio functions can be easily selected through the on-screen menu. |
| 8 Cm | Single-sided 80 min.Double-sided 160 min. | |||
VIDEO-CD | Audio+Video | 12 Cm | 74 min. | • Video with CD sound, VHS quality & MPEG-1 compression technology. |
| 8 Cm | 20 min. | |||
AUDIO-CD | Audio | 12 Cm | 74 min. | • An LP is recorded as an analog signal with more distortion. CD is recorded as a Digital Signal with better audio quality, less distortion and less deterioration of audio quality over time. |
| 8 Cm | 20 min. |
* DO NOT play CD-ROM, CD-I and DVD-ROM in this player!
(CDGs play audio only, not graphics.)
* It may not be to play CD-R,CD-RW and DVD-R in all cases due to the type of disc or condition of the recording.
Disc Markings
 | • Play Region Number |
 | • PAL colour system in Australia, Newzealand, etc. |
 | • NTSC broadcast system in U.S.A, Canada, Korea, Japan, etc. |
 | • Dolby Digital disc |
 | • Stereo disc |
 | • Digital Audio disc |
 | • DTS disc |
 | • Disc contains a Divx software product |
Play Region Number
Both the DVD player and the discs are coded by region. These regional codes must match in order for the disc to play. If the codes do not match, the disc will not play.
The Region Number for this player is described on the rear panel of the player.
Progressive Scan Outputs (525p/625p)
"Consumers should note that not all high definition television sets are fully compatible with this product and may cause artifacts to be displayed in the picture, in case of 525 or 625 progressive scan picture problems, it is recommended that the user switch the connection to the 'STANDARD DEFINITION' output. If there are questions regarding our TV set compatibility with this model 525p and 625p DVD player, please contact our customer servise center."
Front View of the DVD-VCR

1 DVD DECK
2 OPEN / CLOSE BUTTON
3 VIDEO CASSETE COMPARTMENT
4 EJECT BUTTON
5 STANDBY / ON BUTTON
6 REW / SKIP BACK BUTTON
7 STOP BUTTON
8 PLAY / STILL BUTTON
9 F.F / SKIP NEXT BUTTON
10 RECORD BUTTON
11 COPY BUTTON
12 DVD / VCR SELECT BUTTON
13 PROGRESSIVE BUTTON
14 VOLUME + / - BUTTON
15 ECHO BUTTON
16 MIC JACK
Rear View of the DVD-VCR
(DVD-V645K)
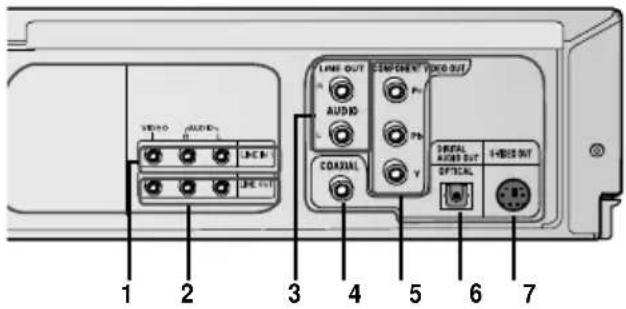
1 LINE IN 1
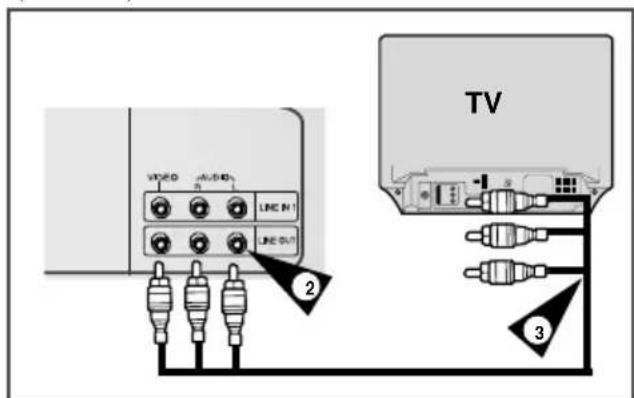
2 LINE OUT TO TV (COMPOSITE)
3 AUDIO LINE OUT TO TV
(S-VIDEO OR COMPONENT)
4 DIGITAL AUDIO OUT SOCKET (COAXIAL)
5 COMPONENT VIDEO OUT
(DVD-V642K)

6 DIGITAL AUDIO OUT SOCKET (OPTICAL)
7 S-VIDEO OUT JACK
Accessories
You have just purchased a SAMSUNG Video Cassette Recorder (DVD-VCR).
Together with your DVD-VCR, you will find the following accessories in the box.
REMOTE CONTROL & BATTERIES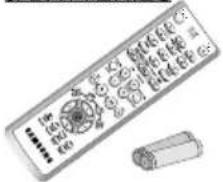 | AUDIO & VIDEO CABLE *(DVD-V645K only)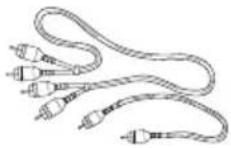 | AUDIO & VIDEO CABLE *(DVD-V642K only)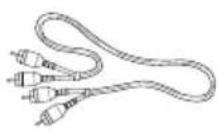 | OWNER'S INSTRUCTIONS |
Display Indicators
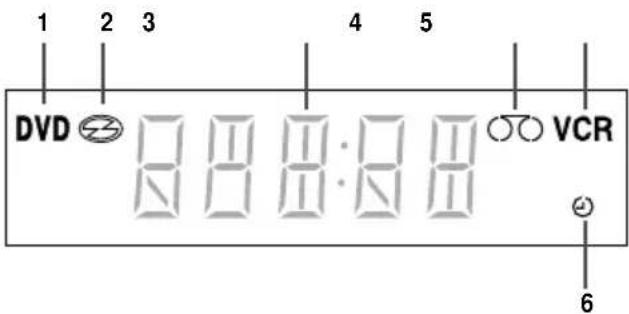
1 The DVD Deck is active
2 A DVD, CD, VCD, or SVCD is loaded
3 The time, counter position, time remaining or current deck status is displayed
4 VHS tape is inserted
5 The VCR Deck is active
6 A Timer Recording is programmed or in progress.
Inserting Batteries in the Remote Control
You must insert or replace the batteries in the remote control when you:
◆ Purchase the DVD-VCR
◆ Find that the remote control is no longer working correctly
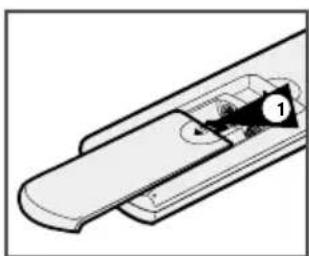
1 Push the tab in the direction of the arrow to release the battery compartment cover on the rear of the remote control.
2 Insert two AAA, RO3 or equivalent batteries, taking care to respect the polarities:
◆ + on the battery with + on the remote control
◆ – on the battery with – on the remote control
3 Replace the cover by aligning it with the base of the remote control and pushing it back into place.
natural_image
Diagram of a mechanical component with a numbered label (1) and directional arrow, no readable text or symbols present.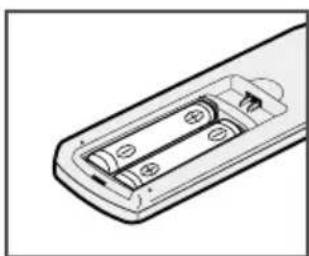
natural_image
Diagram of a remote control casing with battery and indicator lights (no text or symbols)Do not mix different battery types (manganese and alkaline for example).
Connecting DVD-VCR to the TV using the A/V Cable
You can connect your DVD-VCR to the television using the A/V cable if the appropriate input is available on the television. You thus:
◆ Obtain better quality sound and pictures
◆ Simplify the setting up procedure of your DVD-VCR
Regardless of the type of connection chosen, you must always connect the coaxial cable supplied. Otherwise, no picture will be visible on the screen when the DVD-VCR is switched off.
Make sure that both the television and the DVD-VCR are switched off before connecting the cables.
1 Connect the coaxial cable as indicated on page 6.
2 Connect one end of the Audio/Video cable to the Video output and Audio L, R output socket on the rear of the DVD-VCR.
3 Plug the other end into the appropriate connector on the television.
4 To view DVD-VCR, you must select AV mode on your TV.
(DVD-V645K)
(DVD-V642K)
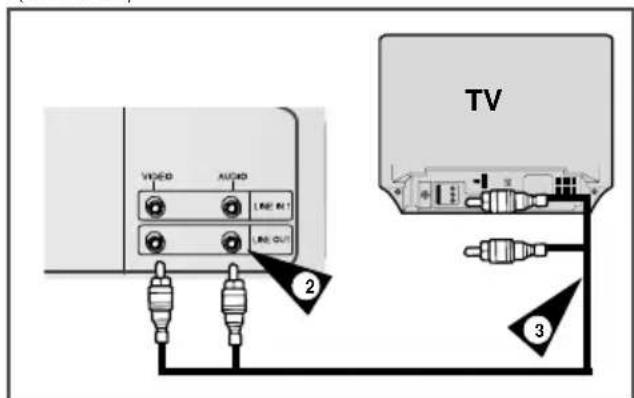
Connecting DVD-VCR to a Satellite Receiver or Other Equipment
You can connect other audio and/or video equipment to your DVD-VCR in different ways. The following illustrations give a few examples of the connection possibilities.
The AV input/output connectors on the rear of the DVD-VCR are used for equipment, such as camcorders, VCRs or sound systems.

Deck Control Keys
The DVD-VCR uses one set of controls to operate both decks. The following keys are helpful in successfully controlling each deck.
1 STANDBY/ON Button
Press the STANDBY/ON button on the remote control or front panel to turn on the DVD-VCR.
2 DVD Button
Press the DVD button on the remote control when you want to control the DVD deck.
◆ The DVD indicator will light on the Front Panel Display to show that the DVD deck is selected.
3 VCR Button
Press the VCR button on remote control when you want to control the VCR deck.
◆ The VCR indicator will light on the Front Panel Display to show that VHS deck is selected.
Before using the VCR operation of 9\~17 pages, press the VCR button on the remote control to select VCR mode.
Before using the DVD operation of 17\~35 pages, press the DVD button on the remote control to select and watch DVD.
Copying from DVD to VCR
The DVD-VCR allows you to copy the contents of a DVD to a VHS tape with a press of the COPY button.

If the DVD you are attempting to copy is copy protected, you will not be able to copy the disc. It is not permitted to copy Macrovision® encoded DVDs.
1 Insert Disc
Insert the disc you wish to copy in the DVD deck and close the drawer.
2 Insert VHS Tape
Insert a blank VHS videotape into the VCR deck.
3 Copy the DVD to VHS Tape
Press the COPY button on the DVD-VCR front panel.
◆ The DVD will go into Play mode and the VCR will go into Record mode.
◆ If the DVD disc menu appears, you may need to press the PLAY button manually to begin copying.
4 Stop the Copy Process
When the DVD is finished playing, press the VCR button on the remote control and then press the STOP button to end the copy.
- You must stop the Copy process manually when the DVD movie ends or the DVD may replay and record over and over again.

Setting the Date and Time
Your DVD-VCR contains a 24-hour clock and calendar used to:
◆ Automatically stop programme recording
◆ Preset your DVD-VCR to record a programme automatically
You must set the date and time when:
◆ You purchase the DVD-VCR

Do not forget to reset the time when you change clocks from winter to summer time and vice versa.
1 After pressing the MENU, press the OK or ▶. Result: The Setup menu is displayed.

2 Press the corresponding ▲, ▼ buttons to select the Clock option.
3 Press the OK or ▶ to select this option.
Result: The Clock Set menu is displayed.
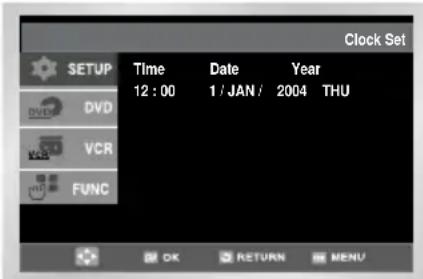
4 Press ◀ or ▶ to select the hour, minutes, day, month and year.
Result: The option selected highlight.
5 Press the ▲ or ▼ buttons to increase or decrease the value.
Result: The day of the week is displayed automatically.
You can hold the ▲,▼ buttons down to scroll more quickly through the values.
6 On completion, press RETURN to exit the menu.
Selecting the Colour Mode
Before recording or playing back a cassette, you can select the required system standard.
When you playback an NTSC-recorded tape on this DVD-VCR make a setting on the colour system according to your TV. If your TV is a PAL system only TV, set NTPB. If your TV is Multi System TV (NTSC 4.43 compatible), set NT4.43 and you can record NT4.43.
1 After pressing the MENU, press the OK or ▶. Result: The Setup menu is displayed.
2 Press the corresponding ▲,▼ buttons to select the User Set option.
3 Press the OK or ▶ to select this option.
Result: The User Set menu is displayed.
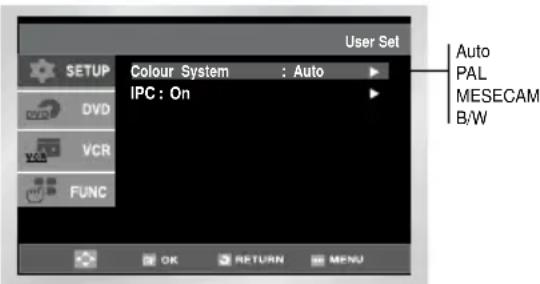
4 Press the corresponding ▲, ▼ buttons, until the Colour System option is selected.
5 Press the OK or ▶ button to select
Auto → PAL→ MESECAM → B/W.
B/W Black and White
6 On completion, press RETURN three time to exit the menu.
Intelligent Picture Control
The Intelligent Picture Control Feature allows you to adjust the sharpness of the image automatically, according to your own preferences.
1 During playback, press the MENU button on the remote control.
2 Press the OK or ▶.
Result: The Setup menu is displayed.
3 Press the corresponding ▲,▼ buttons to select the User Set option.
4 Press the OK or ▶ buttons to select this option.
Result: The User Set menu is displayed.

5 Press the corresponding ▲, ▼ buttons, until the IPC option is selected.
6 Press the OK or ▶ buttons to select the IPC (intelligent picture control) option.
▶ When intelligent picture control mode is ON, the sharpness of the image is adjusted automatically.
7 To adjust the sharpness manually, press the button to turn the IPC mode OFF.
8 Press the ◀ or ▶ buttons until the picture is displayed according to your preferences.
➢ If you do not press a button within ten seconds, the PICTURE menu disappears automatically.
9 On completion, press the RETURN button.
You also can directly select this function using IPC button on the remote control.
Auto Power off Screen Messages
The Auto Power Off feature automatically turns off your DVD-VCR if no signal is received and you do not press any button for the selected time.
1 After pressing the MENU, press the OK or ▶. Result: The Setup menu is displayed.
2 Press the corresponding ▲, ▼ buttons, until the Auto Power Off option is selected.

3 Press the OK or ▶ buttons, until you select the time of Auto Power Off interval.

4 On completion, press RETURN twice to exit the menu.
Your DVD-VCR displays most information both on the DVD-VCR and the television.
You can choose to display or hide this information on the television screen (except for the SEARCH, Programming MENU and Timer functions, which cannot be hidden).
1 After pressing the MENU, press the OK or ▶.
2 Press the corresponding ▲, ▼ buttons, until the Screen Messages option is selected.

| 3 To... Press OK or | ▶, until... |
| Display on-screen information | On is displayed. |
| Hide on-screen information | Off is displayed. |
4 On completion, press RETURN twice to exit the menu.
Selecting the Recording SpeedSelecting
If you wish to use the tape counter to display the time remaining on a cassette, you must indicate the type of cassette inserted.
1 After pressing the MENU press the corresponding ▲, ▼ buttons to select the VCR option.
2 Press the OK or ▶ buttons to select this option.
Result: The VCR Setup menu is displayed.
3 Press the corresponding ▲, ▼ buttons, until the Tape Select option is selected.
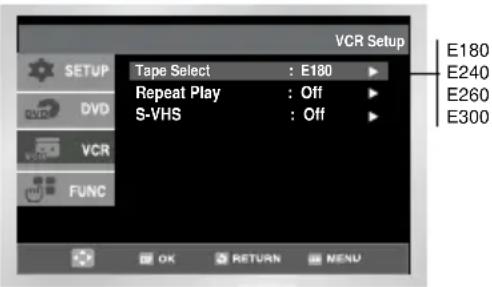
4 Press the OK or ▶ buttons as many times as required, until the correct cassette length is displayed.

5 Press RETURN twice to exit the menu.
Repeat Play
You can set repeat play to repeat the tape continuously from beginning to end.
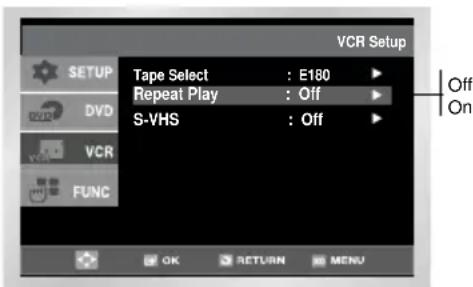
To... Press OK or
▶, until...
Repeat play On is displayed.
Do not wish to repeat play
Off is displayed.
You can record a cassette at two different speeds:
◆ SP (Standard Play)
◆ LP (Long Play)
In Long Play modes:
◆ Each cassette lasts twice as long
◆ The recording is of a slightly lower quality
To record a cassette... Press the SPEED button on the remote control, until...
In standard play mode SP is displayed. In long play mode LP is displayed.
| Type Recording Time (in SP) |
| E-180 180 mins. or 3 hours |
| E-240 240 mins. or 4 hours |
| E-260 260 mins. or 4 hours and 20 mins. |
| E-300 300 mins. or 5 hours |
S-VHS Play
The DVD-VCR allows you to playback high quality S-VHS tapes.
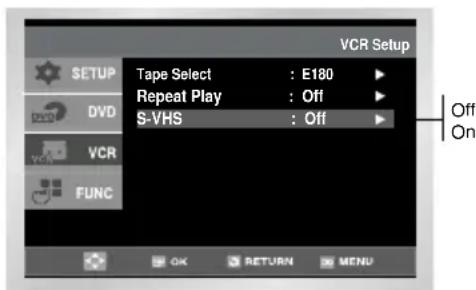
To... Press OK or
▶, until...
S-VHS play
On is displayed.
Do not wish to S-VHS play
Off is displayed.
Recording a Programme Immediately
1 Switch on the television.
2 To monitor the programme being recorded, select the television channel reserved for use with your DVD-VCR (or the AV input if used).
3 Insert the cassette on which the programme is to be recorded, with the window visible and the safety tab intact or the opening covered with adhesive tape. Result: The DVD-VCR is switched on automatically.
4 Select the recording speed by pressing the SPEED button as many times as required (see page 11).
5 Hold REC ( ● ) down for a while to start recording.
Result: The record indicator appears on the television and DVD-VCR display. An index is recorded on the tape (see page 15).
6 To stop recording, press ■ once.
If your DVD-VCR ejects the cassette when you start recording, check to make sure that the cassette's safety tab is intact or that the opening (created by a broken safety tab) is covered with adhesive tape.
◆ If you reach the end of the tape while recording, the cassette rewinds automatically.
Protecting a Recorded Cassette
Video cassettes have a safety tab to prevent accidental erasure. When this tab has been removed, you cannot record on the tape.
1 If you wish to protect a cassette, break off the tab using a small screwdriver.
2 To re-record over a protected cassette (safety tab broken), cover the hole with adhesive tape.

natural_image
Line drawing of a cassette tape with a screwdriver inserted, showing no text or symbolsRecording a Programme with Automatic Stop
This function enables you to record up to nine hours (LP) of programmes.
Your DVD-VCR stops automatically after the requested length of time.
1 Switch on the television.
2 To monitor the programme being recorded, select the television channel reserved for use with your DVD-VCR (or the AV input if used).
3 Insert the cassette on which the programme is to be recorded, with the window visible and the safety tab intact or the opening covered with adhesive tape. Result: The DVD-VCR is switched on automatically.
4 Select the recording speed by pressing the SPEED button as many times as required. (see page 11)
5 Hold the REC button ( ● ) down for a while to start recording.
Result: The record indicator appears on the television screen and DVD-VCR display. An index is recorded on the tape. (see page 15)
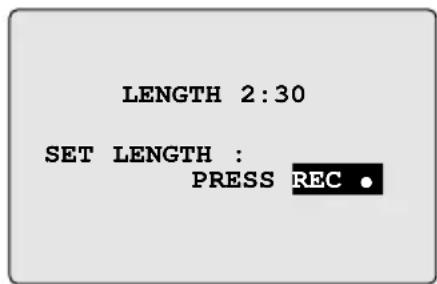
6 Press the REC button ( • ) several times to increase the recording time in:
◆ 30-minute intervals up to four hours
◆ 1-hour intervals up to nine hours
Result: The length is displayed on the television displays. The selected programme is recorded for the length of time requested. At the end of that time, the DVD-VCR stops recording automatically and power off.
7 If you wish to cancel the recording before the end, press STANDBY/ON.
If the end of the tape is reached while recording: ◆ The recording stops and power off.
Playing a Cassette
This function allows you to play back any pre-recorded cassette.
1 Switch on both the television and your DVD-VCR.
2 Insert the video cassette to be played. If the safety tab on the cassette is intact, press ▶II.
Otherwise, the cassette is played automatically.
When a cassette is loaded, the tape position is optimized automatically to reduce disturbance (Digital Auto Tracking). When playing a cassette, if the end of the tape is reached, the cassette is rewound automatically.
3 To... Then press...
Stop the playback
■ (STOP).
Eject the cassette (EJECT).

Adjusting Picture Alignment Manually
The Picture Adjustment feature allows you to adjust the alignment manually to obtain the best possible picture.
When noise bars or streaks appear during playback, adjust alignment manually by pressing the TRK buttons until the picture is clear and stable.
Result:
◆ The tracking bar appears.
◆ The image is adjusted.
◆ The tracking bar disappears when you release the button.
Selecting the Audio Output Mode ★(DVD-V645K only)
You can select the mode in which the sound is reproduced on the loudspeakers and AV outputs. The following options are available.
Option Description
| L Used to listen to the sound on the left Hi-Fi channel. |
| R Used to listen to the sound on the right Hi-Fi channel. |
| MIX Used to listen to the mixed sound of the Hi-Fi and normal channels. |
| MONO Used to listen to the sound on the normal mono channel. |
| L R Used to listen to Hi-Fi stereo sound on the left and right channels.➢ When playing back tapes recorded in Hi-Fi, the sound switches to Hi-Fi after five seconds of Mono. |
To select the sound mode, simply press the AUDIO button on the remote control until the required option is displayed.

flowchart
graph LR
    A["MIX"] --> B["MONO"]
    B --> C["LR"]
    C --> D["LR"]
Playing a Cassette in Slow Motion
You can play a cassette in slow motion.
No sound is heard when playing back a cassette in slow motion.
1 Press:
◆ ▶II to start playing the cassette
◆ ▶ II button one more time to make still mode.
◆ ▶▶ to start SLOW mode.
◆ ◀◀ or ▶▶ button as many times as required to decrease or increase the speed respectively
◆ To return to the normal speed, press the ▶II button twice.
2 When playing back in slow motion, picture interference may occur.
Press the TRK buttons to minimize this effect.
When you have been using the Slow Motion function for more than about two minutes, the DVD-VCR will automatically play to protect the:
♦ Cassette
◆ Video heads
Playing a Sequence at Variable Speeds
You can vary the playback speed using the Shuttle function (up to nine times the normal speed).
Example: You wish to analyse a sportsperson's technique, movement by movement.
The Shuttle function is available on the Remote control
No sound is heard when playing a sequence at variable speeds.
1 Press:
◆ ▶II during playback
◆ SHUTTLE (<<) to play the cassette backwards
◆ SHUTTLE (>>) to play the cassette forwards
2 Each time you press a SHUTTLE button, the speed is changed as shown in the following illustration.
Playing a Sequence Frame by Frame
You can
◆ Stop the cassette at a given frame (image)
◆ Advance one frame at a time
No sound is heard when playing back frame by frame.
1 Press:
◆ ▶II to start playing the cassette
◆ ▶ II button one more time to make still mode.
◆ F.ADV/STEP to advance frame by frame
2 To return to normal playback, press ▶ II
Vertical stability: When playing back frame by frame, interference may be seen on the screen. Press the TRK buttons to minimize this effect.
Searching for a Specific Sequence
Each time you record a cassette on this DVD-VCR, an "index" is automatically marked on the tape when recording starts.
The Search function allows you to fast-forward or rewind to a specific index and start playback from that point. Depending on the direction selected, the indexes are numbered as follows:
| etc. | Prev Seq. | Seq. being played | Next Seq. | etc. |
| 2 | 1 | 1 | 2 |
This DVD-VCR uses a standard indexing system (VISS). As a result, it will recognize any indexes marked by other VCRs using the same system and vice versa.
Go To [0:00:00] Stop
Use this feature when you want to search for the 0:00:00 counter position on a cassette. Press the CLEAR button at the point on the tape where you want to set the counter to 0:00:00.
The VCR will rewind or fast forward, searching for the 0:00:00 counter position, and then automatically stop at that position.
1 After pressing the SEARCH, press the corresponding ▲,▼ buttons, until the Go To [0:00:00] option is selected.
![VCR Function SETUP Go To [0:00:00] DVD End Search VCR Intro Scan FUNC OK RETURN MENU](/content/2026/05/994535/images/e07f6e3b8673fb92e6118095f95c76ef164b4526d0fba6a3f547611f4c790db5.jpg)
2 Press the OK or ▶.
End Search
Use this feature when you want to search for a blank position to record a program on a cassette.
The VCR will fast forward, searching for a blank position, and then automatically stop at that position. If the VCR reaches the end of the tape during end search, the tape will be ejected.
1 After pressing the SEARCH, press the corresponding ▲ or ▼ buttons, until the End Search option is selected.
2 Press the OK or ▶.
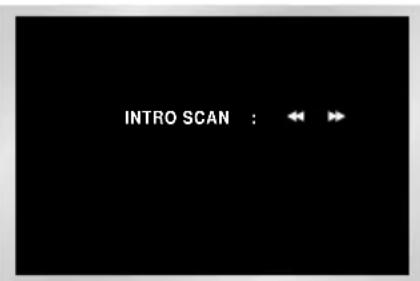
Intro Scan
1 After pressing the SEARCH, press the corresponding ▲,▼ buttons, until the Intro Scan option is selected.
2 Press the OK or ▶.
3 Press the ◀◀ or ▶▶ buttons depending on the direction where your desired programme is located.
4 When an Index mark is found the DVD-VCR will playback the tape for 5 seconds, after which it will continue searching for the next Index mark.
5 If you want to watch the tape from a particular Index, simply press ▶II twice.
Index Skip Search
This feature will enable you to fast forward/rewind to a specific point on a tape: E.g. if you have recorded 3 different programmes on a tape and you have rewound the tape to the beginning, by using this feature you can go directly to the start of programme 2 simply by pressing the SEARCH button.
1 After pressing the SEARCH, press the corresponding ▲, ▼ buttons, until the Intro Scan option is selected.
2 Press the OK or ▶.
3 Press the ◀◀ or ▶▶ buttons twice more. This will take you directly to the start of the desired programme is located.
4 These Index searches can be made forwards: (press ▶▶) or backwards: (press ◀◀). (◀◀ -20 .. 0 .. +20 ▶▶)
5 To cancel an Index search simply press the ▶II or ■ button.

Using the Tape Counter
The tape counter:
◆ Indicates the elapsed time in the play and record modes (hours, minutes and seconds)
◆ Is reset when a cassette is inserted in the DVD-VCR
◆ Allows you to find the beginning of a sequence easily
If the remaining time is to be calculated correctly, you must indicate the type of cassette being used.
1 Insert a cassette in your DVD-VCR.
2 To set the tape counter to zero at the beginning of a sequence:
◆ Press INFO. twice to display the counter
◆ Press CLEAR when you want to set the tape counter to zero.
0:00:00
3 When you are ready,
◆ Start playback or Recording.
◆ Press the ■ button.
◆ To fast-froward or rewind to the sequence at which the counter was set to zero, press ◀◀ or ▶▶.
Some DVD-VCR information, such as the counter, can be displayed on the television screen (unless you have deactivated the Screen messages mode; refer to page 10).
Press INFO.:
◆ Once to display the current function, recording speed, date, time and counter
◆ Twice to display the counter only
◆ Three times to display the time remaining on the cassette
◆ Four times to clear the display
Recording from Another VCR or Camcorder
You can copy a cassette to your DVD-VCR from another video source, such as another VCR or a camcorder.
It is an infringement of copyright laws to copy prerecorded cassettes or to re-record them in any form without the permission of the owners of the corresponding copyright.
1 Connect the DVD-VCR, from which the cassette is to be copied, to the appropriate AV input connectors on the rear of your DVD-VCR, as indicated on page 7.
2 Insert a blank cassette in your DVD-VCR.
3 Insert the pre-recorded cassette in the other video source (VCR or camcorder).
4 Start playing back the cassette to be copied.
5 Hold REC (●) down for a while to start recording on your DVD-VCR.
6 When you have finished recording, press ■ on both VCR and DVD-VCR.
▶ If you wish to view the cassette being copied:
- Your DVD-VCR must be connected as usual to the television (see page 6 for further details)
Using the KARAOKE Function
1 Press the standby/on button and insert KARAOKE tape.
2 Connect Mic into MIC1 or MIC2 jack.
Then the KARAOKE mode is transferred "ON" mode.
◆ Disconnect the Mic makes the KARAOKE mode transfer to "OFF" mode automatically.
◆ Press the KARAOKE button on the remote control.
Press the ◀ or ▶ button to select KARAOKE mode "ON".
3 Adjust the Mic volume and ECHO level.
4 Sing with accompaniment.
SCORE Function
1 Press the KARAOKE button on the remote control.
2 Press the corresponding ▲ or ▼ buttons to select the SCORE mode.
3 Press the ◀ or ▶ buttons to select the SCORE mode "ON".
4 Score will pop up whenever a song is completed.

KARAOKE SEARCH Function
1 Press the STANDBY/ON button and insert KARAOKE tape.
2 Press the KARAOKE button on the remote control. Press the ◀ or ▶ button to select KARAOKE mode "ON".
3 Press ▶II to start playing the cassette.
4 When you want the next song during playing a song, press the KARAOKE SEARCH ▶▶ or KARAOKE SEARCH ◀◀ buttons on the remote control.
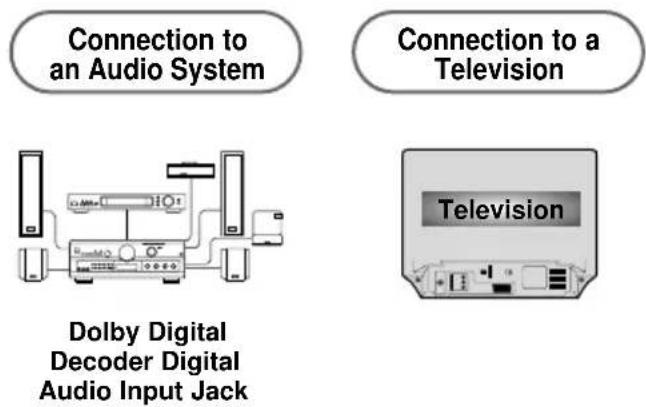
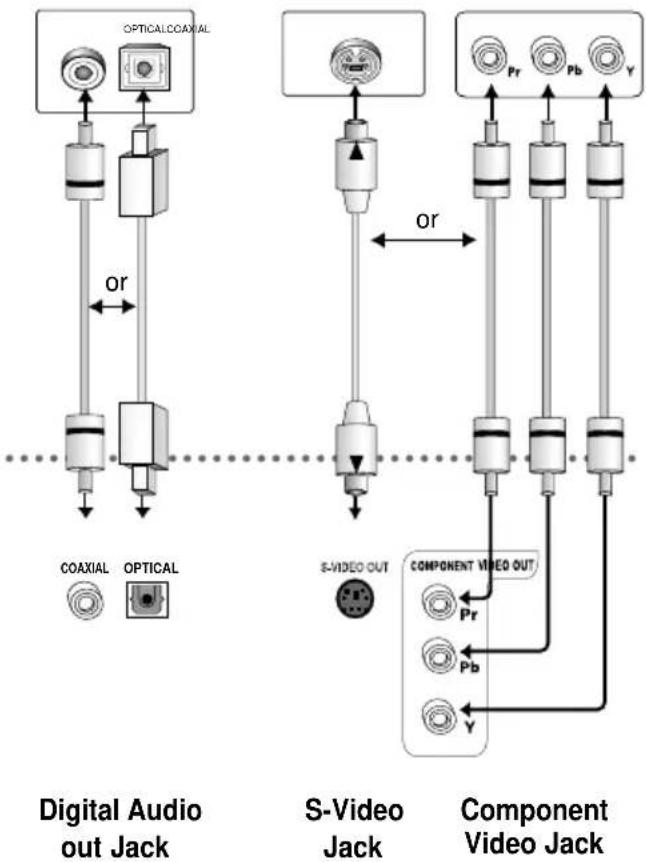
Choosing a Connection
The following show examples of connections commonly used to connect the DVD -VCR player with a TV and other components. It is only available for DVD. The VCR out can not watch by this connection.
flowchart
graph TD
    subgraph Digital Audio Jack
        A["OPTICAL COAXIAL"] --> B["Coaxial"]
        C["OPTICAL"] --> D["Optical"]
    end
    subgraph S-Video Jack
        E["S-VIDEO OUT"] --> F["Component Video Jack"]
    end
    subgraph Component Video Jack
        G["Pr"] --> H["Component Video Out"]
        I["Pb"] --> H
        J["Y"] --> H
    end
    B <-->|or| E
    D <-->|or| E
    F <-->|or| G
    H <-->|or| G
Setting Up the Language Features
If you set the player menu's, disc menu, audio and subtitle language in advance, they will come up automatically every time you watch a movie.
Using the Disc Menu Language
This function changes the text language only on the disc menu screens.
1 With the unit in Stop mode, press the MENU button.
2 Select DVD using ▲, ▼ buttons, then OK or ▶ button
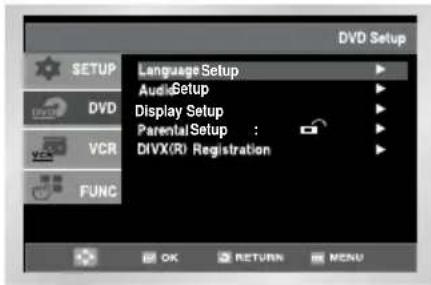
3 Select Language Setup using ▲, ▼ buttons, then press the OK or ▶ button.
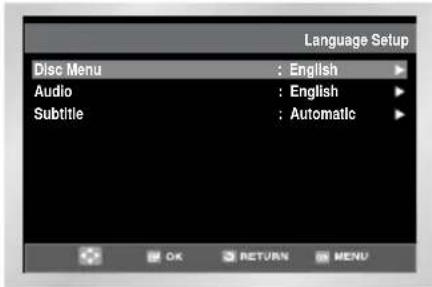
4 Select Disc Menu using ▲, ▼ buttons, then press the OK or ▶ button.
5 Use the ▲,▼ buttons to select 'English'.
- Select "Others" if the language you want is not listed.
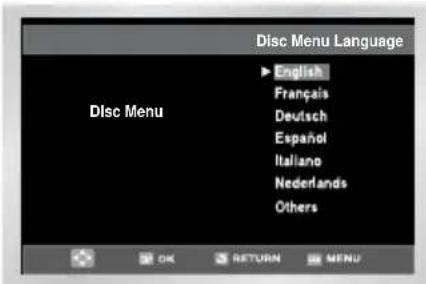
6 Press the OK button.
- English is selected and the screen returns to Language Setupmenu.
Using the Audio Language
1 With the unit in Stop mode, press the MENU button.
2 Select DVD using ▲, ▼ buttons, then OK or ▶ button.
3 Select Language Setup using ▲, ▼ buttons, then press the OK or ▶ button.
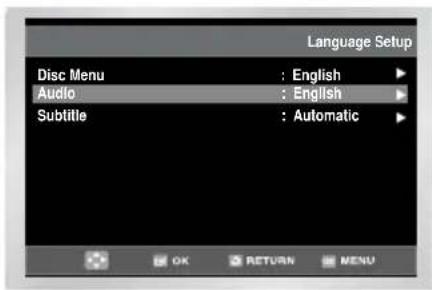
4 Select Audio using ▲, ▼ buttons, then press the OK or ▶button.
5 Press the ▲,▼ buttons to select English.
- Select "Original" if you want the default soundtrack language to be the original language the disc is recorded in.
- Select "Others" if the language you want is not listed.
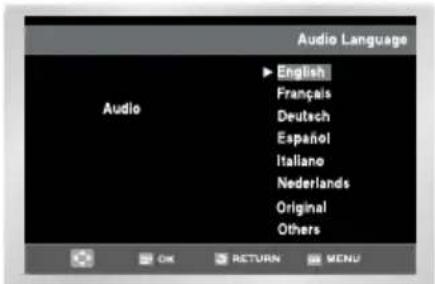
6 Press the OK button.
- English is selected and the screen returns to Language Setup menu.
Setting Up the Language Features
Using the Subtitle Language
1 With the unit in Stop mode, press the MENU button.
2 Select DVD using ▲, ▼ buttons, then OK or ▶ button.
3 Select Language Setup using ▲, ▼ buttons, then press the OK or ▶ button.
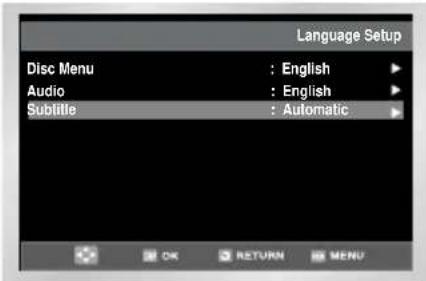
4 Select Subtitle using ▲, ▼ buttons, then press the OK or ▶ button.
5 Use the ▲, ▼ buttons to select English.
- Select "Automatic" if you want the subtitle language to be the same as the language selected as the audio preference.
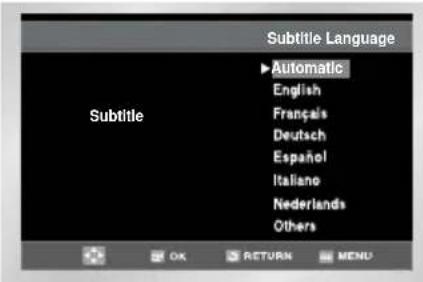
- Select "Others" if the language you want is not listed. Some discs may not contain the language you select as your initial language; in that case the disc will use its original language setting.
6 Press the OK button.
- English is selected and the screen returns to Language Setup menu.
Setting Up the Audio Options
1 With the unit in Stop mode, press the MENU button.
2 Select DVD using ▲,▼ buttons, then OK or ▶ button.

3 Select Audio Setup using ▲,▼ buttons, then press the OK or ▶ button.
4 Use the ▲,▼ buttons to select the desired item. Then press the OK or ▶ button.
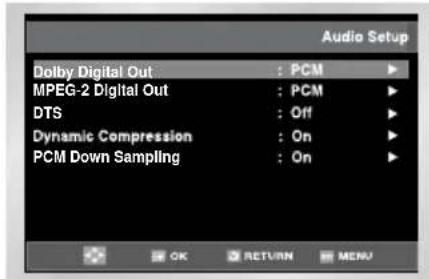
■ Dolby Digital Out
- PCM : Converts to PCM(2CH) audio. Select PCM when using the Analog Audio Outputs.
- Bitstream : Converts to Dolby Digital Bitstream (5.1CH). Select Bitstream when using the Digital Audio Output.
➢ Be sure to select the correct Digital Output or no audio will be heard.
■ MPEG-2 Digital Out
- PCM : Converts to PCM(2CH) audio. Select PCM when using the Analog Audio Outputs.
- Bitstream : Converts to MPEG-2 Digital Bitstream (5.1CH or 7.1CH). Select Bitstream when using the Digital Audio Output.
■ DTS
- Off: Doesn't output digital signal.
- On : Outputs DTS Bitstream via digital output only. Select DTS when connecting to a DTS Decoder.
Setting Up the Audio Options
■ Dynamic Compression
- On : To select dynamic compression.
- Off: To select the standard range.
■ PCM Down Sampling
-
On : Select this when the amplifier connected to the player is not 96KHz compatible. In this case, the 96KHz signals will be down converted to 48KHZ.
-
Off : Select this when the amplifier connected to the player is 96KHz compatible. In this case, all signals will be output without any changes.
• How to make the SETUP menu disappear or return to menu screen during set up; Press RETURN or ◀ button.
- Manufactured under license from Dolby Laboratories. "Dolby" and the double-D symbol are trademarks of Dolby Laboratories.
- "DTS" and "DTS Digital Out" are trademarks of Digital Theater Systems, Inc.
Setting Up the Display Options
1 With the unit in Stop mode, press the MENU button.
2 Select DVD using ▲, ▼ buttons, then OK or ▶ button.

3 Select Display Setup using ▲, ▼ buttons, then press the OK or ▶ button.
4 Use the ▲,▼ buttons to select the desired item. Then press the OK or ▶ button.
3 Select Display Setup using ▲, ▼ buttons, then press the OK or ▶ button. 4 Use the ▲, ▼ buttons to select the desired item. Then press the OK or ▶ button.

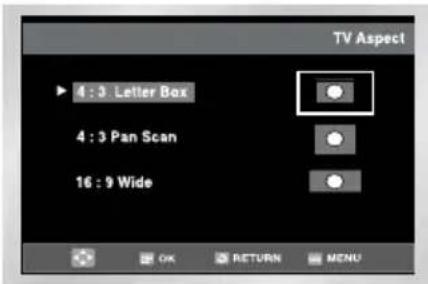
TV Aspect
Depending on the type of television you have, you may want to adjust the screen setting (aspect ratio).
- 4:3 Letter Box : Select when you want to see the total 16:9 ratio screen DVD supplies, even though you have a TV with a 4:3 ratio screen. Black bars will appear at the top and bottom of the screen.
- 4:3 Pan Scan : Select this for conventional size TVs when you want to see the central portion of the 16:9 screen. (Extreme left and right side of movie picture will be cut off.)
- 16:9 Wide : You can view the full 16:9 picture on your widescreen TV.
Black Level
Adjusts the brightness of the screen.(On/Off)
■ NTSC Disc Output
"NTSC" if the screen only has one NTSC-video entrance. If this is not the case, you can choose to leave "PAL60" as is.
Setting Up the Parental Control
The Parental Control function works in conjunction with DVDs that have been assigned a rating - which helps you control the types of DVDs that your family watches.
There are up to 8 rating levels on a disc.
1 With the unit in Stop mode, press the MENU button.
2 Select DVD using ▲, ▼ buttons, then OK or ▶ button.
3 Select Parental Setup using ▲,▼ buttons, then press the OK or ▶ button.

4 Use OK or ▶ to select Yes if you want to use a password. The Enter Password screen appears.

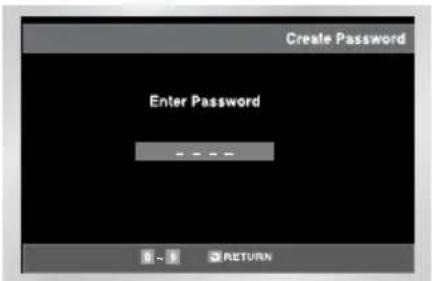
5 Enter your password. The Re-Enter Password screen appears to confirm the password. Ok your password again. The Parental Control screen appears.

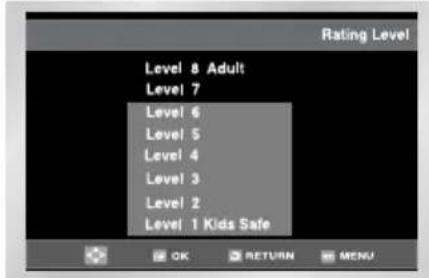
■ About the Rating Level ;
The Rating Level will work only when Use Password is set to Yes. To unlock the player, use▶ or OK to select No. Use ▲,▼ to select Rating Level. Press OK.
- Use ▲, ▼ to select the level(e.g. Level 6) and press OK. Discs that contain Level 7 will now not play.
- To cancel the rating level, use ▶ or OK to select No in Use Password.
■ About the Change Password ;
- Use ▲, ▼ to select Change Password. Press OK. The Change Password screen appears.
- Enter your new password. Re-Enter the new password again.
- How to make the SETUP menu disappear or return to menu screen during set up; Press RETURN or ◀ button.
- If you have forgotten your password, see Forget Password in the Troubleshooting Guide.
Special Playback Features
During DVD/CD playback you can select from the following special playback options. To resume normal playback, press the ▶II button.
1 Still
Press the ▶II button on the remote control during playback.
• The picture will still and the audio will mute.
- To resume playback, press the ▶II button.
- If the player is left in Still mode for 5 minutes, it will stop automatically.
2 Frame Advance (Step)
While in playback mode, press the F.ADV/STEP button on the remote control to advance one frame at a time.
• Audio is muted during Frame Advance mode.
- Press ▶II to resume normal playback.
NOTE: Frame Advance operates only in the forward direction.
3 Skip Forward/Back
While a CD or DVD disc is in Play mode, press the Skip I ◀◀ / ▶▶buttons on the remote control or front panel to jump forward and backward through disc chapters/tracks.
- Skip Forward will jump to the next chapter/track.
- Skip Back will jump to the beginning of the current chapter/track.
- Press Skip Back again to jump to the beginning of the previous chapter/track.
Search Forward/Back
While a disc is in Play mode, press and hold the ◀◀/▶▶ buttons on the remote control or front panel to visually search forward/backward at 2X - 4X - 8X - 16X - 32X - 128X speed. Press ▶II button to resume normal speed.
4 Slow Motion
During playback, press the ▶II button to Still the image. Then use the Search ▶▶ to play in slow motion at variable speeds.
• Each press increases the slow motion speed playback to 1/8, 1/4 or 1/2 normal speed.
• Audio is muted during slow motion playback.
5 Stop/Resume
- Press the Stop button once to stop playback. To resume the DVD/CD from the point where the disc stopped, press the ▶II button.
- Press the ■ button twice to completely stop playback. The next time you press ▶II, the disc will start over from the beginning.
A/V Receiver Connections
To take full advantage of the movie theater experience that DVD offers, you may want to connect your DVD-VCR to a complete Surround Sound system, including an A/V Receiver and six Surround Sound speakers.
Before You Begin...
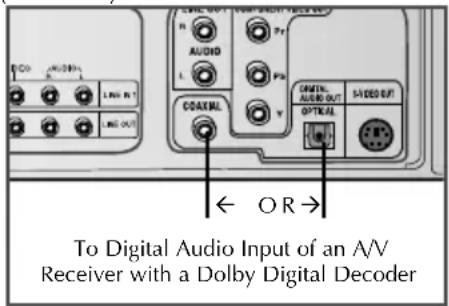
- If your A/V receiver is equipped with a Dolby Digital Decoder, you have the option to bypass the DVD-VCR's built-in Dolby Digital Decoder. Use the Digital Audio Out connection below.
(DVD-V645K)
(DVD-V642K)

1 Digital Audio Out
Connect EITHER an optical cable OR a digital coaxial cable from the Digital Audio Out jacks on the back panel of the DVD-VCR to their corresponding Digital Audio Input jacks on your A/V Receiver:
- Optical
- Coaxial
- Use whichever connection is available on your A/V Receiver.
Component video output is available only for DVD playback. RF and Line output are available for Tuner and VCR playback.
If your TV set supports Progressive Scan, it can transmit Pr, Pb, and Y signals separately, so you can enjoy sharp and clear picture.
What is Progressive Scan?
It is a set of jacks that can provide sharp and clear picture quality by using twice the number of fields of lines than component output.
1 Connect the component output of the DVD player to your TV set.
Use the component cable to connect the component output on the back panel of the DVD-VCR to the component input of your TV.
◆ If you mix up the connections when connecting the component cable, the picture will appear reddish or bluish.
2 Set your TV to COMPONENT.
Select component input as your TV's AV input. At this point, even if the picture appears reddish, it is normal.
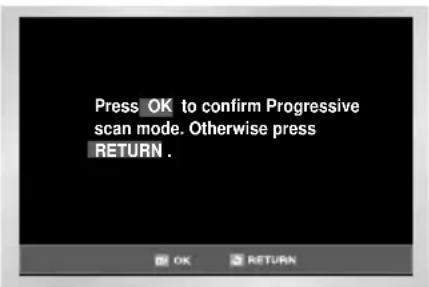
3 Press the Progressive button on the front panel.
If the Progressive button on the front panel of the DVD-VCR is pressed, the following message will be displayed:
To activate Progressive Scan, press OK.
The following message will be displayed and then the picture will be played in Progressive Scan mode.
4 To deactivate Progressive Scan, press the Progressive button again.
If the Progressive button on the front panel of the DVD-VCR is pressed again, Progressive Scan mode will be canceled. Select another mode as your TV's AV input to view another output of the DVD-VCR.
This is available only for a TV set that supports Progressive Scan.
◆ While Progressive Scan is active, video, S-video, and AV output are not available.
◆ To activate Progressive Scan, the DVD-VCR must be in Stop mode.
➢ You can listen to audio sound through Rear audio output while watching Component or S-Video output.

Adjusting the Aspect Ratio (EZ View)
To play back using aspect ratio (DVD)
1 Press the EZ VIEW button.
- The screen size changes when the button is pressed repeatedly.
- The screen zoom mode operates differently depending on the screen setting in the initial DVD menu.
- To ensure correct operation of the EZ VIEW button, you should set the correct aspect ratio in the initial setup.
If you are using a 16:9 TV
■ For 16:9 aspect ratio discs
- Wide Screen
Displays the content of the DVD title in 16:9 aspect ratio.
- Screen Fit
The top and bottom of the screen are cut off. When playing a 2.35:1 aspect ratio disc, the black bars at the top and bottom of the screen will disappear. The picture will look vertically stretched.
(Depending on the type of disc, the black bars may not disappear completely.)
- Zoom Fit
The top, bottom, left and right of the screen are cut off and the central portion of the screen is enlarged.
■ For 4:3 aspect ratio discs
- Normal Wide
Displays the content of the DVD title in 16:9 aspect ratio. The picture will look horizontally stretched.
- Screen Fit
The top and bottom of the screen are cut off and the full screen appears. The picture will look vertically stretched.
- Zoom Fit
The top, bottom, left and right of the screen are cut off and the central portion of the screen is enlarged.
If you are using a 4:3 TV
■ For 16:9 aspect ratio discs
• 4:3 Letter Box
Displays the content of the DVD title in 16:9 aspect ratio.
The black bars will appear at the top and bottom of the screen.
• 4:3 Pan Scan
The left and right of the screen are cut off and displays the central portion of the 16:9 screen.
- Screen Fit
The top and bottom of the screen are cut off and the full screen appears. The picture will look vertically stretched.
- Zoom Fit
When a 4:3 DVD is viewed on a 16:9 TV, black bars will appear at the left and right of the screen in order to prevent the picture from looking horizontally stretched.
■ For 4:3 aspect ratio discs
- Normal Screen
Displays the content of the DVD title in 4:3 aspect ratio.
- Screen Fit
The top and bottom of the screen are cut off and the full screen appears. The picture would look vertically stretched.
- Zoom Fit
The top, bottom, left and right of the screen are cut off and the central portion of the screen is enlarged.
This function may behave differently depending on the type of disc.
Using the Display Function
When Playing a DVD/VCD/CD
1 During play, press the INFO. button on the remote.
2 Use the ▲,▼ buttons to select the desired item.
3 Use the ◀, ▶ buttons to make the desired setup.
- You may use the number buttons of the remote control to directly access a title, chapter or to start the playback from the desired time.
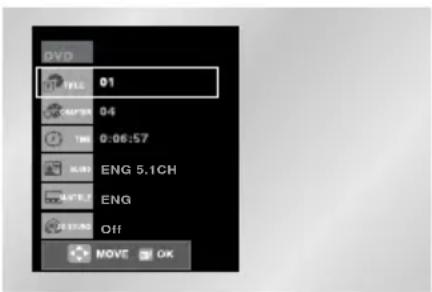
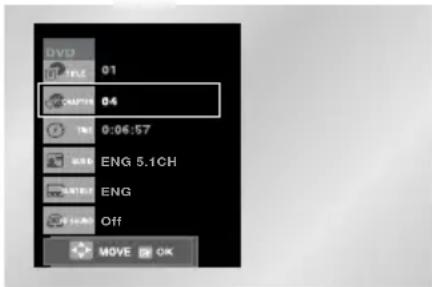
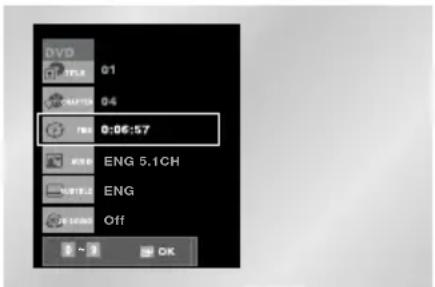
4 To make the screen disappear, press the INFO. button again.
What is a Chapter?
Each Title on a DVD is usually divided into chapters (similar to tracks on an audio CD).
• What is a Title?
A DVD may contain several different titles. For example, if a disc contains four different movies, each might be considered a title.

To access the desired title when there is more than one in the disc. For example, if there is more than one movie on a DVD, each movie will be identified.

Most of DVD discs are recorded in chapters so that you can quickly find a specific passage.

Allows playback of the film from a desired time. You must ok the starting time as a reference.

Refers to the language of the film soundtrack. In the example, the soundtrack is played in English 5.1CH. A DVD disc can have up to eight different soundtracks.

Refers to the subtitle languages available in the disc. You will be able to choose the subtitles language or, if you prefer, turn them off from the screen. A DVD disc can have up to 32 different subtitles.

A surround sound effect is generated using only two front speakers.
* When in VCD 2.0 mode (MENU ON mode), this function does not work.
Use the DISC MENU button in VCD 2.0 mode to select MENU ON or OFF.
Changing the Camera Angle
Using the ANGLE button
When a DVD contains multiple angles of a particular scene, you can select the Angle function.
Press the ANGLE button to see if an ANGLE
() mark is present at the upper Right hand corner of the screen.
1 When an ANGLE mark is shown, press the ANGLE button, then an ANGLE select icon will appear at the upper left hand corner of the screen.
2 Use the ◀, ▶ buttons to select the desired screen angle.
3 To turn off the display, press the ANGLE button again.
![4/6 ◀▶ [图标]](/content/2026/05/994535/images/bbef31c1c968331f6edb0f645d562fde5355bc06cc1120fea35d1bbb58605d35.jpg)
Selecting the Subtitle Language
You can select a desired subtitle quickly and easily with the subtitle button.
Using the SUBTITLE button
1 Press the SUBTITLE button.
2 Use the ◀, ▶ buttons to select the desired subtitle language.
3 Use the ▲,▼ buttons to determine whether or not the subtitle will be displayed.
- The subtitle languages are represented by abbreviations.
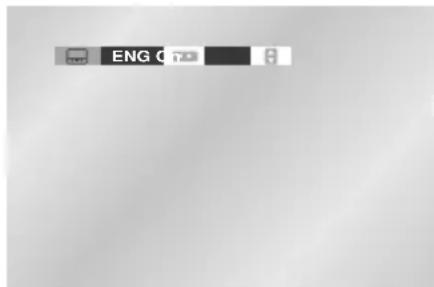
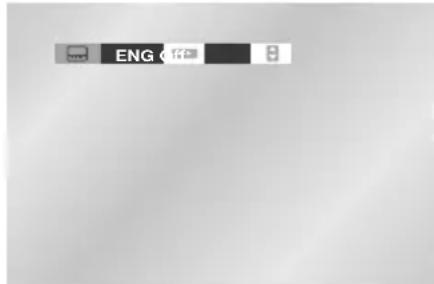
- This function depends on what languages are encoded on the disc and may not work with all DVDs.
- A DVD disc can contain up to 32 subtitle languages.
- How to have the same subtitle language come up whenever you play a DVD; Refer to "Setting Up the Language Features" on page 19.
Repeat Play
Repeat the current track, chapter, title, a chosen section (A-B), or all of the disc.
When playing a DVD
1 Press the REPEAT button on the remote. Repeat screen appears.
2 Select Chapter, Title or A-B using the ◀, ▶ buttons.
- Press the REPEAT button. Select A-B on screen with the ◀, ▶ buttons.
- Press OK at the point where you want the repeat play to start (A). The B is automatically highlighted.
- Press OK at the point where you want the repeat play to stop (B).
- To terminate the function, press the CLEAR button.
- A-B REPEAT does not allow you to set point (B) until at least 5 seconds has elapsed after point (A) has been set.
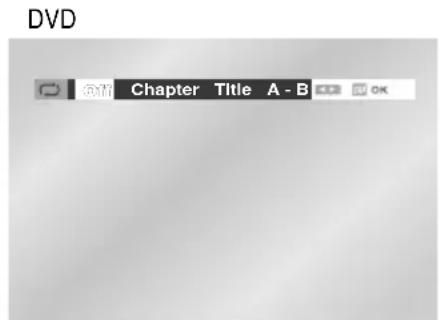
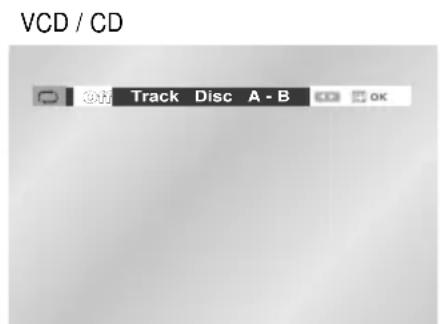
3 Press OK.
4 To return to normal play, press REPEAT again, then press the ◀, ▶ buttons to select Off and press OK.
- It is available to press CLEAR button on the remote controller in order to stop REPEAT play.
- DVD repeats play by chapter or title, CD and VCD repeat play by disc or track.
- Depending on the disc, the Repeat function may not work.
- When in VCD 2.0 mode (MENU ON mode), this function does not work.
Selecting the Audio Language
You can select a desired language quickly and easily with the AUDIO button.
Using the Audio button
1 Press the AUDIO button.
2 Use the ◀, ▶ buttons to select the desired language on a DVD.
- The audio languages are represented by abbreviations.
3 Use the ◀, ▶ buttons to select Stereo, ◀ or ▶ (On VCD/CD)
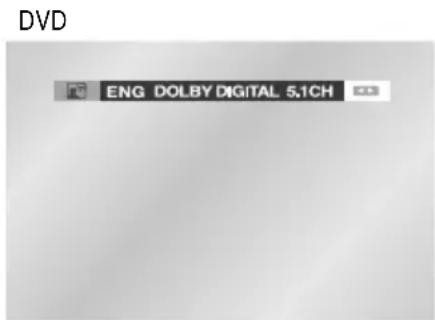
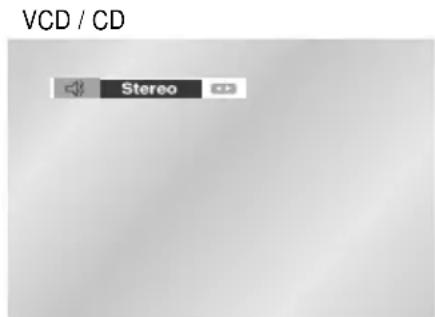
- This function depends on what languages are encoded on the disc and may not work with all DVDs.
- A DVD disc can contain up to 8 audio languages.
- How to have the same audio language come up whenever you play a DVD; Refer to "Setting Up the Language Features" on page 18.
Using the Mark Function
This feature lets you mark sections of a DVD or VCD (MENU OFF mode) so you can quickly find them at a later time.
Using the Mark Function (DVD/VCD)
1 During play, press the MARK button on the remote. The Mark icons will be displayed.
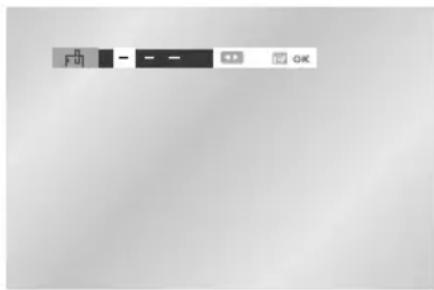
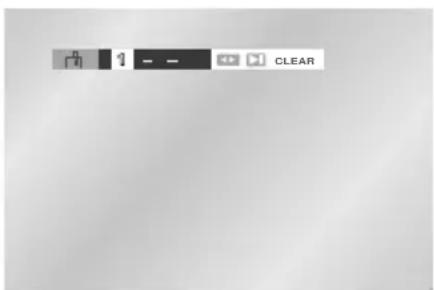
2 Use the ◀, ▶ buttons to move to the desired Mark icon.
3 When you reach the scene you want to mark, press the OK button. The icon will change to a number (1, 2, or 3).
4 Press the MARK button to turn off the display.
Recalling a Marked Scene
1 During play, press the MARK button on the remote.
2 Use the ◀, ▶ buttons to select a marked scene.
3 Press the ▶II buttons to skip to the marked scene.
Clearing a Mark
1 During play, press the MARK button on the remote.
2 Use the ◀, ▶ buttons to select the mark number you want to delete.
3 Press the CLEAR button to delete a mark number. Press the MARK button to turn off the display.
- Up to three scenes may be marked at a time.
- When in VCD 2.0 mode (MENU ON mode), this function does not work.
- Depending on the disc, the mark function may not work.
If you insert an MP3/WMA Disc into the DVD-VCR player, you can see the folder directory.
- Select the desired folder in the root directory.
- Use the OK or ▶II button to select the desired folder.
MP3/WMA Play Function
1 Press the OK or ▶II button, the selected music file will be played back.
Up to 8 music folders can be displayed at a time. If you have more than 8 folders on a disc, press the
▼ button to display them on the screen.
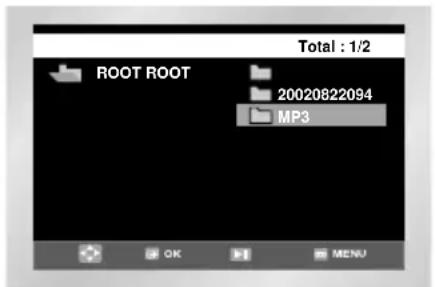
2 Use the ▲, ▼ buttons to select the desired music folder, then press OK.
Press the ▲, ▼ buttons again to select a music file. Press the OK button to begin playback of a music file.
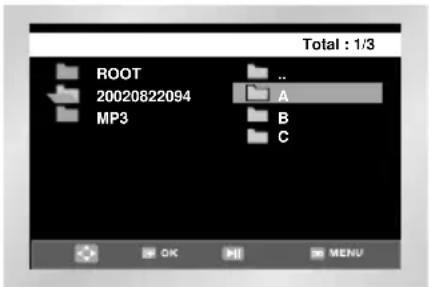
Program/Random playback
1 Press the MODE button in STOP mode to switch between the RANDOM and PROGRAM modes.

- Press the REPEAT button in PLAY mode to hear only music continuously and press it once again to release.
CD-R MP3/WMA discs
When playing CD-R/MP3 or WMA discs, please follow all the recommendations for CD-R above, plus the comments below:
■ Your MP3 or WMA files should be ISO 9660 or JOLIET format.
ISO 9660 format and Joliet MP3 or WMA files are compatible with Microsoft's DOS and Windows, and with Apple's Mac. These two formats are the most widely used.
■ When naming your MP3 or WMA files do not exceed 8 characters, and place ".mp3, .wma" as the file extension.
General name format of: Title.mp3. or Title.wma. When composing your title, make sure that you use 8 characters or less, have no spaces in the name, and avoid the use of special characters including: (.,/,\,=,+).
MP3/WMA Play
■ Use a decompression transfer rate of at least 128Kbps when recording MP3 files.
Sound quality with MP3 files basically depends on the rate of compression/decompression you choose. Getting audio CD quality sound requires an analog/digital sampling rate, that is conversion to MP3 format, of at least 128 Kbps and up to 160 Kbps. However, choosing higher rates, like 192 Kbps or more, only rarely give better sound quality. Conversely, files with decompression rates below 128 Kbps will not be played properly.
■ Use a decompression transfer rate of at least 64Kbps when recording WMA files.
Sound quality with WMA files basically depends on the rate of compression/decompression you choose. Getting audio CD quality sound requires an analog/digital sampling rate, that is conversion to WMA format, of at least 64Kbps and up to 192Kbps. Conversely, files with decompression rates below 64Kbps or over 192Kbps will not be played properly.
■ Do not try recording copyright protected MP3 files.
Certain "securized" files are encrypted and code protected to prevent illegal copying. These files are of the following types: Windows MediaTek (registered trade mark of Microsoft Inc) and SDMITM (registered trade mark of The SDMI Foundation). You cannot copy such files.
■ Important :
The above recommendations cannot be taken as a guarantee that the DVD player will play MP3 recordings, or as an assurance of sound quality. You should note that certain technologies and methods for MP3 file recording on CD-Rs prevent optimal playback of these files on your DVD player (degraded sound quality and in some cases, inability of the player to read the files).
This unit can play a maximum of 500 files and 300 folders per disc.
Program Play & Random Play
Program Play (CD/MP3/WMA)
1 Press the MODE button.
2 Use the ◀, ▶ buttons to select PROGRAM. Press the OK button.
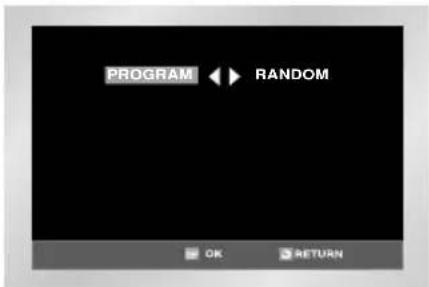
3 Use the ▲, ▼ / ◀, ▶ buttons to select the first track to add to the program. Press the OK button. The selection numbers appear in the Program Order box.
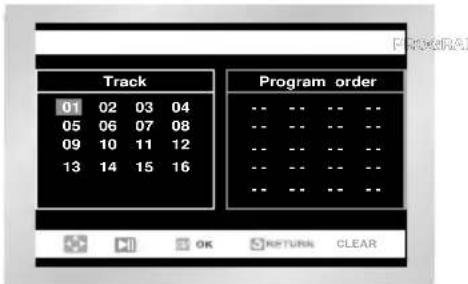
4 Press the ▶|| button. The disc will be played in programmed order.
Random Play (CD/MP3/WMA)
1 Press the MODE button.
2 Use the ◀, ▶ buttons to select RANDOM. Press the OK button. The disc will be played in random order.
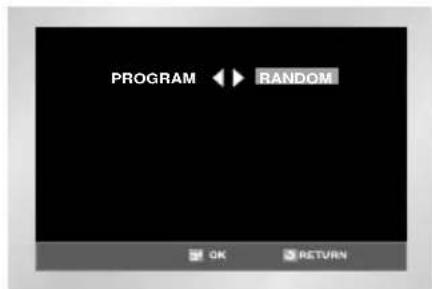
• Depending on the disc, the Program and Random Play functions may not work.
• To resume normal play, press the CLEAR button.
- This unit can support a maximum of 20 programmed order.
Picture CD Playback
1 Open the disc tray.
2 Load the disc on the tray.
Load the disc with the labeled side up.
3 Close the tray.
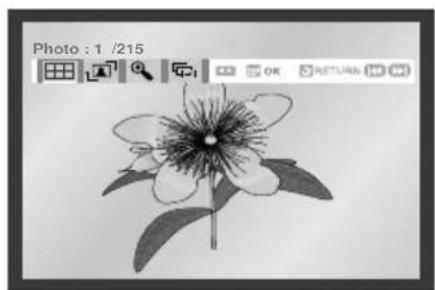
- The tray closes and you should get a screen that looks like the one below.
- Use the ▲, ▼ buttons on the remote controller to select the picture you want to view and then press the OK button.
• To see the next 6 pictures, press the ▶▶I button.
- To see the previous 6 pictures, press the ◀◀◀ button.
• : Return to the Album Screen.
• : Each time the OK button is pressed, the picture rotates 90 degrees clockwise.
• : Each time the OK button is pressed, the picture is enlarged up to 4X. (Normal → 2X → 4X → Normal)
• : The unit enters slide show mode.
* Press the RETURN button to return to the album screen.
* Before the Slide Show can begin, the picture interval must be set.
- : When this icon is selected and OK is pressed, the pictures change automatically with about an 6 second interval.
• : The pictures change automatically with about an 12 second interval.
• : The pictures change automatically with about an 18 second interval.
* Depending on the file size, each interval between images may take longer or shorter than the manual suggests.
natural_image
Line drawing of a flower with leaves and stem, no text or symbols present

natural_image
Line drawing of a flower with visible petals and leaves, no text or symbols present- If no buttons on the remote control are pressed for 10 seconds, the menu will disappear. Press the DISC MENU button on the remote control to display the menu again.
Picture CD Playback
CD-R JPEG Discs
- Only files with the ".jpg" and ".JPG" extensions can be played.
- If the disc is not closed, it will take longer to start playing and not all of the recorded files may be played.
- Only CD-R discs with JPEG files in ISO 9660 or Joliet format can be played.
- The name of the JPEG file may not be longer than 8 characters and should contain no blank spaces or special characters (. / = +).
- Only a consecutively written multisession disc can be played. If there is a blank segment in the multisession disc, the disc can be played only up to the blank segment.
- A maximum of 500 images can be stored on a single CD.
- Only Kodak Picture CDs can be played.
- When playing a Kodak Picture CD, only the JPEG files in the pictures folder can be played.
- Picture discs other than Kodak Picture CD may take longer to start playing or may not play at all.
- If a number of files in 1 Disc is over 500, only 500 JPEG file can be played.
- If a number of folders in 1 Disc is over 300, only JPEG files in 300 folders can be played.
DivX/XviD/MPEG4 Special Playback Features
During DVD/CD playback you can select from the following special playback options. To resume normal playback, press the ▶II button.
1 Still
Press the ▶II button on the remote control during playback.
• The picture will still and the audio will mute.
- To resume playback, press the ▶II button.
- If the player is left in Still mode for 5 minutes, it will stop automatically.
2 Frame Advance (Step)
While in playback mode, press the F.ADV/STEP button on the remote control to advance one frame at a time.
• Audio is muted during Frame Advance mode.
- Press ▶II to resume normal playback.
NOTE: Frame Advance operates only in the forward direction.
3 Slow Motion
During playback, press the ▶II button to Still the image. Then use the Search ▶▶ to play in slow motion at variable speeds.
• Each press increases the slow motion speed playback to 1/8, 1/4 or 1/2 normal speed.
• Audio is muted during slow motion playback.
4 Stop/Resume
- Press the ■ button twice to completely stop playback. The next time you press ▶II, the disc will start over from the beginning.
5 Zoom
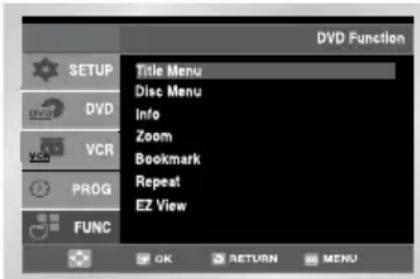
During play, press the MENU button on the remote. Then press the corresponding ▲, ▼ buttons to select the FUNC option.
➢ Auto Scaling : CIF(100kbps)\~D1(784kbps) resolution.
If the file resolution is small, it scales up to 2 times automatically. So you can see the more larger screen.
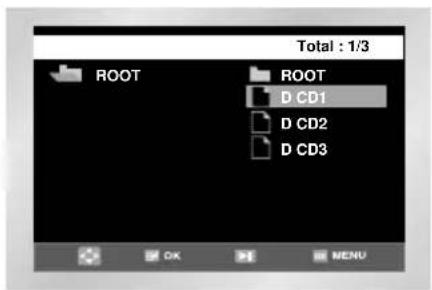
1 When the disc is inserted, the file structure of the disc will be shown. Depending on the file format, a different icon will appear next to each file. The 📄️
DivX, and DivD files will have been highlighted. Use ▲,▼ to select the movie file, and then press OK or ▶II.
Result: When the 'Reading Index.....' message is displayed, wait for a second or two. The movie will be played back.
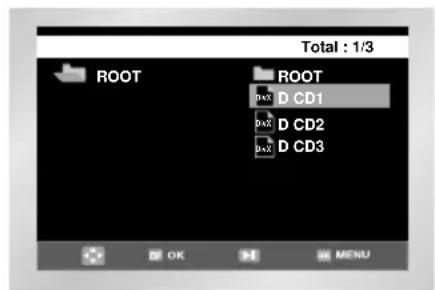
If the "Codec. Not Supported" message is displayed, the selected file cannot be played back.
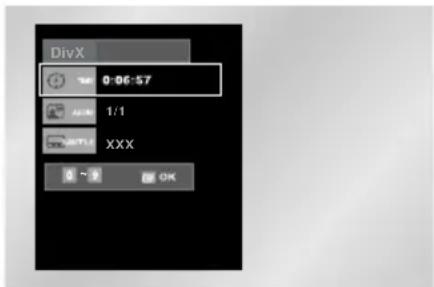
1 To navigate to a specific time while viewing the movie, press the INFO. key. The file format of the current file (DVR, HTR, or XID) and time information will be displayed.
2 Use the numeric keys on the remote control to enter the time to jump to that time in the movie.
DivX/XviD/MPEG4 Feature Table
MPEG4 Supported
Avi files are used to contain the audio and video data; these must be stored on CD in the ISO 9660 format.
| SPEC | ||
| VIDEO Compatibility | DivX 3.11 upper Up | to the latest VERSION |
| XviD | ||
| WMV(?) WMV | V1/V2/V3/V7 | |
| AUDIO Compatibility | MP3 CBR : 80kbps~320kbps | |
| AC3 CBR : | 128kbps~448kbps | |
| AAC(?) | ||
| WMA CBR : | 56kbps~160kbps | |
MPEGs containing DivX can be divided into Video and Audio.
• Video compatibility : All versions of DivX later than 3.11 (including the latest 5.1) are supported. In addition, XviD is supported. For WMV, V1, V2, V3, and V7 formats are possible.
- Audio compatibility : MP3s encoded at bitrates from 80kbps to 320kbps, AC3s from 128kbps to 448kbps, and WMAs from 56kbps to 160kbps are supported.
- In addition, for subtitles, Samsung will support Text format (SMI).
Beginning Karaoke Functions
1 Connect the Mixed Audio Out terminals with the TV or AMP.
2 Press the STANDBY/ON button.
3 Connect Mic into Mic 1 or Mic 2 jack. Then the karaoke mode is transferred to ON mode.
- To disconnect the Mic makes the karaoke mode transfer to OFF mode automatically.
- This function operates only in DVD, VCD, and CD DISC.
- This function cannot operate according to the disc type.
Key Control
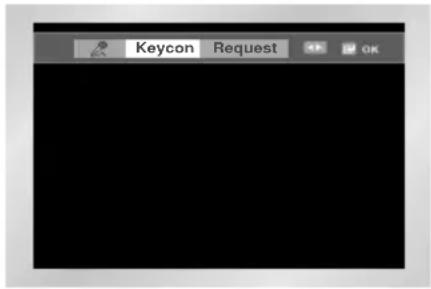
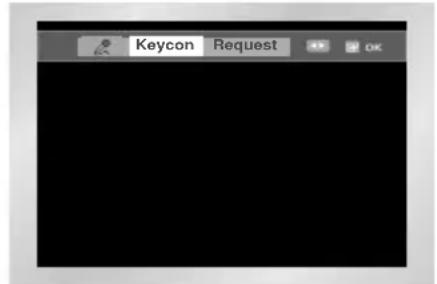
1 Press the KARAOKE button.
2 Select the "Keycon" using the ◀ or ▶ buttons.
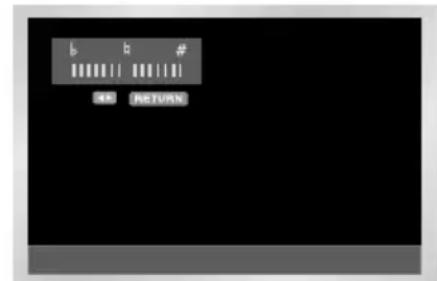
3 By use of the ◀ or ▶ buttons, change to the desired tone.
- b : To let 7 scales down by half scale.
- 1 : Original scale.
-
: To let 7 scales up by half scale.
-
This function operates only in DVD, VCD, and CD DISC.
- This function cannot operate according to the disc type.
Reserving a Song
It is the function to reserve the desired song in advance by use of Karaoke function.
1 Playback the Karaoke Disc containing the wanted songs.
2 Press the KARAOKE button on the remote control.
3 Select the "Request" using the ◀ or ▶ buttons, then press OK button.
4 Input the number (Track No.) of the desired song into the flickering part(--).
- You can reserve up to 10 songs.
5 When you want the next reserved song during playing a song, press the ▶▶▶Ibutton.
When the request is ended, the mode changes to STOP mode.


Cancellation of reservation
1 Cancel by pressing the CLEAR button of the remote.
- The last reserved song will be erased first.
2 Continuous pressing of the CLEAR button can cancel the next reserved song.
3 If the reservation is required again, input the song number in the flickering part.
- Request function is available only when the Karaoke mode is "ON".
- When using “▶▶” button, it can not work at the last song.
- When using Request function, the "REPEAT" function does not work.
Vocal Fader
Pressing the KARAOKE button twice displays the following in Karaoke ON mode:
- This function can provide the only melody without specific vocal sound when playing a Karaoke disc.
| VOCAL | FADER | Remark |
| V1 CH1. Vocal Cancel | ||
| V2 CH2. Vocal Cancel | ||
| V1 V2 CH1, | CH2. Vocal Cancel | |
| OFF Vocal | Fader Off | |
- In VCD, CVD or CD, you can select only the L, R, OFF.
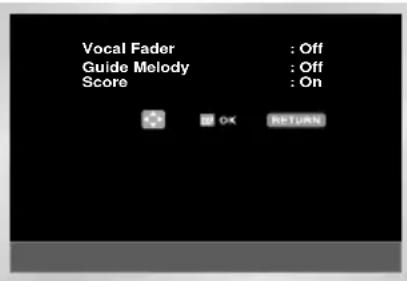
Guide Melody
- To guide melody through xylophone and piano help you sing easily.
- This function works only on the DVD Karaoke disc on which the guide melody is recorded.
Score Function
Press KARAOKE button twice to turn the Score Mode On.
- Score will pop up whenever a song is completed.
Types of Karaoke disc
◆ DVD Karaoke Disc
| Channel | Karaoke -Channel | 5CH. DVD 2C | H. DVD |
| 1 CH L | Left stereo | music Left stereo | music + Vocal |
| 2 CH R | Right | stereo music Right | stereo music + Vocal |
| 3 CH | M | Guide melody | - |
| 4 CH | V1 | Vocal track | - |
| 5 CH | V2 | Vocal track | - |
◆ CVD, VCD Karaoke Disc
| Channel | Karaoke -Channel | CVD | VCD, CD |
| 1 CH | CH1 LEFT | Left stereo music+Vocal | Left stereo music |
| 1 CH | CH1 RIGHT | Right stereo music+Vocal | Right stereo music + Vocal |
| 2 CH | CH2 LEFT | Left stereo music | - |
| 2 CH | CH2 RIGHT | Right stereo music | - |
* It cannot be done as above picture in accordance with the disc type.
CAUTIONS: Make sure to turn the KARAOKE MODE to OFF to play a movie disc or play in a general mode. If you play a movie disc with the KARAOKE ON, a score will show up every time when a chapter is over.
Technical Specifications
| General Size | Rated voltage AC 110 - 240V, 50/60Hz | |
| Power consumption 19 Watts | ||
| Weight 3.8 Kg | ||
| 430mm X 282mm X 82mm | ||
| Operating ambient temperature | +5°C ~ +35°C | |
| Installation conditions Operation position : Horizontal, Relative humidity : Below 75% | ||
| Input | Video input (Rear) A/V jack : 1.0Vp-p (unbalanced) 75Ω | |
| Audio input (Rear) A/V jack : -8dBm, 47Kohm unbalanced | ||
| Mic (front) 2 Mic Input | ||
| Output Audio | Audio (DVD, VCR) | A/V jack |
| o (DVD only) Digital audio out (OPTICAL, COAXIAL) | ||
| Video (DVD, VCR) A/V jack | ||
| Video (DVD only) S-Video out | COMPONENT out : A/V jack | |
| VCR | Tape format | VHS type video tape, S-VHS type video tape (Playback only) |
| Color system | PAL, MESECAM, NT 3.58, NTSC4.43, NTSC playback on PAL TV | |
| Video S/N Above 43dB (standard recording) | ||
| Resolution | Above 240 lines (standard recording) | |
| Audio S/N Above 68dB (Hi-Fi), 39dB (Mono) | ||
| DVD | Disc DVD, CD (12cm), CD (8cm), VIDEO-CD (12cm) | |
| Audio S/N 95dB | ||
| Audio dynamic range | 105dB | |
Before contacting the Samsung after-sales service, perform the following simple checks.
| Problem | Explanation/Solution |
| No power | ◆ Check that the power plug is connected to a wall outlet. ◆ Have you pressed the STANDBY/ON button? |
| You cannot insert a video cassette | ◆ A video cassette can only be inserted with the window side up and the safety tab facing you. |
| No playback picture or the picture is distorted | ◆ Check to see if you are using a prerecorded tape. |
| Noise bars or streaks on playback | ◆ Press the TRK ( ∧ or ∨) buttons to minimize this effect. |
| When the ▶|| button is pressed during playback, the still picture has severe “noise bars” streaks | ◆ A still picture may have “noise bars”, depending on the condition of the tape. Press the TRK ( ∧ or ∨) buttons during SLOW motion to minimize this effect. |
| Video Head Cleaning | ◆ If poor pictures appear on a variety of cassettes, the video heads may need cleaning. This is not a common problem and unless it appears, the heads should not be cleaned. When cleaning the video heads, read all instructions provided with the head cleaning cassette. Incorrect head cleaning can permanently damage the video heads. |
If you are unable to solve the problem after reading the above instructions, note:
◆ The model and serial number on the rear of your DVD-VCR
◆ The warranty information
◆ A clear description of the problem
Then contact your nearest SAMSUNG after-sales service.
Troubleshooting Guide (DVD)
Before requesting service (troubleshooting)
| Problem Action Page | ||
| Disc does not play. | ◆ Ensure that the disc is installed with the label side facing up.◆ Check the region number of the DVD.◆ This player cannot play CD-ROMs, DVD-ROMs, etc. Insert a DVD, a VIDEO-CD or a CD. | P4 |
| 5.1 channel sound is not being reproduced. | ◆ 5.1 channel sound is reproduced only when the following conditions are met.:1) The DVD-VCR player is connected with the proper amplifier2) The disc is recorded with 5.1 channel sound.◆ Check whether the disc being played has the “Dolby 5.1 ch” mark on the outside.◆ Check if your audio system is connected and working properly. | P19-20 |
| The Ⓧ icon appears on screen. | ◆ The features or action cannot be completed at this time because:1. The DVD’s software restricts it.2. The DVD’s software doesn’t support the feature (e.g., angles).3. The feature is not available at the moment.4. You’ve requested a title or chapter number or search time that is out of range. | P22-35 |
| Playback mode differs from the Setup Menu selection. | ◆ Some of the functions selected in the Setup Menu may not work properly if the disc is not encoded with the corresponding function. | P17-21 |
| The screen ratio cannot be changed. | ◆ The Screen Ratio is fixed on your DVDs. | P20 |
| No audio. | ◆ Make sure you have selected the correct Digital Output in the Audio Options Menu. | P19-20 |
| Forgot password | ◆ Press STANDBY/ON from a cold start with no disc in the unit. Press the ◀◀ and ▶▶ buttons simultaneously on the front panel for five seconds. Switch off and on the DVD-VCR by pressing STANDBY/ON button. The Parental Mode is now unlocked as indicated on the display. You can now set your rating level and change your password to a new number. | |
| If you experience other problems. | ◆ Go to the contents and find the section of the instruction book that contains the explanations regarding the current problem, and follow the procedure once again.◆ If the problem still cannot be solved, please contact your nearest authorized service center. |
THIS APPLIANCE IS DISTRIBUTED BY
SAMSUNG
ELECTRONICS
- ◆DVD-VCR Overviews
- ◆Connecting Your DVD-VCR
- ◆Setting Up Your DVD-VCR
- ◆Recording Television Broadcasts
- ◆ Playing Back
- ◆KARAOKE Functions (VCR)
- ◆DVD Functions
- ◆KARAOKE Functions (DVD)
- ◆Solving Problems
- Safety Instructions
- THIS DEVICE IS NOT FOR USE IN INDUSTRIAL ENVIRONMENTS
- Disc Type and Characteristics
- Play Region Number
- Progressive Scan Outputs (525p/625p)
- Front View of the DVD-VCR
- Rear View of the DVD-VCR
- Accessories
- Display Indicators
- Inserting Batteries in the Remote Control
- Connecting DVD-VCR to the TV using the A/V Cable
- Connecting DVD-VCR to a Satellite Receiver or Other Equipment
- Deck Control Keys
- STANDBY/ON Button
- DVD Button
- VCR Button
- Copying from DVD to VCR
- Insert Disc
- Insert VHS Tape
- Copy the DVD to VHS Tape
- Stop the Copy Process
- Setting the Date and Time
- Selecting the Colour Mode
- Intelligent Picture Control
- Auto Power off Screen Messages
- Selecting the Recording SpeedSelecting
- Repeat Play
- S-VHS Play
- Recording a Programme Immediately
- Protecting a Recorded Cassette
- Recording a Programme with Automatic Stop
- Playing a Cassette
- Adjusting Picture Alignment Manually
- Selecting the Audio Output Mode ★(DVD-V645K only)
- Playing a Cassette in Slow Motion
- Playing a Sequence at Variable Speeds
- Playing a Sequence Frame by Frame
- Searching for a Specific Sequence
- Go To [0:00:00] Stop
- End Search
- Intro Scan
- Index Skip Search
- Using the Tape Counter
- The tape counter:
- Recording from Another VCR or Camcorder
- Using the KARAOKE Function
- SCORE Function
- KARAOKE SEARCH Function
- Choosing a Connection
- Setting Up the Language Features
- Using the Disc Menu Language
- Using the Audio Language
- Using the Subtitle Language
- Setting Up the Audio Options
- ■ Dolby Digital Out
- ■ MPEG-2 Digital Out
- ■ DTS
- ■ Dynamic Compression
- ■ PCM Down Sampling
- Setting Up the Display Options
- TV Aspect
- Black Level
- ■ NTSC Disc Output
- Setting Up the Parental Control
- ■ About the Rating Level ;
- ■ About the Change Password ;
- Special Playback Features
- Still
- Frame Advance (Step)
- Skip Forward/Back
- Search Forward/Back
- Slow Motion
- Stop/Resume
- A/V Receiver Connections
- Digital Audio Out
- Adjusting the Aspect Ratio (EZ View)
- To play back using aspect ratio (DVD)
- If you are using a 16:9 TV
- If you are using a 4:3 TV
- Using the Display Function
- When Playing a DVD/VCD/CD
- Changing the Camera Angle
- Using the ANGLE button
- Press the ANGLE button to see if an ANGLE
- Selecting the Subtitle Language
- Using the SUBTITLE button
- When playing a DVD
- Selecting the Audio Language
- Using the Audio button
- Using the Mark Function
- Using the Mark Function (DVD/VCD)
- Recalling a Marked Scene
- Clearing a Mark
- MP3/WMA Play Function
- Program/Random playback
- CD-R MP3/WMA discs
- MP3/WMA Play
- ■ Use a decompression transfer rate of at least 128Kbps when recording MP3 files.
- ■ Use a decompression transfer rate of at least 64Kbps when recording WMA files.
- ■ Do not try recording copyright protected MP3 files.
- ■ Important :
- This unit can play a maximum of 500 files and 300 folders per disc.
- Program Play & Random Play
- Program Play (CD/MP3/WMA)
- Random Play (CD/MP3/WMA)
- Picture CD Playback
- CD-R JPEG Discs
- DivX/XviD/MPEG4 Special Playback Features
- Slow Motion
- Stop/Resume
- Zoom
- DivX/XviD/MPEG4 Feature Table
- MPEG4 Supported
- MPEGs containing DivX can be divided into Video and Audio.
- Beginning Karaoke Functions
- Key Control
- : To let 7 scales up by half scale.
- Reserving a Song
- Cancellation of reservation
- Vocal Fader
- Pressing the KARAOKE button twice displays the following in Karaoke ON mode:
- Guide Melody
- Types of Karaoke disc
- Technical Specifications
- Troubleshooting Guide (DVD)
- THIS APPLIANCE IS DISTRIBUTED BY
- SAMSUNG
- ELECTRONICS
Brand : SAMSUNG
Model : DVD-V645K
Category : DVD/VCR Combo