
Accura View 90 - Reading glasses OLYMPUS - Free user manual and instructions
Find the device manual for free Accura View 90 OLYMPUS in PDF.


| Product Type | 35mm Autofocus Lens-Shutter Camera |
| Model | Olympus Accura View 90 |
| Film Format | 35 mm standard DX-coded film (24 x 36 mm) |
| Lens | Olympus 38–90 mm zoom, F3.7–8.2, 7 elements in 6 groups |
| Shutter | Programmed electronic shutter |
| Viewfinder | Real-image zoom viewfinder with autofocus mark, close-up correction mark, flash indicator, and shutter release indicator |
| Focusing | Active-type autofocus system with focus lock; focusing range 0.8 m to infinity |
| Exposure Control | Programmed automatic exposure; EV 3.8–12.0 (wide angle), EV 6.1–14.3 (telephoto) |
| Film Speed Range | Automatic setting for DX-coded film ISO 50–3200; non-DX film defaults to ISO 100 |
| Film Loading & Advance | Automatic loading and advance; auto rewind at end of film or mid-roll rewind button |
| Flash | Built-in flash; recycling time approx. 0.5–4 sec; working range: 0.8–5.3 m (wide) / 0.8–2.4 m (tele) for ISO 100 |
| Flash Modes | Auto, Red-Eye Reducing, Off, Fill-In, Night Scene, Red-Eye Reducing Night Scene |
| Self-timer | Electronic with approx. 12-second delay |
| Battery | One 3V lithium battery (CR123A or DL123A) |
| Dimensions (W x H x D) | 129 x 72.5 x 55.5 mm (Non-QUARTZDATE); 129 x 72.5 x 59.5 mm (QUARTZDATE) |
| Weight | 285 g (Non-QUARTZDATE) / 295 g (QUARTZDATE) without battery |
| Date Imprinting (QUARTZDATE only) | Year-month-day, day-hour-minute, month-day-year, day-month-year, no data; auto calendar up to 2049; uses CR2025 battery |
| Diopter Adjustment | Adjustable dial for viewfinder clarity; for nearsighted or farsighted users |
| Accessories | Strap included; tripod socket |
| Care | Keep clean; avoid extreme temperatures, humidity, dust, and magnetic fields; use soft cloth for lens |
Frequently Asked Questions - Accura View 90 OLYMPUS
User questions about Accura View 90 OLYMPUS
0 question about this device. Answer the ones you know or ask your own.
Ask a new question about this device
Download the instructions for your Reading glasses in PDF format for free! Find your manual Accura View 90 - OLYMPUS and take your electronic device back in hand. On this page are published all the documents necessary for the use of your device. Accura View 90 by OLYMPUS.
USER MANUAL Accura View 90 OLYMPUS
Read this manual carefully before using your camera.

natural_image
Abstract geometric pattern with diagonal black and gray stripes (no text or symbols)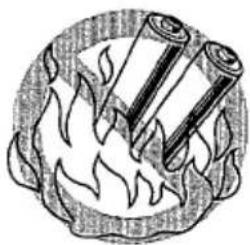
natural_image
Illustration of a fire pit with two cylindrical objects on its surface (no text or symbols)WARNING

Indicates circumstances under which mishandling resulting from ignoring this symbol could result in personal injury or property damage.
KEEP THE BATTERIES AWAY FROM FIRE. NEVER TRY TO DISASSEMBLE, RECHARGE, OR SHORT-CIRCUIT BATTERIES.
KEEP THE BATTERY OUT OF THE REACH OF CHILDREN. IF A CHILD SWALLOWS A BATTERY, CONTACT A DOCTOR IMMEDIATELY.

natural_image
Illustration of a screwdriver and a rectangular device with internal components, no text or symbols presentNEVER ATTEMPT TO DISASSEMBLE THE CAMERA; IT CONTAINS A HIGH-VOLTAGE CIRCUIT. IF THE INTERNAL PARTS OF THE CAMERA ARE EXPOSED DUE TO DROPPING OR DAMAGE, REMOVE THE BATTERIES IMMEDIATELY TO PREVENT FURTHER USAGE.
IN CASE OF MALFUNCTION, CONSULT YOUR NEAREST OLYMPUS DEALER OR OLYMPUS SERVICE CENTER.
Names of parts 6
Viewfinder display/LCD panel .... 8
Diopter adjustment 11
Using the strap 11
Loading the battery.... 12
Checking the battery 14
Proper shutter release 15
Loading the film 16
Taking pictures 19
Using the focus lock 25
After shooting.... 27
Unloading the film 28
Using the flash modes ..... 29
Selftimer.... 38
Printing the date and time* ..... 40
Correcting the data* 42
Replacing the date unit's
battery* 44
Care and storage 46
Troubleshooting 51
Specifications 64
Specifications for date unit*.... 70
* QUARTZDATE model only.
NAMES OF PARTS

① Shutter release button
② Power button
③ Autofocus windows*
④ Flash mode button
⑤ Selftimer button
⑥ Mid-roll rewind button
⑦ LCD panel
⑧ Flash
⑨ Zoom buttons
⑩ Selftimer indicator
⑪ Lens*
⑫ Viewfinder*
* Keep clean. Otherwise you may get blurred pictures. Wipe clean with a soft cloth.
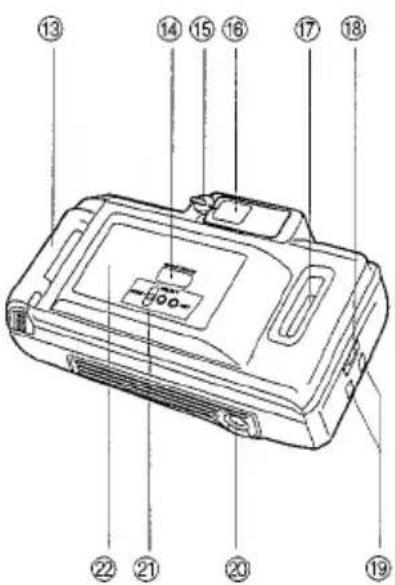
⑬ Battery compartment cover
⑭ Date/time indicator"
⑮ Diopter adjustment dial
⑯ Viewfinder
⑰ Film window
⑱ Back cover release
19 Strap eyelet
⑳ Tripod socket
②1 Date/time MODE /SELECT/ SET buttons"
② Back cover
**QUARTZDATE model only.

VIEW/FINDER DISPLAY/ LCD PANEL
Viewfinder Display
① Flash indicator (orange)
Lights: Flash is ready.
Blinks: Flash is recharging.
- Lights when the shutter release button is pressed halfway.
② Autofocus mark (red)
If this starts blinking after the
shutter release button is
pressed halfway, it means that
the subject is out of focus.
③ Close-up correction mark (orange)
The area inside this mark (which lights) when the shutter release button is pressed halfway is the picture area.
④ Shutter release indicator (green) Lights when the camera starts releasing the shutter. Goes out when the camera finishes releasing the shutter.
When the camera is turned on, only the autofocus mark (red) will light. When the camera is turned off, all the indicators will go out.

LCD Panel
① Selftimer
② Battery check
③ Exposure counter
④ Night Scene Flash mode
⑤ Red-Eye Reducing Flash mode
⑥ Off (Flash Override) mode
⑦ Fill-In Flash mode
Notes:
- If you don't use the camera, the LCD goes off after four and half minutes.
- The LCD panel does not actually display all indications simultaneously as shown.
DIOPTER ADJUSTMENT
natural_image
Technical diagram of a mechanical component with a central shaft and rectangular housing (no text or symbols)Press the power button to turn on the camera. Then turn the diopter adjustment dial until the autofocus mark is clear.
Turn to the right if you are farsighted. Turn to the left if you are nearsighted.

natural_image
Illustration of two identical camera modules connected by wires, no text or symbols presentUSING THE STRAP
Attach the strap as shown.
LOADING THE BATTERY

-
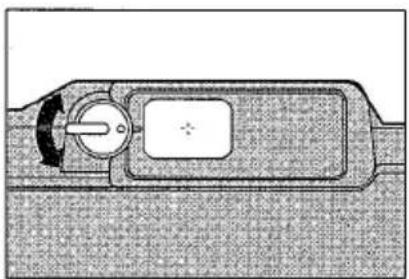
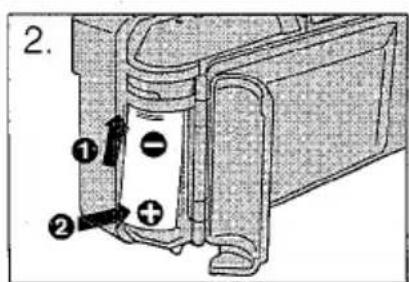
Press the power button to turn off the camera. Push OPEN ① to open the battery compartment cover ②.
-
Insert the new battery correctly. (One 3V lithium battery. CR123A or DL123A)
Notes:
- Dispose of used batteries in the battery recycling boxes at stores selling batteries.
- If lithium batteries are not fully discharged, protect against short-circuit (e.g. by taping the contacts) before disposing.
Notes:
- About 15 rolls of 24-exposure film can be used with one new battery. (Flash use 50%)
- Keep a spare battery on hand when going on a long trip or to a cold area.
- Sweat, oil, and so on can prevent a battery's terminals from making electrical contact. To avoid this, wipe both terminals before loading the battery.
CHECKING THE BATTERY

natural_image
Line drawing of a camera with a circular lens and adjustment arrows (no text or symbols)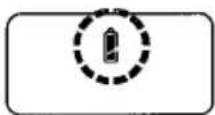
Press the power button to turn on the camera.
Display: lights
Meaning: Battery is OK. You can shoot.
Display: blinks and other indicators are displayed normally.
Meaning: Battery power is low and battery should be replaced.
Display: blinks and other indicators go out.
Meaning: Battery is dead and should be replaced immediately.


PROPER SHUTTER RELEASE
Practice before loading the film.
-
Depress the shutter release button halfway to lock the focus.
• The shutter won't release when the autofocus and/or flash mark inside the viewfinder is blinking. -
Depress the shutter release button fully to release the shutter and take the picture.
Cautions:
- Press the shutter release button gently.
- Avoid shaking the camera when pressing the shutter release button to prevent blurry pictures.
LOADING THE FILM

natural_image
Diagram of a device with a door and arrow indicating left-side movement (no text or symbols)- Slide the back cover release button upward to open the back cover. Do not touch the inside of the camera, especially the lens.

natural_image
Diagram of a refrigerator interior with a kettle and plastic tray, no text or symbols present- Insert the film cartridge until it clicks.
Note: Use of ISO 400 film is recommended.

natural_image
Hand holding a circular object with a prohibition symbol, resting on a textured surface (no text or symbols present)
A. Correct
Make sure the film is lying flat before closing the back cover.
B. Incorrect
Push the film cartridge gently to position the film correctly. Then press the left side of the back cover and close it securely. If the film is not lying flat, the film may not advance to the first frame.


-
Pull the film leader so that it is positioned about 10 mm (0.4 in.) from the tip of the arrow of [← FILM TIP], and close the back cover. The film automatically advances to the first frame. Make sure that the film is positioned between the positioning guides (A) before closing the back cover.
-
Press the power button to turn on the camera. The exposure counter on the LCD panel reads 1.
Note: If links in the exposure counter, the film is improperly loaded. Reload the film.
TAKING PICTURES

natural_image
Line drawing of a vintage camera with lens and adjustment knob (no text or symbols)- Press the power button to turn on the camera. The lens protector opens, the lens extends slightly, and the autofocus mark in the viewfinder lights.

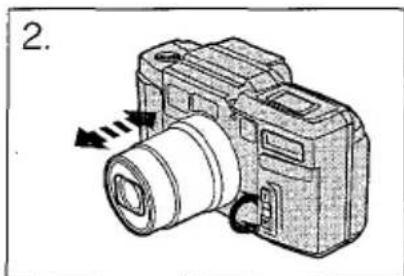
natural_image
Line drawing of a digital camera with directional arrows indicating motion (no text or symbols)- Aim the camera at your subject. Use the zoom buttons for telephoto or wide-angle photography.
Note: Keep your hair, hands, strap etc. away from the autofocus windows, lens, light sensor and flash.

natural_image
Illustration of a woman with curly hair facing a beach and water, accompanied by a vertical scale labeled 'W' (no text or symbols on the main image)How to Use the Zoom Buttons Telephoto: Push the "T" button to zoom in.
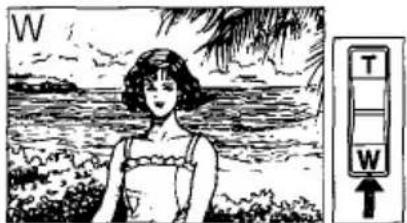
natural_image
Illustration of a woman in a beach with palm trees and waves, accompanied by a vertical scale labeled T-W (no text or symbols on the main scene)Wide angle: Push the "W" button to zoom out.

natural_image
Black-and-white illustration of a girl standing in front of a beach with trees and waves (no text or symbols)
- Position the autofocus mark ① on your subject.
WARNING: DO NOT LOOK DIRECTLY AT THE SUN THROUGH THE VIEWFINDER.
- Depress the shutter release button halfway to adjust the focus. Focus has been correctly adjusted and the autofocus mark lights. Exposure also will be adjusted automatically.

- Depress the shutter release button fully to take the picture.
The shutter release indicator (green) remains lit from the moment when the shutter release button has been pressed all the way until completion of film winding.
Working distance: 0.8 m (2.6 ft) \~ ∞ (infinity)
Notes:
- When the subject is closer than the minimum working distance, the shutter will not release. (Autofocus mark blinks.)
- When the subject is extremely close to the camera, the subject will be out of focus although the shutter releases.
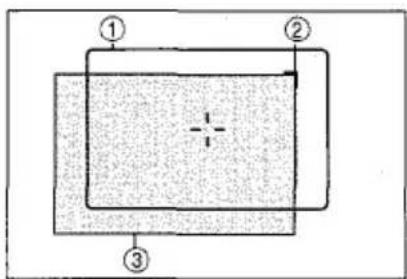
Close-up Correction
① Picture area at ∞(infinity)
② Close-up correction mark
③ Image area of picture at 0.8 m (2.6ft)
The picture area will move lower in the viewfinder as you get closer to the subject. When the close-up correction mark lights, the picture area is inside the mark.


natural_image
Black-and-white illustration of two people standing together, one holding a plant (no text or symbols visible)
USING THE FOCUS LOCK
When the main subject is not within the autofocus mark. Use the focus lock.
① Autofocus mark
- Position the autofocus mark on your subject and press the shutter release button halfway.
The autofocus mark lights when the shutter button is pressed. At this time, the exposure is also locked.
The focus lock is released when you take your finger off the shutter button.
natural_image
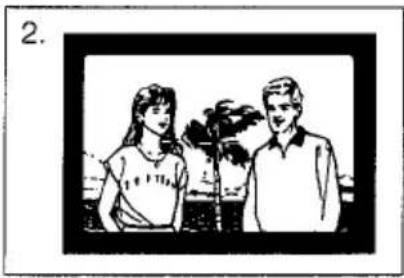
Illustration of two people standing side by side, one in casual clothing and the other in casual shirt, with a potted plant in the background (no text or symbols)- Reposition your subjects in the picture frame while keeping the shutter release button depressed halfway. Then press the shutter release button fully.
AFTER SHOOTING

natural_image
Line drawing of a digital camera with lens and adjustment knob (no text or symbols)- Press the power button to turn off the camera.
- The lens is retracted and the lens barrier is closed.
• The display goes out.
UNLOADING THE FILM
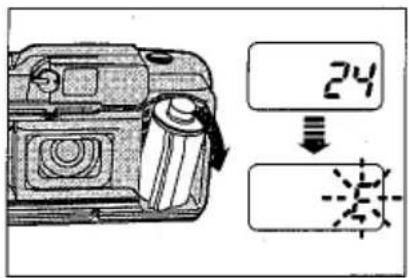
The camera automatically rewinds the film when you reach the end of a roll.
After the motor stops and E starts blinking on the LCD panel, open the back cover and remove the film.

Rewinding the film before the end of the roll
Press the mid-roll rewind button gently with the protrusion on the strap buckle.
Caution: Do not use an instrument with a sharp tip.
USING THE FLASH MODES

This camera has six flash modes. Use these modes in accordance with the photographic conditions and your purpose.
Setting the Modes
Each time the flash mode button is pressed, the mode will change sequentially as shown on page 30.
WARNING: DO NOT FIRE FLASH TOO CLOSE TO THE EYES OF PEOPLE OR ANIMALS.

flowchart
graph TD
    A["No Display"] --> B["Sin visualización"]
    C["Pas d'affichage"] --> B
    D["Keine Anzeige"] --> B
    E["Not Rated"] --> F["Eye Icon"]
    G["Not Rated"] --> H["Star Icon"]
    I["Not Rated"] --> J["Star Icon"]
    K["Not Rated"] --> L["Star Icon"]
① Auto Flash mode (p. 31)
② Red-Eye Reducing Flash mode (p. 32)
③ Off (Flash Override) mode (p. 34)
④ Fill-in Flash (Forced Activation) mode (p. 35)
⑤ Night Scene Flash mode (p. 36)
⑥ Red-Eye Reducing Night Scene Flash mode (p. 37)
Note: The flash strength is automatically controlled to prevent pictures from being overexposed even when the subjects are close.

natural_image
Simple diagram with a starburst symbol and a plus sign inside a rectangle (no text or labels)| ISO | W (38 mm)☆ | T (90 mm)☆ |
| 100 | 0.8~5.3 m(2.6~17.4 ft) | 0.8~2.4 m(2.6~7.9 ft) |
| 200 | 0.8~7.5 m(2.6~24.6 ft) | 0.8~3.4m(2.6~11.1 ft) |
| 400 | 0.8~10.6m(2.6~34.8 ft) | 0.8~4.8 m(2.6~15.7 ft) |
AUTO FLASH
The flash fires automatically in dark places.
→The flash indicator in the viewfinder lights when the shutter release button is depressed halfway.
Notes:
- When the flash indicator is blinking, the flash is recharging and the shutter won't release. Release your finger from the shutter release button, and wait for several seconds.
• Maximum distance is about 70% of the working range(☆) when using reversal film.
☆ Flash Working Range (with color negative film)
RED-EYE REDUCING FLASH

Significantly reduces the phenomenon of "red-eye" (when a subject's eyes appear red in flash photography).
In the flash mode, the camera will fire a series of low-power preflashes before the regular flash.
Red-eye reduction may not be effective when the subject:
- Is not looking at the red-eye reducing lamp from the right front.
- Is not watching the red-eye reducing lamp.
- Is too far from the camera.
The effectiveness of red-eye reduction varies depending on the individual characteristics of subjects.
IMPORTANT: Be sure to hold the camera still until the shutter. releases. It takes approximately one second.

natural_image
Two-panel illustration showing a person viewing framed artworks on the left and a man pointing at a framed picture on the right (no text or symbols)OFF (FLASH OVERRIDE)
When you don't want the flash to fire even in the dark or when you want to shoot such subjects as fireworks.
Use this mode in situations where flash photography is not desired, is prohibited, in twilight, or night scenes.
Note: Since a slow shutter speed (down to 1 second) is automatically selected in low-light situations, the use of a tripod is recommended. Turning off the camera restores the Auto Flash mode.
natural_image
Illustration of a person with short hair and a tree, showing a downward arrow from above to below (no text or symbols)FILL-IN FLASH (Forced Activation)
When you want the flash to fire for each shot.
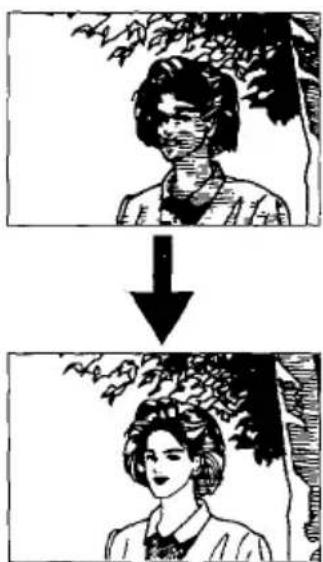
The flash fires regardless of available light. Use this mode to compensate for a shadow cast on the subject's face (such as the shadow of a tree). It is also used when shooting in backlit conditions or under artificial lighting (such as fluorescent light). Use this mode within the flash working range (p. 31). Turning off the camera restores the Auto Flash mode.
NIGHT SCENE FLASH

natural_image
Two black-and-white photos showing a man standing at night and another person standing in front of a building with windows (no text or symbols visible)When taking pictures of a night scene, this mode produces clear images.
Notes:
• The use of a tripod is recommended since slow shutter speeds (down to 1 second) are automatically selected in low-light situations.
- Turning off the camera restores the Auto Flash mode.

RED-EYE REDUCING NIGHT SCENE FLASH MODE
You can take pictures of people with a night scene background while reducing the "red-eye" phenomenon.
Notes:
- Except for the Ⓞ pre-flashes, this mode is the same as the Night Scene Flash mode.
- Read precautionary remarks in "Red-Eye Reducing Flash" (p. 32) and "Night Scene Flash" (p. 36).
- If the camera is turned off in this mode, the Red-Eye Reducing Flash mode will be engaged the next time the camera is turned on.
SELFTIMER


- Press the selftimer button to display ⚙. Fix the camera on a tripod or other support.
- Aim at your subject, and press the shutter release button. The shutter will be released about 12 seconds after you press the button. The selftimer automatically disengages after release.
① 10 sec: Selftimer indicator lights
② 2 sec: Blinks
Notes:
- The focus and exposure will be locked when the shutter release button is depressed halfway.
• Take care not to stand in front of the camera when you depress the shutter button.
- To cancel the selftimer after it has been activated, press the selftimer button again.

PRINTING THE DATE AND TIME (QUARTZDATE model only)
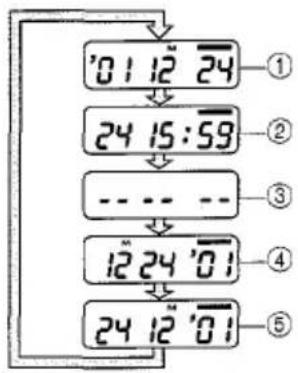
This camera has five data imprinting modes. Press the MODE button to choose the mode you want to use.
① Month indicator ("M" stands for month.)
② Imprinting confirmation indicator Blinks for about 3 seconds after shooting to make sure the data has been imprinted. (These indicators will not be imprinted on a picture.)
MODE button: Chooses date and time.
SELECT button: Chooses the indication to be changed.
SET button: Adjusts figures.
flowchart
graph TD
    A["01 12 24"] --> B["24 15:59"]
    B --> C["---"]
    C --> D["12 24 '01"]
    D --> E["24 12 '01"]
    style A fill:#f9f,stroke:#333
    style B fill:#f9f,stroke:#333
    style C fill:#f9f,stroke:#333
    style D fill:#f9f,stroke:#333
    style E fill:#f9f,stroke:#333
As you press the MODE button, the mode will switch in the order shown below.
① Year-month-day
② Day-hour-minute
③ No data
④ Month-day-year
⑤ Day-month-year
Be sure to correct the data after the date unit's battery is replaced. The data is imprinted in the lower right of the picture. If the area where the data is imprinted is whitish or tinged with orange, it may be difficult to read.
CORRECTING THE DATA (QUARTZDATE model only)

Press the SELECT button to switch to the data correction status to adjust year-month-day or hour-minute.
- Press the SELECT button until the indication you want to change starts blinking.
- Press the SET button to correct the data.
If you press the SET button once, the number on the display will advance by 1. If you hold the button down, the numbers will advance in rapid succession.
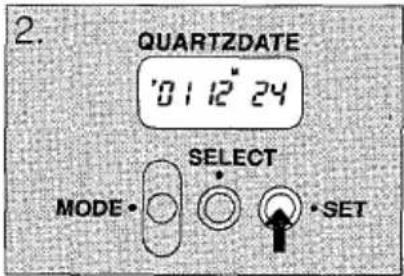
Note: As you press the SELECT button, the blinking indication changes in the order of year, month, day or hour, minute. Data correction ends when you press the SELECT button again.
Press the SELECT button again until the imprinting confirmation indicator appears. When the imprinting confirmation indicator does not appear, the data will not be copied onto the picture.
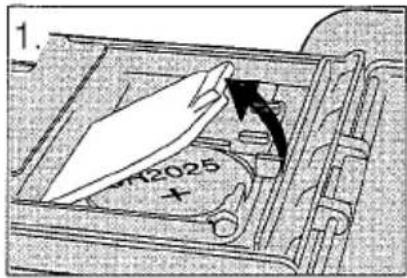

REPLACING THE DATE UNIT'S BATTERY (QUARTZDATE model only)
- Open the back cover and remove the cover of the date unit's battery.
- Replace the battery with a new one. Align the direction of the new battery as indicated on the unit.
→ Use one CR2025 battery.

natural_image
Diagram of a mechanical device with a black arrow indicating direction, no visible text or symbols- Replace the cover of the date unit.
→ Be sure to adjust the date and time after changing the battery.
CARE AND STORAGE


1 Do not leave the camera in any place exposed to excessive heat, humidity, or direct sunlight — for example, in a car or on the beach.
2 Do not expose the camera to formalin or naphthalene.
3 If the camera gets wet, wipe it with a dry towel. The salt in seawater can be especially damaging.
4 Do not use organic solvents, such as alcohol or paint thinner when cleaning the camera.

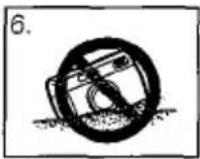

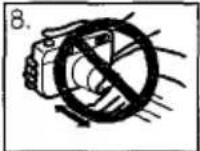
5 Do not leave the camera on or near a television, refrigerator, or other appliance with a magnetic field.
6 Do not expose the camera to dust or sand as this could cause serious damage.
7 Do not shake or shock the camera.
8 Do not apply excessive force to the zoom lens.
- Keep the camera in a well-ventilated place.
- Do not expose the camera to extreme heat (over 40°C/104°F) or to extreme cold (below -10°C/14°F). Low temperatures, even within this range, may sometimes cause deterioration in battery performance, temporarily disabling the camera.
- When transporting the camera from a cold place to a warm place or in the event of a sudden temperature change, put the camera into a plastic bag. This allows the camera's temperature to change slowly. Once the camera has adjusted to the new temperature, you can remove it from the bag and use it.
- Avoid leaving the camera unused for long periods of time. This can cause mold to grow on the camera as well as other problems. Try to press the shutter release button and check the operation of the camera before use.
- Some airport X-ray machines can damage the film in your camera. Try to avoid passing your camera through these machines. Give it to the security officer for manual inspection.
- This camera is controlled by a microcomputer. Problems with the microcomputer can affect or stop camera operation. If this happens, remove the batteries, then reload them and try the camera again. Strong electrical fields can also interfere with the operation of this camera so try to avoid places or objects that generate such fields.
- This camera is not suitable for professional use or for use under severe conditions.
TROUBLESHOOTING
OPERATING PROBLEMS
The camera does not work.
① The power is off.
→ Press the power button to turn on the camera, (p. 14)
② The alignment of the battery terminals is not correct.
→ Reload the battery correctly, (p. 12).
③The battery is exhausted.
→ Replace the battery with a new one. (p. 12, 14)
④ The battery is temporarily unable to function because of cold temperature.
→ Keep the camera warm while using it.
⑤ The loaded film has been rewound.
→ Remove the film. (p. 28)
⑥ The film is inserted incorrectly.
→ Remove the film and re-insert correctly, (p. 16, 18)
The LCD panel display turns off suddenly.
① The LCD panel display turns off after four and a half minutes if the camera is not used. The viewfinder display also turns off at the same time. → Press the power button to turn the camera off and on again or press the zoom button; the LCD panel display and viewfinder display will turn on. (p. 19, 20)
The autofocus mark blinks, and the shutter will not release.
①The camera is within 0.8 m
(2.6 ft) of the subject.
→ Move the camera so that it is more than 0.8 m (2.6 ft)
away from the subject, (p. 24)
The flash indicator blinks, and the shutter will not release.
①The flash has not finished recharging.
→ Remove your finger from the shutter release button and wait for several seconds until the flash is recharged before shooting, (p. 29)
The flash does not fire, even in the dark.
① The flash mode is set to off. (p. 34)
→ Select a different mode.
② High-sensitivity film is being used.
→ Set the flash mode to Fill-in, (p. 30, 35)
Images in the viewfinder look blurred.
① The diopter adjustment dial is not in the correct position. →Turn the diopter adjustment dial until the images in the viewfinder become clear, (p. 11)
PROBLEMS WITH PRINTED PICTURES
The picture is out of focus.
① The camera moved when the shutter release button was pressed. → Hold the camera correctly and press the shutter release button gently. (p. 15)
② The subject was not within the viewfinder's autofocus mark. → Position the subject in the center of the autofocus mark, or use the focus lock. (p. 22, 25)
③ The lens and autofocus window were dirty. → Clean the lens and autofocus window. Wipe the lens gently with a lens cleaning tissue moistened with a small amount of lens cleaning fluid.
④ The autofocus window was blocked, such as by a finger. → Hold the camera correctly, keeping your fingers clear of the autofocus window.
⑤ You attempted to take a picture with the subject less than 0.8 m (2.6 ft) away. → Move at least 0.8 m (2.6 ft) away from the subject, (p. 23)
⑥ When using the selftimer, the shutter release button was pressed while standing right in front of the camera. → Do not stand in front of the camera. Press the shutter release button while looking through the viewfinder. (p. 38)
⑦ The autofocus didn't work correctly. There are some subjects that are difficult for the autofocus to lock on. These include: glossy or reflective surfaces, black objects, subjects behind glass or wire mesh, flames and smoke, excessively bright light within the picture area. → First focus on an object at the same distance as the desired subject. Then aim at the desired subject and press the shutter release button. (p. 25)
The data has not been printed (or looks faded).*
① The data mode was set no data (-- --) → Change the data mode to another setting, (p. 40)
② There is a bright color like white, orange, or yellow in the area of the picture where the data is printed. → Avoid bright colors in the lower right corner of your photo compositions, (p. 41)
* QUARTZDATE model only
The finished prints are dark.
① The fingers, etc., were in front of the flash → Hold the camera correctly so the flash is not covered by the fingers, etc.
② The subject was beyond the flash range. → Position the subject within the flash range, (p. 31)
③ The Flash Off mode was set. → Check the flash mode and reset if necessary, (p. 29)
The colors in indoor pictures are not normal.
①The colors were affected by the color of the indoor lighting.
→ Set the Fill-in mode and take the picture, (p. 35)
SPECIFICATIONS
Type: Full automatic 35 mm autofocus lens-shutter camera with built-in 38 - 90 mm zoom lens.
Film format: 35 mm standard DX-coded film (24 x 36 mm).
Lens: Olympus lens 38 \~ 90 mm zoom, F3.7 \~ 8.2, 7 elements in 6 groups.
Shutter: Programmed electronic shutter.
Viewfinder: Real-image zoom viewfinder (with in-focus indication provided autofocus mark, close-up correction mark, flash indicator and shutter release indicator).
Focusing: Active-type autofocus system. Focus lock possible. Shutter release locks to warn when inside minimum working distance. Focusing range - 0.8 m (2.6 ft) - ∞(infinity).
Exposure control: Programmed automatic exposure control. Auto exposure range - EV 3.8 \~ 12.0 at wide angle: EV6.1 \~ 14.3 at telephoto.
Exposure counter: Progressive type with automatic reset, displayed on LCD panel.
Selftimer: Electronic selftimer with approx. 12-sec. delay.
Film speed range: Automatic setting with DX-coded film with ISO 50, 100,200,400, 800, 1600 and 3200. Film speeds other than above will be automatically set to next lower speed. For non-DX-coded film and film with less than ISO 50, film speed is set to ISO 100.
Film loading: Automatic loading. (Automatically advances to first frame when camera back cover is closed.)
Film advance: Automatic film winding.
Film rewind: Automatic film rewind (automatic rewind activation at end of film, automatic rewind stop). Rewind possible at any point with mid-roll rewind button.
Flash: Built-in flash. Recycling time - Approx. 0.5 \~ 4 sec. (at normal temperature with new battery). Flash working range - 0.8 \~ 5.3 m (2.6 \~ 17.4 ft) at wide angle and 0.8 \~ 2.4 (2.6 \~ 7.9 ft) at telephoto with ISO 100 color negative film; 0.8 \~ 10.6m (2.6 \~ 34.8 ft) at wide angle and 0.8 \~ 4.8 m (2.6 \~ 15.7 ft) at telephoto with ISO 400 color negative film.
Flash modes: Auto Flash, 📍 Red-Eye Reducing Flash, 📍 Off, 📍 Fill-in Flash Night Scene Flash and Red- Eye Reducing Night Scene Flash.
Battery check: Displayed on LCD panel.
Power source: One 3 V lithium battery (CR123A or DL123A).
Dimensions: Non QUARTZDATE model-129 (W)x 72.5(H) x 55.5 (D) mm (5.1 x 2.9 x 2.2 in) QUARTZDATE model - 129 (W) x 72.5 (H) x 59.5 (D) mm (5.1 x 2.9x2.3 in).
Weight: Non QUARTZDATE model-285 g (10.1 oz) (without battery) QUARTZDATE model - 295 g (10.4 oz) (without battery)
SPECIFICATIONS FOR DATE UNIT (QUARTZDATE model only)
Data/Timing coding: Year-month-day, day-hour-minute, no data, month-day-year and day-month-year.
External indication of data: Data display on LCD panel.
Automatic calendar system: Up to year 2049.
Film speed setting: Automatic film speed setting.
Power source: One 3 V coin-type lithium battery (CR2025).
Battery life: Approx. 3 years (approx. 40,000 imprints).
OLYMPUS®
OLYMPUS OPTICAL CO., LTD. San-Ei Building, 22-2, Nishi Shinjuku 1 -Chome, Shinjuku-ku, Tokyo, Japan. Tel. 03-3340-2211
OLYMPUS AMERICA INC. TwoCorporate Center Drive, Melville, NY 11747-3157, U.S.A. Tel. 1 -800 "O" CAMERA(622-6372)
OLYMPUS OPTICAL CO. (EUROPA) GMBH. (Premises/Goods delivery) Wendenstrasse 14-18, 20097 Hamburg, Germany. Tel. 040-237730
(Letters) Postfach 10 49 08, 20034 Hamburg, Germany.
OLYMPUS SINGAPORE PTE. LTD. 491B River Valley-Road, #13-04 Valley Point Office Tower, Singapore 248373
Tel. 7387838/1-800-OLYMPUS(6596787)
This device complies with part 15 of the FCC Rules. Operation is subject to the conditions that this device does not cause harmful interference.
- WARNING
- NAMES OF PARTS
- VIEW/FINDER DISPLAY/ LCD PANEL
- Viewfinder Display
- LCD Panel
- Notes:
- DIOPTER ADJUSTMENT
- USING THE STRAP
- LOADING THE BATTERY
- CHECKING THE BATTERY
- PROPER SHUTTER RELEASE
- Cautions:
- LOADING THE FILM
- Correct
- Incorrect
- TAKING PICTURES
- Close-up Correction
- USING THE FOCUS LOCK
- AFTER SHOOTING
- UNLOADING THE FILM
- Rewinding the film before the end of the roll
- USING THE FLASH MODES
- Setting the Modes
- AUTO FLASH
- RED-EYE REDUCING FLASH
- OFF (FLASH OVERRIDE)
- FILL-IN FLASH (Forced Activation)
- NIGHT SCENE FLASH
- RED-EYE REDUCING NIGHT SCENE FLASH MODE
- SELFTIMER
- PRINTING THE DATE AND TIME (QUARTZDATE model only)
- CORRECTING THE DATA (QUARTZDATE model only)
- REPLACING THE DATE UNIT'S BATTERY (QUARTZDATE model only)
- CARE AND STORAGE
- TROUBLESHOOTING
- OPERATING PROBLEMS
- PROBLEMS WITH PRINTED PICTURES
- SPECIFICATIONS
- SPECIFICATIONS FOR DATE UNIT (QUARTZDATE model only)
- OLYMPUS®
Brand : OLYMPUS
Model : Accura View 90
Category : Reading glasses