COM200 - Oven TRAEGER - Free user manual and instructions
Find the device manual for free COM200 TRAEGER in PDF.


| Product Type | Wood Pellet Grill/Smoker (Multi-Function Oven) |
| Brand | Traeger |
| Model | COM200 |
| Primary Cooking Methods | Grill, Smoke, Bake, Roast, Braise, BBQ |
| Overall Dimensions (with lid closed) | 54 in (H) x 44 in (W) x 27 in (D) (approx.) |
| Shipping Weight | 120 lbs (approx.) |
| Power Supply | 120 V, 60 Hz, 300 W ignition |
| Fuel Type | 100% All-Natural Hardwood Pellets |
| Hopper Capacity | 20 lbs |
| Primary Cooking Area | 646 sq in (approx.) |
| Temperature Range | 180°F to 500°F (Smoke to High) |
| Temperature Control | Digital Pro Controller with Advanced Grilling Logic (ARC) |
| Ignition System | Automatic Hot Rod Igniter |
| Construction | All-Welded Steel Body with Porcelain-Coated Grates |
| Wheels | Heavy-Duty All-Terrain Wheels (2) |
| Cleaning & Maintenance | Scrape grates after each use; remove ash periodically; deep clean drip tray and grease bucket monthly |
| Safety Features | Auto-flameout shutoff; cool-touch handle; hot surface caution labels |
| Spare Parts Availability | Digital Controller, Auger Assembly, Fire Pot, Hot Rod, Pellet Hopper, Temperature Probes, Door Gaskets |
| Repairability | User-replaceable components; support documentation available |
| Warranty | Limited 3-year (varies by region) |
Frequently Asked Questions - COM200 TRAEGER
User questions about COM200 TRAEGER
0 question about this device. Answer the ones you know or ask your own.
Ask a new question about this device
Download the instructions for your Oven in PDF format for free! Find your manual COM200 - TRAEGER and take your electronic device back in hand. On this page are published all the documents necessary for the use of your device. COM200 by TRAEGER.
USER MANUAL COM200 TRAEGER
natural_image
Black-and-white photo of a portable industrial cart with wheels and a handle, no visible text or symbols.COMMERCIAL PELLET GRILL
This Grill Protected Under Patent Numbers: 4,619,209 and 4,823,684
FOR OUTDOOR USE ONLY!
WARNING!
DO NOT STORE OR USE COMBUSTABLE MATERIALS NEAR THIS APPLIANCE!
USE ONLY TRAEGER BRAND HARDWOOD BBQ PELLETS IN THE OPERATION OF THIS UNIT.
COM200 WIRING DIAGRAM
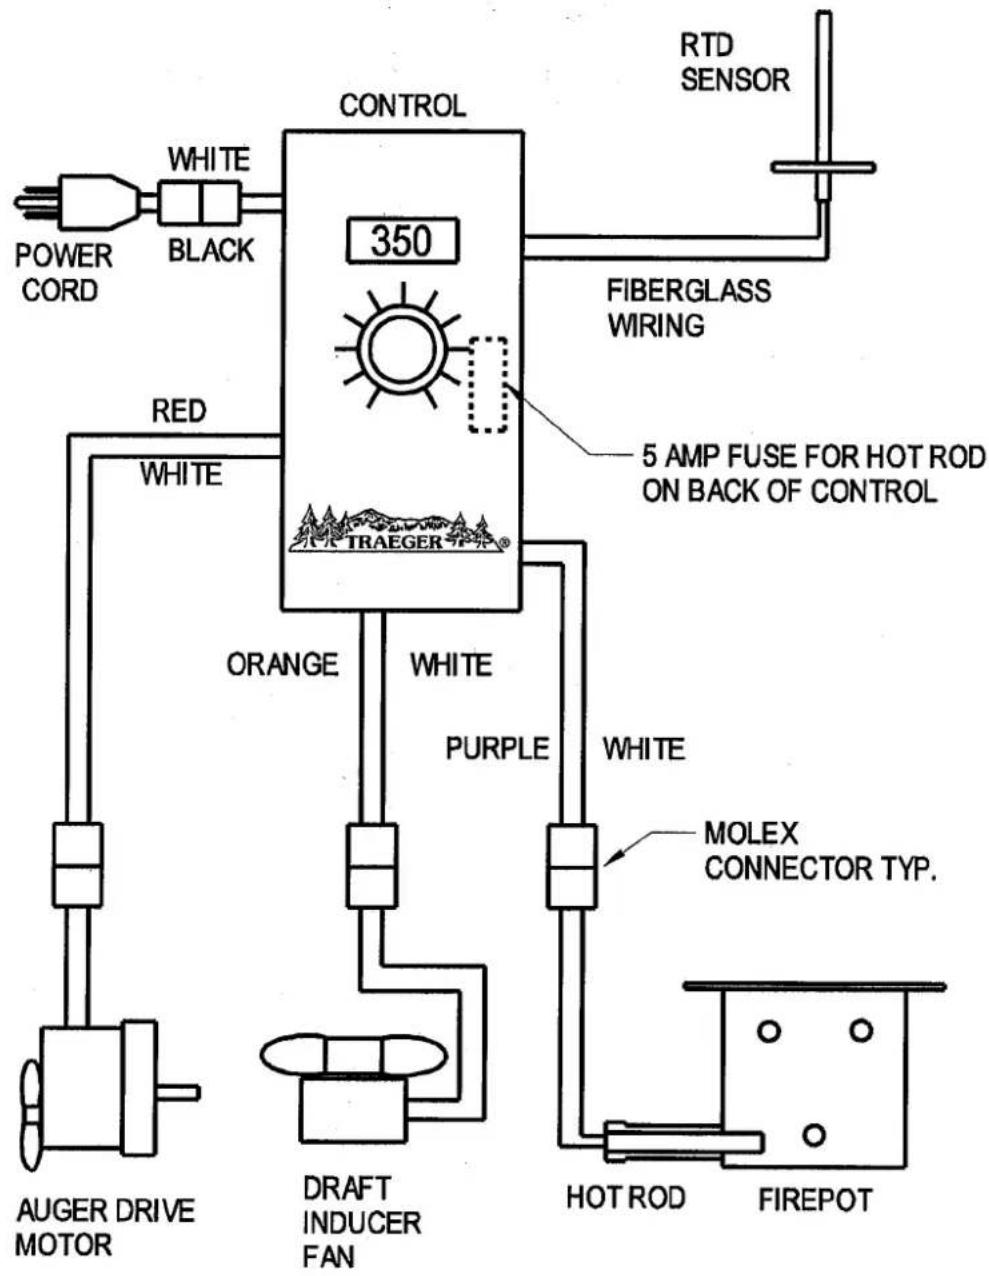
flowchart
graph TD
    A["AUGER DRIVE MOTOR"] --> B["ORANGE"]
    B --> C["TRAEGER"]
    C --> D["FIBERGLASS WIRING"]
    D --> E["RTD SENSOR"]
    F["POWER CORD"] --> G["WHITE BLACK"]
    G --> H["CONTROL 350"]
    H --> I["ORANGE"]
    I --> J["TRAEGER"]
    K["DRAFT INDUCER FAN"] --> L["ORANGE"]
    L --> M["TRAEGER"]
    N["MOLEX CONNECTOR TYP."] --> O["ORANGE"]
    P["HOT ROD"] --> Q["TRAEGER"]
    R["FIREPOT"] --> S["ORANGE"]
    T["WHITE PURPLE"] --> U["TRAEGER"]
    V["RED"] --> W["TRAEGER"]
    X["5 AMP FUSE FOR HOT ROD ON BACK OF CONTROL"] --> Y["TRAEGER"]
NOTE--
COM200 HAS:
3 HOTRODS
3 AUGER DRIVE MOTORS
2 DRAFT INDUCER FANS
COM200 THREE-BURNER SYSTEM

COM200 AXLE MOUNTING


Congratulations on your purchase of this Traeger Wood Pellet Grill, Model COM200. With proper set-up, operation and maintenance, the Grill will provide you with delicious food and years of cooking enjoyment.
READ THESE INSTRUCTIONS CAREFULLY BEFORE ATTEMPTING TO ASSEMBLE THIS UNIT. SPEND A FEW MINUTES FAMILIARIZING YOURSELF WITH THE PARTS AND DIAGRAMS.
NOTE: NUMBERS FOLLOWING PART NAMES THROUGHOUT THIS MANUAL REFER TO THE COMPONENT DIAGRAM, THREE-BURNER SYSTEM AND AXLE MOUNTING DOCUMENTS.
After removing the box, remove all parts from inside the Grill. Remove any remaining packaging material from inside the Grill as well. Remove the straps securing the Axle (38) and the Trailer Tongue (21) to the pallet. Set those parts safely aside until you are ready for assembly. Make sure you have, and can identify all of the following parts:
(1) COM200 Grill Body (32)
(1) Axle (38)
(1) Trailer Tongue (21)
(2) Wheels (31)
(2) Fenders (18)
(1) Grease Drain Pan (11)
(2) Grease Buckets (26)
(4) Porcelain Grills (2)
(1) Heat Baffle (10)
(1) Box of Bolts, Washers and Nuts
NOTE: THE ASSEMBLY OF THE COM200 IS A TWO-PERSON OPERATION!
You will need to complete the assembly process, which includes:
1) Installing the Axle (38)
2) Mounting the Wheels (31)
3) Installing the Trailer Tongue (21)
4) Attaching the Fenders (18)
5) Removing the COM200 from the pallet
6) Installing the Heat Baffle (10
7) Positioning the Grease Drain Pan (11)
8) Installing the Porcelain Grills (2)
9) Hanging the Grease Buckets (26)
Tools required for assembly:
(2) 3/4" wrenches or a 3/4" ratchet set
(1) 7/16" socket / driver or wrench
(1) Tire iron or lug wrench
(1) 1/4" socket / driver or wrench
Follow these step by step instructions and you will be cookin in no time.
SECTION ONE: ASSEMBLY INSTRUCTIONS
INSTALLING THE AXLE: (Refer to the COM200 AXLE MOUNTING diagram)
Raise one side of the COM200 Grill Body (32) approximately 6 inches and securely block in place. Repeat with the opposite side. This should provide you with enough room to slide the Axle (38) into place and bolt the Axle Mounting Bracket on Axle (39) to the Axle Mounting Bracket on Grill (37). Bolt in place using the 1/2" x 2" Bolts (40), Washers (41), Lock washers (42) and Nuts (43) as shown in the Axle Mounting diagram. MAKE SURE ALL 4 BOLTS ARE TIGHT.
MOUNTING THE WHEELS:
Using the same procedure as above, securely block each side of the Grill Body (32) and then bolt the Wheels (31) on to the Axle (38) with the Lug Nuts provided. MAKE SURE ALL LUG NUTS ARE TIGHT.
INSTALLING THE TRAILER TONGUE:
Thread the wiring through the Trailer Tongue (21). Carefully slide the Trailer Tongue (21) into the Trailer Tongue Receiver (30), being careful not to damage the wiring. Align the two holes in the Trailer Tongue (21) with the two holes in the Trailer Tongue Receiver (30). Insert a 1/2" x 4 1/2" Bolt (22) with Flat Washer into each hole and install Flat washer, Lock washer and Nut. MAKE SURE 2 BOLTS ARE TIGHT. Attach the white ground wire, with the ring connector, to the hex screw installed below the Trailer 2" Ball Hitch (23).
ATTACHING THE FENDERS:
The Fenders [Left and Right] (18) mount over each Wheel (31). Make sure that the Trailer Lights (19) are facing toward the Roll-up Door (14). There are four nut inserts (Nut Serts) installed on each side of the Grill Body (32). Line up the holes in the Fender (18) with the Nut Serts. Insert one of the 1/4" Bolts with a Flat Washer (27) into each Fender hole and bolt into place. Do not over tighten. Connect the Trailer Wiring to the Trailer Lights (19). On the Left Trailer Light (19) connect the Yellow Wire (29) from the Trailer to the Red Wire (28) from the Light. Connect the remaining two wires. On the Right Trailer Light (19), connect the Green Wire (29) from the Trailer to the Red Wire (28) from the Light. Connect the remaining two wires.
REMOVING THE COM200 FROM THE PALLET:
Put a board under each wheel and carefully roll the COM200 off the end of the pallet. Use the Trailer Tongue (21) to steer the Grill. Put the Jack Stand (24) down to help you move the Grill.
NOTE: IF AT THIS POINT YOU ARE READY TO START YOUR GRILL, REFER TO THE INITIAL FIRING INSTRUCTIONS IN SECTION TWO OF THIS MANUAL OR ON A SEPARATE SHEET IN THE PELLET HOPPER, BEFORE PROCEDING WITH FURTHER ASSEMBLY.
INSTALLING THE HEAT BAFFLE:
The Heat Baffle (10) fits over the 3 Firepots using the square tubes attached to the Heat Baffle (10) and the receiving tubes mounted on the bottom of the Grill. Refer to the Component Diagram for proper orientation of the Heat Baffle (10).
POSITIONIG THE GREASE DRAIN PAN:
Slide the Grease Drain Pan (11) back into place making sure that the Grease Drain Tubes (12) slide through the back wall of the Grill Body (32)
RECOMMENDATION for ease of clean-up: Line the Grease Drain Pan with heavy-duty aluminum foil. Be sure the edges and ends of the foil are tight against the bottom of the Grease Drain Pan. Overlap the foil to get complete coverage. Do not allow the foil to block the Grease Drain Tubes.
INSTALLING THE PORCELAIN GRILLS:
Slide the 4 Porcelain Grills (2) into place in the tracks. Note: The Porcelain Grills (2) will be oily. They are coated with vegetable oil at the factory. The Porcelain Grills (2) should be oiled with vegetable or olive oil on a regular basis to help keep food from sticking to them.
HANGING THE GREASE BUCKETS:
Hang the Grease Buckets (26) on the hooks above the Grease Drain Tubes (12).
IMPORTANT NOTICE!
Licensing requirements vary from state to state. You should check with the appropriate licensing authorities to determine if your unit needs to be licensed as a trailer or similar licensing and/or whether it needs to be licensed if used for commercial food preparation. If required, please contact the factory for Proof of Origin certificate to assist you with the licensing of your unit.
SECTION TWO: INITIAL FIRING INSTRUCTIONS
(To be used on initial firing or anytime the Grill runs out of Pellets) In order to ensure proper operation of the Grill, you must first allow the Auger Tube to be “charged” with Pellets.
1) Open the Door and remove the Porcelain Grills, Grease Drain Pan and Heat Baffle from inside the Grill.
2) Make sure the Switch/Dial is in the OFF position. Plug the Power Cord into an appropriate, grounded electrical outlet.
3) Open the Pellet Hopper Lid and locate the Augers. Make sure there are no foreign objects in the Augers. Turn the Switch/Dial ON and look into the Pellet Hopper to confirm the Augers are turning. At the same time, place your fingers over the Firepots and feel the air movement from the Draft Inducer Fans. Look to see if the Hot Rods are getting hot. DO NOT TOUCH THEM! Turn the Switch/Dial OFF.
4) Fill the Pellet Hopper with TRAEGER BBQ PELLETS. WARNING! USE ONLY TRAEGER BRAND BBQ PELLETS, which are specifically made to work in our Grills. NEVER use heating fuel pellets in the Grill. Turn the Switch/Dial ON, set the Temperature Dial to HIGH. Note: During the initial charging of the Augers, it will take time for the Pellets to travel from the Pellet Hopper to the Firepots. When the Pellets begin to fall into the Firepots, turn the Switch/Dial OFF.
5) Turn the Switch/Dial ON, set the Temperature Dial to SMOKE. Let the Pellets come to full flame. Once you see flames come out of the Firepots, turn the Switch/Dial OFF, and let the Grill cool down.
RECOMMENDATION for ease of clean-up: Line the Grease Drain Pan with heavy-duty aluminum foil. Be sure the edges and ends of the foil are tight against the bottom of the Grease Drain Pan. Position the Heat Baffle, the foil lined Grease Drain Pan and Porcelain Grills in their proper locations.
6) With the Door open, turn the Switch/Dial ON and set the Temperature Dial to SMOKE. In approximately 2 minutes you will notice whitish-gray smoke coming out of the Grill as the Pellets ignite. After assuring the Pellets have ignited, close the Door and set the Temperature Dial to any cooking setting desired.
7) Note: Before cooking the first batch of food in your new Grill, you will need to season the Grill. Turn the Temperature Dial to HIGH and run for 45 minutes at this setting with the Door closed. This must be done before cooking any food on the Grill.
8) The Grill should be allowed to pre-heat for approximately 10 minutes with the Door closed before placing food in the Grill.
ALWAYS START THE GRILL ON SMOKE SETTING WITH THE DOOR OPEN
Once the Pellets are ignited, close the Door and set the Temperature Dial to any cooking temperature desired.
NOTE: When operating this Grill, maintain a minimum clearance of 10 inches from Grill to combustibles
SECTION THREE: SUBSEQUENT START-UP
With the Door open, turn the Switch/Dial ON and Temperature Dial to SMOKE. In approximately 2 minutes you will notice whitish-gray smoke coming out of the Grill as the Pellets ignite. After assuring the Pellets have ignited, close the Door and set the Temperature Dial to any cooking setting desired.
If the Grill fails to light or if the fire in the Firepot goes out while cooking or smoking, follow these steps:
1) Turn the Switch/Dial to OFF. Open the Door and remove all food, Porcelain Grill, Grease Drain Pan and Heat Baffle.
2) IMPORTANT: Remove all unburned Pellets and ash from inside and around the Firepot.
3) Before replacing the Heat Baffle, Grease Drain Pan and Porcelain Grill, restart the Grill and confirm that the ignition cycle is working. (The Hot Rod should begin to turn red and Pellets should fall into the Firepot from the Auger Tube.)
4) If this procedure is not successful, see SECTION SIX: FREQUENTLY ASKED QUESTIONS for troubleshooting tips or contact Traeger Technical Support (SECTION SEVEN) to help diagnose the problem before proceeding to the MANUAL LIGHTING INSTRUCTIONS below.
MANUAL LIGHTING INSTRUCTIONS:
If the Hot Rod only is not operating, the Grill can still be used to cook and smoke using the MANUAL LIGHTING PROCEDURE below:
1) Making sure the Switch/Dial is set to OFF and the Hot Rod connector (Purple / White wire pair) is disconnected, plug the Power Cord into an appropriate, grounded electrical outlet.
2) Open the Pellet Hopper and fill with TRAEGER BBQ PELLETS. WARNING! USE ONLY TRAEGER BRAND BBQ PELLETS, which are specifically made to work in our Grills. NEVER use heating fuel pellets in the Grill.
3) Remove the Porcelain Grill, Grease Drain Pan and Heat Baffle to expose the Firepot in the bottom of the Grill.
4) Pour 1/2 cup of TRAEGER BBQ PELLETS into the Firepot.
5) Squirt 2 tablespoons of Alcohol Gel fire lighter into the Firepot on top of the Pellets.
6) Light the Alcohol Gel with a fireplace match or a long-reach butane lighter. WARNING! NEVER SQUIRT ALCOHOL GEL INTO A BURNING FIRE OR A HOT FIREPOT. THE ALCOHOL GEL BOTTLE COULD EXPLODE AND CAUSE SERIOUS INJURY.
7) Let the Alcohol Gel and Pellets burn for approximately 4 minutes.
8) After assuring the Pellets have ignited, install the Heat Baffle, Grease Drain Pan and Porcelain Grill back in place.
9) Turn the Switch/Dial ON and the Temperature Dial to any setting desired. With the Door closed, let the Grill pre-heat for approximately 10 minutes before placing food in the Grill.
SECTION FOUR: OPERATING TIPS
1) The Temperature Dial can be changed at any time to increase or decrease the cooking temperature of the Grill. The HIGH/HIGHER Temperature settings are for Grilling. The MED/MID RANGE Temperature settings are for Slow Cooking. The SMOKE setting is for Smoking and adding Smoke Flavor to foods being cooked. The SMOKE setting can also be used to "hold" foods at approximately 180 to 200 degrees F.
2) Your TRAEGER PELLET GRILL should never be moved while it is hot. If you are transporting your Grill in a vehicle after cooking on it, make sure the fire is completely out and the Grill is COLD before placing it in any vehicle. NEVER put water into the Firepot. It will jam the Auger.
3) The TRAEGER PELLET GRILL is designed to operate with the Door CLOSED. Cooking with the Door open greatly lengthens your cooking time.
4) NEVER add Pellets by hand to a hot Firepot. This is dangerous and you may be seriously burned. If you run out of Pellets and lose your fire while cooking, let the Grill completely cool and start again with the INITIAL FIRING INSTRUCTIONS.
5) Make sure the Heat Baffle is properly seated on its locating brackets. The long lips of the Heat Baffle should be pointing down over the Firepot. If not seated properly, direct heat and flame could come up out of the Firepot and cause a grease fire in the Grill.
6) When estimating cooking times, the outside temperature will be an important factor. If it is hot outside, it will take less time for food to cook. If it is cold, wet or windy, it will take longer.
7) Grease fires are caused by not properly maintaining the Grill by failing to clean your Grease Drain Pan, V-shaped Grease Drain and Grease Drain Tube on a consistent basis. In the unlikely event of a grease fire while cooking, TURN THE SWITCH/DIAL OFF and KEEP THE DOOR CLOSED until the fire is completely out. Never keep the Door open during a grease fire. If it does not go out, lightly sprinkle baking soda on the fire. Be careful not to burn yourself. If this does not work, then carefully remove the food from the Grill and keep the Door closed until the fire is completely out. Again, be careful not to burn yourself. When the Grill is completely cool, remove the Porcelain Grill and replace the foil on the Grease Drain Pan. Clean any grease accumulation from the V-shaped Grease Drain and the Grease Drain Tube. Replace the Grease Drain Pan and the Porcelain Grill in their proper positions, restart the Grill and resume cooking.
SECTION FIVE: MAINTAINING YOUR NEW GRILL
1) Change the aluminum foil on the Grease Drain Pan frequently. Periodically, clean the grease out of the Grease Drain Tubes and off of the interior surfaces of the Grill. Empty the Grease Buckets occasionally and line with aluminum foil for easy clean-up. It is easier to clean off accumulated grease when the Grill is warm. BE CAREFUL NOT TO BURN YOURSELF. If too much grease is allowed to build up on the Grease Drain Pan, or is allowed to plug the Grease Drain Tubes, a grease fire could result. We recommend cleaning these locations regularly.
2) Outside surfaces: DO NOT use oven cleaner, abrasive cleansers or abrasive cleaning pads on the outside Grill surfaces. Use warm soapy water to cut the grease.
3) If the Grill is stored outside during the rainy season, care should be taken to ensure that water does not get into the Pellet Hopper. Wood pellets, when wet, expand greatly and will jam your Auger. A cover to protect the Grill is highly recommended! We recommend that you use a tarp and elastic cords to keep the Grill covered when not in use. Put the tarp over the Grill only when it is cold!
4) Depending on use, periodically remove the Porcelain Grills, Grease Drain Pan and Heat Baffle to clean the ash from in and around the Firepots. A shop-vac is handy for this chore. Make sure the Grill is COLD before starting this procedure.
5) We recommend keeping a long-handled cleaning brush near the Grill. After removing your food, give the Porcelain Grills a quick brushing. It takes only a minute and it will be ready the next time you want to use the Grill. Be careful not to burn yourself.
6) The COM200 is a very reliable cooking appliance but parts do wear out. We recommend that you purchase an extra Hot Rod, Auger Drive Motor and Draft Inducer Fan for emergency repairs. These are specialty parts and not available through general retail outlets.
SECTION SIX: FREQUENTLY ASKED QUESTIONS
1) Verify power at the electrical outlet.
a) If Power Cord is connected to a GFI (Ground Fault Interrupter), check and reset if necessary.
b) Initiate startup.
Still no ignition – Proceed to step 2.
2) Disconnect Power Cord from electrical outlet.
a) Remove the Control and check the fuse on back. Replace the fuse if blown. Reinstall the Control!
b) Unplug Hot Rod connector (Purple/White wire pair), plug Power Cord into an appropriate, grounded electrical outlet and turn the Switch/Dial ON. NOTE: At this point the Grill will not ignite.
c) Check the Draft Inducer Fan and the Auger Drive Motor for operation. If both are operating -- the Hot Rod needs to be replaced. If one or both are not operating, contact Traeger Technical Support (SECTION SEVEN) for additional troubleshooting help. Contact your Traeger Dealer or the Traeger Parts Department (SECTION SEVEN) to place an order.
3) If the problem is identified to be a failed Hot Rod, the Grill can still be used to cook and smoke by following the MANUAL LIGHTING INSTRUCTIONS in SECTION THREE of this OWNER'S MANUAL.
WHY ARE NO PELLETS BEING DELIVERED INTO THE FIREPOT?
1) Verify that there are Pellets in the Pellet Hopper. If this is the INITIAL FIRING or the Grill has run out of Pellets, allow sufficient time for the Pellets to travel from the Pellet Hopper to the Firepot (can take up to 7 minutes).
2) Initiate startup. See INITIAL FIRING INSTRUCTIONS in SECTION TWO of this OWNER'S MANUAL.
Still no Pellets in the Firepot – Proceed to step 3.
3) Disconnect Power Cord from electrical outlet.
a) Unplug the Auger Drive Motor (Red/White wire pair connector) and the Draft Induction Fan (Orange/White wire pair connector).
b) Reconnect the Draft Induction Fan to the Red/White wire pair and the Auger Drive Motor to the Orange/White pair.
c) Plug Power Cord into an appropriate, grounded electrical outlet and turn the Switch/Dial ON.
d) If the Auger Drive Motor is operating (check the small fan blade on the back of the motor), the problem is in the Three Speed or Digital Control, which will need to be replaced. Contact your Traeger Dealer or the Traeger Parts Department (SECTION SEVEN) to place an order.
4) If the Auger Drive Motor is not operating but the Draft Induction Fan is operating, the problem is in the Auger system, which will need to be checked.
a) With the Switch/Dial OFF, locate the small fan blade on the back of the Auger Drive Motor.
b) While watching the fan blade, turn the Switch/Dial to ON. If the fan blade does not turn, turn the Switch/Dial to OFF. This indicates a defective Auger Drive Motor and it will need to be replaced. Contact your Traeger Dealer or the Traeger Parts Department (SECTION SEVEN) to place an order.
c) If the fan blade turns a bit and then stops, continue watching and turn the Switch/Dial to OFF. If the fan blade UNWINDS slightly, this indicates a jam in the Auger system which will need to be cleared.
d) Disconnect Power Cord from electrical outlet and remove Pellets from the Pellet Hopper. Check for foreign objects and wet/decomposed Pellets, both of which can cause a jam in the Auger system. The Auger will need to be removed to clear a jam in the Auger system. See "HOW DO I REMOVE THE AUGER IF IT JAMS?" section below.
HOW DO I REMOVE THE AUGER IF IT JAMS?
For models with a fixed Auger Drive Motor:
1) Remove any covers necessary to access the Auger Drive Motor.
2) Remove the screw connecting the Auger Drive Motor shaft to the Auger shaft, using a 7/64 hex wrench and a 5/16 wrench or driver.
3) Remove two bolts mounting the Auger Drive Motor/Bracket assembly to the Burner Box with a 7/16 wrench.
4) With a small pipe wrench or locking pliers on the Auger shaft, turn the Auger counter clockwise. It will turn hard until it breaks free, then the Auger will turn freely.
5) Remove the Auger and clean all Pellets, ash or foreign objects from the Auger, Auger Tube and Firepot. A shop-vac is ideal for this task.
6) Sand the outside surfaces of the auger with medium grit sandpaper. Check the inside of the Auger Tube and sand it if needed. Vacuum sanding grit from the Auger Tube and Firepot when finished.
7) Reinstall the Auger into the Auger Tube, making sure that it rotates freely.
8) Re-attach the Auger Drive Motor/Bracket assembly, ensuring that the Auger shaft rotates freely on the Auger Drive Motor Shaft. Re-attach the Auger shaft to the Auger Drive Motor shaft.
For models with a floating Auger Drive Motor:
(Note: some units with the floating Auger Drive Motor will require metric tools.)
1) Remove any covers necessary to access the Auger Drive Motor.
2) Remove the screw connecting the Auger Drive Motor shaft to the Auger shaft and the screw retaining the Auger Bushing into the Auger Tube.
3) With a small pipe wrench or locking pliers on the Auger shaft, turn the Auger counter clockwise. It will turn hard until it breaks free, then the Auger will turn freely.
4) Remove the Auger and clean all Pellets, ash or foreign objects from the Auger, Auger Tube and Firepot. A shop-vac is ideal for this task.
5) Sand the outside surfaces of the auger with medium grit sandpaper. Check the inside of the Auger Tube and sand it if needed. Vacuum sanding grit out of the Auger Tube and Firepot when finished.
6) Reinstall the Auger Bushing and the Auger into the Auger Tube, making sure that the Auger rotates freely.
7) Re-attach the Auger shaft to the Auger Drive Motor shaft.
WHY DOES MY GRILL FIRE GO OUT ON "SMOKE" SETTING?
Excess ash in the Firepot may be the problem.
1) Open the Door and remove the Porcelain Grill, Grease Drain Pan and Heat Baffle from inside the Grill.
2) IMPORTANT: Remove all unburned Pellets and ash from inside and around the Firepot. A shop-vac is ideal for this task CAUTION! ASSURE THAT THE GRILL IS COLD TO AVOID A FIRE FROM HOT ASH.
3) Replace the Heat Baffle, Grease Drain Pan and the Porcelain Grill and initiate start-up procedure.
4) If this didn't remedy the problem, contact Traeger Technical Support (SECTION SEVEN) for additional troubleshooting help.
THE AUGER MAKES A LOT OF NOISE WHEN I TURN THE GRILL ON AND I HAVE NOTICED A DROP IN THE GRILL TEMPERATURE. WHAT CAN I DO TO CORRECT THIS?
In Grill models with a fixed Auger Drive Motor, you will need to "TRUE" the Auger
1) Remove all Pellets from the Pellet Hopper and run Pellets out of the Auger Tube.
2) Remove the screw connecting the Auger Drive Motor shaft to the Auger shaft, using a 7/64 hex wrench and a 5/16 wrench or driver.
3) Spin the Auger shaft over the Auger Drive Motor shaft. It should rotate freely, without binding.
4) If the Auger shaft binds, loosen the two bolts mounting the Auger Drive Motor/Bracket assembly to the Burner Box with a 7/16 wrench.
5) Move the Auger Drive Motor/Bracket assembly until you can feely rotate the Auger shaft over the Auger Drive Motor shaft.
6) Re-tighten the 7/16 bolts, making sure that the Auger End Piece Shaft still freely rotates over the Auger Drive Motor shaft.
7) Reinstall the screw and nut connecting the Auger Drive Motor shaft to the Auger shaft.
WITH THE TRAEGER DIGITAL CONTROL, WHAT DIAL SETTING IS RECOMMENDED FOR STARTING THE GRILL?
The auto-start procedure is the same for all Grill Controls. With the Door open, turn the Switch/Dial ON and Temperature Dial to SMOKE. In approximately 2 minutes you will notice whitish-gray smoke coming out of the Grill as the Pellets ignite. After assuring the Pellets have ignited, close the Door and set the Temperature Dial to any cooking setting desired.
HOW DO I PROTECT MY PAINT FINISH?
1) Use a protective Cover on the Grill and touch-up paint to repair any scratches.
2) Every 90 days, use a high quality car wax on the outside surfaces of the Grill. ONLY APPLY WAX TO A COLD GRILL.
WHERE CAN I GET A NEW PART FOR MY GRILL?
Check with your Traeger Dealer. They may have the part in stock or can order the part for you. Or you can contact the Traeger Parts Department (SECTION SEVEN) to place an order. In either case, please provide your name, phone number, address, Model and Serial Number of the Grill (located on a label inside the Hopper Lid), along with the part identification.
SECTION SEVEN: TRAEGER SUPPORT
Parts are identified in the front of this manual on the COMPONENT DIAGRAM, THREE-BURNER SYSTEM AND AXLE MOUNTING documents. To order parts: Call, E-mail or write to your Traeger Dealer or Traeger Pellet Grills. Please provide your name, phone number, address, Model and Serial Number of the Grill (located on a label inside the Hopper Lid), along with the part identification.
TRAEGER PELLET GRILLS, LLC.
9445 SW Ridder Road #310
Wilsonville, OR 97070
TRAEGER TECHNICAL SUPPORT
Available 24/7
TRAEGER PARTS DEPARTMENT
Available Weekdays 8AM to 4:30PM
Pacific Time
TRAEGER SALES/ORDER DESK
Available Weekdays 8AM to 5PM
Pacific Time
TOLL-FREE TELEPHONE: 1-800-872-3437
E-mail: service@traegergrills.com
Website: www.traegergrills.com

- COMMERCIAL PELLET GRILL
- COM200 THREE-BURNER SYSTEM
- SECTION ONE: ASSEMBLY INSTRUCTIONS
- MOUNTING THE WHEELS:
- INSTALLING THE TRAILER TONGUE:
- ATTACHING THE FENDERS:
- REMOVING THE COM200 FROM THE PALLET:
- INSTALLING THE HEAT BAFFLE:
- POSITIONIG THE GREASE DRAIN PAN:
- INSTALLING THE PORCELAIN GRILLS:
- HANGING THE GREASE BUCKETS:
- IMPORTANT NOTICE!
- SECTION TWO: INITIAL FIRING INSTRUCTIONS
- ALWAYS START THE GRILL ON SMOKE SETTING WITH THE DOOR OPEN
- SECTION THREE: SUBSEQUENT START-UP
- If the Grill fails to light or if the fire in the Firepot goes out while cooking or smoking, follow these steps:
- MANUAL LIGHTING INSTRUCTIONS:
- SECTION FOUR: OPERATING TIPS
- SECTION FIVE: MAINTAINING YOUR NEW GRILL
- SECTION SIX: FREQUENTLY ASKED QUESTIONS
- WHY ARE NO PELLETS BEING DELIVERED INTO THE FIREPOT?
- Still no Pellets in the Firepot – Proceed to step 3.
- HOW DO I REMOVE THE AUGER IF IT JAMS?
- WHY DOES MY GRILL FIRE GO OUT ON "SMOKE" SETTING?
- THE AUGER MAKES A LOT OF NOISE WHEN I TURN THE GRILL ON AND I HAVE NOTICED A DROP IN THE GRILL TEMPERATURE. WHAT CAN I DO TO CORRECT THIS?
- WITH THE TRAEGER DIGITAL CONTROL, WHAT DIAL SETTING IS RECOMMENDED FOR STARTING THE GRILL?
- HOW DO I PROTECT MY PAINT FINISH?
- WHERE CAN I GET A NEW PART FOR MY GRILL?
- SECTION SEVEN: TRAEGER SUPPORT
Brand : TRAEGER
Model : COM200
Category : Oven