IWM-800TL - Washing machine Imarflex - Free user manual and instructions
Find the device manual for free IWM-800TL Imarflex in PDF.


| Product Type | Top-Loading Washing Machine |
| Brand | Imarflex |
| Model | IWM-800TL |
| Capacity | 8 kg |
| Dimensions (W x D x H) | 600 mm x 600 mm x 850 mm |
| Net Weight | 35 kg |
| Power Supply | 220 V ~ 50 Hz |
| Power Consumption | 500 W |
| Water Consumption (per cycle) | Approx. 120 L |
| Spin Speed | 800 rpm |
| Number of Wash Programs | 10 |
| Special Programs | Quick Wash, Delicate, Heavy Duty, Soak, Rinse+Spin |
| Water Level Selection | Manual/Auto |
| Display Type | LED |
| Safety Features | Child Lock, Overheat Protection, Unbalanced Load Detection |
| Material | Plastic Body, Stainless Steel Drum |
| Noise Level (Wash/Spin) | ≤ 62 dB / ≤ 75 dB |
| Maintenance | Clean lint filter monthly; descale every 3 months |
| Accessories Included | Inlet Hose, Drain Hose, Manual |
| Warranty | 1 Year |
Frequently Asked Questions - IWM-800TL Imarflex
User questions about IWM-800TL Imarflex
0 question about this device. Answer the ones you know or ask your own.
Ask a new question about this device
Download the instructions for your Washing machine in PDF format for free! Find your manual IWM-800TL - Imarflex and take your electronic device back in hand. On this page are published all the documents necessary for the use of your device. IWM-800TL by Imarflex.
USER MANUAL IWM-800TL Imarflex
Description of Parts....2
Installation and Adjustment
How to Install Bottom Cover...... 3
How to Use Drain Hose.... 4
Water Inlet Installation.... 5
Water Inlet Installation.... 6
Preparation Before Operation.... 7
LoadLaundries....7
Program Operation....8
Control Panel Guide.... 8
Operation....9
Cleaning Instruction....10
Operation Steps....11
Troubleshooting....12
Other functions....13
Other functions
- Troubleshoot
| Problem | Cause | Solution |
| Indicator light soak, wash , rinse , spin flash, other lights are not on | 5 minutes after draining, it still does not reach to the water level | Open top cover, if there is no problem in drain hose, then close the top cover and clear up the alarm |
| During running, process indicator light flashing and others which have no any changes | The top cover is opened when it is spinning | Close the top cover and clear up the alarm |
| Rinse and spin indicator light flashing together and others which have no any changes | Spin is not balance | Open the top cover and clear up the alarm |
| Water level indicator lightflash and other lights are not on | 20 minutes after inlet, it still not reach the suggested water level | Open top cover, if there is no problem inlet hose. Then close the top cover and clear up the alarm. |
| Child-lock light flash and other lights which have no any changes | The top cover is opened after setting child-lock | Close the top cover and clear up the alarm |
| "1", "5" water level light flash, others are not on | Water level sensor is wrong | Cut the power supply and call the technicians |
2. Imbalance adjustment
During spinning, if the laundries are not placed equally in the tub, it would cause violent vibration. This machine has imbalance adjustment function, and the vibration testing system will supervise the running. Once vibration is beyond certain level, the adjustment system will start automatically to adjust the imbalance.
3. Power supply is cut off automatically
(1) If failed to press START/PAUSE in 10 minutes after pressing POWER, power supply will cut off automatically.
(2) After the washing finished, power supply will cut off automatically.
4. Child lock function
(1) If setting up "Child-Lock" functions, all the buttons will be locked including POWER. The top cover is opened while the washing machine is working, the washing will stop and give an alarm. But if you close the top cover in 5 seconds, the alarm of the washing machine will stop and continue working. If you unable to close the top cover in 5 seconds, the washing machine will begin to drain some remaining water in the inner tub, even closing the top cover still invalid. During the draining procedure, alarm will be given every 10 seconds, when the water in the inner tub is about 5cm higher, alarm will be given every 10 minutes (alarm is always given). When draining is finished, the washing machine will be in the state of waiting, if the top cover is closed, the washing machine is unlocked and start working as previous setting.
(2) Once child lock is set, open top cover every 5 seconds during washing or rinse (if there is water in the inner tub), washing machine will drain the remaining water and give an air ram. If you unlock the function during draining, the washing machine will add water to setting the water level and will continue working again.
Troubleshooting
Before contacting the technicians, please check on the following reminders:
| PROBLEM | CAUSE |
| Control panel has no any display | Plug is not inserted tightlyNo electricity in the socketPower switch is not turned onPower supply is cut off |
| Inlet hose leaks | Inlet hose connector (connecting with the tap) is not fixed, if loosen, tightly Inlet hose and washing machine connector |
| It does not drain | Drainpipe is not placed downDrainpipe is banded or blocked |
| It does not inlet | No water supplyTap is not openInlet hose is blocked |
| Spin stops and begins to inlet during spin program | Laundries is too much or too little or if the machine is not stable in placed. |
| Pressing the SPIN program button to spin, but it doesn't spin. | When finished draining, do not close the top cover.When starting repeat the same procedure, open the top cover once again |
| It doesn't spin continuously | Balance the number of laundries for continuous spinning |
| First time user, experience some water flows from the drain hose | Remaining water caused by factory testing |
SPECIFICATION
MODEL NO. : IWM-800TL
RATED VOLTAGE : 230V a.c. 60Hz
POWER CONSUMPTION : Wash: 440W Spin: 325W
DIMENSION : 580*587*968mm
IMPORTANT SAFEGUARDS
Read and understand thoroughly these safety instructions before use. The items indicated here are very important that must be followed. We cannot be held liable for damage caused by non-compliance with the warning and safety instructions resulting to incorrect use or operation. When using electrical appliances, basic safety precautions should always be followed, including the following:
-
Read all instructions carefully.
-
Before using the washing machine, check if the voltage indicated corresponds with the convenience outlet (230Vac).
-
Do not use two-way socket with other appliance.
-
Do not use any appliance with a damaged cord or plug. If the cord is damaged it must be replaced with the same type and size or bring the unit to the nearest authorized service center.
-
Do not plug the washing machine on an extension cord, it does not guaranteed the safety of the appliance.
-
Faulty components must only be replaced by genuine manufacturer original spare parts. Only when these parts are proper to the safety standards of the machine guaranteed.
-
Unauthorized repairs could result in unforeseen dangers for the user, for which the manufacturer is not liable. Repairs should only be undertaken by an authorized service technician. Machine is not guaranteed until after maintenance or repair work has been carried out.
-
This appliance is not intended to be use by persons (including children) with reduced physical, sensory or mental capabilities, or lack of experience and knowledge, unless they have been given supervision or instruction concerning use of the appliances by a person responsible for their safety.
-
Children should be supervised to ensure that they do not play with the appliance.
-
Do not use this unit unless it is intended to be used.
-
Save this instruction for future reference.
-
To avoid the risk of personal injury or damage to washing machine, do not install it in place where it is damp and where it suffers from rainfall.
-
Do not install the washing machine in a place where it suffers from direct sunlight in which plastic or components will be damaged. It will be shortened the life of your washing machine.
-
Do not install the washing machine in a place where temperatures below freezing may occur burst and split in the hose of the machine. The reliability of the electronic control unit may be impaired at temperatures below freezing point.
-
Do not shoot the washing machine with water when you clean it. Keep the unit away from fire or heat sources.
-
Ensure that foreign objects (e.g. nails, pins, coins, paper clips) is remove from laundry before placing it into the washing machine, these may damage components of the machine (e.g. drum), or may damage to the laundry.
-
Keep children away from the washing machine at all times. To avoid the risk of injury do not allow children to play on or near it or to play with its controls. Supervise children while using it.
-
Older children may only use the waching machine if its operation has been clearly explained to them and they are able to use it safely, recognizing the dangers of misuse.
-
Do not wash water-repellent things (e.g. raincoats) with washing machine. Only remove laundry from the washing machine once the unit has stopped.
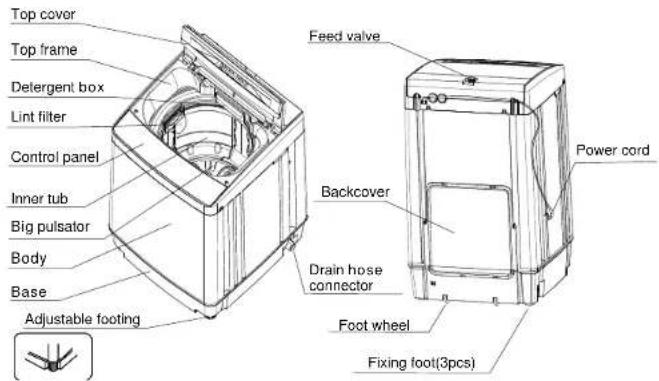
Description of Parts
Accessories
Connector connecting toiliance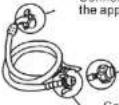 Connector forwater inlet hoseand tapConnector connecting towater inlet hose connector Connector forwater inlet hoseand tapConnector connecting towater inlet hose connector | 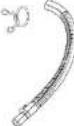 | |
| Bottom cover(1pc) | Water inlet hose (1pc)water inlet hose connector(1pc) | Drain hose(1pc)Drain hose clip(1pc) |
Symbol definition
| Warning symbols | Pay special attention to the warning symbols. There may be serous risks to personal body safety or damages to the washing machine if not followed. |
| Forbidden symbols | If this symbol appear please discontinue using the machine, otherwise it may damage the appliance or cause an injury to user. |
Operation steps
- Press power switch, this procedure will activate the machine.
1). If there is no water in the inner tub, the machine is in the state of "AUTOMATIC", this state tells each model's button explanation.
2). If there is water in inner tub, the machine is not in the state of "AUTOMATIC", this state tells each model's button explanation.
- Press program button to begin process selection.
| Times of pressing the "program" button | Selected procedure program | Applicable procedure | Consents (the lighted indicator indicates the programs about to use) |
| 0 | Wash, rinse, spin | Standard program | Wash rinse and spin lights are activated |
| 1 | Spin | Wash by hand and only need to spin | Spin light is activated |
| 2 | Soak, wash, rinse ,spin | For dirty laundries | Soak, wash, rinse and spin lights are activated |
| 3 | Wash | when use detergent repeatedly | Wash light is activated |
| 4 | Wash, rinse | No need to spin for laundry s crease d easily | Wash and rinse lights are activated |
| 5 | Rinse ,spin | Wash by hand and need to rinse and rinse | Rinse and spin lights are activated |
Remarks: press PROGRAM button continually, the above mode will repeat every turn.
- Select appropriate water level according to your laundries quantity.
- When the washing is finished, buzzer alarm, power supply cut off automatically.
Cleaning Instruction
Cleaning Instruction methods
| After the end of the ProcedureThe machine will stops automatically and music buzzer will remind you to take out the laundries or start again.Once you have finished using the machine, you are advised to unplug it and turn off the water taps to avoid unexpected leak or fire. | External cleaningClean the exterior cabinet of the machine with soft cloth. Don't use cleanser, volatile chemical materials to clean the machine, which will damage plastic parts and the surface. |
| Clean the lint filterIt is necessary to use lint filter during washing.After washing, please clean the lint filter in time.Clean the lint filter according to the following steps:1. Pull out the lint filter.2. Turn the filter net outside and wash it.3. Recover the filter net and remount it.Groove | Clean inlet gateIt is possible that the inlet filter net can be blocked by the dust, please clean it according to the follow steps:1. Close the tap and turn on the power switch.2. Start the washing machine for 5 seconds (make the water in the inlet hose flows to the tub),and cut off the powersupply.3. Pull off the inlet hose, remove and clean the inlet valve and the inlet net, and install again.[IMAGE] |
- Once your using the machine, you are advised to turn off the water taps (if necessary, pull out the inlet hose).
- Do not keep water in tub for a long time. When washing is finished, drain it right away.
- Once you have finished using the machine, you are advised to unplug it.
- Put the electric cable and the drain hose in order.
- Wipe the water on the surface and in tub with soft cloth and keep the top cover remains open for a while. It helps to prevent mould and stagnant smells forming inside the appliance.
If the water in the inner tub has possibility to freeze, please do like below:
- In winter, remaining freeze water can cause the washing machine trouble, please take off the water inlet hose and drain out the water in the hose and inner tub.
- If the water freeze, please don't operate the washing machine. Put 40^ C, hot water in the tub, the hot water should submerge the pulsator, after a few minutes, rotate the pulsator by hand gently, then you can operate the washing machine again.
Installation and adjustment
Please install and adjust the machine according to the requirements of the manual. It is very important to your safety and correct operation.
Installing the bottom cover
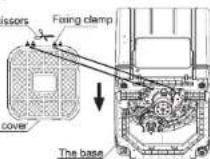
- Inclined the back of the washing machine forward, then make
the bottom side of the cover with sticker description placed back to the washing machine, insert it below the washing machine along the direction of the arrow.
- Remove two fixing clamp by using scissors, then insert it accordingly to the indicated red line holes, gently pull fixing clamp, it should not be pulled out and make the bottom cover fixed on the base.
Positioning
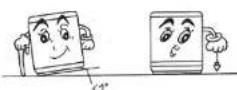
The distance between the washing machine and the wall must be more than 50mm, while the maximum allowed angle for the shank base of the machine is 1°. Slanting or uneven rough ground may cause the machine to stop operating, please use the following method for adjusting:
● Make it horizontal
Use a plumb bob to check if the washing machine is positioned horizontally.
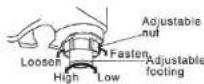
● How to use the adjustable footing:
(1) Lift up the adjustable footing gently
(2) Twist the adjustable nut to the left to loosen it. and twist the adjustable foot.
(3) Adjust the footing until the washing machine is balance.
(4) Tighten and lock the nut by twisting to the right.
How to use drain hose
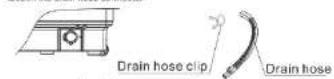
Install drain hose
Set drain hose clip into the drain hose to 2-3cm (from the end of the drain hose that it will be set without the pothlock), then install the drain hose into the drian hose connector and fix the drain hose and drian hose connector with the clip, after that put up the drain hose clip on the cabinet.
How to change the direction of the drainhose
Detach the drain hose and drain hose clip from drain hose connector, put some soft mat on the floor, make washing machine front side a down and gently put down the washing machines front side on the mat, domount the screws on the back cover with screwdriver and take out the back cover. Demount one screw that
fixed the drain hose connector (on right side of the washing machine), loosen the drain hose connector
Drain hose connector
(Section sketch map for washing machine right side) 3. With proper force to take down drain hose gate stopper on left side of the washing machine. The drain hose gate stopper is fixed on washing machine base with two clips, please see the fixing type from the place of opening back cover.
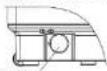
Drain hose gate stopper (Section sketch map for washing machine left side)
- Extrude the drain hose with proper force and take out drain hose hoop (on right of the washing machine), make the inner drain hose loosen.
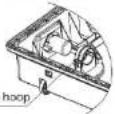
(Section sketch are inside washing machine)
- Pull the inner drain hose to another side, please do not make the inner drain pipe distortion, as per foregoing description. Fix inner drain hose with drain hose hoop with one screw fix drain hose connector, install the drain hose gate stopper to another side, make washing machine standing gently, fix back cover with screw and install the drain hose and drain hose clip into the drain hose connector.
Water drainage
The drain hose should drain smoothly 1. The height of the drain hose should be less than 10cm, otherwise the drainage will not be smooth and need a long time to drain, the machine may stop during working.
2.Do not step on or press the drain hose.
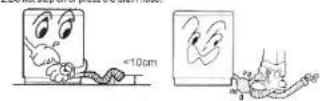
- Cut the drain hose if it is too long. Cut the front end of the hose startlingly to make drainage smoothly.
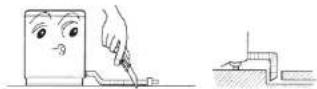
- Purchase another hose if you need an additional drain hose. It's diameter should not be less than 30mm and length should not exceed in 1.5m.
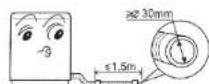
If the additional drain hose is too long.
cut some at A or B point.

A B
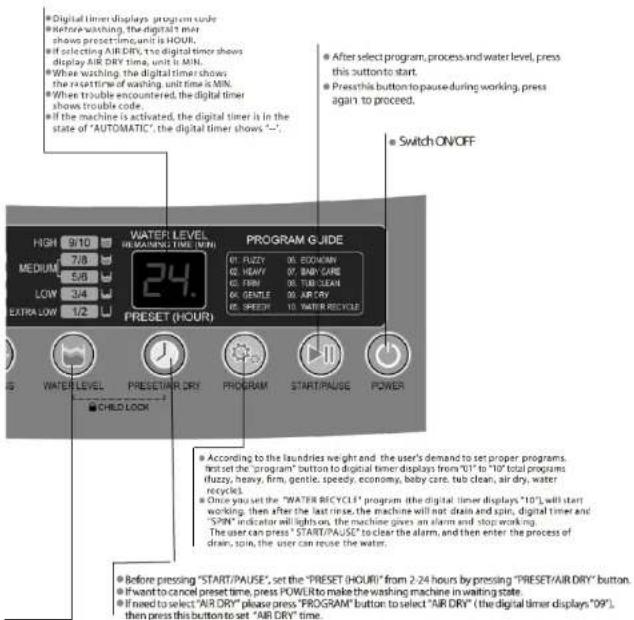
Before pressing "START/PAUSE", the digital timer displays "-" automatically and the water level is not set. Before pressing the "START/PAUSE" button, check if the program is FUZZY or HEAVY (digital timer display '01' or '02'), AUTOMATIC function is ON. If program is "TIRM" ("digital timer displays '03', AUTOMATIC is OFF, the water level is "7"). If process setting knotset to "WASH", AUTOMATIC is OFF.
Be before pressing the "WATER LEVEL" button to set the water level, the digital timer displays from "1" to "10", it shows a meter of water level 1 to water level 10. There is an AUTOMATIC function, where you can set the water level according to the weight of soundlines. 1-2 less water level, 3-4 is lower water level, 5-6 is middle water level, 9-10 is high water level.
During "WASH" (including rinse), if needed to add water, press "WATER LEVEL" button to add water, unpress will stop water level for you can "PAUSE" the washing machine and press "WATER LEVEL" button to select higher water level, then press "START/PAUSE" to add water. The washing machine will add water to setting level automatically and continue working. If resetting water level is lower than present water level, the lower water level will valid in next water inlet.
Automatically it will add water during SOAC WASH and RINSE process, if the washing machine water level is lower than setting water level, the washing machine will pause and add water to setting water level automatically.
Control panel guide
Mode and meaning of the indicator light
on: indicates the selected mode
flashing: indicates the running program
flashing rapidly, indicates an abnormal condition
- Press this button to select one cycle from "wash-rinse-spin", "spin", "soak-wash-rinse-spin", "wash", "wash-rinse", "rinse-spin".
- If the machine is activated, set the program setting to "wash-rinse-spin".
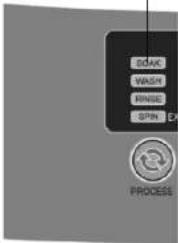
Child-Lock Function
- To activate "Child-Lock" function, press "WATER LEVEL" and "PROGRAM" at the same time. The "Child-Lock" display will light up once it is activated. Press "WATER LEVEL" and "PROGRAM" once again to cancel child look.
- However, if the cover is not closed within 5 seconds, the washing machine will automatically drain the water. Even closing the cover will not be valid. During draining, alarm will be given every 10 minutes. When the draining is finished, the washing machine is in state of waiting. Closing the cover will make the machine to start with the previous setting.
Once child lock is set, open top cover every 5 seconds during washing or rinse if there is water in the inner tub, washing machine will drain and give an air ram. If you unlock the function during draining, the washing machine will add water to setting water level and continue working. - Turn on the power by press POWER button, the machine will start to activate:
1.) If there is no water in inner tub, the machine is under the status of AUTOMATIC, the PROCESS is in timer displays “\~” water level is not set up in this state. If PROGRAM is “FUZZY”, press “program ‘01’. Press “START/PAUSE” directly by press “PROGRAM” to choose “02” HEAVY, if the machine is in the status of “01” FUZZY, the machine will start to automatically detect the weight and water level. - If there is water in the inner tube, the machine is under the state of non-fuzzy, the process will be displayed in the program time, water level is "7" (press "WATER LEVEL" in the timer displays "9"), the (Press "PROGRAM" in the digital timer display "01").
Activating the machine
Water inlet installation
Faucetselection
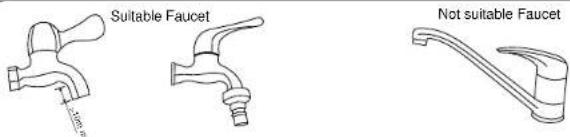
The front end should be longer than 10mm. The faucet exit end face should be flat and smooth, if not file it to avoid leakage
Connect the inlet hose connector with the faucet
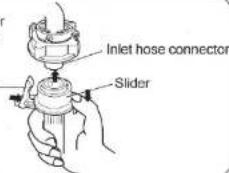
(1) Press the lower end of the lock lever and push down the slider, take off the inlet hose connector from the inlet hose, see illustration 1.
(2) Loosen the four bolts on the inlet hose connector till the faucet can be accessed, then set the inlet hose connector in the faucet, see illustration 2. (if the faucet caliber is larger and could not set into the inlet hose end, unscrew the four bolts and take out the bushing, faucet exit end must flat, otherwise it will leak, see illustration 3)
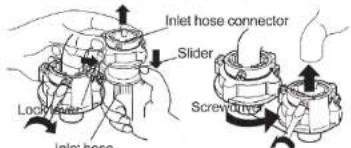
(3) Fasten the four bolts in the inlet hose connector evenly, see illustration 4.
(4) Twist the fastening nut as the illustration, see illustration 5.
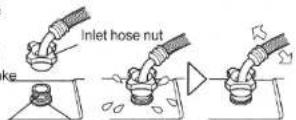
Remark: Before twisting the nut, remember that the threading is about 4mm above the upper surface of the nut, after twisting, the threading will now be less than 2mm above the upper surface of the nut, see Illustration 6.
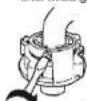
Illustration 4
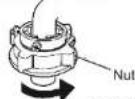
Illustration 5

Before twisting about 4mm
After twisting less 2mm
Illustration 6
Water inlet installation
Connect the inlet hose with the washing machine
- Do not take off the water absorption cushion. Please
check if the cushion is dropped or damaged before
each usage. If it is, contact the seller immediately.
-
Put the inlet hose nut on the inlet valve connector.
-
Fasten the inlet hose nut and swing it gently to make
sue if it is suitable.
Inlet valve connector
Water absorption cushion
Cautions: When installing the washing machine, please use the bottom end of the new hose along with the washing machine, old bottom end of the hose can not reuse after.
Connect the inlet hose connector with the inlet hose
-
Push down the slider, insert the inlet hose into the connector
-
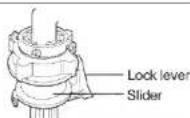
Hang the lock lever to the inlet hose connector and release
the slider till a click sound is heard.
Lock lever
Check the connection between inlet hose
connector and the faucet
-
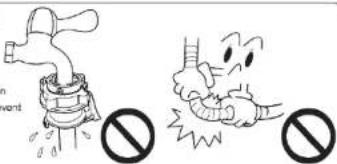
Swing the inlet hose gently to confirm if it is fastened.
-
After installation, open the tap and check if it leaks.
-
Do not bend the inlet hose with overstrain.
-
Before each usage, check the connection between
Inlet hose connector and the bucket, and the installation of light base. Make sum they are finally offered to our end
of inert notes. Make sure they are finlty attached to prove it dropping from improper installation position
Dismantle the inlet hose
-
Close the tap.
-
Press the locking lever, push down the slider, and pull of the
inlet hose. If the machine is used frequently, the connector
of the inlet hose can be kept on the tap to prevent damaging
the fixing screw.
Preparation before operation
Preparation before washing
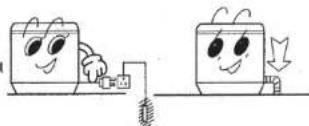
- Connect the inlet hose and open the tap.
- This appliance must be rooted. Confirm
the socket if rooted reliably and insert the
power plug. The rooted terminal should not
link to gas pipeline, tap pipeline etc.
- Put down the drain hose.
natural_image
Illustration of two cartoon characters interacting with a battery and plug, no text or symbols presentWarning: the temperature of the water should less than 50!
Load laundries
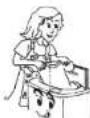
- Know the capacity of washing and spinning process of the machine based on the weight
of the laundries under dry condition. Washing quantity shall be lower than the rated capacity. The maximum capacity of this machine is 8.0kg. - Different thickness, size and type of the laundries will influence the actual washing
capacity. It is suitable that the laundries can be turned round normally during washing. - Do not select high water level when laundries are less than
1.5kg to avoid water splashing
Use of detergent
Detergent box
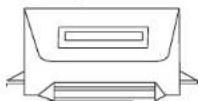
How to use bleach
●Fill up a container with water, dilute
the bleach in the container, and pour it slowly into the washing
lub.
●Do not use bleach for colored or figured laundries as they are prone
to lose colors.
●Do not put bleach to laundries
directly.
and quantity of the bleach.
●Please dissolve powder bleach
- It is suggested to use low water washing pads or
For the quantity of the concentrated washing powder, please refer to its manual.
Remarks: Avoid splashing of water and waste of washing powder, water level should not be too
high if soundies are too small.
● Remove the dispenser box before adding detergent
● Pour concentrated synthetic washing powder into
the box directly as shown in the left illustration.
- The disagree on the washing powder, please refer to
below it is suggested to use low detergent washing
powder
How to use the washing powder
• Dissolve in the machine directly not suitable for
presd program
1. Low waist level
2. Add the washing powder, and run the machine for
30 seconds to discharge in completely.
- The instant dissolution of the soconic powder
1. Prepare warm water of 30%a container
2. Pour the powder while stirring to fully dissolve it.
- The washing powder is more prone to pollute the
launches than the detergent, therefore, please use
with proper quantity.
- Washing powder with poor quality or not used for a
long portion may get blocked please clean the detergent box in regular.
- Other functions
- Imbalance adjustment
- Power supply is cut off automatically
- Child lock function
- Troubleshooting
- SPECIFICATION
- IMPORTANT SAFEGUARDS
- Operation steps
- Cleaning Instruction
- Installation and adjustment
- Installing the bottom cover
- Positioning
- How to use drain hose
- Install drain hose
- How to change the direction of the drainhose
- Water drainage
- Control panel guide
- Child-Lock Function
- Activating the machine
- Water inlet installation
- Connect the inlet hose connector with the faucet
- Connect the inlet hose with the washing machine
- Connect the inlet hose connector with the inlet hose
- Check the connection between inlet hose
- connector and the faucet
- Dismantle the inlet hose
- Preparation before operation
- Preparation before washing
- Warning: the temperature of the water should less than 50!
- Load laundries
- Use of detergent
Brand : Imarflex
Model : IWM-800TL
Category : Washing machine