MatrixPad P10 - Graphic tablet Vankyo - Free user manual and instructions
Find the device manual for free MatrixPad P10 Vankyo in PDF.


| Product Type | Graphic Tablet |
| Model | MatrixPad P10 |
| Brand | Vankyo |
| Display | 10.1-inch (approx) touchscreen |
| Processor | Quad-core (estimated) |
| Operating System | Android (Google Play supported) |
| Memory (RAM) | 2GB/3GB (typical for budget tablet) |
| Storage | 32GB/64GB (expandable via microSD up to 512GB) |
| Battery | Rechargeable Li-ion, 6000mAh (estimated) |
| Charging | USB-C, original adapter recommended |
| WiFi | Dual-band 2.4GHz/5GHz |
| Bluetooth | Yes, 5.0 (estimated) |
| Cameras | Front-facing and rear camera |
| Ports | USB-C, Micro HD, headphone jack, memory card slot |
| Connectivity | WiFi, Bluetooth, HDMI (via Micro HD), OTG (cable required) |
| Screen Mirroring | Wired (HDMI) and wireless (Cast) |
| Keyboard Support | Yes, via keyboard pins |
| Weight | Approx. 500g (estimated) |
| Dimensions | Approx. 240 x 160 x 8 mm (estimated) |
| Maintenance | Clean screen with soft cloth; avoid dust and grease |
| Safety Warning | Do not replace battery yourself; avoid heat; dispose of battery per local laws |
| Spare Parts | Optional: OTG cable, HDMI cable, memory card |
Frequently Asked Questions - MatrixPad P10 Vankyo
User questions about MatrixPad P10 Vankyo
0 question about this device. Answer the ones you know or ask your own.
Ask a new question about this device
Download the instructions for your Graphic tablet in PDF format for free! Find your manual MatrixPad P10 - Vankyo and take your electronic device back in hand. On this page are published all the documents necessary for the use of your device. MatrixPad P10 by Vankyo.
USER MANUAL MatrixPad P10 Vankyo
natural_image
Line drawing of a tablet device with a scroll and control panel (no text or symbols)USER GUIDE
Please read this instruction throughly before using this product and keep it for future reference.
SERVICE
Need quick help on using your tablet?
Need information about repairs or replacement parts?
Here are the ways to look for help:
Email Address:
North America: support@ivankyo.com
United Kingdom: support.uk@ivankyo.com
CONTENTS
PRODUCT OVERVIEW 01
GETTING STARTED 02
Charge 02
Power On/Off 02
Battery 02
Sleep Mode 03
Screenshot 03
HOME SCREEN 04
Home Screen Overview 04
Home Settings, Widgets and Wallpapers 04
SETTING BASICS 05
Quick Settings 05
More Settings 06
NETWORK CONNECTION 11
WiFi Connection 11
Bluetooth Pairing 12
APP MANAGEMENT 12
App Download and Installation 12
App Management 13
INTERNET NAVIGATION 13
MULTIMEDIA 13
Connecting to a Computer 13
Connecting to an External Device 15
Screen Mirroring 16
TROUBLESHOOTING 17
PRODUCT OVERVIEW
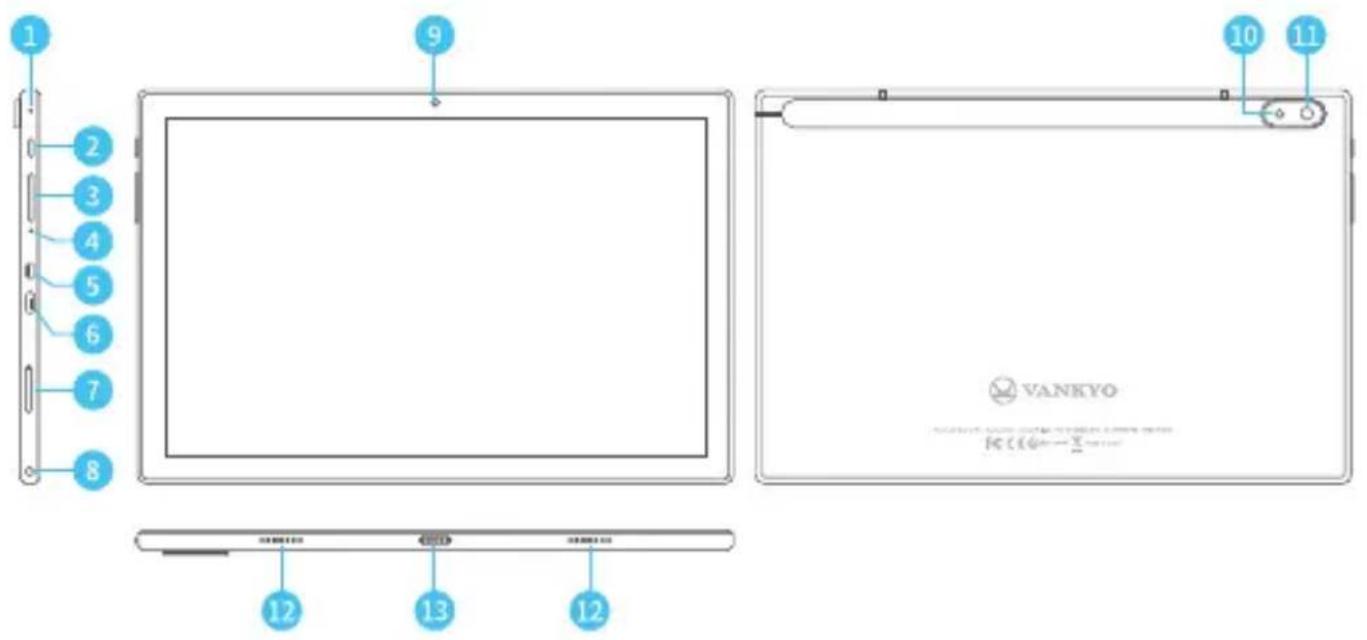
- Microphone
- Headphone Jack
- Power Button 9. Front-facing Camera
- Volume +/- 10. Flash
- Reset Hole 11. Rear Camera
- Micro HD Port 12. Speakers
- USB-C Port 13. Keyboard Pins
- Memory Card Slot
* Google, Android, Google Play and other marks are trademarks of Google LLC.
GETTING STARTED
Charge
* If the tablet cannot be powered on at your first try, please charge it for more than 30 minutes, then try again.
* It is recommended that you fully charge the device before using your device for the first time.
For a quick check of the battery level:
* View the battery status icon on the upper right of the Home Screen when the tablet powered on:
During Charging: 71%
Fully Charged: 100%
* View the battery charge indicator on display when the tablet powered off:
During Charging: 71%
Fully Charged: 100%
Power On/Off
* Press and hold the power button for 4-5s to turn on your tablet. Select your language and set up your tablet following the start guide.
* Press and hold the power button for 2s, then release it. It will show Power off, Restart and Screenshot on the screen. Tap Power off to turn off the tablet.
* Press and hold the power button for 8s to do a forced reboot when it's frozen.
Battery
* A rechargeable Li-ion battery is installed in the tablet.
* DO NOT attempt to replace the tablet battery by yourself because you may damage the battery, which might cause overheating, fire or injury.
* DO NOT dispose of tablet in a fire.
EN
* DO NOT expose the tablet battery to any heat source, direct sunlight or high temperature.
* Only use the ORIGINAL power adapter provided by us to charge the tablet battery.
* We suggest you drain the battery completely once a month if only use your tablet occasionally.
* The Li-ion battery in your tablet should be serviced or recycled by an authorized service provider, and must be recycled or disposed of separately from household waste.
* Dispose of battery according to your local environmental laws and regulations.
Sleep Mode
Simply press the power button once to switch the tablet to the Sleep Mode when the tablet is ON; press again to wake it up.

Tip:
Go to Settings > Display > Screen timeout to set the time of entering the Sleep Mode.
Screenshot
* Press the Volume-button and the Power On/Off button for 2 seconds to capture a picture.
* Press and hold the power button for 2s, then release it. It will show Power off, Restart and Screenshot on the screen. Tap Screenshot to capture a screenshot.
HOME SCREEN
Home Screen Overview

- Status icons
- Google Search Bar
- Back
- Home Screen
- Recent Activities
Home Settings, Widgets and Wallpapers

Tap and hold the empty section of a Home Screen, Home Settings, Widgets and Wallpapers will be displayed.
* Tap Home Settings to enable/disable Add app icon to Home screen. This is applicable to the new Apps installed from Play Store.
* Tap Widgets, touch and hold any application (e.g. Clock), then slide and add it to a Home Screen. Remove it by sliding it to X Remove.
* Tap Wallpapers to change the current wallpaper of the tablet from the default Wallpapers or Gallery Go.
SETTING BASICS
Quick Settings
Swipe down from the top of the screen to access Quick Settings.
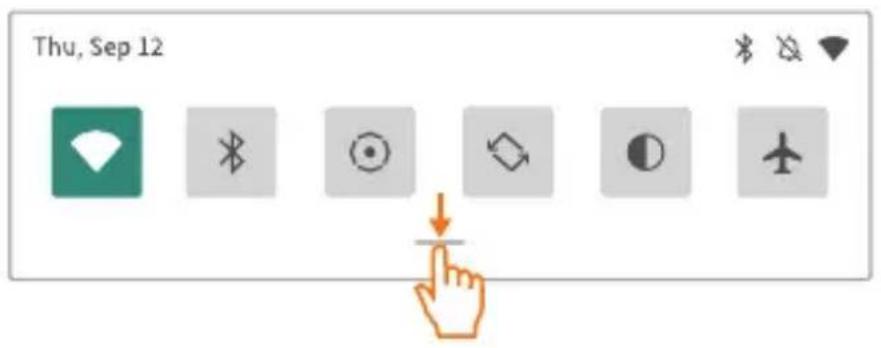


: WiFi. Tap to connect/disconnect to a wireless network
: Bluetooth. Enable/disable the Bluetooth of the tablet
● : Screen Record. Tap to begin recording your activity on the screen; tap again to stop
: Auto-rotate. Turn on/off the Auto-rotate of the screen
● : Dark theme. Enable/Disable Night Mode
: Airplane mode. Turn on/off all the network connectivity
: Eye comfort. The blue light will be filtered out and the screen will take on a tint of yellow after enabling this option
☐ : Read Mode. The screen will be black and white after enabling this option
: Location. Enable/disable location access
⊖ : Do Not Disturb. Mute sound and prevent notifications of Apps after enabling this function
+: Battery Saver. Tap to choose the power setting you prefer to save the battery time
XX: Nearby Share. Enable to instantly share files, links, pictures, and more with nearby devices that support Nearby Share
Tap the 🔗 icon to change the options in the Quick Settings. Long press each icon to enter the interface of its detailed settings.
More Settings
Go to Quick Settings, then tap the ⚙️ icon to enter the detailed setting interface. Or, tap Settings App on the Home screen to enter.
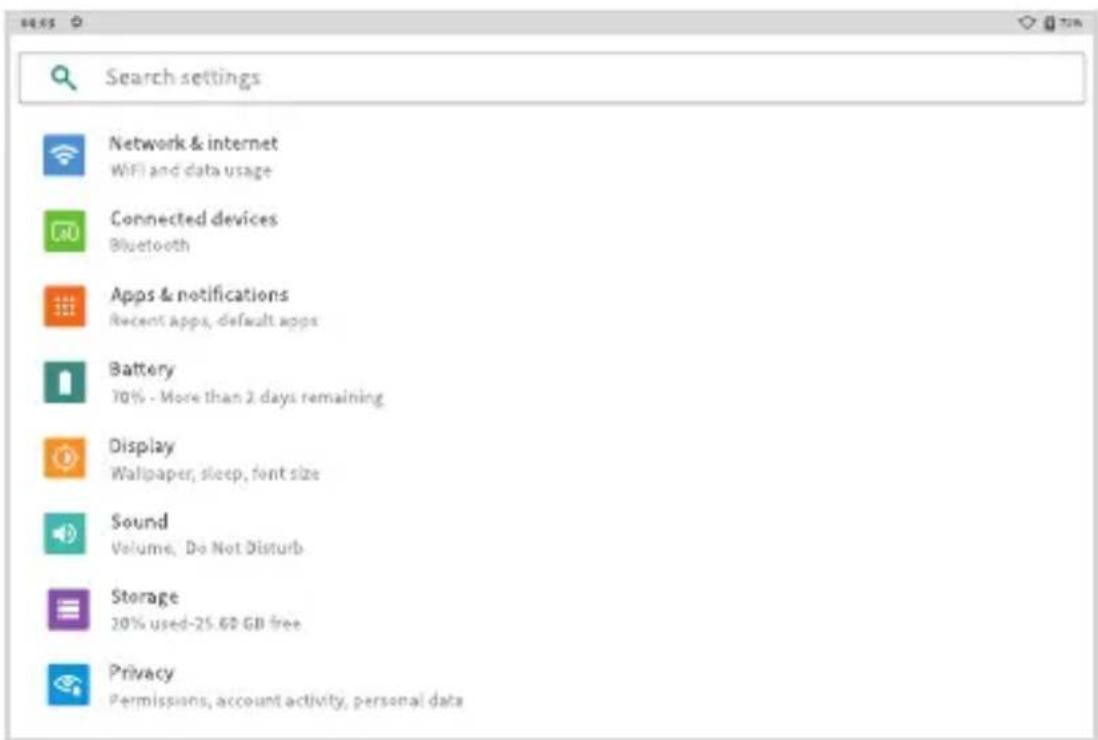

Network & internet
* Connect to any working WiFi
* Monitor the data usage
* Enable/disable the Airplane Mode
* Add VPN connections
Connected devices
* Pair with Bluetooth devices and check the paired devices
* Turn on/off Bluetooth
* Check the connection status of the cast devices
* Add and check printers
* Check the received files from other devices via Bluetooth connection
* Enable Nearby Share to share files with nearby devices that support this function
and more
Apps & notifications
* Check the Apps recently opened
* Check all the Apps on the tablet
* Adjust App notification settings
* Check the screen time for Apps
* Set default apps
* Set the App permissions
* Set special app access
Battery
* Display the remaining battery power as a percentage
* Enable/disable Battery Saver
* Enable/disable Battery percentage and Battery Manager
* Check the time for Last full charge and Screen usage since full charge
Display
* Adjust the screen brightness
* Enable/disable the Night Light and Dark theme
* Change the wallpaper
* Adjust the time of entering the Screen timeout
* Adjust the Font size, Display size and Lock screen
* Set the Screen saver and more
Sound
* Set sound level for Media, Alarm and Notification
* Enable/disable Do Not Disturb to mute sound and prevent notifications of Apps
* Set default notification sound and alarm sound
* Enable/disable Screen locking sounds, Charging sounds and Touch sounds and more
EN
Storage
* View and manage your storage space
Privacy
* Set app permissions
* Set to show/hide the password when input a password
* Set the Lock screen preferences
* Add an account and autofill service from google and more
Location
* Check recent location requests
* Turn on/off the location services for specific apps
* Set apps that have access to location
* Enable/disable WiFi and Bluetooth scanning and more
Security
* Check the security status
* Set screen lock pattern, e.g. Swipe, Pattern, PIN and Password
* Set Face Unlock
* Choose a Smart Lock to keep the device unlocked if you preset a lock pattern
* Allow the admin app to Find My Device and lock or erase a lost device and more
Accounts
* Add and manage the user accounts on your tablet
Accessibility
* For vision and hearing impaired users, manage settings for SCREEN READERS, DISPLAY, INTERACTION CONTROLS, AUDIO & ON-SCREEN TEXT and EXPERIMENTAL
Digital Wellbeing & parental controls
* Check your app usage based on Screen time, Notifications received, or Times opened from Dashboard
* Set Focus mode to pause distracting apps when you need time to focus
* Manage the related notification settings to reduce interruptions
* Set up Parental controls to help your kids balance their screen time
* Set the preferences for Google™ related services
Duraspeed
* Restrict third-party apps from running in the background to help foreground apps run smoothly and quickly
System
* Set Language
Tap Languages & input > Languages > + Add a language to add your language. After adding, hold and slide the = to the top to change the language
* Enable the gesture control for quickly accessing the camera
* Set the date and time
* Turn on/off the Back up to Google Drive
* Restore factory setting
Tap Reset options > Erase all data (factory reset) to restore the factory setting and more
EN
About tablet
* Check the detailed information about the tablet
NETWORK CONNECTION
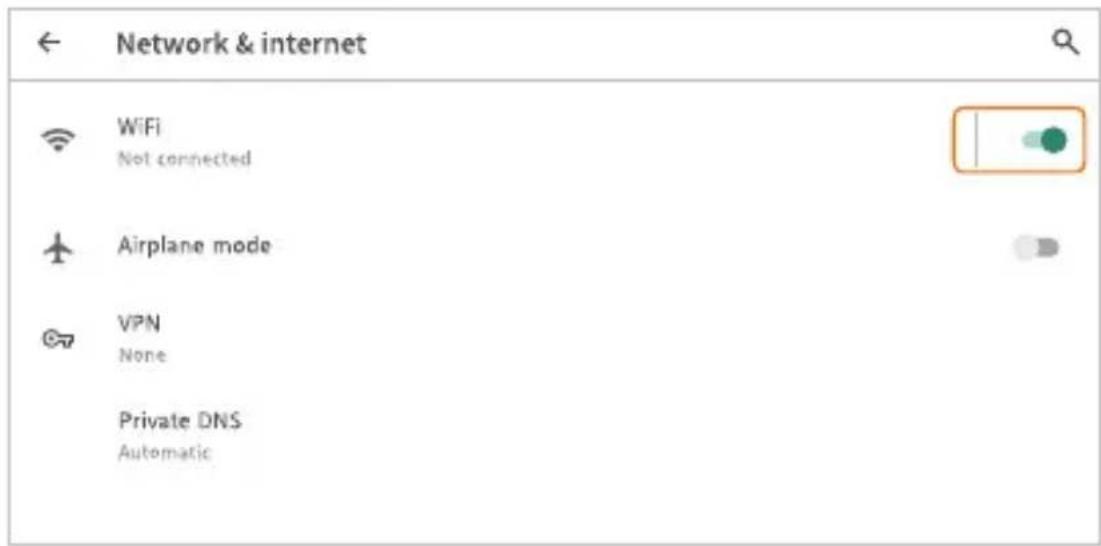
Launch the App Settings or long press the WiFi/Bluetooth icon in Quick Settings.
WiFi Connection
1 Tap Network & internet and turn on the WiFi. All the WiFi connections available will be listed.
2 Select your WiFi and input the correct password.

Bluetooth Pairing
Please turn on the Bluetooth on your Bluetooth devices firstly.
1 Go to Connected devices > Connection preferences > Bluetooth to turn on the Bluetooth on your tablet.
2 Tap +Pair new device to enter the scanning interface. Devices available will be displayed after a few seconds.
3 Tap the desired device to get a paring code and click PAIR on both devices. The automatic connection is applied to some devices.
APP MANAGEMENT
App Download and Installation
1 Tap and open Play Store on the Home Screen.
2 Log into your Google Account, then search and download the App you need.
EN
App Management
Move the App
Tap and hold the App, then slide it to a desired screen.
Remove the App from the Home screen
Touch and hold the App, then slide to X Remove to remove it from your Home Screen.
Uninstall the App
Touch and hold the App, then slide to the ☐ Uninstall to uninstall the App.
Clear the Cache of the App
1 Go to Settings > Apps & notifications.
2 Select an App > Storage & cache > CLEAR CACHE to clear the cache.
INTERNET NAVIGATION
Please make sure the tablet is connected to a working WiFi network before navigating the Internet.
You may use the pre-installed Chrome browser or use another browser downloaded on the Play Store.
MULTIMEDIA
Connecting to a Computer
1 Connect your tablet to the computer with a USB-C cable.
2 File Transfer is the default setting. Go to your computer and find your tablet P10 to transfer files between your tablet and computer.

Tips:
Go to Quick Settings, tap Android System · USB file transfer turned on > Tap for more options > USB Preferences to select the option preferred.
1 Select File Transfer to transfer files between the devices.
2 Select MIDI to play MIDI instruments on the tablet.
3 Select PTP to transfer photos between the devices.
4 Select No data transfer to charge your tablet only.


Connecting to an External Device
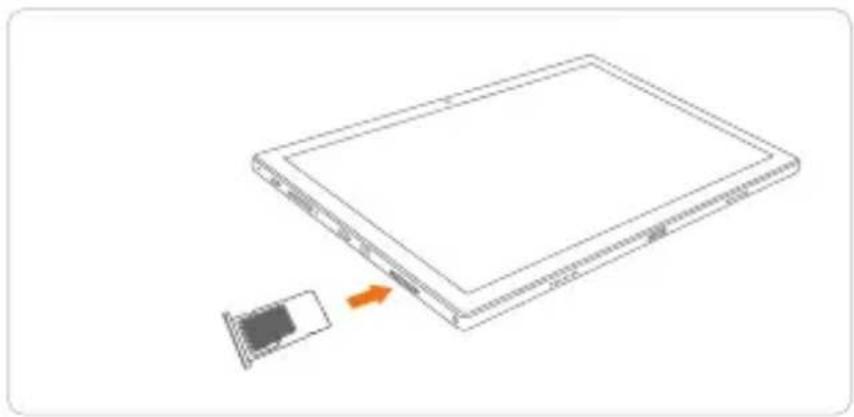
1 Install a memory card (up to 512GB) into the memory card slot when the tablet is off.
natural_image
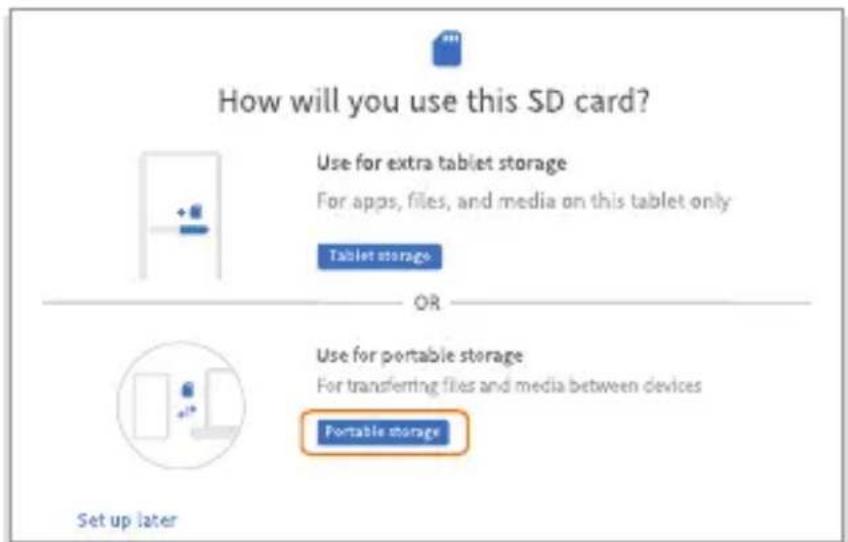
Diagram showing a device with an orange arrow pointing to a small black component, no text or symbols present.2 Turn on the tablet, then go to Quick Settings and tap SET UP.
3 Set the memory card as a portable storage by selecting Portable storage. Enter memory card storage to move files between the card and tablet.

Screen Mirroring
Option 1: Wired Connection
Use an HDMI cable to connect the tablet to a compatible device via the Micro HD port.

Tip:
HDMI enabled is required for wired connection. Go to Settings > Display > Advanced > HDMI settings > HDMI to check if it's on when the screen mirroring is not working.
EN
Option 2: Wireless Connection
Step 1:
Connect the tablet and a compatible device to the same WiFi network. Please make sure the WiFi is stable and smooth.
Step 2:
Go to Settings > Connected Device > Connection Preferences > Cast, tap : and turn on "Enable wireless display".
Step 3:
Wait a few seconds for search results and select your compatible device to start connection.
TROUBLESHOOTING
If you have any questions, please feel free to contact VANKYO support at support@ivankyo.com(CA/US) or support.uk@ivankyo.com(UK).
Q1. The tablet doesn't power on.
* Reboot your tablet after charging for more than 30 minutes.
* Press the power button to check if the tablet is in the Sleep Mode.
* Press and hold the power button for 8s to reboot it.
* Insert the pin into the Reset Hole to power off the tablet, then try again to power on the tablet.
Q2. The tablet doesn't charge.
* Make sure the USB cable is properly plugged into the charging port.
* Try another compatible USB cable and adapter.
Q3. Error message occurs during the operation.
* Uninstall the App with error message, then download and install again.
* Insert the pin into the Reset Hole to power off the tablet, then power on the tablet to try again.
Q4. The tablet cannot be detected by the computer.
* Make sure the tablet is powered on.
* Try another USB cable.
* Try another USB port on the computer.
* Instead of No data transfer, choose File Transfer or PTP when connecting the tablet to the computer.
Q5. The tablet cannot connect to the WiFi.
* Make sure the WiFi in your tablet is ON.
* Make sure you input the correct password when connecting the WiFi.
* Restart the router.
* Make sure there is no filter setting or device connection limitation in the setting of the router.
* Forget the current WiFi, reset the router and connect to the WiFi again.
Q6. The storage space of the tablet is not enough.
* Delete the Apps you don't use.
* Clear the cache of the Apps regularly.
* Install a memory card to expand the storage.
Q7. The screen is unresponsive.
* Check if the screen is dusty or greasy. If yes, please gently wipe the screen with a cloth to clean it.
* Insert the pin into the Reset Hole to power off the tablet, then power on the tablet to try again.
EN
Q8. The font size is too small to read.
* Please go to Settings > Display > Advanced > Font Size to adjust the text size.
Q9. Can the tablet support OTG function?
* Yes, but an extra OTG cable is required. You can connect the mouse or a USB drive through the cable then.
Q10. The tablet comes with scratches on the screen.
* Check if the scratches are on the film. If yes, please remove the film.
Q11. How to use your voice to search a fact?
* Tap the microphone icon on Google Search bar, tell the tablet what you want to know and it will show you the search results.
Frequency Range:
| Bluetooth/BLE | 2402-2480MHz(TX/RX) |
| 2.4G WiFi | 2412-2472MHz(TX/RX) |
| 5G WiFi | 5150-5250 MHz, 5725-5850MHz(TX/RX) |
| BDS B1I/ Galileo E1/GPS L1 C/A | 1559-1610MHz (RX) |
| FM | 87.5-108MHz (RX) |
Transmit Power:
| Bluetooth | <3dBm |
| BLE | <1dBm |
| 2.4G WiFi | <13dBm(802.11b/802.11g/802.11n-HT20) |
| 5G WiFi | 5150-5250 MHz:<13dBm (802.11a/802.11n20/802.11n40/802.11ac20/802.11 ac40/802.11 ac80)5725-5850MHz:<7dBm (802.11a/802.11n20/802.11n40/802.11ac20/802.11ac40/802.11 ac80) |
FCC Caution
Any Changes or modifications not expressly approved by the party responsible for compliance could void the user's authority to operate the equipment.
This device complies with part 15 of the FCC Rules. Operation is subject to the following two conditions:
(1) This device may not cause harmful interference, and
(2) this device must accept any interference received, including interference that may cause undesired operation.
This equipment complies with FCC radiation exposure limits set forth for an uncontrolled environment.
EN
Note:
This equipment has been tested and found to comply with the limits for a Class B digital device, pursuant to part 15 of the FCC Rules. These limits are designed to provide reasonable protection against harmful interference in a residential installation. This equipment generates, uses and can radiate radio frequency energy and, if not installed and used in accordance with the instructions, may cause harmful interference to radio communications. However, there is no guarantee that interference will not occur in a particular installation. If this equipment does cause harmful interference to radio or television reception, which can be determined by turning the equipment off and on, the user is encouraged to try to correct the interference by one or more of the following measures:
—Reorient or relocate the receiving antenna.
—Increase the separation between the equipment and receiver.
—Connect the equipment into an outlet on a circuit different from that to which the receiver is connected.
—Consult the dealer or an experienced radio/TV technician for help.
This transmitter must not be co-located or operating in conjunction with any other antenna or transmitter.
ISEDC Requirements
This device complies with Innovation, Science, and Economic Development Canada licence-exempt RSS standard(s). Operation is subject to the following two conditions:
(1) this device may not cause interference, and
(2) this device must accept any interference, including interference that may cause undesired operation of the device.
The device has been tested and comply with IC SAR limits.
Operation of this device in the band 5150-5250 MHz is restricted to indoor use only.
This transmitter must not be co-located or operating in conjunction with any other antenna or transmitter.
RISK OF EXPLOSION IF BATTERY IS REPLACED BY AN INCORRECT TYPE. DISPOSE OF USED BATTERIES ACCORDING TO THE INSTRUCTIONS

The symbol indicates DC voltage

RECYCLING
This product bears the selective sorting symbol for Waste electrical and electronic This equipment (WEEE). This means that this product must be handled pursuant to European directive 2012/19/EU in order to be recycled or dismantled to minimize its impact on the environment.
EN
User has the choice to give his product to a competent recycling organization or to the retailer when he buys a new electrical or electronic equipment.
This product can be used across EU member states.
The device complies with RF specifications when the device used at 5mm form your body.
EU Compliance Statement: Shenzhen VanTop Technology & Innovation Co., Ltd. hereby declares that this device is in compliance with the essential requirements and other relevant provisions of the Directive 2014/53/EU.
A copy of the EU Declaration of Conformity is available online at https://doc.vantop.com/
Notes:
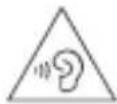
- High Sound Pressure
- Hearing Damage Risk
- Do not listen at high volume levels for long periods.

| BE | BG | CZ | DK | DE | EE | IE | EL |
| ES | FR | HR | IT | CY | LV | LT | LU |
| HU | MT | NL | AT | PL | PT | RO | SI |
| SK | FI | SE | NO | IS | LI | CH | TR |
In all EU member states, operation of 5150-5250 MHz is restricted to indoor use only.
- USER GUIDE
- SERVICE
- Email Address:
- CONTENTS
- NETWORK CONNECTION 11
- APP MANAGEMENT 12
- INTERNET NAVIGATION 13
- TROUBLESHOOTING 17
- PRODUCT OVERVIEW
- GETTING STARTED
- Charge
- Power On/Off
- Battery
- EN
- Sleep Mode
- Tip:
- Screenshot
- HOME SCREEN
- SETTING BASICS
- Quick Settings
- More Settings
- Network & internet
- Connected devices
- Apps & notifications
- Display
- Sound
- Storage
- Privacy
- Location
- Security
- Accounts
- Accessibility
- Digital Wellbeing & parental controls
- Duraspeed
- System
- About tablet
- NETWORK CONNECTION
- WiFi Connection
- Bluetooth Pairing
- APP MANAGEMENT
- App Download and Installation
- Move the App
- Uninstall the App
- Clear the Cache of the App
- INTERNET NAVIGATION
- MULTIMEDIA
- Connecting to a Computer
- Tips:
- Connecting to an External Device
- Screen Mirroring
- Option 1: Wired Connection
- Option 2: Wireless Connection
- Step 1:
- Step 2:
- Step 3:
- TROUBLESHOOTING
- Q1. The tablet doesn't power on.
- Q2. The tablet doesn't charge.
- FCC Caution
- Note:
- ISEDC Requirements
- Notes:
Brand : Vankyo
Model : MatrixPad P10
Category : Graphic tablet