
Pegas - Tricycle Chipolino - Free user manual and instructions
Find the device manual for free Pegas Chipolino in PDF.


| Product Type | Tricycle |
| Brand | Chipolino |
| Model | Pegas |
| Recommended Age | 1 to 5 years |
| Maximum Weight Capacity | 25 kg |
| Number of Wheels | 3 |
| Features | Adjustable canopy, parent push handle, safety bumper, adjustable foot rest (3 positions), reclining seat, reversible seat (parent-facing or forward-facing), front and rear storage baskets |
| Materials | Plastic, metal, textile (100% polyester) |
| Assembly Required | Yes, by an adult only |
| Brakes | No brakes |
| Usage | Indoor/outdoor on even playgrounds, away from traffic |
| Maintenance | Clean with soft damp cloth and water or neutral detergent; do not soak; oil moving parts regularly; store in dry place away from heat and sunlight |
| Spare Parts | Use only producer-approved spare parts; contact retailer or authorized service center |
| Safety Warnings | Use under direct adult supervision; not suitable for children under 1 year; maximum weight 25 kg; no brakes; remove parent handle when child rides alone; avoid water, sand, stairs, pools |
Frequently Asked Questions - Pegas Chipolino
User questions about Pegas Chipolino
0 question about this device. Answer the ones you know or ask your own.
Ask a new question about this device
Download the instructions for your Tricycle in PDF format for free! Find your manual Pegas - Chipolino and take your electronic device back in hand. On this page are published all the documents necessary for the use of your device. Pegas by Chipolino.
USER MANUAL Pegas Chipolino
This product is produced in accordance with requirements of Toy safety Directive 2009/48/EC of the European Parliament and the Council, Regulation regarding Essential Requirements and Conformity Assessment of Toys, Regulation regarding Conformity Marking and the standards applicable for this toy.
FOLLOW ALL WARNINGS, INSTRUCTIONS AND RECCOMENDATIONS IN THIS MANUAL IN ORDER TO GUARANTEE THE SAFE USE OF THIS PRODUCT:
CAUTION! WARNINGS!
CAUTION! USE ONLY UNDER DIRECT ADULT SUPERVISION!
CAUTION! THIS TOY HAS NO BRAKES!
CAUTION! THE TOY IS NOT SUITBALE FOR CHILDREN UNDER 1 YEAR!
✿ CAUTION! USE FOR CHILDREN OLDER THAN 1 YEAR AND WEIGHT UP TO 25kg.
✿ CAUTION! DO NOT USE FOR CHILDREN OVER 25KG – DANGER OF OVERLOADING THE TOY!
✿ CAUTION! BEFORE USING THE TRICYCLE, TEACH THE CHILD THE CORRECT WAY TO USE IT AND THE SAFETY RULES.
CAUTION! USE THE TOY ONLY FOR ITS PURPOSE.
✿ CAUTION! USE THE TOY ONLY DURING THE DAY ON EVEN PLAYGROUNDS AND AT A SAFE DISTANCE FROM STREETS OR ROAD LANES FOR VEHICLES.
✿ CAUTION! TO AVOID THE DANGER OF INJURY ALWAYS REMOVE THE PUSH HANDLE WHENEVER THE CHILD IS RIDING THE TOY ON HIS OWN!
CAUTION! KEEP AWAY FROM FIRE OR OTHER HEAT SOURCES!
- Assembly of the TOY to be made ONLY by an adult!
DO NOT allow presence of children under 3 years before assembly of the TOY is complete. In this way, you will avoid their access to small or loose parts!
The TOY is intended for one child at a time ONLY!
DO NOT allow children to push the tricycle!
The TOY is NOT suitable for running or skating!
Cease using the TOY if you find missing or damaged parts.
DO NOT let the child stand on the footrest or the seat to avoid injury.
The child must wear shoes when using the TOY!
DO NOT tie strings or accessories to the TOY in order to avoid the risk of suffocation!
DO NOT place more than 0,2 kg load in the front storage basket.
DO NOT place more than 0,5 kg load in the rear storage basket.
DO NOT put items or luggage in the handle bar or the parent handle in order to avoid risk of injury resulting from the toy's instability and tipping over!
DO NOT place items or heavy objects in the TOY or on it during storage or transportation to avoid damage to the frame.
DO NOT use another transport means to move the TOY by pulling it.
DO NOT allow the child using the TOY or other children around it to touch the wheels or put items in them.
Use away from rivers, pools, stairs or hurdles!
Do not make changes or modifications to the TOY frame! If necessary, contact the retailer or an authorized service center for advice and repair.
Use only spare parts, which are approved by the producer and recommended by the distributor or company service! The producer revokes all responsibility in case parts different from the original ones have been used.
- Keep nylon packages away from children to avoid risk of suffocation!
PRODUCT FEATURES
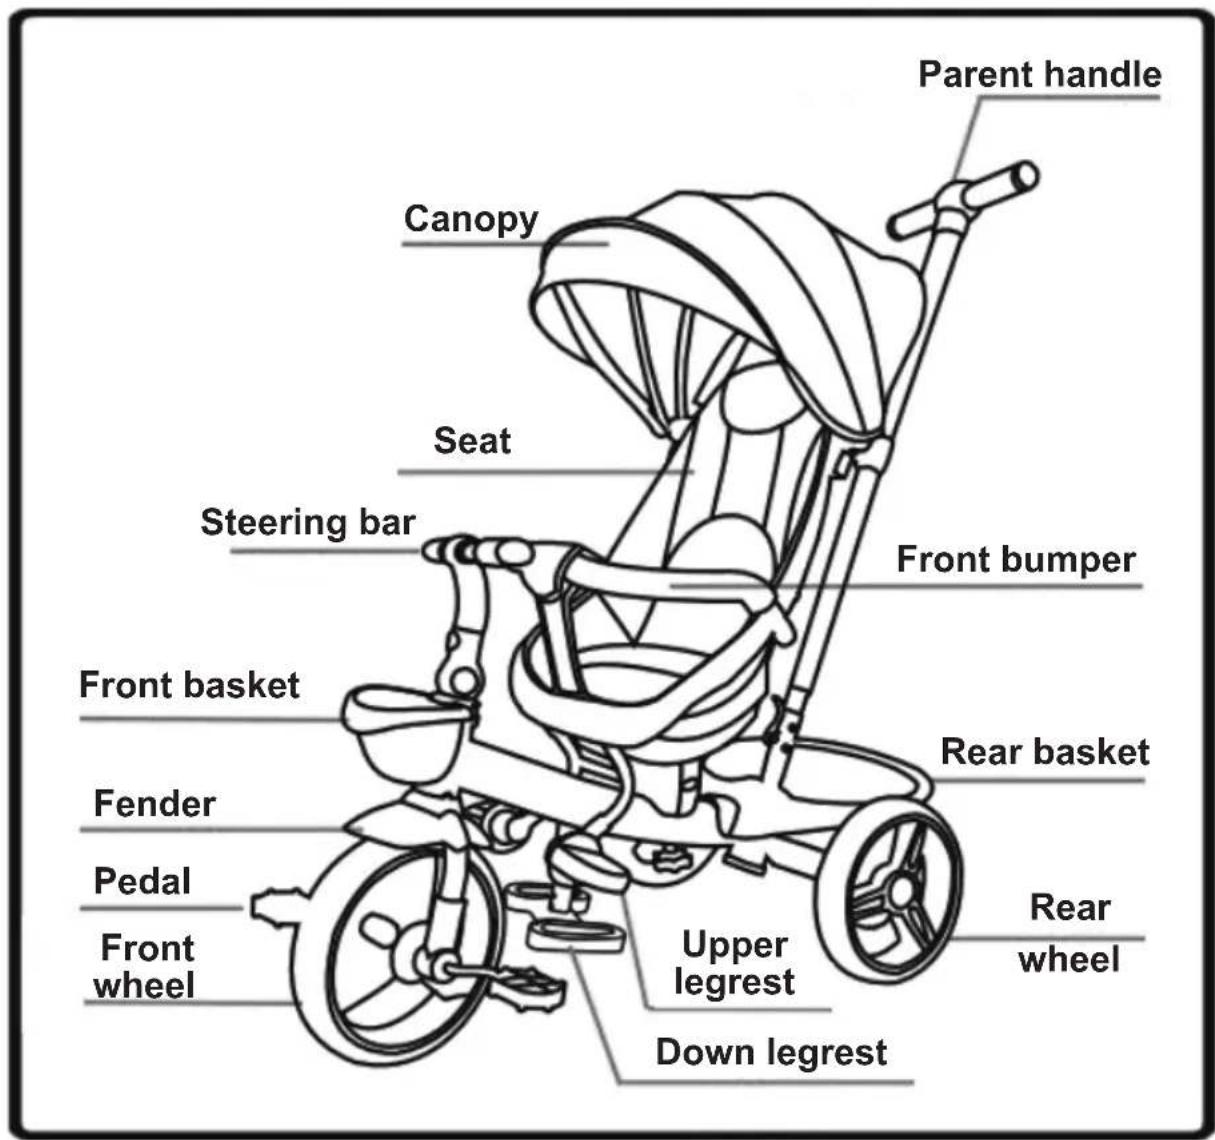
This is a functional TOY whose purpose is to create in the child initial skills to coordinate its arms and feet when riding a tricycle or bicycle.
IMPORTANT! Remove the parent handle when you are sure that the child can ride the tricycle on his own and unaided.
The TOY is suitable for children older than 1 year with weight up to 25 kg.;
❖ Recommended age – from 1 up to 5 years;
- Can be driven by the child using the pedals;
Can be pushed by an adult and the child lays his feet on the foot rest;
Safety bumper;
- Down leg rest adjustable in 3 height positions;
❖ Upper leg rest – used in parent facing mode;
◆ Adjustable canopy;
✿ Rear and front storage basket.
MAIN PARTS
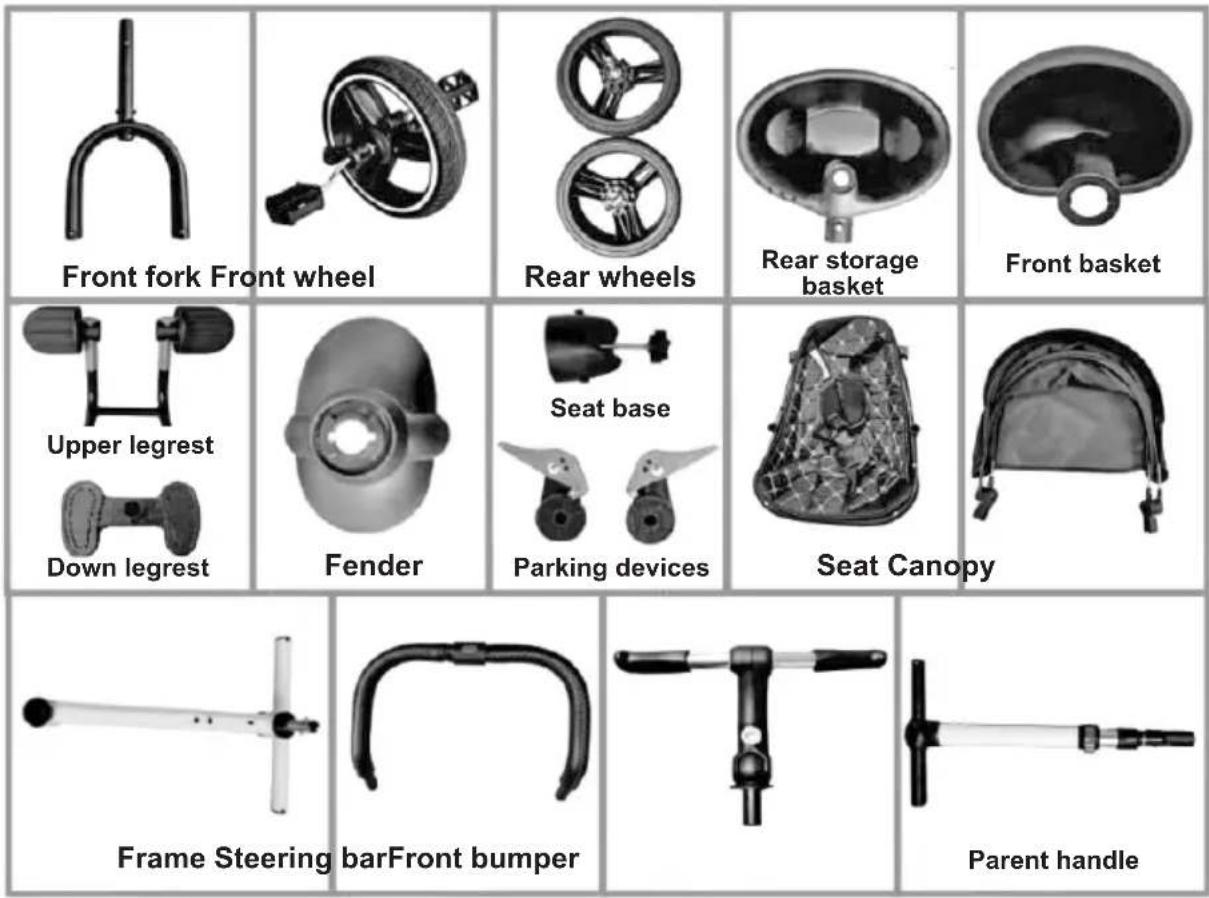
Please, make sure if these parts are in the package.
ASSEMBLY INSTRUCTIONS
IMPORTANT! Follow exactly the instructions given and check the pictures.
IMPORTANT! AFTER EACH OPERATION, MAKE SURE THAT YOU HAVE FOLLOWED THE INSTRUCTIONS CORRECTLY AND THE FIXING IS STABLE!
IMPORTANT! Tighten the screws well, without overtightening them. If screws are loose, this could lead to disassembly of some part and injure to the child!
Necessary tools: For TOY's assembly no tools are needed!
ASSEMBLY AND FUNCTIONS
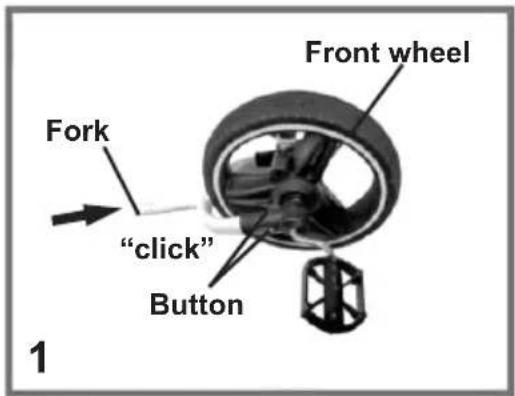
1. INSTALLING THE FORK TO THE FRONT WHEEL
Align the fork to the tube of front wheel. Press the buttons at the fork and insert it into the tubes of front wheel until you hear a click sound and buttons show from the openings.
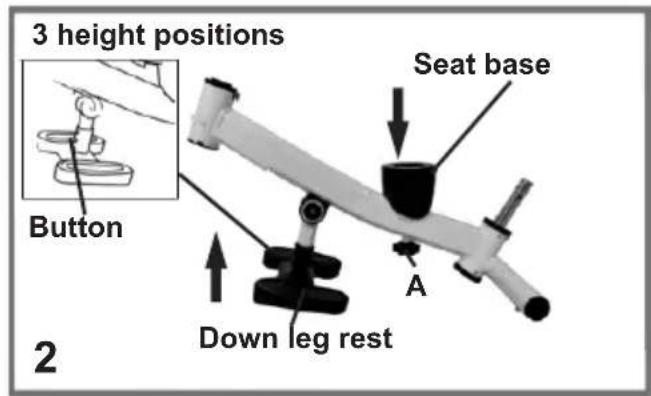
2. INSTALLING THE DOWN LEGREST AND SEAT BASE
Place the down leg rest to the frame as figure shows. Press the buttons at both sides at the frame tube and insert the leg rest until you hear a click sound and buttons show from the openings.
Adjusting the leg rest in 3-height position: Press both pins and set the leg rest up or down until you reach the desired position.
ATTENTION! WHEN PARENT IS PUSHING THE TOY, THE CILD MUST USE THE LEG REST, BUT WHEN CHILD RIDES THE TOY – THE LEG REST MUST BE REMOVED FROM THE FRAME.
Align the seat base to the frame and fix with the screw with plastic head A.
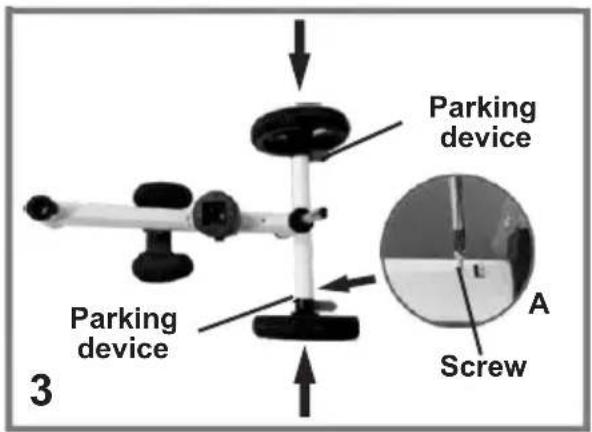
3. INSTALLING THE REAR WHEEL
Place each of the parking device to the rear tube of the frame and align with the tube's opening.
Insert each of the rear wheel axis into the openings at both sides of the rear tube and fic with screws as figure shows (view A).
Note: Make sure that wheels are stable fixed as try to pull them outwards.
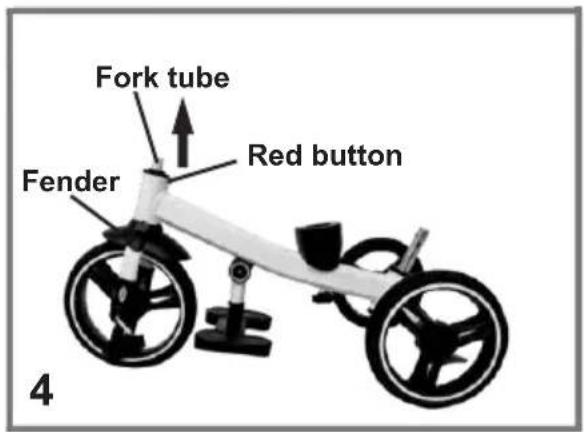
4. INSTALLING THE FRONT WHEEL
Place the fender onto the tube of front fork.
Insert the tube of the fork into the opening at front part of the frame and press to fix.
ATTENTION! By assembly, the pin of the fork tube must point towards the frame and must match the red button at frame tube.
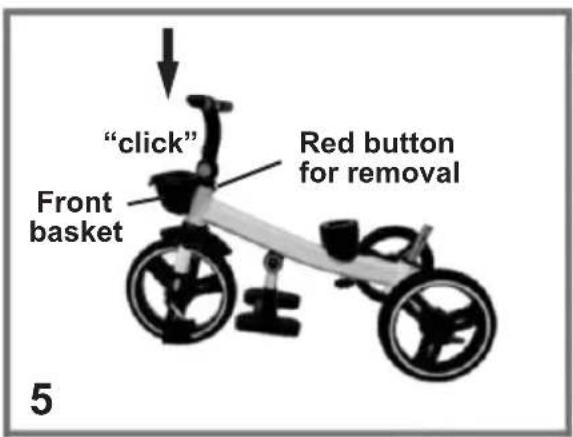
5. INSTALLING THE FRONT BASKET AND STEERING BAR
Place the front basket to front fork tube so that the profiles match well.
Place the steering bar and press until you hear a click sound and it fixes.
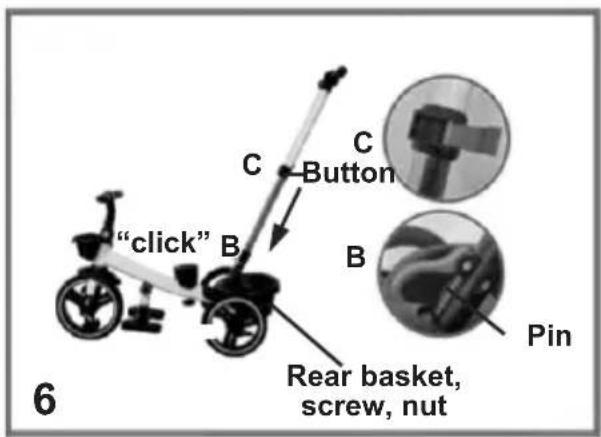
6. INSTALLING THE RAR BASKET AND PARENT HANDLE
Place the rear basket to the rear part of the frame. Fix with screw and nut.
Place the parent handle into the opening at the rear part of the frame. Press until the pin shows through the opening and you hear a click sound. To fix move upwards the lever of the locking mechanism B.
Pull outwards the lever of the locking mechanism C and after that pull the parent handle upwards until you hear a click sound.
To push the parent handle down, pull the lever of the locking mechanism C, press the button and set the handle in lower position.
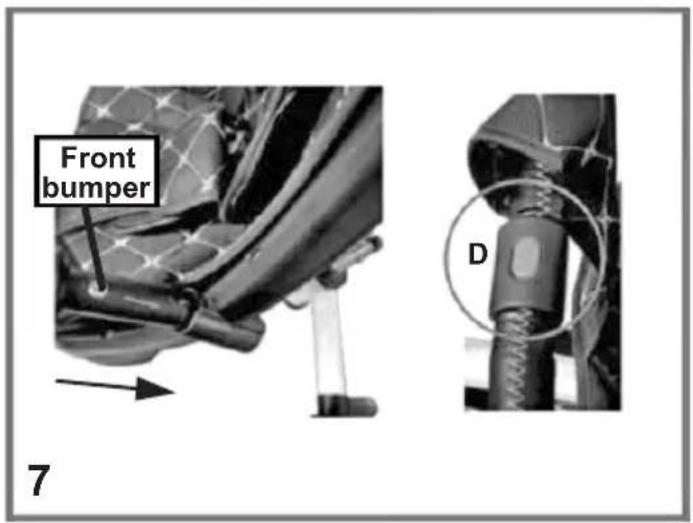
7. INSTALLING THE SAFETY BUMPER
If needed press the button D and split both parts of the bumper.
Align each of them to the corresponding opening at the frame and rotate downwards up to the normal bumper position. Insert the crotch fabric part into one of the parts, press button D and join both parts.
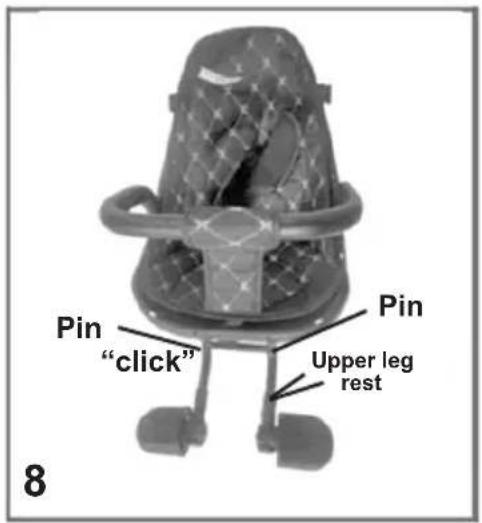
8. INSTALLING THE UPPER PART OF THE LEGREST
ATTENTION! THE UPPER PART OF THE LEGREST CAN BE INSTALLED ONLY WHEN THE SEAT IS IN PARENT FACING MODE (DIRECTION OPPOSITE TO THE MOTION).
Insert with pressure tubes of the upper leg rest into the openings at the seat. You will hear a click sound by fixing and pins must show from the openings.
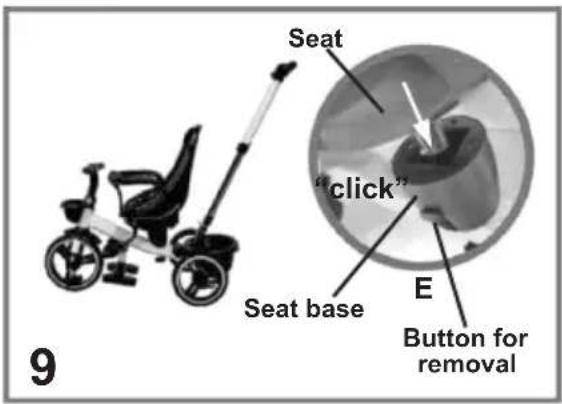
9. INSTALLING AND REMOVING OF THE SEAT
Align the seat tube to the opening at the base of the seat. Press downwards as figure E shows until you hear a click sound and it fixes.
ATTENTION! Make sure that seat is fixed to the frame as try to pull it upwards.
To remove the seat press the buttons at both sides and rove the seat from the base.
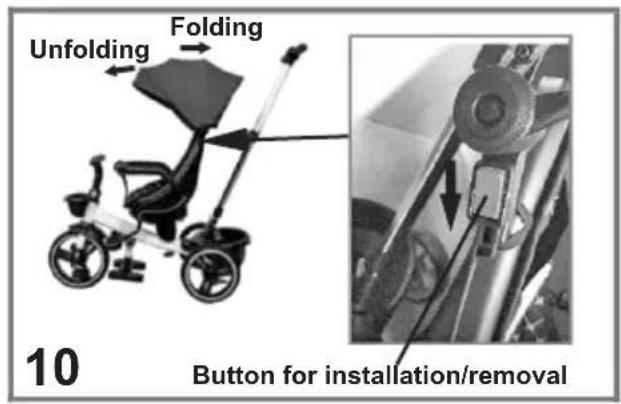
10. INSTALLING THE CANOPY. FUNCTIONS
Press the button for assembly/removal and insert each of the endings of canopy into the openings at the frame. Release the button to fix.
To remove the canopy, press the button and pull the canopy from the frame.
Folding of canopy: Push the canopy with your hand.
Unfolding of canopy: Pull the canopy with your hand.
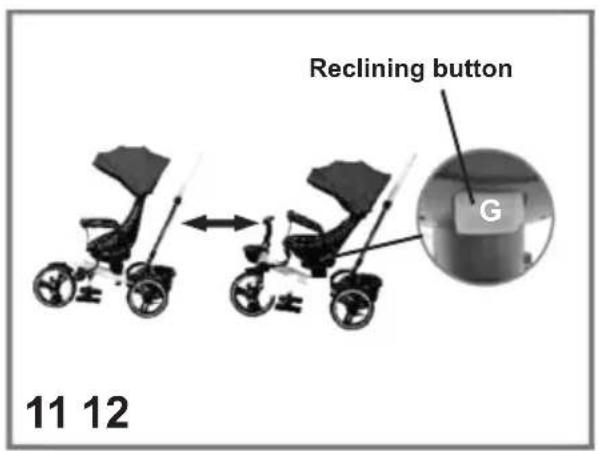
11. RECLINE OF THE SEAT
Press the button at the bottom of the seat and set the backrest of the seat in required position.
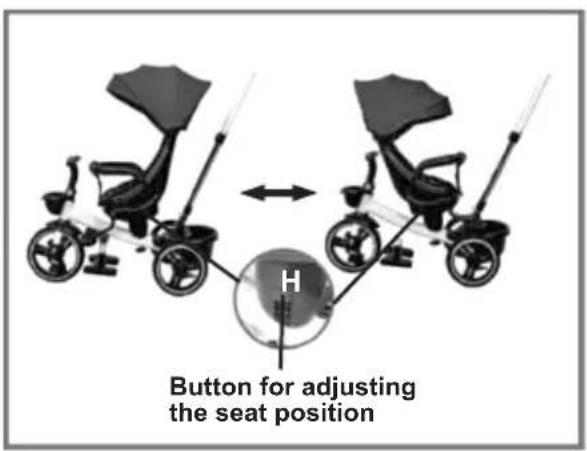
12. SEAT POSITIONS
Seat can be set in two directions:
• In motion direction (child is not facing the parent)
• In motion opposite direction (child is facing the parent)
To change the seat direction, press the buttons for removal (H) at both sides of the seat, remove it from the base, rotate it and install it in opposite direction.
(see article 9 INSTALLING AND REMOVING OF THE SEAT).
MAINTENANCE GUIDELINES
Periodically check the good working order of the tricycle parts.
Do not wash it and do not soak it in water. Use a soft damp cloth and water or neutral liquid detergent.
Do not use aggressive detergents, containing abrasive particles, ammonia, bleach or spirits.
◆ Regularly oil the moving parts.
Do not use on sand.
Do not store the tricycle in hot environment, in order to avoid the plastic parts from deforming.
Store the product in clean and dry place indoors. Do not expose to direct sunlight, moisture or harsh weather!
❖ Always let the tricycle to dry out fully before storing or using it, in order to avoid mold and rust.
- Contact your authorized dealer if consultation or repair is needed.
Materials used: plastic, metal, textile part and filling – 100% polyester.

TRKPEG022xxxx / HLF-6017
- FOLLOW ALL WARNINGS, INSTRUCTIONS AND RECCOMENDATIONS IN THIS MANUAL IN ORDER TO GUARANTEE THE SAFE USE OF THIS PRODUCT:
- CAUTION! WARNINGS!
- PRODUCT FEATURES
- MAIN PARTS
- ASSEMBLY INSTRUCTIONS
- ASSEMBLY AND FUNCTIONS
- INSTALLING THE FORK TO THE FRONT WHEEL
- INSTALLING THE DOWN LEGREST AND SEAT BASE
- INSTALLING THE REAR WHEEL
- INSTALLING THE FRONT WHEEL
- INSTALLING THE FRONT BASKET AND STEERING BAR
- INSTALLING THE RAR BASKET AND PARENT HANDLE
- INSTALLING THE SAFETY BUMPER
- INSTALLING THE UPPER PART OF THE LEGREST
- INSTALLING AND REMOVING OF THE SEAT
- INSTALLING THE CANOPY. FUNCTIONS
- RECLINE OF THE SEAT
- SEAT POSITIONS
- MAINTENANCE GUIDELINES
Brand : Chipolino
Model : Pegas
Category : Tricycle