
GMK407 - Car radio American International - Free user manual and instructions
Find the device manual for free GMK407 American International in PDF.


| Product Type | Uncategorized Electronic Device |
| Brand | American International |
| Model | GMK407 |
| Dimensions (L x W x H) | 15 x 10 x 5 cm |
| Weight | 0.5 kg |
| Power Source | 220-240V AC, 50Hz |
| Power Consumption | 50 W |
| Material | Plastic |
| Color | Black |
| Functions | Basic operation, on/off switch |
| Maintenance | Wipe with a dry, soft cloth |
| Safety | Do not immerse in water; keep away from children |
| Spare Parts & Repairability | Contact manufacturer or authorized service center |
| General Information | User manual available for free download in PDF format |
Frequently Asked Questions - GMK407 American International
User questions about GMK407 American International
0 question about this device. Answer the ones you know or ask your own.
Ask a new question about this device
Download the instructions for your Car radio in PDF format for free! Find your manual GMK407 - American International and take your electronic device back in hand. On this page are published all the documents necessary for the use of your device. GMK407 by American International.
USER MANUAL GMK407 American International
American International
CAUTION: Before proceeding, set emergency brake and disconnect negative battery cable.
GMK-407
1994-95 BUICK LE SABRE, PARK AVENUE, 1995 BUICK REGAL 1994-95 OLDS 88/98, 1995 OLDS AURORA, 1995 OLDS CUTLASS SUPREME 1992-95 GEO METRO, TRACKER, 1992-95 SUZUKI SWIFT, SIDEKICK
GMK-407
1992-95 GEO METRO, TRACKER 1992-95 SUZUKI SWIFT, SIDEKICK
1992-95 GEO METRO, 1992-95 SUZUKI SWIFT
Dash Disassembly/Radio Mounting
- Remove (1) screw on upper lip of A/C and heater controls.
- Remove (2) screws above radio opening.
- Remove (4) screws securing factory radio. Slide unit forward enough to disconnect power, speaker and antenna connections. Remove radio.
- Install radio into kit. Break away side brackets of GMK-407 leaving 2 on top and 2 on bottom. Follow radio manufacturer's wiring instructions.
- Re-install entire assembly as illustrated. Re-assemble dash by reversing steps 1 through 3.

1992-95 GEO TRACKER, 1992-95 SUZUKI SIDEKICK Dash Disassembly/Radio Mounting
- Remove ashtray.
- Remove (1) screw securing ashtray housing
- Pull ashtray bracket away from dash panel. Unsnap dash panel.
- Remove (4) screws securing factory radio. Slide unit forward enough to disconnect power, speakers and antenna connections. Remove radio.
- Break away top and bottom mounting tabs of GMK-407 leaving only the 4 side brackets shown as illustrated. Follow radio manufacturer's wiring instructions.
- Install new radio as illustrated or as in the new radio mounting instructions.
- Re-install entire assembly as illustrated by reversing steps 1 through 4.

DIN Radio Kit Assembly
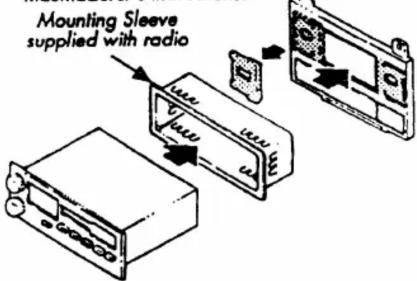
If you have a DIN-style radio, carefully break out the shaft radio mounting provisions to accept the DIN radio mounting sleeve. Mount the DIN Radio mounting sleeve into the opening as per the radio manufacturer's instructions.
Wire Harness;
A wiring harness is available from American International that wires to your new radio and plugs into your car's factory harness. It is not required, but makes installation easier.

IWH-990 (Not included with this kit)
Pullout Radio Assembly
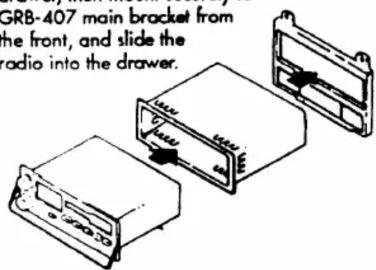
Break away shaft mounting provisions as shown in the DIN radio kit assembly. Wire pullout drawer, then mount securely to GRB-407 main bracket from the front, and slide the radio into the drawer.

Installation of 1"x7" Equalizers
Snap out the Equalizer dummy panel from the GRB-407 main bracket and trim the equalizer space supports. Attach the left and right equalizer mounting brackets to the main bracket, and attach the unit to the mounting brackets.
REAR VIEW

Note: if your equalizer is less than 7" wide, scorelines are provided on the back of EQ-407. Cut each side to trim, then simply snap into place.
Vehicle Wiring Harness
![vehicle Wiring Harness gray/white [ R R + ] green/white [ L R - ] green/black [ L R - ] gray/block [ R R - ] black (chassis ground) red/yellow (not used) white (12 memory) orange/black [ L F - ] red/ black [ R F + ]](/content/2026/05/994269/images/1c7e5f8878c3e2d474e334816d73ace0905602527c60801f3886a45c6f007617.jpg)
Brand : American International
Model : GMK407
Category : Car radio