VP-426C - Processor Kramer - Free user manual and instructions
Find the device manual for free VP-426C Kramer in PDF.


| Product Type | Video Processor / Scaler |
| Dimensions (W x D x H) | 19" (483 mm) x 6.7" (170 mm) x 1.7" (44 mm) |
| Weight | Approximately 1.5 kg (3.3 lbs) |
| Power Supply | 100-240 V AC, 50/60 Hz, 12V DC adapter included |
| Inputs | 4x HDMI, 2x VGA, 2x Composite, 1x Component |
| Outputs | 2x HDMI, 1x VGA, 1x Composite |
| Max Resolution | 1920x1200 (WUXGA) or 1080p |
| Video Processing | Scaling, deinterlacing, aspect ratio control |
| Control Interface | RS-232, Ethernet, IR remote, front panel buttons |
| EDID Management | Built-in EDID emulation and learning |
| Audio Support | Embedded audio pass-through via HDMI |
| Operating Temperature | 0°C to 40°C (32°F to 104°F) |
| Storage Temperature | -20°C to 60°C (-4°F to 140°F) |
| Humidity | 10% to 90% RH (non-condensing) |
| Mounting | 19" rack mountable (1U), ears included |
| Safety Certifications | CE, FCC Class A, RoHS |
| Included Accessories | Power adapter, IR remote, rack mount kit, quick start guide |
| Maintenance | Clean with soft dry cloth; avoid liquids |
| Repairability | No user-serviceable parts; contact Kramer support |
Frequently Asked Questions - VP-426C Kramer
User questions about VP-426C Kramer
0 question about this device. Answer the ones you know or ask your own.
Ask a new question about this device
Download the instructions for your Processor in PDF format for free! Find your manual VP-426C - Kramer and take your electronic device back in hand. On this page are published all the documents necessary for the use of your device. VP-426C by Kramer.
USER MANUAL VP-426C Kramer
Typical Applications 3
Defining VP-426C and VP-424C 4
Defining VP-426C 4K HDMI/USB-C/PC Scaler 4
Defining VP-424C 4K HDMI/USB-C Scaler 5
Mounting VP-426C and VP-424C 6
Connecting the Devices 7
Connecting VP-426C 7
Connecting the Remote Control Switches 8
Connecting the Balanced Output to a Balanced/Unbalanced Stereo Audio Acceptor 8
Connecting VP-424C 9
Connecting the Remote Control Switches 9
Operating and Controlling VP-426C and VP-424C 10
Using the Front Panel Buttons 10
Controlling the Device Via the OSD Menu 10
Upgrading the Firmware 17
Technical Specifications 18
VP-426C 18
VP-424C 19
Input Resolutions 20
Output Resolutions 20
Default EDID 21
Introduction
Welcome to Kramer Electronics! Since 1981, Kramer Electronics has been providing a world of unique, creative, and affordable solutions to the vast range of problems that confront the video, audio, presentation, and broadcasting professional on a daily basis. In recent years, we have redesigned and upgraded most of our line, making the best even better!
Getting Started
We recommend that you:
- Unpack the equipment carefully and save the original box and packaging materials for possible future shipment.
- Review the contents of this user manual.

Go to www.kramerav.com/downloads/VP-424C or www.kramerav.com/downloads/VP-426C to check for up-to-date user manuals, application programs, and to check if firmware upgrades are available (where appropriate).
Achieving Best Performance
- Use only good quality connection cables (we recommend Kramer high-performance, high-resolution cables) to avoid interference, deterioration in signal quality due to poor matching, and elevated noise levels (often associated with low quality cables).
- Do not secure the cables in tight bundles or roll the slack into tight coils.
- Avoid interference from neighboring electrical appliances that may adversely influence signal quality.
- Position your Kramer VP-424C away from moisture, excessive sunlight and dust.
Safety Instructions

Caution:
- This equipment is to be used only inside a building. It may only be connected to other equipment that is installed inside a building.
- For products with relay terminals and GPI\O ports, please refer to the permitted rating for an external connection, located next to the terminal or in the User Manual.
- There are no operator serviceable parts inside the unit.

Warning:
- Use only the power cord that is supplied with the unit.
- To ensure continuous risk protection, replace fuses only according to the rating specified on the product label which is located on the bottom of the unit.
Recycling Kramer Products
The Waste Electrical and Electronic Equipment (WEEE) Directive 2002/96/EC aims to reduce the amount of WEEE sent for disposal to landfill or incineration by requiring it to be collected and recycled. To comply with the WEEE Directive, Kramer Electronics has made arrangements with the European Advanced Recycling Network (EARN) and will cover any costs of treatment, recycling and recovery of waste Kramer Electronics branded equipment on arrival at the EARN facility. For details of Kramer's recycling arrangements in your particular country go to our recycling pages at www.kramerav.com/il/quality/environment.
Overview
Congratulations on purchasing your Kramer VP-426C and VP-424C.
VP-426C 18G 4K HDR HDMI™ ProScale™ is a digital scaler with HDMI, USB-C and VGA signals with an unbalanced stereo audio input and an HDMI and balanced stereo audio output.
VP-424C 18G 4K HDMI™ ProScale™ is a digital scaler with HDMI and USB-C inputs and an HDMI output.
VP-426C and VP-424C are high-performance digital scalers for HDMI, USB
Type-C and VGA (for VP-426C) signals. The units up- or down-scale the selected video signal to resolutions up to 4K2K at a maximum data rate of 18Gbps (6Gbps per graphic channel). The user selects the input and the scaled output is sent to the HDMI output.
VP-424C and VP-426C provide exceptional quality, advanced and user-friendly operation, and flexible control.
Exceptional Quality
• High-Performance Professional Scaler –
- VP-426C: Up-scales or down-scales HDMI, USB type-C and VGA signals to any resolution up to 4K@60 (4:4:4). The scaler supports HDR10, and HDCP 2.2/1.4, and features Input Auto-Switching, Constant Sync on the output even if the input video signal is lost or interrupted, and a built-in ProcAmp for convenient signal adjustment.
- VP-424C: Up-scales or down-scales HDMI and USB type-C signals to any resolution up to 4K@60 (4:4:4). The scaler supports HDCP 2.2/1.4, and features Input Auto-Switching, Constant Sync on the output even if the input video signal is lost or interrupted, and a built- ProcAmp for convenient signal adjustment.
- Fast, Smooth Manual and Auto Switching Between Sources – Select the HDMI, USB Type-C or VGA (for VP-426C only) input, or configure the device to automatically select the active source.
- VP-426C HDMI Support – HDR, CEC, 4K@60, Deep Color / x.v.Color™, 7.1 PCM, Dolby TrueHD and DTS-HD as specified in HDMI 2.0.
- VP-424C HDMI Support – CEC, 4K@60 and Deep Color / x.v.Color™ as specified in HDMI 2.0.
- Input resolutions – up to 4K@60 (4:4:4) with a maximum data rate of 18Gbps (6Gbps per graphic channel).
- Output resolutions – up to 4K2K.
Advanced and User-friendly Operation
- Convenient Control – Control the unit using an OSD (On-Screen Display) via front panel buttons and input selector, video freeze and resolution reset front panel buttons. Additionally, connect to the contact closure connector for remote switching of sources. All settings are saved in non-volatile memory.
- LED indicator for each input and for power status.
- Local firmware upgrade via the USB type-A port ensures lasting, field-proven deployment.
- OSD and FREEZE buttons and a RESET TO XGA/1080P button (to hardware-reset the output resolution).
- An OSD (On-Screen Display) – for configuring the device.
• Efficient power-saving features.
- Advanced EDID management per input.
- Easy Installation – Compact MegaTOOLS® fan-less enclosure for surface mounting or side-by-side mounting of 2 units in a 1U rack space with the recommended rack adapter.
• Control your device directly via the front panel push buttons (with OSD menus).
Flexible Connectivity
- VP-426C: Flexible Analog Audio Embedding and Extraction (De-embedding) – The user can select the unbalanced analog audio input to embed into the HDMI output signal. On the output, the user can select to extract the audio signal and output it as balanced analog audio.
• VP-426C: 3 selectable inputs, USB Type-C, HDMI and VGA.
• VP-424C: 2 selectable inputs, USB Type-C and HDMI.
Typical Applications
VP-424C is ideal for the following typical applications:
- Presentation and multimedia.
- Projection systems in conference rooms, boardrooms, auditoriums, hotels and churches, production studios, rental and staging.
- Any application where high quality conversion and switching of multiple and different video signals to graphical data signals is required for display or projection purposes.
Defining VP-426C and VP-424C
This section defines VP-426C and VP-424C.
Defining VP-426C 4K HDMI/USB-C/PC Scaler
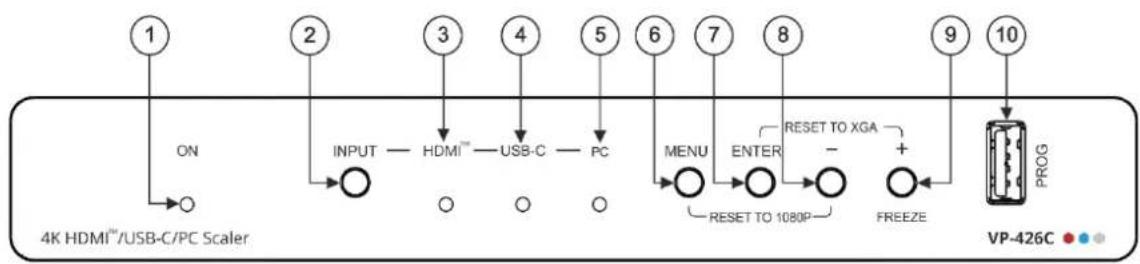
flowchart
graph LR
    1["1 ON"] --> 2["2 INPUT"]
    2 --> 3["HDMI™"]
    3 --> 4["USB-C"]
    4 --> 5["PC"]
    5 --> 6["MENU"]
    6 --> 7["ENTER"]
    7 --> 8["RESET TO XGA"]
    8 --> 9["FREEZE"]
    9 --> 10["PROG"]
    style 1 fill:#fff,stroke:#000
    style 2 fill:#fff,stroke:#000
    style 3 fill:#fff,stroke:#000
    style 4 fill:#fff,stroke:#000
    style 5 fill:#fff,stroke:#000
    style 6 fill:#fff,stroke:#000
    style 7 fill:#fff,stroke:#000
    style 8 fill:#fff,stroke:#000
    style 9 fill:#fff,stroke:#000
    style 10 fill:#fff,stroke:#000
Figure 1: VP-426C 4K HDMI/USB-C/PC Scaler Front Panel
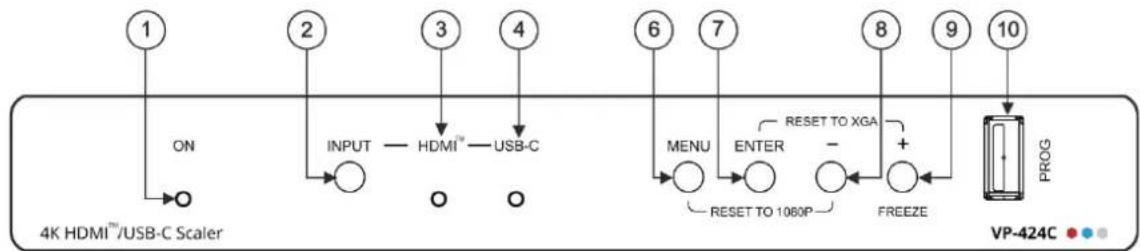
flowchart
graph LR
    1["1 ON"] --> 2["2 INPUT"]
    2 --> 3["HDMI™ USB-C"]
    3 --> 4["4"]
    4 --> 6["6 MENU"]
    6 --> 7["7 ENTER"]
    7 --> 8["8 RESET TO XGA"]
    8 --> 9["9 FREEZE"]
    9 --> 10["10 PROG"]
    style 1 fill:#fff,stroke:#000
    style 2 fill:#fff,stroke:#000
    style 3 fill:#fff,stroke:#000
    style 4 fill:#fff,stroke:#000
    style 6 fill:#fff,stroke:#000
    style 7 fill:#fff,stroke:#000
    style 8 fill:#fff,stroke:#000
    style 9 fill:#fff,stroke:#000
    style 10 fill:#fff,stroke:#000
Figure 2: VP-424C 4K HDMI/USB-C Scaler Front Panel
| # | Feature | Function |
| 1 | ON LED | Lights green when the unit is powered. |
| 2 | INPUT Button | VP-426C: Press to cycle the input between HDMI^TM , USB-C and PC.VP-424C: Press to cycle the input between HDMI^TM and USB-C. |
| 3 | HDMI^TM LED | Lights when the HDMI input is selected. |
| 4 | USB-C LED | Lights when the USB-C input is selected. |
| 5 | PC LED | Lights when the PC input is selected. |
| 6 | MENU Button | Press to enter/escape the on-screen display (OSD) menu. Press together with the – button to reset the output resolution to 1080p (RESET TO 1080P). |
| 7 | ENTER Button | In OSD, press to choose the highlighted menu item. Press together with the + button to reset the output resolution to XGA (RESET TO XGA). |
| 8 | – Button | In OSD, press to move backward through the list or to decrement the parameter value. |
| 9 | +/FREEZE Button | In OSD, press to move forward through the list or to increment the parameter value. When not in OSD, press to freeze/unfreeze the display. |
| 10 | PROG USB Connector | Connect to a USB memory stick for upgrading the firmware. |
Defining VP-424C 4K HDMI/USB-C Scaler
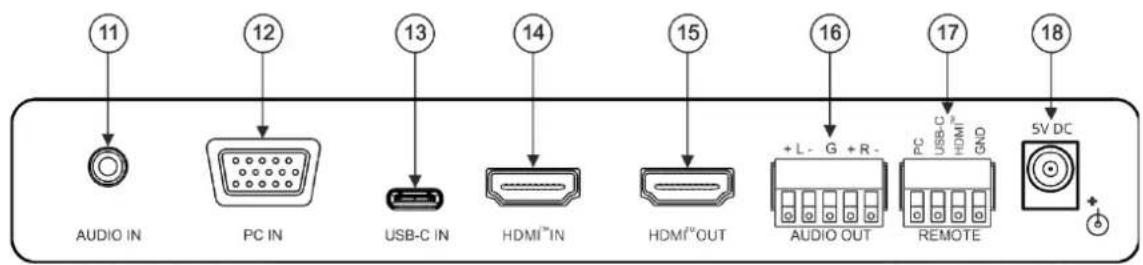
Figure 3: VP-426C 4K HDMI/USB-C/PC Scaler Rear Panel
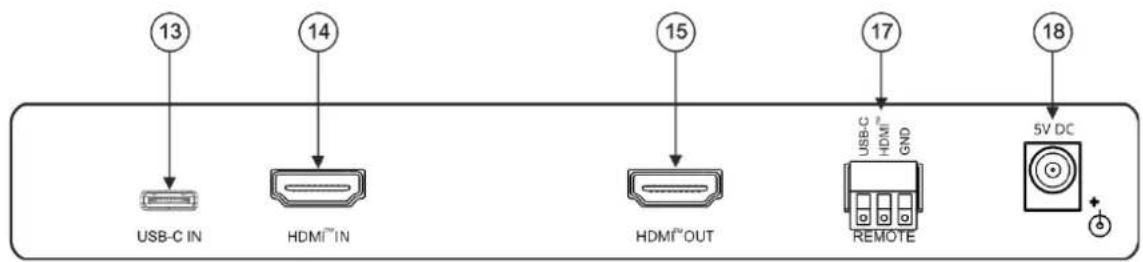
Figure 4: VP-424C 4K HDMI/USB-C Scaler Rear Panel
| # | Feature | Function |
| 11 | AUDIO IN PC 3.5mm Mini Jack | Connect to an unbalanced stereo audio PC source. Can also be selected as the audio input for HDMI and USB-C (instead of the embedded audio). |
| 12 | PC IN 15-pin HD Connector | Connect to a VGA source (for example, a laptop). |
| 13 | USB-C IN USB Type C Port | Connect to a USB type-C audio-video source. |
| 14 | HDMI ^TM IN Connector | Connect to an HDMI source. |
| 15 | HDMI ^TM OUT Connector | Connect to an HDMI acceptor. |
| 16 | AUDIO OUT Terminal Block Connector | Connect to a balanced stereo audio acceptor. |
| 17 | REMOTE Terminal Block Connector | Connect to contact closure switches (by momentary contact between the desired pin and GND pin) to select an input. |
| 18 | 5V DC | +5V DC connector for powering the unit. |
Mounting VP-426C and VP-424C
This section provides instructions for mounting VP-426C and VP-424C. Before installing, verify that the environment is within the recommended range:

- Operation temperature – 0° to 40°C (32 to 104°F).
- Storage temperature -40^ to +70^ (-40 to +158^ ).
- Humidity – 10% to 90%, RHL non-condensing.

- VP-424C must be placed upright in the correct horizontal position.

Caution:
- Mount VP-426C and VP-424C before connecting any cables or power.

Warning:
- Ensure that the environment (e.g., maximum ambient temperature & air flow) is compatible for the device.
- Avoid uneven mechanical loading.
- Appropriate consideration of equipment nameplate ratings should be used for avoiding overloading of the circuits.
- Reliable earthing of rack-mounted equipment should be maintained.
To mount VP-426C and VP-424C in a rack:
Mount the unit in a rack using the recommended rack adapter (see www.kramerav.com/product/VP-424C).
To mount VP-426C and VP-424C on a table or shelf:
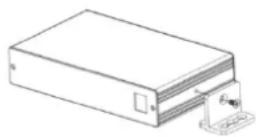
- Attach the rubber feet and place the unit on a flat surface.
- Fasten a bracket (included) on each side of the unit and attach it to a flat surface.

Connecting the Devices
This section describes how to connect the VP-426C and VP-424C.
Connecting VP-426C

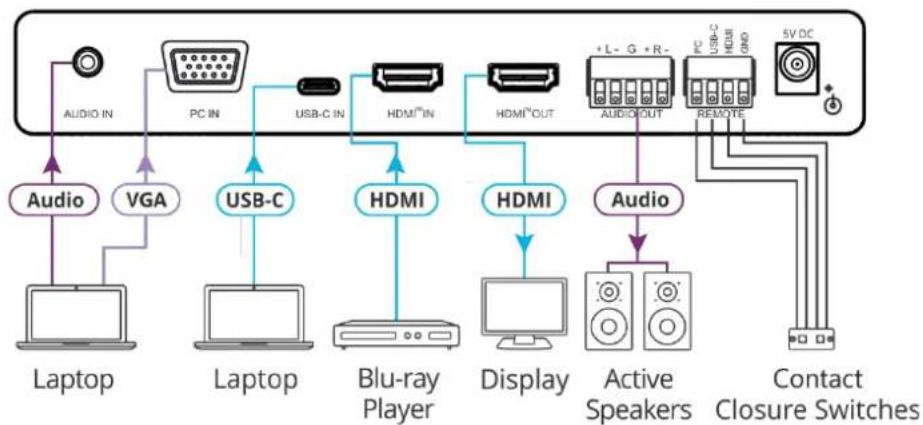
Always switch off the power to each device before connecting it to your VP-426C. After connecting your VP-426C, connect its power and then switch on the power to each device.
flowchart
graph LR
    A["Laptop"] -->|Audio| B["PC IN"]
    A -->|VGA| C["USB-C"]
    A --> D["Laptop"]
    D --> E["Blu-ray Player"]
    E --> F["HDMI"]
    E --> G["Display"]
    G --> H["Active Speakers"]
    G --> I["Contact Closure Switches"]
    B --> J["USB-C IN"]
    C --> K["HDMI IN"]
    F --> L["HDMI OUT"]
    H --> M["Audio"]
    I --> N["+L-G+R-"]
    I --> O["REMOTE"]
    I --> P["5V DC"]
Figure 5: Connecting to the VP-426C Rear Panel
To connect the VP-426C as illustrated in the example in Figure 5:
-
Connect a computer graphics source (for example, a laptop):
-
The unbalanced stereo audio PC source to the AUDIO IN 3.5mm mini jack ⑪.
-
The VGA signal to the PC 15-pin HD connector . ^12
-
Connect a USB-C source (for example, a laptop) to the USB-C port ⑬.
- Connect an HDMI source (for example, a Blu-ray player) to the HDMI IN connector ⑭.
- Connect the HDMI OUT connector ⑮ to an acceptor (for example, a display).
- Connect the AUDIO OUT 5-pin terminal block connector to a balanced stereo audio acceptor (for example, Kramer TAVOR 6-O active speakers).
- Connect the REMOTE 4-pin terminal block connector ⑰ to contact closure switches (for example, Kramer RC-22TB).
- Connect the power adapter to the VP-426C power connector ⑱ and to the mains electricity (not shown in Figure 5).
Connecting the Remote Control Switches
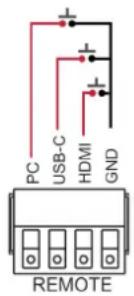
Momentarily connect the desired pin to the GND pin to select an input:
| Pin Name | Function |
| PC | Select the PC input. |
| USB-C | Select the USB-C input. |
| HDMI | Select the HDMI input. |
Connecting the Balanced Output to a Balanced/Unbalanced Stereo Audio Acceptor
The following are the pinouts for connecting the balanced output to a balanced or unbalanced stereo audio source:
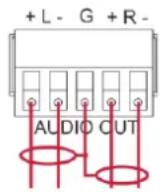
Figure 6: Connecting the Balanced Output to a Balanced Stereo Audio Acceptor
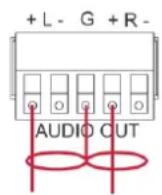
Figure 7: Connecting the Balanced Output to an Unbalanced Stereo Audio Acceptor
Connecting VP-424C

Always switch off the power to each device before connecting it to your VP-424C. After connecting your VP-424C, connect its power and then switch on the power to each device.
flowchart
graph LR
    A["Laptop"] -->|USB-C| B["USB-C IN"]
    B --> C["HDMI"]
    C --> D["Blu-ray Player"]
    D --> E["HDMI"]
    E --> F["Display"]
    F --> G["USB-C HDM1* GND"]
    G --> H["5V DC"]
    G --> I["Remote"]
    I --> J["Contact Closure Switches"]
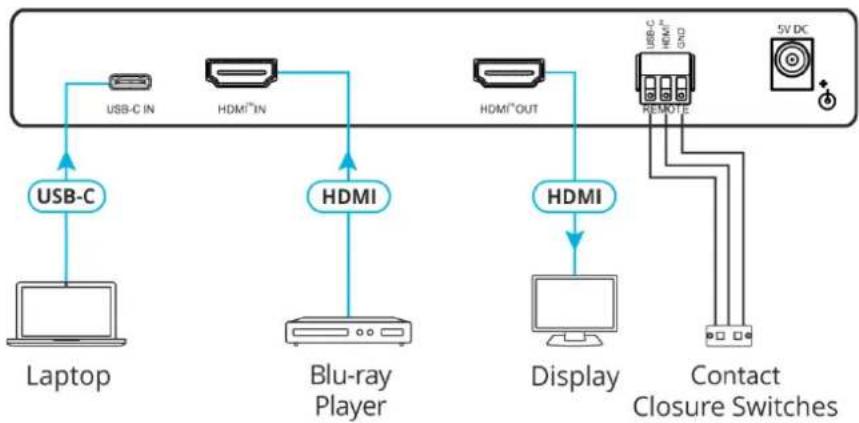
Figure 8: Connecting to the VP-424C Rear Panel
To connect the VP-424C as illustrated in the example in Figure 5:
- Connect a USB-C source (for example, a laptop) to the USB-C port ⑬.
- Connect an HDMI source (for example, a Blu-ray player) to the HDMI IN connector ⑭.
- Connect the HDMI OUT connector ⑮ to an acceptor (for example, a display).
- Connect the REMOTE 4-pin terminal block connector ⑰ to contact closure switches (for example, Kramer RC-22TB).
- Connect the power adapter to the VP-424C power connector ⑱ and to the mains electricity (not shown in Figure 5).
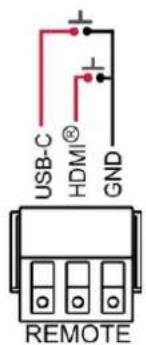
Connecting the Remote Control Switches
Momentarily connect the desired pin to the GND pin to select an input:
| Pin Name | Function |
| USB-C | Select the USB-C input. |
| HDMI | Select the HDMI input. |
Operating and Controlling VP-426C and VP-424C
Control the devices via the front panel buttons, the OSD menu or via the remote control contact closure switches.
Using the Front Panel Buttons
On the front panel buttons:
- Press INPUT ② to select the Input (HDMI/USB-C/PC or HDMI/USB-C) to switch to the output.
- Press MENU ⑥ and - ⑧ to reset the RESOLUTION 1080p.
- Press ENTER ⑦ and + (FREEZE) ⑨ to reset the RESOLUTION to XGA.
- Press MENU, ENTER (when in the OSD menu), + and – buttons to control the device (see Controlling the Device Via the OSD Menu on page 10).
Controlling the Device Via the OSD Menu
Use the OSD buttons to control the VP-426C/VP-424C via the OSD menu.
To enter and use the OSD menu buttons:
- Press MENU.
-
Press:
-
ENTER to accept changes and to change the menu settings.
-
- and – to move through the OSD menu, which is displayed on the video output.
- EXIT to exit the menu.

The default OSD timeout is set to 10 seconds.
Use the OSD menu to perform the following operations:
- Setting Image Parameters on page 11.
• Selecting the Input Signal on page 11. - Setting Output Parameters on page 12.
• VP-426C – Setting the Audio Source on page 12.
• Setting OSD Parameters on page 13. -
Setting HDCP on page 13.
• Setting Sleep Mode on page 14. -
Setting the Switching Mode on page 14.
- Setting Auto Image on the PC on page 14.
- Setting Freeze Button functionality on page 15.
• Managing EDID on page 15.
• Viewing Device Information on page 16.
• Performing Factory Reset on page 16.

Although VP-426C and VP-424C have similar OSD menus there are some differences, which are described within the text.
Setting Image Parameters
To set the image parameters:
- On the front panel click MENU. The menu appears.
- Click PICTURE and set the following:
| Menu Item | Function | |
| CONTRAST | Set the contrast. | |
| BRIGHTNESS | Set the brightness. | |
| FINETUNE | Input Signal | Function |
| HDMI/USB-C | HUE – set the color hue. | |
| SATURATION – set the color saturation. | ||
| SHARPNESS – set the sharpness of the picture. | ||
| NOISE REDUCTION – select the noise reduction: OFF (default), LOW, MIDDLE, HIGH or AUTO. | ||
| VGA(VP-426C) | PHASE – set the phase. | |
| CLOCK – set the clock. | ||
| H-POSITION – set the horizontal position. | ||
| V-POSITION – set the vertical position. | ||
PC MODE – select the PC resolution mode. Greyed out except for cases where the H or V timing on the input can represent more than one resolution, in order to allow the user to manually select the exact resolution on the input. (For example, a 720 line resolution can be selected as 1280x720 or 1680x720.) Greyed out except for cases where the H or V timing on the input can represent more than one resolution, in order to allow the user to manually select the exact resolution on the input. (For example, a 720 line resolution can be selected as 1280x720 or 1680x720.) | ||
| COLOR | Set the RED, GREEN and BLUE shades. | |
Selecting the Input Signal
To set the input source:
- On the front panel click MENU. The menu appears.
- Click INPUT and set select the input source:
■ VP-426C: HDMI, TYPE-C (USB-C) or PC.
■ VP-424C : HDMI, TYPE-C (USB-C).
Setting Output Parameters
To set the output parameters:
- On the front panel click MENU. The menu appears.
- Click OUTPUT and set the following:
| Menu Item | Function | |||
| SIZE | Set the size of the image: OVER SCAN, FULL, BEST FIT (default), PAN SCAN, LETTER BOX, UNDER 2, UNDER 1, FOLLOW IN. | |||
| RESOLUTION | Select the output resolution (default, NATIVE): | |||
| Appears as | Output Resolution | Appears as | Output Resolution | |
| VP-424C and VP-426C | 640x480 60 | 640x480 @60Hz | 800x600 60 | 800x600 @60Hz |
| 1024x768 60 | 1024x768 @60Hz | 1280x768 60 | 1280x768 @60Hz | |
| 1280x800 60 | 1280x800 @60Hz | 1280x1024 60 | 1280x1024 @60Hz | |
| 1360x768 60 | 1360x768 @60Hz | 1400x1050 60 | 1400x1050 @60Hz | |
| 1440x900 60 | 1440x900 @60Hz | 1600x1200 60 | 1600x1200 @60Hz | |
| 1680x1050 60 | 1680x1050 @60Hz | 1920x1200 60 RB | 1920x1200 @60Hz RB | |
| 2560x1600 60 RB | 2560x1600 @60Hz RB | 1920x1080 60 | 1920x1080 @60Hz | |
| 1280x720 60 | 1280x720 @60Hz | 2048x1080 50 | 2048x1080 @50Hz | |
| 2048x1080 60 | 2048x1080 @60Hz | 2560x1440 60 RB | 2560x1440 @60Hz RB | |
| 720x480P 60 | 720x480P @60Hz | 720x576P 50 | 720x576P @50Hz | |
| 1280x720P 50 | 1280x72P @50Hz | 1280x720P 60 | 1280x720P @60Hz | |
| 1920x1080P 24 | 1920x1080P @24Hz | 1920x1080P 25 | 1920x1080P @25Hz | |
| 1920x1080P 30 | 1920x1080P @30Hz | 1920x1080P 50 | 1920x1080P @50Hz | |
| 1920x1080P 60 | 1920x1080P @60Hz | 2560x1080P 50 | 2560x1080P @50Hz | |
| 2560x1080P 60 | 2560x1080P @60Hz | 3840x2160P 24 | 3840x2160P @24Hz | |
| 3840x2160P 25 | 3840x2160P @25Hz | 3840x2160P 30 | 3840x2160P @30Hz | |
| 3840x2160P 50 | 3840x2160P @50Hz | 3840x2160P 60 | 3840x2160P @60Hz | |
| VP-426C | 3840x2160P 50(42C) | 4k2k @50Hz (4:2:0) | 3840x2160P 60(420) | 4k2k @60Hz (4:2:0) |
| BYPASS ENABLE(VP-426C) | Select ON for the HDMI signal to bypass the scaler (no video processing).Select OFF to process the HDMI signal via the scaler. | |||
VP-426C - Setting the Audio Source
To set the audio source:
- On the front panel click MENU. The menu appears.
- Click AUDIO and set the following:
| Menu Item | Function |
| DELAY | Set the audio delay time to 40ms (default), 110ms or 150ms. |
| INPUT | Set to AUTOMATIC (default) or LINE IN. |
| OUTPUT VOLUME | Set volume from 0 to 100 (80 is 0dB). |
Setting OSD Parameters
To set the OSD parameters:
- On the front panel click MENU. The menu appears.
- Click OSD and set the following:
| Menu Item | Function |
| H POSITION | Set the horizontal position of the OSD. |
| V POSITION | Set the vertical position of the OSD. |
| TIMER | Set the timeout period in seconds. |
| TRANSPARENCY | Set the OSD background between 100 (transparent) and 0 (opaque). |
| DISPLAY | Select the information displayed on-screen during operation:INFO (default) – the information appears for 10 seconds.ON – the information appears constantly.OFF – the information does not appear. |
Setting HDCP
To set the HDCP on the inputs and output:
- On the front panel click MENU. The menu appears.
- Click ADVANCED and select the following:
| Menu Item | Function |
| HDCP ON INPUT HDMI | Set HDCP on HDMI input: either ON (default) or OFF.Setting HDCP support to enabled (ON) or disabled (OFF) on the input allows the source to transmit a non-HDCP signal if required (for example, when working with a Mac computer). |
| HDCP ON INPUT TYPE C | Set HDCP on USB-C: either ON (default) or OFF.Setting HDCP support to enabled (ON) or disabled (OFF) on the input allows the source to transmit a non-HDCP signal if required (for example, when working with a Mac computer). |
| HDCP (OUT) | Select FOLLOW OUTPUT (recommended) for the scaler to match its HDCP output to the HDCP setting of the HDMI/HDCP acceptor to which it is connected.Select FOLLOW INPUT, to change its HDCP output setting according to the HDCP of the input (recommended when the HDMI/HDCP output is connected to a splitter/switcher). |
Setting Sleep Mode
To set the Auto SYNC OFF:
- On the front panel click MENU. The menu appears.
- Click ADVANCED and select the following:
| Menu Item | Function |
| AUTO SYNC OFF: | Turns off the output after a period of not detecting a valid video signal on the input(s) until a valid input is again detected or any keypad is pressed.Set to:Slow – to disable outputs after 2 minutes.Fast – to disable outputs after 10 seconds.Disable – to leave outputs active at all times. |
Setting the Switching Mode
To set the switching mode:
- On the front panel click MENU. The menu appears.
- Click ADVANCED and select the following:
| Menu Item | Function |
| AUTO SWITCH | Set to:OFF (default) – for manual switching.AUTO SCAN (default) – scans for a valid input when no signal is found on the selected input.LAST CONNECT – switches to the last connected input. |
Setting Auto Image on the PC
To set the PC Auto Image Adjustment:
-
On the front panel click MENU. The menu appears.
-
Click ADVANCED and select the following:
| Menu Item | Function |
| PC AUTO SETUP (VP-426C) | When ON, auto image is implemented every time the input is switched to VGA or when the input resolution changes.The auto-image feature calculates the positioning based on the picture connected to the VGA input. Only a “full screen” picture can be used for this auto-positioning – a test pattern (or some other picture) which has black along the entire top, bottom or one of the sides would not be suitable). |
Setting Freeze Button functionality
To set the functionality of the FREEZE front panel button:
- On the front panel click MENU. The menu appears.
- Click ADVANCED and select the following:
| Menu Item | Function |
| FREEZE: | Select to freeze and/or mute the display FREEZE ONLY / FREEZE + MUTE (default) / MUTE ONLY. |
Managing EDID
You can read the EDID to the HDMI input or the USB-C input from:
■ The default EDID list.
- An external custom EDID file (see Uploading EDID from an External File on page 16).
The output.
To copy an EDID from an input (or output) to an input:
- On the front panel click MENU. The menu appears.
- Select ADVANCED.
- Select EDID and then select an input (TYPE C or HDMI).
- For the selected input set one of the EDID options:
| EDID Selection | Operation |
| Def. 1080P | Select a built-in EDID from the list and press enter. |
| Def. 1080P(AUD) | |
| Def. 4K2K(3G) | |
| Def. 4K2K(3G-AUD) | |
| Def. 4K2K(6G) | |
| Def. 4K2K(6G-AUD) | |
| USER1 | Select the EDID uploaded from an external file (see Uploading EDID from an External File on page 16). |
| USER2 | |
| OUTPUT | To read the EDID from a connected output:Make sure that the output is connected to an acceptor and then select OUTPUT. |
Uploading EDID from an External File
To select the EDID from an external file:
-
Save the EDID file to a memory stick.
The EDID file name should include USER 1 or USER 2.
For example, use USER_EDID1.bin for USER 1 and USER_EDID2 for USER 2. -
Plug the memory stick into the PROG USB port 10n the device front panel.
-
On the front panel click MENU. The OSD menu appears.
-
Select EDID UPLOAD.
-
Select USER EDID. The external EDID file (USER_EDID1.bin, in this example) is stored to USER 1.
You can now read the uploaded EDID to an input by selecting USER 1 in a selected input in the ADVANCED>EDID menu.
Viewing Device Information
To view the information:
- On the front panel click MENU. The menu appears.
- Click INFO and view the following information: the selected source, the input and output resolutions, and the software version.
Performing Factory Reset
To perform factory reset:
- On the front panel click MENU. The menu appears.
- Click FACTORY and click YES. Wait for completion of factory reset (resolution is set to Native).
Upgrading the Firmware
To upgrade the firmware:
- Save the new firmware file to a memory stick.
- Verify that an input and output are connected to the device with a valid signal on the acceptor.
- Plug the memory stick into the PROG USB port 10n the device front panel.
- Press and hold both the MENU button and the ENTER button until LEDs flash and then release.
During upgrade the LEDs flash and once complete, one of the INPUT LEDs turns on and a valid signal appears on the output. - Check that the OSD Info screen shows the latest FW version.
- Perform factory reset.
Technical Specifications
This section describes the technical specifications.
VP-426C
| Inputs | Computer Graphics (VGA) | On a female 15-pin HD connector |
| Unbalanced Stereo Audio | On a 3.5mm mini jack | |
| HDMI | On a female HDMI connector | |
| USB-C | DP Alternate Mode on a female USB-C connector (USB3.1) | |
| Outputs | HDMI | On a female HDMI connector |
| Balanced Analog Stereo Audio | On a 5-pin terminal block connector | |
| Ports | 3 Remote Contact Closure Switches | On a 4-pin terminal block connector for input selection |
| USB | On a USB-A connector for firmware upgrade | |
| Video | Max Data Rate | 18Gbps (6 Gbps per graphic channel) |
| Max Input Resolution | 4K@60Hz (4:4:4) | |
| Latency | 1-2 frames | |
| Compliance | HDMI 2.0 and HDCP 2.2/1.4 | |
| Audio | Maximum Input Level | 6.5vpp |
| Maximum Output Level | 11vpp (14dBu) | |
| Controls | Rear Panel | Contact closure switches |
| Front Panel | Input select, OSD, resolution reset and freeze buttons | |
| Indication LEDs | Front Panel | 2 Input LEDs |
| 1 Power on LED | ||
| Power | Consumption | 5V DC, 2400mA |
| Source | 5V DC, 4A | |
| Environmental Conditions | Operating Temperature | 0° to +40°C (32° to 104°F) |
| Storage Temperature | -40° to +70°C (-40° to 158°F) | |
| Humidity | 10% to 90%, RHL non-condensing | |
| Regulatory Compliance | Safety | CE |
| Environmental | RoHs, WEEE | |
| Enclosure | Size | MegaTOOLS® |
| Type | Aluminum | |
| Cooling | Convection ventilation | |
| General | Net Dimensions (W, D, H) | 18.8cm x 14.5cm x 2.5cm (7.4" x 5.7" x 1") |
| Shipping Dimensions (W, D, H) | 34.4 cm x 20.9 cm x 6.8cm (13.5" x 8.2" x 2.7") | |
| Net Weight | 0.7 kg (1.5lbs) | |
| Shipping Weight | 1.3kg (2.8lbs) approx. | |
| Accessories | Included | Power adapter cord |
| Specifications are subject to change without notice at www.kramerav.com | ||
VP-424C
| Inputs | HDMI | On a female HDMI connector |
| USB-C | DP Alternate Mode on a female USB-C connector (USB3.1) | |
| Outputs | HDMI | On a female HDMI connector |
| Ports | 2 Remote Contact Closure Switches | On a 3-pin terminal block connector for input selection |
| USB | On a USB-A connector for firmware upgrade | |
| Video | Max Data Rate | 18Gbps (6 Gbps per graphic channel) |
| Max Input Resolution | 4K@60Hz (4:4:4) | |
| Latency | 1-2 frames | |
| Compliance | HDMI 2.0 and HDCP 2.2/1.4 | |
| Controls | Rear Panel | Contact closure switches |
| Front Panel | Input select, OSD, resolution reset and freeze buttons | |
| Indication LEDs | Front Panel | 2 Input LEDs |
| 1 Power on LED | ||
| Power | Consumption | 5V DC, 1800mA |
| Source | 5V DC, 4A | |
| Environmental Conditions | Operating Temperature | 0° to +40°C (32° to 104°F) |
| Storage Temperature | -40° to +70°C (-40° to 158°F) | |
| Humidity | 10% to 90%, RHL non-condensing | |
| Regulatory Compliance | Safety | CE |
| Environmental | RoHs, WEEE | |
| Enclosure | Size | MegaTOOLS® |
| Type | Aluminum | |
| Cooling | Convection ventilation | |
| General | Net Dimensions (W, D, H) | 18.8cm x 14.5cm x 2.5cm (7.4" x 5.7" x 1") |
| Shipping Dimensions (W, D, H) | 34.4 cm x 20.9 cm x 6.8cm (13.5" x 8.2" x 2.7") | |
| Net Weight | 0.7 kg (1.5lbs) | |
| Shipping Weight | 1.3kg (2.8lbs) approx. | |
| Accessories | Included | Power adapter cord |
| Specifications are subject to change without notice at www.kramerav.com | ||
Input Resolutions
| Resolution/Refresh Rate | Type C | HDMI | PC ( only) |
| 480I/576I | √ | √ | X |
| 480P/576P | √ | √ | X |
| 720P@(60/50) | √ | √ | X |
| 1080I@(60/50) | √ | √ | X |
| 1080P@(60/50) | √ | √ | X |
| 1080P@(24/25/30) | √ | √ | X |
| 640x480@(60/67/72/75/85) | √ | √ | √ |
| 800x600@(56/60/72/75) | √ | √ | √ |
| 1024x768@(60/70/75) | √ | √ | √ |
| 1280x1024@(60/75) | √ | √ | √ |
| 1280X960@60 | √ | √ | √ |
| 1280X720@60 | √ | √ | √ |
| 1920X1080@60 | √ | √ | √ |
| 1600X1200@60 | √ | √ | √ |
| 1280x768@60 | √ | √ | √ |
| 1280x800@60 | √ | √ | √ |
| 1360x768@60 | √ | √ | √ |
| 1366x768@60 | √ | √ | √ |
| 1400x1050@60 | √ | √ | √ |
| 1600X900@60 RB | √ | √ | √ |
| 1680x1050@60 | √ | √ | √ |
| 1920x1200@60 RB | √ | √ | √ |
| 2048x1080@(24/25/30/50/60) | √ | √ | × |
| 4K2K@(24/25/30/50/60) | √ | √ | × |
| 4K2K(4:2:0)@(50/60) | √ | √ | × |
Output Resolutions
| Resolution/Refresh Rate | VP-426C | VP-424C |
| 640x480 60Hz | Yes | Yes |
| 800x600 60Hz | Yes | Yes |
| 1024x768 60Hz | Yes | Yes |
| 1280x768 60Hz | Yes | Yes |
| 1280x800 60Hz | Yes | Yes |
| 1280x1024 60Hz | Yes | Yes |
| 1360x768 60Hz | Yes | Yes |
| 1400x1050 60Hz | Yes | Yes |
| 1440x900 60Hz | Yes | Yes |
| 1600x1200 60Hz | Yes | Yes |
| 1680x1050 60Hz | Yes | Yes |
| 1920x1200 RB 60Hz | Yes | Yes |
| 2560x1600 RB 60 | Yes | Yes |
| 1920x1080 60Hz | Yes | Yes |
| 1280x720 60Hz | Yes | Yes |
| 2048x1080 50/60Hz | Yes | Yes |
| 2560x1440 60Hz | Yes | Yes |
| 720x480p 60Hz | Yes | Yes |
| 720x576p 50Hz | Yes | Yes |
| 1280x720p 50/60Hz | Yes | Yes |
| 1920x1080p 24/25/30/50/60Hz | Yes | Yes |
| 2560x1080p 50/60Hz | Yes | Yes |
| 4K2K 24/25/30/50/60Hz | Yes | Yes |
| 4K2K (4:2:0) 50/60Hz | Yes | No |
Default EDID
VP-426C
Monitor
Model name..... VP-426C
Manufacturer..... KMR
Plug and Play ID..... KMR060D
Serial number...... 49
Manufacture date...... 2018, ISO week 6
Filter driver...... None
EDID revision...... 1.3
Input signal type...... Digital
Color bit depth...... Undefined
Display type..... Monochrome/grayscale
Screen size..... 360 x 360 mm (20.0 in)
Power management...... Standby, Suspend
Extension blocs..... 1 (CEA/CTA-EXT)
DDC/CI...... Not supported
Color characteristics
Default color space..... Non-sRGB
Display gamma.... 2.40
Red chromaticity..... Rx 0.611 - Ry 0.329
Green chromaticity..... Gx 0.313 - Gy 0.559
Blue chromaticity..... Bx 0.148 - By 0.131
White point (default).... Wx 0.320 - Wy 0.336
Additional descriptors... None
Timing characteristics
Horizontal scan range.... 15-136kHz
Vertical scan range..... 23-61Hz
Video bandwidth...... 600MHz
CVT standard...... Not supported
GTF standard...... Not supported
Additional descriptors... None
Preferred timing..... Yes
Native/preferred timing.. 3840x2160p at 60Hz (16:9)
Modeline..... "3840x2160" 594.000 3840 4016 4104 4400 2160 2168 2178 2250 +hsync +vsync
Detailed timing #1..... 1920x1080p at 60Hz (16:9)
Modeline..... "1920x1080" 148.500 1920 2008 2052 2200 1080 1084 1089 1125 +hsync +vsync
Standard timings supported
640 x 480p at 60Hz - IBM VGA
640 x 480p at 72Hz - VESA
640 x 480p at 75Hz - VESA
800 x 600p at 56Hz - VESA
800 x 600p at 60Hz - VESA
800 x 600p at 72Hz - VESA
800 x 600p at 75Hz - VESA
1024 x 768p at 60Hz - VESA
1024 x 768p at 70Hz - VESA
1024 x 768p at 75Hz - VESA
1280 x 1024p at 75Hz - VESA
1600 x 1200p at 60Hz - VESA STD
1280 x 1024p at 60Hz - VESA STD
1400 x 1050p at 60Hz - VESA STD
1920 x 1080p at 60Hz - VESA STD
640 x 480p at 85Hz - VESA STD
800 x 600p at 85Hz - VESA STD
1024 x 768p at 85Hz - VESA STD
1280 x 1024p at 85Hz - VESA STD
EIA/CEA/CTA-861 Information
Revision number...... 3
IT underscan...... Supported
Basic audio..... Supported
YCbCr 4:4:4.... Supported
YCbCr 4:2:2.... Supported
Native formats..... 0
Detailed timing #1..... 1440x900p at 60Hz (16:10)
Modeline...... "1440x900" 106.500 1440 1520 1672 1904 900 903 909 934 -hsync +vsync
Detailed timing #2..... 1366x768p at 60Hz (16:9)
Modeline..... "1366x768" 85.500 1366 1436 1579 1792 768 771 774 798 +hsync +vsync
Detailed timing #3..... 1920x1200p at 60Hz (16:10)
Modeline..... "1920x1200" 154.000 1920 1968 2000 2080 1200 1203 1209 1235 +hsync -vsync
CE video identifiers (VICs) - timing/formats supported
1920 x 1080p at 60Hz - HDTV (16:9, 1:1)
1920 x 1080p at 50Hz - HDTV (16:9, 1:1)
1280 x 720p at 60Hz - HDTV (16:9, 1:1)
1280 x 720p at 50Hz - HDTV (16:9, 1:1)
1920 x 1080i at 60Hz - HDTV (16:9, 1:1)
1920 x 1080i at 50Hz - HDTV (16:9, 1:1)
720 x 480p at 60Hz - EDTV (4:3, 8:9)
720 x 576p at 50Hz - EDTV (4:3, 16:15)
720 x 480i at 60Hz - Doublescan (4:3, 8:9)
720 x 576i at 50Hz - Doublescan (4:3, 16:15)
1920 x 1080p at 30Hz - HDTV (16:9, 1:1)
1920 x 1080p at 25Hz - HDTV (16:9, 1:1)
1920 x 1080p at 24Hz - HDTV (16:9, 1:1)
1920 x 1080p at 24Hz - HDTV (16:9, 1:1)
1920 x 1080p at 24Hz - HDTV (16:9, 1:1)
1920 x 1080p at 24Hz - HDTV (16:9, 1:1)
1920 x 1080p at 24Hz - HDTV (16:9, 1:1)
1920 x 1080p at 24Hz - HDTV (16:9, 1:1)
NB: NTSC refresh rate = (Hz*1000)/1001
CE audio data (formats supported)
LPCM 2-channel, 16/20/24 bit depths at 32/44/48 kHz
CE speaker allocation data
Channel configuration.... 2.0
Front left/right..... Yes
Front LFE...... No
Front center...... No
Rear left/right..... No
Rear center..... No
Front left/right center.. No
Rear left/right center... No
Rear LFE...... No
CE vendor specific data (VSDB)
IEEE registration number. 0x000C03
CEC physical address..... 1.0.0.0
Supports AI (ACP, ISRC).. No
Supports 48bpp..... Yes
Supports 36bpp...... Yes
Supports 30bpp..... Yes
Supports YCbCr 4:4:4..... Yes
Supports dual-link DVI... No
Maximum TMDS clock..... 300MHz
Audio/video latency (p).. n/a
Audio/video latency (i)... n/a
HDMI video capabilities.. Yes
EDID screen size..... No additional info
3D formats supported..... Not supported
Data payload..... 030C001000783C20008001020304
CE vendor specific data (VSDB)
IEEE registration number. 0xC45DD8
CEC physical address..... 0.1.7.8
Supports AI (ACP, ISRC).. Yes
Supports 48bpp...... No
Supports 36bpp...... No
Supports 30bpp...... No
Supports YCbCr 4:4:4..... No
Supports dual-link DVI... No
Maximum TMDS clock..... 35MHz
YCbCr 4:2:0 capability map data
Data payload..... 0F000003
Report information
Date generated.... 24/09/2019
Software revision..... 2.91.0.1043
Data source...... Real-time 0x0041
Operating system..... 10.0.17134.2
Raw data
00,FF,FF,FF,FF,FF,FF,00,2D,B2,0D,06,31,00,00,00,06,1C,01,03,80,24,24,8C,C2,90,20,9C,54,50,8F,26,
21,52,56,2F,CF,00,A9,40,81,80,90,40,D1,C0,31,59,45,59,61,59,81,99,08,E8,00,30,F2,70,5A,80,B0,58,
8A,00,BA,88,21,00,00,1E,02,3A,80,18,71,38,2D,40,58,2C,45,00,BA,88,21,00,00,1E,00,00,00,FC,00,56,
50,2D,34,32,36,43,0A,20,20,20,20,20,00,00,00,FD,00,17,3D,0F,88,3C,00,0A,20,20,20,20,20,20,01,0A.
02,03,3B,F0,52,10,1F,04,13,05,14,02,11,06,15,22,21,20,5D,5E,5F,60,61,23,09,07,07,83,01,00,00,6E,
03,0C,00,10,00,78,3C,20,00,80,01,02,03,04,67,D8,5D,C4,01,78,80,07,E4,0F,00,00,03,9A,29,A0,D0,51,
84,22,30,50,98,36,00,10,0A,00,00,00,1C,66,21,56,AA,51,00,1E,30,46,8F,33,00,10,09,00,00,00,1E,28,
3C,80,A0,70,B0,23,40,30,20,36,00,10,0A,00,00,00,1A,00,00,00,00,00,00,00,00,00,00,00,E0
VP-424C
Monitor
Model name..... VP-424C
Manufacturer..... KMR
Plug and Play ID..... KMR060D
Serial number...... 49
Manufacture date...... 2018, ISO week 6
Filter driver...... None
EDID revision...... 1.3
Input signal type...... Digital
Color bit depth...... Undefined
Display type..... Monochrome/grayscale
Screen size..... 360 x 360 mm (20.0 in)
Power management...... Standby, Suspend
Extension blocs..... 1 (CEA/CTA-EXT)
DDG/CI...... Not supported
Color characteristics
Default color space..... Non-sRGB
Display gamma.... 2.40
Red chromaticity..... Rx 0.611 - Ry 0.329
Green chromaticity..... Gx 0.313 - Gy 0.559
Blue chromaticity..... Bx 0.148 - By 0.131
White point (default).... Wx 0.320 - Wy 0.336
Additional descriptors... None
Timing characteristics
Horizontal scan range.... 15-136kHz
Vertical scan range..... 23-61Hz
Video bandwidth..... 600MHz
CVT standard...... Not supported
GTF standard...... Not supported
Additional descriptors... None
Preferred timing...... Yes
Native/preferred timing.. 3840x2160p at 60Hz (16:9)
Modeline..... "3840x2160" 594.000 3840 4016 4104 4400 2160 2168 2178 2250 +hsync +vsync
Detailed timing #1..... 1920x1080p at 60Hz (16:9)
Modeline..... "1920x1080" 148.500 1920 2008 2052 2200 1080 1084 1089 1125 +hsync +vsync
Standard timings supported
640 x 480p at 60Hz - IBM VGA
640 x 480p at 72Hz - VESA
640 x 480p at 75Hz - VESA
800 x 600p at 56Hz - VESA
800 x 600p at 60Hz - VESA
800 x 600p at 72Hz - VESA
800 x 600p at 75Hz - VESA
1024 x 768p at 60Hz - VESA
1024 x 768p at 70Hz - VESA
1024 x 768p at 75Hz - VESA
1280 x 1024p at 75Hz - VESA
1600 x 1200p at 60Hz - VESA STD
1280 x 1024p at 60Hz - VESA STD
1400 x 1050p at 60Hz - VESA STD
1920 x 1080p at 60Hz - VESA STD
640 x 480p at 85Hz - VESA STD
800 x 600p at 85Hz - VESA STD
1024 x 768p at 85Hz - VESA STD
1280 x 1024p at 85Hz - VESA STD
EIA/CEA/CTA-861 Information
Revision number...... 3
IT underscan...... Supported
Basic audio..... Supported
YCbCr 4:4:4.... Supported
YCbCr 4:2:2.... Supported
Native formats..... 0
Detailed timing #1..... 1440x900p at 60Hz (16:10)
Modeline..... "1440x900" 106.500 1440 1520 1672 1904 900 903 909 934 -hsync +vsync
Detailed timing #2..... 1366x768p at 60Hz (16:9)
Modeline..... "1366x768" 85.500 1366 1436 1579 1792 768 771 774 798 +hsync +vsync
Detailed timing #3..... 1920x1200p at 60Hz (16:10)
Modeline...... "1920x1200" 154.000 1920 1968 2000 2080 1200 1203 1209 1235 +hsync -vsync
CE video identifiers (VICs) - timing/formats supported
1920 x 1080p at 60Hz - HDTV (16:9, 1:1)
1920 x 1080p at 50Hz - HDTV (16:9, 1:1)
1280 x 720p at 60Hz - HDTV (16:9, 1:1)
1280 x 720p at 50Hz - HDTV (16:9, 1:1)
1920 x 1080i at 60Hz - HDTV (16:9, 1:1)
1920 x 1080i at 50Hz - HDTV (16:9, 1:1)
720 x 480p at 60Hz - EDTV (4:3, 8:9)
720 x 576p at 50Hz - EDTV (4:3, 16:15)
720 x 480i at 60Hz - Doublescan (4:3, 8:9)
720 x 576i at 50Hz - Doublescan (4:3, 16:15)
1920 x 1080p at 30Hz - HDTV (16:9, 1:1)
1920 x 1080p at 25Hz - HDTV (16:9, 1:1)
1920 x 1080p at 24Hz - HDTV (16:9, 1:1)
1920 x 1080p at 24Hz - HDTV (16:9, 1:1)
1920 x 1080p at 24Hz - HDTV (16:9, 1:1)
1920 x 1080p at 24Hz - HDTV (16:9, 1:1)
1920 x 1080p at 24Hz - HDTV (16:9, 1:1)
1920 x 1080p at 24Hz - HDTV (16:9, 1:1)
NB: NTSC refresh rate = (Hz*1000)/1001
CE audio data (formats supported)
LPCM 2-channel, 16/20/24 bit depths at 32/44/48 kHz
CE speaker allocation data
Channel configuration.... 2.0
Front left/right..... Yes
Front LFE...... No
Front center...... No
Rear left/right..... No
Rear center...... No
Front left/right center.. No
Rear left/right center... No
Rear LFE...... No
CE vendor specific data (VSDB)
IEEE registration number. 0x000C03
CEC physical address..... 1.0.0.0
Supports AI (ACP, ISRC).. No
Supports 48bpp...... Yes
Supports 36bpp..... Yes
Supports 30bpp...... Yes
Supports YCbCr 4:4:4..... Yes
Supports dual-link DVI... No
Maximum TMDS clock..... 300MHz
Audio/video latency (p)... n/a
Audio/video latency (i).. n/a
HDMI video capabilities.. Yes
EDID screen size..... No additional info
3D formats supported..... Not supported
Data payload.... 030C001000783C20008001020304
CE vendor specific data (VSDB)
IEEE registration number. 0xC45DD8
CEC physical address..... 0.1.7.8
Supports AI (ACP, ISRC).. Yes
Supports 48bpp...... No
Supports 36bpp...... No
Supports 30bpp...... No
Supports YCbCr 4:4:4..... No
Supports dual-link DVI... No
Maximum TMDS clock..... 35MHz
YCbCr 4:2:0 capability map data
Data payload..... 0F000003
Report information
Date generated..... 24/09/2019
Software revision..... 2.91.0.1043
Data source...... Real-time 0x0041
Operating system..... 10.0.17134.2
Raw data
00,FF,FF,FF,FF,FF,00,2D,B2,0D,06,31,00,00,00,06,1C,01,03,80,24,24,8C,C2,90,20,9C,54,50.8F,26,21,52,56,2F,CF,00,A9,40,81,80,90,40,D1,C0,31,59,45,59,61,59,81,99,08,E8,00,30,F2,70,5A,80,B0,58,8A,00,BA,88,21,00,00,1E,02,3A,80,18,71,38,2D,40,58,2C,45,00,BA,88,21,00,00,1E,00,00,00,FC,00,56,50,2D,34,32,34,43.0A,20,20,20,20,20,00,00,FD,00,17.3D,OF,88,3C,00,A0,20,20,20,20,20,01.0C,02,03.3B,F0,52.10.1F,04.13.05.14.02;11.06.15.22.21.20.5D.5E.5F.60.61.23.09.07.07.83.01.00.00.6E. 03.0C.00.10.00.78.3C.20.00.80.01.02.03.04.67.D8.5D.C4.01.78.8O.07.E4.0F.00.00.03.9A.29,A0.D0.51 84.22.30.50.98.36.00.10.AA.00.00.00.1C.66.21.56.AA.51.00.1E.30.46.8F.33.00.10.09.00.00.00.1E.28 3C.8G.AO.70.BO.23.40.30.20.36.00.1O.AA.00.00.1A.1O.O.O.O.O.O.O.O.O.O.O.O.O.O.O.O.O.O.E
The warranty obligations of Kramer Electronics Inc. ("Kramer Electronics") for this product are limited to the terms set forth below:
What is Covered
This limited warranty covers defects in materials and workmanship in this product.
What is Not Covered
This limited warranty does not cover any damage, deterioration or malfunction resulting from any alteration, modification, improper or unreasonable use or maintenance, misuse, abuse, accident, neglect, exposure to excess moisture, fire, improper packing and shipping (such claims must be presented to the carrier), lightning, power surges, or other acts of nature. This limited warranty does not cover any damage, deterioration or malfunction resulting from the installation or removal of this product from any installation, any unauthorized tampering with this product, any repairs attempted by anyone unauthorized by Kramer Electronics to make such repairs, or any other cause which does not relate directly to a defect in materials and/or workmanship of this product. This limited warranty does not cover cartons, equipment enclosures, cables or accessories used in conjunction with this product.
Without limiting any other exclusion herein, Kramer Electronics does not warrant that the product covered hereby, including, without limitation, the technology and/or integrated circuit(s) included in the product, will not become obsolete or that such items are or will remain compatible with any other product or technology with which the product may be used.
How Long this Coverage Lasts
The standard limited warranty for Kramer products is seven (7) years from the date of original purchase, with the following exceptions:
- All Kramer VIA hardware products are covered by a standard three (3) year warranty for the VIA hardware and a standard three (3) year warranty for firmware and software updates; all Kramer VIA accessories, adapters, tags, and dongles are covered by a standard one (1) year warranty.
- Kramer fiber optic cables, adapter-size fiber optic extenders, pluggable optical modules, active cables, cable retractors, ring mounted adapters, portable power chargers, Kramer speakers, and Kramer touch panels are covered by a standard one (1) year warranty. Kramer 7-inch touch panels purchased on or after April 1st, 2020 are covered by a standard two (2) year warranty.
- All Kramer Calibre products, all Kramer Minicom digital signage products, all HighSecLabs products, all streaming, and all wireless products are covered by a standard three (3) year warranty.
- All Sierra Video MultiViewers are covered by a standard five (5) year warranty.
- Sierra switchers & control panels are covered by a standard seven (7) year warranty (excluding power supplies and fans that are covered for three (3) years).
- K-Touch software is covered by a standard one (1) year warranty for software updates.
- All Kramer passive cables are covered by a lifetime warranty.
Who is Covered
Only the original purchaser of this product is covered under this limited warranty. This limited warranty is not transferable to subsequent purchasers or owners of this product.
What Kramer Electronics Will Do
Kramer Electronics will, at its sole option, provide one of the following three remedies to whatever extent it shall deem necessary to satisfy a proper claim under this limited warranty:
- Elect to repair or facilitate the repair of any defective parts within a reasonable period of time, free of any charge for the necessary parts and labor to complete the repair and restore this product to its proper operating condition. Kramer Electronics will also pay the shipping costs necessary to return this product once the repair is complete.
- Replace this product with a direct replacement or with a similar product deemed by Kramer Electronics to perform substantially the same function as the original product. If a direct or similar replacement product is supplied, the original product's end warranty date remains unchanged and is transferred to the replacement product.
- Issue a refund of the original purchase price less depreciation to be determined based on the age of the product at the time remedy is sought under this limited warranty.
What Kramer Electronics Will Not Do Under This Limited Warranty
If this product is returned to Kramer Electronics or the authorized dealer from which it was purchased or any other party authorized to repair Kramer Electronics products, this product must be insured during shipment, with the insurance and shipping charges prepaid by you. If this product is returned uninsured, you assume all risks of loss or damage during shipment. Kramer Electronics will not be responsible for any costs related to the removal or re-installation of this product from or into any installation. Kramer Electronics will not be responsible for any costs related to any setting up this product, any adjustment of user controls or any programming required for a specific installation of this product.
How to Obtain a Remedy Under This Limited Warranty
To obtain a remedy under this limited warranty, you must contact either the authorized Kramer Electronics reseller from whom you purchased this product or the Kramer Electronics office nearest you. For a list of authorized Kramer Electronics resellers and/or Kramer Electronics authorized service providers, visit our web site at www.kramerav.com or contact the Kramer Electronics office nearest you.
In order to pursue any remedy under this limited warranty, you must possess an original, dated receipt as proof of purchase from an authorized Kramer Electronics reseller. If this product is returned under this limited warranty, a return authorization number, obtained from Kramer Electronics, will be required (RMA number).
You may also be directed to an authorized reseller or a person authorized by Kramer Electronics to repair the product.
If it is decided that this product should be returned directly to Kramer Electronics, this product should be properly packed, preferably in the original carton, for shipping. Cartons not bearing a return authorization number will be refused.
Limitation of Liability
THE MAXIMUM LIABILITY OF KRAMER ELECTRONICS UNDER THIS LIMITED WARRANTY SHALL NOT EXCEED THE ACTUAL PURCHASE PRICE PAID FOR THE PRODUCT. TO THE MAXIMUM EXTENT PERMITTED BY LAW, KRAMER ELECTRONICS IS NOT RESPONSIBLE FOR DIRECT, SPECIAL, INCIDENTAL OR CONSEQUENTIAL DAMAGES RESULTING FROM ANY BREACH OF WARRANTY OR CONDITION, OR UNDER ANY OTHER LEGAL THEORY. Some countries, districts or states do not allow the exclusion or limitation of relief, special, incidental, consequential or indirect damages, or the limitation of liability to specified amounts, so the above limitations or exclusions may not apply to you.
Exclusive Remedy
TO THE MAXIMUM EXTENT PERMITTED BY LAW, THIS LIMITED WARRANTY AND THE REMEDIES SET FORTH ABOVE ARE EXCLUSIVE AND IN LIEU OF ALL OTHER WARRANTIES, REMEDIES AND CONDITIONS, WHETHER ORAL OR WRITTEN, EXPRESS OR IMPLIED. TO THE MAXIMUM EXTENT PERMITTED BY LAW, KRAMER ELECTRONICS SPECIFICALLY DISCLAIMS ANY AND ALL IMPLIED WARRANTIES, INCLUDING, WITHOUT LIMITATION, WARRANTIES OF MERCHANTABILITY AND FITNESS FOR A PARTICULAR PURPOSE. IF KRAMER ELECTRONICS CANNOT LAWFULLY DISCLAIM OR EXCLUDE IMPLIED WARRANTIES UNDER APPLICABLE LAW, THEN ALL IMPLIED WARRANTIES COVERING THIS PRODUCT, INCLUDING WARRANTIES OF MERCHANTABILITY AND FITNESS FOR A PARTICULAR PURPOSE, SHALL APPLY TO THIS PRODUCT AS PROVIDED UNDER APPLICABLE LAW. IF ANY PRODUCT TO WHICH THIS LIMITED WARRANTY APPLIES IS A "CONSUMER PRODUCT" UNDER THE MAGNUSON-MOSS WARRANTY ACT (15 U.S.C.A. §2301, ET SEQ.) OR OTHER APPLICABLE LAW, THE FOREGOING DISCLAIMER OF IMPLIED WARRANTIES SHALL NOT APPLY TO YOU, AND ALL IMPLIED WARRANTIES ON THIS PRODUCT, INCLUDING WARRANTIES OF MERCHANTABILITY AND FITNESS FOR THE PARTICULAR PURPOSE, SHALL APPLY AS PROVIDED UNDER APPLICABLE LAW.
Other Conditions
This limited warranty gives you specific legal rights, and you may have other rights which vary from country to country or state to state. This limited warranty is void if (i) the label bearing the serial number of this product has been removed or defaced, (ii) the product is not distributed by Kramer Electronics or (iii) this product is not purchased from an authorized Kramer Electronics reseller. If you are unsure whether a reseller is an authorized Kramer Electronics reseller, visit our web site at www.kramerav.com or contact a Kramer Electronics office from the list at the end of this document. Your rights under this limited warranty are not diminished if you do not complete and return the product registration form or complete and submit the online product registration form. Kramer Electronics thanks you for purchasing a Kramer Electronics product. We hope it will give you years of satisfaction.

HDMI™
HIGH-DEFINITION MULTIMEDIA INTERFACE
P/N: 2900-301245

Rev:


SAFETY WARNING
Disconnect the unit from the power supply before opening and servicing
For the latest information on our products and a list of Kramer distributors, visit our website where updates to this user manual may be found.
We welcome your questions, comments, and feedback.
The terms HDMI, HDMI High-Definition Multimedia Interface, and the HDMI Logo are trademarks or registered trademarks of HDMI Licensing Administrator, Inc. All brand names, product names, and trademarks are the property of their respective owners.
- Defining VP-426C and VP-424C 4
- Mounting VP-426C and VP-424C 6
- Connecting the Devices 7
- Operating and Controlling VP-426C and VP-424C 10
- Upgrading the Firmware 17
- Technical Specifications 18
- Introduction
- Getting Started
- Achieving Best Performance
- Safety Instructions
- Caution:
- Warning:
- Recycling Kramer Products
- Overview
- Exceptional Quality
- Advanced and User-friendly Operation
- Flexible Connectivity
- Typical Applications
- Defining VP-426C and VP-424C
- Mounting VP-426C and VP-424C
- To mount VP-426C and VP-424C on a table or shelf:
- Connecting the Devices
- Connecting VP-426C
- Connecting the Remote Control Switches
- Connecting the Balanced Output to a Balanced/Unbalanced Stereo Audio Acceptor
- Connecting VP-424C
- Operating and Controlling VP-426C and VP-424C
- Using the Front Panel Buttons
- Controlling the Device Via the OSD Menu
- Setting Image Parameters
- Selecting the Input Signal
- Setting Output Parameters
- To set the output parameters:
- VP-426C - Setting the Audio Source
- To set the audio source:
- Setting OSD Parameters
- To set the OSD parameters:
- Setting HDCP
- Setting Sleep Mode
- To set the Auto SYNC OFF:
- Setting the Switching Mode
- To set the switching mode:
- Setting Auto Image on the PC
- To set the PC Auto Image Adjustment:
- Setting Freeze Button functionality
- Managing EDID
- Uploading EDID from an External File
- To select the EDID from an external file:
- Viewing Device Information
- To view the information:
- Performing Factory Reset
- To perform factory reset:
- Upgrading the Firmware
- To upgrade the firmware:
- Technical Specifications
- Default EDID
- VP-426C
- EIA/CEA/CTA-861 Information
- CE video identifiers (VICs) - timing/formats supported
- CE audio data (formats supported)
- CE speaker allocation data
- CE vendor specific data (VSDB)
- VP-424C
- What is Covered
- What is Not Covered
- How Long this Coverage Lasts
- Who is Covered
- What Kramer Electronics Will Do
- What Kramer Electronics Will Not Do Under This Limited Warranty
- How to Obtain a Remedy Under This Limited Warranty
- Limitation of Liability
- Exclusive Remedy
- Other Conditions
Brand : Kramer
Model : VP-426C
Category : Processor