
SLOHT26 - Heating SereneLife - Free user manual and instructions
Find the device manual for free SLOHT26 SereneLife in PDF.


| Product Type | Electric Space Heater |
| Brand | SereneLife |
| Model | SLOHT26 |
| Dimensions (W x H x D) | Approx. 20 x 30 x 20 cm |
| Weight | Approx. 2.0 kg |
| Power Source | AC 120V, 60Hz |
| Power Consumption | 1500W (max) |
| Heating Element | PTC Ceramic |
| Heat Settings | Low, High, Fan Only |
| Thermostat | Adjustable thermostat |
| Oscillation | Yes, wide-angle oscillation |
| Timer | 1-12 hours auto shut-off |
| Remote Control | Includes remote control |
| Safety Features | Tip-over protection, overheat protection |
| Noise Level | < 45 dB |
| Coverage Area | Up to 200 sq ft |
| Cleaning | Wipe with dry cloth; do not use water |
| Filter | Washable pre-filter |
| Spare Parts | Contact manufacturer for replacement parts |
| Warranty | 1 year limited warranty |
Frequently Asked Questions - SLOHT26 SereneLife
User questions about SLOHT26 SereneLife
0 question about this device. Answer the ones you know or ask your own.
Ask a new question about this device
Download the instructions for your Heating in PDF format for free! Find your manual SLOHT26 - SereneLife and take your electronic device back in hand. On this page are published all the documents necessary for the use of your device. SLOHT26 by SereneLife.
USER MANUAL SLOHT26 SereneLife
*☆☆★☆☆×X

* * * * * * * * *
About SereneLife
SereneLife products are designed to create a more comfortable living space, indoors and out. Our team presents innovative lifestyle solutions throughout the year that promote simplicity and serenity.
We're committed to delivering the most dependable products so you can live a better, more serene life.

CONTENTS
FEATURES AND TECHNICAL SPECS 4
IMPORTANT INSTRUCTIONS 5
PREPARATION 7
PARTS DESCRIPTIONS 7
INSTALLATION 8
OPERATIONS 9
CLEANING/MAINTENANCE 10
REGISTER PRODUCT 11
READ AND SAVE THESE INSTRUCTIONS

WARNING: Cancer and Reproductive Harm - www.P65warnings.ca.gov
Features:
• High Rated Aluminum Reflector
- Offers Sun-like Infrared Heating
- Includes Mesh Grille Front
- Odorless, No Gas or Propane Use
- Remote Control Ceiling Heater
• Dust and Waterproof Design
• Anodized Extruded Aluminum Alloy Housing
• High-Efficiency Carbon Fibre Heating Elements
- One Power Settings
- IP65 Approved
What's in the Box:
• 1500 Watt Electric Patio Heater
- Allen Wrench
• (2) Upper L Bracket
• (2) Lower L Bracket
• (2) Expansion Bolt M6 x 70
• (2) Screw M6 x 16
• (1) Remote Control
• (4) Screw M6 x 8
Technical Specs:
- Construction Material: Aluminum Alloy Frame
• Power Supply: 1500W
• 1 Heat Levels: 1500 Watts
• Heating Area: 18 sq. ft.
• Maximum Amperage: 12.5 Amps - Battery Life: Up to 2+ Hours
- Battery Operated Remote: 1.5V, (2) x 'AAA' Batteries (not included)
• Power Cable Length: 2 Meters, 120V - Heat Warm Range: Around 10-15 Square Meters
- Product Dimensions (L x W x H): 29.13" x 6.4" x 6.1"-inches
PLEASE MAKE SURE THAT YOU HAVE READ THE MANUAL CAREFULLY BEFORE USING IT.
IMPORTANT INSTRUCTIONS
When using electrical appliances, basic precautions should always be followed to reduce the risk of re, electric shock, and injury to persons, including the following:
-
Read all instructions before using this heater.
-
Extreme caution is necessary when any heater is used by or near children or invalids and whenever the heater is left operating and unattended.
-
Do not operate any heater after it malfunctions. Disconnect power at the service panel and have the heater inspected by a reputable electrician before reusing.
-
Do not insert or allow foreign objects to enter any ventilation or exhaust opening as this may cause an electric shock or fire, or damage the heater.
-
To prevent a possible fire, do not block air intakes or exhaust in any manner.
-
A heater has hot and arcing or sparking parts inside. Do not use it in areas where gasoline, paint, or flammable vapors or liquids are used or stored.
-
The unit must be placed with a clearance of 39 inches to the wall and 12 inches to the ceiling.
-
This heater is hot when in use. To avoid burns, do not let bare skin touch hot surfaces. High temperature, keep combustible material such as furniture, pillows, bedding, papers, clothes, and curtains at least 3 feet (0.9 meters) from the front of the heater and away from the side and rear.
-
The heater must be installed at least 7 feet above the floor.
-
The unit is at high temperature during operation. It remains hot for a period after shut down. Potential danger can occur when touching it during this period.
-
Do not place the unit close to curtains and/or other flammable objects. Otherwise, there will be a danger of catching fire.
-
Do not cover the unit with anything during operation or a short time after it's shut down.
-
Do not wrap the power supply cord on the unit.
-
The unit must be handled with care, avoiding vibration or impact.
-
The unit must be securely grounded during operation.
-
When damaged, the unit must be repaired by a professional repair team.
-
If the supply cord is damaged, it must be replaced by the manufacturer, its service agent, or similarly qualified persons to avoid a hazard.
-
The heater must not be located immediately below a socket-outlet.
-
When assembling, keep clear of any board or flammable material.
-
Do not use this heater with a programmer, timer, or any other device that switches the heater on automatically, since a fire risk exists if the heater is covered or positioned incorrectly.
-
This appliance is not intended for use by persons (including children) with reduced physical, sensory, or mental capabilities, or lack of experience and knowledge, unless they have been given supervision or instruction concerning the use of the appliance by a person responsible for their safety.
-
Children should be supervised to ensure that they do not play with the appliance.
-
The head of the unit is at high temperature during operation. Unplug the unit and wait until it's cool before cleaning.
-
Do not use this heater in the immediate surroundings of a bath, a shower, or a swimming pool.
-
Do not use this unit in places where causticity or volatile air exists, i.e., dust, steam, gas, etc.
-
Do not use this unit as a cloth dryer or towel dryer.
-
Do not use this unit as a sauna heater.
-
Do not use this unit as a room heater for heat storage.
-
Do not use this unit in animal propagation and raising.
-
Do not use this unit in a central heating system.
-
Do not immerse this unit into water for cleaning.
-
The unit should be plugged into a socket that is easily visible and reachable.
-
To avoid potential fire hazards, never place your heater or its electrical cord under rugs or carpeting. Place the electrical cord away from busy areas to avoid accidental tripping and contact.
-
To disconnect the heater, turn controls to off, and turn off power to the heater circuit at the main disconnect panel. Then remove the plug from the outlet.
-
Use this heater only as described in this manual.
Any other use not recommended by the manufacturer may cause fire, electric shock, or injury to persons.
- Surface temperatures become very hot when operating the heater.
Children and adults should stay away to avoid burns or clothing ignition.
-
Young children should be carefully supervised when they are in the area of the heater.
-
CAUTION: MOUNT WITH THE BOTTOM OF THE HEATER AT LEAST 8 FEET ABOVE THE FLOOR OR GRADE.
SAVE THESE INSTRUCTIONS
Preparation
- Unpack the carton. Remove the accessories pack from the carton containing the heater body. Ensure that all accessories listed in the Check List are included. If anything is missing, promptly contact the retailer for assistance.
- Prepare a cross-head screwdriver.
- Carefully read this instruction manual before installation and use. Keep this manual in a safe and accessible place for future reference.
PARTS DESCRIPTIONS
Parts Descriptions:
| No. | Part Name No. Part Name | ||
| 1 | Expansion Bolt M6*70 | 7 | Lower L Bracket |
| 2 | Upper L Bracket 8 Main Switch | ||
| 3 | Washer 9 Control Panel | ||
| 4 | Spring Washer | 10 | Screw M6*8 |
| 5 | Screw Nut M6 | 11 | Allen Key |
| 6 | Screw M6*16 | 12 | Remote Control |
Accessories Pack Check List:
| Accessory Name | Qty |
| Upper L Bracket | 2 |
| Lower L Bracket | 2 |
| Expansion Bolt M6*70 | 2 |
| Screw M6*16 | 2 |
| Remote Control | 1 |
| Allen Key | 1 |
| Screw M6*8 | 4 |
Installation
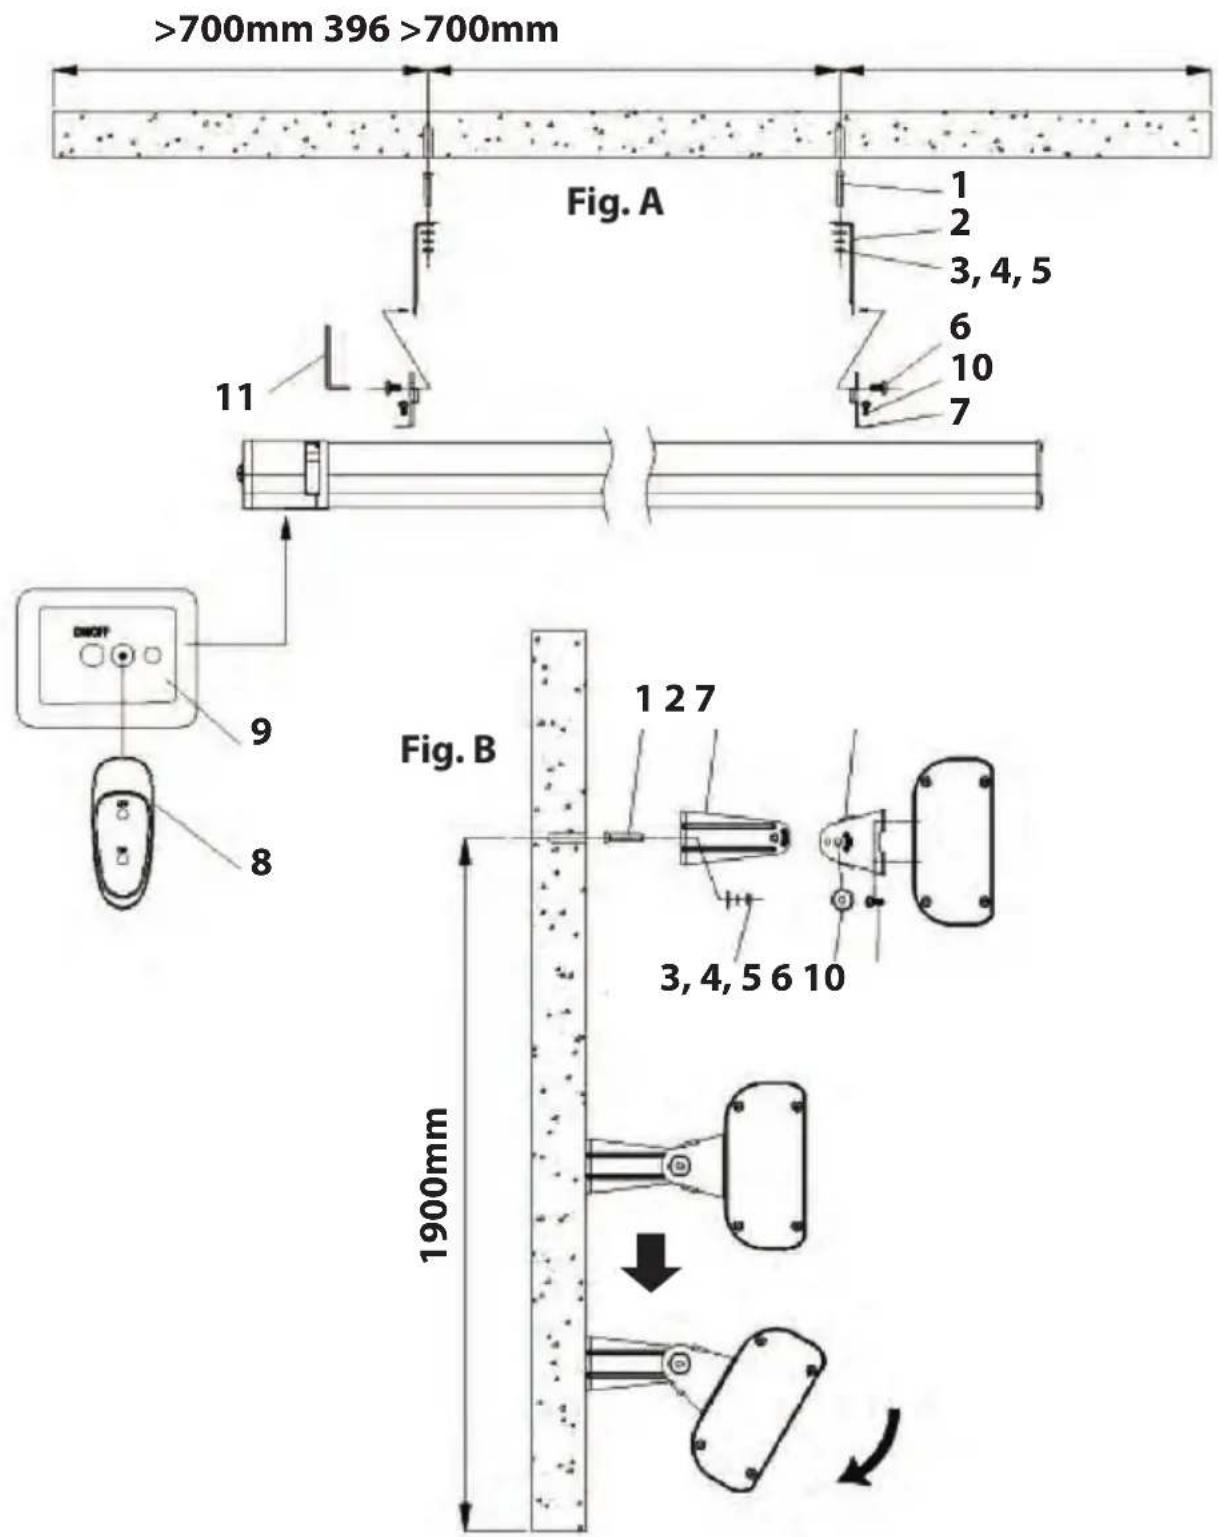
- The heater must be installed at least 5.9 feet (1.8 meters) from the ground and 19.7 inches (50 cm) from the side wall.
- Drill 2 holes in the ceiling or wall according to the size shown in the table above. Insert the 2 expansion bolts into the holes. Use a spanner to twist the screw nuts on the expansion bolts clockwise until they are securely located in the holes. Unscrew the screw nuts and set them aside with washers and spring washers for further use.
- Place the upper L bracket onto the ceiling or wall. Let the 2 expansion bolts go through the holes on the upper L bracket and fix them with the washers, spring washers, and screw nuts mentioned above.
- Attach the lower L bracket to the rear side of the heater. Fix it with M6*8 screws using the provided Allen key.
- Mount the upper L bracket onto the lower L bracket. Screw it tightly with M6*16 screws. For wall-mounted installation, make sure the control box is on the left side.
- Loosen the M616 screw, set the heater to the desired angle, and tighten the M616 screws. The adjustable angle is within 60 degrees in total.
Operations
- Plug the unit into a socket. Make sure the power supply matches the rated power.
-
Press the switch on the left side of the heater. The LED indicator light starts flashing, showing the heater is on standby. Press the ON button on the control panel (or the ON button on the remote control) to switch on the heater. To shift the heater to standby mode, press the ON button on the control panel (or the OFF button on the remote control). The LED indicator light starts flashing again.
-
To switch off the heater, press the switch on the left side of the heater accordingly.
Grounding Instructions
This heater is designed for use on 120 volts. The cord comes with a plug as shown at A in the figure below. An adapter, as shown at C, is available for connecting three-blade grounding-type plugs to two-slot receptacles. The green grounding lug extending from the adapter must be connected to a permanent ground, such as a properly grounded outlet box. However, it is recommended not to use the adapter if a three-slot grounded receptacle is available.

CLEANING/MAINTENANCE
- Before cleaning, make sure the power has been turned off at the circuit breaker panel and that the heating element of the heater is cool.
- To maintain the external appearance of the radiator, it only needs to be wiped over occasionally with a dry duster. During the summer months, or at other times when the appliance is not in use and is completely cold, it is the best opportunity to wipe it over with a damp cloth. Store the cord, heater, and similar items in a cool place when not in use.
- Do not use abrasive cleaning powders or furniture polish.
Do not use chemical or abrasive products, metallic scourers, and so on, which may deteriorate the surface, to clean the appliance.
- All other servicing should be performed by authorized service personnel.
- Do not disassemble the heater when cleaning.


Register Product
Thank you for choosing SereneLife. By registering your product, you ensure that you receive the full benefits of our exclusive warranty and personalized customer support.
Complete the form to access expert support and to keep your SereneLife purchase in perfect condition.

Serenelifehome.com/ register
serenelife™

Questions or Comments?
We are here to help!
Phone: 1.718.535.1800
Serenelifehome.com/ContactUs

- ABOUT SERENELIFE
- CONTENTS
- READ AND SAVE THESE INSTRUCTIONS
- FEATURES
- WHAT'S IN THE BOX
- TECHNICAL SPECS
- PLEASE MAKE SURE THAT YOU HAVE READ THE MANUAL CAREFULLY BEFORE USING IT
- IMPORTANT INSTRUCTIONS
- SAVE THESE INSTRUCTIONS
- PREPARATION
- INSTALLATION
- OPERATIONS
- GROUNDING INSTRUCTIONS
- CLEANING/MAINTENANCE
- REGISTER PRODUCT
- SERENELIFE™
Brand : SereneLife
Model : SLOHT26
Category : Heating