
Pursuit 3 - Treadmills LifeSpan - Free user manual and instructions
Find the device manual for free Pursuit 3 LifeSpan in PDF.


| Product Type | Treadmill |
| Brand | LifeSpan |
| Model | Pursuit 3 |
| Motor Type | Brushless |
| Speed Range | 1–16 km/h |
| Display | 5-window LCD (Speed, Time, Distance, Calories, Pulse) |
| Preset Programs | 15 (P1–P15) plus Body Fat Test |
| Countdown Modes | Time, Distance, Calories |
| Heart Rate Monitoring | Hand pulse sensors (for reference only) |
| Safety Key | Yes – emergency stop |
| Folding Design | Yes, with air pressure rod |
| Power Requirements | 220–240 V, 50/60 Hz, grounded outlet |
| Recommended Fuse | 10 A |
| Assembly Required | Yes – tools included |
| Maintenance | Lubricate belt/deck periodically; adjust belt tracking |
| Motor Brush Replacement | After approximately 1000 hours |
| Lubricant Type | Silicone-based spray or oil |
| Intended Use | In-home only |
| Warranty | Refer to lifespanfitness.com.au/warranty-repairs |
Frequently Asked Questions - Pursuit 3 LifeSpan
User questions about Pursuit 3 LifeSpan
0 question about this device. Answer the ones you know or ask your own.
Ask a new question about this device
Download the instructions for your Treadmills in PDF format for free! Find your manual Pursuit 3 - LifeSpan and take your electronic device back in hand. On this page are published all the documents necessary for the use of your device. Pursuit 3 by LifeSpan.
USER MANUAL Pursuit 3 LifeSpan
Product may vary slightly from the item pictured due to model upgrades.

Read all instructions carefully before using this product. Retain this owner's manual for future reference.
NOTE:
This manual may be subject to updates or changes. Up to date manuals are available through our website at www.lifespanfitness.com.au
TABLE OF CONTENTS
I. Important Safety Instructions 03
II. Important Electrical Information 05
III. Important Operating Instructions 06
IV. Assembly Instructions 07
V. Folding Instructions 10
VI. Operation Guide 11
VII. Exercise Guide ...... 15
VIII. Maintenance Instructions ....17
IX. Replacing Motor Brushes 21
X. Exploded Diagram 24
XI. Parts List 25
XII. Trouble Shooting Guide 26
XIII. Warranty 28
XIV. Hand Pulse Technology 29
I. IMPORTANT SAFETY INSTRUCTIONS
WARNING: Read all instructions before using this treadmill.
It is important your treadmill receives regular maintenance to prolong its useful life. Failing to regularly maintain your treadmill may void your warranty.
! DANGER
To reduce the risk of electric shock disconnect your treadmill from the electrical outlet prior to cleaning and/or service work.
DO NOT USE AN EXTENSION CORD:
DO NOT ATTEMPT TO DISABLE THE GROUNDED PLUG BY USING IMPROPER ADAPTERS OR IN ANY WAY MODIFY THE CORD SET.
• Install the treadmill on a flat level surface with access to a 220-240 volt (50/60Hz), grounded outlet.
- Do not operate treadmill on deeply padded, plush or shag carpet. Damage to both carpet and treadmill may result.
- Do not block the rear of the treadmill. Provide a minimum of 1 metre clearance between the rear of the treadmill and any fixed object.
- Place your unit on a solid, level surface when in use.
- When running, make sure the plastic clip is fastened on your clothing. It is for your safety, should you fall or move too far back on the treadmill.
- Keep hands away from all moving parts.
- Never operate the treadmill if it has a damaged power cord or plug. When damaged, these must be replaced by the manufacturer, its service agent or similarly qualified persons in order to avoid a hazard.
- Keep the cord away from heated surfaces.
- Do not operate where aerosol spray products are being used or where oxygen is being administered. Sparks from the motor may ignite a highly gaseous environment.
- Never drop or insert any object into any openings.
- The treadmill is intended for in-home use only and is not suitable for commercial environments.
- To disconnect, turn all controls to the off position, remove the safety key, and then remove the plug from the outlet.
- The pulse sensors are not medical devices. Various factors, including the user's movement, may affect the accuracy of heart rate readings. The pulse sensors are intended only as exercise aids in determining heart rate trends in general.
- Use the handrails provided; they are for your safety.
- Wear proper shoes. High heels, dress shoes, sandals or bare feet are not suitable for use on your treadmill. Quality athletic shoes are recommended to avoid leg fatigue.
- Before undertaking any type of exercise program, it is recommended that you consult a doctor.
- Injuries to health may result from incorrect or excessive training.
- This appliance is not intended for use by persons (including children) with reduced physical, sensory or mental capabilities, or lack of experience and knowledge, unless they have been given supervision or instruction concerning use of the appliance by a person responsible for their safety.
- WARNING: Heart rate monitoring systems may be inaccurate. If you feel faint stop exercising immediately.
- Children should not be allowed on or around the equipment, even when not in use.
- Children should be supervised to ensure that they do not play with this machine.
- Loose-fitting clothing or jewellery that could become an entanglement hazard should not be worn.
- Training shoes should be worn when using the equipment.
- Equipment must be used on a level and stable surface.
- All fixings should be checked before the equipment is used.
- All literature relating to the use of the equipment should be retained for future reference.
- Recommended operating temperature: 5-40°C.
Remove the safety key after use to prevent unauthorized treadmill operation.
II. IMPORTANT ELECTRICAL INFORMATION

WARNING!
- Route the power cord away from any moving part of the treadmill including the elevation mechanism and transport wheels.
- NEVER remove any cover without first disconnecting AC power.
- NEVER expose this treadmill to rain or moisture. This treadmill is not designed for use outdoors, near a pool, or in any other high humidity environment.
- This is a high-power item; please do not share the same outlet with other high power machines such as, fridges, air conditioning etc. Please choose an outlet exclusively for the machine and make sure the fuse is 10A.
This product must be grounded. If it should malfunction or breakdown, grounding provides a path of least resistance for electric current to reduce the risk of electric shock. This product is equipped with a cord having an equipment-grounding conductor and a grounding plug. The plug must be plugged into an appropriate outlet that is properly installed and grounded in accordance with all local codes and ordinances.

DANGER
Improper connection of the equipment-grounding conductor can result in a risk of electric shock. Check with a qualified electrician or serviceman if you are in doubt as to whether the product is properly grounded. Do not modify the plug provided with the product – if it will not fit the outlet, have a proper outlet installed by a qualified electrician. This product is for use on a nominal 220-240/100-120-volt circuit and has a grounding plug that looks like the plug illustrated in sketch A in following figure. Make that the product is connected to an outlet having the same configuration as the plug. No adapter should be used with this product. (The below picture is just for reference; the actual plug and jack is depending on import country)
GROUNDING METHODS

III. IMPORTANT OPERATING INSTRUCTIONS
- Understand that changes in speed and incline do not occur immediately. Set your desired speed on the display console and release the adjustment key. The display will obey the command gradually.
- Use caution while participating in other activities while walking on your treadmill, such as watching television, reading, etc. These distractions may cause you to lose balance or stray from walking in the centre of the belt; which may result in serious injury.
- In order to prevent losing balance and suffering unexpected injury, never mount or dismount the\ treadmill while the belt is moving. This unit starts with at a very low speed. We recommend to stand on the side rails then start the treadmill. Once the belt starts to move at low speed you can then step onto the belt and start your workout.
This helps to preserve the motor as it does not put a lot of pressure at the starting point.
• Always hold on to handrail while making control changes.
- A safety key is provided with this machine. Remove the safety key will stop the walking belt immediately; the treadmill will shut off automatically. Inserting the safety key will reset the display.
- Do not use excessive pressure on console control keys. They are precision set to function properly with little finger pressure.
- Replace any defective components immediately. The machine must be kept out of use until repaired.
- Belt wear-in period: all treadmills make a certain type of thumping noise due to the belt riding over the rollers, especially new treadmills. This noise will diminish over time, although may not completely go away. The belt will stretch over time, causing it to ride smoother over the rollers.
IV. ASSEMBLY INSTRUCTIONS

PARTS LIST
| No. | Description | Specification | Qty |
| 1 | Main Frame | 1 | |
| 8 | 5#Allen Wrench | 1 | |
| 56 | Bolt | M8*42 | 2 |
| 67 | Lock Washer | 8 | 6 |

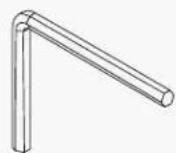
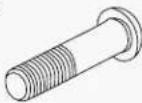


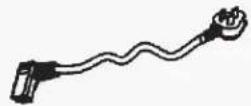
FIXING TOOLS:
5# Allen Wrench 5mm 1PC
Wrench with screwdriver S=13/14/15 1PC
| No. | Description | Specification | Qty |
| 39 | Silicone Oil | 1 | |
| 38 | Safety Key | 1 | |
| 60 | Bolt | M8*16 | 4 |
| 45 | Power Wire | 1 |

NOTICE:
Do not turn on machine until assembly is completed.


STEP 1
- Open the carton, take out the above parts.
- Put the Main Frame on the level ground.
STEP 2
- Hold the upright arms and use the 5# Allen wrench to secure bolt (56) and lock washer (67) through the hole on the left upright and base frame (as pictured). Tighten the bolts.
- Use the 5# Allen wrench to secure the bolt (60) and lock washer (67) through the hole on left upright and base frame (as pictured). Tighten the bolts.
- Repeat the same steps on the right upright.


STEP 3

CAUTION:
There is cables leading from the display and the upright arms. Be careful when unfolding it to avoid cutting the cables. Ensure the cables are properly clicked into place before assembly the upright.
Support the uprights when assembling to prevent it from falling. A second helper may be needed.
- Position the display as pictured.
- Use the 5# Allen wrench to lock the bolt (60) and lock washer (67) on left upright lightly, then fix the right upright in same way as left upright. Finally, tighten both left and right bolts securely.

STEP 4
- Fasten the left & right-side decorative cover (27) on the handlebar.
- Turn the computer (6) to a suitable angle.
STEP 5
- Place the safety key (38) on the computer.
- Plug the power cord (45) into the power cord socket of the main frame and start your exercise.
V. FOLDING INSTRUCTIONS

FOLDING
Pull up the base frame at position A, until you hear the sound that the air pressure bar B is locked into the round tube.

UNFOLDING
Support place A with hand, tap on the place of air pressure bar, then the main frame will slowing come down automatically. Please keep children and any pets away from the machine while unfolding.
Please make sure all parts have been fixed properly. Before you use the treadmill, please read the instruction carefully.
VI. OPERATION GUIDE
OVERVIEW
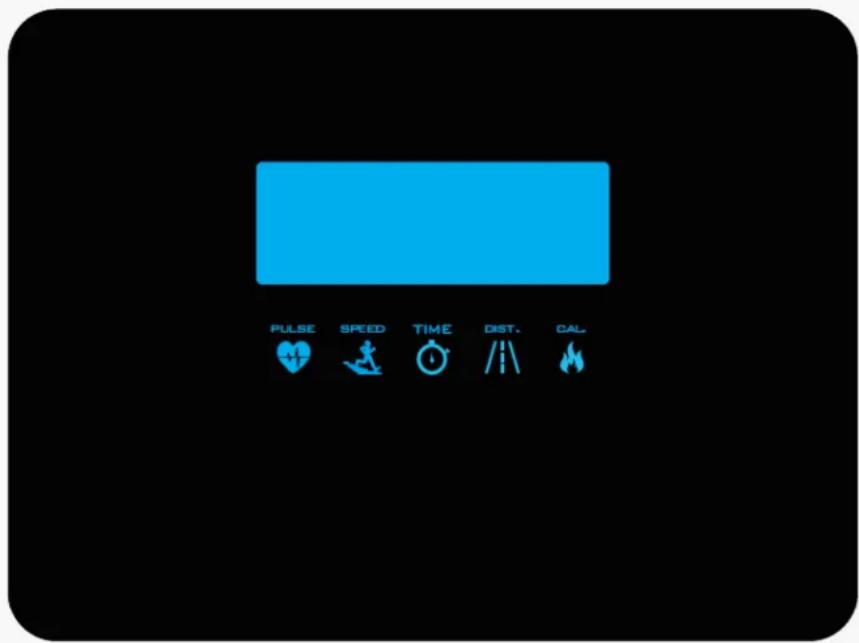

1. WINDOW DISPLAY
SPEED: Display the speed.
TIME: Display the time.
DIST: Display the distance.
CAL: Display the calories.
PULSE: Display the heart rate.
3. KEY FUNCTION
"START" Button: Press this button to start the machine, the machine will run at the lowest speed or at the speed of default program.
"STOP" Button: Pause/stop key. In the running state of the treadmill, press this key to pause the treadmill. Press this key again, the machine will slow the speed still stop and all data will be cleared.
"PROG" Button: Press this button to choose program from manual mode — P1----P15---FAT.
"MODE" Button: In the normal mode of the manual program PO, press this button to choose 4 different operating modes: time countdown mode, distance countdown mode, calorie countdown mode, and normal mode.
"SPEED+-": Adjust the speed. Press the button to adjust the speed when running and adjust the data when stopped.
"SPEED 2/4/6/8/10/12": Adjust the speed quickly.
3. MAIN FUNCTION
Open the power switch, the window will light, the machine will enter ready state.
I. Start-Up Quickly (Manual)
Put safety key, press 'START' button, the treadmill will run at the lowest speed in 3 seconds, press SPEED +/- to adjust the speed. Press the 'STOP' button or take out the safety key directly to stop the treadmill.
II. Countdown Mode
Press the 'MODE' button, it can choose time countdown mode, distance count down mode, calories countdown mode, and the window will show the default data and glitter. At the same time, press SPEED +/- to set the data. Press 'START' button, the machine will run at the lowest speed, you can press SPEED +/- to change the speed. When it counts down to 0, the machine will stop smoothly. Certainly, you can press 'STOP' button or take out the safety key from the computer to stop the machine.
III. Preset Program
Press 'PROG' button to choose the inner install program from P1----P15. When setting the program, the time window will show default data and blink, press SPEED button to set the running time.
Each program has been divided into 20 sections. Each exercise time = the setting time divide by 20. Press 'START', the machine will run at the first section speed.
When the section is over, it will enter next section automatically, the speed will change as next section data. When the program is finished, the machine will stop slowly. During the program, you can manually change the speed by the SPEED +/- however, when the program enters the next section, it will go back to the preset speed.
You can press 'STOP' or take out the safety key to stop the machine whenever.
4. HEART RATE SENSOR
When holding the hand pulse by two hands, the pulse window will show your heartrate after 5 seconds. In order to get the heartrate more correct, please test when the machine is stopped, and holding the hand pulse more than 30 seconds. The pulse sensors are not 100% accurate and is not to be used as a medical device.
5. BODY FAT TEST
Press 'PROG' button until 'FAT' shows up in the speed window. 'FAT' is body fat test mode. Press 'MODE' to choose parameter 'SEX / AGE / HEIGHT / WEIGHT', and window will show "F1", "F2", "F3", "F4". When setting each parameter, press SPEED +/- to adjust the data, and the window will show the data.
Press 'MODE' button to finish and the window will show "F5" and "--" and enter ready condition. Hold the handle pulse sensor with two hands, it will show your BMI data after 8 seconds.
I. Data Display and Set Range
| Default | Range | Mark | |||
| Sex (F1) | 1 (MALE) | 1-2 | 1= MALE 2= FEMALE | ||
| Age | (F2) | 25 | 10-99 | ||
| Height | (F3) | 170CM | 100-200CM | ||
| Weight | (F4) | 70KG | 20-150KG | ||
II. BMI Reference
BMI
| <19 | THIN |
| 19-26 | NORMAL |
| 26-30 | OVERWEIGHT |
| >30 | FAT |
6. SLEEP FUNCTION
If the machine is not in operation for more than 10 minutes, the display will go into sleep mode. Press any key to turn it back on.
If you are not using it for a long period of time, we recommend switching the machine off at the On/Off switch or at the power point to preserve the control board.
7. SAFETY KEY FUNCTION
Click the safety key to your clothing. If you are going too fast, pull the cord and the key will come off from display. This will stop the treadmill. All the windows will display "----". The key must be fitted back into place to start the treadmill again.
8. EXERCISE PARAMETER AND SETTING
| Display | Range | Default | Data | Data | Setting | |
| Speed | (km/h) | 1-16km/h | ---- | ---- | 1-16 | |
| Time | (Min:Sec) | 0:00-99:59 | 15:00 | 0:00 | 5:00-99:59 | |
| Distance | (km) | 0.00-99.9 | 1.0 | ---- | 0.50-9 | |
| Calories | 0Kcl-999Kcl | 50Kcl | ---- | 10Kcl-999Kcl | ||
9. PROGRAMS TABLE
Setting Time/20 = interval running time
| PROGRAM | TIME | 1 | 2 | 3 | 4 | 5 | 6 | 7 | 8 | 9 | 10 | 11 | 12 | 13 | 14 | 15 | 16 | 17 | 18 | 19 | 20 |
| P01 | SPEED | 2 | 3 | 3 | 3 | 4 | 3 | 4 | 5 | 5 | 3 | 4 | 5 | 4 | 4 | 4 | 2 | 3 | 3 | 5 | 3 |
| P02 | SPEED | 2 | 4 | 4 | 5 | 6 | 4 | 6 | 6 | 6 | 4 | 5 | 6 | 4 | 4 | 4 | 2 | 2 | 5 | 4 | 2 |
| P03 | SPEED | 2 | 4 | 4 | 6 | 6 | 4 | 7 | 7 | 7 | 4 | 7 | 7 | 4 | 4 | 4 | 2 | 4 | 5 | 3 | 2 |
| P04 | SPEED | 3 | 5 | 5 | 6 | 7 | 7 | 5 | 7 | 7 | 8 | 8 | 5 | 9 | 5 | 5 | 6 | 6 | 4 | 4 | 3 |
| P05 | SPEED | 2 | 4 | 4 | 5 | 6 | 7 | 7 | 5 | 6 | 7 | 8 | 8 | 5 | 4 | 3 | 3 | 6 | 5 | 4 | 2 |
| P06 | SPEED | 2 | 4 | 4 | 4 | 5 | 6 | 8 | 8 | 6 | 7 | 8 | 8 | 6 | 4 | 4 | 2 | 5 | 4 | 3 | 2 |
| P07 | SPEED | 2 | 3 | 3 | 3 | 4 | 5 | 3 | 4 | 5 | 3 | 4 | 5 | 3 | 3 | 3 | 6 | 6 | 5 | 3 | 3 |
| P08 | SPEED | 2 | 3 | 3 | 6 | 7 | 7 | 4 | 6 | 7 | 4 | 6 | 7 | 4 | 4 | 4 | 2 | 3 | 4 | 4 | 2 |
| P09 | SPEED | 2 | 4 | 4 | 7 | 7 | 4 | 7 | 8 | 4 | 8 | 9 | 9 | 4 | 4 | 4 | 5 | 6 | 3 | 3 | 2 |
| P10 | SPEED | 2 | 4 | 5 | 6 | 7 | 5 | 4 | 6 | 8 | 8 | 6 | 6 | 5 | 4 | 4 | 2 | 4 | 4 | 3 | 3 |
| P11 | SPEED | 2 | 5 | 8 | 10 | 7 | 7 | 10 | 10 | 7 | 7 | 10 | 10 | 5 | 5 | 9 | 9 | 5 | 5 | 4 | 3 |
| P12 | SPEED | 3 | 4 | 9 | 9 | 5 | 9 | 5 | 8 | 5 | 9 | 7 | 5 | 5 | 7 | 9 | 9 | 5 | 7 | 6 | 3 |
| P13 | SPEED | 3 | 6 | 7 | 5 | 9 | 9 | 7 | 5 | 5 | 7 | 9 | 5 | 8 | 5 | 9 | 5 | 9 | 9 | 4 | 3 |
| P14 | SPEED | 2 | 2 | 4 | 5 | 6 | 5 | 4 | 3 | 2 | 1 | 2 | 3 | 4 | 5 | 6 | 5 | 4 | 3 | 2 | 1 |
| P15 | SPEED | 2 | 4 | 6 | 8 | 6 | 6 | 4 | 4 | 2 | 2 | 2 | 4 | 6 | 8 | 6 | 6 | 4 | 4 | 2 | 2 |
VII. EXERCISE GUIDE
! PLEASE NOTE:
Before beginning any exercise program, consult your physician. This is important especially if you are over the age of 45 or individuals with pre-existing health problems.
The pulse sensors are not medical devices. Various factors, including the user's movement, may affect the accuracy of heart rate readings. The pulse sensors are intended only as an exercise aid in determining heart rate trends in general.
Exercising is great way to control your weight, improving your fitness and reduce the effect of aging and stress. The key to success is to make exercise a regular and enjoyable part of your everyday life.
The condition of your heart and lungs and how efficient they are in delivering oxygen via your blood to your muscles is an important factor to your fitness. Your muscles use this oxygen to provide enough energy for daily activity. This is called aerobic activity. When you are fit, your heart will not have to work so hard. It will pump a lot fewer times per minute, reducing the wear and tear of your heart.
So as you can see, the fitter you are, the healthier and greater you will feel.
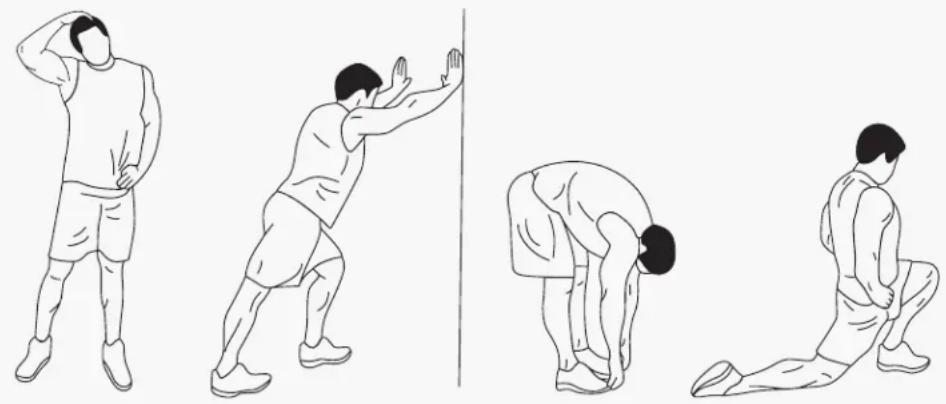
WARM UP
Start each workout with 5 to 10 minutes of stretching and some light exercises. A proper warm-up increases your body temperature, heart rate and circulation in preparation for exercise. Ease into your exercise.
After warming up, increase the intensity to your desired exercise program. Be sure to maintain your intensity for maximum performance. Breathe regularly and deeply as you exercise.
COOL DOWN
Finish each workout with a light jog or walk for at least 1 minute. Then complete 5 to 10 minutes of stretching to cool down. This will increase the flexibility of your muscles and will help prevent post-exercise problems.
WORKOUT GUIDELINES

This is how your pulse should behave during general fitness exercise. Remember to warm up and cool down for a few minutes.
The most important factor here is the amount of effort you put in. The harder and longer you work, the more calories you will burn.
VIII. MAINTENANCE INSTRUCTIONS
Reasonable cleaning/lubricating should be made to extend the life time of this unit. Performance is maximized when the belt and mat are kept as clean as possible.
! WARNING:
- The mat/deck friction may lay a major role in the function and life of your treadmill and that is why we recommend you constantly lubricate this friction point to prolong the useful life of your treadmill. Failing to do this may void your warranty.
- Unplug power cord before maintenance.
- Stop treadmill before folding.
1. GENERAL CLEANING
- Use a soft, damp cloth to wipe the edge of the belt and the area between the belt edge and frame. A mild soap and water solution along with a nylon scrub brush will clean the top of the textured belt. This task should be done once a month. Allow to dry before using.
- On a monthly basis, vacuum underneath your treadmill to prevent dust build up. Once a year, you should remove the black motor shield and vacuum out dirt that may accumulate.
2. GENERAL CARE
- Check parts for wear before use.
- Pay particular attention to the fixing knobs and make sure they are tight.
• Always replace the mat if worn and any other defective parts. - If in doubt do not use the treadmill and contact us.
Take care to protect carpets and floor in case of leakages. This product is a machine that contains moving parts which have been greased / lubricated and could leak.
3. BELT/DECK/ROLLER LUBRICATION
The mat/deck friction may play a major role in the function and life of your treadmill and that is why we recommend you constantly lubricate this friction point to prolong the useful life of your treadmill. You should apply lubrication after approximately the first 30 hours of operation.
We recommend lubrication of the deck according to the following timetable:
• Light use (less than 3 hours per week) every 6 months.
• Medium use (3-5 hours a week) every 3 months.
• Heavy use (more than 5 hours per week) every 6-8 weeks.
See below procedures for lubricating:
- Use a soft, dry cloth to wipe the area between the belt and deck.
- Spread lubricant onto the inside surface of belt and deck evenly (make sure the machine is turned off and power is disconnected).
- Periodically lubricate the front and rear rollers to keep them at their peak performance. If the treadmill belt/deck/roller is kept reasonably clean it is possible to expect over 1200 hours before relubricating is necessary.

Video Tutorial Available at: http://youtu.be/cP9NtFHfWlc
Lifespan Fitness YouTube Channel: http://www.youtube.com/user/treadmillsvideos
4. HOW TO CHECK THE RUNNING MAT FOR PROPER LUBRICATION
- Disconnect the main power supply.
- Fold the treadmill up into the storage position.
- Feel the underside surface of the running mat.
If the surface is slick when touched, then no further lubrication is needed.
If the surface is dry to the touch, apply a suitable silicone lubricant.
We recommend that you use a silicone based spray to lubricate your treadmill. This can be purchased directly from us or any hardware store.
Video Tutorial Available at: http://youtu.be/cP9NtFHfWlc
Lifespan Fitness YouTube Channel: http://www.youtube.com/user/treadmillsvideos
5. ADJUSTING THE RUNNING BELT
Place treadmill on a level surface. Run treadmill at approximately 4km/h, checking the running condition.
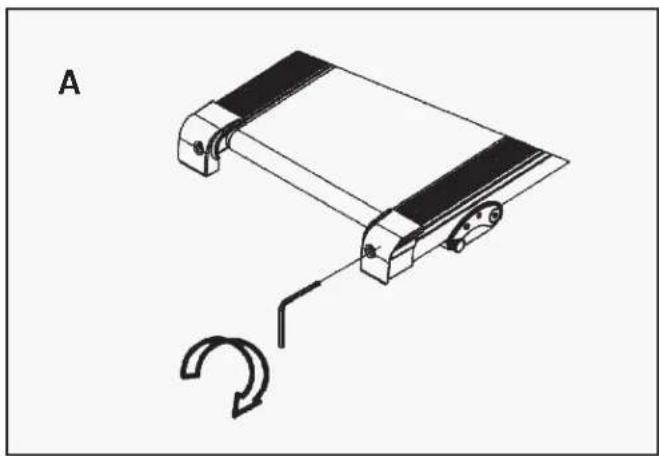
If the belt has drifted to the right: Whilst the treadmill is running at 4km/h, carefully turn the right adjusting bolt 1/4 turn clockwise. Then monitor treadmill until the belt centers. Repeat until the belt correctly centers.
See Picture A
If you have over adjusted the belt and it drifts to the right, carefully turn the right adjusting bolt anticlockwise until the belt centers.

If the belt has drifted to the left: Whilst the treadmill is running at 4km/h, carefully turn the left adjusting bolt 1/4 turn clockwise. Then monitor treadmill until the belt centers. Repeat until the belt correctly centers.
See Picture B
If you have over adjusted it, carefully turn the left adjusting bolt anticlockwise and until the belt centers.
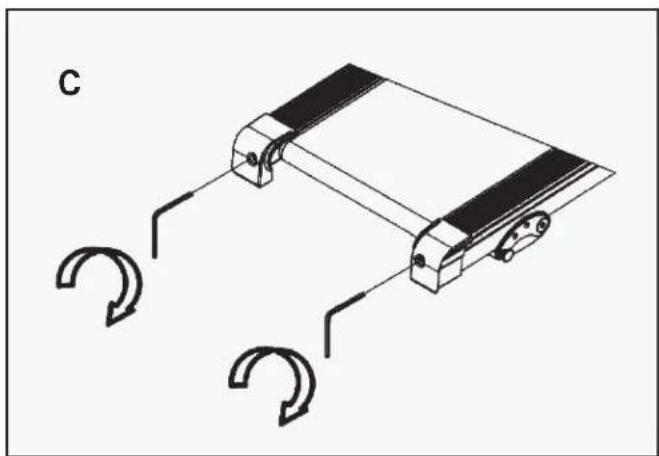
To adjust the tightness of the belt: Turn the treadmill off. Turn both the left and right adjusting bolts 1/4 turn clockwise. Repeat until the belt correctly tightens.
See Picture C
If the belt is over tightened, simply do the opposite to loosen.

NOTE:
When properly tightened, you should be able to peel the very edge of the side of the belt up approximately 2 inches. However, this is a rough reference and not all treadmills are the same. Some treadmills that have longer belts may give different measurements for correct belt tightness.
Simply, if the belt begins to slip during use, this is an indication that the belt still needs tightening.

Video Tutorial Available at: http://youtu.be/vllsamTSvvA Lifespan Fitness YouTube Channel: http://www.youtube.com/user/treadmillsvideos
IX. REPLACING MOTOR BRUSHES
After extended use, the motor brushes in your treadmill motor will wear down, and this can lead to motor failure. It is important that you maintain your motor by replacing the brushes on either side of the motor when they are worn down. We recommend that you check your motor every 1000 hours of usage.

IMPORTANT:
Before beginning the replacement of your motor brush, ensure that the treadmill is off and unplugged from the electrical socket.

- Remove the cover from the motor by squeezing it from the sides.
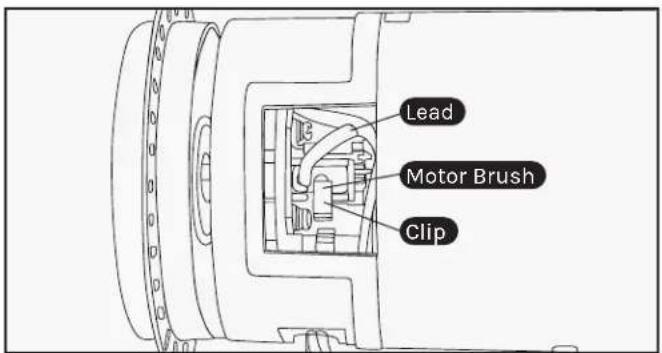
- You will find the motor brush held in with a clip, with the lead plugged in.

- Pull the clip out from its position. 4a. Hold the clip out of the way with a

screwdriver or similar object. Keep the screwdriver in this position until step 9.

4b. Some treadmill motors may use a push clip instead. In this case, gently push the clip inwards and then up to release it from its latch.

4c. Remove the clip, noting the direction in which it was originally placed, and put it safely aside.

- Slide the motor brush out from its slot. If the brush is shorter than 5mm on the longest side, you will need to replace both brushes.
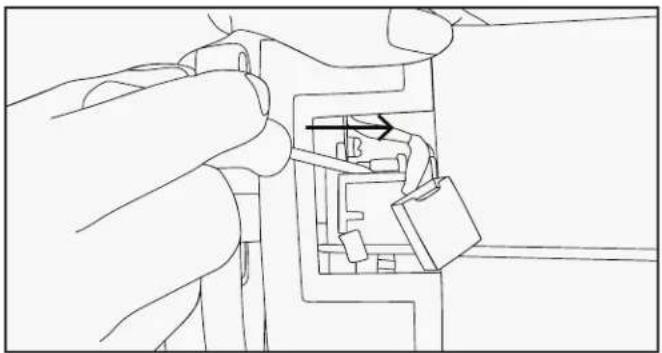
- Slide the motor brush lead off the terminal using another small screwdriver or needle nosed pliers.

- Plug the new motor brush lead into the terminal.
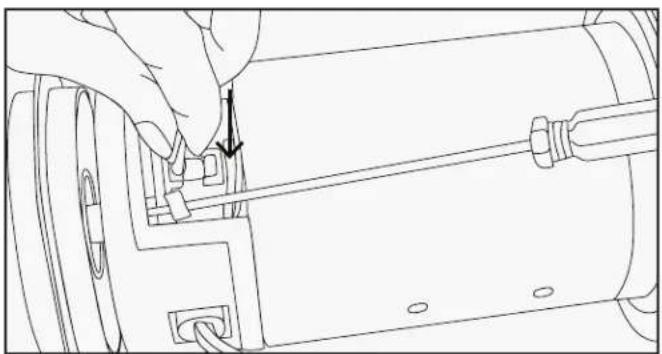
- Slide the new motor brush into the slot.
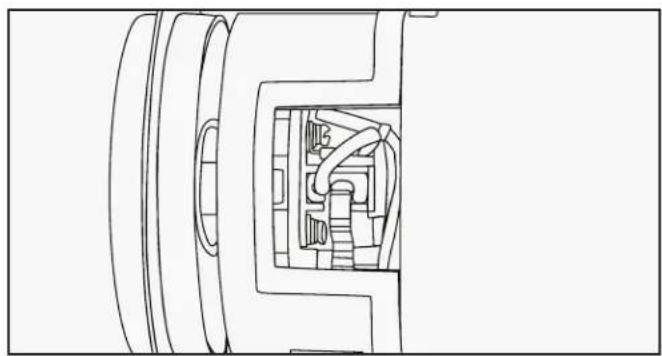

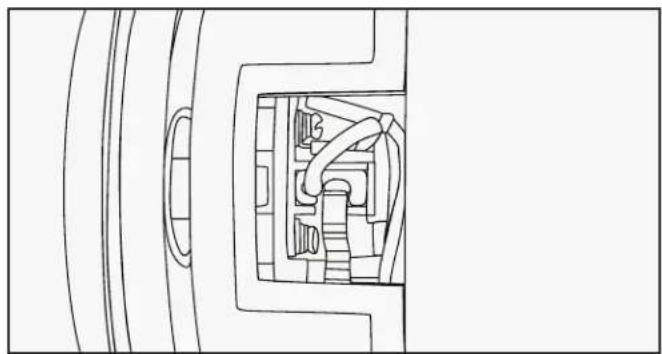
9a. Release the clip back into its position. 9b. If your motor uses a push clip, replace the push clip by pushing it inwards and then down so that it engages the catch.

-
Check that the motor brush is held firmly in place by the clip, and that the lead is plugged securely onto the terminal.
-
Replace the motor cover. Repeat steps 1-15 for the second brush located on the opposing side of the motor.
-
You have now successfully replaced the motor brushes. We also recommend that you remove any dirt and dust from your treadmill motor fan using a vacuum cleaner before replacing the cover.
X. EXPLODED DIAGRAM
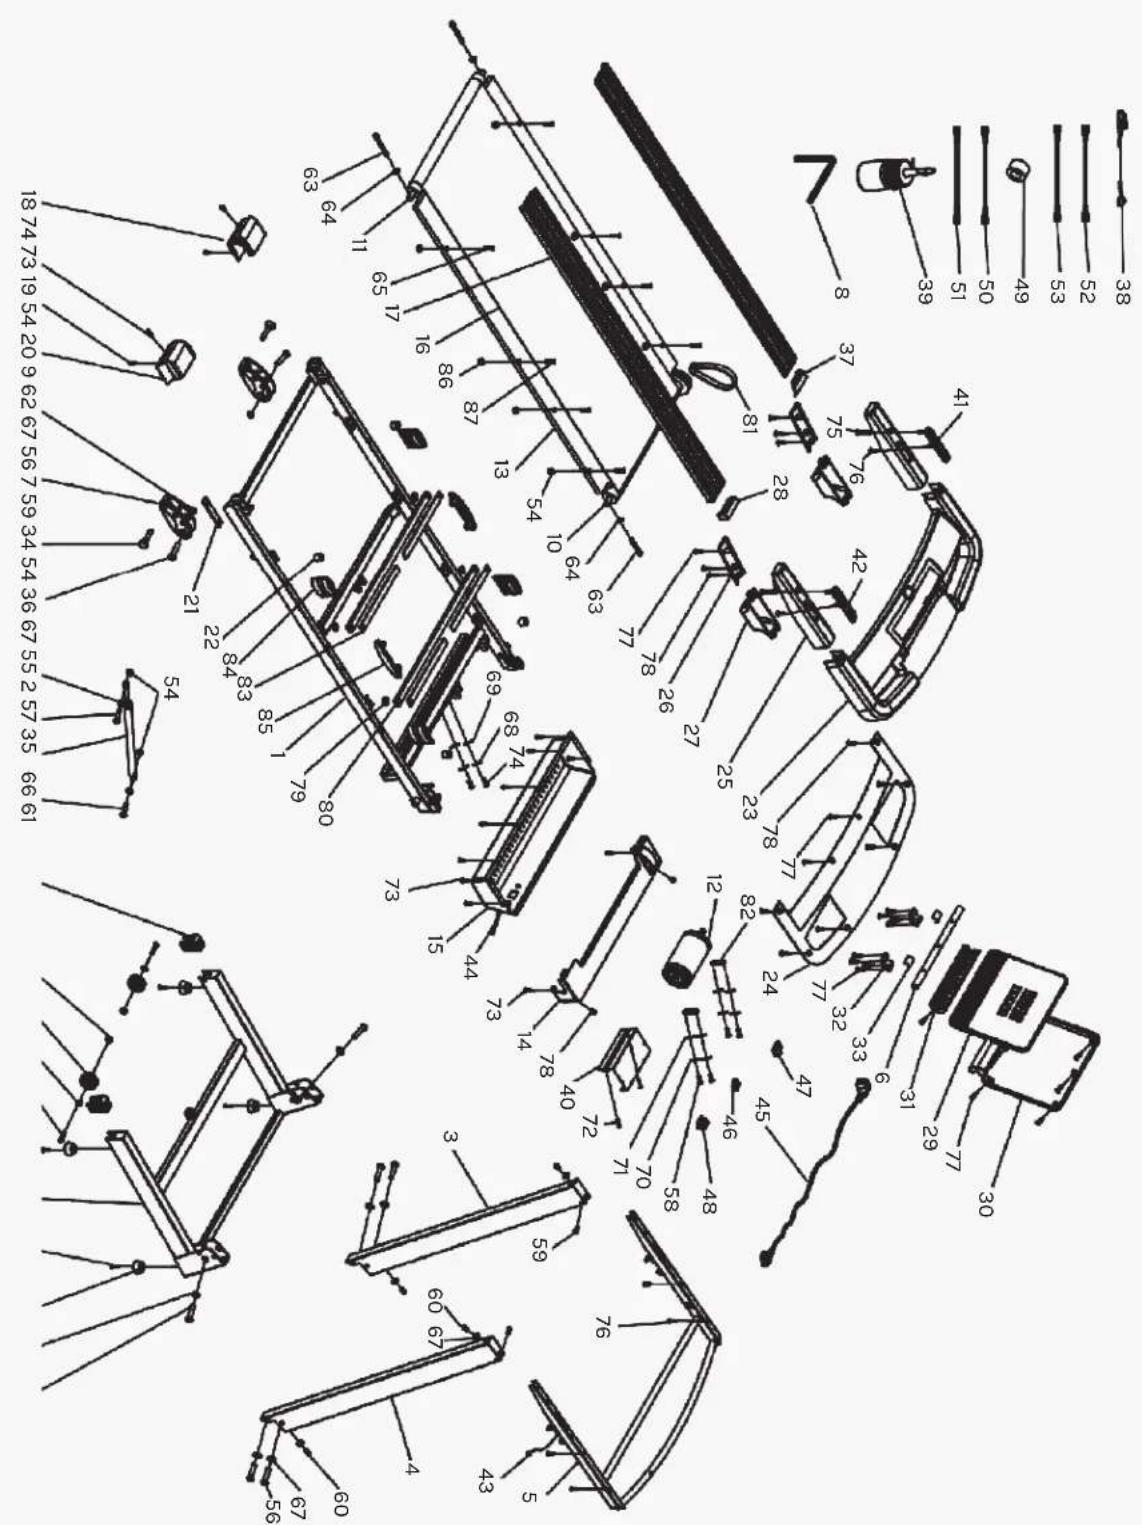
XI. PARTS LIST
No. Description Specs Qty
| 1 Main Frame 1 | |
| 2 Base Frame 1 | |
| 3 Left Upright 1 | |
| 4 Right Upright 1 | |
| 5 Computer Bracket 1 | |
| 6 Rotating Shaft Tube 1 | |
| 7 Cylinder | 1 |
| 8 5# Allen Wrench | 1 |
| 9 Fix Pin | 2 |
| 10 Front Roller | 1 |
| 11 Back Roller | 1 |
| 12 Brush less Motor | 1 |
| 13 Running Board | 1 |
| 14 Motor Top Cover | 1 |
| 15 Motor Bottom Cover | 1 |
| 16 Running Belt | 1 |
| 17 Side Rail | 2 |
| 18 Left End Cap | 1 |
| 19 Right End Cap | 1 |
| 20 Adjust Foot Pad | 2 |
| 21 Rubber Pad 2 2 | |
| 22 Stiffener Cushion | 6 |
| 23 Computer Top Cover | 1 |
| 24 Computer Bottom Cover | 1 |
| 25 Handlebar Top Cover | 2 |
| 26 Handlebar Bottom Cover | 2 |
| 27 Upright Decorative Cover | 2 |
| 28 Right Side Rail Adapter Block | 1 |
| 29 Computer Top Cover | 1 |
| 30 Computer Bottom Cover | 1 |
| 31 Rotate Lid | 1 |
| 32 Tile Clamp | 2 |
No. Description Specs Qty
| 33 | Tile | 2 | |
| 34 | Wheel Cover | 2 | |
| 35 | Foot Pad | 4 | |
| 36 | Transportation Wheel | 2 | |
| 37 | Left Side Rail Adapter Block | 1 | |
| 38 | Safety Key | 1 | |
| 39 | Silicon Oil | 1 | |
| 40 | Control Board | 1 | |
| 41 | Hand Pulse with Start/Stop | 1 | |
| 42 | Hand Pulse with Speed +/- | 1 | |
| 43 | Computer Top Wire | 1 | |
| 44 | Computer Bottom Wire | 1 | |
| 45 | Power Wire | 1 | |
| 46 | Switch | 1 | |
| 47 | Overload Protector | 1 | |
| 48 | Power Socket | 1 | |
| 49 | Magnet Ring | 1 | |
| 50 | AC Single Wire | Length 120 | 2 |
| 51 | Blue Single Wire | Length 250 | 1 |
| 52 | Ground Wire | 1 | |
| 53 | Brown Single Wire | Length 350 | 1 |
| 54 | Lock Nut | M8 | 12 |
| 55 | Screw | M8*40 | 2 |
| 56 | Screw | M8*42 | 5 |
| 57 | Screw | 4.2*25 | 4 |
| 58 | Screw | M6*15 | 4 |
| 59 | Screw | M8*25 | 3 |
| 60 | Screw | M8*16 | 4 |
| 61 | Screw | M10*55 | 2 |
| 62 | Screw | M8*45 | 2 |
No. Description Specs Qty
| 63 Screw M6*60 3 | |||
| 64 Lock Washer M6 3 | |||
| 65 Screw M8*45 6 | |||
| 66 Lock Washer | 10 2 | ||
| 67 Lock Washer | 8 14 | ||
| 68 Standard Spring Washer | 5 | 2 | |
| 69 Lock Washer | 5 | 2 | |
| 70 Standard Spring Washer | 6 | 4 | |
| 71 Lock Washer | 6 | 4 | |
| 72 Screw | ST4.2*19 | 2 | |
| 73 Screw | ST4.2*12 | 13 | |
| 74 Screw | M5*10 | 4 | |
| 75 Screw | 4.2*19 | 2 | |
No. Description Specs Qty
| 76 | Screw | 4.2*12 | 6 |
| 77 | Screw | 4.2*13 | 25 |
| 78 | Screw | 4.2*12 | 11 |
| 79 | Screw | 4.2*9 | 4 |
| 80 | Screw | 2.9*8 | 2 |
| 81 | Drive Belt | 1 | |
| 82 | Motor Fixing Plate | 2 | |
| 83 | Reinforced Rod Cushion | 4 | |
| 84 | Elastic Cushion | 4 | |
| 85 | Cushion 1 | 2 | |
| 86 | Screw | M6 4 | |
| 87 | Screw M6*40 4 |
XII. TROUBLE SHOOTING GUIDE
Code Reason Solution
| E01 Software runs overload Turn off the switch and restart the machine. | ||
| E02 | Hardware is overloaded | Turn off the switch and restart the machine. |
| E03 | IPM module is overheated due to overload. | Shut down the machine 30 minutes, then restart the machine. |
| E04 | 1. Input voltage is too low | 1. Check if the power supply voltage is normal. |
| 2. Control board is damaged | 2. If input voltage is normal, please replace the lower control. | |
| E05 | 1. Input voltage is too high | 1. Check if the power supply voltage is normal. |
| 2. Control board is damaged | 2. If input voltage is normal, please replace the lower control. | |
| E06 Motor open-phase protection 1. Check whether the motor wiring is normal, if it is normal, replace the control board2. Change the motor. | ||
| E07 Motor lock-up protection 1. It is overload, or the motor/ | rollers are stuck. Check whether the transmission parts are normal. Turn off the switch and restart the machine. | |
| E08 Motor doesn’t work 1. The motor/drum is stuck. Check | whether the transmission parts are normal.2. Replace the lower control or motor. | |
| E09 Motor over current protection 1. The machine is being used too long, the friction is high, put some silicon oil under running belt according to instruction.2. Replace the motor. | ||
| E10 Overload protection 1. The machine is being used too long, the friction is high, put some silicon oil under running belt according to instruction.2. Replace the motor (within the rated load). | ||
| E12 Communication failure | 1. Check if the computer top and bottom wire are properly connected and without damage. If not, reconnect the wire or change the broken computer top and bottom wire.2. Check if the control board communication interface is normal.3. Change the control board.4. Check if the computer communication interface is normal.5. Change the computer. | |
XIII. WARRANTY
AUSTRALIAN CONSUMER LAW
Many of our products come with a guarantee or warranty from the manufacturer. In addition, they come with guarantees that cannot be excluded under the Australian Consumer Law. You are entitled to a replacement or refund for a major failure and compensation for any other reasonably foreseeable loss or damage.
You are entitled to have the goods repaired or replaced if the goods fail to be of acceptable quality and the failure does not amount to a major failure. Full details of your consumer rights may be found at www.consumerlaw.gov.au.
Please visit our website to view our full warranty terms and conditions: http://www.lifespanfitness.com.au/warranty-repairs
WARRANTY AND SUPPORT
Any claim against this warranty must be made through your original place of purchase. Proof of purchase is required before a warranty claim may be processed.
If you have purchased this product from the Official Lifespan Fitness website, please visit https://lifespanfitness.com.au/warranty-form
For support outside of warranty, if you wish to purchase replacement parts or request a repair or service, please visit https://lifespanfitness.com.au/warranty-form and fill in our Repair/Service Request Form or Parts Purchase Form.
Scan this QR code with your device to go to lifespanfitness.com.au/warranty-form

XIV. HAND PULSE TECHNOLOGY
This product comes equipped with hand pulse sensors which are used to pick up tiny EKG/ECG signals that run through the body when your heart beats. These electrical EKG/ECG signals are very small and must be amplified 1000 times to make the signal viable for the computer to display your pulse.
To ensure proper operation:
- The user must maintain good, consistent contact on all four sensors.
- The users skin cannot be too dry or too wet.
Other factors that could affect the reading:
- Change of grip on the sensors (during slow pace walking and up to running).
- Tightening of hand muscles will produce small electrical signal.
- Static electricity charges from the air or from walking on the treadmill.
EKG/ECG Sensors may filter through actual EKG/ECG signals and "Noise" factors that may affect the reading. This will cause the pulse reading to be delayed and will take longer to update the display as the heart rate changes. Too much noise will create an incorrect reading. Medical conditions or having no electrical signal in the hands are other factors that may also affect pulse readings.
These are limitations of hand pulse technology and even the most expensive systems (which can cost upwards of \$3,000) used in hospitals have the same problems. The difference is that a patient in a hospital is not running on a treadmill. Hand pulse technologies work well on stationary exercise machines like bikes and even elliptical cross trainers but are not perfect on a treadmill. We offer treadmills with a wireless heart rate receiver which may be the more accurate option.
To test if your hand pulse sensors are working up to specification, hold them while standing on the sidestep rails, not walking, and see if the reading is more in line with what you would expect. This will eliminate the movement and static electricity factors. If your hands are dry, then wet them slightly (saliva works as a great conductor if this doesn't bother you).
- TABLE OF CONTENTS
- IMPORTANT SAFETY INSTRUCTIONS
- WARNING: READ ALL INSTRUCTIONS BEFORE USING THIS TREADMILL
- DANGER
- DO NOT USE AN EXTENSION CORD
- IMPORTANT ELECTRICAL INFORMATION
- WARNING
- IMPORTANT OPERATING INSTRUCTIONS
- ASSEMBLY INSTRUCTIONS
- FIXING TOOLS
- NOTICE
- STEP 1
- STEP 2
- STEP 3
- CAUTION
- STEP 4
- STEP 5
- FOLDING INSTRUCTIONS
- OPERATION GUIDE
- WINDOW DISPLAY
- KEY FUNCTION
- MAIN FUNCTION
- START-UP QUICKLY (MANUAL)
- COUNTDOWN MODE
- PRESET PROGRAM
- HEART RATE SENSOR
- BODY FAT TEST
- DATA DISPLAY AND SET RANGE
- BMI REFERENCE
- SLEEP FUNCTION
- SAFETY KEY FUNCTION
- EXERCISE PARAMETER AND SETTING
- PROGRAMS TABLE
- EXERCISE GUIDE
- PLEASE NOTE
- WARM UP
- COOL DOWN
- WORKOUT GUIDELINES
- MAINTENANCE INSTRUCTIONS
- GENERAL CLEANING
- GENERAL CARE
- BELT/DECK/ROLLER LUBRICATION
- HOW TO CHECK THE RUNNING MAT FOR PROPER LUBRICATION
- ADJUSTING THE RUNNING BELT
- SEE PICTURE A
- SEE PICTURE B
- SEE PICTURE C
- NOTE
- REPLACING MOTOR BRUSHES
- IMPORTANT
- EXPLODED DIAGRAM
- PARTS LIST
- TROUBLE SHOOTING GUIDE
- WARRANTY
- AUSTRALIAN CONSUMER LAW
- WARRANTY AND SUPPORT
- HAND PULSE TECHNOLOGY
Brand : LifeSpan
Model : Pursuit 3
Category : Treadmills