
001 - Uncategorized Mooer - Free user manual and instructions
Find the device manual for free 001 Mooer in PDF.


| Product Type | Guitar Effects Pedal |
| Brand | Mooer |
| Model | 001 |
| Dimensions (W x D x H) | 9.3 x 4.2 x 5.0 cm |
| Weight | 150 g |
| Power Supply | 9V DC, negative center, 200 mA |
| Input Impedance | 1 MΩ |
| Output Impedance | 100 Ω |
| Main Functions | Preamp simulation, 3-band EQ, Gain, Volume, Bypass |
| Controls | Volume, Tone, Gain, 3-band EQ (Bass, Mid, Treble) |
| Connectivity | 1/4" instrument input, 1/4" output, 9V DC power input |
| Bypass | True bypass |
| Housing Material | Aluminum alloy |
| Operating Temperature | 0°C to 40°C |
| Maintenance | Wipe with dry cloth; avoid moisture and extreme temperatures |
| Safety | Use only specified power supply; do not disassemble; keep away from children |
| Spare Parts & Repairability | Contact manufacturer for service; no user-serviceable parts |
Frequently Asked Questions - 001 Mooer
User questions about 001 Mooer
0 question about this device. Answer the ones you know or ask your own.
Ask a new question about this device
Download the instructions for your Uncategorized in PDF format for free! Find your manual 001 - Mooer and take your electronic device back in hand. On this page are published all the documents necessary for the use of your device. 001 by Mooer.
USER MANUAL 001 Mooer
Please connect the designated AC adapter to an AC outlet of the correct voltage. Please be sure to use only an AC adapter which supplies 9V DC. ☐-Counter negative. Unplug the AC power adapter when not in use or during electrical storms.
Connections
Always turn off the power and all other equipment before connecting or disconnecting. This will help prevent malfunction and damage to any of the devices. Make sure to unplug all connection cables and power cords before moving this unit. To avoid deformation, decoloration, or other serious damage, do not expose this unit to the following conditions:
- Direct sunlight
- Magnetic fields - Excessively dusty or dirty location - Strong vibration or shock
- Heat sources - Extreme temperature or humidity - High humidity or moisture
Interference with other electrical devices and Cleaning
Radios and televisions placed nearby may experience reception interference. Operate this unit at a suitable distance from radios and televisions. Clean only with a soft, dry cloth.
Handling
Do not apply excessive force to the switches or controls.
Do not let paper, metal, or other objects into this unit. Take care not to drop the unit, and do not subject it to shock or excessive pressure.
FCC certification
This device complies with Part 15 of the FCC Rules. Operation is subject
to the following two conditions:
• This device may not cause harmful interference.
- This device must accept any interference received, including interference that may cause undesired operation.
Overview
These micro preamps are sonically accurate digital recreations of the preamp sections of popular tube amps. We have developed these by directly analyzing real tube amplifiers using a brand new technology to capture their sound, dynamics and response. Please ensure to use a clean _w power supply and a high quality power amp to get the best results. Each Micro Preamp comes complete with dual channels, integrated speaker cabinet simulation and dual operating modes to suit the needs of all users.
Pedal layout
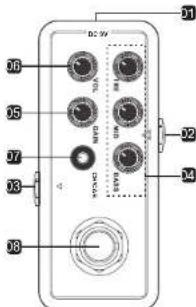
7.LED BUTTON
Press once to switch between channel A/B (Blue/Red) Press and hold for 2 seconds to switch Cab simulation on/off When Cab simulation is active the LED BUTTON will flash
8.FOOTSWITCH
The footswitch has 2 modes of operation 1. Ioggles the preamp on/off 2. Switch between channel A/B (The micro preamp will be permanently on in mode 2) To change footswitch mode, press and hold the footswitch for two seconds. The LED BUTTON will flash twice to confirm the mode has changed.
Note: All EQ. gain and volume settings will be automatically stored separately for
Connections
1 DCIN
Connect a DC 9V 220mA centre pin negative power supply
2. INPUT Connect your instrument directly or the output of your pre, pre-amp effects like
OVERIVE, distortion, etc. OUTPUT
Connect to a power amp or your amplifier's effects return.
(Highly recommend using a tube amplifier)
Different power amplifiers will affect the outcome of the final tone.
You can also connect directly to a sound card and activate the speaker cab simulation for recording purposes
Note. You can connect your "fx loop" effects, like modulation and time based effects, in between the MOOER preamps output and the input of the power amp (fx return)
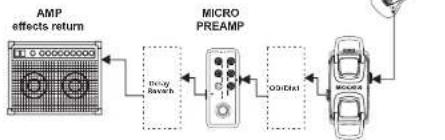
flowchart
graph LR
    A["AMP effects return"] --> B["Micro PREAM"]
    B --> C["QD/Dist"]
    C --> D["Car"]
    D --> E["Signal"]
    B --> F["Delay Switch"]
    F --> B
Specification
Input: 1/4" mono audio jack. (Impedance: 1 meg Ohms) Output: 1/4" mono audio jack (Impedance: 100 Ohms) Power requirements: AC adapter 9V DC ⊕—○, center negative Current Draw:300mA Dimensions:93.5mm(D) x 42mm(W) x 52mm(H) Weight:160g Accessories:Owner's Manual
Notes: Any specification is subject with not be amended in this material.
Part No:620010622
Brand : Mooer
Model : 001
Category : Uncategorized