
BT-28SPS - Turntable Boytone - Free user manual and instructions
Find the device manual for free BT-28SPS Boytone in PDF.


| Product Type | Vinyl Turntable |
| Brand | Boytone |
| Model | BT-28SPS |
| Dimensions (W x D x H) | 420 x 360 x 120 mm |
| Weight | 3.5 kg |
| Power Supply | AC 100-240V, 50/60Hz |
| Power Consumption | 15 W |
| Speed Settings | 33 1/3, 45, 78 RPM |
| Turntable Type | Belt Drive |
| Platter Material | Aluminum |
| Tonearm | Straight, Counterweight adjustable |
| Cartridge | Magnetic, Replaceable |
| Stylus | Diamond tip |
| Output | RCA Line Out, Built-in Speaker |
| Built-in Speaker | Yes, 2 x 3W |
| Bluetooth | Yes, Transmitter/Receiver |
| USB Recording | Yes, to USB drive |
| Material | MDF Wood base, Plastic platter |
| Cleaning Instructions | Use anti-static cloth; avoid liquids |
| Safety Certifications | CE, FCC, RoHS |
| Spare Parts Availability | Stylus, belt, cartridge available |
| Repairability | DIY-friendly, common parts |
Frequently Asked Questions - BT-28SPS Boytone
User questions about BT-28SPS Boytone
0 question about this device. Answer the ones you know or ask your own.
Ask a new question about this device
Download the instructions for your Turntable in PDF format for free! Find your manual BT-28SPS - Boytone and take your electronic device back in hand. On this page are published all the documents necessary for the use of your device. BT-28SPS by Boytone.
USER MANUAL BT-28SPS Boytone
Turntable with CD Player, AM/FM Radio,
Cassette Player & MP3 Encoding

MODEL(S): BT28SPB | BT28SPS
Operating Instructions Manual
CAUTION
TO PREVENT FIRE OR SHOCK HAZARD, DO NOT USE THIS PLUG WITH AN EXTENSION CORD, RECEPTACLE OR OTHER OUTLET UNLESS THE BLADES CAN BE FULLY INSERTED TO PREVENT BLADE EXPOSURE. TO PREVENT FIRE OR SHOCK HAZARD, DO NOT EXPOSE THIS APPLIANCE TO RAIN OR
MOISTURE.

The lightning flash with arrowhead symbol, within an equilateral triangle is intended to alert the user to the presence of uninsulated 'dangerous voltage' within the product's enclosure that may be of sufficient magnitude to constitute a risk of electric shock to persons.

WARNING: TO REDUCE THE RISK OF ELECTRIC SHOCK DO NOT REMOVE COVER (ORBACK), NO USER SERVICEABLE PARTS INSIDE REFER SERVICING TO QUALIFIED SERVICE PERSONNEL.

The exclamation point within an equilateral triangle is intended to alert the user to the presence of important operating and maintenance (servicing) instructions in the literature accompanying the appliance.
IMPORTANT SAFETY INSTRUCTIONS
1) Please read these instructions and keep them for future reference.
2) Pay attention to all warnings.
3) Follow all instructions.
4) Do not use this apparatus near water.
5) Clean only with a dry cloth.
6) Do not block any ventilation openings.
7) Install in accordance with the manufacturer's instructions.
Do not install near any heat sources such as radiators, heaters, stoves, or other apparatus (including amplifiers) that produce heat.
8) Protect the power cord from being walked on or kinked, in particular where the plug is fitted and at the point where it exits from the apparatus.
9) Only use attachments / accessories specified by the manufacturer.
10) Unplug this apparatus during lightning storms or when unused for long periods of time.
11) Refer all servicing to qualified service personnel. Servicing is required when the apparatus has been damaged in any way, such as power-supply cord or plug is damaged, liquid has been spilled or objects have fallen into the apparatus, the apparatus has been exposed to rain or moisture, does not operate normally, or has been dropped.
12) This appliance should not be exposed to dripping or splashing water and no object filled with liquids, such as vases, should be placed on the apparatus.
13) Do not overload the wall power outlet. Use only power source as indicated - i.e. 100V AC mains.
IMPORTANT NOTES
Avoid installing this unit in places exposed to direct sunlight or close to heat radiating appliances such as electric heaters, on top of other stereo equipment that radiates too much heat, places lacking ventilation or dusty areas, places subject to constant vibration and/or humid or moist areas.
Do not attempt to clean this unit with chemical solvents as this might damage
the finish. Use a clean dry cloth. Operate controls and switches as described in the manual. Before turning On the power, make certain the AC power cord is plugged in.
Store your CDs, Cassettes in a cool area to avoid damage from heat. When moving the set, be sure to first disconnect the power cord.
PREPARATION FOR USE
UNPACKING AND SET UP
- Carefully remove the unit from the display carton and remove all packing material from the unit.
- Unwind the AC power cord and extend it to its full length.
- Unwind the FM Antenna wire and extend it to its full length.
- Place the unit on a stable, level surface, convenient to an AC outlet, out of Direct sunlight, and away from sources of excess heat, dust, moisture, humidity or strong magnetic fields.
- Remove the opaque white plastic stylus cover from the phonograph stylus by sliding it forward and down.
- Discard the stylus cover
- Remove the twist-tie that was used to secure the tone arm during shipment.
- Release the tone arm lock lever.
- Connect the plug to your AC outlet.
POWER SOURCE
This product is designed to operate on 110V 60Hz AC Mains only. Attempting to operate this system from any other power source may cause damage to the system, and such damage is not covered by your warranty.
PROTECT YOUR FURNITURE
This model is equipped with non-skid rubber 'feet' to prevent the product from moving when you operate the controls. These 'feet' are made from non-migrating rubber material specially formulated to avoid leaving any marks or stains on your furniture. However certain types of oil based furniture polishes, wood preservatives, or cleaning sprays may cause the rubber 'feet' to soften, and leave marks or a rubber residue on the furniture. To prevent any damage to your furniture we strongly recommend that you purchase small self-adhesive felt pads, available at hardware stores and home improvement centers everywhere, and apply these pads to the bottom of the rubber 'feet' before you place the product on fine wooden furniture.
LOCATION OF CONTROLS AND INDICATORS
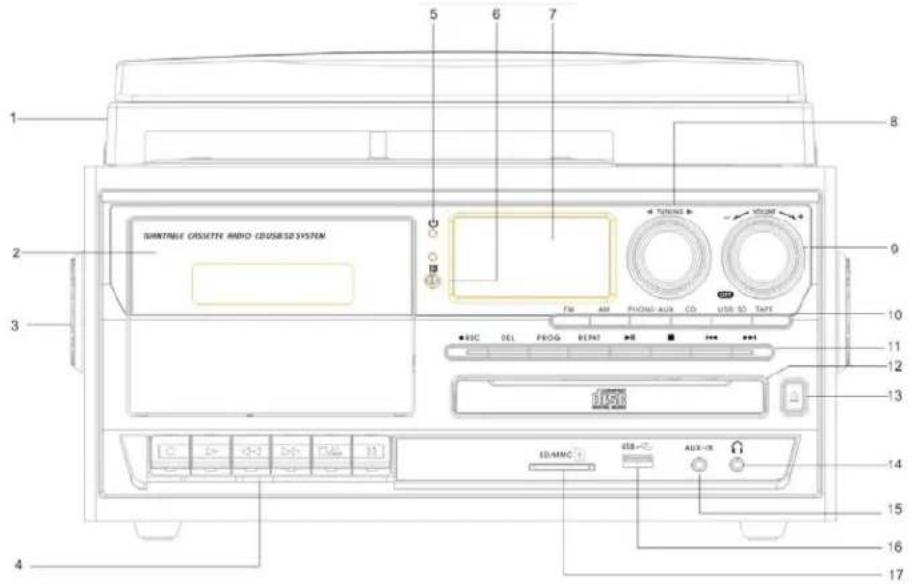
1) Dust Cover
10) Function Selector Button
2) Cassetter Door
11) CD/USB/SD Playback Control Button
3) Speaker
12) Disk Tray Door
4) Cassetter Button
13) CD-Rom Open/close button
5) Power Led Indicators
14) 3.5mm headphone socket
6) IR Remote Receiver
15) Auxiliary input
7) Lcd Display Screen
16) USB socket
8) Tuning Knob
17) SD/MMC card slot
9) Power Switch & Volume Knob
PHONOGRAPH
NOTE: All the buttons on the remote control just use for CD/USB/SD function.
OPERATING INSTRUCTIONS
Listening to radio
- Turn the volume knob in a clockwise direction to turn the equipment on.
- Use the function selector to select TUNER mode.
- Use the radio band selector to select the desired band (AM, FM or FM-Stereo).
- Turn and hold the tuning knob for a few seconds to tune into a radio station. The unit will start searching automatically and stop when a radio station is found. Release the knob once a station has been found.
- Repeat the above step until your desired radio station is found.
- Adjust the volume knob to your desired volume level.
- AM reception: the receiver has a built-in AM bar antenna. If reception is weak, slightly rotate or reposition the unit to improve AM reception.
- FM reception: the receiver has a built-in FM wire antenna hanging at the rear cabinet. For best reception, completely unravel and extend this wire.
- When you have finished listening to the radio, turn the volume knob in a counterclockwise direction to switch the unit off. Unplug it from the power supply if you are not going to use it for a while.
FM and FM-stereo
- FM-Stereo : receiving stereo programs. Once a stereo signal is received, the ST icon will light up on the display.
Phono Operation
- Open the dust cover and turn the volume knob clockwise to turn the equipment on.
- Use the function selector to select PHONO mode.
- Set the speed selector to the appropriate position: 33, 45 or 78, depending on the record to be played.
-
Set the auto stop control to ON if you want the turntable to stop turning when it has reached the end of the record. If the switch is set to OFF, the turntable will continue turning at the end of the record.
-
Place the record on the turntable (use the 45 rpm adaptor, if required).
- Move the lift lever towards the back to raise the tone arm from the arm park, then slowly move the arm to the record, as illustrated on the right. The turntable will start rotating.
- Move the lift lever towards the front, the tone arm will gently drop onto the record and playback will start.
- To stop playback, move the lift lever towards the back to raise the tone arm. The turntable will still be rotating but the record will stop playing. To continue playback, move the lift lever towards the front.
- To play a different piece on the record, move the lift lever towards the back, move the raised tone arm to the start of the piece and then move the lift lever towards the front to lower the tone arm and start playback.
- To adjust the volume level, turn the volume knob to the right or left.
- At the end of the record, move the lift lever towards the back to raise the tone arm and move it back to the tone arm park, and then move the lift lever towards the front to lower the arm onto its rest.
- Alternatively, lift the tone arm off the record and return it to the arm rest manually.
- When you have finished playing records, engage the tone arm lock to protect it from accidental movement. Turn the volume knob in a counterclockwise direction to switch the unit off. Unplug it from the power supply if you are not going to use it for a while.
NOTE: Should your record stop before the last track finishes, set the auto stop control to OFF. Your record will now play to the end, but you will have to stop the turntable rotation manually. (Return the tone arm to its rest manually and if the turntable is still rotating, switch off the unit by the volume control knob. Then set the auto stop control back to ON.)
Phono encoding
- Set the function button to PHONO mode and then insert a memory device (USB drive, SD or MMC card).
- Put your record onto the turntable and get it ready for playback.
- Press the record ● REC button. It will take about 3 - 4 seconds to read the memory device, then the USB or SD icon will be flashing on the LC display.
- Press the skip up ▶▶▶ or skip down ◀◀◀ button to select the desired mode (USB or SD) for encoding, then press the record ● REC button again to confirm.
(You can skip this step if only a USB drive or an SD/MMC card is inserted.)
-
The system will start the encoding mode after a few seconds.
-
Lower the tone arm to start playback of the record. During encoding, the USB or SD icon will be flashing on the display.
-
To finish encoding, press the stop button. The display will show "END" and return to PHONO mode.
NOTE:
● The recording speed is 1:1. Recording will take as long as playing the record.
● The recording format is preset at MP3 bit rate 128 kbps.
Cassette Operation
- Cassetter Button Indicators

- Cassetter Button Control
a) RECORDER----Copy RADIO / PHONO /AUX IN / CD / USB / SD to TAPE
b) PLAYER----Play tape tracks
c) REVERSE
d) FORWARD
e) STOP/EJECT----1 ^st push – Cassette function stop, 2 ^nd push open cassette door
f) PAUSE----Pause when cassette in PlayBack mode.
3. Cassette PlayBack Control Operating
1) TAPE Play:
a) Function Choose to "TAPE" mode---Push "EJECT" key under tape----Open cassette tape door----put your tape into cassette dock----Manual close the tape door -Press "PLAYER" Key ---- To adjust the volume level for your preference, turn the volume knob to the right or left
b) Press "PAUSE" button once to stop playing, press it again to continue
C) When TAPE tracks play ending, "PLAYER" Key up automatically.
2) REVERSE ----When Cassette Stop ----Press "REVERSE".
3) FORWARD----When Cassette Stop ----Press FORWARD.
4) STOP/EJECT----1 ^st push – Cassette function stop, 2 ^nd push open cassette
5) RECORDER----Recording from RADIO / PHONO /AUX IN / CD / USB / SD
to TAPE
a) RADIO / PHONO /AUX IN / CD / USB / SD----During playing ----Press Tape"EJECT"----Open tape door----Put a blank tape into Cassette Dock----close the door----Press RECORDER&PLAYER together same time----Now start the recording songs to the tape---- Press "PAUSE" button if need to pause recording , press it again to continue recording.
b) Press "STOP" to stop recording.
c) When recording finished (Tape is full-end), "RECORDER&PLAYER" Auto Key-up.
IMPORTANT!
When using the cassette deck :
● Make sure to insert the cassette in the correct direction.
● To avoid damaging the cassette, we strongly recommend taking it out of the equipment after playing the cassette.

natural_image
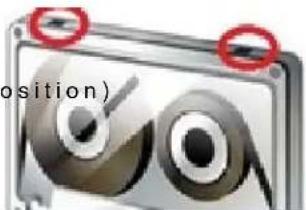
Close-up of a cassette tape with two dials and a blue label (no readable text or symbols)- In case erase tape tracks by improper operation, you can choose take off anti-erase tap (write protection) to finalize the recorded-tape.
For the same principle, if take off anti-erase tap, this tape would not be
able to write new contents/songs.
(Anti-erase taps position)
Cassette encoding
-
Set the function button to TAPE/AUX mode and then insert a memory device (USB drive, SD or MMC card).
-
Press the record ● REC button, it will take 3 - 4 second to read the memory device, then the USB or SD icon will be flashing on the LC display.
-
Press the skip up ▶▶▶ or skip down ◀◀◀ button to select the desired mode (USB or SD) for encoding, then press the record ● REC button again to confirm. (You can skip this step if only a USB drive or an SD/MMC card is inserted.)
-
The system will start the encoding mode after a few seconds. Insert your cassette into the playback slot. During encoding, the USB or SD icon will be flashing on the display.
- To finish encoding, press the stop ■ button. The display will show "END" and return to TAPE/AUX mode.
NOTE:
● The recording format is preset at MP3 bit rate 128 kbps.
● The recording speed is 1:1. Recording will take as long as playing the record.
CD Operation
- Turn the volume knob clockwise to turn the equipment on.
- Press the CD-Rom switch, then the disk tray door opens.
- Place the CD face up inside, making sure it is fully placed. Then press the CD-Rom switch again, the disk tray door closes.
- To play a different piece on the record, Press the skip up ▶▶ or skip down ◀◀◀ button to select the desired piece.
5 To adjust the volume level, turn the volume knob to the right or left.
CD encoding
- Set the function button to CD/USB/SD mode and then insert a memory device (USB drive, SD or MMC card).
- Press the record ● REC button, it will take 3 - 4 second to read the memory device, then the USB or SD icon will be flashing on the LC display.
- Press the skip up ▶▶ or skip down ◀◀ button to select the desired mode (USB or SD) for encoding, then press the record ● REC button again to confirm. (You can skip this step if only a USB drive or an SD/MMC card is inserted.)
- The system will start the encoding mode after a few seconds. Insert your cassette into the playback slot. During encoding, the USB or SD icon will be flashing on the display.
- To finish encoding, press the stop ■ button. The display will show "END" and return to CD/USB/SD mode.
NOTE:
- The recording speed is 1:1. Recording will take as long as playing the record. The recording format is preset at MP3 bit rate 128 kbps.
The USB Port and SD Card Slot
Playback of music in MP3/WMA format via USB device or memory card
The system is able to decode and playback all MP3/WMA files stored in the memory media connected to the USB port or SD/MMC card slot.
- Turn the volume knob clockwise to turn the equipment on.
- Following the illustration below, insert a USB device face up into the USB port, making sure it is fully inserted. Alternatively, insert a memory card in the direction of the arrow (as shown on the label next to the memory card slot), making sure to insert it straight without bending.
IMPORTANT: Connecting the USB device upside down or backwards could damage the audio system or storage media (USB drive, SD or MMC card). Check to ensure the direction is correct before connection.


-
Set the function selector to USB/SD mode. (If you have both a USB device and a memory card inserted, press the MODE button to toggle between USB and SD mode.) The system will start reading the storage medium automatically after mode selection and will display the total number of folders and MP3/WMA files.
-
The system will then start audio playback from the media storage device (USB or SD card) automatically.
Playback controls
PLAY/PAUSE Press this button once to stop playing, press it again to continue.
STOP Press this button to stop audio playback, the display will then show the total number of MP3/WMA files.
SKIP UP Press this button once to play the next file, press and hold this button to fast forward through the files/tracks.
SKIP DOWN Press this button once to play the previous file, press and hold this button to fast reverse through the files/tracks.
TUNING KNOB Turn this knob to the right/left to search a folder backward or forward.
Important notes
- The system can detect and read files in MP3 / WMA format only via the USB port or SD card slot.
- You can connect an MP3 player to the system via the USB socket, however, some MP3 players may not be able to play via the USB socket. This is due to variances in the MP3 encoding format; it is not a malfunction of the system.
- There are numerous USB and SD device producers and their products vary in solution and format. We therefore cannot guarantee that this unit will support all USB and SD devices from every brand.
● This system supports SD cards up to 8GB.
● MP3 / WMA track format requirements: - MP3 bit rate: 32 kbps\~256 kbps; WMA bit rate: 32 kbps \~ 320 kbps.
Programming tracks for playback
Up to 64 tracks can be programmed for MP3 / WMA file playback in any order.
Before programming, however, be sure the system is in STOP mode.
- Set the function selector to CD/USB/SD mode, then press the stop ■ button.
- Press the program PROG button, MEM will be flashing on the LC display, and it will indicate the program number and digits for the track number to be programmed.
- Press the SKIP UP ▶▶ or SKIP DOWN ◀◀ button to select a desired track.
- Press the program PROG button to store the track into the memory.
- Repeat steps 3 and 4 to enter additional tracks into the memory.
- When all desired tracks have been programmed, press the PLAY/PAUSE button to play the tracks in the assigned order.
- To cancel programming, press the STOP button twice.
Copying of MP3 / WMA files
The system allows you to copy files from USB to SD/MMC or vice versa. You can copy a single file/track, a folder of files/tracks, or all files/tracks on the storage medium.
Copying a single file/track
-
Insert a USB storage device and SD/MMC card, then select USB/SD mode (as described previously).
-
Press the record ● REC button during playback of the track you want to copy: "ONE" will be flashing on the display. Press the record ● REC button again to confirm.
- The USB or SD icon will be flashing on the display while the system is copying the file.
- Once the file has been copied, the unit will stop playback automatically. "END" will be shown on the display and the system will revert to USB or SD mode.
Copying a folder
- Insert a USB storage device and SD card, then select USB/SD mode (as described previously). When the system has recognised the device, press the stop ■ button.
- Turn the tuning knob to select the desired folder for copying.
- Press the record ● REC button: "ONE" will be flashing on the display. Press the SKIP UP ▶▶ or SKIP DOWN ◀◀◀ button to select "FOL" (folder) on the display. Press the record ● REC button again to confirm.
- The USB or SD icon will be flashing on the display while the system is copying the folder.
- When the folder has been copied, the USB or SD icon will stop flashing on the display.
Copying all files/tracks
- Insert a USB storage device and SD card, then select USB/SD mode (as described previously). When the system has recognised the device, press the stop ■ button.
- Press the record ● REC button: "ONE" will be flashing on the display. Press the SKIP UP ▶▶ or SKIP DOWN ◀◀◀ button to select "ALL" on the display. Press the record ● REC button again to confirm.
- The USB or SD icon will be flashing on the display while the system is copying the files/tracks.
- When all files/tracks have been copied, the USB or SD icon will stop flashing on the display.
NOTE: If you press the record ● REC button during playback in USB or SD mode, the file will copy from USB to SD or vice versa.
Deleting files from the USB device / SD card
The system is able to erase files stored on the USB drive or SD card. You can delete a single file/track, a folder of files/tracks, or all files/tracks on the storage medium.
Deleting a single file/track
- Insert the USB storage device or SD card, then select USB/SD mode (as described previously).
- Press the delete DEL button during the playback of the track you want to delete: "ONE" will be flashing on the display. Press the delete DEL button again to confirm.
- "DEL" will show on the display while the file/track is being deleted until the deletion is complete.
Deleting a folder
- Insert a USB storage device and SD card, then select USB/SD mode (as described previously). When the system has recognised the device, press the stop ■ button.
- Turn the tuning knob to select the desired folder for deleting.
- Press the delete DEL button: "ONE" will be flashing on the display. Press the
SKIP UP ▶▶| or SKIP DOWN ◀◀◀ button to select "DIR" (directory) on the display. Press the delete DEL button again to confirm.
- "DEL" will show on the display while the folder is being deleted until the deletion is complete.
Deleting all files/tracks
- Insert a USB storage device and SD card, then select USB/SD mode (as described previously). When the system has recognised the device, press the stop ■ button.
- Press the delete DEL button: "ONE" will be flashing on the display. Press the
SKIP UP ▶▶▶ or SKIP DOWN ◀◀◀ button to select "ALL" on the display.
Press the delete DEL button again to confirm.
- While the system is deleting the files/tracks, the USB or SD icon will be flashing on the display until the deletion is complete.
NOTE: Pressing the delete DEL button will completely delete all files/tracks on the USB device or SD card.
Removing the USB device / SD card
- First move the function selector to another mode (tuner, phono, tape), then turn the volume knob counterclockwise to turn off the power.
● To remove a USB device, pull it out of the USB port.
- To remove a memory card, press the memory card inwards and then release it. The card will be released (partially ejected) and you can remove it by hand.
The auxiliary input
Listening to a CD (or other auxiliary input)
- Turn the volume knob clockwise to turn the equipment on.
- Use the function selector to select TAPE/AUX mode, then connect the external audio device (such as a CD player) to the AUX IN socket at the front of the equipment. The audio signal from the external audio device will now be played through the system.
- If an external audio device is connected to the AUX IN socket, playing of the auxiliary device takes priority over cassette playback.
NOTE: If you won't use the unit for a long time, you had better take the CD out from the disk tray door.
AUX IN encoding
- Use the function selector to select PHONO/AUX mode and then insert a memory device (USB drive, SD or MMC card).
- Press the record ● REC button, it will take 3 - 4 seconds to read the memory device, then the USB or SD icon will be flashing on the LC display.
- Press the skip up ▶▶ or skip down ◀◀ button to select the desired mode (USB or SD) for encoding, then press the record ● REC button again to confirm. (You can skip this step if only a USB drive or an SD/MMC card is inserted.)
- The system will start the encoding mode after a few seconds. During encoding, the USB or SD icon will be flashing on the display.
- To finish encoding, press the stop button. The display will show "END" and return to PHONO/AUX mode.
NOTE:
- The recording speed is 1:1. Recording will take as long as playing the CD (or other auxiliary input).
● The recording format is preset at MP3 bit rate 128 kbps.
Troubleshooting Guide
If you are experiencing problems with your USB Turntable with Cassette Deck and Radio, check in the section below whether there are any quick and easy checks you can do that may help you solve the problem. If you cannot solve the problem by yourself, contact our after sales support line for advice. Do not attempt to open, repair or modify the equipment yourself.
Problems with sound
- Clockwise rotate the power/volume knob to increase the volume.
- Make sure the unit's power cord is connected to an appropriate electrical outlet.
● Make sure the wall socket is switched on. - Make sure the function switch is set to your desired function: PHONO, USB/SD, TUNER, PHONO/AUX.
- When playing records, make sure you've selected correct speed (33, 45, 78 rpm).
- When playing a cassette, make sure it is properly inserted.
- When playing a CD, make sure the CD is dealt face up.
- When playing a CD via the AUX IN connection, make sure the cable is firmly connected, all controls on the CD player are properly set, the disc tray is closed and the disc is clean and undamaged.
- When playing music from USB device (or SD/MMC card), make sure the memory device is properly inserted in USB port (SD/MMC card slot) and correct MODE is selected.
Problems with radio reception
● Make sure you are in an area that can receive signals for your selected radio station.
- If AM reception is weak, rotate or reposition the equipment to improve reception.
- If FM reception is weak, try the following to improve reception:
- Completely unravel the wire aerial at the back of the cabinet.
- Slightly move the wire aerial for better reception.
- If none of these measures improve stereo reception, try the same station on the FM (mono) band.
- Try moving your radio to an alternative location to see if the reception improves.
- Check that you do not have other electrical equipment too close to your radio, which may cause interference.
- CAUTION
- IMPORTANT SAFETY INSTRUCTIONS
- IMPORTANT NOTES
- PREPARATION FOR USE
- UNPACKING AND SET UP
- POWER SOURCE
- PROTECT YOUR FURNITURE
- PHONOGRAPH
- OPERATING INSTRUCTIONS
- Listening to radio
- FM and FM-stereo
- Phono Operation
- Phono encoding
- NOTE:
- Cassette Operation
- Cassette PlayBack Control Operating
- IMPORTANT!
- Cassette encoding
- CD Operation
- CD encoding
- The USB Port and SD Card Slot
- Playback of music in MP3/WMA format via USB device or memory card
- Playback controls
- Programming tracks for playback
- Copying of MP3 / WMA files
- Copying a single file/track
- Copying a folder
- Copying all files/tracks
- Deleting files from the USB device / SD card
- Deleting a single file/track
- Deleting a folder
- Deleting all files/tracks
- Removing the USB device / SD card
- The auxiliary input
- Listening to a CD (or other auxiliary input)
- AUX IN encoding
- Troubleshooting Guide
- Problems with sound
- Problems with radio reception
Brand : Boytone
Model : BT-28SPS
Category : Turntable