
NDK780 - Car audio accessory American International - Free user manual and instructions
Find the device manual for free NDK780 American International in PDF.


| Product Type | Small Kitchen Appliance |
| Model | NDK780 |
| Brand | American International |
| Dimensions (approx.) | 10 x 8 x 6 inches |
| Weight (approx.) | 2.5 lbs |
| Power Supply | 120 V ~ 60 Hz |
| Power Consumption | 800 W |
| Main Functions | Toasting, Defrosting, Reheating, Cancel |
| Browning Control | Adjustable 1-6 levels |
| Number of Slots | 2 |
| Auto Shut-off | Yes |
| Crumb Tray | Removable for easy cleaning |
| Housing Material | Stainless Steel |
| Safety Features | Overheat protection, non-slip feet |
| Cleaning Instructions | Unplug and wipe with damp cloth; do not immerse |
| Spare Parts Availability | Crumb trays and heating elements available online |
| Warranty | 1 year limited |
Frequently Asked Questions - NDK780 American International
User questions about NDK780 American International
0 question about this device. Answer the ones you know or ask your own.
Ask a new question about this device
Download the instructions for your Car audio accessory in PDF format for free! Find your manual NDK780 - American International and take your electronic device back in hand. On this page are published all the documents necessary for the use of your device. NDK780 by American International.
USER MANUAL NDK780 American International
NOK780MountingKit
VEHICLEAPPLICATIONS (WithOversizeRadio).
Nissan
2013-16CITYEXPRESS
2013-16FRONTIER
2015-16JUKE
2015-16NV
2013-15NV200
2013-15QUESTw/baseradio
2012-13ROGUE
2014-15ROGUEw/baseradio
2013-14TITAN
2013-16VESA
2014-16VESANOTE
2013-15XTERRA
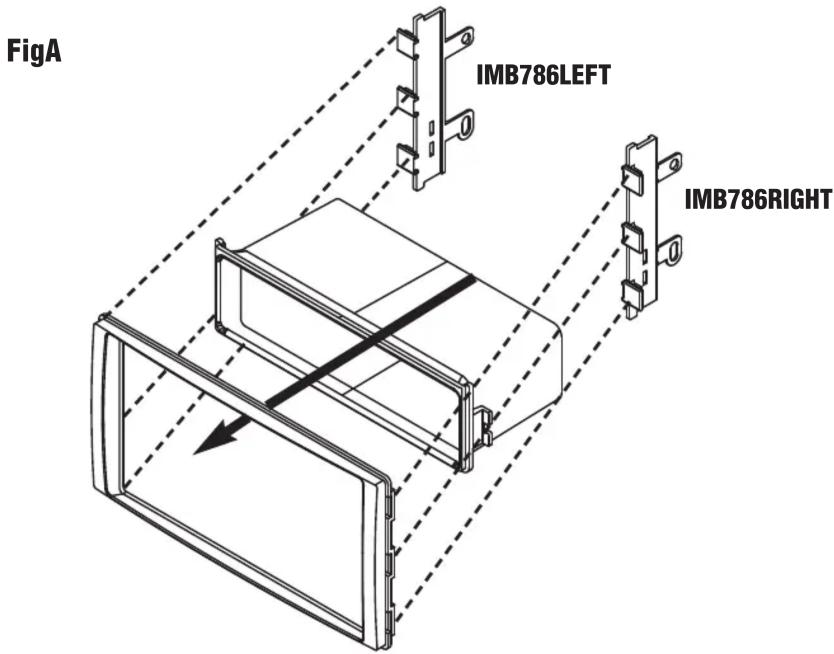
SINGLEDINw/POCKETKITASSEMBLYINSTRUCTIONS
- AttachISObracketstotherearofthemainmountingkit.
2.SlidepocketintotherearontheISObracketsandsnapintobottomlocation. - Attachthefactorymetalmountingbracketstotherearleftandrightsidesoftheaftermarketradiousing(2)screwsremovedfromthefactoryradio.
- PlacemainframeoftheNDK780aroundthefrontoftheaftermarketradio, thenscrewtheISO bracketsbetweentheOEMmetalmountingbracketsandtheaftermarketfrontscrewlocations usingthe(2)screwsremovedfromthefactoryradio.
- Using the bolt and nut provided. Secure the bottom front right and left of the OEM metal mounting bracket to the bottom of the NDK780 ISO brackets.
DOUBLEDINKITASSEMBLYINSTRUCTIONS
- AttachISObracketstotherearofthemainmountingkit.
- Attachthefactorymetalmountingbracketstotherearleftandrightsidesoftheaftermarket radiousing(4)screwsremovedfromthefactoryradio.
- PlacemainframeoftheNDK780aroundthefrontoftheaftermarketradio, thenscrewthe ISObracketsbetweentheOEMmetalmountingbracketsandtheaftermarketfrontscrew locationsusingthe(4)screwsremovedfromthefactoryradio.
FigB

2012-14NISSANVERSASEDAN/2014VERSANOTE
DASHDISASSEMBLY
- CarefullypryforwardanduncliptheRadio/Venttrimbezelandthenunplugthehazzardand airbaglight(donotturnkeyononceunplugged).Removepanel.
- Removethe(4)Phillipsscrewssecuringtheradiotothesub-dash
3.Pulltheradioforward, disconnectallharnessesandantennaleadandremoveradio.
2007-12NISSANVERSAHATCHBACK
2007-11NISSANVERSASEDAN
DASHDISASSEMBLY
- Starting from the front, carefully pray up on the top dash vent trim and pull forward to remove.
2.Removethe(2)Phillipsscrewssecuringthetopedgeoftheradiotrimbezel. - Carefully pull the radiotrim bezelforward, disconnect all attached harnesses from the back of the radiotrim bezeland removetrim bezel.
- Removethe(4)Phillipsscrewssecuringthefactoryradiotothesub-dash.
- Carefully pulltheradio forward, disconnect all harnesses and antenna connector and remover radio.
2013-14NISSANFRONTIER/XTERRA
DASHDISASSEMBLY
- Carefullyremovethepanelfromthetopoftheradio.
2.Removethe(1)PhillipsscrewfromthetopoftheRadiodashtrimbezel. - Carefully liftupward from the bottom of the other radiotrim bezel, pull Radiotrim bezel forward and remove.
4.Removethe(2)Phillipsscrewssecuringthefactoryradiotothesub-dash. - PullRadioforward, disconnectallharnesses andantennalead from radio and remover radio.
- Removethe(4) Torxscrewssecuringthefactoryradiotothedashpanel.
2013-14NISSANTITAN
DASHDISASSEMBLY
- Carefullyremovethepanelsurroundingtheradioandclimatecontrols.
- Removethe(4)Phillipsscrewssecuringthefactoryradiotothesub-dash.
- PullRadioforward, disconnectallharnessesandantennaleadfromradio andremoveradio.
2011-13NISSANROGUE
DASHDISASSEMBLY
- Using a panel removal tool, carefully prysthe frontedge of the center channels speaker cover upward to unclip and remove from the top of the dash.
- Removethe(4)Phillipsscrewssecuringthecenterchannelspeaker(Ifequipped).
- Disconnect the center channel wire harness from the speaker and remove speaker if equipped.
- CarefullyprythelowersideedgetrimpiecesfrombesidetheVent/Hazardassembly, thenusingapanelremovaltoolfrominsidethecenterchannelspeakerareaatthe topofthedash, slidethepanelremovaltoolbetweenthecenterchannelspeaker mountsurface, and the basebeneaththecenterchannelspeakermountsurface and pryupwardontheVentpanelassembly, disconnectallharnessesfromtherearof thepanelandremoveassembly.
- Using a panel removal tool, carefully pry the climate control panel forward and layout of the way.
- Removethe(4)Phillipsscrewssecuringtheradiotothesub-dash.
- Carefully pulltheradio forward, disconnect all wire harnesses and antennalead and remover radio.
ForinformationaboutotherAmericanInternationalautomotive
accessoriesvisitourwebsiteat:
http://www.aius.net

American International
2500EastFrancisStreetOntario,CA91761,U.S.A.
USASales(800)336-6500
CanadaSales(888)922-3006
CUSTOMERHELPLINE
USA800-323-4329•Canada800-245-8777
iNDK780
- NOK780MOUNTINGKIT
- VEHICLEAPPLICATIONS (WITHOVERSIZERADIO)
- SINGLEDINW/POCKETKITASSEMBLYINSTRUCTIONS
- DOUBLEDINKITASSEMBLYINSTRUCTIONS
- 2012-14NISSANVERSASEDAN/2014VERSANOTE
- DASHDISASSEMBLY
- 2007-12NISSANVERSAHATCHBACK
- 2007-11NISSANVERSASEDAN
- 2013-14NISSANFRONTIER/XTERRA
- 2013-14NISSANTITAN
- 2011-13NISSANROGUE
- AMERICAN INTERNATIONAL
Brand : American International
Model : NDK780
Category : Car audio accessory