
DRV-W440 - Camcorder KENWOOD - Free user manual and instructions
Find the device manual for free DRV-W440 KENWOOD in PDF.


| Product Type | Dash Cam / Camcorder |
| Brand | Kenwood |
| Model | DRV-W440 |
| Dimensions | Approximately 5.0 x 4.0 x 3.0 cm |
| Weight | Approximately 50 g |
| Power Supply | 12/24V vehicle cigarette lighter adapter (included) or USB (5V) |
| Main Functions | Full HD video recording, loop recording, G-sensor, parking mode, wide-angle lens, night vision |
| Storage Medium | microSD card (up to 32 GB, not included) |
| Display | 2.0-inch TFT LCD |
| Video Resolution | 1920 x 1080p @ 30 fps |
| Field of View | 140 degrees |
| G-Sensor | Built-in 3-axis accelerometer for impact detection and auto-lock recording |
| GPS | Built-in GPS for speed and location data |
| Audio Recording | Built-in microphone (audio can be disabled) |
| Operating Temperature | -20°C to +60°C |
| Maintenance | Clean lens with soft dry cloth; format microSD card periodically |
| Safety | Do not expose to direct sunlight or high heat; use only supplied power adapter |
| Spare Parts & Repairability | Replacement microSD card, car adapter, suction mount available via Kenwood service centers |
| General Information | Designed for in-car video recording; supports loop recording and emergency file protection |
Frequently Asked Questions - DRV-W440 KENWOOD
User questions about DRV-W440 KENWOOD
0 question about this device. Answer the ones you know or ask your own.
Ask a new question about this device
Download the instructions for your Camcorder in PDF format for free! Find your manual DRV-W440 - KENWOOD and take your electronic device back in hand. On this page are published all the documents necessary for the use of your device. DRV-W440 by KENWOOD.
USER MANUAL DRV-W440 KENWOOD
Setting the Date and Time
For make sure that the date and time of your recordings are correct, check the settings before you begin reactiving.
-
Press □ contains the Settings Menu
-
Select System > Date/Time
-
Use + - just the value of the selected field press and respect the step until all fields have been changed.
-
When does press

Recording in Driving Mode
Continuous Recording
By default, the system will automatically begin continuous recording shortly after start-up. The system indicator flashes in green and amber alternately while the recording is in progress.
The recording may be divided into several video clips, recording will not stop between video clips. When your memory card fills up with continuous recordings, it will automatically copy over the slides existing files in this category.
When continuous recording is in progress, you can manually stop recording by pressing it to the recording
The continuous recordings can be found in the "video" category for file playback.
Event Recording
By default, if an event happens such as a sudden impact, high-score driving, an aggressive turn or an accidental crash during continuous recording, the G-center will prompt the desire to start reversing the event.
Note: You can change the sensitivity level at the G sensor by selecting
Video Recording > G-Sensor Sensitivity

Getting to Know Your Device

① Mini-USB corrector
② Device mount socket
③ CD2001
4 System indicator
① Vomson and
- 本说明仅供参考。
7 Shutdown button
③ Correcters
⑨ Spewalven
10 P2X 3,167
5.2.3.1.1
Using Your Device in a Vehicle
- Make sure that your car is parked on level ground. Use a commercially available cleaning cloth to wipe off any dirt or grease from the location you are mounting the device. Follow the instructions below to securely mark your device in a vehicle.

- Adjust the lens angle. When adjusting the angle of mounting, make sure that the came a view is parallel with the level ground and the ground/say ratio is close to 6/4.
- Connect the cables. Route the cables through the top ceiling and the Ap-pilar so that it does not interfere with driving. Make sure that the cable installation does not interfere with the vehicle's airbags or other safety features.
If you want to manually start an event recording while continuous recording is in progress, press the event factor (
The event recording will save moments before and moments after the event. When your memory card fills up with event recordings, it will record over the oldest existing files in this category.
The event recordings can be found in the "event" category for the playback.
Parking Mode
Your desire supports the parking recording function. You must use an additional hard wire kit (sold separately) to record the video during the Parking mode.
The Parking mode function is divided by default. Before crashing the Parking mode, please check the memory storage allocation of your device. Select ▶ System ▶ Storage Allocation to set a proper allocation for parking recording. Changing the allocation will erase the memory card, to save any videos or photos to your computer first.
You can enable the function by selecting Parking Mode:
Detection > On (The Picon will appear on the screen) When the Parking mode detection is enabled, the system will enter the Parking mode when the car stops moving for about 5 minutes.
In the Parking noise, parking recordings could be a gagered only when movements or vibrations are detected. The parking recording will save moments before and moments after the event. When your memory card fills up with parking recordings, it will record over the oldest existing files in this category.
Note:
- You are press to eventually enter the Parking mode while continuous recording is in progress.
- The parking recording is triggered by the G Sensor and motion detection of the device. You can change the convection by selecting > Parking mode > Motion Detection and G-Sensor Sensitivity.
To exit the Parking mode and resume continuous recording, prevent improvements are detected and recorded during the Parking mode, you will be asked to playback the video when you exit the Parking mode. The parking recordings can be found in the "Parking" category for file playtuck.

Using a Memory Card
You must enter a memory card before you can start recording. You should use separate MicroSD cards for recording and for regular data storage.
Hold the card (MicroSD) by the edges and gently insert into the slot as shown in the illustration.
to remove a card, gently push the top edge of the card moves to release Card pull it out of the slot.
Formatting a Card
to format a memory card tail data will be erased), press format
Note:
• DCNO apply pressure to the centre of the memory card.
- The manufacturer does not guarantee the product's compatibility with common cards from all manufacturers.
- Before you that recording, please confirm the memory card to avoid
- Instruction caused by the not cleared by the device
• Turn the device of before removing the memory card.
Turning the Device On
Complete the installation according to the instructions in the "Using your device in vehicle" section. Once the vehicle engine is started, the device automatically turns on. The system indicator glow in green when the device is powered
Power Button
Press and hold the Fower button for 2 seconds to manually turn the device on one oil.

Format
广力云智慧零售收银系统
card
compulsivity
The Ground Truth image displays a single, solid horizontal line. According to Rule 2 (UNDERSCORE & LINE RULES), this is a stylistic or background line, not a placeholder underscore. Therefore, the OCR result must ignore it and output nothing or only meaningful text.
(no text)
call to a/21.
1
(3)
[Non-Text]
in the "Ukina"
is started.
glova in gro
[Non-Text]
[Non-Text]
nally turn the
2、本次收购的公司名称
Camera Mode
The device allows you to take a photo. Do one of the following:
• If the recording is a previous case, it is also
Estate 100000
The character can be found in the "face" camera for file playback.
Playback Mode
To select a video or photo for playback
• White played videos
Press play the previous video press and
help the but one to fast wind/forward the vision
press → return to the list
[Unreadable]
Mess
lay / Pause: Stents or causes the paybacks.
love to Event Moves the file to the Event category
transfer to phone: Uploads the selected video to your
smartphone
delete: Deves the file.
e viewing photos
Press / / . . . . . . . . . . . . . . . . . . . . . .
1. 2. 3. 4. 5. 6. 7. 8. 9. 10. 11. 12. 13. 14. 15. 16. 17. 18. 19. 20. 21. 22. 23. 24. 25. 26. 27. 28. 29. 30. 31. 32. 33. 34. 35. 36. 37. 38. 39. 40. 41. 42. 43. 44. 45. 46. 47. 48. 49. 50. 51. 52. 53. 54. 55. 56. 57. 58. 59. 60. 61. 62. 63. 64. 65. 66. 67. 68. 69. 70. 71. 72. 73. 74. 75. 76. 77. 78. 79. 80. 81. 82. 83. 84. 85. 86. 87. 88. 89. 90. 91. 92. 93. 94. 95. 96. 97. 98. 99.
Fies 5
Press your display the pop-up menu to select:
transfer to phone: Uploads the selected photo to your
stargn
delete: De et al. He
Shutting down the Device
Occasionally, you may need to perform a hardware reset when the device stops responding or it appears to be "frozen" or unresponsive. To shut down the device, press and hold the power button and the system covers off
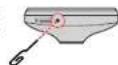
The system does not shut down by keeping the Power button presses, you can force it to shut down by inserting a small rod such as a straightened paperclip into the Shutdown button on the device.
Function Keys
The device provides a function-ray to conduct the corresponding screens displayed on the LCD screen. He keys functions may vary on different screens.

- Opens the Menu screen - Entries Parking notes. - Takes a photo. - Manually starts at event recording.

- Acts as the BACK button. - Acts as the OFFR button. - Moves to the previous action. - Moves to the next action.
System Icons
Various system icons on the status bar at the top of the screen provide the status information of your device. The displayed icons will vary depending on your device model and state.
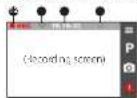
① Receiving indicator ② Wireless LAN status ③ Time display ④ Microphone status
Getting Connected
KENWOOD DRV Link
The KENWOOD DRV Link app is an integrated application that allows you to view, share and back up the videos recorded on a dashboard camera via wireless LAN. Search for "KENWOOD DRV Link" in Apple App store or in Google Play Store to download the app for free.
Note:
- The KENWOOD DRV Link aps is compatible with iOS 9.0 (one above) and Android 5.0 (and above devices). NCKEMOOD does not guarantee the product's compatibility with smartphones from all manufacturers.
- Top State is a service mark of Apple Inc., registered in the U.S. and other countries.
IOS is a trademark or registered trademark of Coup in the U.S. and other countries and is used under license.
Android and Google Play are trademarks of Google U
Setting up a Wireless Connection
On your device, select > Wireless LAN > On to enable the wireless LAN mode. Once enabled, the wireless LAN setting screen displays the SSD and password of the device.
On your smartphone, follow the steps to set up the wireless connection.
1. Enable the wireless ALL function on the smartphone.
2. Open the KFVW300 DBV Link app and follow the on-screen instructions to set up the connection.
Open the wireless LAN setting of the smartphone to display the detection devices. From the I.e. select the device you want to connect to and then enter the password.
The next time you use your smartphone to connect to the device, you will not be prompted to enter the password again unless you reset your phone to the factory default settings.
Note: The instructions about operating the smartphone are for reference only. The actual setting options and methods may vary depending on your phone type/model and the supervision.
You can check the wireless connection status by a location on the device.
| The device is connected to the smartphone and paired with the KTNWOOD DRV Link app. | |
| The device is not connected to the smartphone. | |
| The device is connected to the smartphone but not paired with the CNWOOD DRV Link app yet. |
Once connected, the event recordings will be automatically transferred to your smartphones via the KEM/OGOD Dev Link App
System Settings
Note: Not all setting items and options are available for all models.
日
File Playback
Plays the recorded videos and photos.
Camera
Press to enter Camera Tode.
Wireless LAN
Enables or disables wireless LAN
Sound Recording
Sets if you want to include sounds in the recordings
Parking Mode
- Detection: When enabled, the device will automatically enters the Parking mode when the car stops moving for about 2 minutes.
- Detection Method: Sets the parking detection method triggered by the 3-sensor motion detection or both.
- Auto Entry: Sets the mode (Easy, Medium, Difficult or Manual) for the system to enter the Parking mode automatically.
- Motion Detection Sets the sensitivity level of motion detection that triggers the system to save the parking recording.
• G-Sensor Sensitivity Sets the sensitivity level of the G sensor that triggers the system to save the parking recording.
Video Recording
- Video Clip Length: Sets the length of each video clip for a continuous recording.
* WDR Enables the Wide Dynamic Range (WDR) function to improve
the devices image quality under high contrast lighting conditions.
• Frequency Set the frequency for the camera to avoid problems caused by artificial light sources that are not constant.
• G-Sensor Sensitivity. Sets the sensitivity level of the G sensor that triggers the event recording during continuous recording
+ Text stamp Displays custom available text information.
System
- Date/Time: set the system date and time
- System Sound Enables or disables system modification sounds
• Volume. Acjus a the volume level
+ LCD Standby
• Always On: Keeps the LCD on
- HUD: Turns off the LCD in specified time, but still displays the time during recording.
- 10 sec / 1 min / 3 min. Sets the timer for the LCD to turn off automatically after recording starts.
• Storage Allocation: The system provides 3 memory configurations to store the videos and photos. Select the proper configuration based on your usage.
+ Restore to Defaults: Restores the system settings to the factory defaults.
+ Version: Displays the software information.
Format
Formats a memory card. (All data will be enacted)
Using the PC Application
KEYWOOD ROUTE WATCHER is a C application for displaying video recorded with the device.
System Requirements for KENWOOD ROUTE WATCHER II
OS Microsoft Windows 10 (Windows II), Windows 7 (except for the Windows 10 Mobile, Windows III; Windows 7 Service Pack 1 must be installed.
OS Apple Max OS X 10.11 (E Casitan) or later
Microsoft, and Windows are registered trademark or trademark of Microsoft Corporation in the U.S. and other countries Macintosh, Mac are trademarks of Apple Inc. registered in the U.S. and other countries
Installing the Software
Install the software in a computer environment, in which you have administrator rights.
1 Download the installer from http://www.konwood.com/cs/cc/ 2 Install according to the on-screen instructions
Specifications
5screen size
2.7 inches color TFT
Operating voltage
DC502
Current Consumption
481m (Max.12)
G-sensor
- 用 x 的点
Correlation Sensitivity
Image sensor
10.1(4) 68% sensor
Number of Pixel
2M Fixes (1920x1083)
Angles of view
Horizontal
Vertical 52"
D
Lens
12
Operating temp
Recording resolution
1920×1080 Full HD (Max 2.0M)
Frame rate
30fps
Recording preservation timing
Continuous / Event / Parking
recording mode
17.32.01H Video format
12S≤ME4
Picture format
PE5 (Max 1928 x 1080)
Recording media
microS2HC card 4GB to 52GB
USD Port
mail 13
Dimensions WxHxD [Main unit]
84mm×52mm×3mm
Weight (Main unit)
(1)
Accessories
Lar-therger-cord (5.5 m) x 1
Roundard cricket double-sided
The specifications and design
are subject to charge due to
technological development.
• The TICLOSURC logo
(1) 2019年1月1日
Precautions and Notices
Precautions and Notices
- Warning! Do not operate the device while driving. Using this product does not change the requirements for a direct to rare full responsibility for his or her behavior. This responsibility includes observing all traffic rules and regulations in order to avoid accidents, personal injury or property damage.
• For your own safety, do not operate the controls of the product while driving.
• A window mount is needed when using the recorder in a car. Make sure that you place the recorder in an appropriate place, so as not to obstruct the driver view or deployment of airbags
* Make sure that no object is clocking the camera lens and no
- If the car's windscrew is inside with a coating, it may impact the recording quality
- Connect the charge to a proper power source. The voltage requirements are found on the product case and/or packaging. - Do not use the charge if the cord harness damaged.
- Do not attempt to service the unit. There are no serviceable parts inside. Replace the unit, if it is damaged or exposed to excess moisture.
Caring for Your Device
• Taking good care of your device will ensure trouble-free operation and reduce the risk of damage.
- Keep your device away from excessive moisture and extreme
temperature.
- Avoid exposing your device to dress, sunlight or strong lighting for extended periods of time.
• Do not place anything on top of your device or drop objects on your device.
• Do not drop your device or subject it to severe shock.
- Do not subject your device to sudden and severe temperature changes. This could cause more stress compensation made the unit, which could damage your device, in the event of moisture condensation, allow the device to dry out completely before use. - The screen surface can easily be scratched. Avoid touching it with sharp objects. Nonadhesive generic screen protectors designed
specifically for use on portable devices with LCD panels may be used to help protect the screen from minor scratches.
- Never clean your device with it powered on. Use a soft, Int-free cloth to wipe the screen and the exterior of your device.
• Do not use paper easily to clean the green.
- Never attempt to disseminate, repair or make any modifications to your device. Disassembly modification or any attempt at repair could cause damage to your device and even bodily injury or property damage and will void any warranty.
- Do not store or carry remarkable liquids, gases or exclusive materials in the same compartment as your sake, 15 parts of accessories.
• To discourage the ^2 , do not leave the desire and accessories in plain view in an unattended vehicle.
• Overloading may damage the service.
Cleaning the Device
- When the device is dirty, wipe it with a dry silicone cloth or other soft cloth. If the device is very dirty, remove the dirt, with a cloth with neutral cleaner on it and then wipe off the dearer. Wiping the device with a hard cloth or using using a volatile substance such as thinner or alcohol may cause scratches, deformation, deterioration, or other damage.
- When the lens is dirty, gently wipe it with a soft cloth dampened with water. Rubbing the lens strongly with a dry cloth may cause scratches
Precautions for Installation
- total the device in a position where it will not have the 'front size of the driver' position where hidden by the rear-view mirror.
- install the device so that it is within the wiping range of the wiper
- install the device in a position where it will not interfere with the movement of the rear view mirror.
• take care not to install the device over the vehicle inspection stickers or other stickers.
Take care not to install the device where it will interfere with driving or airbag operation.
- When installing the device in a vehicle equipped with a driving support system, check the instruction manual of the vehicle and then select an installation location that will not interfere with the driving support system.
• The device is installed incorrectly, event recording or parking
recording may not work correctly. Refrict: I know to install for the loosening of firing knot, installation orientation, installation angle, and other information and their install the device correctly.
- Do not install the device near a digital terrestrial television an erms or an electrical component. Being so much reduce television receiver sensitivity or cause flowering and noise.
- Use a commercially available cleaning cloth or the like to wipe of all dirt and grease on the mounting surface and then for the mount base in place, if the device is re-affixed or mounted using, for example, general purpose enable spindle, the aesthetic strength may seem and cause the desire to fall.
- After mounting the device, lease it for 24 hours before use to enable the mounting strength of the mount bracket to improve. Failing to do so may result in the adhesion of the mount bracket becoming weak and the device falling.
• For the cord in place with race or the line so that it does not interfere with driving.
Precautions for Use
- E0 no. block the camera lens, get dirt on it, or place a reflective object near it.
- When LED traffic lights are recorded, video in which they appear to be flickering or flashing may be recorded. WORKWOOD assumes no responsibility with regard to the distinguishing or recording of traffic lights.
- If coating is used on the windshield at the center, recording quality may be affected.
- There is no guarantee that the desire can respect wider in all conditions.
Others
About software
This device includes the software owned by following third parties.
Following condition of the license is applicable to each software.
Copyright © 2012 NASLDA mines
Applicable license of T License
Hepop
Copyright © 2000-2005 ntd Corporation
Applicable license SSD3-Clause "New or Revised" license
Applicable condition of license for third party software
MIT License
Permission is hereby granted, free of charge, to any person obtaining a copy of this software and associated documentary on files (the "Software"), to deal in the Software without restriction, including without limitation on the rights to use, copy, modify, merge, publish, distribution, subclass, and/or sell copies of the Software, and to commit persons to whom the software is furnished to do so, subject to the following conditions
The active copyright notice and this permission notice shall be included in all options or sub-total portions of the Software.
IT SOFTWARE IS PROVIDED AS IN, WITHOUT WARRANTY OF ANY KIND, EXPRESS OR IMPLIED, INCLUDING BUT NO LIMITED OF THE WARRANTIES OF MERCHANTABILITY, FITNESS FOR A PARTICULAR PURPOSE AND NONINFRINGEMENT. IS NO EVENT SHALL THE AUTHORS OR COPYRIGHT DOES NOT BE LIABLE FOR ANY ANY ANY DAMAGES OR OTHER ANY liability, WITH FROM AN ACTION OF CONTRACT, TORT OR OTT BYRST, ARISING FROM OUT OF OR IN CONNECTION ON WHILE THE SOFTWARE OR THE USE OR OTHER DETAILS IN THE SOFTWARE.
BSD 3-Clause 'New' or 'Revised' License
* Reca utilisation, exclude in source and binary forms, with or without * uncalibration, are permitted provided that the following conditions are met: * Other and other
*Written Red substitutions of source code must retain the above copyright notice, *the list of concr. ons and the following disclaimer
* Items Bed or buttons in primary form must reproduce the above copyright * Importing this list or conditions are the following child's entry in the * Documentation and/or other materials provided with the distribution. * Items Neither name of Intel Corporation on the name or its contribution * may be used to endorse or no write products derived from the software * Use your specific prior written permission.
THIS SOFTWARE INFORMS BY THE CORPORATION OF ORGAN CONTRACTORS * PACT AND ANY EXPEDITS OR IMPIED IMPROVATIONS, INCLUDING BUT NOT * USED TO, THE INFORMATION OF THIS INFORMATION IS AND RESPONSIBLE * A SERVICE PER SPECIFIC PER DISCUITING INFORMATION IS NOT TO * CONTAIN OUTS BY, ABRELLA FOR ANY OTHERS, INCOME ONLY. ALL AN AL SPONS. * ENROLL ANY CHANGE IN FACTS (NOTING WITHOUT INTENDED) * PROCEDURE OF SUBSTITUTE GOODS OR SERVICES LOSS OF USE, DATA OF * PUBLIC WORK IN ANY OTHERS. THE COMPANY WAS USED ON ANY THEORY * LET ABRELLA WITHIN IN CONTRACT, STRICT, UTILITY, HISTORY, UNIVIDING * INSPEECHY SHALL BE MADE ABRELLA IN ANY WAY TO THE THIS * SOFTWARE IS NOT AVAILABLE FOR ANY OTHERS.
•
If You Notice a Problem with the Device
let the device. I um off the power by pressing the reset button on the back of the device with the tip of a thin taper clip. Press the power button once again to turn the device an again.
SD Cards
Cards supports by this device
| Standard micro-DC |
| Capacity = 64 to 35 Gb |
| Speed class Class 0 or above |
| File system (A13) |
Precautions for Using SD cards
- When using a commercially available SD card, also check the instructions to replace with the SD card.
- Be sure to form (initialize) an SD card with the device before use
- SD cards have a product lifespan, such as the number of times that writing can be performed. It is recommended to explore the SD card with a new one regularly depending on the usage condition.
*When inserting and removing an SO card, confirm the orientation, do not expand it and do not apply a strong force or force to it.
- Do not directly touch the contact part with a band or metal. The stored data may be scanned or lost due to static electric ice.
- For sure to back up (copy), the required files in the SD card to a FC or other device. The saved data may be lost due to the usage conditions of the SD card. Please note that FC <W(10) cannot compensate for any damages arising from the loss of saved files.
• Formal the memory card periodically.
Do not remove the memory card while recording or during playback because it may soon get data on the memory card.
The device may not rotate normally if you use an SD card that was used by another device, such as a computer or digital camera. Format the memory card in the device.
- Depending on the specifications of the memory cars, the reading and waiting spaces for the device's data may differ.
Compies with IDA Standards EBO771

- Setting the Date and Time
- Recording in Driving Mode
- Continuous Recording
- Event Recording
- Using Your Device in a Vehicle
- Parking Mode
- Using a Memory Card
- Formatting a Card
- Turning the Device On
- Power Button
- Camera Mode
- Playback Mode
- Shutting down the Device
- Function Keys
- System Icons
- Getting Connected
- KENWOOD DRV Link
- Setting up a Wireless Connection
- System Settings
- File Playback
- Camera
- Wireless LAN
- Sound Recording
- Video Recording
- System
- + LCD Standby
- Format
- Using the PC Application
- System Requirements for KENWOOD ROUTE WATCHER II
- Installing the Software
- Specifications
- 5screen size
- Recording preservation timing
- Precautions and Notices
- Caring for Your Device
- Cleaning the Device
- Precautions for Installation
- Precautions for Use
- Others
- About software
- Applicable condition of license for third party software
- MIT License
- BSD 3-Clause 'New' or 'Revised' License
- If You Notice a Problem with the Device
- SD Cards
- Precautions for Using SD cards
Brand : KENWOOD
Model : DRV-W440
Category : Camcorder