
SDA-SC510 - Battery charger PIONEER - Free user manual and instructions
Find the device manual for free SDA-SC510 PIONEER in PDF.


| Brand | Pioneer |
| Model | SDA-SC510 |
| Product Type | Battery Charger |
| Input Voltage | 100-240 V AC, 50/60 Hz |
| Output Voltage | 12 V DC |
| Charging Current | 1 A |
| Compatible Battery Types | Lead-acid, AGM, Gel |
| Battery Capacity Range | Up to 100 Ah |
| Charging Modes | Automatic, Float, Pulse |
| Protection Features | Overcharge, Short Circuit, Reverse Polarity |
| Cooling | Passive (no fan) |
| Dimensions (L x W x H) | 120 x 70 x 45 mm |
| Weight | 250 g |
| Housing Material | ABS Plastic |
| LED Indicators | Power, Charging, Full |
| Operating Temperature | 0°C to 40°C |
| Storage Temperature | -20°C to 60°C |
| Certifications | CE, RoHS |
| Included Accessories | AC cable, alligator clips, ring terminals |
| Maintenance | Keep dry, clean contacts regularly |
| Repair | No user-serviceable parts; contact support |
Frequently Asked Questions - SDA-SC510 PIONEER
User questions about SDA-SC510 PIONEER
0 question about this device. Answer the ones you know or ask your own.
Ask a new question about this device
Download the instructions for your Battery charger in PDF format for free! Find your manual SDA-SC510 - PIONEER and take your electronic device back in hand. On this page are published all the documents necessary for the use of your device. SDA-SC510 by PIONEER.
USER MANUAL SDA-SC510 PIONEER
Thank you for buying this Pioneer product. Please read through these instructions so you will know how to operate your model properly. After you have finished reading the instructions, keep this document in a safe place for future reference. Always read and follow the "Safety Precautions" described in this manual when installing this product in a vehicle. There is a risk of accident and injury if this product is installed using methods other than those described in this manual, or if parts are used other than those described in this manual. Pioneer accepts no responsibility whatsoever in these cases.
Register your product at
https://www.pioneerelectronics.com/PUSA/
in Canada
https://www.pioneerelectronics.ca/POCEN/
PIONEER CORPORATION
28-8, Honkomagome 2-chome, Bunkyo-ku, Tokyo 113-0021, Japan
PIONEER ELECTRONICS (USA) INC.
P.O. Box 1540, Long Beach, CA 90801-1540, U.S.A.
TEL: (800) 421-1404
English
© 2021 PIONEER CORPORATION. < KFWZ21L > < 10.0105.0956 >
Precaution
Certain country and state laws may prohibit or restrict the placement and use of this product in your vehicle. Please comply with all applicable laws and regulations regarding the use, installation and operation of this product. It is the user's responsibility to comply with all applicable laws, rules, regulations and ordinances.
- This device complies with part 15 of the FCC Rules. Operation is subject to the following two conditions: (1) This device may not cause harmful interference, and (2) this device must accept any interference received, including interference that may cause undesired operation.
- FCC Radiation Exposure Statement: This equipment complies with FCC radiation exposure limits set forth for an uncontrolled environment and meets the FCC radio frequency (RF) Exposure Guidelines.
- Information to User - Alteration or modifications carried out without appropriate authorization may invalidate the user's right to operate the equipment. - NOTE: This equipment has been tested and found to be used in the following two cases: B. B. B. B. B. Pursuant to Part 15 of the FCC Rules. These limits are designed to provide reasonable protection against harmful interference in a residential installation. This equipment generates, uses and can radiate radio frequency energy and, if not installed and used in accordance with the instructions, may cause harmful interference in the other areas. The requirements for these devices were there is no guarantee that interference will not be in a particular installation. If this equipment does cause harmful interference to radio or television reception, which can be determined by turning the equipment off and on, the user is encouraged to try to correct the interference by one or more of the following measures:
- Increase the separation between the equipment and receiver. - Connect the equipment into an outlet on a circuit different from that to which the receiver is connected.
— Consult the dealer or an experienced radio/TV technician for help.
FEDERAL COMMUNICATIONS COMMISSION SUPPLIER'S DECLARATION OF CONFORMITY Product Name: Wireless Charging Cradle Model Number: SDA-SC510 Responsible Party Name: PIONEER ELECTRONICS (USA) INC.
SERVICE SUPPORT DIVISION Address: 2050 W. 190TH STREET, SUITE 100, TORRANCE, CA 90504, U.S.A. Phone: 1-800-421-1404
▲ CAUTION
- The graphical symbol 🐘 on the product means direct current.
After-sales service for Pioneer products
Please contact the authorized Pioneer dealer from which you purchased this unit or an authorized Pioneer service company for after-sales service or questions you may have about the product. You may contact Pioneer directly as follows:
Do not ship your unit in for repair without contacting Pioneer first. Units sent without a return
authorization number will be refused.
USA & CANADA
Pioneer Electronics (USA) Inc.
CUSTOMER SUPPORT DIVISION P.O. Box 1760
Long Beach, CA 90801-1760 U.S.A.
800-421-1404
For warranty information, please see the Limited Wa
ranty sheet included with this unit.
Visit our website
U.S.:
https://www.pioneerelectronics.com
Canada: https://www.pioneelectronics.ca
If you experience problems
Should this product fail to operate properly, please contact your dealer or nearest authorized Pioneer Service Company.
Safety Precautions
Always observe the precautions described here to pre-
vent harm to yourself and others and to prevent damage to property before it happens.
Important safeguards
WARNING
- Do not install this product where it may
(i) obstruct the driver's vision, (ii) impair the performance of any of the vehicle's operating systems or safety features, including airbags, indicators (lights) and hazard lamp buttons, or (iii) impair the driver's ability to safely operate the vehicle. It is also the driver's responsibility to know and comply with the laws, rules, and regulations of the driving location and not to use the device in any location where its installation or use is prohibited.
- Any obstruction of or other interference with the airbag, either denioved or non-denjoved, or with the
clear view of the road must be avoide
Important safety information
WARNING
- If liquid or foreign matter should get inside this prod-
dct, park your vehicle in a sale place, turn the ignition suity off (ICC OFF) and uplay the cigarette holder.
plug immediately, and consult your dealer or the near
est authorized Pioneer Service Company. Do not use
this product, in this condition because doing so may result in a fire, electric shock, or other failures.
- If you notice smoke, a strange noise or odor from this
product, turn off the power immediately and consult
your dearer of the nearest authorized monetary service Company. Using this product in this condition may
result in permanent damage.
- Do not disassemble or modify this product, as there
are high-voltage components inside which may cause an electric shock. Be sure to consult your dev
er or the nearest authorized Pioneer Service Compa
ny for internal inspection, adjustments or repairs.
Before using this product, be sure to read and fully
• Do not operate this product if doing so will divert
your attention in any way from the safe operation of
your vehicle. Always observe safe driving rules and
follow an existing traffic regulations. If job experience difficulty in operating this product, park your
vehicle in a safe location and apply the parking brake
before making the necessary adjustments.
- Keep this manual handy as a reference for operating
- It is extremely dangerous to allow cables to become
wound around the steering column or gearstick. Be
sure to install this product, its cables, and wiring in
such a way that they will not destruct or hinder driving.
- Make sure that the cable will not interfere with or become caught in any of the vehicle's moving parts, espe-
cially the steering wheel, gearstick, handbrake, sliding
seat tracks, doors, or any of the vehicle's controls.
Precautions before installing
WARNING
- Firmly install this product so it does not fall off. If
this product is not firmly installed, it may fall off
White driving and cause an accident. Periodically inspect this product
- Do not shorten any cables. If you do, the protection
circuit (fuse holder, fuse resistor or filter, etc.) may
I am to work properly.
Never used power to other electronic products by cutting the insulation of the power supply cable of this
product and tapping into the cable. The current capac-
ity of the cable will be exceeded, causing overheating.
Precautions before installation
CAUTION
Never install this product in places where, or in a
In order that,
- could injure the driver of passengers in the vehicle stops suddenly.
- May interfere with the driver's operation of the vehi-
cle, such as on the floor in front of the driver's seat,
To answer appropriate installation, he ever has used the use
To ensure proper motivation, we done to use the top of your parts in the manner specified. If any parts are
not supplied with this product, use compatible parts
in the manner specified after you have the parts'
compatibility checked by your dealer. If parts other
than supplied of companion ones are used, they ma
damage internal parts of this product or they may
- Never install this product in front of or next to the
place in the dashboard, door, or pillar from which
one of your vehicle's airbags would deploy. Please
refer to your vehicle's owner's manual for reference
to the deployment area of the frontal airbags.
- Consult with your nearest dealer if installation require
drilling notes of other modifications of the vehicle.
- DO NOT install this product in places subject to high
Places that may be exposed to ski
— Close to the door or on the vehicle's floor
D. (1) 4-6, 5-7, 8-9
Preculations for cigarette lighter plug
WARNING
- When using a power supply in the vehicle, use the
dedicated cigarette lumber plug.
Using a plug other than specified may result in fire
electric shock, or product failure.
- Onplug the cigarette plug after using the product, and
When the product will not be used for a long period of off. Depending on the vehicle, the pinnette series may
upertaining on the terrain, the cigarette is burned off. Not he burned off over when the engine is burned off.
For this reason, there is a risk of fire or a dead better.
• Fully insert the cigarette lighter plug. Poor contact mar
occur due to vibrations while driving, resulting in an e
fremely dangerous situation where the unit overheats.
• Regularly inspect and clean the cigarette lighter soc
et. Foreign material inside the cigarette lighter socks
such as shots, may cause heat generation due to
(1) 2017 and 2018, following the use of a research and literature.
When Using Wireless Charges
▲ MULTIMOUNT
WARNING
• DO NOT USE metal objects (such as steelers made of material containing metals to the wireless chargers or
compatible device. A fire, burn, or injury may occur
• Do not place metal objects (such as a stran or clip
made of material containing metal) between the
wireless charger and compatible device. A fire, burn, or
injury may occur.
Never move a credit card or other magnetic card, mag-
meic recording media, or other magnetized item near
the charging area magnetic data may be detected.
charging area as failure may occur.
Remove any cover or other item attached to the compat.
ible device before charging with the wireless charger.
Normal charging may not be possible and a fire, burn, or
injury may occur due to the material or thickness of the
cover or other item, or due to diff. of other foreign maten-
or trapped between the compatible device and cover.
- Do not place this product in direct sunlight for an extended amount of time, or where it would be surpassed.
to extreme temperatures. Store out of direct sunlight
when not in use

Usage Precautions
⚠️ Precautions When Handling this Product
- Although this device should not interfere with a vehicle's automatic anti-theft system (immobilizer), keyless entry system, or other control equipment or devices, confirm that there are no electromagnetic issues by starting the vehicle or using the keyless entry system, if any. If any malfunctions should occur and the problem is not resolved by moving this device to a different suitable location within the vehicle, stop usage and contact Pioneer or your authorized Pioneer dealer.
Conditions Under Which Functions May Not Work Normally
- When the device to be charged is already fully charged. - When there is foreign material between this product and the device. - When the temperature of the device very high. - When the device is placed with the front screen facing the charger. - When the device and this product's charging area are misaligned. - When used in a location where strong radio waves and noise are generated such as a location near a TV antenna, power plant, petrol/gas station, broadcasting station, large display, or airport. - When the device is contacting a card with aluminum foil or other metal. - When the device to be charged has been covered by a material, such as a smartphone cover, etc., that obstructs or does not transfer its electric waves. - When used near a wireless remote control.
SDA-SC510
Owner's Manual
Thank you for buying this Pioneer product. Please read through these instructions so you will know how to operate your model properly. After you have finished reading the instructions, keep this document in a safe place for future reference. Always read and follow the "Safety Precautions" described in this manual when installing this product in a vehicle. There is a risk of accident and injury if this product is installed using methods other than those described in this manual, or if parts are used other than those described in this manual. Pioneer accepts no responsibility whatsoever in these cases.
Register your product at
https://www.pioneerelectronics.com/PUSA/
in Canada
https://www.pioneerelectronics.ca/POCEN/
PIONEER CORPORATION
28-8, Honkomagome 2-chome, Bunkyo-ku, Tokyo 112 0001, Japan
Tokyo 113-0021, Japan
PIONEER ELECTRONICS (USA) INC. P.O. Box 1540 Long Beach, CA 90801
U.S.A.
TEL: (800) 421-1404

Features
- This product is a wireless charging cradle that uses electromagnetic induction technology.
- You can release the cradle lock with a single touch to remove your smartphone.
- Your smartphone is removable even when the vehicle's engine is off thanks to an electric double-
layer capacitor (storage capacitor).
• This product is compliant with the Qi wireless charging standard.
• Any product compliant with Qi can be charged by simply placing it in this product. - Fast charging can be performed in fast wireless charging mode at 10 W. *
— Smartphones compatible with 5 W or higher wireless charging are supported. — Charging at 5 or 7.5 W is possible for iPhone ^® , and charging at 5, or 10 W depending on the specifica-
tions of the smartphone is possible for Android™. (Must be compliant with the Qi standard.)
— There is no guarantee that charging or fast charging will be possible with all models. (For fast charging, a unique standard may be used depending on the phone in such a case, she
charging, a unique standard may be used depending on the smartphone. In such a case, charging will be limited to a maximum of 5 W.)
* For fast charging, please use the USB1 (green port) of the included USB charger. The USB2 (white port) is not compatible with fast charging.

Trademarks & Copyrights
• Qi is a registered trademark of the Wireless Power Consortium.
• Android is a trademark of Google LLC.
- iPhone is a trademark of Apple Inc., registered in the U.S. and other countries.
- USB Type-C® and USB-C® are registered trademarks of USB Implementers Forum.
• Pioneer is a registered trademark of Pioneer Corporation.

Specifications
This product
| Input Max. 5 V / 2 A, 9 V / 1.67 A, or | 1 V / 1.67 A |
| Output Android | ^10 max 10 W, iPhone max 7.5 W / Minimum 5 W |
| Input port: USB Type-C | * female |
| Frequency Range 110 kHz to 205 kHz | |
| Operating temperature range -10 °C to +50 °C (14 °F to +122 °F) | |
| Charging efficiency ≥slant 70% | |
| Possible electric power transmission distance | ≤slant 6.0 mm |
| External dimensions (W x H x D) | 46.8 mm x 120 mm x 24.5 mm (2-5/8 in, x-3/4 in, x-1 in). |
| Product weight Approx. 140 g (5 oz) | |
USB charger
| Connector | USB A connector female |
| No. of ports (Port name) | 2 (USB1 (green port) / USB2 (white port)) |
| Input | 12 V / 24 V DC |
| Operating temperature range | -10 °C to +50 °C (14 °F to +122 °F) |
| Output | USB1 (green port): 5 V / 3 A, 9 V / 2 A, or 12 V / 1.5 A DCUSB2 (white port): 5 V • 2.4 A DC |
| Max. output | 30 W |

Checking the Contents of the Package


Part Names
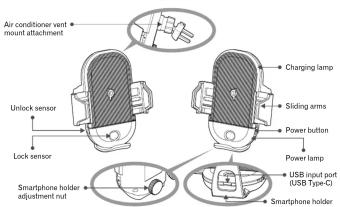

Before Installing the Product
⚠ Precautions for installing this product in the vicinity of the
duckboard
dashboard
Observe the following points.
• Do not block the view ahead
- Do not block the view immediately in the front and at the sides.
- Do not obstruct air bag system operation
• Install where there will be little eye movement for navigation purposes during driving.
- Do not install in the following locations.
* If there min is likely to set on the product
- Where harm is likely to get on the product
Where hampere and other chisicle will bump into the product
• Always use the parts supplied with the product as specified. Using other than the specified parts
Always use the parts supplied with the product as specified. Using other than the specified parts may result in damage to components inside the device or the product falling due to not being firmly
may return
secured

Installation
This product can be mounted to either an air condition
vent or the dashboard.
Mounting to Air Conditioner Vent
4 Insert and fix the clip in an air conditioner vent.
.
The image contains no discernible text or characters.
▲ CAUTION - Some vehicle side vents defront the side
Firmly press the lock button on the air
- Some vehicle side vents defrost the side windows, so blocking those vents may
conditioner vent mount attachment to release the lock and then open the air conditioner louvre (slats) and attach the product to the air vent.
windows, so blocking those vents may decrease visibility in cold locations. Do not

mount on a side vent that defrosts the side
When attaching the product to an air conditioner vent, take care not to damage the air conditioner louvre (slats).

7 Turn the nut counterclockwise and remove it.

Assemble the air conditioner vent mount attachment and
2 nut, and insert them into
the attachment hole of the
product.


Fix them in place by turning the nut clockwise.

Removing from Air Conditioner Vent
Firmly press the lock button on the air conditioner.
- Firmly press the lock button on the all-offshore vent mount attachment to release the lock and then
remove the product from the air vent.

When removing the product from an air conditioner vent, take care not to damage the air conditioner louvre (slats).

Installation
Mounting to Dashboard
Protective film is affixed to the suction surface
(back side) of the suction cup. Do not peel off the film until plan 10. If the suction surface of the
the limit will step for the suction surface of the suction cup becomes dirty, the suction power will
be reduced and the product may fall.
Select the following location to install the
product. If the product is not installed correctly, it will fall, etc.
* Smooth and level location on the dashboard
* Location where the entire suction surface car
be affixed
Be sure to attach the supplied safety strap to
Turn the nut counterclockwise
and remove it.

Assemble the dashboard
mount attachment and
2 nut, and insert them into
the attachment hole of the
product.

2 Fix them in place by turning
the nut clockwise


Determine the mount position.
Determine the mount position of the product
by placing the attachment on the dashboard
without removing the film.
图 2
A
(1) ( \overline{a} = \frac{1}{2}\left( {\overline{b} - \overline{c}}\right) + \frac{1}{2}\left( {\overline{b} - \overline{c}}\right) + \cdots + \frac{1}{2}\left( {\overline{b} - \overline{c}}\right) + \frac{1}{2}\left( {\overline{b} - \overline{c}}\right) + \cdots + \frac{1}{2}\left( {\overline{b} - \overline{c}}\right) + \frac{1}{2}\left( {\overline{a} - \overline{b}}\right) + \cdots + \frac{1}{2}\left( {\overline{a} - \overline{b}}\right) + \cdots + \frac{1}{2}\left( {\overline{a} - \overline{b}}\right) + \cdots + \frac{1}{2}\left( {\overline{a} - \overline{b}}\right) + \cdots + \left( {\overline{a} - \overline{b}}\right) + \cdots + \frac{1}{2}\left( {\overline{a} - \overline{b}}\right) + \cdots + \frac{1}{2}\left( {\overline{a} - \overline{b}}\right) + \cdots + \frac{1}{2}\left( {\mathrm{{ab}}}^{\prime }\right) + \cdots + \frac{1}{2}\left( {\mathrm{{ab}}}^{\prime }\right) + \cdots + \frac{1}{2}\left( {\mathrm{{ab}}}^{\prime }\right) + \cdots + \frac{1}{2}\left( {\mathrm{{ab}}}^{\prime }\right) + \cdots + \frac{1}{2}\left( {100}\right) + \cdots + \frac{1}{2}\left( {100}\right) + \cdots + \frac{1}{2}\left( {100}\right) + \cdots + \frac{1}{2}\left( {100}\right) + \cdots + \frac{1}{2}\left( {100}\right) + \cdots
O X
0 x x

Adjust the angle and height.
-
Loosen each of the screws for the angle ①
tighter the corsoy
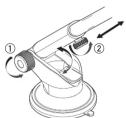
Pass the safety strap through
the hole in the suction cup
surface mount sheet and
fasten the strap.

Pass the shortest loop of the safety strap
through the hole in the suction cup surface mount sheet and fasten the strap.

Pass the other end of the
safety стран through the
safety strap through the gap in the dashboard mount
gap in the aachnsburs mount attachment and factor the
strap.


Pass the longest loop of the safety strap
through the gap in the dashboard mount
attachment, pass the suction cup surface
mount sheet at the other end through the
loop, and fasten the strap.
Peel off the double-sided ta
release paper on the back of
the suction cup surface mou
sheet and affix the suction
surface mount sheet to the
dashboard.
• Affix the suction cup surface mount sheet
to the desired mounting position.
- Wipe clean and dry the affixing location
before amixing
• After affixing the suction cup surface
mount sheet, firmly press the entire
affixing surface to push out any air.
- Select the following location to aim (i
* On the basis of the line is ill
Smooth and lever location on the dashboard
- Location where the entire avlation
Location where the entire suction surface can be affixed.
The Ground Truth image displays a single, solid horizontal line. According to Rule 2 (UNDERSCORE & LINE RULES), if the GT contains lines used for stylistic emphasis or as background elements (like ruled paper), the OCR result must ignore them. The provided OCR content is "____", which consists of four underscores. This is incorrect because underscores are not equivalent to a solid line and are not permitted under the “Stylistic/Background Lines (Ignore)” rule. Outputting underscores for a stylistic line violates the rule and constitutes an error. Therefore, the OCR result is inconsistent with the Ground Truth.
Raise the suction surface lock


Peel off the film from the
10 suction surface and place the
10 suction surface on the suction
cup surface mount sheet.
三
Lower the suction surface
lock lever to lock the suction
surface in place.

Move the product up, down, left, and right to
check that it does not rattle.

Connecting

Insert the supplied USB
charger into the vehicle's
cigarette lighter socket.
-

lighter socket
For fast charging, please use the USB1
(green port) of the included USB charger. The
USB2 (white port) is not compatible with fast champion. For champion would be possible
charging. Fast charging may not be possible with a charging part filled to the vehicles as
standard or a commercially available USB
charger with an insufficient voltage/current
because USB output equivalent to the product

Connect the USB input port

of this product and the USB

charger with the supplied

USB Type-C Cable.

(1)

(2)

[Non-Text]

(1)

(2)

图 1

1

□ H
When inserting the USB connector into this
product, insert it until you hear a click. When
the cable is connected, the power lamp and
charging lamp will illuminate. For details
- Implementation Status: 0.0 - Product Status Display"

Turning the Power On and Off
Turning the Power On

Press the power button.
The power lamp (blue) lights. For details
on illumination status, see "Product Status
Display"

• N
ormally, when the vehicle's engine is
turned on (ACC ON), power is supplied
from the USB charger and the product
power turns on automatically.
- When the product power on state continues for 5 minutes after power steps
continued for 6-minutes after power stops being supplied from the USB charger, the
product power will turn off automatically.
• If the charge of the electric double-laye
capacitor has run out due to opening
and closing the arms several times while
there is no power supplied from the USB
charger, the product power will not turn on
Turning the Power Off

Press and hold down the
power button for 3 seconds.
www.laser.com.cn
THE DOW
BEVER lamp (blue) goes out and the er turns off.

Inserting and Removing a Smartphone
Inserting a Smartphone
1 Touch and hold the unlock
7 Touch sensor

The sliding arms widen automatically.
If the product does not operate, start the vehicle's engine and then perform the
vehicle's engine and then perform the operation.

Insert your smartphone.
Always insert your smartphone by sliding it from the top of the cradle as shown in the figure.
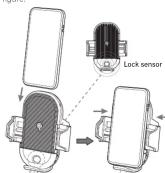
The lock sensor senses the smartphone and the sliding arms close automatically.
Note
● Take precaution that your hand does not get
caught between the phone and the sliding
arms when the sliding arms are closing.
Once a compatible smartphone is inserted,
wireless charging will start automatically.
The charging lamp will illuminate during
charging. For details on illumination status
see "Product Status Display".

In the following cases, adjust the length of the
holder from the bottom of the cradle.
• If a sliding arm is pressing the power
button or volume button of the
smartphone.
- If the charging indicator does not light
even though a compatible smartphone is inserted.

Removing a Smartphone

Touch and hold the unlock
Touch sensor.


ding arms widen automatically

Removing a Smartphone

When the power turns off, the sliding arms
close automatically.

Product Status Display Troubleshooting
Power Lamp Display
| The product status is indicated by the lighting/flashing state. | |
| Status Display | |
| Storing Flashing blue | |
| Storing complete Solid blue | |
| Power off Off | |
Charging Lamp Display
| The wireless charging status of the smartphone is indicated by the lighting/flashing state. The charging lamp may not turn off after charging completes depending on the smartphone you are using. | |
| Status Display | |
| Waiting to charge Solid red | |
| Charging Solid blue | |
| Charging complete | Off |
| High temperature or overvoltage | Flashing red |
| Abnormality detected or incompatible smartphone inserted | Flashing red and blue alternately |
Check the following information before sending the product in for service.
| Symptom Cause Action | ||
| Power does not turn on. | No charge is stored in the product. | Connect the USB cable and check that the power lamp of the product lights or flashes. |
| The connection of the supplied USB charger is poor. | Reserve the USB charger into the cigarette buffer socket. | |
| Sliding arms do not open even when touching and holding the unlock sensor. | The charge of the product ran out while the USB cable is not connected. | Connect the USB cable to change the product. |
| The unlock sensor does not respond. Try touching the sensor for a longer period. | ||
| The smartphone is not positioned correctly. | Adjust the position of the smartphone so that the charging lamp lights green. | |
| Wireless charging is not performed even though a smartphone is inserted. | The smartphone cover is thick. | Remove the smartphone cover and place the smartphone on this product. |
| A metal smartphone cover is attached. | ||
| The smartphone is a device that is not compliant with the Qi wireless charging standard. | Use a device that is compliant with the Qi wireless charging standard. | |
- Precaution
- Usage Precautions
- ⚠️ Precautions When Handling this Product
- Conditions Under Which Functions May Not Work Normally
- SDA-SC510
- Owner's Manual
- Features
- Trademarks & Copyrights
- Specifications
- Checking the Contents of the Package
- Part Names
- Before Installing the Product
- Where hampere and other chisicle will bump into the product
- Installation
- Mounting to Dashboard
- Connecting
- Turning the Power On and Off
- Turning the Power On
- Inserting and Removing a Smartphone
- Inserting a Smartphone
- Insert your smartphone.
- Note
- Removing a Smartphone
- Product Status Display Troubleshooting
Brand : PIONEER
Model : SDA-SC510
Category : Battery charger