SVCA26CAT - Heating SVAN - Free user manual and instructions
Find the device manual for free SVCA26CAT SVAN in PDF.


| Product Type | Electric Heater |
| Brand | SVAN |
| Model | SVCA26CAT |
| Heating Technology | Convection |
| Heating Power | 2000 W |
| Power Supply | 220-240 V ~ 50 Hz |
| Recommended Room Size | Up to 25 m² |
| Dimensions (H x W x D) | 450 x 600 x 150 mm |
| Weight | 4.5 kg |
| Thermostat Control | Adjustable thermostat with temperature range 5-35 °C |
| Timer Function | 24-hour programmable timer |
| Safety Features | Overheat protection, tip-over switch, child lock |
| Installation | Wall-mounted or freestanding with feet |
| Cleaning | Wipe with damp cloth; do not use abrasive cleaners |
| Filter | Washable dust filter |
| Noise Level | < 35 dB |
| Energy Efficiency Class | A+ |
| Warranty | 2 years |
| Certifications | CE, RoHS |
| Spare Parts Availability | Thermostat, heating element, fan motor available |
| Repairability Index | 8.5 / 10 |
Frequently Asked Questions - SVCA26CAT SVAN
User questions about SVCA26CAT SVAN
0 question about this device. Answer the ones you know or ask your own.
Ask a new question about this device
Download the instructions for your Heating in PDF format for free! Find your manual SVCA26CAT - SVAN and take your electronic device back in hand. On this page are published all the documents necessary for the use of your device. SVCA26CAT by SVAN.
USER MANUAL SVCA26CAT SVAN
natural_image
Black svan portable gas stove with cooling fan and ventilation grille (no visible text or symbols)Note: The illustration is a reference image, your device may differ
SVAN MODEL: SVCA26CAT
Read this manual carefully and keep it for future reference. This appliance is intended for domestic use only.
SAFETY PRECAUTIONS:
natural_image
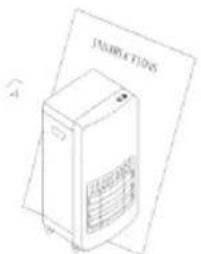
Line drawing of a server unit with ventilation grille and fan (no text or symbols)- Always use Heater in accordance with user's instructions supplied with each heater.
Keep this instructions in a safe place.
natural_image
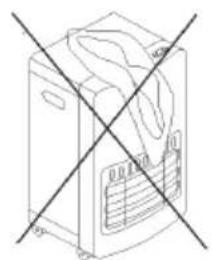
Line drawing of a washing machine with diagonal lines indicating crossed-out sections (no text or symbols)- DO NOT place clothes or other material on the heater. As apart from danger of fire, their presence could affect the efficiency of the appliance.
natural_image
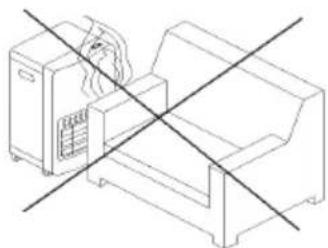
Line drawing of a mechanical device with intersecting diagonal lines (no text or symbols)- DO NOT position Heater close to armchairs, fabrics, bed linen and other furniture.
natural_image
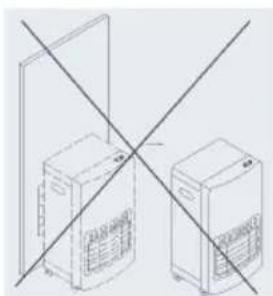
Line drawing of two server units with a diagonal line crossing through them (no text or symbols)- DO NOT move Heater from room to room when operating.
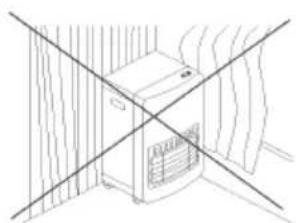
natural_image
Line drawing of a microwave oven with diagonal lines indicating airflow or ventilation (no text or symbols)- DO NOT position Heater alongside a wall or near curtains and other flammable materials. The following minimum distances should be respected: 20cm from sides, 150cm from front. ALWAYS face Heater towards center of room. Special care should be taken if the heater is on a surface where it can twist on its castors if knocked by a child or dog etc.
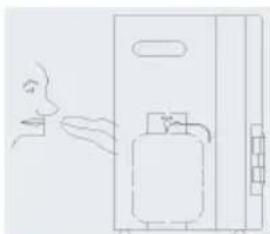
natural_image
Line drawing of a person using a gas pump next to a vertical container (no text or symbols)- In the event of gas leakage, the heater's gas supply need to be turned off..
DO NOT disconnect the regulator. Extinguish all naked lights. Check all connections. Slowly turn the gas on and brush the connections with soapy water or liquid detergents, a gas leakage point will form bubbles. If a leak is found, turn the gas off and inform your gas supplier. DO NOT use the Heater again until it has been checked and maintained by your dealer.
NOTE: READ THE INSTRUCTIONS BEFORE USING THIS APPLIANCE.
VENTILATION: USE ONLY IN A WELL-VENTILATED ROOM.
DO NOT USE IN LEISURE VEHICLES SUCH AS CARAVANS OR AUTOCARAVANS.
DO NOT CHANGE GAS CYLINDER IN THE PRESENCE OF NAKED LIGHT.
THIS APPLIANCE REQUIRES INSTALLATION BY A COMPETENT PERSON THIS APPLIANCE REQUIRES AN APPROVED HOSE AND REGUALATOR CHECK WITH YOUR GAS SUPPLIER
TECHNICAL CHARACTERISTICS
Domestic Flueless Space Heater, mobile, equipped with anti-tilt switch, oxygen depletion system, flame supervision device, Over heater protection and Over current protection, but no connecting pipe and regulator supplied.

2531-18
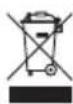
Mobile Gas heater
| Model | SVCA26CAT | ||
| Category(cat.) | I_3B/P(30) | I_3B/P(37) | I_3+I/(28-30/37) |
| Gas Type | Butane(G30),Propane(G31) or their mixtures | Butane(G30),Propane(G31) | |
| Pressure | (28-30) mbar | 37 mbar | Butane(G30) at (28-30) mbarPropane(G31) at 37 mbar |
| Injector size | 0.59 mm | 0.54 mm | 0.59 mm |
| Countries of destination | LU, NL, DK, FI, SE, NO, TR, HR, RO, IT, HU, SK, SI, BG, IS, CY, CZ, EE, LT, LV, MT, | PL | BE, FR, IT, LU, IE, GB, GR, PT, ES, CY, CZ, LT, SK,CH, S |
| Total heat input ( Q_n ) | 4.2kW (306 g/h) | ||
| Serial no. | |||
| P.I.N code | 2531CT-0107 | ||
VENTILATION
Your heater consumes oxygen while it is in operation. For that reason, adequate ventilation should be provided in rooms in which the heater is used. This ensures the removal of products of combustion and allows the entry of replacement air.
Adequate ventilation should considerably reduce the possibility of condensation occurring. The following table shows the smallest sizes of room suitable for each heat setting and the ventilation surface, which should be provided.
REQUIRED VOLUME OF ROOM AND VENTILATION SURFACE:
| VOLUME OF LIVING ROOM | VENTILATION SURFACE | |
| Low Level | High Level | |
| 84 cubic meters | 105cm^2 | 105 cm^2 |
CONNECTING THE CONTAINER
- Use an approved regulator according to gas supply pressure and approved tubing having a length of 50cm and in no case longer than 1m. When connecting the regulator to the container avoid twisting of hose.
- Slowly open the valve of the container and check if there is any gas leakage by brushing the connections with soapy water. NEVER USE A MATCH! A gas leakage forms the bubbles. In the event of gas leakage the appliance should be turned off by closing the valve and the regulator disconnected from the bottle.
Place container in its proper space and attach the rear cover.
HOW TO CHANGE LPG CONTAINER
- Container must be replaced in a flame-free atmosphere.
- Do not smoke while changing the container.
- When you needed to replace your empty container, turn off gas container's valve.
- Make sure that the heater is extinguished completely.
- Remove the regulator from the empty container.
- Following the steps described in "Connecting the container" to connect a filled one.
IMPORTANT
- It is important that all gas connections have been correctly connected to prevent any leakage. Use soapy water instead of a match for gas leakage checking.
- Put your container always in upright position. Using the container in horizontally laid down position may damage your heater and create serious results.
- If a newly filled container is used, ignition might impair as there may be some inert gas present in the container. In this case, change the container with another one which is partially used.
- When you light your heater for the first time or if it has been a long time since you used it last time. Please be noted that first light your heater in open air (garden or balcony). Take your heater inside after 15 minutes operation.
- Do not use your heater while sleeping.
Do not use your heater in high-rise flats.
Do not use your heater in basements, bathrooms or bedrooms. - This appliance requires a hose and a regulator, check with your gas supplier.
Please seek advice from your gas and regulator supplier so as to use correct hose.
The guard on the appliance is to prevent risk of fire or injury form burns and no part of it should be permanently removed.
IT DOES NOT GIVE FULL PROTECTION FOR YOUNG CHILREN OR THE INFIRM.
CONTROL BUTTON:
GAS CONTROL :
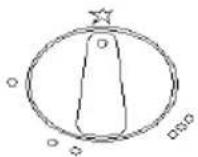
Lighting Position
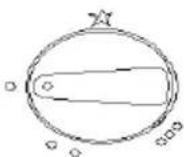
Minimum Position
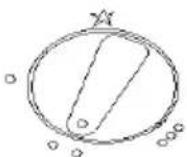
Medium Position
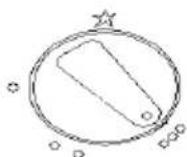
Maximum Position
1. LIGHTING INSTRUCTION
A. The heater has three settings.
Lighting position (Pos.1)
Minimum position (Pos.2);
Medium position (Pos.3)
Maximum position (Pos.4).
B. Turn on the gas on the container.
2. LIGHTING:
Use one hand Press down the control button for 10 seconds, at the same time press down the piezo igniter key with thumb finger of another hand. Continue this procedure until pilot is ignited. Approximately 20 seconds later release the control button. At the moment if pilot is ignited, it means that the heater is at its minimum position. If pilot flame goes out, please repeat this procedure.
3. HEAT LEVEL SETTINGS
To change from minimum to medium. Please gently press down the control button and turn it to position 2.
To change from medium to maximum. Please gently press down the control button and turn it to position 3.
4. SWITCHING OFF
Turn off the gas on the container. If the heater will not be used for a period of time, please disconnect the regulator from the container and replace any valve protection plug or cover. If the heater fails to extinguish, please do not disconnect the regulator from the container and remove the heater outdoors and let the gas in the container used up.
WARNING
- Read these instructions before using this appliance.
- The appliance is not to be used by children or persons with reduced physical, sensory or mental capabilities, or lack of experience and knowledge, unless they have been given supervision or instruction.
- Children being supervised not to play with the appliance.
- Do not used the heater with a programmer, timer or any other device that switches the heater on automatically.
-
Use an approved regulator which is adjusted to the gas supply pressure required.
-
Do not keep pressing the ignition button for more than 40 seconds.
- Never disconnect the regulator while container valve is open.
- Don't change container with in areas in which open fire exists.
- Don't expose your container to extreme heat area.
- Don't locate any other container with in the space/room in which your heater is used.
- Do not insert your finger or any other material through the front panel of the heater.
- Leave at least 1 meter distance between your heater and the other heat source.
- Do not let unauthorized persons to interfere with your heater.
- Do not place appliance under socket outlet.
- Don't use the heater in surroundings of a bath, shower of swimming pool, leisure vehicles such as caravans or auto caravans.
- This heater must not be used without a gas container fitted for stability purposes.
- Do not cover your heater.
- Fabrics, clothing, hangings, net curtains, bed linens and other flammable materials may ignite if placed against the outlets of your heater.
- In the event of leakage, the appliance shall be turned off valve and the regulator disconnected from the container.
- After use, turn off the appliance at the gas valve.
- Only use in a well ventilated area.
- Safety earth connection required when using the electrical parts.
- When cleaning or maintaining the electrical parts, water spaying or rain is prohibited.
- Please don't have the children touch the appliance when using heating elements.
- Switch off the appliance when leaving.
- If the supply cord is damaged, it must be replaced by the manufacturer, its service agent or similarly qualified persons.
- In order to avoid overheating, do not cover the heater.
STORAGE
-
Disconnect container.
-
Store container in a well-ventilated area away from combustible material.
Storage should preferably be in an outhouse but must not be in a basement or high-rise flat.
- The heater should be covered in a dry, dust-free medium in its original package.
CLEANING
- Use a damp cloth wrung out in a solution of soapy water to clean the exterior and container storage area of your heater.
- Quartz tube and reflector cleaning: Before clean quartz tube and reflector, must disconnect the plug. first remove barbed wire in front of quartz tube, use dry cloth to wipe clean the surface of quartz tube and reflector, and then put the wire back into the position.
-
Make sure that no water gets onto the burners or pilot/light area. Wipe the heater completely dry before use.
-
Don't use abrasive cleaners as they may damage the quality paint finish.
MAINTENANCE
- Check flexible tube between regulator and heater before every operation and replace it if perished, worn or damaged. In any case consider its expiration date to replace the tube
- Contact agent named on last page of this manual if any major maintenance is needed.
- It is recommended that the heater is maintained every two years by authorized personnel.
Assembly
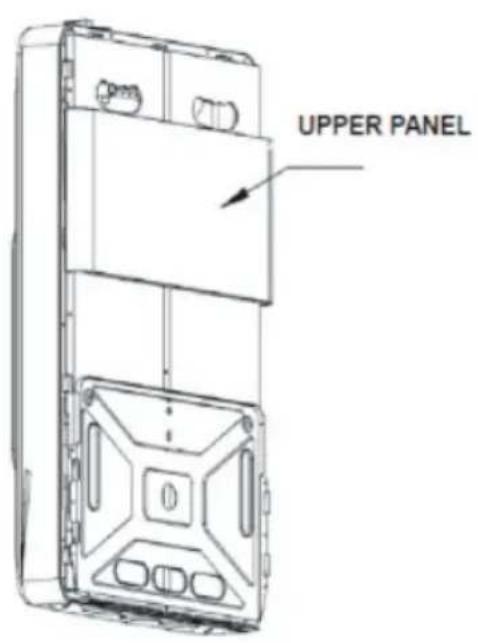
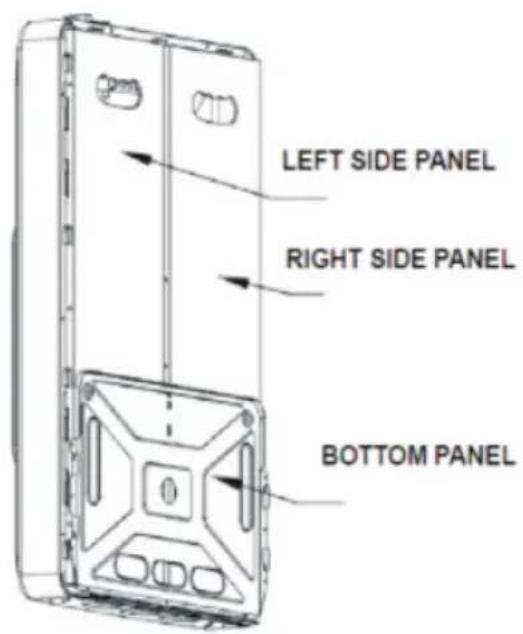
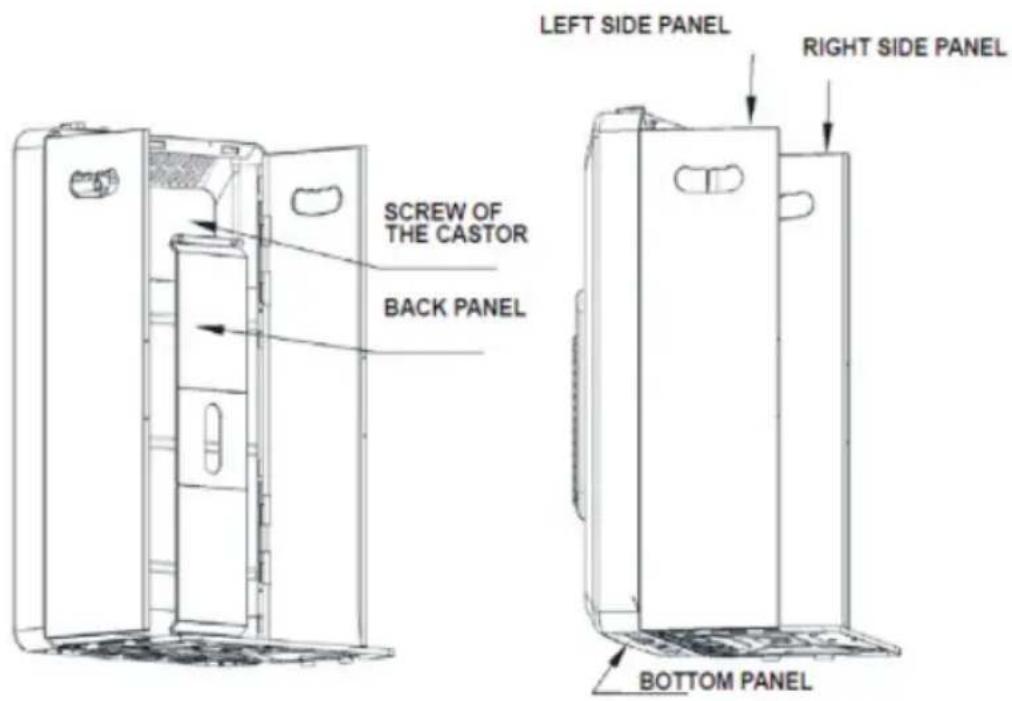
- Remove the heater from the package, pick up The screw, castor and the back panel.
Assembly
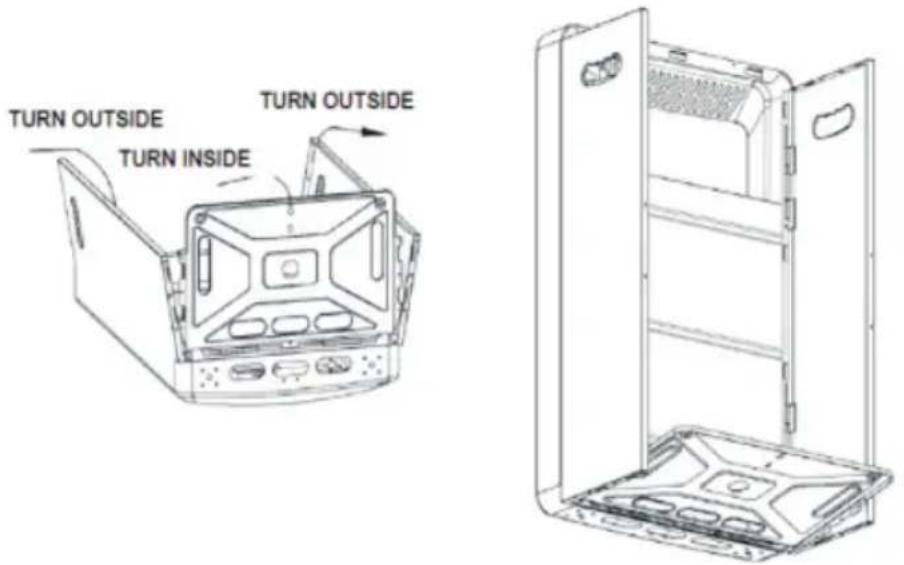
- Left side and right side panel Turn outside, at a 90 degree angle, bottom turn inside.
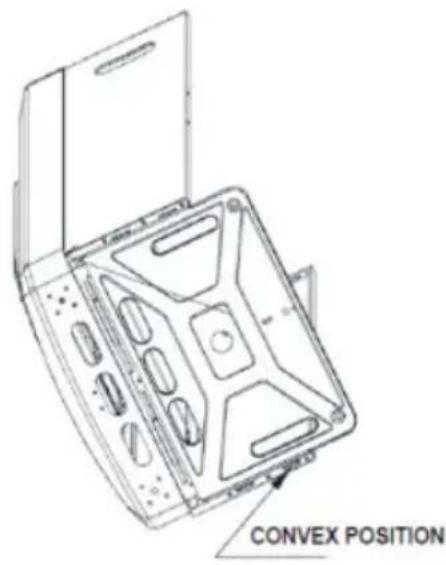
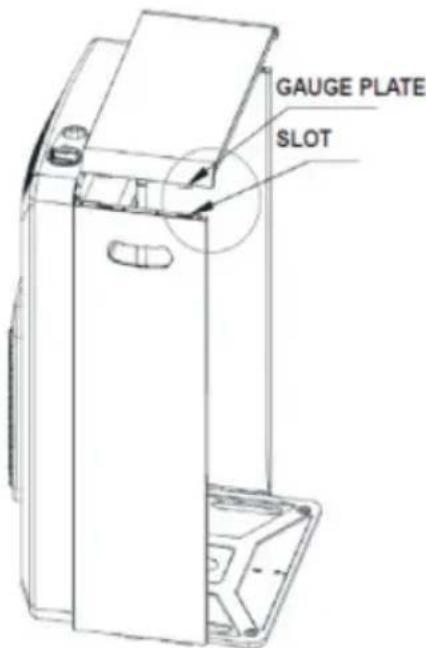
- Match the position, fasten the left side panel, right side panel and bottom panel.
- Put the upper panel on top of the heater, match the position.
Assembly
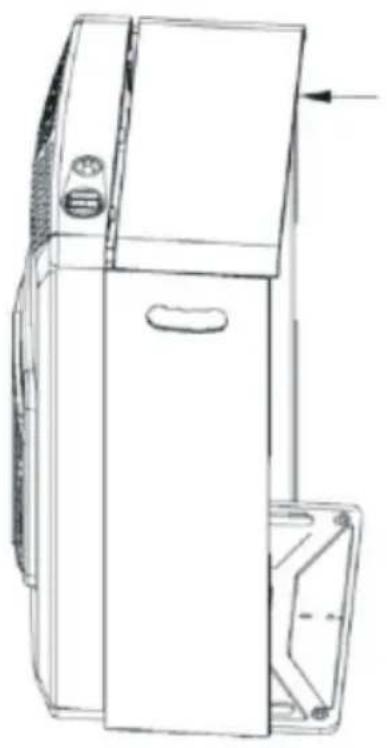
natural_image
Line drawing of a mechanical device with front panel and side panel (no text or symbols)- Push the upper panel, fasten the left, right side panel and front panel.
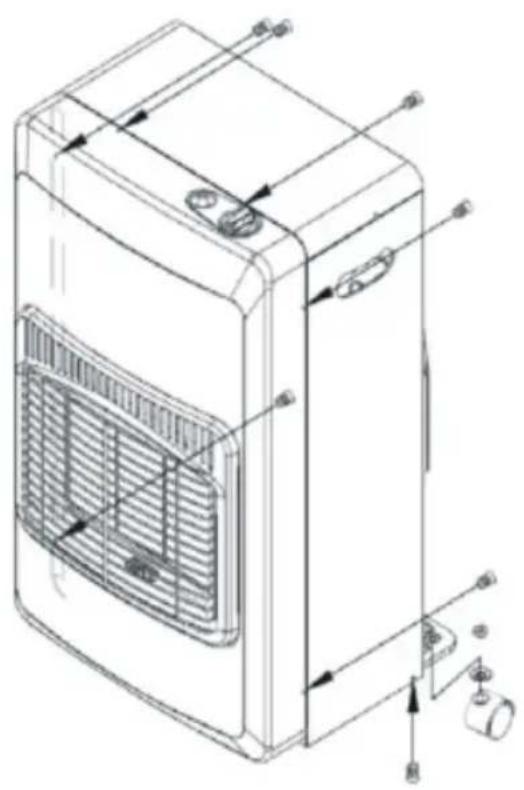
natural_image
Technical line drawing of a portable air conditioner unit with ventilation grilles and mounting components (no text or labels)- Fasten with the screw following the arrows in the picture. Install the back panel and castor.
SVAN TRADING S.L.
natural_image
Black svan gas stove with ventilation grilles and a grid chamber (no visible text or symbols)natural_image
Line drawing of a portable air conditioner unit (no text or symbols on the device itself)natural_image
Line drawing of a washing machine with crossed diagonal lines indicating no text or symbols on the device itselfnatural_image
Line drawing of a mechanical device with intersecting diagonal lines (no text or symbols)natural_image
Technical line drawing of two industrial equipment units with diagonal cross lines indicating alignment (no text or symbols)natural_image
Line drawing of a room interior with a cabinet and ventilation duct (no text or symbols)natural_image
Simple line drawing of a person standing near a door with a bottle and handle (no text or symbols)natural_image
Technical line drawing of a mechanical device with no visible text or symbolsnatural_image
Technical line drawing of a front-mounted air conditioner unit with internal fan and mounting components (no text or labels)Brand : SVAN
Model : SVCA26CAT
Category : Heating