
Healthy Choice PC8000 - Frying Pan Lenoxx - Free user manual and instructions
Find the device manual for free Healthy Choice PC8000 Lenoxx in PDF.


| Product Type | Frying Pan |
| Brand | Lenoxx |
| Model | Healthy Choice PC8000 |
| Material | Die-cast Aluminum |
| Inner Coating | Non-stick Ceramic (PTFE-free) |
| Diameter | 28 cm (11 inches) |
| Height | 5 cm |
| Weight | 1.3 kg |
| Handle Material | Bakelite with Soft-touch Grip |
| Handle Attachment | Riveted |
| Heat Source Compatibility | Gas, Electric, Ceramic, Induction |
| Maximum Heat Resistance | 260°C |
| Oven Safe | Yes, up to 180°C (without lid) |
| Dishwasher Safe | No, hand wash recommended |
| Cleaning Method | Soft sponge, avoid abrasive cleaners |
| Safety Features | Cool-touch handle, stable base |
| Warranty | 2 years |
| Country of Origin | China |
| Package Contents | 1 Frying Pan |
| Color | Black |
Frequently Asked Questions - Healthy Choice PC8000 Lenoxx
User questions about Healthy Choice PC8000 Lenoxx
0 question about this device. Answer the ones you know or ask your own.
Ask a new question about this device
Download the instructions for your Frying Pan in PDF format for free! Find your manual Healthy Choice PC8000 - Lenoxx and take your electronic device back in hand. On this page are published all the documents necessary for the use of your device. Healthy Choice PC8000 by Lenoxx.
USER MANUAL Healthy Choice PC8000 Lenoxx
The illustrations used in this manual are to illustrate the operation method and product structure of the product. Where there is a small difference between the physical item and the illustrations, please take the physical as the standard.
TABLE OF CONTENTS
| Introduction | 1 - 2 |
| Important safeguards | 3 - 6 |
| Parts name | 7 |
| Instructions for use | 8 - 10 |
| Operating instructions | |
| Manual setting | 11 - 13 |
| Manually setting the time | 14 |
| Slow cook | 15 |
| Cook, using the COOK button | 16 |
| Pre-set time | 16 |
| Keep warm | 16 |
| Off | 17 |
| Cancelling a cooking program | 17 |
| Cleaning | 17 |
| Troubleshooting | 18 |
| Specifications | 19 |
INTRODUCTION
You're about to experience a better, faster and healthier way of cooking. This Electric Pressure & Slow Cooker seals in steam to cook hotter and faster, and it seals in nutrients as well. Cook in less water and experience textures and tastes that are simply sensational. Features easy touch-button settings, a countdown timer, and a cooking pot big enough for a pot roast with all the fixings. The appliance has the following characteristics:
1. Multi-Functions, Convenient to use
1) Soup, Chicken, Beef, Fish, Rice, Slow Cook, Steam and Cake preset buttons.
2) This Electric Pressure & Slow Cooker offers a high variety of options for professional cooking per customers' tastes. Only press a preset button to enter an automatic cooking process. When finished, an alert signal will sound, and the appliance will go into keep warm mode.
3) The appliance features a 24-Hour countdown timer function, after setting a time, a countdown will start. When the countdown reaches 0, it will start a cooking program.
2. Fast Cooking, Saving Energy.
1) It saves about 20% of time and more than 25% of power when cooking meals. It will save about 40% of the time and more than 50% of power when cooking soups.
2) The appliance features a high pressure and elevated temperature cooking system, to cook food with less energy and a faster timeframe.
3. Safety Features
1) Safety lock: the cover (lid) cannot be closed if it is not fitted correctly and cannot be opened if the appliance has high pressure inside.
2) Pressure control safety device: the appliance will be switched off automatically when it reaches a pre-set pressure temperature for stable pressure containing.
3) Pressure regulation: If the temperature and pressure reach over their maximum level, the exhaust valve (steam release valve) will release pressure via the float valve.
4) Anti-block safety device: helps to avoid blockage of the air outlet food.
5) Pressure-relief safety device: to prevent a spill over.
6) Overheat safety device: when temperature reaches limitation, the fuse will burn-out.
7) Temperature regulation: in case of incorrect operation, such as if the inner pot is empty or temperature is not per the program, the regulator will connect or disconnect power.
IMPORTANT SAFEGUARDS
This User Manual contains information on the use and care of this product. Please read this User Manual carefully before using the appliance and save it for future reference.
■ Before first use, check the device specifications and the power supply in your network.
■ Remove and safely disregard any packaging material and labels before using this product for the first time. Ensure children and babies do not play with plastic bags or any packaging materials.
■ Do not use if the cord or plug are damaged. If the power cord is damaged; it must be replaced by the manufacturer, its service agent or a similarly qualified person to avoid a hazard.
■ Do not operate any appliance with a damaged cord or plug or after the appliance malfunctions or is dropped or damaged in any manner, take it to the store where the unit was purchased or call Lenoxx customer service for further assistance on 1300 666 848.
■ Do not let the cord hang off the edge of a bench, table or touch a hot surface.
■ Do not pull the cord. Always take the plug. Do not reel the cord around the device housing.
■ Never attempt to disassemble and repair the appliance by yourself. If you encounter problems, please contact customer service.
■ Using accessories or replacement parts that are not recommended or not sold by the manufacturer may cause damage to the appliance.
■ Always unplug the appliance and let it cool down before cleaning and removing parts. Keep it unplugged when not in use.
■ To avoid electric shock and fire, do not immerse the appliance in water or other liquids. If that occurs, immediately unplug it and contact customer service for inspection.
■ This appliance shall not be used by children. Keep the appliance and its cord out of reach of children.
■ Children should be supervised to ensure that they do not play with the appliance.
■ Place the appliance on a stable, horizontal and level surface. Position it far from flammable materials including curtains, walls, and fabric upholstered furniture.
■ Do not place the appliance near heat-emitting devices such as heaters, cooktops or electric burners.
■ Make sure that there is enough space around. The appliance should stand more than 15 cm far from such flammable objects as furniture, curtains etc.
■ Do not use the appliance near explosive objects.
■ This appliance is not intended for used by persons (including children) with reduced physical, sensory or mental capabilities, or lack of experience and knowledge, unless they have been given supervision or instruction concerning use of the appliances by a person responsible for their safety.
■ This appliance is intended to be used in household and similar applications such as:
-staff kitchen areas in shops, offices and other working environments;
-farm houses;
-by clients in hotels, motels and other residential type environments;
-bed and breakfast type environments
■ This appliance is not intended to be operated by means of an external timer or separate remote-control system.
■ Caution, hot surface. The surface is liable to get hot during use.
■ Do not move the appliance containing hot food or liquid or when the appliance is connected to electricity.
■ Do not leave water or products in the appliance for a long time.
■ Pour water into the inner pot only. Don't pour water into the appliance body.
■ While cooking, avoid using sharp utensils not to damage the inner pot surface. Please use spoon which comes with the appliance. You may use also wooden, plastic or silicone utensils.
■ Always check that there are no any foreign objects between bottom of the inner pot and the heating plate. It may cause a burning smell, strange sounds or cause the appliance to malfunction.
■ If any unusual sounds, odour or any other disruption happens, switch the appliance off. Make sure that there are no objects or liquids between the inner pot and heating plate. If the malfunction reason is not found, please contact customer service. Never attempt to dissemble and repair the appliance by yourself.
■ Do not cover the exhaust valve (steam release valve) and the cover (lid) while the appliance is operating. It may cause malfunction in the appliance.
■ Do not operate the appliance with an empty inner pot.
■ While you are cooking, the cover (lid) and outer surface of the appliance can become hot. Handle or move the appliance with care.
■ When you open the cover (lid), wait for the steam to disperse before leaning over the appliance.
ATTENTION: The appliance lid becomes extremely hot while cooking and may cause burns. Always use lid handle to remove the lid.
■Do not cover or block the steam release opening, exhaust valve (steam release valve) and float valve.
■Do not press on the steam release opening, exhaust valve (steam release valve) and float valve.
■Do not use the appliance if the sealing ring is absent or damaged. Use the sealing ring from this appliance only.
■Before pressure cooking, ensure that the inner pot contains water or broth. Pressure cooking needs liquid for producing steam.
■Ensure that steam does not come out where the lid meets the appliance body.
■Never exert force on opening the appliance lid. Inner pressure in the pot must be equal to atmosphere pressure before opening the lid.
■Open the cover (lid) only if the exhaust valve (steam release valve) is in a low position, when pressure inside has become normal and safe.
■Always check that the steam release opening, exhaust valve (steam release valve) and float valve are clean before using the appliance.
- Keep the steam release opening, exhaust valve (steam release valve) and float valve clean.
■Allow the inner pot to cool down before touching it.
■Always unplug the appliance after cooking and before taking your cooked meal out.
ATTENTION:
Beware of the hot steam that comes out of the steam release opening. Keep hands and face away from the appliance when you open it to avoid being burnt by hot steam. Never put your hands, face or any other unprotected skin over the exhaust valve (steam release valve) or try to open the cover (lid) while cooking or releasing pressure.
CAUTION:
Do not force the cover (lid) to open before the float valve is completely subsided to its lowered (down) position.
PARTS NAME
UNIT
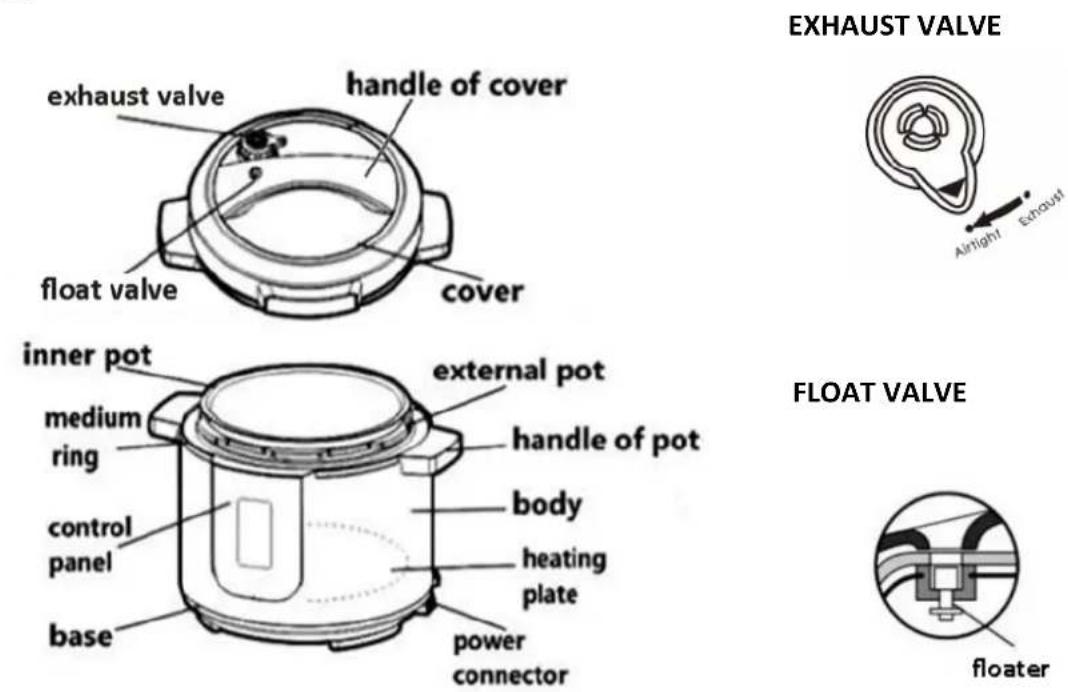
COVER (LID)
CONTROL PANEL


INSTRUCTIONS FOR USE
Once the appliance is assembled properly, you are ready to begin cooking.
- To remove the cover (lid), grasp the handle, turn clockwise and lift. (See figure A、B)

natural_image
Illustration of a hand pressing down on a rice cooker with a curved arrow indicating rotation (no text or symbols)
natural_image
Diagram of a rice cooker with a hand placing the lid onto its side, showing internal components and an upward arrow (no text or symbols)- Remove the cooking pot from the appliance and add food and liquids as the recipe directs.
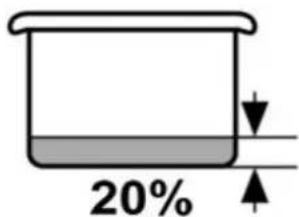
Note: The total volume of food and liquid must not exceed 80% of the capacity of the cooking pot (figure C). For foods such as dried vegetables and beans, or rice and grains, the total volume must not exceed 60% capacity (figure D). Always use at least 1/2 cup liquid when pressure cooking. The total volume of food and liquid must not be less than 20% of the capacity of the cooking pot (figure E).

C

D
E
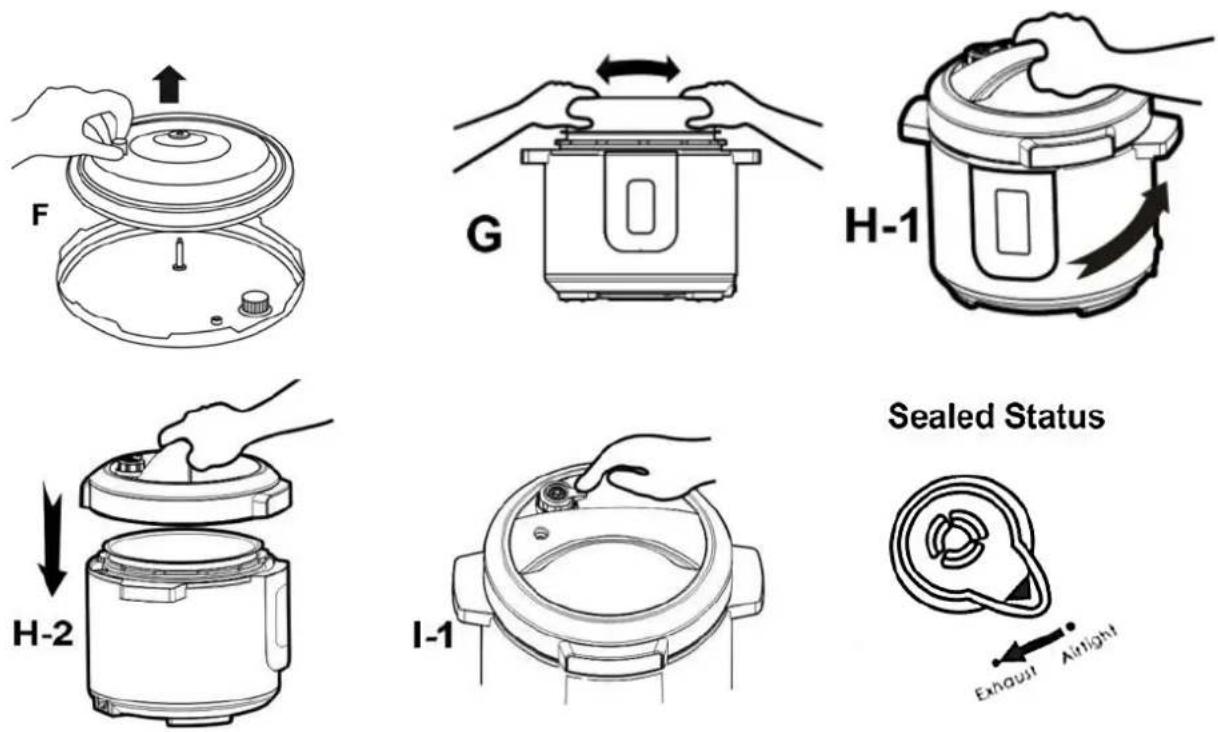
- To lock the cover (lid) in place, remove any food residue from upper rim of cooking pot to ensure a proper seal. Ensure the sealing ring is securely in place on the sealing ring supporting cover (figure F).
- Wipe any water or food residue away before placing the cooking pot back into the external pot. Ensure the inner pot is settled firmly on the heating plate (figure G).
- Close the cover (lid). Ensure the inner lid covers the inner pot. Then rotate the handle of cover (lid) anti-clockwise until it clicks into position (figure H-1, H-2).
- Position the exhaust valve (steam release valve) and turn it to the AIRTIGHT (sealed) position, then check the exhaust valve (steam release valve) has dropped down (figure I-1).
Note: The exhaust valve (steam release valve) does not click or lock into place.
Even though it will have a loose fit, it is safely secured.
The part which will become locked will be the cover (lid) which will lock onto the main body of the unit during the pressure building process.
The vent valve on the cover (lid) must be fully down to properly seal the pot before cooking.
- To turn the unit on:
Plug the power cord into the pressure cooker and then into the wall outlet.
There will be a "BEEP" sound and the time display on the control panel will show "00:00", the unit is now in "stand by" mode.
- Press a pre-set cooking button or use the cook button to choose your desired cooking function.
When you have selected your desired cooking option, the display will show the “pressure cooking time” (e.g.: The letter P followed by the number of minutes the unit will cook for. If it shows P25 the cooking time will be 25 minutes),
The pressure-cooking time will blink on the screen for 5 seconds,
The pressure-cooking time will be shown on the screen with two zeros "00". The two zeros will be scrolling on the screen. This means that the pressure cooker is now building pressure inside it.
When enough pressure has built inside the unit, the two zeros will no longer be scrolling on the screen and the pressure cooker will begin it's cooking process. This may take approximately 5-10 minutes depending on the quantity of food you are cooking. The cooking timer only begins once the desired pressure has been reached.
-
When the pressure inside hits proper level, the pressure hold indicator is turned on and the timer begins counting.
-
When the pressure-cooking cycle is finished, the unit will automatically switch to the Keep Warm mode.
* After entering the keep warm mode: if you do not want to continue this mode, you can press the OFF button or unplug the power supply. For safety reason, after 12 hours of continuous Keep Warm mode, the unit will automatically enter pending status.
There are two methods to release steam from a pressure cooker, Natural release or Quick release. Some recipes may call for either one. The most commonly used release method is Quick release.
Natural release: Once OFF has been pressed, the pressure will slowly release itself.
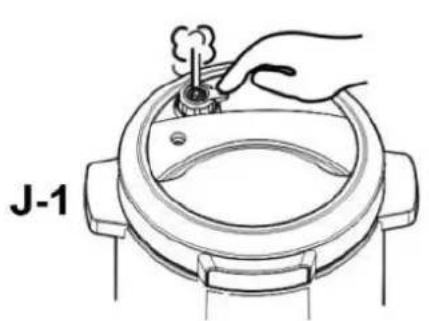
Quick release: Once OFF has been pressed, turn the exhaust valve (steam release valve) to the EXHAUST (release) position to release manually at a faster pace. (figure J-1, J-2)
natural_image
Line drawing of a hand placing a small object into a circular container with a label 'J-1' (no other text or symbols)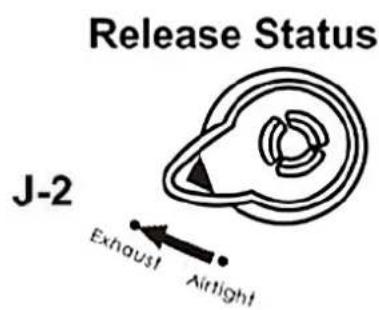
When enough pressure has been released, the cover (lid) will be unlocked from the main body of the unit and can then be removed.
Then you can unplug the unit and take out the food.
Note: While cooking liquids such as porridge or soups, the unit must be cooled down before you release the pressure.
OPERATING INSTRUCTIONS
Manual setting (1)
LIGHT/ STANDARD OR STRONG:
After selecting one of the pre-set cooking options, you can again press the "SELECT" button to choose a pressure time, the options are: "Light", "Standard" or "Strong".
EXAMPLE: Press the "SOUP" button, then press the "SELECT" button, the "Standard" led will be on and the pressure time will be 25 mins. If the "SELECT" button is pressed again, the "Strong" led will be on and the pressure time will be 45 mins. If the "SELECT" button is pressed again, the "Light" led on and the pressure time will change to 15 mins.
When you have made your selection and the chosen pressure-cooking time is shown on the screen, you do not need to press anything else.
The pressure-cooking time will blink on the screen for 5 seconds,
The pressure-cooking time will be shown on the screen with two zeros “00”. The two zeros will be scrolling on the screen. This means that the pressure cooker is now building pressure inside it.
When enough pressure has built inside the unit, the two zeros will no longer be scrolling on the screen and the pressure cooker will begin it's cooking process. This may take approximately 5-10 minutes depending on the quantity of food you are cooking. The cooking timer only begins once the desired pressure has been reached.
When the pressure inside hits proper level, the pressure hold indicator is turned on and the timer begins counting.
A table guide is shown below indicating the times for different cooking options.
| MINUTES GUIDE | ||||||||
| Soup | Chicken | Beef | Fish | Rice | Slow Cook | Steam | Cake | |
| Default Pressure time Light | 15 min | 10 min | 40 min | 1 min | 10 min | / | 10 min | / 18 min / |
| Default Pressure time -Standard | 25 min | 13 min | 45 min | 5 min | 12 min | 4 h | 13 min | |
| Default Pressure time Strong | 45 min | 20 min | 60 min | 10 min | 15 min | / | 18 min | |
| Pressure range manually set | 15-45 min | 1-20 min | 1-90 min | 1-10 min | 1-20 min | 2-9 h | 10-18 min | 1-33 min |
Soup:
Press the "SOUP" button. The default time shown on the screen will be 25 minutes.
Press the "SELECT" button, the time on the screen will be 45 minutes (strong).
Press the "SELECT" button again. The time on the screen will be 15 minutes (light).
Press the “+” or “-” buttons to choose your own cooking time between the range of 15 – 45 minutes.
Chicken:
Press the "CHICKEN" button. The default time on the screen will be 13 minutes (standard).
Press the "SELECT" button, the time on the screen will be 20 minutes (strong).
Press the "SELECT" button again. The time on the screen will be 10 minutes (light).
Press the - or + buttons to choose your own cooking between the range of 1 - 20 minutes.
Beef:
Press the "BEEF" button. The default time on the screen will be 45 minutes (standard).
Press the "SELECT" button, the time on the screen will be 60 minutes (strong).
Press the "SELECT" button again. The time on the screen will be 40 minutes (light).
Press the “+” or “-” buttons to choose your own cooking time between the range of 1 – 90 minutes.
Fish:
Press the "FISH" button. The default time on the screen will be 5 minutes (standard).
Press the "SELECT" button, the time on the screen will be 10 minutes (strong).
Press the "SELECT" button again. The time on the screen will be 1 minute (light).
Press the “+” or “-” buttons to choose your own cooking time between the range of 1 – 10 minutes.
Rice:
Press the "RICE" button. The default time on the screen will be 12 minutes (standard).
Press the "SELECT" button, the time on the screen will be 15 minutes (strong).
Press the "SELECT" button again. The time on the screen will be 10 minutes (light).
Press the “+” or “-” buttons to choose your own cooking time between the range of 1 – 20 minutes.
Slow cook:
Please see the section 'slow cook' for further info.
Steam:
Press the "STEAM" button. The default time on the screen will be 13 minutes (standard).
Press the "SELECT" button, the time on the screen will be 18 minutes (strong).
Press the "SELECT" button again. The time on the screen will be 10 minutes (light).
Press the “+” or “-” buttons to choose your own cooking time between the range of 10 – 18 minutes.
Cake:
Press the "CAKE" button. The default time on the screen will be 18 minutes (standard).
The "SELECT" button will not work on cake mode.
Press the “+” or “-” buttons to choose your own cooking time between the range of 1 – 33 minutes.
Manual setting (2)
MANUALLY SETTING THE TIME:
After selecting one of the pre-set cooking options, you can press the "PRESET PRESSURE" button and then press the "+" or "-" buttons to amend the pressure-cooking time.
EXAMPLE: Press the "Soup" button, then press the "PRESET PRESSURE" button, the "PRESET PRESSURE" led will be on, then press the "+" or "-" buttons to amend the pressure-cooking time.
When you have made your selection and the chosen pressure-cooking time is shown on the screen, you do not need to press anything else.
The pressure-cooking time will blink on the screen for 5 seconds,
The pressure-cooking time will be shown on the screen with two zeros “00”. The two zeros will be scrolling on the screen. This means that the pressure cooker is now building pressure inside it.
When enough pressure has built inside the unit, the two zeros will no longer be scrolling on the screen and the pressure cooker will begin it's cooking process. This may take approximately 5-10 minutes depending on the quantity of food you are cooking. The cooking timer only begins once the desired pressure has been reached.
When the pressure inside hits proper level, the pressure hold indicator is turned on and the timer begins counting.
Slow Cook:
This model features a slow cook function, allowing the slow cook time to be set between 2 hours and 9 hours, in 30-minute increments.
To use this function, press the "SLOW COOK" button.
The default 4-hour slow cook time will show on the screen.
Press the "+" or "-" buttons to change the slow cook time to your desired preference.
When your chosen time is shown on the screen, you do not need to press anything else.
When your chosen slow cook time is shown on the screen, you do not need to press anything else.
The slow cook time will blink on the screen for 5 seconds,
The slow cook time will be shown on the screen with two zeros “00”. The two zeros will be scrolling on the screen. This means that the pressure cooker is now building pressure inside it.
When enough pressure has built inside the unit, the two zeros will no longer be scrolling on the screen and the pressure cooker will begin it's cooking process. This may take approximately 5-10 minutes depending on the quantity of food you are cooking. The cooking timer only begins once the desired pressure has been reached.
When the pressure inside hits proper level, the pressure hold indicator is turned on and the timer begins counting.
Light", "Standard" or "Strong" cooking is not an option in slow cook mode.
Cook: Using the COOK button:
There are 6 available cooking times available:
P 10/ P 15 / P 20 / P 25 / P 30 / P 35.
You can press the "COOK" button to select different pressure time options.
E.g.: press the COOK button repeatedly to change between the times.
When you have selected, and a LED light is shown for your chosen option (E.g.: next to 20 mins) the unit will cook for that chosen time at 145 degrees.
Pre-set time:
HOW TO USE THE "PRESET TIME" BUTTON:
If you wish to program your pressure cooker to automatically cook prepared food at a later time, you can program the pressure cooker to delay cooking by up to 24 hours. This setting is used in combination with the pre-set buttons (Soup, Chicken, Beef, Fish, Rice, Slow Cook, Steam or Cake).
1) Prepare desired food and place into cooking pot
2) Secure the cover (lid) onto the unit, turn it Counter-clockwise to lock it in place.
3) Make sure the exhaust valve (steam release valve) is set to the "CLOSED" position.
4) Plug in the power cord to a 220-240V outlet.
5) The LED screen will display 00:00.
6) Press the "PRESET TIME" button (the indicator light will begin blinking), then press "-" "+" button to adjust delay cooking time. Once for each additional is 30 minutes. The Maximum delay period is 24 hours.
7) After choosing the desired delay time, choose your desired cooking option. Then wait 5 seconds to start.
Keep warm:
When the unit has completed a cooking program, it will beep 3 times to indicate the program has completed.
The screen will them show "bb" and it will switch into keep warm mode.
The unit will cool down to 60 - 80 degrees Celsius.
The pressure built inside will release slowly due to the cool down in temperature.
After about 1 hour most of the pressure will have been released, however still turn the release valve to remove any pressure which remains.
To turn the keep warm mode off, press the "KEEP WARM/OFF" button.
When the unit is in standby mode (when "00 00" is shown on the screen), you can use the keep warm function.
Press the "KEEP WARM" button, the LED screen will show "bb" and hear one short beep.
To turn the keep warm mode off, press the "KEEP WARM/OFF" button.
Off:
When the unit is OFF, all the indicator lights will be off.
When "00 00" is shown on the screen, the unit is now in standby mode.
When "00 00" is shown on the screen, the unit can be set for operation again.
To power the unit off completely, disconnect it from the power cord.
Cancelling a cooking program:
To cancel a cooking program, press the "KEEP WARM/OFF" button once.
When "00 00" is shown on the screen, the unit is now in standby mode.
The unit can be set for operation again.
NOTE: keep warm & off functions are on the one button, keep warm shows "bb",
OFF shows "00 00".
CLEANING
- Unplug the power cord before cleaning.
- Clean the outer body with a soft cloth such as a paper towel or microfiber towel. Do not immerse the outer body in water or pour water into it.
- Rinse the underside of the cover (lid), sealing ring, pressure limit valve, anti-block cover, air escape, and float valve with warm water. Dry completely.
- Clean area under upper ring with dampened cloth or microfiber towel. Do not use chemical cleaners.
- The cooking pot is dishwasher safe. To hand-clean the cooking pot, use a soft cloth or sponge and wipe. Be careful not to damage the inside coating. Never use harsh chemicals or scouring pads.
- To clean the sealing ring, hold the knob on the sealing ring supporting cover and pull the sealing ring up. After cleaning, put the sealing ring supporting cover back in place.
TROUBLESHOOTING
| Symptom | Possible Reasons | Solutions |
| Lid does not lock | The ring is not properly installed | Reinstall the ring |
| The float is seized by the push rod | Push the rod with hands | |
| Cannot open the lid after air exhaust | The float is still up | Press the float down |
| Air escapes from the rim of the lid | No sealing ring was installed | Install the sealing ring |
| Food residue on sealing ring | Clean sealing ring | |
| Sealing ring worn out | Replace the sealing ring | |
| Lid not locked properly | Rotate lid fully | |
| Air escapes from the float valve | Food stuck on the sealing ring of the float valve | Clean the sealing ring |
| The sealing ring on the float wore out | Replace the sealing ring | |
| The float will not rise | The pressure limit valve is not placed properly | Place the device to Pressure |
| Not enough food and water | Check recipe for proper quantity | |
| Air escaping from the rim of the lid and the pressure limit valve | Call our Consumer Service Center | |
| Display E1 | Sensor control- broken circuit | Call our Consumer Service Center |
| Display E2 | Sensor control- short circuit | Call our Consumer Service Center |
| Display E3 | Inner pot temperature overheats | Wait for it to cool down |
| Display E4 | Pressure switch error | Call our Consumer Service Center |
SPECIFICATIONS
| Voltage | 220-240V |
| Power | 1200W |
| Capacity | 8L |
| Diameter | 24cm |
| Work Pressure | 0-70kPa |
| Pressure Limit | 90kPa |
| Keep Warm | 60~80°C |
| Accessories | Power supply lead, Measuring cup, Spoon, Instruction book |
LENOXX
www.lenoxx.com.au

1300 666 848

_enoxxElectronics

LenoxxElectronics

@LenoxxAustralia

- INTRODUCTION
- Multi-Functions, Convenient to use
- Fast Cooking, Saving Energy.
- Safety Features
- IMPORTANT SAFEGUARDS
- ATTENTION: The appliance lid becomes extremely hot while cooking and may cause burns. Always use lid handle to remove the lid.
- ATTENTION:
- CAUTION:
- PARTS NAME
- INSTRUCTIONS FOR USE
- OPERATING INSTRUCTIONS
- Manual setting (1)
- LIGHT/ STANDARD OR STRONG:
- Fish:
- Rice:
- Slow cook:
- Steam:
- Cake:
- Manual setting (2)
- MANUALLY SETTING THE TIME:
- Cook: Using the COOK button:
- Pre-set time:
- HOW TO USE THE "PRESET TIME" BUTTON:
- Keep warm:
- Off:
- Cancelling a cooking program:
- CLEANING
- SPECIFICATIONS
- LENOXX
Brand : Lenoxx
Model : Healthy Choice PC8000
Category : Frying Pan