
Architectural iC3 - Loudspeaker NHT Audio - Free user manual and instructions
Find the device manual for free Architectural iC3 NHT Audio in PDF.


| Product Type | In-ceiling loudspeaker |
| Brand | NHT Audio |
| Model | Architectural iC3 |
| Impedance | 8 ohms |
| Recommended Power | 10–125 Watts |
| Max RMS Power Handling | 125 Watts |
| Coverage Angle | Up to 60° off-axis |
| Cutout Diameter | 8.375 inches (8-3/8") |
| Depth Behind Ceiling | 4.875 inches (4-7/8") |
| Finished Diameter | 9.44 inches (9-7/16") |
| Mounting Type | Spring-loaded mounting clamps (dog-legs) |
| Grille Attachment | Magnetic |
| Moisture Resistance | Suitable for moisture-prone interiors (bathrooms, etc.) |
| Maximum Ceiling Thickness | 2 1/4 inches |
| Wiring Requirement | 16 AWG for runs ≤ 50 ft, 14 AWG for longer runs |
| In-Wall Wire Rating | CL-2, CL-3, CM (UL) or FT4 (CSA) |
| Recommended Wire Polarity | Red (+), Black (-) |
| Pre-Construction Bracket (optional) | iCB6 (sold separately) |
| Maintenance | Clean grille with mild detergent; avoid harsh cleaners |
| Paint Warning | Use professional painter; latex paint clogs micro-perforations |
| Included Accessories | Speaker assembly, metal grille, cardboard cutout template |
Frequently Asked Questions - Architectural iC3 NHT Audio
User questions about Architectural iC3 NHT Audio
0 question about this device. Answer the ones you know or ask your own.
Ask a new question about this device
Download the instructions for your Loudspeaker in PDF format for free! Find your manual Architectural iC3 - NHT Audio and take your electronic device back in hand. On this page are published all the documents necessary for the use of your device. Architectural iC3 by NHT Audio.
USER MANUAL Architectural iC3 NHT Audio
1) Introduction
2) Placement
3) Wiring
4) Getting Wired
5) Drill with Caution!
6) Installation: New Construction (ceilings not installed – you see ceiling joists when you look up)
7) Installation: Existing Construction (retrofitting finished ceilings)
8) Painting
9) In Use
10) Optimizing Sonic Performance
11) Maintenance
12) Service & Support & Troubleshooting
13) Professional Specifications

natural_image
Technical line drawing of a mechanical assembly with no visible text or symbolsIntroduction
We're glad you chose NHT in-ceiling loudspeakers. We know you won't be disappointed. Please take a few minutes to read this entire Installation Guide prior to installing your new speakers. The information provided will help you to obtain maximum performance from your audio system. If you have questions or need assistance at any time before, after or during the installation or operation of your new speakers we are here to help.
Our telephone number is: 707-747-0122
Our web address www.nhthifi.com
What's In The Box?
(1) Speaker assembly
(1) Metal grill
(1) Cardboard Cutout Template

natural_image
Technical line drawing of a mechanical component with no visible text or symbolsSpeaker Assembly

Metal Grille

Cardboard Cutout Template
Before we start, please, consider hiring a pro installer to do this while you go fishing with some old friends.
Cutting holes in ceilings and walls and installing heavy objects above you and your loved ones heads is serious business. There are also numerous decisions concerning wiring, control systems, methods, and best practices only a professional will have knowledge of. Please consult a professional to install this speaker.
Find an Installer near you by visiting www.nhthifi.com - navigate to the Where to Buy section or visit www.cedia.org to find a CEDIA installation professional.
One last word of advice - It is up to you to insure that the installer (NHT referred or not) possesses sufficient skill, the proper tools, knowledge of local fire and building codes, and a familiarity with the structure of the building (especially wall and/or ceiling materials, layouts, electrical and plumbing lines, etc.).
With the above said, we know there are capable do-it-yourselfers. If you are one of them and want to install the speaker on your own or with the help of an expert friend, read on. If you have questions or need assistance at any time before, during or after the installation or about the operation of you new speakers, we're here to help. Finally, like our fathers told us, measure twice and cut once.
First Paint Warning: NHT recommends that you use a capable, professional painter only to paint this speaker grill (if necessary to perfectly match the wall or ceiling). Latex paint will definitely clog the micro-perforated grill holes and constrict the speaker's performance capability. Contact us if you need a new grill cover because yours is plugged up with paint. Unfortunately they are not free.
Placement
NHT ARC series of in-ceiling speakers are designed for installation in sheetrock, plaster and lath, wood and material combination ceilings up to 2 1/4" thick almost always between standard wood joists. Their moisture resistant drive units, ARC frames and stainless steel hardware allow them to be installed in moisture prone interiors and protected exterior environments such as bathrooms, indoor swimming pool rooms, above covered porches, sauna rooms and under eave structures. Exposed outdoor use is not recommended. We make specific "All-Weather" Outdoor speakers for this application.
Spend some time considering placement prior to installing the speakers. Once they are installed, they are permanent, so their location should be selected carefully. When possible, locate the speakers at least 3 feet from adjacent sidewalls and at least 2 feet from front or rear walls to allow them to radiate over the widest possible area. The speakers should be mounted on a flat surface to ensure a good seal between the baffle and the mounting surface – the speaker's frame is rigid and will not flex! For the best stereo effect, position the speakers so that they are equidistant from the most likely listening area. If the NHT in-ceiling speakers are going to serve as rear (surround or back) channels in a home theater system, make sure to install them toward the "rear" of the room and try to get them behind the listener for best results. For best spacing, position the NHT in-ceiling speakers 15° to 60° off-axis from the listening position. If you wish to get an idea how they will look, try taping the supplied cutout templates to the ceiling or print to scale one of the images from our website full-size if possible and tape to the ceiling (maybe Kinko's will do this for you). For more information about home theater speaker placement, try Dolby Labs website at: www.dolby.com/us/en/consumer/setup/connection-guide/home-theater-speaker-guide/index.html
Wiring (Retrofit Installations or New Construction)
How you wire is an important subject. If you are just wiring for 2 or 4 speakers for the surround and/or back channels of a home theater system within the same room, it a fairly simple wiring task. Be sure to always leave yourself some extra length on the ends for working room and terminate the speaker wires to wall plates when possible (leave yourself some extra wire to work with and stuff the excess in the wall). All this will make your life easier. Don't nail the wire down in place unless building codes require it - you may want to pull additional or different cables later, if you must, use large staples to "guide" the wire. At this point you once again may consider hiring a professional installer and have a few beers with your friends instead.
Multi-room audio, where you will use multiple pairs of speakers in different rooms, is a completely different wiring situation and the methods for doing so are too numerous to cover here. Consider what device you will amplify them with, if you will have local controls to wire to, if you need to pull control cables like CAT6, or will the speaker wires home run to the head-end? On. and on., and on. Home runs to a single location are the safest but controlling the volume remotely in a room will then require a wireless command and control system that are typically pricey. If all this sounds foreign to you, stop everything now and consult a professional to learn more about your options and at least consider having them wire your house for the command and control system you plan to use.
Getting Wired
Proper loudspeaker wiring methods and type and quality of wire are essential to good sound. At a minimum, 16 AWG 2-conductor speaker wire is recommended for runs up to 50 feet or less, 14AWG for longer runs. When permanently installing wire inside walls, be sure to use wire that is rated for in-wall use and has special jacketing for fire prevention. In the U.S., the U.L. standard is CL-2, CL-3 and CM wire, and in Canada the CSA standard is FT4 wire. The wire should be run in accordance with National Electrical Code best practices to meet any applicable local or national building codes. Be forewarned, MDU and high-rise developments have additional requirements and restrictions. For best results, avoid running speaker wire near AC wire, as it may induce a 60Hz hum in the audio signal. It's a good idea to run the speaker wire after the AC wiring has already been completed, so that you can route the speaker wire away from the AC wiring. If speaker wire and AC wiring must run parallel, install the speaker wire within a steel conduit. Note that low voltage wiring (doorbell, intercom, telephone, security, etc.) can also induce hum.
Drill with Caution!
Remember, these are only suggestions. There are building codes and best practices to be followed – be sure you are familiar with them. When drilling holes through wall studs or ceiling joists, use a drill bit that is (sharp) wider than the speaker cable that will be routed (pulled) through them. Always drill through the center of the stud or joist. If the hole must be drilled within one inch of the edge of a wall stud, add a nail plate to the drywall side to protect the wire from possible nails and screws put in the wall later. Line up the holes in the studs or joists as you go, so that pulling the wire through them will be easier. Maybe you consider hiring a professional installer and see a movie with some friends instead.
Installation: New Construction (ceilings not installed – you see ceiling joists when you look up)
Installation in new construction is a three-step process. (1) Install the appropriate pre-construction brackets in the chosen locations according to your well though-out plan. (2) Run your speakers wires to these locations according to your well though-out wiring plan. (3) Install the speakers after the ceiling and trim is installed and painted but just before the carpet or flooring is installed.
The iCB6 kit is the pre-construction bracket you'll use for the iC2-ARC and iC3-ARC speakers. Each box will contain a mounting system for one speaker, which includes: iCB6 Mounting Bracket Aluminum Mounting Wings Screws
(1) iCB6 Mounting Bracket
(2) Aluminum Mounting Wings
(4) 5 x 50mm flathead wood/metal screws
iCB6 Mounting Bracket

natural_image
Simple line drawing of a circular object inside a rectangular frame with side handles (no text or symbols)Aluminum Mounting Wings

Screws


Installation: New Construction Continued....
Tools You'll Need:
Pencil
2 Philips screwdriver
Tape measure
Utility knife
Keyhole saw, jigsaw or rotary saw
Safety goggles
Dust mask
Protective gloves
A ladder
Electric drill with #2 Philips bit
Band-aids
Performance tip: Consider building a box using plywood behind the speaker. We offer a technical document (Tech Docs) on the nhthifi.com website recommending the optimal internal volume and how much insulation to place in the box by speaker model. This will help isolate the speaker sound from bleeding into adjacent rooms, improve bass response, (tightness and lower distortion). Build it solid, use screws and construction adhesive and caulking to air seal it and insure it will not vibrate, rattle, fall apart or come loose. Make sure it is supported by the ceiling joists, not the sheetrock!
- Once you've selected the desired location(s) for the speakers, begin installing the iCB6 pre-construction bracket(s) between adjacent ceiling joists. First attach the mounting wings to the bracket by inserting them into the locking plastic tabs in the side of the bracket (fig.1).

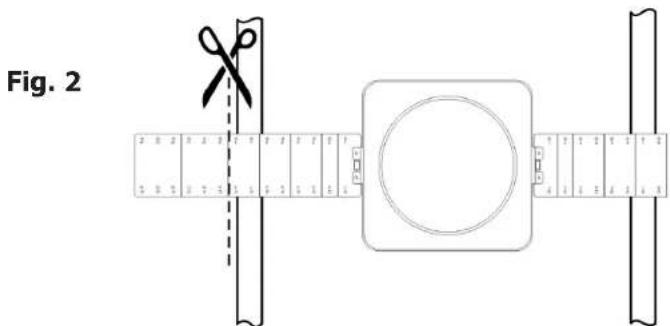
- The wings feature progressively scored sections (1", 1", 2", 2", 2", 3", 3") with screw holes spaced in one-inch increments to help you align the bracket. The iCB6 pre-construction bracket has NHT logos on one side - this side should be oriented away from the drywall – towards the sky. Attach the wings to the joists using the 50mm flathead screws, use two screws for each wing. Cut off the extra portion of the wing. (fig.2).
Installation: New Construction Continued....
-
Complete the pre-wiring to the speaker brackets before the drywall goes up. Leave an extra few feet of speaker wire on each end to make your life easier later. Coil the excess and tack it carefully to an adjacent ceiling joist for easy retrieval during speaker installation. You can be clever here.
-
During the drywall installation, cut a hole in the drywall so it butts up to the protruding lip of the mounting bracket, as you would cut out for a ceiling light can. (Once installed, the lip of the speaker frame will extend about 12 inch beyond the perimeter of the bracket lip to hide minor imperfections in the cutout.) (fig.3).

-
After the ceiling trim work is installed and the painting is complete, but just before the carpet or flooring is installed install the speaker by first connecting the speaker wire to the spring posts on the back of the speaker assembly, making sure to observe correct polarity – red (+), black (-).
-
The speaker assembly is then inserted into the hole in the bracket and attaches to the bracket and ceiling drywall via four plastic, spring-loaded mounting clamps (dog-legs) on the back of the speaker assembly that will swivel out 45° and lower to "sandwich" the drywall (and mounting bracket) when you start to tighten the 4 mounting screws (fig.4). Begin this phase by being sure the dog-legs are rotated sideways (like the speaker came packed) so that the body of the speaker assembly can slide through the mounting bracket. Exercise caution not to damage the drivers themselves.
Installation: New Construction Continued....
Fig. 4

Note: it's ok to let the fiberglass insulation lay on the back of the speaker.
-
Begin to tighten the screws that at first rotate the dog-legs out 45^ and then start to move downwards to clamp the ceiling and bracket. Tighten the screws carefully but snugly, making sure to not over tighten, as this may compromise the fit of the speaker assembly. The use of power screwdrivers is not recommended but if you must, set the torque ratchet setting at its least resistive position and the speed very low. The speaker frame lip should rest flush and seal against the ceiling. The spring loaded mounting clamps provide tension once installed.
-
Once all the screws are snug and speaker secure, install the grill. It uses magnets to attach to the speaker. You will notice a gauzy-white cloth on the speaker side of the grill. It's called "scrim cloth" and helps hide the speaker's silhouette from showing through the grill. Do not remove this scrim under penalty of law!
Installation: Existing Construction (retrofitting finished ceilings)
This multi-step process begins by identifying a location in your ceiling for the speaker (always keeping a plan B in mind). Somehow you'll need to get speaker wire to that spot. Using a stud-finder or something you will make sure there are no obstructions behind your intended speaker location. Using the enclosed cutout template you will mark the hole and cut a clean hole using a rotary cutter, sheetrock or keyhole saw. After you have found and connected the speaker wire you will mount the speaker in the hole and snap on the magnetic grill. It's usually not as easy as this sounds and you should once again consider hiring a pro installer.
Warning: Exercise caution when drilling into existing ceilings. Do not drill through electrical wires, pipes, drains, conduits, heating or air conditioning ducts or structural wood or metal support members. If you feel resistance while drilling, you should stop immediately. Do not install the speaker into a drop ceiling (T-Bar) or soft ceiling without a proper backing board to spread the load, as this type of construction will not support its weight.
You will not need the iCB6 pre-construction bracket nor will you be able to install it if you wanted to. The speaker is designed to mount securely without it (assuming you do everything right).
Tools You'll Need:
2 Philips screwdriver
Pencil
Tape measure
Utility knife or keyhole saw
Safety goggles
Dust mask
Protective gloves
A ladder
Electric drill with #2 Philips bit
Band-aids
- Using a "stud finder" or the "knocking" method, locate the ceiling joists in the ceiling area where you wish to mount the speaker. The speaker will be mounted between adjacent joists, no closer than two inches from either joist.
- Determine that there are no obstructions above the desired cutout area. This may be accomplished by drilling a hole in the center of the cutout area and using an "L" shaped piece of metal (like a bent coat hanger wire) to "feel around" above the ceiling. If you discover an obstruction, fill the hole with patching compound and try another location (plan B).
- If no obstructions are found above the ceiling, use the supplied cutout template and a pencil to draw an outline of the area to be cut out. Make sure you are using the right template. Begin by drilling a hole on the inside of the circle with a 1/4" bit, then cut the
Installation: Existing Construction Continued....
hole with a keyhole saw or use a rotary cutter (fig.7). If the ceiling is painted, use the utility knife to score the paint so the sheetrock paper or paint does not peel when you cut. Once installed, the speaker frame lip will extend about 1/2 inch beyond the perimeter of the cutout to hide minor cutting imperfections.
- If the ceiling is constructed of lath and plaster, outline the penciled circle with masking tape to help prevent plaster cracking, drill a 1/4" hole, and use a jig saw with a new blade or rotary saw to cut through the plaster lath. A saber saw with a metal cutting blade can be used however this saw will vibrate plaster off the ceiling and is easy to lose control of. Save yourself the headache and buy a good rotary cutter. Always be prepared to patch the plaster.
- Locate the speaker wire, strip the ends 12 " and connect the speaker wire to the spring posts on the back of the speaker, making sure to observe correct polarity - red (+), black (-).
- The speaker assembly mounts to the existing ceiling via four plastic, spring-loaded mounting clamps (dog-legs) on the back of the speaker assembly that will swivel out 45^ and lower to "sandwich" the speaker assembly in place between its protruding outer frame and the rear surface of the drywall. Begin this phase by being sure the dog-legs are rotated sideways (like the speaker came packed) so that the body of the speaker assembly can slide through the mounting bracket. Exercise caution not to damage the drivers themselves. (fig. 4).
- Tighten the screws snugly, making sure not to over tighten, as this may compromise the fit of the speaker assembly. The use of power screwdrivers is not recommended. The gasket on the back the speaker assembly lip reduces unwanted vibrations against the drywall and will compress slightly to allow the speaker assembly lip to rest flush and seal against the ceiling.
Painting
Don't. But if you must to keep the homeowner or decorator happy, take the grill to a professional painter. Bring a sample of the color you want with you along with a box of chocolate for the painter. High-end custom automotive painting shops can match the color and paint the grill without plugging up the 1000 grill holes. We have extra grills available, for a charge, if you do not heed our warning and try to paint the grill yourself with latex paint.
In Use
The NHT in-ceiling speakers are designed to handle a wide range of listening levels, but every speaker has limits. It is important to use common sense and listen for signs of possible distress from the speakers – here are some pointers to remember:
- Noticeable distortion or harsh breakup is an indication that the amplifier or your speakers are running beyond their capacity, and the volume should be decreased ASAP.
- Speaker damage most often occurs from sustained high volume levels, not from transient sounds or brief musical peaks.
- Excessive boosting of bass, treble or equalizer controls can worsen the problem, and is not recommended.
- Having more power is always better than having less. Underpowered amplifiers are most often the cause of speaker damage.
- If you tend to listen at higher volume levels, get a powerful amplifier because they are less likely to run out of power.
- Proper wiring of the speakers is critical to good sound - speaker wires have some sort of marking along one or both conductors to help you make the correct connections.
- Weak bass and the lack of a well-defined stereo image indicate incorrect speaker phase (the + and - are reversed on one speaker)
Optimizing Sonic Performance
Bass response is smoothest when the speaker is mounted into a rigid ceiling that flexes very little. For improved performance, during framing, add cross-braces horizontally roughly one and a half feet to either side of the speaker location. Use adhesive caulk and extra screws when attaching the drywall to the joists around the speaker. Additionally, once the speaker cutout has been made in the drywall, add a strip of a high-quality non-hardening construction adhesive type caulk where the drywall meets the joists and cross-braces. Also for more controlled bass response, add (code-approved & fire resistant) insulation to the ceiling cavity around and behind the speaker to provide acoustic damping. Be sure to add the same amount of insulation to each speaker in the same room to ensure consistent sound. Use R-12 or R-19 fiberglass insulation, and be sure to wear protective gloves and a breathing mask to avoid contact and inhalation of the fibers. If the insulation is paper or foil faced, position the paper or foil side away from the speaker. If the new or existing insulation is the "loose" blown-in type, place a thin sheet of fiberglass over the top of the speaker to keep out small debris.
Maintenance
Do not expose the speakers to direct sunlight or excessively high temperatures.
Do not attempt to clean the actual drivers (speakers) themselves.
You may clean the grill after removal with a citrus-based cleaner to cut a greasy film otherwise a mild detergent will clean the speaker up nicely. Avoid harsh cleaners. Let dry completely.
Service & Support & Troubleshooting
Contact the NHT Authorized Reseller who sold you the products or,
Contact NHT by telephone go online at www.nhthifi.com and navigate to the Service Center area for more information.
Professional Specifications
Average Impedance 8Ω
Recommended Power 10-125W
Max RMS Power Handling 125W
Coverage to 60° off-axis
Cutout dim: 8.375" diameter (8-3/8")
Depth behind the wall: 4.875" (4-7/8")
Finished dim: 9.44" (9-7/16")
© NHT Audio LLC 2013
REV 5213
- Introduction
- Placement
- Wiring (Retrofit Installations or New Construction)
- Getting Wired
- Drill with Caution!
- Installation: New Construction (ceilings not installed – you see ceiling joists when you look up)
- Tools You'll Need:
- Philips screwdriver
- Installation: Existing Construction (retrofitting finished ceilings)
- Painting
- In Use
- Optimizing Sonic Performance
- Maintenance
- Service & Support & Troubleshooting
- Professional Specifications
Brand : NHT Audio
Model : Architectural iC3
Category : Loudspeaker