
AMP12US - Wireless pointer TARGUS - Free user manual and instructions
Find the device manual for free AMP12US TARGUS in PDF.


| Product Type | Wireless Presenter / Pointer |
| Brand | Targus |
| Model | AMP12US |
| Connectivity | 2.4 GHz Wireless via USB Receiver |
| Operating Range | Up to 50 feet (15 meters) |
| Laser Type | Class 2 Red Laser (≤1mW, 650nm) |
| Power Source | 2 x AAA Batteries (included) |
| Battery Life | Approximately 20 hours of typical use |
| Dimensions (L x W x H) | 4.5 x 1.2 x 0.6 inches (114 x 30 x 15 mm) |
| Weight (including batteries) | 1.2 oz (34 g) |
| Compatible Operating Systems | Windows 7/8/10/11, macOS 10.10+, Linux (basic functions) |
| Presentation Functions | Slide forward/back, laser pointer, black screen |
| Receiver Storage | Built-in magnetic slot for USB receiver |
| Color | Black with silver accents |
| Included Accessories | USB receiver, 2 x AAA batteries, carrying case |
| Safety Certification | FDA/CDRH, CE, RoHS |
| Operating Temperature | 32°F to 104°F (0°C to 40°C) |
| Warranty | Limited 1-year warranty |
Frequently Asked Questions - AMP12US TARGUS
User questions about AMP12US TARGUS
0 question about this device. Answer the ones you know or ask your own.
Ask a new question about this device
Download the instructions for your Wireless pointer in PDF format for free! Find your manual AMP12US - TARGUS and take your electronic device back in hand. On this page are published all the documents necessary for the use of your device. AMP12US by TARGUS.
USER MANUAL AMP12US TARGUS
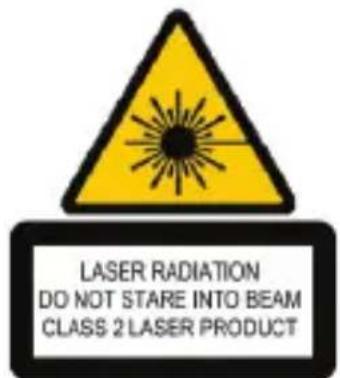
Complies with EN 60825-1: 1994+A1+A2 and Complies with 21 CFR 1040.10 and 1040.11 except for deviation pursuant to Laser Notice No.50, dated July 26, 2001.
AVOID EXPOSURE--HAZARDOUS ELECTROMAGNETIC RADIATION EMITTED FROM THIS APERTURE.
LASER RADIATION. DO NOT STARE INTO THE BEAM OR VIEW DIRECTLY WITH OPTICAL INSTRUMENTS. CLASS 2 LASER PRODUCT.
NEVER POINT A LASER BEAM INTO A PERSON'S EYES OR VIEW A LASER BEAM DIRECTLY, AS PROLONGED EXPOSURE CAN BE HAZARDOUS TO THE EYES. MOMENTARY EXPOSURE FROM A LASER POINTER, SUCH AS AN INADVERTENT SWEEP OF THE LIGHT ACROSS A PERSON'S EYES, MAY CAUSE TEMPORARY FLASH BLINDNESS SIMILAR TO THE EFFECT OF A CAMERA FLASH BULB. ALTHOUGH THIS CONDITION IS TEMPORARY, IT CAN BECOME MORE DANGEROUS IF THE EXPOSED PERSON IS ENGAGED IN A VISION-CRITICAL ACTIVITY SUCH AS DRIVING.
CAUTION: ANY CHANGES OR MODIFICATIONS NOT EXPRESSLY APPROVED BY THE PARTY RESPONSIBLE FOR COMPLIANCE COULD VOID THE USER'S AUTHORITY TO OPERATE THE EQUIPMENT.
THIS DEVICE AND ITS ANTENNA(S) MUST NOT BE CO-LOCATED OR OPERATING IN CONJUNCTION WITH ANY OTHER ANTENNA OR TRANSMITTER. YOUR DEVICE CONTAINS A LOW POWER TRANSMITTER. WHEN DEVICE IS TRANSMITTED IT SENDS OUT RADIO FREQUENCY (RF) SIGNAL. NOTE: THE MANUFACTURER IS NOT RESPONSIBLE FOR ANY RADIO OR TV INTERFERENCE CAUSED BY UNAUTHORIZED MODIFICATIONS TO THIS EQUIPMENT. SUCH MODIFICATIONS COULD VOID THE USER'S AUTHORITY TO OPERATE THE EQUIPMENT.
Ultra-Slim Stow-N-Go™ ExpressCard Presenter
Introduction
Congratulations on your purchase of the Targus Ultra Slim Stow-N-Go™ ExpressCard Presenter. This is a plug and play device so no additional software is required. This presenter is compactly designed to conveniently store in the PC card slot of your laptop computer.
Contents
• Targus ExpressCard Presenter
- Slim receiver (attached to the presenter)
- 1 x CR2032 coin battery
- PCMCIA Adapter tray
System Requirements
Hardware
- USB interface
Operating System
- Microsoft Windows® 2000
- Microsoft Windows® XP
- Microsoft Windows® Windows Vista™
• Mac OS X (10.4 or higher)
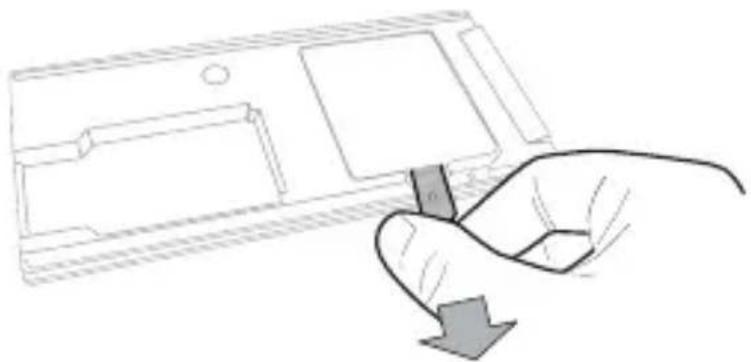
Removing the Plastic Tab
natural_image
Line drawing of a hand pressing down on a device component with a downward arrow (no text or symbols)Before operating - Pull to remove tab

THE CLEAR PLASTIC TAB IS USED TO KEEP THE BATTERY FROM CONTACTING AND LOSING POWER DURING SHIPMENT. PLEASE REMOVE AT INITIAL USAGE.
Installing the Batteries
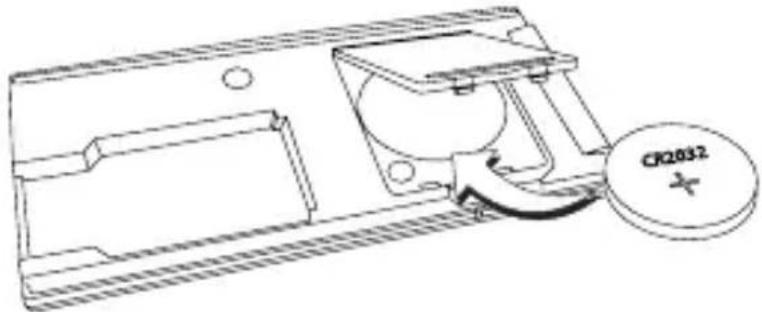
- Use the CR2032 battery. (included)
- Remove the battery cover from the back of the device.
- Insert the battery, making sure that the positive (+) side of the battery is facing up to the battery cover.
natural_image
Technical line drawing of a mechanical component with a circular inset showing a labeled part (no text or symbols present)
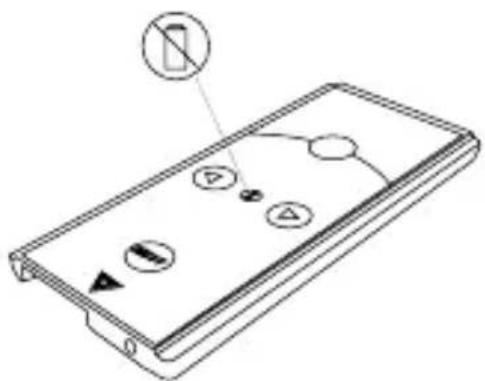
NOTE: ON THE PRESENTER, THERE IS A POWER LOW INDICATOR WHICH WILL LIGHT UP WHEN THE BATTERY POWER IS LOW. WHEN THE LIGHT STARTS TO BLINK, PLEASE REPLACE WITH A NEW BATTERY.
Keys and Functions
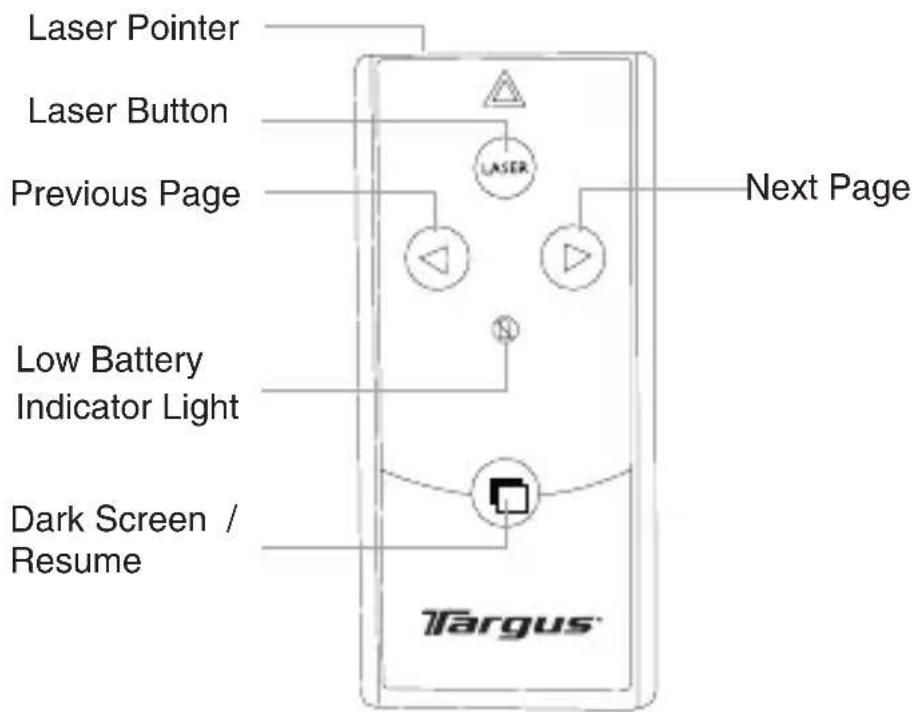
| Laser Button Press to activate the laser pointer | |
| Low Battery Indicator Light | The light will glow when the battery power level is low |
| Next Page Press to go to next page | |
| Resume / Dark Screen | Press to switch between dark screen and resume presentation |
| Previous Page Press to return to previous page | |
Storing and Removing the Receiver
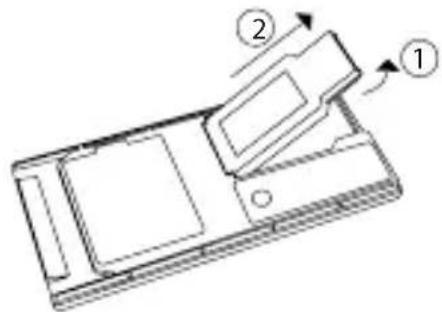
Removing the USB Receiver
Pull up the USB receiver (1) and remove from the presenter (2)
Stowing the USB Receiver
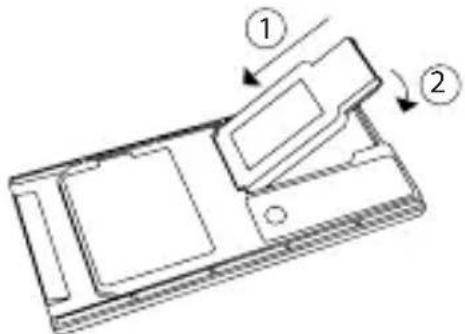
Insert into the back of the presenter with the label upwards (1) and press flat. (2)
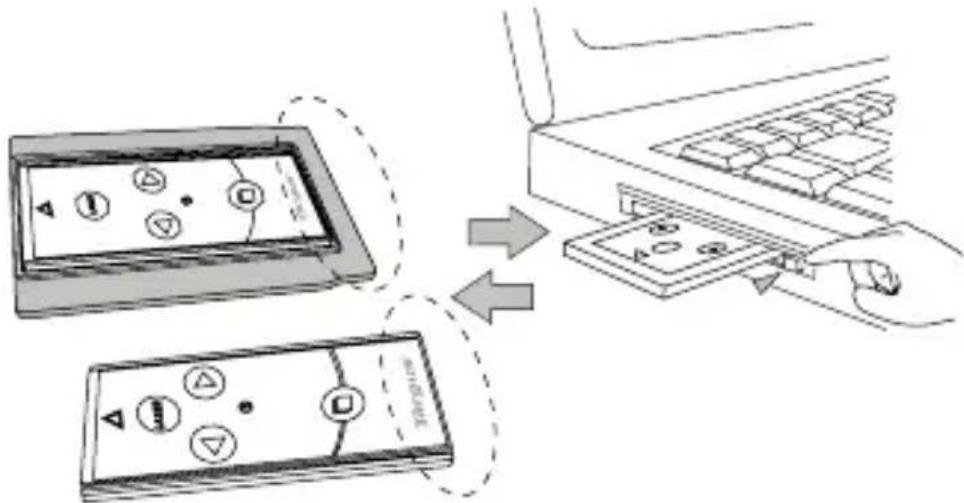
This presenter is designed to fit into the PC card slot of most laptops.

NOTE: WHEN STORING IN THE SLOT, THE BOTTOM OF THE PRESENTER SHOULD BE INSERTED FIRST. FOR PC CARD (PCMCIA) NOTEBOOKS, THE ADAPTER TRAY IS USED, BE SURE THE NARROW END OF THE TRAY IS INSERTED FIRST INTO THE PC CARD (PCMCIA) SLOT.
Connecting the USB Receiver to Your PC
Take out the USB receiver attached on the back and plug it into an available USB port with connecting pins on the receiver facing the connecting pins in the USB port and plug into any available USB port on your laptop computer.
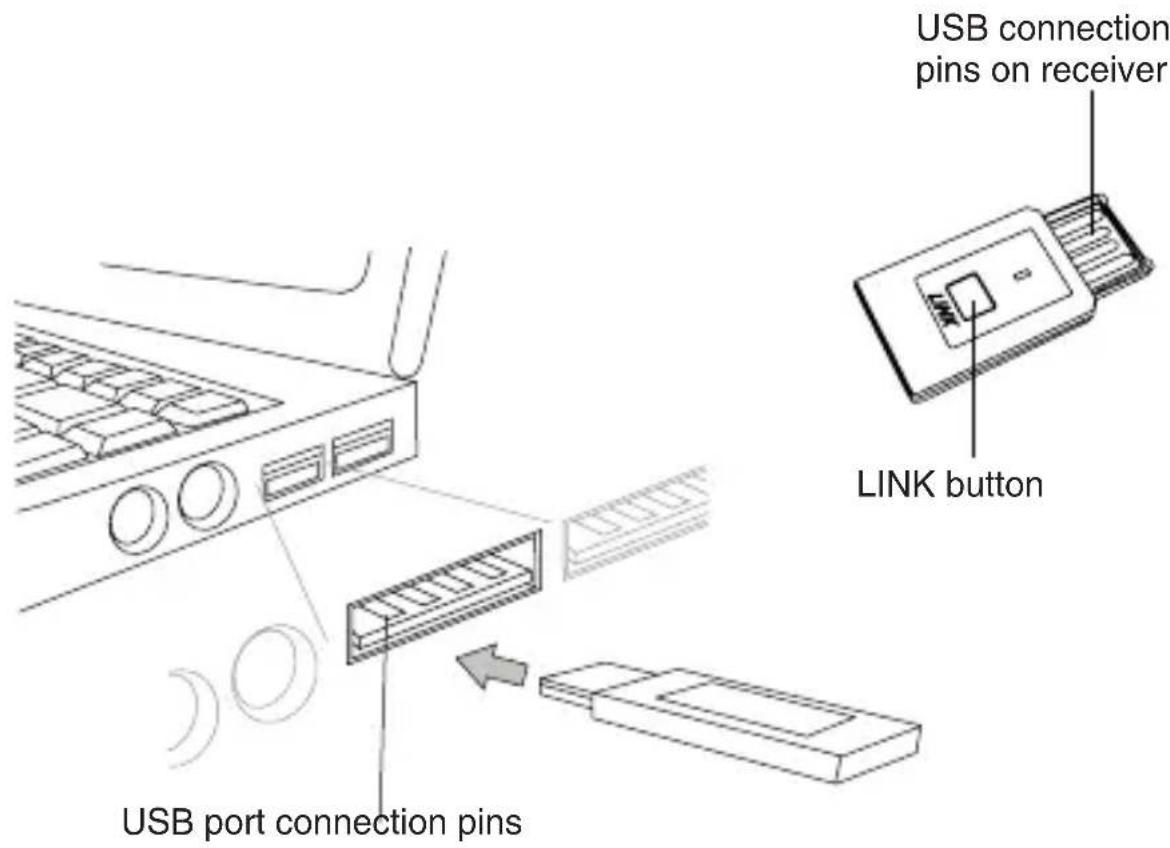

WHEN INSERTING THE USB RECEIVER INTO THE COMPUTER'S USB PORT. PLEASE MAKE SURE THAT THE CONNECTOR PINS ON THE RECEIVER AND THE PINS IN THE COMPUTER'S USB PORT ARE FACING EACH OTHER.
Your computer will automatically recognize the connection and prompt you for installation. Please follow the instructions to complete installation.
Establishing a Connection
This presenter is a plug-n-play device. It should automatically operate when the USB receiver is connected to the computer.
If the presenter is not working or you have recently replaced the battery, you can reset the ID code between the receiver and the presenter. To do this, do the following:
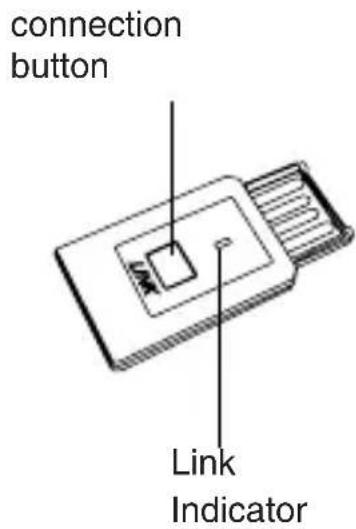
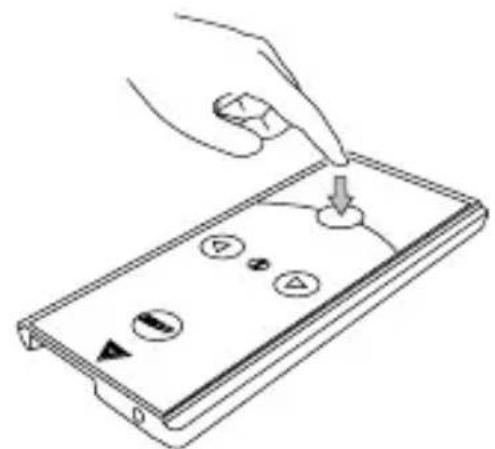
Press and release the connection indicator button on the receiver. The link indicator light should illuminate. Next, press and hold the "Resume / Dark Screen" button for 3 seconds. When the LED light on the receiver dongle flashes, the new connection is established.
natural_image
Line drawing of a hand using a tool to press or install a device with control buttons (no text or symbols)
NOTE: MAKE SURE THAT YOUR COMPUTER IS TURNED ON AND HAS DETECTED THE USB RECEIVER BEFORE YOU START THE CONNECTION PROCESS.
Now, you're ready to go. Launch your presentation program to ensure the presenter is functioning properly.

NOTE: DEPENDING ON THE PRESENTATION' SOFTWARE CAPABILITIES, THE REMOTE FUNCTIONS CAN VARY.
Technical Support
For technical questions, please visit:
US Internet: www.targus.com/support.asp
Australia Internet: www.targus.com/au
Email: infoaust@targus.com
Telephone: 1800-641-645
New Zealand Telephone: 0800-633-222
Product Registration
Targus recommends that you register your Targus accessory shortly after purchasing it. Go to:
http://www.targus.com/registration.asp.
You will need to provide your full name, email address, country of residence and product information.
Warranty
Targus warrants this product to be free from defects in materials and workmanship for one year. If your Targus accessory is found to be defective within that time, we will promptly repair or replace it. This warranty does not cover accidental damage, wear and tear, or consequential or incidental loss. Under no conditions is Targus liable for loss of, or damage to devices; nor loss of, or damage to, programs, records, or data; nor any consequential or incidental damages, even if Targus has been informed of their possibility. This warranty does not affect your statutory rights.
Regulatory Compliance
This device complies with Part 15 of the FCC Rules. Operation is subject to the following two conditions: (1) This device may not cause harmful interference, and (2) This device must accept any interference received, including interference that may cause undesired operation.
FCC Statement Tested to Comply
This equipment has been tested and found to comply with the limits of a Class B digital device, pursuant to Part 15 of the FCC Rules. These limits are designed to provide reasonable protection against harmful interference in a residential installation. This equipment generates, uses, and can radiate radio frequency energy and if not installed and used in accordance with the instructions, may cause harmful interference to radio communications. However, there is no guarantee that interference will not occur in a particular installation. If this equipment does cause harmful interference to radio or television reception, which can be determined by turning the equipment off and on, the user is encouraged to try to correct the interference by one or more of the following measures:
- Reorient or relocate the receiving antenna;
- Increase the separation between the equipment and receiver;
- Connect the equipment into an outlet on a circuit different from that to which the receiver is connected;
- Consult the dealer or an experienced radio/TV technician for help.
Changes or modifications not authorized by the party responsible for compliance could void the user's authority to operate this product.
Declaration of Conformity
Hereby, Targus, declares that this device is in compliance with the essential requirements and other relevant provisions of Directive 1999/5/EC.
Microsoft, Windows, and Windows Vista are either registered trademarks or trademarks of Microsoft Corporation in the United States and/or other countries. All trademarks and registered trademarks are the property of their respective owners. All rights reserved. Features and specifications are subject to change without notice. © 2008. Targus Group International, Inc. and Targus, Inc., Anaheim, CA 92806 USA
Product Specification
Transmitter
| RF 2.400GHz-2.483GHz | |
| Battery Type CR2032 battery | |
| Effective RF Communication Range | 20 meters max |
| RF output power 1 mW max | |
| Power Consumption 30 mA max |
Receiver
| RF 2.400GHz-2.483GHz | |
| Interface USB 1.1 | |
| Power USB Bus Powered 5 | V DC |
- Ultra-Slim Stow-N-Go™ ExpressCard Presenter
- Introduction
- Contents
- System Requirements
- Hardware
- Operating System
- Removing the Plastic Tab
- Installing the Batteries
- Keys and Functions
- Storing and Removing the Receiver
- Removing the USB Receiver
- Stowing the USB Receiver
- Connecting the USB Receiver to Your PC
- Establishing a Connection
- Technical Support
- Product Registration
- Warranty
- Regulatory Compliance
- FCC Statement Tested to Comply
- Declaration of Conformity
- Product Specification
Brand : TARGUS
Model : AMP12US
Category : Wireless pointer