VL9000 - Tumble dryer Thor - Free user manual and instructions
Find the device manual for free VL9000 Thor in PDF.


User questions about VL9000 Thor
0 question about this device. Answer the ones you know or ask your own.
Ask a new question about this device
Download the instructions for your Tumble dryer in PDF format for free! Find your manual VL9000 - Thor and take your electronic device back in hand. On this page are published all the documents necessary for the use of your device. VL9000 by Thor.
USER MANUAL VL9000 Thor
natural_image
Illustration of a smiling sun and outdoor scene with a woman holding a basket, no text or symbols present
natural_image
Line drawing of a front-loading washing machine (no text or symbols)Table of Contents
Before using the dryer
Name of Parts....1
Important Safety Instructions .....2-3
Installation....4-10
Preparation 11
How to operate the dryer
Control panel....12-13
Programming guide....14
Drying methods 15
Maintenance
Cleaning and maintenance .....16-17
Trouble shooting 18-19
Wiring circuit 20
Specifications 21
Name of Parts
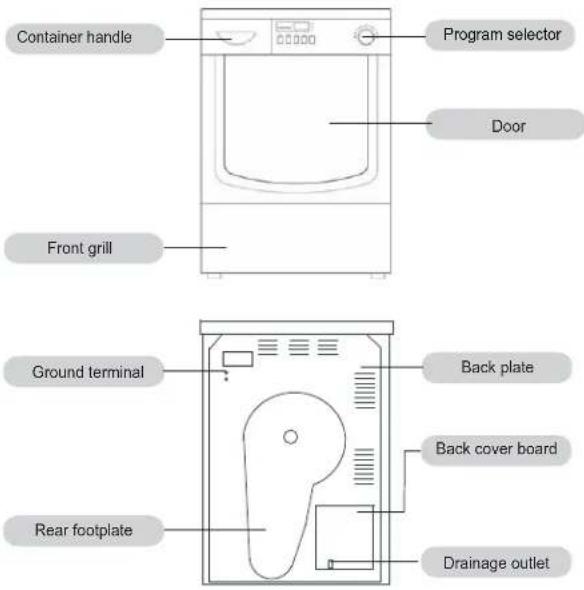
Warning
Read all instructions before using dryer.
Dryers are provided with operating, care and installation instructions
SAVE THESE INSTRUCTIONS
This diagram may be slightly different from the layout of the machine you have just purchased due to technical improvements
Important Safety Instructions Important Safety Instructions
⚠ WARNING To reduce the risk of fire, electrical shock, or injury to persons when using this dryer, follow basic precautions, including the following:
- Read all instructions before using this dryer.
- Do not dry items that have been previously cleaned in, washed in, soaked in, or spotted with gasoline, cleaning solvents, kerosene, waxes, etc. Do not store these flammable materials on or near the dryer. These substances give off vapors that could ignite or explode.
- This appliance is not intended for use by persons (including children) with reduced physical, sensory or mental capabilities, or lack of experience. Children should be supervised to ensure that they to not play with the appliance. Do not allow children to play on or in the dryer. Close supervision of children is necessary when the dryer is used near children.
- Before the dryer is removed from service or discarded, remove the dryer door to prevent accidental entrapment.
- To prevent injury, do not reach into the dryer if the drum is moving. Wait until the dryer has stopped completely before reaching into the drum.
- Do not install or store this appliance where it will be exposed to water and/or the weather.
- Do not tamper with controls.
- Do not repair or replace any part of the appliance or attempt any servicing unless specifically recommended in the user-maintenance instructions or in published user-repair instructions.
- To prevent fire, do not dry items containing plastic, foam, rubber or similarly textured rubber-like materials, or items containing feathers or down.
- Do not place items exposed to cooking oils in your dryer. Items contaminated with cooking oils may contribute to a chemical reaction that could cause a load to catch fire.
- Clean lint screen before or after each load.
- This dryer must be properly installed in accordance with the installation instructions before it is used.
- To prevent shock hazard and assure stability during operation, the dryer must be installed and electrically grounded by a qualified service person in accordance with local codes.
-
Always disconnect dryer from electrical supply before attempting any service. Disconnect power cord by grasping the plug, not the cord.
-
The dryer must only be used for its intended purpose.
- Do not sit on top of the dryer.
- If the cord is damaged, it must be replaced by the manufacturer, its service agent or similarly qualified persons in order to avoid a hazard.
18.Do not operate the dryer if any parts are missing or broken. - Do not store or use gasoline or other flammable vapors and liquids in the vicinity of the appliance.
- Keep surrounding areas free from the accumulation of lint, dust and dirt.
- Avoid fire hazard or electrical shock. Do not use an adaptor plug or extension cord or remove grounding prong from electrical power cord. Failure to follow this warning can cause serious injury, fire or death.
22.Do not dry unwashed items in the tumble dryer.
23.Fabric softeners, or similar products, should be used as specified by the fabric softener instructions.
WARNING: Never stop a tumble dryer before the end of the drying cycle unless all items are quickly removed and spread out so that the heat is dissipated.
Installation
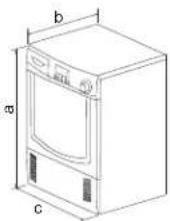
- Dimensions
$$ a = 3 3 - 1 / 2 ^ {\prime \prime} $$
$$ b = 2 4 - 3 / 8 ^ {\prime \prime} $$
$$ c = 2 3 - 7 / 1 6 ^ {\prime \prime} $$
Weight =95lbs.
- Packing accessories
Checklist of the accessories and materials provided with the machine:
| Name | Owner's manual | Certificate of Conformity | Drainpipe | Terminal block cover | Screw |
| Quantity | 1 | 1 | 1 | 1 | 2 |
- To ensure the dryer operates normally, attention must be paid to the following instructions;
■ The dryer must be level when installed. Its bottom is equipped with adjustable feet. Adjust these 4 feet to level the unit before operation:
■ Check whether there is any damage to the dryer during transportation. Do not use your dryer is there are signs of damage. Contact your dryer supplier.
■ The dryer must be kept away from flammable substances;
■ The surrounding environment must be dry and ventilated;
■ Do not install the dryer on any hairy carpet because the normal ventilation of the vent hole may be blocked:
■ To allow the dryer to perform better, the ambient temperature shall not be lower than 50 degree F nor higher than 95 degree F.
Installation
● Change the door-opening direction
If the direction of the dryer's door is not suitable to the location, its opening direction may be changed. The procedure is as follows:
■Screw off the 4 screws fixing the door's hinge to remove the door;
■Remove the hinge from the door and take off the hinge cover at the other side and fix the hinge back;
■ Screw off the screws fixing the door switch to remove the door switch. Take off the door switch cover at the other side and fix the door switch back;
■Put the removed hinge cover and door switch cover into the side opposite to the door;
■Remove the 4 corks and the door lock cover from the front panel and put them on the other side of the front panel;
■ Fix the door on the other side of the machine.
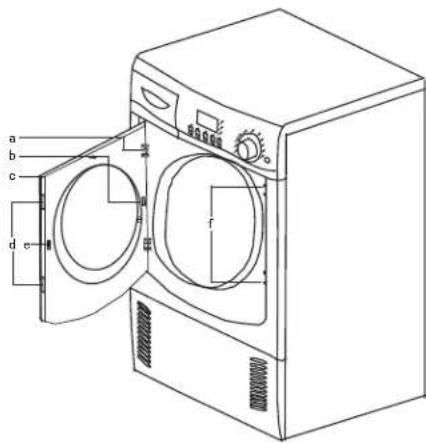
a-door hinge
b-catch cover
c-door
d-hinge cover
e-door catch
f-blanking plug
Installation Installation
● ELECTRICAL CONNECTIONS
■ 1. This appliance must be properly grounded. Electrical shock can result if the dryer is not properly grounded. Follow the instructions in this manual for proper grounding.
■ 2.Do not use an extension cord with this dryer. Some extension cords are not designed to withstand the amounts of electrical current this dryer utilizes and can melt, creating electric shock and/or fire hazard. Locate the dryer within reach of the receptacle for the length power cord to be purchased, allowing some slack in the cord. Refer to the electrical requirements in this manual for the power cord to be purchased.
■ 3.A U.L. approved strain relief must be installed onto power cord. If the strain relief is not attached, the cord can be pulled out of the dryer and can be cut by any movement of the cord, resulting in electrical shock.
■4.Do not use an aluminum wire receptacle with copper wired power cord and plug (or vice versa). A chemical reaction occurs between copper and aluminum and can cause electrical shorts. The proper wiring and receptacle is a copper wired power cord with a copper wired receptacle.
Note: Dryers operating on 208 Volt power supply will have longer drying times than operating on 240 Volt power supply.
Danger:Improper connection of the equipment-grounding conductor can result in a risk of electrical shock. Check with a licensed electrician if you are in doubt as to whether the appliance is properly grounded. The dryer must be connected to a grounded metal, permanent wiring system, or an equipment-grounding conductor must be run with the circuit conductors and connected to the equipment-grounding terminal or lead on the appliance.
Power Supply:
3 or 4 wire, 240 Volt, 30 Amp, 60Hz, 1 Phase
Power Supply Cord Kit: (not supplied when sold in the United States) The dryer MUST employ a 3-conductor power supply cord NEMA 10-30 type SRDT rated at 240 Volt AC minimum, 30 Amp., with 3 open end spade lug connectors with upturned ends or closed loop connectors and marked for use with clothes dryers. If being installed in a manufactured (mobile) home, the dryer MUST employ a 4-conductor power supply cord NEMA 14-30 type SRDT or ST (as required) rated at 240 Volt AC minimum, 30 Amp., with 4 open end spade lug connectors with upturned ends or closed loop connectors and marked for use with clothes dryers. See Electrical Connections for A 4-Wire System.
● 3-Wire Cord Connections
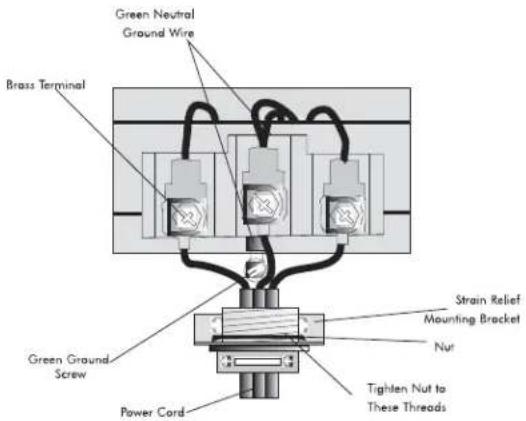
■ 1. Install a U.L. approved strain relief into the power cord entry hole of the mounting bracket. Finger tighten the nut only at this time.
■ 2. Thread a U.L. Approved 30 Amp. power cord, NEMA 10-30 Type SRDT, through the strain relief.
■ 3. Attach the power cord neutral (center wire) conductor to the silver-colored center terminal on the terminal block. Tighten the screw securely.
■ 4. Attach the remaining two power cord outer conductors to the outer brass colored terminals on the terminal block. Tighten both screws securely. WARNING: Do not make a sharp bend or crimp wiring/conductor at connections.
■ 5. Tighten the screws securing the cord restraint firmly against the power cord.
■ 6. Tighten the strain relief nut securely so that the strain relief does not turn.
■ 7. install the terminal block cover supplied as an accessory together with two screws.
Installation Installation
● 4-Wire Cord Connections
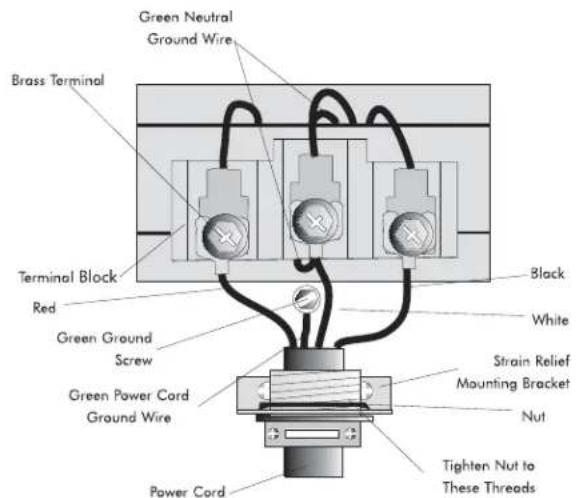
■ 1. Install a U.L. approved strain relief into the power cord entry hole of the mounting bracket. Finger tighten the nut only at this time.
■ 2. Remove the green neutral ground wire from the green ground screw located above the terminal block.
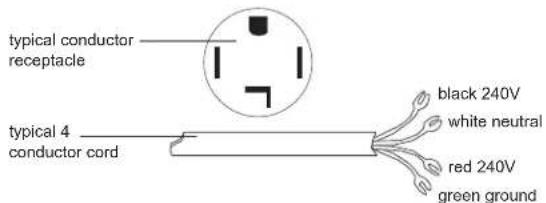
30 AMP NEMA 14-30 TYPE SRDT OR ST
■ 3. Thread a U.L. approved 30 Amp power cord, NEMA 14-30 type ST or SRDT through the strain relief.
■ 4. Attached the green power cord ground wire to the cabinet with green ground screw.
■ 5. Attached the white (neutral) power cord conductor from the power cord and the green ground wire from the dryer harness to the silver-colored center terminal on the terminal block. Tighten the screw securely.
■ 6. Attached the red and black power cord conductors to the outer brass-colored terminals on the terminal block. WARNING: Do not make a sharp bend or crimp wiring/conductor at connections.
■ 7. Tighten the screws securing the cord restraint firmly against the power cord.
■ 8. Tighten the strain relief nut securely so that the strain relief does not turn.
■9. Install the terminal block cover supplied as an accessory together with two screws.
Caution: Label all wires prior to disconnection, when servicing controls. Wiring errors can cause improper operations and be dangerous. Check unit for proper operation after servicing.
Warning:

Discard or destroy the carton and plastic bags after the dryer is unpacked. Children should not be allowed to use them to play with. Cartons covered with rugs, bedspreads, or plastic sheets can become an airlight chamber and cause suffocation leading to death. Make all packing materials inaccessible to children.
Warning: The instructions in this manual and all other literature included with this dryer can not cover every possible condition and situation that may occur. Good safe practice and caution must be applied when installing, operating and maintaining any appliances. After installing, if you are in doubt, call a certified electrician to install and wire the dryer.
Installation
- Drain switchover
During the drying of the laundry, the condensate water is automatically collected in a box inside the machine. The water needs to be removed from the box after every drying cycle. If your dryer is in the vicinity of a drain, you may allow the condensed water to discharge directly into the drain through the drainpipe provided. This eliminates the need to empty the box.
The method to connect the drainpipe is as follows:
- Loosen the hose clip with the drain switchover joint;
- Pull the hose off the joint;
- Install the accessory drainpipe on the joint;
- Fix the hose in place with the clip;
Note: The outlet of the drainpipe must not be higher than 3 feet above the floor
natural_image
Simple line drawing of a mechanical component with a curved handle and a small inset showing a force or moment (no text or symbols)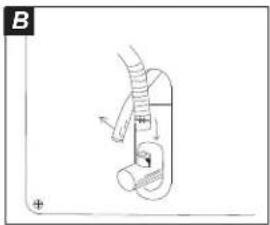
natural_image
Simple line drawing of a mechanical device with a handle and spring, no text or symbols presentPreparation
- Attention
■ Before use, clean any deposits from inside the drum of the dryer with a wet towel;
■ Clean debris on the filter screen to increase the drying efficiency.
- Turning on power
Before turning on the power for the dryer, check:
Whether the supply voltage is in accordance with the value indicated on the nameplate;
■Whether the supply receptacle can withstand the maximum power load to the dryer;
Whether the electrical outlet is in accordance with the plug of the dryer. If not, replace the power supply cable or outlet to make them accord with each other; The replacement of the power supply cable must be made by a qualified professional or our authorized service agent;
■ The dryer must be grounded securely.
• Treatment of laundry to dry
■ Check whether the laundry to be dried is suitable to be dried in the dryer;
■The dryer can only dry the laundry that has been spun dry. Do not put too wet laundry into the machine;
■ Empty all pockets of the laundry with such items as keys and coins and remove the adornment that is not suitable to be dried;
■Pull up zippers, sew and mend up loosened fasteners and tie up dispersed ribbons to prevent the laundry from being entangled. If necessary, put small items into a net.
■ To achieve a better drying result, shake the heavy laundry and make it loose before load it into the dryer.
- Load to dry
Make sure that the laundry you are going to dry is suitable for drying in a dryer. You will find information on this on the laundry labels. The following symbols mean:
| Dry at normal temperature | Dry at reduced temperature | Drying in the tumble dryer not possible |
Warning: Do not dry wool, silk, down and other delicate fabrics to avoid damage to fabrics.
Control Panel Control Panel
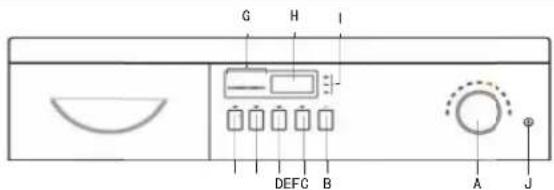
A - Program knob
Turn this knob to choose the drying program you desire. This type of dryer has 11 program options. For description of specific programs, refer to the list of programs on Page 14. When the drying program is selected, the relevant indicator light is on.
B - Start/Pause button
Gently touch this button to start the dryer. Gently touch this button again during the operation of the dryer and the indicator light and display screen will flash and the machine will be paused. Press the button again and the program will continue.
C - Signal button
When the drying cycle has finished, an intermittent acoustic signal will sound. Touch this button, the buzzer will be canceled.
D- Anti-crease button
If this additional function is selected, the anti-crease phase at the end of the drying cycle is lengthened by 60 minutes. The laundry can be removed at any time during the anti-crease phase.
E - Delicate button
During a program, the drying temperature and power will decrease and the drying time will increase to take better care of the delicate laundry.
F- Delay button
Gently touch this button before a program starts. You may choose to start the dryer after a preset time. The delay range is between 1 and 19 hours. Every touch of the delay button will increment by one hour. When you pass 19 hours, the delay time will turn off. After a delay time is set, gently touch the Start/Pause button to the start the delay operation and the indicator light will flash.
G - Program progress display
Depending on the program selected, the drying stage reached is shown by the indicator light on the control panel:
- Drying
- Ready to iron
- Airing
- End/Anti-crease
At the end of a program, the End/Anti-crease indicator light comes on. The drum will continue to rotate at intervals to prevent laundry creasing, if you do not wish to remove it immediately.
H - LED screen
The screen displays the remaining time for a program, the delay time and other related information.
Note: The remaining time to start a program is the default time for the program.
I - Maintenance displays
- Empty tank
- Clean filter
- Clean condenser
Important: After each drying cycle,
- Clean the filter;
- Drain the condensed water container(unless direct drain is installed); (See section "Cleaning and maintenance")
J- Power button
Press this button to switch on the dryer. Press it again to switch it off.
D+E composite button and child lock function
During a program, press and hold down the D and E buttons simultaneously for 3 seconds to set up the child lock function. The display screen will show the remaining time and the lock alternatively, and the control panel will lock. Press and hold down both buttons for 3 seconds once again and the child lock will release. When the program is finished or the power is turned off during the program, the child lock will release.
Programming Guide
| Program | Degree of drying | Max. load | Type of Laundry |
| COTTON | |||
| Very dry | Extra dry | 15.4lbs. | Heavy cotton fabrics, sheets, gowns. |
| Normal | Ready to wear | 15.4lbs. | Cotton fabrics, sheets, coats |
| Slightly Damp | Ready to iron | 15.4lbs. | Ordinary cotton fabrics |
| Damp | Damp | 15.4lbs. | Ordinary cotton fabrics |
| SYNTHETIC | |||
| Normal | Ready to wear | 6.6lbs. | Ordinary synthetic fabrics |
| Damp | Ready to iron | 6.6lbs. | Ordinary synthetic fabrics |
| TIMER | |||
| 20 min | Timer 20 min | 15.4lbs. | Heavy fabrics, needing further drying. |
| 40 min | Timer 40 min | 15.4lbs. | |
| 60 min | Timer 60 min | 15.4lbs. | |
| SPECIAL PROGRAMS | |||
| Cool | Refresh/Airing | 15.4lbs. | / |
| Mix | One piece | 1.1lbs. | / |
Drying Methods
| 1.Turning on powerInsert the power plug into an appropriate wall socket and turn on the power.Operating power supply: (220-240)V/60Hz. | |
| 2. Laundry loadingOpen the door and place the laundry into the drum of the dryerTo save energy and achieve a better drying result, please spin the laundry as dry as possible. Place the laundry evenly into the drum after shaking them loose.Note: Do not put excess laundry into the dryer to avoid damage to the dryer and laundry. | Reference weight of fabrics for drying● Overalls (cotton appr 950g)● Blended fabric clothes (appr 800g)● T-shirt (appr 300g)● Jackets (cotton appr 800g)● Woolen blankets (appr 3000g)● Jeans (300g)● Pajamas (appr 200g)● Shirts (appr 300g)● Underwear (appr 70g)● Socks (blended fabrics appr 50g)● Single bed sheets (cotton appr 800g) |
| 3. Setting drying programTurn the program knob to set an optimal drying program according to the laundry type and the drying result required. | |
| 4.Selecting additional functionsAccording to you desire, select the additional function:- Start Delay,- Deliacate,- Anti-crease,- Signal Off. | |
| 5. Program operationAfter a program is set, gently touch the Start/Pause button to start the program. | |
| 6. Program completionBefore the drying program ends, the dryer will enter the cold air cycle. After the program is complete, the display screen will display "End." Open the door to remove the laundry.If the laundry is not removed after the drying program is complete,the dryer will start the anti-crease protection cycle automatically.In the anti-crease protection cycle, the dryer's drum will run at a set interval to keep your laundry loose. | |
| 7. Turning off the dryerPress the power button to cut off the power supply . | |
Cleaning and Maintenance
- Cleaning the surface
Wipe the body of the dryer and the control panel with a damp cloth. Remember not use any organic solvent or corrosive agent to avoid damage to the machine.
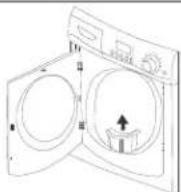
- Cleaning the filter screen
To ensure a good ventilation during drying, the filter screen must be cleaned after every drying program is complete.
Open the door and remove the filter screen from the machine. Open the screen and clean off the dust on the screen with a wet towel. After cleaning, put the screen back in place.
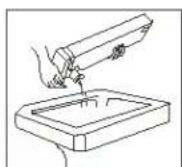
- Emptying the water collection box
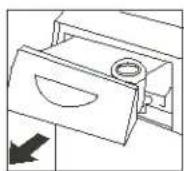
During operation, steam condenses into water and is collected in the box. The box must be emptied after the program is complete.
-Hold the handle and pull the box outwards to remove it. keep it level to prevent the water from overflowing;
-Pour away water. Note: the water can not be used for drink or for food processing;
-Put the box back in place. If the box has not been emptied, the dryer will sound an alarm when the box is full. The indicator light comes on while the box is emptied and the dryer will stop. It will not restart until the box is emptied. Note: The collection box does not need to be emptied if the drain option is installed.
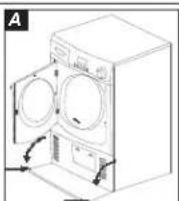
4.Cleaning the condenser
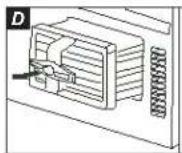
The condenser must be cleaned monthly. Switch off the power supply before cleaning. -Hold the protrusions on both sides of the lower panel and open it.
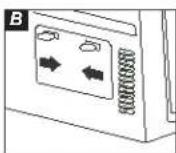
Cleaning and Maintenance
-Using a coin or other tool, push the slides on the cover to the position as shown in the figure and then remove the cover;
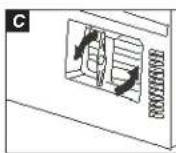
-Turn the condenser's handle 90 degrees in the direction as shown in the figure;
-Remove the condenser from the dryer;
-Clean the condenser with a brush or flush with water:
Note: Do not use a sharp tool in cleaning the heat exchanger, otherwise it may damage its sealing performance;
-Put the condenser back in place and lock up the cover;
-Put the lower panel back in place.
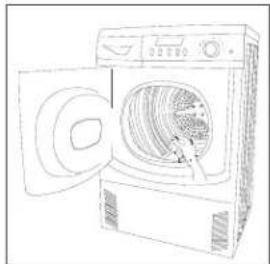
- Cleaning the drum
After the dryer has operated for a time, fabric caring agents or calcium contained in the water will form an almost invisible layer on the inside of the drum.
This makes the dryer not able to reliably and accurately identify the dryness of the laundry. So the inside of the drum, especially the stainless steel pieces on the blades must be cleaned regularly by a wet cloth.
natural_image
Line drawing of a washing machine with open door and internal fan (no text or symbols)Trouble Shooting Trouble Shooting
| Those listed below are not failures. The following must be confirmed before calling for service: | |
| Problem | Possible Cause |
| The dryer does not start | ●Whether the power supply plug peels off; ●Whether the local circuit is out of power; ●Whether the door is closed tightly; ●Whether a drying program has been set; ●Whether the Start/Pause button has been pressed; ●Whether the condensate collection box is full; |
| The drying result is not good and the drying time is too long. | ●Whether the drying program setting is correct or not; ●Whether the filter screen has been cleaned up; ●Whether the condenser is blocked; ●Whether the amount of the loaded laundry exceeds the rated load; ●Whether the loaded laundry has been spun dry; ●Whether the vent duct is blocked; ●Whether the surface of the inside of the drum gets a segregation layer; |
| The remaining time display is halted, or the remaining time displayed by skipping degression | The remaining time will be adjusted and corrected continuously and automatically based on the following factors: ●Type of laundry; ●Loaded amount; ●The degree of spinning dry of laundry; ●Ambient temperature; The automatic adjustment is a normal operation. |
Prompt and Alarm Information
In case of an improper operation or trouble with the machine when it operates, the code corresponding to the trouble will be displayed on the screen:
| Code | Category | Cause | Solutions |
| E2 | Trouble code | There is no change in the temperatures of the laundry in the tub | Contact a professional serviceman |
| E5 | Trouble code | The thermal sensor open-circuited or short circuited | Contact a professional serviceman |
| E6 | Trouble code | Drain pump fails | Contact a professional serviceman |
Wiring Circuit
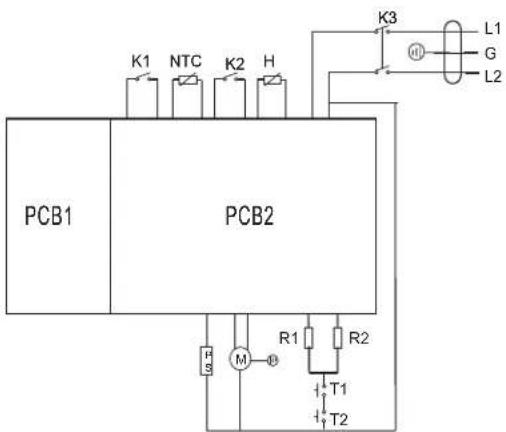
R1-Heating1 R2-Heating2 T1-Non-self-resting thermal cut-out
T2-Thermostat K1-Door switch K2-Level switch
K3-Power switch H-Humidity sensor NTC-Temperature sensor
PS-Drainage pump M-Motor
PCB1 PCB2-Printed circuit board
Specifications
| Item\Type | VL9000 |
| Power supply | (220-240)V/60Hz |
| Maximum operating current(A) | 12 |
| Drying program | 11 |
| Maximum power(W) | 2800 |
| Dimensions(H×D×W) | 33-1/2"x24-3/8"x23-7/16" |
| Waterproof level | IPX4 |
- Table of Contents
- Name of Parts
- SAVE THESE INSTRUCTIONS
- Important Safety Instructions Important Safety Instructions
- ⚠ WARNING To reduce the risk of fire, electrical shock, or injury to persons when using this dryer, follow basic precautions, including the following:
- Installation
- Installation Installation
- - Drain switchover
- Preparation
- - Attention
- - Turning on power
- • Treatment of laundry to dry
- - Load to dry
- Control Panel Control Panel
- A - Program knob
- B - Start/Pause button
- C - Signal button
- D- Anti-crease button
- E - Delicate button
- F- Delay button
- G - Program progress display
- H - LED screen
- I - Maintenance displays
- J- Power button
- D+E composite button and child lock function
- Cleaning and Maintenance
- Trouble Shooting Trouble Shooting
- Prompt and Alarm Information
- Wiring Circuit
- Specifications
Brand : Thor
Model : VL9000
Category : Tumble dryer