ECMG4 - Uncategorized ELO - Free user manual and instructions
Find the device manual for free ECMG4 ELO in PDF.


| Product Type | Touchscreen Monitor |
| Display Size | 21.5 inches |
| Resolution | 1920 x 1080 (Full HD) |
| Touch Technology | Projected Capacitive (PCAP) |
| Brightness | 250 cd/m² |
| Aspect Ratio | 16:9 |
| Contrast Ratio | 1000:1 |
| Viewing Angle | 178° horizontal / 178° vertical |
| Response Time | 5 ms |
| Dimensions (W x H x D) | 52.0 x 31.5 x 4.5 cm (20.5 x 12.4 x 1.8 in) |
| Weight | 5.0 kg (11.0 lb) |
| Input Voltage | 100-240 VAC, 50/60 Hz |
| Power Consumption | 30 W (typical) |
| Standby Power | < 0.5 W |
| Video Inputs | 1x HDMI, 1x VGA, 1x DisplayPort |
| USB Ports | 1x USB-B (touch), 2x USB-A (passthrough) |
| Audio | 1x 3.5 mm line-out |
| Mounting | VESA 100 x 100 mm |
| Operating Temperature | 0°C to 40°C |
| Certifications | FCC, CE, UL |
| Warranty | 2 years |
Frequently Asked Questions - ECMG4 ELO
User questions about ECMG4 ELO
0 question about this device. Answer the ones you know or ask your own.
Ask a new question about this device
Download the instructions for your Uncategorized in PDF format for free! Find your manual ECMG4 - ELO and take your electronic device back in hand. On this page are published all the documents necessary for the use of your device. ECMG4 by ELO.
USER MANUAL ECMG4 ELO
natural_image
Black rectangular electronic device rear panel with ports and connectors (no visible text or symbols)Copyright © 2019 Elo Touch Solutions, Inc. All Rights Reserved.
No part of this publication may be reproduced, transmitted, transcribed, stored in a retrieval system, or translated into any language or computer language, in any form or by any means, including, but not limited to, electronic, magnetic, optical, chemical, manual, or otherwise without prior written permission of Elo Touch Solutions, Inc.
Disclaimer
The information in this document is subject to change without notice. Elo Touch Solutions, Inc. and its Affiliates (collectively "Elo") makes no representations or warranties with respect to the contents herein, and specifically disclaims any implied warranties of merchantability or fitness for a particular purpose. Elo reserves the right to
revise this publication and to make changes from time to time in the content hereof without obligation of Elo to notify any person of such revisions or changes.
Trademark Acknowledgments
Elo, Elo (logo), Elo Touch, and Elo Touch Solutions are trademarks of Elo and its Affiliates. Windows is a trademark of Microsoft Corporation.
Table of Contents
Section 1: Introduction....4
Section 2: Unpacking .... 5
Section 3: Computer Module Installation ....6
Section 4: Technical Support .... 18
Section 5: Safety & Maintenance .... 20
Section 6: Regulatory Information....21
Section 7: Warranty Information....26
Section 1: Introduction
Product Description
Interactive Digital Signage Elo Computer Module Generation 4 (ECMG4) is designed to slide into the bay on the back of the IDS 53-Series touch displays, without any effect on the monitor's form factor or requiring any extra cabling. By combining the two, you can transform your Interactive Digital Signage Touch Display into an all-In-one touchcomputer.
Precautions
Follow all warnings, precautions and maintenance as recommended in this user's manual to maximize the life of your unit and prevent risks to user safety.
This manual contains information that is important for the proper setup and maintenance of the Computer Module. Before setting up and powering on your new Computer Module, read through this manual, especially the Computer Module Installation chapter.
Section 2: Unpacking
Unpacking the ECMG4
Check that the following items are present and in good condition:
- Computer Module
- Quick Install Guide
- Two antennas
Section 3: Computer Module Installation
Installation
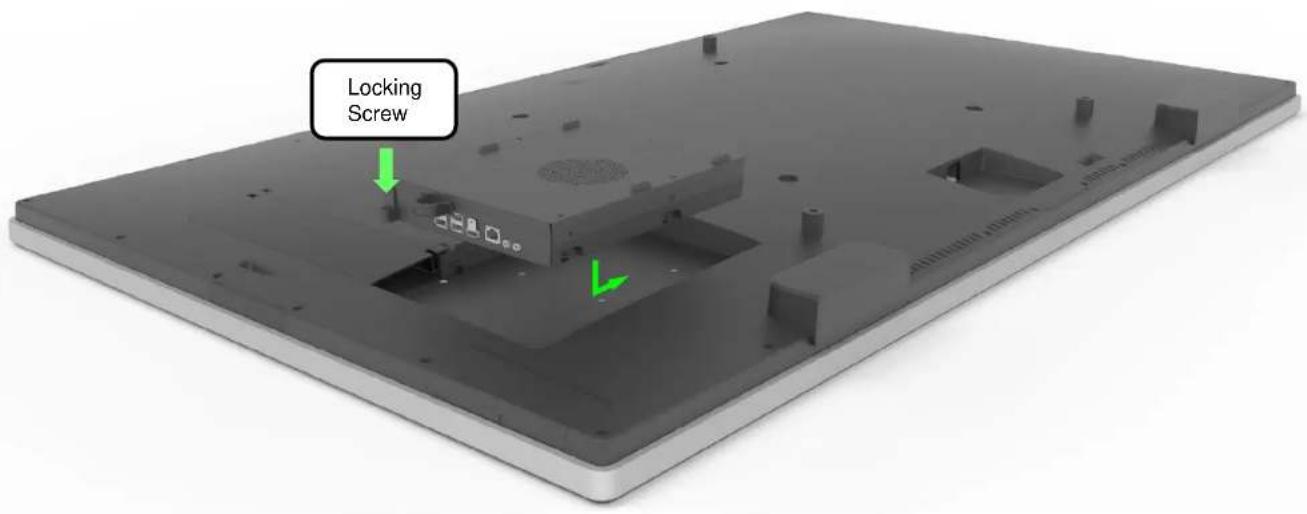
- Slide the ECM down into the docking bay and slide it in to engage the connector. Tighten the locking screw with a philips screwdriver.
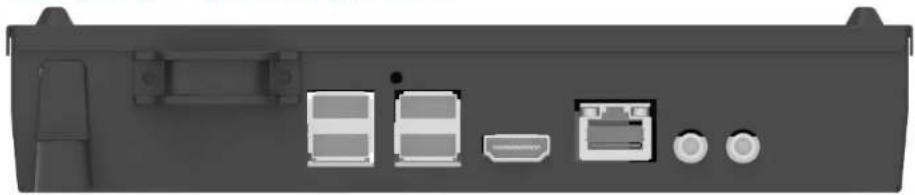
Connector Panel & Interfaces
natural_image
Back view of a computer monitor with four labeled buttons (no text or symbols visible)USB x4
HDMI
Ethernet
Line Out / Microphone
Touchmonitor & Computer Module Connections
- Once the Computer Module has been installed, connect the AC power cable between the touchmonitor's POWER IN connector and the AC power source.
a. NOTE: Computer Module can be installed when the AC power cable is connected (Hot pluggable). Do not remove the Computer Module unless it is completely shut off. - Make any desired connections to the Computer Module connector panel.
- Press the touchmonitor's power button to turn on the Computer Module.
Operating System Setup - Windows 10
The initial setup of the operating system takes approximately five minutes. Additional time might be needed for specifying operating system configurations. During installation, you will be prompted to enter user information. This can be done via touch and the on screen keyboard or you can connect a USB mouse and keyboard to fill in the required information.
To set up the Windows 10 OS for the Computer Module, turn on the touchcomputer and follow the instructions on the screen.
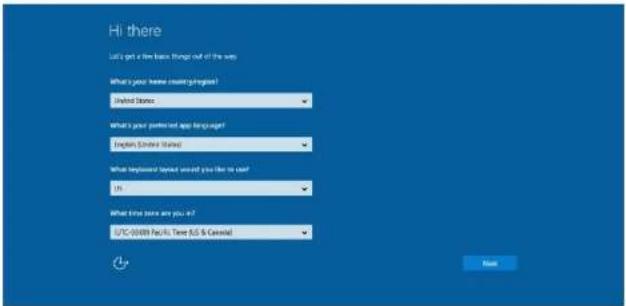
Selecting the Language
Windows will prompt you to select your language of preference. See reference image below.
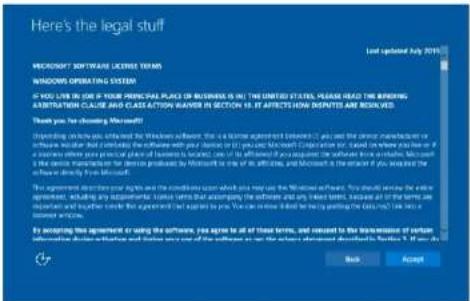
Agreeing to Terms and Conditions
You will be prompted to agree to the Windows license terms. Click "I Accept" to continue.
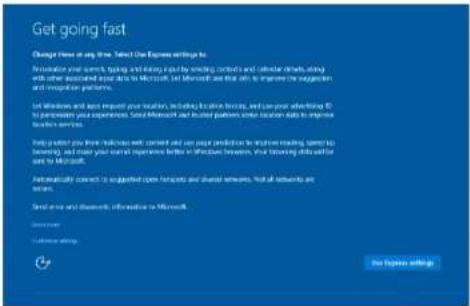
Choosing the Windows Settings
You will be prompted to select the Windows settings
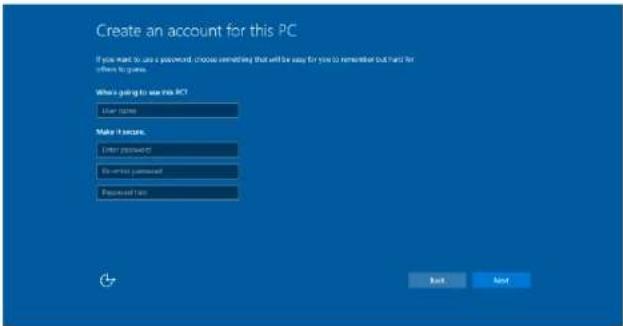
Creating Your Account
You will be prompted to create a Username and Password. Once set up, click "Finish" to complete Setup. See reference image below.
Operating System Setup – No OS
No Operating System (No OS) units will require an operating system to be installed on them.
Load your operating system of choice onto the Computer Module.
Once you have installed an OS image onto your computer, allow the system to automatically install all the available drivers.
You can download the latest Elo Touch Driver from www.elotouch.com and proceed to install that driver onto the computer.
Installing Touchscreen Technology Software Drivers on Elo Computer Modules
Visit the Elo Touch Solutions website www.elotouch.com for:
• The latest versions of our touch drivers
• Additional touch driver information
• Detailed touch driver installation guides
- Touch drivers for other operating systems
Download and install the required touch driver from www.elotouch.com.
Creating the Recovery Flash Drive
All Windows 10 Computer Modules come with the built-in Elo Restore Utility on the Windows Desktop. The utility allows for creation of a recovery flash drive based on the purchased operating system. Please create your recovery flash drive immediately. In the event that the HDD/SSD recovery partition accidentally gets deleted or becomes inaccessible, you can use the recovery flash drive to recover your system.
The following procedures demonstrate how to create a recovery flash drive.
- Right-click on the EloRestoreUtility icon on the Desktop and select "Run as administrator."
![Elo Restore Utility Status: Press [Start] Button to begin ... Message: Set default Operating System Start Exit](/content/2026/05/992112/images/fd22ed3564491ae7af43782cee27a84a3a32119c68cf0ff5eee596df414e8909.jpg)
- Click "Start" button to begin the process.
- Once completed, you will see a pop-up window that will prompt you to insert a blank flash drive to any of the available USB ports on your system. (For Windows 10, use a flash drive with at least 32GB of space available)
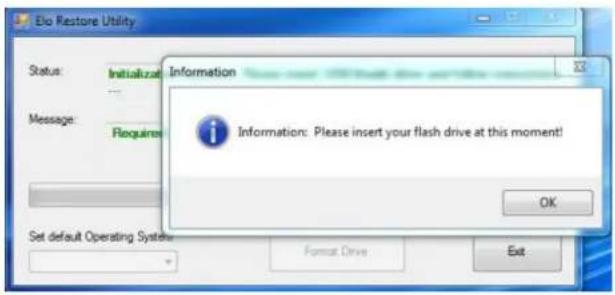
- After the flash drive is plugged in, you will see the below window. Click "Format Drive" to continue the process. PLEASE NOTE THAT THIS WILL ERASE ALL DATA CONTAINED IN THE FLASH.
![Elo Restore Utility Status: Found Drive - D:\ Message: Press [Format Drive] Button to start format process ... Set default Operating System Format Drive Exit](/content/2026/05/992112/images/4c04778ab1a731b7b014ddb94655095c1a5a3b23b9d8c9684a673c1cd5270007.jpg)
![Elo Restore Utility Status: Creating directory structures ... Message: Creation directories success, please press [Create Restore Media] to start restore media creation ... Set default Operating System Create Restore Media Exit](/content/2026/05/992112/images/c1af4605c0c57d7f9bcb35da21c3bf9629a030835e12018a0d3a0d4ad8f6680e.jpg)
-
Click "Create Restore Media" to proceed. This step will take about 10-20 minutes, depending on your system configurations and flash drive performance.
-
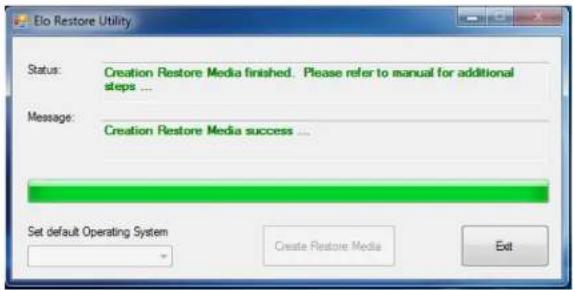
Once the message "Creation Restore Media success..." appears, remove the flash drive and click "Exit" to exit the program.
Recovering the System to factory defaults
If for any reason the touchcomputer's operating system needs to be recovered TO FACTORY SETTINGS, you can recover your system by following procedures below. PLEASE NOTE THAT ALL CUSTOMER SETTINGS AND DATA WILL BE LOST DURING THIS PROCESS. Please be sure to backup all data, settings, and customer-installed software before proceeding.
- Power off your system.
- Power on your system.
-
Plug in the USB drive (created in the previous section) to the computer module.
-
In case the system is crashed and you have to use the recovery flash drive, reboot the system and press F7 several times to enter Device Boot Menu. Then, choose "boot from flash drive". When the following UI is presented, click "Install Recovery Solution" button.
![Elo OS Recovery Solution (64-bit) Actions Install Recovery Solution Capture OS Console Inject Language (Win 7 only) Exit Status Welcome to the Elo OS Recovery Solution! If you previously captured an OS image file (*.win), press [Install Recovery Solution]. Otherwise, press [Capture OS] to create an image of your current operating system. © 2012 RSQUASE Corporation. All rights reserved. v4.0.31.0713](/content/2026/05/992112/images/04c7349e138209718b39291e9c92d14ce1f3b622b9dcb44e6422cf0d75dd022f.jpg)
- Follow the on-screen instructions to complete the installation process and then exit the program.
i. Note: All data will be deleted during the recovery process. User should back up files when necessary. Elo Touch Solutions does not accept liability for lost data or software.
ii. Note: The end user must adhere to Microsoft's Licensing Agreement
Recovering the Operating System
- Select "Restore OS". The system will automatically test your hardware. Once the process completes, click the "Start" button to perform the system recovery function.
![OS Recovery Solution (32-bit) Restore OS Close Recovery Status Ready to Restore OS Current Progress: Overall Progress: Time Elapsed: Start Information This utility will restore the operating system. Please verify the Recovery OS Image file and press [Start] to restore the OS or press [Exit] to return to the main screen: OS Image File: aa32_boot.wim OS Family: Windows 7 WARNING! All data on the OS partition will be lost. © 2012 BSQUARE Corporation. All rights reserved. v3.1.00.0312](/content/2026/05/992112/images/f6ebbaec53738f3e077a70c4ac5c19d2d5b3d6af10f4ae4e5d96cb6ec861a992.jpg)
- The following process will reformat the primary hard drive. Please back up your data before performing the recovery process.
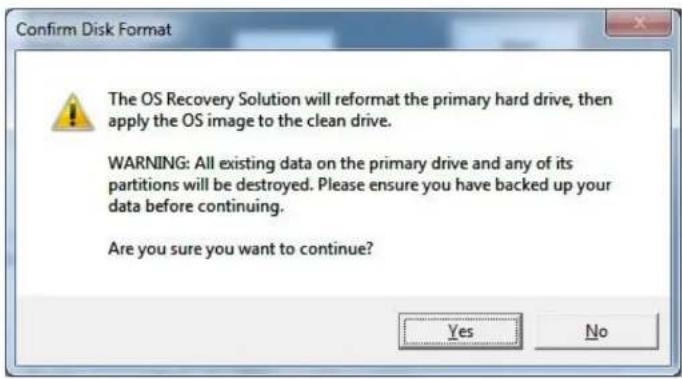
- Once completed, click the "Close" button. The system will return to the main menu of the Elo Recovery Solution. Click the "Exit" button to restart your system.
All data is deleted during the recovery process. The user should back up files when necessary. Elo Touch Solutions does not accept liability for lost data or software.
The end user must adhere to Microsoft's Licensing Agreement.
Software Solutions
The following software solutions are can be used to enhance the experience when using the Elo Computer module with the IDS 6553 or 5553L monitor.
Qwizdom Octopus – Can be used for whiteboard applications and presentations. The user guide for this software is available at https://qwizdomoktopus.com/user-guide/
DisplayNote Montage – Can be used for wireless presentations and collaboration. The details for this software is available at https://www.displaynote.com/solutions/montage
AirServer – Can be used to wireless cast devices to the ECMG4 + IDS6553 Display. Details for the AirServer Application is available at https://www.airserver.com/WindowsDesktop
Section 4: Technical Support
If you are experiencing trouble with your Computer Module, refer to the following suggestions.
If the problem persists, please contact your local dealer or contact Elo Touch Solutions Customer Service.
Solutions to Common Problems
| Problem | Suggested Troubleshooting |
| The Computer Module does not turn on when the power button is pressed. | Disconnect the AC power cable and verify that the Computer Module is properly installedReconnect the AC power cable and turn on the system |
| Audio cannot be heard on external devices | Ensure that the proper source is selected on the monitor OSD.Confirm that the correct audio output port is selected on the Windows OS. |
Technical Assistance
Technical Specifications
visit www.elotouch.com/products for technical specifications for this device
Support
visit www.elotouch.com/support for technical support
See this user manual's last page for worldwide technical support phone numbers.
Technical assistance for Computer Modules running Windows OS are also available on the computer in the Support Information section of the Systems Properties menu. The Systems Properties menu can be accessed by:
- Right-clicking the My Computer icon and selecting Properties from the drop-down menu, or
- Clicking the Start button; go to the Settings -> Control Panel menu and selecting the System icon
Section 5: Safety & Maintenance
Safety
• To avoid risk of electric shock, follow all safety notices and do not disassemble the touchmonitor. They are not user-serviceable.
- The slots located on the sides and top of the touchmonitor case are for ventilation. Do not block or insert anything inside the ventilation slots.
- Ensure that your installation allows touchmonitor to meet specified environmental conditions below:
Environmental conditions for transportation and storage
Temperature:
Operating 0°C to 40°C
Storage/Transportation -20°C to 60°C
Humidity (non-condensing):
Operating 20% to 80%
Storage/Transportation 10% to 90%
Altitude:
Operating 0 to 3,000m
Storage/Transportation 0 to 12,192m
Caution
There is risk of explosion if battery is replaced by an incorrect type. Dispose of used batteries at the end of its useful life according to local laws and regulations.
Waste Electrical & Electronic Equipment Directive (WEEE)
This product should not be disposed of with household waste. It should be deposited at a facility that enables recovery and recycling.
as put in place recycling arrangements in certain parts of the world. For information on how you can access these arrangements, please visit elotouch.com/e-waste-recycling-program/.
Section 6: Regulatory Information
Electrical Safety Information
Compliance is required with respect to the voltage, frequency, and current requirements indicated on the manufacturer's label. Connection to a different power source than those specified herein will likely result in improper operation, damage to the equipment or pose a fire hazard if the limitations are not followed.
There are no operator serviceable parts inside this equipment. There are hazardous voltages generated by this equipment which constitute a safety hazard. Service should be provided only by a qualified service technician.
Contact a qualified electrician or the manufacturer if there are questions about the installation prior to connecting the equipment to mains power.
Emissions and Immunity Information
Notice to Users in the United States:
NOTE: This equipment has been tested and found to comply with the limits for a Class A digital device, pursuant to Part 15 of the FCC Rules. These limits are designed to provide reasonable protection against harmful interference when the equipment is operated in a commercial environment. This equipment generates, uses, and can radiate radio frequency energy and, if not installed and used in accordance with the instruction manual, may cause harmful interference to radio communications. Operation of this equipment in a residential area is likely to cause harmful interference in which case the user will be required to correct the interference at his own expense.
Notice to Users in Canada:
This equipment complies with the Class A limits for radio noise emissions from digital apparatus as established by the Radio Interference Regulations of Industrial Canada.
CAN ICES3(A)/NMB3(A)
This device complies with Industry Canada's license-exempt RSSs. Operation is subject to the following two conditions:
(1) This device may not cause interference; and
(2) This device must accept any interference, including interference that may cause undesired operation of the device.
Notice to Users in the European Union: Use only the provided power cords and interconnecting cabling provided with the equipment. Substitution of provided cords and cabling may compromise electrical safety or CE Mark Certification for emissions or immunity as required by the following standards:
This Information Technology Equipment (ITE) is required to have a CE Mark on the Manufacturer's label which means that the equipment has been tested to the following Directives and Standards: This equipment has been tested to the requirements for the CE Mark as required by EMC Directive 2014/30/EU as indicated in European Standard EN 55032 Class A and the Low Voltage Directive 2014/35/EU as indicated in European Standard EN 60950-1.
General Information to all Users: This equipment generates, uses and can radiate radio frequency energy. If not installed and used according to this manual the equipment may cause interference with radio and television communications. There is, however, no guarantee that interference will not occur in any particular installation due to site-specific factors.
This device complies with part 15 of the FCC Rules. Operation is subject to the following two conditions: (1) This device may not cause harmful interference, and (2) this device must accept any interference received, including interference that may cause undesired operation.
- In order to meet emission and immunity requirements, the user must observe the following:
a. Use only the provided I/O cables to connect this digital device with any computer.
b. To ensure compliance, use only the provided manufacturer's approved line cord.
c. The user is cautioned that changes or modifications to the equipment not expressly approved by the party responsible for compliance could void the user's authority to operate the equipment.
- If this equipment appears to cause interference with radio or television reception, or any other device:
a. Verify as an emission source by turning the equipment off and on. If you determine that this equipment is causing the interference, try to correct the interference by using one or more of the following measures:
i. Move the digital device away from the affected receiver.
ii. Reposition (turn) the digital device with respect to the affected receiver.
iii. Reorient the affected receiver's antenna.
iv. Plug the digital device into a different AC outlet so the digital device and the receiver are on different branch circuits.
v. Disconnect and remove any I/O cables that the digital device does not use. (Unterminated I/O cables are a potential source of high RF emission levels.)
vi. Plug the digital device into only a grounded outlet receptacle. Do not use AC adapter plugs. (Removing or cutting the line cord ground may increase RF emission levels and may also present a lethal shock hazard to the user.)
If you need additional help, consult your dealer, manufacturer, or an experienced radio or television technician.
Agency Certifications
The following certifications and marks have been issued or declared for this monitor:
- Europe CE
• Australia RCM - Canada CUL, IC
- Europe CE
Japan VCCI
• United States FCC, UL
• International CB
China RoHS
In accordance to Chinese law (Management Methods for the Restriction of the Use of Hazardous Substances in Electrical and Electronic Products), the section below lists out the name and amount of the toxic and/or hazardous materials that this product may contain.
Explanation of Markings
In accordance with the SJ/T11364 requirement, electrical and electronic products are marked with the following pollution control logo.
The Environment-Friendly Use Period for this product is 10 years. The product will not leak or mutate under normal operating conditions listed below, so that the use of this electronic information product will not result in any severe environmental pollution, any bodily injury, or damage to any assets.

Operating Temperature: 0-40 / Humidity: 20%-80% (non-condensing).
Storage Temperature: -20\~60 / Humidity: 10%\~90% (non-condensing).
It is encouraged and recommended that product packaging be recycled and reused according to local laws.

Section 7: Warranty Information
For warranty information, go to http://support.elotouch.com/warranty/
Notes
Notes
www.elotouch.com
Visit our website for the latest
• Product Information
- Specifications
- Upcoming Events
- Press Releases
- Software Drivers
- Touchmonitor Newsletter
To find out more about our extensive range of Elo touch solutions, go to www.elotouch.com, or call the office nearest you.
North America
Tel +1 408 597 8000
Fax +1 408 597 8001
customerservice@elotouch.com
Europe
Tel +32 (0)16 70 45 00
Fax +32 (0)16 70 45 49
elosales@elotouch.com
Asia-Pacific
Tel +86 (21) 3329 1385
Fax +86 (21) 3329 1400
eloasia@elotouch.com
Latin America
Tel +52 (55) 2281 69581
elosales.latam@elotouch.com

- Disclaimer
- Trademark Acknowledgments
- Table of Contents
- Section 1: Introduction
- Product Description
- Precautions
- Section 2: Unpacking
- Unpacking the ECMG4
- Section 3: Computer Module Installation
- Installation
- Connector Panel & Interfaces
- Touchmonitor & Computer Module Connections
- Operating System Setup - Windows 10
- Selecting the Language
- Agreeing to Terms and Conditions
- Choosing the Windows Settings
- Creating Your Account
- Operating System Setup – No OS
- Installing Touchscreen Technology Software Drivers on Elo Computer Modules
- Creating the Recovery Flash Drive
- Recovering the System to factory defaults
- Recovering the Operating System
- Software Solutions
- Section 4: Technical Support
- Technical Assistance
- Technical Specifications
- Support
- Section 5: Safety & Maintenance
- Safety
- Environmental conditions for transportation and storage
- Caution
- Waste Electrical & Electronic Equipment Directive (WEEE)
- Section 6: Regulatory Information
- Electrical Safety Information
- Emissions and Immunity Information
- Agency Certifications
- China RoHS
- Explanation of Markings
- Section 7: Warranty Information
- Notes
- www.elotouch.com
Brand : ELO
Model : ECMG4
Category : Uncategorized