
ALRMMW30WT - Motion detector NEDIS - Free user manual and instructions
Find the device manual for free ALRMMW30WT NEDIS in PDF.


| Product Type | Motion Detector |
| Brand | Nedis |
| Model | ALRMMW30WT |
| Detection Technology | Passive Infrared (PIR) |
| Detection Range | 12 m (max) |
| Detection Angle | 180° |
| Power Supply | 3 x AA batteries (4.5 V DC) |
| Battery Life | Up to 1 year (in normal use) |
| Wireless Connectivity | None (standalone) |
| Indoor/Outdoor | Indoor use only |
| Mounting Type | Wall or corner mount |
| Dimensions (H x W x D) | 105 x 60 x 45 mm |
| Weight | 120 g (without batteries) |
| Operating Temperature | -10°C to 40°C |
| Light Sensitivity | Adjustable (day/night) |
| Time Delay | 10 sec to 4 min (adjustable) |
| Alarm Output | Built-in siren (85 dB) |
| LED Indicator | Red LED on detection |
| Material | ABS plastic |
| Color | White |
| Certifications | CE, RoHS |
| Included Accessories | Mounting screws, anchors, manual |
| Maintenance | Clean lens with soft dry cloth; replace batteries when low |
| Safety Instructions | Keep out of reach of children; do not expose to moisture; use only recommended batteries |
| Repairability | Replaceable batteries; no user-serviceable parts |
Frequently Asked Questions - ALRMMW30WT NEDIS
User questions about ALRMMW30WT NEDIS
0 question about this device. Answer the ones you know or ask your own.
Ask a new question about this device
Download the instructions for your Motion detector in PDF format for free! Find your manual ALRMMW30WT - NEDIS and take your electronic device back in hand. On this page are published all the documents necessary for the use of your device. ALRMMW30WT by NEDIS.
USER MANUAL ALRMMW30WT NEDIS
Wall alarm with remote control
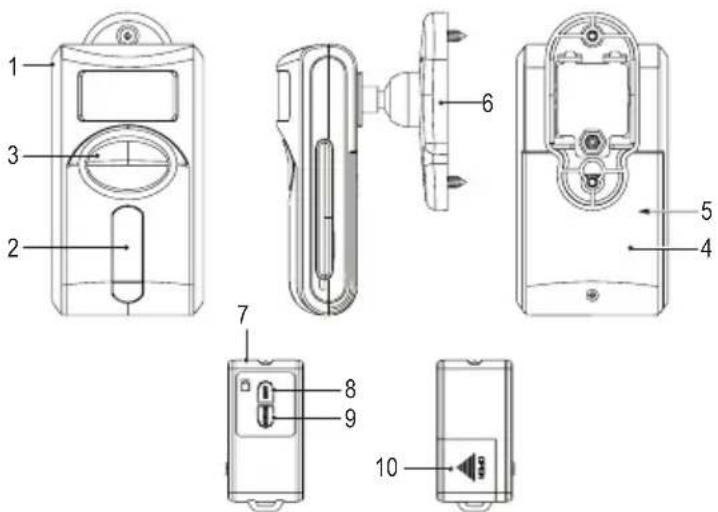
Description
English
The wall alarm is a battery-powered security device which is mounted to the wall.
| 1. PIR motion detector | Notes:The effective detection range depends on the height and may vary in different environmental conditions.Any obstructions in the environment will reduce the detector's effectiveness.Small animals can trigger the detector. |
| 2. LED indicator | |
| 3. Mode selection switch | Use the switch to select the mode (alarm mode / chime mode). |
| 4. Battery compartment | If the battery level is low, the LED indicator will flash slowly to indicate that the batteries must be replaced immediately.Open the battery compartment.Insert the batteries (3x AA) into the battery compartment.Close the battery compartment. |
| 5. Learning button | To pair the remote control with the detector, use a screwdriver to press the learning button. Aim the remote control at the front of the detector. The LED indicator flashes slowly to indicate that the detector is in learning mode.Press a button on the remote control. The detector will beep to indicate that the pairing is successful. |
| 6. Mounting bracket | |
| 7. Remote control | |
| 8. Arming button | Press the button to arm the detector. |
| 9. Disarming button | Press the button to disarm the detector. |
| 10. Battery compartment | Open the battery compartment.Insert the battery (CR2032) into the battery compartment.Close the battery compartment. |
Installation
• Mount the detector in a location where the remote control has a clear line of sight to the detector.
• Mount the detector to the wall at a height between 1.8 and 2.4 metres.
Do not install the device outdoors.
Do not install the device in direct sunlight.
Do not install the device in locations with high humidity, such as bathrooms and swimming pools.
Do not install the device within detection range of devices which emit heat or cold (e.g. air conditioners, refrigerators, ovens, heaters, microwaves or other electronic equipment which generates heat as a by-product of operation).
• Install the mounting bracket to the wall using the supplied screws.
- Secure the detector to the mounting bracket.
Use
Alarm mode
If the detector is triggered in alarm mode, the alarm will sound with a 30-second delay. If the detector is not disarmed within 30 seconds, the alarm will sound at full volume. To disarm the detector, press the disarming button on the remote control.
Chime mode
If the detector is triggered in chime mode, the chime will sound immediately. After the chime sounds, there is a short delay before the chime will sound again. To disarm the detector, press the disarming button on the remote control.
Panic alarm
For an immediate alarm with no delay, aim the remote control at the front of the detector. Simultaneously press and hold the arming button and the disarming button for 2 seconds. The alarm will sound. Release the arming button and the disarming button. To deactivate the panic alarm, aim the remote control at the front of the detector and press and hold the disarming button until the alarm stops.
Entry and exit delays
If the detector is armed, it will enter an arming delay of 45 seconds. The LED indicator will flash. After the arming delay has elapsed, the detector will beep once to indicate that it is armed. If the detector is triggered, the alarm will sound with a 30-second delay. If the detector is not disarmed within 30 seconds, the alarm will sound at full volume. To disarm the detector, press the disarming button on the remote control.
Technical data
PIR motion detector
| Battery type | AA, 1.5 V DC (3x) (not included) |
| Battery standby time | 12 months |
| Detection range | 6 m |
| Detection area | 110° horizontally, 70° vertically |
| Operating temperature | 0 °C ~ 50 °C |
| Relative humidity | 10% ~ 70% (non-condensing) |
| Alarm mode | |
| Noise level | >85 dB |
| Alarm duration | 30 s |
| Entry delay | 30 s |
| Exit delay | 45 s |
| Re-trigger delay | 5 s |
| Chime mode | |
| Noise level | >90 dB |
| Chime duration | 2 s |
| Re-trigger delay | 2 s |
Remote control
| Battery type | CR2032, 3 V DC (included) |
| Battery standby time | 12 months |
| Transmission range | ≥ 6 m |
| Transmission area | ≤ 60^ |
| Operating temperature | 0 ^ C – 50 ^ C |
| Relative humidity | 10% – 70% (non-condensing) |
Safety
• Read the manual carefully before use. Keep the manual for future reference.
• Only use the device for its intended purposes. Do not use the device for other purposes than described in the manual.
• Do not use the device if any part is damaged or defective. If the device is damaged or defective, replace the device immediately.
Battery safety
• Use only the batteries mentioned in the manual.
Do not use old and new batteries together.
Do not use batteries of different types or brands.
Do not install batteries in reverse polarity.
• Do not short-circuit or disassemble the batteries.
Do not expose the batteries to water.
Do not expose the batteries to fire or excessive heat.
Batteries are prone to leakage when fully discharged. To avoid damage to the product, remove the batteries when leaving the product unattended for longer periods of time.
• If liquid from the batteries comes into contact with skin or clothing, immediately rinse with fresh water.
Cleaning and maintenance
Warning!
• Do not use cleaning solvents or abrasives.
• Do not clean the inside of the device.
Do not attempt to repair the device. If the device does not operate correctly, replace it with a new device.
• Clean the outside of the device using a soft, damp cloth.
Beschrijving
Brand : NEDIS
Model : ALRMMW30WT
Category : Motion detector