
BTPRC250 - Frying Pan Bellini - Free user manual and instructions
Find the device manual for free BTPRC250 Bellini in PDF.


| Brand | Bellini |
| Model | BTPRC250 |
| Product Type | Electric Pressure Cooker |
| Capacity | 6 liters (maximum fill level 5 liters) |
| Power Supply | AC 220-240 V ~ 50 Hz |
| Power Consumption | 1000 W |
| Main Functions | Rice, Soup, Chicken, Meat, Porridge, Fish, Bean, Cake, Reheat, Manual cook (2-99 min), Timer (0.5-24 h), Keep Warm |
| Pressure Release Methods | Natural Pressure Release, Quick Pressure Release |
| Safety Features | Open-and-Close Lid Safety, Pressure Control, Pressure Regulator Valve, Anti-block Inner Lid, Pressure Relief, Thermostat, Thermal Fuse |
| Display Type | LED display with cooking indicators |
| Controls | Touch buttons: Warm/Cancel, +/-, Rice, Bean, Fish, Porridge, Soup, Chicken, Meat, Cake, Reheat, Timer, Manual Cook |
| Inner Pot Material | Metal with non-stick coating |
| Included Accessories | Measuring cup, rice scoop, detachable inner lid, condensation collector, power cord |
| Cleaning | Hand wash inner pot, lid, and accessories; wipe outer body with damp cloth; do not immerse main body in water |
| Repairability | No user-serviceable parts; contact qualified service personnel or consumer service center (1300 373 199) |
| Warranty / Manufacturer | GSM International Ltd., made in China |
Frequently Asked Questions - BTPRC250 Bellini
User questions about BTPRC250 Bellini
0 question about this device. Answer the ones you know or ask your own.
Ask a new question about this device
Download the instructions for your Frying Pan in PDF format for free! Find your manual BTPRC250 - Bellini and take your electronic device back in hand. On this page are published all the documents necessary for the use of your device. BTPRC250 by Bellini.
USER MANUAL BTPRC250 Bellini
Important Safeguards
When using electrical appliances, in order to reduce the risk of fire, electric shock, and/or injury to persons, basic safety precautions should always be followed, including:
Read this user manual carefully before you use the appliance, and save it for future reference.
Dangerous high voltages are present inside this enclosure. To avoid electric shock, DO NOT open the case, refer servicing to qualified personnel only.
Do not use this appliance for anything other than its intended use.
This appliance is not intended to be operated by means of an external timer or a separate remote-control system.
The appliance is intended to be used in household or similar applications such as:
- staff kitchen areas in shops, offices and other residential type environments;
- farm houses;
- by clients in hotels, motels and other residential type environments;
- bed and breakfast type environments.
Position instructions
Do not use this appliance outdoors. This appliance is for household use only and not for commercial or industrial use.
Do not expose the appliance to direct sunlight. Place the appliance on a stable, horizontal, and level surface.
Do not operate or place any part of the appliance on or near any hot surfaces (such as a hot gas or electric burner, or in a heated oven).
Do not place objects filled with water (e.g. vases) on or near the appliance.
Do not place objects with open flames (e.g. candles) on top of or beside the appliance.
Do not operate under or near flammable materials, such as curtains, drapes or any other combustible materials.
Do not expose the appliance to high temperatures, nor place it on a working or still hot stove or cooker.
Do not use under hanging cabinets as steam from pressure release may cause damage.
Do not cover the appliance – heat and steam must be able to be released without obstruction.
Always -
Always put the inner pot in the appliance before you put the plug in the power outlet and switch it on.
When pressure is being released from the pressure regulator valve, hot steam or liquid will be ejected. Keep hands and face away from the steam vent.
The accessible surfaces may become hot when the appliance is operating. Take extra caution when touching the hot surfaces.
Make sure that the sealing ring is clean and in good condition.
Only use the cooking utensils provided. Avoid using sharp utensils.
Always clean the appliance after use. Do not clean the appliance in dishwasher.
Always unplug the appliance if not used.
Before each use, check that the valves and vents are not obstructed. Always let the appliance cool down to room temperature before you clean or move it. Let the appliance cool completely before storing.
Do not -
Never use the appliance without water, as this could cause serious damage (except when in Cake mode).
Never leave the appliance unattended during use.
Do not leave the rice scoop or other objects in the outer pot. Do not place the cooking utensils inside the pot while cooking.
Do not use the inner pot with different pots or accessories. Do not use the inner pot if it is deformed.
Do not place rice in cooking bags inside the appliance.
Do not use this pressure cooker for frying oil.
Do not lift and move the appliance while it is operating.
Do not place a magnetic substance on the lid. Do not use the appliance near a magnetic substance.
Do not allow the power cord to hang over the edge of a table or counter, or touch hot surfaces.
Do not place heavy objects on top of the appliance.
Do not place the inner pot directly over an open fire to cook food.
Do not operate the appliance with a damaged power cord or plug; if the appliance malfunctions; or if it is dropped or damaged in any manner.
Connect the appliance to a suitable wall outlet (AC 240V\~50Hz)
This appliance is intended to be plugged in a standard domestic power outlet only.
Before connecting, check that the power supply voltage and current rating corresponds with the power supply details shown on the appliance rating label.
Make sure the heating element, the temperature sensor, and the outside of the inner pot are clean and dry before you put the plug in the power outlet.
Lay out the cord in such a way to avoid unintentional pulling or tripping hazards. If an extension cord is used, its capacity needs to be suitable for the power consumed by the appliance.

Only use an "Earthed" outlet
This appliance is classified as protection class I and must be connected to an earthed outlet.
Always make sure that the plug is inserted firmly into the power outlet.
To avoid damaging the cord, do not squeeze, bend or chafe it on sharp edges. Also take care to keep it away from hot surfaces and open flames.

natural_image
Simple line drawing of an electrical outlet with a warning symbol (no text or labels)Never use any accessories or parts which are not recommended by the manufacturer
The use of attachments or accessories not recommended or sold by the manufacturer can cause fire, electric shock or injury.
Only use the supplied utensils or a plastic or wooden scoop to remove food from the appliance. Only use the removable inner pot supplied.
Never add any additional weight on the pressure regulator valve or replace the pressure regulator valve with another object.

natural_image
Illustration of two cooking pots with heat exchanger and warning symbol (no text or labels)Do not use a damaged power cord
If the supply cord is damaged, it must be replaced by a qualified electrician.
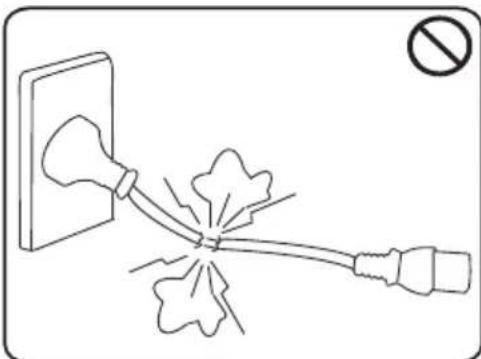
natural_image
Simple line drawing of a lamp emitting sparks from a fuse, with no text or symbols present.Do not insert foreign objects
Do not insert any foreign objects into the inside of the casing.
Do not open the appliance casing under any circumstances.

natural_image
Line drawing of a hand holding a rice cooker with a handle, no text or symbols presentKeep away from children
This appliance is not intended for use by persons (including children) with reduced physical, sensory and mental capabilities, or lack of experience and knowledge, unless they have been given supervision or instruction concerning use of the appliance by a person responsible for their safety.
Children should be supervised to ensure that they do not play with the appliance. Keep the appliance and its cord out of reach of children.
Close supervision is necessary when the pressure cooker is used near children. It is not intended for use by children.
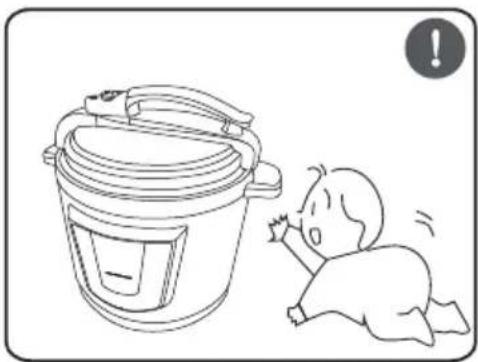
natural_image
Illustration of a baby crawling next to a cooking pot with a warning symbol (no text or labels)Do not immerse in water
Do not immerse the appliance in water, nor rinse it under the tap.
To protect against the risk of electric shock, DO NOT IMMERSE the plug, power cord or the electrical parts of the appliance in water or any other liquids.

natural_image
Line drawing of a rice cooker with a faucet and water tap symbol (no text or labels)Before removing the lid, always ensure:
The internal pressure is completely reduced and no steam escapes form the vents. The floater valve drops down.
Wear oven gloves when rotating Pressure regulator valve to "OPEN" position to avoid injury from steam release.
Avoid scalding from escaping steam when
opening the lid. Keep hands and face away from steam release vents when releasing pressure. Warning:
NEVER ATTEMPT TO OPEN LID WHILE THE UNIT IS OPERATING. Do not open the pressure cooker until the unit has cooled and all internal pressure has been released. If the lid is difficult to rotate, this indicates that the cooker is still pressurized. Do not force it to open. Any pressure in the cooker can be hazardous.
Do not open the lid with external force when the floater valve has not sunk.
When cooking soup or viscous liquid, do not release pressure by turning the pressure regulator valve to "OPEN" position immediately after cooking, otherwise liquid might spurt from the pressure regulator valve. Wait until the pressure is naturally released and the floater valve has dropped to open the top lid.

natural_image
Line drawing of a hand placing a lid onto a cooking pot with a prohibition symbol (no text or labels)Do not touch with wet hands.
Do not plug in the appliance or touch the control panel with wet hands or while standing on a wet floor as this may cause an electric shock.

natural_image
Illustration of a hand holding an electrical plug with a socket, next to a wall socket (no text or symbols)Pull the power plug, not the cable
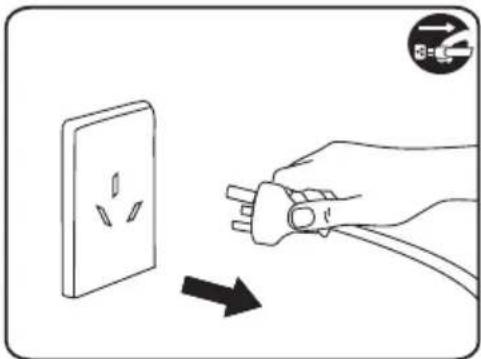
Do not grasp the power cable when pulling the power plug out of the wall outlet. Never carry the appliance by the power cord.
Do not wrap the power cable around the appliance.

natural_image
Illustration of a hand using a screwdriver to plug an electrical outlet with a no-smoking symbol (no text or labels)Disconnect the power plug
Switch off the power outlet and remove the plug before cleaning or when not in use.
To unplug, grasp the plug and pull from the power outlet. Never pull the power cord.
Keep face and hands away from the vents
This appliance cooks under pressure and improper use may result in scalding injuries.
Keep a safe distance from the appliance and take special care when opening the lid.
Beware of hot steam coming out of the floater valve and pressure regulator valve during cooking or out of the appliance when you open the lid. Keep hands and face away from the appliance to avoid the steam.
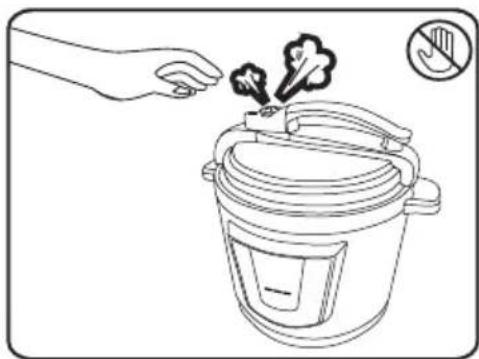
natural_image
Line drawing of a cooking pot with steam rising, hand pointing to it, and no text or symbols presentWARNING: Steam may condense on the underside of the lid. Caution should be taken when removing the lid as hot liquid may fall from the lid. Always first tilt the lid towards the Pressure Cooker bowl to catch any excess hot liquid.
Do not place any food or liquids into the outer pot
Always place food and liquids in the inner pot.
Make sure that the exterior of the outer pot and inside of the appliance is cleaning and dry. Residue between the inner pot and heating plate might overheat and burn.

natural_image
Illustration showing cooking steps: adding a pot, dropping liquid, and using a hand to clean water (no text or symbols)Do not exceed the Full marking
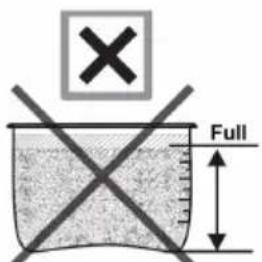
Do not fill the inner pot beyond the Full marking indicated in the inner pot to prevent overflow at any time.
When cooking foods that expand during cooking, such as dried vegetables, legumes, beans, and grains, do not fill the unit over 1/2 full. Overfilling may cause a risk of clogging the pressure regulator valve and create excess pressure.

Do not touch hot parts of the appliance
During use, the appliance becomes hot. Use with care.
Do not touch hot surfaces of pressure cooker. Touch the control panel and use handles only.

natural_image
Line drawing of a hand placing a cooking pot with a crossed lid, no text or symbols presentWhen moving, hold the product by its handles
Extreme caution must be used when moving the appliance containing hot liquids or foods.
Do not touch hot surfaces.

natural_image
Illustration of two hands using a portable stove or cooking pot with a 'no' symbol, no text or labels present.Do not use a damaged appliance!
If the appliance is malfunctioned or damaged, disconnect it from the wall outlet and seek advice from qualified personnel only.
- Do not use the appliance if the plug, the power cord, the inner pot, the sealing ring, or the main body is damaged.
- Do not use the appliance if too much air or steam is leaking from under the top lid.
- Do not use the appliance if steam releases around the lid during the cooking process.

natural_image
Line drawing of a cooking pot with a magnified inset showing two small objects (no text or symbols)Do not repair the appliance
Do not attempt to repair, disassemble or modify the appliance. There are no user serviceable parts. Danger of electric shock! In case of malfunction, repairs are to be conducted by qualified personnel only.

natural_image
Line drawing of a rice cooker with a hand holding a tool, no text or symbols presentWarning
If the supply power cord is damaged, the power cord must be replaced by the manufacturer, its service agent or similarly qualified persons in order to avoid a hazard.
This product has not been designed for any uses other than those specified in this booklet.
Do not remove any operations warning labels from the appliance , these should remain as an operation safeguard and to also guide users that maybe unfamiliar with the use the appliance.
Package contents
Please make sure the following items are included in package. If any item is damaged or missing, contact your dealer.

Save These Instructions
Overview
Product overview

Controls overview

Control buttons description
1. Warm/Cancel button
This button serves two functions:
a. Press to keep food warm for an indefinite period of time.
b. Press to cancel cooking process during operation. Previously selected cooking mode or times will be cancelled and return to Standby mode.
2. '+' and '-' buttons
Press these buttons to:
a. Manually set any cooking time between 2 and 99 minutes at 1 minute intervals after having pressed Manual cook button.
b. Increase or Decrease the desired cooking time after the cooking mode is selected (under cook or over cook).
c. Set timer (After pressing Timer button) for delay cooking start.
Note: you can either press +/- button repeatedly to increase or decrease time or hold the button to speed scroll to desired time setting.
3. Rice, Bean, Fish, Porridge, Soup, Chicken, Meat, Cake and Reheat buttons
To activate the required cooking mode by simply pressing cooking modes button on the control panel. The corresponding indicator lights up red.
Note: Reheat Function is specifically for reheat previously cooked foods, the default time is 10 minutes.
4. Timer button
This appliance is equipped with a 24-hour timer, which can be used for all cooking modes except Cake mode.
The preset timer is available from 0.5 hour to 24 hours at 0.5 hour intervals.
After the cooking mode is selected, press this button to preset the delayed cooking time (in conjunction with +/- Buttons).
The unit will start cooking automatically when set time has elapsed.
5. Manual cook button:
Press this button to manually select pressure cooking time from 2-99 minutes (in conjunction with +/- buttons) to have independent control.
Functions overview
| Pressure cooking functions | ||
| Cooking functions | Default pressure keeping time (minute) | Pressure keeping time regulating range (minute) |
| Soup 25 15-40 | ||
| Chicken 30 15-35 | ||
| Meat 21 15-30 | ||
| Cake 30 30-50 | ||
| Rice | 8 (1-3 cup) 8-16 | |
| 12 (4-7 cup) 8-16 | ||
| 15 (8-12 cup) 8-16 | ||
| Bean 40 15-50 | ||
| Fish 8 5-15 | ||
| Porridge 18 8-24 | ||
| Manual | 2 2-99 | |
| Reheat | 10 5-15 | |
Keep Warm Function
After cooking is finished, the corresponding indicator goes out. The appliance will beep 5 times and automatically enters the Keep Warm mode. The Keep Warm/Cancel indicator lights up yellow and "0000" is shown on the display screen.
WARNING:
The keep-warm mode does not switch off automatically. For optimal results and taste, we do not recommend using the keep warm mode for longer than 8 hours at any cooking mode.
Setting the Timer
You can preset the delayed cooking time for all cooking modes except Cake mode.
After the cooking mode is selected, press Timer button within 8 seconds, the hour unit "0.5" Hour digits will appear on display and starts flashing. Press + /- buttons to adjust the delayed cooking time from 0.5 hour to 24 hours at 0.5 hour intervals. The electric pressure cooker will start cooking automatically when set timer has elapsed.
To Stop or Cancel
During cooking, you can press Warm/Cancel button to end the keep-warm mode. During set up process, you can press Warm/Cancel button to cancel the settings if any incorrect cooking modes or times is selected. The appliance will return to Standby mode.
Using the appliance
Before First Use
Remove any packaging materials from your electric pressure cooker.
Take out all accessories from the inner pot. Clean the parts of the electric pressure cooker thoroughly before using it for the first time (see Chapter "Care and Cleaning").
Make sure all parts are completely dry before you start using the electric pressure cooker.
Preparations before cooking
Before using the electric pressure cooker to cook food, follow below preparation steps:
- Place the appliance on a stable, level and heat-resistant surface where you intend to cook.
- Hold the lid handle and turn it clockwise until the top lid cannot move any more, then lift up the top lid.
• Take out the inner pot from the electric pressure cooker and put the pre-washed food in the inner pot. - Wipe the outside of the inner pot dry, and then put it back into the electric pressure cooker.
- Place the top lid onto the electric pressure cooker and turn it anti-clockwise till the top lid is properly locked.
- Position the pressure regulator valve in the "CLOSE" position. Make sure the floater valve on the top lid drops down before cooking.
Note: For the best results, before each use make sure that:
- The sealing ring is not damaged and properly assembled around the edge of the detachable inner lid.
- The pressure regulator valve and floater valve are clean and not blocked.
- The condensation collector is assembled correctly on rear of the appliance.
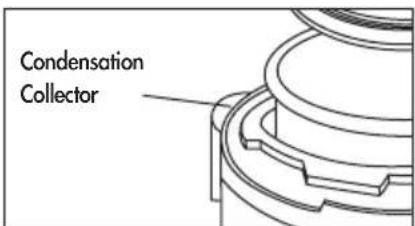
- The outside of the inner pot is dry and clean, and that there is no foreign residue on the heating element.
- The inner pot is in proper contact with the heating element.
Instructions for Use
This appliance cooks under pressure. Improper use may result in scalding injury.
1. Adding ingredients before cooking
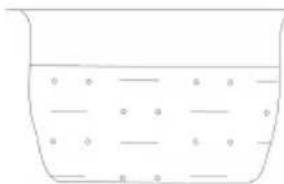
a. Do not fill the inner pot with less than 1/5 or more than 4/5 full of food and liquid which indicated by level mark inside the cooking pot as "4/5" or "Full".
The maximum volume of both food and liquid is approximate 5 litres.
natural_image
Simple line drawing of a container with liquid and floating objects inside (no text or symbols)4/5

natural_image
Simple line drawing of a container with liquid and floating objects inside (no text or symbols)1/2
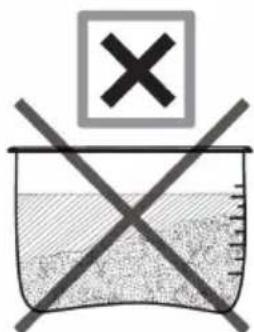
b. For food that expands during cooking such as dried vegetables, beans, rice or grains (these ingredients expand a lot with absorption of liquid), do not fill the inner pot with more than 1/2 full of food and liquids.
The maximum volume of expands ingredients and liquid is approximate 3 litres.

c. For rice cooking, follow the water level indications on the inside of the inner pot to add raw rice and water. From 2-12 cups of rice can be cooked at a time. "cup" or "cups" refers to the measuring cup provided with the appliance."
For cooking rice, do not exceed the "12" cups mark indicated on the inside of the inner pot.
Note: Always ensure the ingredients is spread evenly across the bottom of the inner pot and not heaped to one side.

2. Releasing pressure after cooking
After cooking is completed and before the lid is opened, the pressure from the appliance needs to be released. There are two techniques for doing this:
Natural Pressure Release –
Following pressure cooking, allow the unit to remain on Keep Warm. The pressure will begin to drop – time required for the pressure to drop depends on the amount of liquid in the pressure cooker and the length of time for which that pressure was maintained.
Natural Pressure Release takes approximately 12 to 30 minutes. Cooking will continue during this time, therefore it is recommended for certain cuts of meats, and some desserts.
When pressure is fully released, the Floater Valve (Pressure Indicator) drops.
Quick Pressure Release –
Turn the Pressure regulator Valve to the OPEN position and allow the steam and pressure to escape, only do this with the aid of tongs or by wearing oven mitts.
Steam will immediately begin to release through the valve vents.
Keep face, hands and forearms away from steam when it is releasing.
Do not release the pressure with the appliance positioned under overhanging cabinets, as these can be damaged by the steam.
When pressure is fully released, the Floater Valve (Pressure Indicator) drops.
WARNING:
When cooking soup or viscous liquid, do not release pressure by turning the pressure regulator valve to "OPEN" position immediately after cooking, otherwise liquid might spurt from the pressure regulator valve.
Wait until the pressure is naturally released and the floater valve has dropped to open the top lid.
3. Opening the lid in a safe manner

Warning! Danger of scalding!
This appliance cooks under pressure. Improper use may result in scalding injuries.
Keep a safe distance from the appliance and take special care when opening the lid!
Do not open the lid until the pressure is fully released and the pressure floater valve is completely drops down.
Never remove the pressure regulator when it is releasing pressure.
Use extreme caution when releasing pressure. Use tongs, similar utensils or oven mitts to turn the Pressure Regulator valve to the OPEN position.
Keep face, hands and forearms away from steam release vents when releasing pressure.
For large quantities of foods and liquid type food (e.g. porridge), do not set the Pressure Regulator release valve to "OPEN" position immediately after the cooking is finished, as the fluid food might spurt through the vent pipe and cause burns. Instead, use the natural pressure release method and wait until the floater valve drops.
After confirming that the Floater Valve (Pressure Indicator) is completely down, grasp the lid handle and open the lid by turning it clockwise and lift to remove. Take care to keep face, hands and forearms away from steam release vents until pressure is completely released.

natural_image
Technical illustration of a cooking pot with an inset showing a mechanical assembly (no text or symbols)Note: During the Keep Warm period, a little condensation will settle in the upper rim of the appliance, this is as a result of the appliance naturally de-pressurizing during the first halve hour in Keep Warm Mode, this is normal. Take special care when opening the lid.
Pressure cooking

Warning! Danger of scalding!
This appliance cooks under pressure. Improper use may result in scalding injuries.
Keep a safe distance from the appliance and take special care when opening the lid!
Rice
- Follow the steps in "preparations before cooking".
- Turn the pressure regulator to "CLOSE" position.
- Insert the connector of power cord to the socket of the pressure cooker and put the plug into to the wall power outlet. Switch Power outlet on, the appliance is now in Standby Mode.
- Press RICE button, both Rice cooking indicator and default rice capacity 4-7 cup indicator are illuminated. The default pressure keeping time "0012" appears on LED Display and start to flash, "12" indicators the pressure keeping time is 12 minutes.
• Within 8 seconds after pressing the Rice button,
- According to the uncooked rice which you want to cook, press Rice button repeatedly to select the rice capacity options (8-12 cup 1-3 cup 4-7 cup as a cycle).
- And then you can press + or - buttons to set a different pressure keeping time if you prefer an alternative cooking time (The adjustment time range is 8-16 minutes).
- You can also press Timer and + or – buttons to set the delayed cooking time. (refer to "Setting the timer" section)
Note: If no button is pressed within 8 seconds, the appliance activates the selected mode automatically.
- The cooking process will start automatically after 8 seconds flashing time or preset timer has elapsed.
- During cooking, the appliance will beep 1 time when the working pressure is reached and the pressure keeping time will start counting down.
- When the pressure keeping time has elapsed, the electric pressure cooker will beep 5 times and automatically switch to keep warm mode. The Rice cooking indicator goes out and the Warm/Cancel indicator lights up yellow.
- After the cooking is finished, you can press the Warm/Cancel button to turn off the keep warm function and unplug the appliance immediately after use.
Note: The Warm/Cancel button can be pressed at any time during cooking to cancel the operation.
- Before opening the lid, make sure to release the pressure from the inside of the appliance (refer to "Releasing pressure after cooking" section).
Tips for cooking rice:
- Measure the rice with the measuring cup provided. In the instructions below "cup" or "cups" refers to the measuring cup provided with the appliance.
- The cup should be full but not heaped. From 2-12 cups of rice can be cooked at a time.
- Wash the rice thoroughly. Use a separate container to wash the rice to avoid damaging the surface of the inner pot. Ensure rice has been thoroughly rinsed with cold water before cooking to prevent rice grains from sticking to the inner pot. Repeat the process until the water appears clear. This process also helps to remove any starch and excess residue.
- Put the pre-washed rice in the inner pot.
- Add water to the level indicated on the scale inside the inner pot that corresponds to the number of cups of rice used. Do not exceed the "12" cups mark indicated on the inside of the inner pot. Then smooth the rice surface.
For instance, if you cook 4 cups of rice, add water up to the 4-cup level indicated on the scale.
Note: The level marked inside the inner pot is just an indication. You can always adjust the amount of rice or the water level for different types of rice and your own preference.
- Let the raw rice soak for 5-10 minutes prior to cooking – this will make the rice softer when it is cooked.
Note: During cooking 8-12 cups rice, the heating will be interrupted 2 minutes for 2 times to allow the rice to suck enough water, it is normal to get an optimal rice texture.
- To get an optimal rice texture and moisture level, allow the unit to remain on "Keep-Warm" mode for several minutes after cooking, but it is not recommended to leave rice on "Keep-Warm" mode for a long period of time to prevent your rice from drying out or discolouring.
The table below shows the suggest keep warm time for rice after cooking (for reference only)
| 1-3 cups | 4-7 cups | 8-12 cups | |
| Keep warm time (in minute) | 5-15 15-30 | 30-60 |
Beware of the hot steam, use caution when opening the lid as steam escaping will be extremely hot.
Soup
- Follow the steps in "preparations before cooking".
- Turn the pressure regulator to "CLOSE" position.
- Insert the connector of power cord to the socket of the pressure cooker and put the plug into to the wall power outlet. Switch Power outlet on, the appliance is now in Standby Mode.
- Press SOUP button, the Soup cooking indicator will illuminated. The default pressure keeping time "0025" appears on LED Display and start to flash, "25" indicators the pressure keeping time is 25 minutes.
- Within 8 seconds after pressing the Soup button,
- You can press + or - buttons to set a different pressure keeping time if you prefer an alternative cooking time (The adjustment time range is 15-40 minutes).
- You can also press Timer and + or - buttons to set the delayed cooking time. (refer to "Setting the timer" section)
Note: If no button is pressed within 8 seconds, the appliance activates the selected mode automatically. - The cooking process will start automatically after 8 seconds flashing time or preset timer has elapsed.
- During cooking, the appliance will beep 1 time when the working pressure is reached and the pressure keeping time will start counting down.
- When the pressure keeping time has elapsed, the electric pressure cooker will beep 5 times and automatically switch to keep warm mode. The Soup cooking indicator goes out and the Warm/Cancel indicator lights up yellow.
- After the cooking is finished, you can press the Warm/Cancel button to turn off the keep warm function and unplug the appliance immediately after use.
Note: The Warm/Cancel button can be pressed at any time during cooking to cancel the operation.
- Before opening the lid, make sure to release the pressure from the inside of the appliance (refer to "Releasing pressure after cooking" section).
Chicken
- Follow the steps in “preparations before cooking”.
- Turn the pressure regulator to "CLOSE" position.
- Insert the connector of power cord to the socket of the pressure cooker and put the plug into to the wall power outlet. Switch Power outlet on, the appliance is now in Standby Mode.
- Press CHICKEN button, the Chicken cooking indicator will illuminated. The default pressure keeping time "0030" appears on LED Display and start to flash, "30" indicators the pressure keeping time is 30 minutes.
- Within 8 seconds after pressing the Chicken button,
- You can press + or - buttons to set a different pressure keeping time if you prefer an alternative cooking time (The adjustment time range is 15-35 minutes).
- You can also press Timer and + or - buttons to set the delayed cooking time. (refer to "Setting the timer" section)
Note: If no button is pressed within 8 seconds, the appliance activates the selected mode automatically.
- The cooking process will start automatically after 8 seconds flashing time or preset timer has elapsed.
- During cooking, the appliance will beep 1 time when the working pressure is reached and the pressure keeping time will start counting down.
- When the pressure keeping time has elapsed, the electric pressure cooker will beep 5 times and automatically switch to keep warm mode. The Chicken cooking indicator goes out and the Warm/Cancel indicator lights up yellow.
- After the cooking is finished, you can press the Warm/Cancel button to turn off the keep warm function and unplug the appliance immediately after use.
Note: The Warm/Cancel button can be pressed at any time during cooking to cancel the operation.
- Before opening the lid, make sure to release the pressure from the inside of the appliance (refer to "Releasing pressure after cooking" section).
Meat
- Follow the steps in "preparations before cooking".
- Turn the pressure regulator to "CLOSE" position.
- Insert the connector of power cord to the socket of the pressure cooker and put the plug into to the wall power outlet. Switch Power outlet on, the appliance is now in Standby Mode.
- Press MEAT button, the Meat cooking indicator will illuminated. The default pressure keeping time "0021" appears on LED Display and start to flash, "21" indicators the pressure keeping time is 21 minutes.
- Within 8 seconds after pressing the Meat button,
- You can press + or - buttons to set a different pressure keeping time if you prefer an alternative cooking time (The adjustment time range is 15-30 minutes).
- You can also press Timer and + or - buttons to set the delayed cooking time. (refer to "Setting the timer" section)
Note: If no button is pressed within 8 seconds, the appliance activates the selected mode automatically. - The cooking process will start automatically after 8 seconds flashing time or preset timer has elapsed.
- During cooking, the appliance will beep 1 time when the working pressure is reached and the pressure keeping time will start counting down.
- When the pressure keeping time has elapsed, the electric pressure cooker will beep 5 times and automatically switch to keep warm mode. The Meat cooking indicator goes out and the Warm/Cancel indicator lights up yellow.
- After the cooking is finished, you can press the Warm/Cancel button to turn off the keep warm function and unplug the appliance immediately after use.
Note: The Warm/Cancel button can be pressed at any time during cooking to cancel the operation. - Before opening the lid, make sure to release the pressure from the inside of the appliance (refer to "Releasing pressure after cooking" section).
Porridge
- Follow the steps in "preparations before cooking".
- Turn the pressure regulator to "CLOSE" position.
- Insert the connector of power cord to the socket of the pressure cooker and put the plug into to the wall power outlet. Switch Power outlet on, the appliance is now in Standby Mode.
- Press PORRIDGE button, the Porridge cooking indicator will illuminated. The default pressure keeping time "0018" appears on LED Display and start to flash, "18" indicators the pressure keeping time is 18 minutes.
- Within 8 seconds after pressing the Porridge button,
- You can press + or - buttons to set a different pressure keeping time if you prefer an alternative cooking time (The adjustment time range is 8-24 minutes). s
- You can also press Timer and + or - buttons to set the delayed cooking time. (refer to "Setting the timer" section)
Note: If no button is pressed within 8 seconds, the appliance activates the selected mode automatically. - The cooking process will start automatically after 8 seconds flashing time or preset timer has elapsed.
- During cooking, the appliance will beep 1 time when the working pressure is reached and the pressure keeping time will start counting down.
- When the pressure keeping time has elapsed, the electric pressure cooker will beep 5 times and automatically switch to keep warm mode. The Porridge cooking indicator goes out and the Warm/Cancel indicator lights up yellow.
- After the cooking is finished, you can press the Warm/Cancel button to turn off the keep warm function and unplug the appliance immediately after use.
Note: The Warm/Cancel button can be pressed at any time during cooking to cancel the operation. - Before opening the lid, make sure to release the pressure from the inside of the appliance (refer to "Releasing pressure after cooking" section).
Fish
- Follow the steps in "preparations before cooking".
- Turn the pressure regulator to "CLOSE" position.
- Insert the connector of power cord to the socket of the pressure cooker and put the plug into to the wall power outlet. Switch Power outlet on, the appliance is now in Standby Mode.
- Press FISH button, the Fish cooking indicator will illuminated. The default pressure keeping time "0008" appears on LED Display and start to flash, "08" indicators the pressure keeping time is 08 minutes.
- Within 8 seconds after pressing the Fish button,
- You can press to set a different pressure keeping time if you prefer an alternative cooking time (The adjustment time range is 5-15 minutes).
- You can also press Timer and + or - buttons to set the delayed cooking time. (refer to "Setting the timer" section)
Note: If no button is pressed within 8 seconds, the appliance activates the selected mode automatically. - The cooking process will start automatically after 8 seconds flashing time or preset timer has elapsed.
- During cooking, the appliance will beep 1 time when the working pressure is reached and the pressure keeping time will start counting down.
- When the pressure keeping time has elapsed, the electric pressure cooker will beep 5 times and automatically switch to keep warm mode. The Fish cooking indicator goes out and the Warm/Cancel indicator lights up yellow.
- After the cooking is finished, you can press the Warm/Cancel button to turn off the keep warm function and unplug the appliance immediately after use.
Note: The Warm/Cancel button can be pressed at any time during cooking to cancel the operation. - Before opening the lid make sure to release the pressure from the inside of the appliance (refer to "Releasing pressure after cooking" section).
Bean
- Follow the steps in "preparations before cooking".
- Turn the pressure regulator to "CLOSE" position.
- Insert the connector of power cord to the socket of the pressure cooker and put the plug into to the wall power outlet. Switch Power outlet on, the appliance is now in Standby Mode.
- Press BEAN button, the Bean cooking indicator will illuminated. The default pressure keeping time "0040" appears on LED Display and start to flash, "40" indicators the pressure keeping time is 40 minutes.
- Within 8 seconds after pressing the Bean button, - You can press + or - buttons to set a different pressure keeping time if you prefer an alternative cooking time (The adjustment time range is 15-50 minutes).
- You can also press Timer and + or - buttons to set the delayed cooking time. (refer to "Setting the timer" section)
Note: If no button is pressed within 8 seconds, the appliance activates the selected mode automatically.
- The cooking process will start automatically after 8 seconds flashing time or preset timer has elapsed.
- During cooking, the appliance will beep 1 time when the working pressure is reached and the pressure keeping time will start counting down.
- When the pressure keeping time has elapsed, the electric pressure cooker will beep 5 times and automatically switch to keep warm mode. The Bean cooking indicator goes out and the Warm/Cancel indicator lights up yellow.
- After the cooking is finished, you can press the Warm/Cancel button to turn off the keep warm function and unplug the appliance immediately after use.
Note: The Warm/Cancel button can be pressed at any time during cooking to cancel the operation.
- Before opening the lid, make sure to release the pressure from the inside of the appliance (refer to "Releasing pressure after cooking" section).
Cake
- Follow the steps in "preparations before cooking".
- Turn the pressure regulator to "CLOSE" position.
- Insert the connector of power cord to the socket of the pressure cooker and put the plug into to the wall power outlet. Switch Power outlet on, the appliance is now in Standby Mode.
- Press CAKE button, the Cake cooking indicator will illuminated. The default pressure keeping time "0030" appears on LED Display and start to flash, "30" indicators the pressure keeping time is 30 minutes.
- Within 8 seconds after pressing the Cake button,s
- You can press + or - buttons to set a different pressure keeping time if you prefer an alternative cooking time (The adjustment time range is 30-50 minutes).
Note: If no button is pressed within 8 seconds, the appliance activates the selected mode automatically.
- The cooking process will start automatically after 8 seconds flashing time has elapsed.
- During cooking, the appliance will beep 1 time when the working pressure is reached and the pressure keeping time will start counting down.
- When the pressure keeping time has elapsed, the electric pressure cooker will beep 5 times and automatically switch to keep warm mode. The Cake cooking indicator goes out and the Warm/Cancel indicator lights up yellow.
- After the cooking is finished, you can press the Warm/Cancel button to turn off the keep warm function and unplug the appliance immediately after use.
Note: The Warm/Cancel button can be pressed at any time during cooking to cancel the operation.
- Before opening the lid, make sure to release the pressure from the inside of the appliance (refer to "Releasing pressure after cooking" section).
Reheat
This cooking mode is used when just wanting to warm up leftovers (e.g. cold cooked rice etc.)
- Follow the steps in "preparations before cooking".
- Turn the pressure regulator to "CLOSE" position.
- Insert the connector of power cord to the socket of the pressure cooker and put the plug into to the wall power outlet. Switch Power outlet on, the appliance is now in Standby Mode.
- Press REHEAT button, the Reheat cooking indicator will illuminated. The default pressure keeping time "0010" appears on LED Display and start to flash, "10" indicators the pressure keeping time is 10 minutes.
- Within 8 seconds after pressing the Reheat button,
- You can press + or - buttons to set a different pressure keeping time if you prefer an alternative cooking time (The adjustment time range is 5-15 minutes).
- You can also press Timer and + or - buttons to set the delayed cooking time. (refer to "Setting the timer" section)
Note: If no button is pressed within 8 seconds, the appliance activates the selected mode automatically.
- The cooking process will start automatically after 8 seconds flashing time or preset timer has elapsed.
- During cooking, the appliance will beep 1 time when the working pressure is reached and the pressure keeping time will start counting down.
- When the pressure keeping time has elapsed, the electric pressure cooker will beep 5 times and automatically switch to keep warm mode. The Reheat cooking indicator goes out and the Warm/Cancel indicator lights up yellow.
- After the cooking is finished, you can press the Warm/Cancel button to turn off the keep warm function and unplug the appliance immediately after use.
Note: The Warm/Cancel button can be pressed at any time during cooking to cancel the operation.
- Before opening the lid, make sure to release the pressure from the inside of the appliance (refer to "Releasing pressure after cooking" section).
Manual Cook
This cooking mode allows you to manually select the cooking time for all types of food, specifically useful for ingredients that require longer cook time than 60 minutes or don't have dedicated default cooking times.
- Follow the steps in "preparations before cooking".
- Turn the pressure regulator to "CLOSE" position.
- Insert the connector of power cord to the socket of the pressure cooker and put the plug into to the wall power outlet. Switch Power outlet on, the appliance is now in Standby Mode.
- Press MANUAL button, the Manual cooking indicator will illuminated. The default pressure keeping time "0002" appears on LED Display and start to flash, "02" indicators the pressure keeping time is 2 minutes.
- Within 8 seconds after pressing the Manual button,
- You can press + or - buttons to set a different pressure keeping time if you prefer an alternative cooking time (The adjustment time range is 2-99 minutes).
- You can also press Timer and + or - buttons to set the delayed cooking time. (refer to "Setting the timer" section)
Note: If no button is pressed within 8 seconds, the appliance activates the selected mode automatically.
- The cooking process will start automatically after 8 seconds flashing time or preset timer has elapsed.
- During cooking, the appliance will beep 1 time when the working pressure is reached and the pressure keeping time will start counting down.
- When the pressure keeping time has elapsed, the electric pressure cooker will beep 5 times and automatically switch to keep warm mode. The Manual cooking indicator goes out and the Warm/Cancel indicator lights up yellow.
- After the cooking is finished, you can press the Warm/Cancel button to turn off the keep warm function and unplug the appliance immediately after use.
Note: The Warm/Cancel button can be pressed at any time during cooking to cancel the operation.
- Before opening the lid, make sure to release the pressure from the inside of the appliance (refer to "Releasing pressure after cooking" section).
Safety Devices
There are seven safety devices installed in the pressure cooker to assure its reliability.
1. Open-and-Close Lid Safety Device
The appliance will not start pressurizing until the lid is closed and locked properly. The lid cannot be opened if the appliance is pressurized.
2. Pressure Control Device
The correct pressure level is automatically maintained during the cooking cycle.
3. Pressure Regulator Valve
The pressure regulator valve will release the pressure automatically when the pressure inside exceeds the preset pressure.
4. Inner lid with anti-block function
Prevents any food material from blocking the pressure regulator valve.
5. Pressure Relief Device
When the pressure cooker reaches the maximum allowable pressure and temperature, the cooking pot will move down until the lid separates from the sealing ring, releasing air pressure.
6. Thermostat
The power will automatically switch off when the appliance has reached peak temperature or operated without food in cooking pot. The Thermostat will cycle On/Off to maintain peak temperature.
7. Thermal Fuse
In the unlikely event of thermostat failure, where temperature continues to rise beyond peak preset temperature and exceeding the temperature rating of the thermal fuse, the fuse will open circuit, rendering the appliance inoperable (Cannot be reset).
Care and cleaning
This product contains no user serviceable parts. Refer service to qualified service personnel.
WARNING: Do not immerse the mains body, cord or plug in water or any liquid while cleaning.
- Always unplug the appliance from the electrical outlet and wait until it has cooled down sufficiently before cleaning.
- Always wash immediately after use for easier cleaning. Don't let food dry on the inner pot as this will make cleaning difficult.
- Take out the top lid, rice scoop and inner pot. Wash with a sponge or a cloth in hot water with some washing-up liquid. Rinse and dry thoroughly with a soft cloth. Do not use abrasive cleaning agents or metal utensils to clean the inner pot, as they damage the surface of the inner pot.
- Remove the detachable inner lid. Soak it in warm water and clean with sponge.
- To clean the condensation collector, remove and clean it with warm soapy water, then reinstall it.
- Wipe the heating element with a dry cloth. Remove food residues with wrung out and damp cloth.
- Finally, wipe the outer body with a slightly damped cloth to remove any residue, and dry thoroughly. Never immerse the mains body of the appliance in water or other liquid, nor rinse it under the tap.
- Dry the appliance and at the accessories with a soft, dry cloth. Make sure all parts are completely dry before re-stalling the appliance.
- The sealing ring and the gasket of the floater valve may shrink, become hard, deformed, worn, or pitted with normal use. Exposure to high heat causes these parts to deteriorate rapidly. When this happens, replace those parts immediately.
Helpful tips:
To clean your inner pot easily, you can:
- Squirt a small amount of dishwashing liquid into the inner pot and fill with warm water.
- Leave the rice residue to soak for 30 minutes.
- Wash the inner pot.
- Rinse under running water and dry thoroughly.
To protect the surface of the inner pot, do not:
• Use the inner pot for washing dishes.
- Put vinegar or salt in the pot. Any residue of vinegar or salt may cause pan to corrode.
To clean the sealing ring and inner lid, you can:
- Turn the top lid upside down.
• Take out the detachable inner lid by holding the knob on inner lid.
• Gently pull out the sealing ring from the inner lid.
- Wash the inner lid, sealing ring and top lid in hot water and dry thoroughly with a soft cloth.
- Reassemble the sealing ring and inner lid and make sure it is properly assembled.

To clean the vent pipe, you can:
- Remove the pressure regulator valve by pulling it up.
- Clean the vent pipe with a small brush or pipe cleaner.
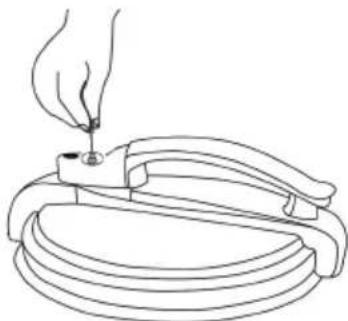
natural_image
Line drawing of a hand using a tool to press or install a cylindrical object on a base (no text or symbols)Note: Do not disassemble the pressure regulator during cooking. Always unplug the pressure cooker and wait until the pressure has been released sufficiently and cool completely to do so.
Specifications
POWER SUPPLY...... AC 220-240V\~50Hz
POWER CONSUMPTION...... 1000W
BOWL CAPACITY....6 LITRES (MAXIMUM FILL LEVEL 5 LITRES)
NOTE: As a result of continual improvements, the design and specifications of the product within may differ slightly from the unit illustrated on the packaging.
Troubleshooting
If your electric pressure cooker does not function properly or if the cooking quality is insufficient, consults the table below. If you are unable to solve the problem, contact a quality personnel or consumer service centre.
| Symptom Possible reason | Solution | |
| Appliance does not work Power plug not correctly connected to wall outlet | Reconnect the power plug to the wall outlet | |
| Lid does not lock | Lid not correctly positioned Re-close the top lid | |
| Floater valve stuck in up position Push floater valve down manually. | ||
| Cannot open lid after the appliance is depressurized | Floater valve stuck in up position Press the floater down with chopsticks | |
| Air / Steam escaping from around the rim of the lid | The sealing ring is not well assembled. | Make sure the sealing ring is well assembled around the inner lid. |
| Food residue remaining on sealing ring | Clean sealing ring | |
| Sealing ring is damaged or worn out Replace sealing ring | ||
| Lid not locked properly Re-close the top lid | ||
| Air / Steam escaping from around the floater valve | Food deposits stuck on gasket of the floater valve | Clean the gasket of floater valve |
| The gasket of the Floater valve is damaged or worn out | Replace the gasket | |
| Floater valve does not rise up after the appliance starts pressurizing. | The pressure regulator valve is not in CLOSE position | Rotate pressure regulator valve to CLOSE position |
| Not enough food and liquid in the inner pot | Check recipe for proper quantity | |
| Air/ Steam escaping around the lid rim and around pressure regulator valve | Call Consumer Service Centre 1300 373 199 | |
| E1 appears on the display Sensor open circuit Call Consumer Service | Centre 1300 373 199 | |
| E2 appears on the display Sensor short circuit Call Consumer Service | Centre 1300 373 199 | |
| E4 appears on the display Pressure switch faulty Call Consumer Service | Centre 1300 373 199 | |
Note: These time specifications are for reference only and may vary depending on the circumstances.
Pressure Cooking Timetable for Rice and Grains
| Rice & Grain Water Quantity | (Grain : Water ratios) Cooking Time (in Minutes) | |
| Barley, pearl 1:4 25 – 30 | ||
| Barley, pot 1:3 ~ 1:4 25 – 30 | ||
| Porridge, thick 1:4 ~ 1:5 15 – 20 | ||
| Porridge, thin 1:6 ~ 1:7 15 – 20 | ||
| Couscous 1:2 5 – 8 | ||
| Corn, dried, half 1:3 25 – 30 | ||
| Kamut, whole 1:3 10 – 12 | ||
| Oats, quick cooking 1:1 2/3 6 | ||
| Oats, steel-cut 1:1 2/3 10 | ||
| Quinoa, quick cooking | 1:2 | 8 |
| Rice, basmati | 1:1.5 8 | |
| Rice, brown | 1:1.5 | 10 – 15 |
| Rice, white | 1:1.5 8 | |
| Rice, wild | 1:3 25 – 30 | |
| Sorghum | 1:3 20 – 25 | |
| Spelt berries | 1:3 15 – 20 | |
| Wheat berries 1:3 25 – 30 | ||
Pressure Cooking Timetable for Dried Beans, Legume and Lentils
| Dried Beans & Legume Dry, Cooking Time (in Minutes) | Soaked, Cooking Time (in Minutes) | |
| Adzuki 25-40 15-20 | ||
| Anasazi 20-25 15-20 | ||
| Black beans 25-40 15-20 | ||
| Black-eyed peas 25-40 15-20 | ||
| Chickpeas (chick peas, garbanzo bean or kabuli) | 35-40 20-25 | |
| Cannellini beans 35-40 20-25 | ||
| Soy beans 25 – 30 20-25 | ||
| Scarlet runner 20-25 10-15 | ||
| Peas 15-20 10-15 | ||
| Pinto beans 25-30 20-25 | ||
| Navy beans 25-30 20-25 | ||
| Kidney beans, white 35-40 20-25 | ||
| Kidney beans, red 25-30 20-25 | ||
| Lima beans 20-25 10-15 | ||
| Lentils, yellow, split (moong dal) | 15-18 | N/A |
| Lentils, red, split | 15-18 | N/A |
| Lentils, green, mini (brown) | 15-20 | N/A |
| Lentils, French green | 15-20 | N/A |
| Great Northern beans | 25-30 20-25 | |
| Gandules (pigeon peas) | 20-25 15-20 | |
Pressure Cooking Timetable for Meat (Chicken, Duck, Turkey, Beef, Pork and Lamb)
| Meat Dry, Cooking Time (in Minutes) | |
| Beef, stew meat 15-20 | |
| Beef, meat ball 10-15 | |
| Beef, dressed 20-25 | |
| Beef, pot roast, steak, rump, round, chuck, blade or brisket, large | 35-40 |
| Beef, pot roast, steak, rump, round, chuck, blade or brisket, small chunks | 25-30 |
| Beef, ribs 25-30 | |
| Beef, shanks 25-30 | |
| Beef, oxtail 40-50 | |
| Chicken, breasts 8-10 | |
| Chicken, whole 20-25 | |
| Chicken, cut up with bones 10-15 | |
| Chicken, drumsticks, legs or thighs 10-15 | |
| Cornish Hen, whole 20-30 | |
| Duck, cut up with bones 15-20 | |
| Duck, whole 25-30 | |
| Ham slice 9-12 | |
| Ham picnic shoulder 25-30 | |
| Lamb, cubes, | 10-15 |
| Lamb, stew meat | 10-15 |
| Lamb, leg | 35-45 |
| Pheasant | 20-25 |
| Pork, loin roast | 55-60 |
| Pork, butt roast | 45-50 |
| Pork, ribs | 20-25 |
| Turkey, breast, boneless | 15-20 |
| Turkey, breast, whole, with bones | 25-30 |
| Turkey, drumsticks (leg) | 15-20 |
| Veal, chops | 5-8 |
| Veal, roast | 35-45 |
| Quail, whole | 8-10 |
Pressure Cooking Timetable for Seafood and Fish
| Seafood and Fish Fresh, Cooking Time (in Minutes) Frozen, Cooking Time (in Minutes) | ||
| Crab 3 – 4 5 – 6 | ||
| Shrimp or Prawn 1 – 2 2 – 3 | ||
| Seafood soup or stock 6 – 7 7 – 9 | ||
| Mussels 2 – 3 4 – 5 | ||
| Lobster 3 – 4 4 – 6 | ||
| Fish steak 3 – 4 4 – 6 | ||
| Fish fillet 2 – 3 3 – 4 | ||
| Fish, whole(trout, snapper, etc.) | 5 – 6 7 – 10 | |
Fresh or Frozen Vegetable Pressure Cooking Timetable
| Vegetable Fresh Cooking Time | (in Minutes) | Frozen, Cooking Time (in Minutes) |
| Artichoke, whole, trimmed without leaves 9 – 11 | 11 – 13 | |
| Artichoke, hearts 4 – 5 5 – 6 | ||
| Asparagus, whole or cut 1 – 2 2 – 3 | ||
| Beans, green/yellow or wax, whole, trim ends and strings | 1 – 2 2 – 3 | |
| Beets, small roots, whole | 11 – 13 | 13 – 15 |
| Beets, large roots, whole | 20 – 25 | 25 – 30 |
| Broccoli, florets | 2 – 3 3 – 4 | |
| Broccoli, stalks | 3 – 4 4 – 5 | |
| Brussel sprouts, whole | 3 – 4 4 – 5 | |
| Cabbage, red, purple or green, shredded | 2 – 3 3 – 4 | |
| Cabbage, red, purple or green, wedges | 3 – 4 4 – 5 | |
| Carrots, sliced or shredded | 1 – 2 2 – 3 | |
| Carrots, whole or chunked | 2 – 3 3 – 4 | |
| Cauliflower florets | 2 – 3 3 – 4 | |
| Celery, chunks | 2 – 3 3 – 4 | |
| Collard | 4 – 5 5 – 6 | |
| Corn, Kernels | 1-2 | 2-3 |
| Corn, on the cob | 3-4 | 4-5 |
| Eggplant, slices or chunks | 2-3 | 3-4 |
| Endive | 1-2 | 2-3 |
| Escarole, chopped | 1-2 | 2-3 |
| Green beans, whole | 2-3 | 3-4 |
| Green (beet greens, collards, kale, spinach, swiss chard, turnip greens), chopped | 3-6 4-7 | |
| Leeks 2-4 3-5 | ||
| Mixed vegetables 2-3 3-4 | ||
| Okra 2-3 3-4 | ||
| Onions, sliced 2-3 3-4 | ||
| Parsnips, sliced 1-2 2-3 | ||
| Parsnips, chunks 2-4 4-6 | ||
| Peas, in the pod 1-2 2-3 | ||
| Peas, green 1-2 2-3 | ||
| Potatoes, in cubes 7-9 9-11 | ||
| Potatoes, whole, baby 10-12 12-14 | ||
| Potatoes, whole, large 12-15 15-19 | ||
| Pumpkin, large slices or chunks 4-5 6-7 | ||
| Pumpkin, large slices or chunks 8-10 | 10-14 | |
| Rutabaga, slices | 3-5 4-6 | |
| Rutabaga, chunks | 4-6 6-8 | |
| Spinach | 1-2 3-4 | |
| Squash, acorn, slices or chunks 6-7 8-9 | ||
| Squash, butternut, slices or chunks 8-10 | 10-12 | |
| Sweet potato, in cubes | 7-9 9-11 | |
| Sweet potato, whole small | 10-12 12-14 | |
| Sweet potato, whole large | 12-15 15-19 | |
| Sweet pepper, slices or chunks 1-3 2-4 | ||
| Tomatoes, in quarters | 2-3 4-5 | |
| Tomatoes, whole | 3-5 5-7 | |
| Turnip, chunks | 2-4 4-6 | |
| Yum, in cubes | 7-9 9-11 | |
| Yum, whole, small | 10-12 12-14 | |
| Yum, whole, large | 12-15 15-19 | |
| Zucchini, slices or chunks | 2-3 3-4 |
Recipes
Multigrain Rice
- 3 cups brown rice, wild rice or other whole grains, rinsed
• 2 tablespoons of oil (olive oil preferred) - 9 cups of water
- 1 12 teaspoons salt (optional)
Beer Potato Fish
- 1/2 kg fish fillet
- 4 medium size potatoes, peeled and diced 1 cup beer
- 1 red pepper sliced
- 1 tablespoon oil
• 1 tablespoon oyster flavored sauce
• 1 tablespoon rock candy - 1 teaspoon salt
Red Bean Soup Recipe
• 2 cups of red beans
- 1/2 cup of dry lotus seeds, with the sprouts removed
• 1/2 cup of dry chestnuts (Optional)
- 2 small pieces of dried mandarin or lemon peel, broken into tiny pieces (Optional)
- 8\~12 cups of water, depending on whether you prefer thick or thinner soup
Duck Cooked With vegetables
• 1 medium size duck
• 1 cucumber cut into pieces
- two carrots cut into pieces
- 1 tablespoon cooking wine or 2 tablespoons wine
- 2 cups water
• 1 small piece of ginger cut into pieces
- 2 teaspoons salt
Chicken With Shallots And Balsamic Vinegar
- 500g shallots, peeled
• 500g Maryland chicken
• 2 tablespoons unsalted butter
• 2 tablespoons olive oil - 30ml dry red wine
• 125ml chicken stock
• 30ml balsamic vinegar - Salt and pepper
Notes
Notes
Notes

Gerard Sourcing & Manufacturing
GSM International Ltd.
Consumer Service Centre : 1300 373 199
GSM International Ltd has a policy of continual improvement throughout the product range. As such the unit contained within may differ slightly from the unit illustrated on the pack.
MADE IN CHINA for GSM International Ltd.
Cat. No. BTPRC250
February 2015
- Important Safeguards
- Position instructions
- Always -
- Do not -
- Connect the appliance to a suitable wall outlet (AC 240V\~50Hz)
- Only use an "Earthed" outlet
- Never use any accessories or parts which are not recommended by the manufacturer
- Do not use a damaged power cord
- Do not insert foreign objects
- Keep away from children
- Do not immerse in water
- Before removing the lid, always ensure:
- opening the lid. Keep hands and face away from steam release vents when releasing pressure. Warning:
- Do not touch with wet hands.
- Pull the power plug, not the cable
- Disconnect the power plug
- Keep face and hands away from the vents
- Do not place any food or liquids into the outer pot
- Do not exceed the Full marking
- Do not touch hot parts of the appliance
- When moving, hold the product by its handles
- Do not touch hot surfaces.
- Do not use a damaged appliance!
- Do not repair the appliance
- Warning
- Package contents
- Save These Instructions
- Overview
- Product overview
- Control buttons description
- Warm/Cancel button
- '+' and '-' buttons
- Rice, Bean, Fish, Porridge, Soup, Chicken, Meat, Cake and Reheat buttons
- Note: Reheat Function is specifically for reheat previously cooked foods, the default time is 10 minutes.
- Timer button
- Manual cook button:
- Functions overview
- Keep Warm Function
- WARNING:
- Setting the Timer
- To Stop or Cancel
- Using the appliance
- Before First Use
- Preparations before cooking
- Note: For the best results, before each use make sure that:
- Instructions for Use
- Adding ingredients before cooking
- Releasing pressure after cooking
- Natural Pressure Release –
- Quick Pressure Release –
- Keep face, hands and forearms away from steam when it is releasing.
- Opening the lid in a safe manner
- Warning! Danger of scalding!
- Keep a safe distance from the appliance and take special care when opening the lid!
- Keep face, hands and forearms away from steam release vents when releasing pressure.
- Pressure cooking
- Rice
- Note: The Warm/Cancel button can be pressed at any time during cooking to cancel the operation.
- Tips for cooking rice:
- Soup
- Chicken
- Meat
- Porridge
- Fish
- Bean
- Cake
- Reheat
- Manual Cook
- Safety Devices
- Open-and-Close Lid Safety Device
- Pressure Control Device
- Pressure Regulator Valve
- Inner lid with anti-block function
- Pressure Relief Device
- Thermostat
- Thermal Fuse
- Care and cleaning
- WARNING: Do not immerse the mains body, cord or plug in water or any liquid while cleaning.
- Helpful tips:
- To clean your inner pot easily, you can:
- To protect the surface of the inner pot, do not:
- To clean the sealing ring and inner lid, you can:
- To clean the vent pipe, you can:
- Specifications
- Troubleshooting
- Recipes
- Multigrain Rice
- Beer Potato Fish
- Red Bean Soup Recipe
- Duck Cooked With vegetables
- Chicken With Shallots And Balsamic Vinegar
- GSM International Ltd.
Brand : Bellini
Model : BTPRC250
Category : Frying Pan