
LS 15 - Audio Equipment AUDIO RESEARCH - Free user manual and instructions
Find the device manual for free LS 15 AUDIO RESEARCH in PDF.


| Product Type | Vacuum Tube Line Stage Preamplifier |
| Brand | Audio Research |
| Model | LS 15 |
| Dimensions (W x H x D) | 19 x 5.25 x 15 inches (483 x 133 x 381 mm) |
| Weight | 20 lbs (9.1 kg) |
| Power Consumption | 100 watts |
| Inputs | 5 line-level inputs (RCA), 1 tape input |
| Outputs | 2 main outputs (RCA), 1 tape output |
| Gain | 12 dB (line stage) |
| Frequency Response | 20 Hz - 20 kHz ±0.5 dB |
| Total Harmonic Distortion | < 0.01% at 2V RMS output |
| Signal-to-Noise Ratio | 90 dB (A-weighted) |
| Tube Complement | 4 x 6H30P or equivalent |
| Remote Control | Optional (RC-5) |
| Power Requirements | 100-125V or 200-250V, 50/60 Hz (user selectable) |
| Safety Certifications | CE, UL |
| Recommended Cleaning | Unplug unit, wipe with dry soft cloth. Avoid solvents. |
| Spare Parts Availability | Tubes and fuse available from authorized dealers |
| Repair | Refer to qualified service technician only |
Frequently Asked Questions - LS 15 AUDIO RESEARCH
User questions about LS 15 AUDIO RESEARCH
0 question about this device. Answer the ones you know or ask your own.
Ask a new question about this device
Download the instructions for your Audio Equipment in PDF format for free! Find your manual LS 15 - AUDIO RESEARCH and take your electronic device back in hand. On this page are published all the documents necessary for the use of your device. LS 15 by AUDIO RESEARCH.
USER MANUAL LS 15 AUDIO RESEARCH
Please take time to carefully read and understand the following instructions before you install or attempt to operate your Audio Research LS15 preamplifier. Becoming familiar with the product and its correct operating procedures will help assure you of maximum musical enjoyment and reliable operation. The effort you invest now will be well rewarded in the years ahead.
Warnings
- To prevent fire or shock hazard, do not expose this product to rain or moisture.
- This unit operates on voltages which can cause serious injury or death. Do not operate with covers removed. Any necessary servicing should be carried out by your authorized Audio Research dealer or other qualified electronics technician.
- The power cord on this unit is safety-tested and is equipped with a proper grounding plug. If used normally, it will provide a safe earth ground connection of the chassis. Defeat of the grounding plug or replacement of the plug or power cord, or any unauthorized modification of the active circuitry or controls of this unit, automatically voids warranty coverage, and could cause injury or death.
- For safe operation and protection against fire hazard, replace fuses only with those of the same type and rating as those supplied with this unit.
Packaging
Save all packaging accompanying this product. You have purchased a precision electronic instrument, and it should be properly cartoned any time shipment becomes necessary. It is very possible that this unit could be damaged during shipment if repackaged in cartoning other than that designed for it. The original packaging materials help protect your investment from unnecessary damage, delay and added expense whenever shipment of this unit is required.
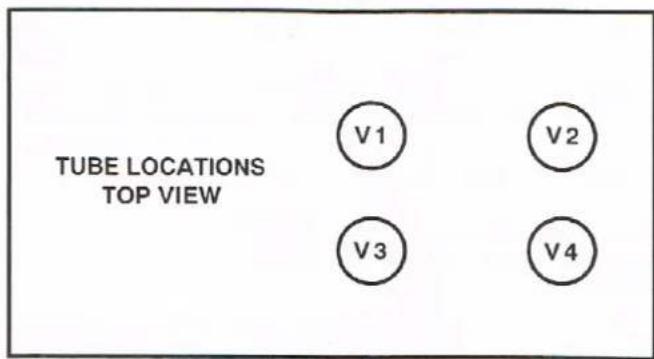
Note: This unit has been shipped with the vacuum tubes installed in a protective foam block under the top cover. Using a phillips-head screwdriver to loosen the fastening screws, remove the top cover and set aside. Install the numbered tubes in their respective sockets, refasten the top cover and store the foam block with your carton.
DO NOT ATTEMPT TO OPERATE THIS EQUIPMENT BEFORE INSTALLING THE VACUUM TUBES IN THEIR PROPER SOCKETS.
REAR
FRONT
Description of Controls
VOLUME CONTROL: The Volume control of the LS15 pre-amplifier is a departure from the traditional mechanical volume control potentiometer. Instead, there is a 2-way switch with a spring-loaded center return position that electronically adjusts volume level either a step at a time or continuously. By turning the switch clockwise and releasing it quickly, the volume level increases a step at a time. A counter-clockwise turn and release of the control decreases the volume level a step at a time. Holding the Volume control in either direction continuously adjusts the volume level in the respective direction. The selected volume setting is indicated by the illuminated LED position within the LED volume range arc, analogous to a "traditional" volume control level setting.
Note that the LS15 has 70 individual steps across the volume control adjustment range and 20 LEDs per control. The corresponding LED position that is illuminated for a given volume control setting serves as a general level indicator and will remain lit for several individual adjustment steps before an adjacent LED illuminates.
SOURCE SELECTOR SWITCH: Allows selecting from any of four single-ended input sources (labeled SE1, SE2, SE3 and SE4) as well as one balanced input source.
Turning and releasing the spring-loaded Source selector switch in either direction steps through the source options which are indicated by LED illumination.
Note that changing the settings of the following four toggle switches on the LS15 is accomplished by pressing the toggle downward each time. A lit LED indicates the function above the toggle switch is active. When the LED is unlit the function below the toggle switch is active (in the case of the Power switch, the unlit LED indicates that power is off).
Model LS15
POWER ON/OFF SWITCH: Supplies power from AC wall outlet to LS15 when in "On" position (indicated by illuminated LED).
In the event of loss of power to the LS15 while it is turned on, the Power On/Off switch will default to the "Off" position when power is restored. If the LS15 is unplugged, the Power On/Off switch will default to the "Off" position when it is plugged in again. In each instance you must manually select the Power switch "On" position to begin operation of the unit.
Should you lose power to the LS15 or unplug it from its power receptacle, it will default to minimum volume level. "Mute", "Source" (Monitor "off"), "Direct" and "SE1" settings. After turn-on by the Power On/Off switch, the LS15 will always return to the previously used settings, but in the "Mute" position.
MUTE/OPERATE SWITCH: In "Mute" position (indicated by LED illumination), shorts all outputs of the preamplifier to allow listening interruptions for telephone answering or other reasons. This switch should always be activated between listening uses or switching of inputs, in addition to turning the Volume control down. These two simple precautions will prevent inadvertent misuse of your LS15 and help protect your power amplifier(s) and speakers from unexpected transient signal pulses. In "Operate" position, this switch allows the signal to pass normally to the outputs.
CAUTION: Do not turn up the Volume control beyond normal listening positions when the LS15 is in the Mute mode. Always turn the Volume control down when changing program sources, even when it is muted.
OPERATE/MUTE CIRCUIT LED: Note that for approximately 30 seconds after start-up this LED will flash until the automatic muting cycle is completed. None of the front panel controls except for the Power On/Off switch are operable during the automatic muting cycle. Upon completing the automatic muting cycle, the unit will then be in the manual "Mute" position (indicated by illuminated Mute LED) until the "Operate" position is manually selected.
MONITOR/SOURCE SWITCH: In "Monitor" position this switch bypasses the Source selector and presents the signal to the main outputs from the Monitor input on the rear panel. In the "Source" position, the program source is controlled by the Source selector (SE1, SE2, SE3, SE4 and BAL).
DIRECT/SOURCE SWITCH: Allows the use of either the "direct" gain path set of balanced inputs or the normal "source" inputs otherwise found on the Source selector switch. The "Direct" position provides the highest possible resolution for the high level source (CD player, DAC processor, etc.) routed through it, bypassing the Source selector control. Since the direct gain path inputs are wholly independent from the other inputs, it is not possible to record off the "Direct" set of inputs (see also "Tape Recording Procedure").
RESETTING CONTROLS: To avoid discharging static to the LS15 controls, contact another surface (such as a metal equipment rack) to drain away the charge before touching the LS15. If a static charge should "lock up" the microprocessor making the front panel controls inoperable, put the LS15 in mute, power down the system and turn off and unplug the LS15 from its power receptacle. After waiting a few seconds plug in the LS15 and power it up with the rest of the system; the controls should resume normal operation. If the problem persists, contact your dealer or Audio Research Customer Service at 612-939-0600. CST.
USE OF REMOTE CONTROL UNIT: All front-panel functions are duplicated on the remote control unit for the LS15.
The life of the batteries in the remote control is about 1 year. For replacement use only batteries of the type RO3, UM4 or AAA.
Connections
INPUT CONNECTORS: All are clearly marked to indicate use. The inputs are 200K ohms impedance balanced, and 100K ohms single-ended.
MAIN OUTPUT CONNECTORS: There is 1 set of single-ended and 2 sets of balanced output connectors. Any or all 3 sets may be connected simultaneously to your crossover or amplifier(s) as necessary.
NOTE: The XLR connector pin leads are as follows: 1-ground; 2-positive; 3-negative. If used with a power amplifier which utilizes different pin leads for positive, negative and/or ground, the signal being fed to the loudspeakers will be incorrect. Please consult your Audio Research dealer.
At the performance level of the LS15, high-quality audio signal interconnect cables are critical to preserving maximum fidelity. Audio Research RFI-shielded or unshielded interconnect cables are highly recommended for connection to your power amplifier(s) and to other ancillary equipment. See your authorized Audio Research dealer for recommended lengths.
TAPE OUTPUT CONNECTORS: The LS15's Tape outputs (labeled "Record" output) should be connected to your tape deck's "REC" or "LINE" inputs. These outputs supply whatever is selected by the Source selector control to the tape deck for recording. Level is non-variable and approximately the same as the selected input source.
Model LS15
Installation Instructions
While the LS15 does not dissipate an unusual amount of heat, it is important that it be provided with reasonable airflow to assure long, trouble-free operation. In addition, the following installation guidelines will help insure maximum sonic performance as well as reliable service.
- Upright and horizontal mounting is suggested if extended operation (longer than one hour) is anticipated.
- Do not stack the LS15 on top of a power amplifier: not only could this cause overheating, but hum may be introduced into the LS15 from the proximity of the amplifier's power transformer.
- Do not place or operate your LS15 on a soft or irregular surface such as a rug. This will prevent proper ventilation.
- Do not operate your LS15 without the top and bottom covers installed. These are required both for safety as well as shielding from interference (except in service operations).
- If rack mounting is employed, use Audio Research Rack Mount Ventilators (RMV-3) below and above your LS15.
- In a cabinet or rack-mount installation which has an enclosed back, an exhaust fan is desirable so as not to operate the LS15 in overheated ambient air. Operation of vacuum tube equipment for long periods of time in hot ambient air will shorten tube life and increase chance of failure of other component parts.
Operating Procedure
Start-Up:
- Secure all rear-panel connections between LS15, power amplifier(s) and input sources.
- Plug 3-prong powerline cord from rear of LS15 into grounded AC wall receptacle. (Power On/Off switch defaults to "Off" position when unit is plugged into power receptacle.)
- Turn Power switch to "On". The Mute/Operate LED will flash for approximately 30 seconds while power supply stabilizes, indicating operation of automatic muting circuit. After this automatic muting period the LED will stay on, indicating that your LS15 is in the "Mute" position. Adjust the Volume control to the minimum level, as indicated by fully counter-clockwise LED illumination. When the "Operate" position is manually selected the mute LED will turn off, indicating the LS15 is ready for operation.
Note: For superior sonic performance, a warm-up period of at least one hour is recommended. In addition, your LS15 may be safely left "on" continuously for maximum performance at all times, but at the expense of higher maintenance costs (more frequent tube replacement).
- Turn Source selector to desired source; set switch options to desired positions.
- Activate selected input source, then deactivate Mute switch and adjust Volume control as necessary.
Shut-Down:
- Set Mute switch to "Mute" position.
- Turn Volume control counter-clockwise to minimum setting.
- Turn off power amplifier(s).
- Turn off all input sources.
- Set LS15 Power switch to "Off" position.
Tape Recording Procedure
When using the LS15 as a control center for recording, the program source to be recorded must be connected to one of the five inputs controlled by the Source selector switch. This routes the selected program to the Record output. The Direct input cannot be routed through the Record output at any time.
If you own a three-head tape deck, and wish to monitor the actual tape while making a recording (for a true "A-B" comparison of signals before and after recording), connect the tape deck output to the Monitor input.
It is also possible to dub from one tape deck to another. Simply connect the output from one tape deck to an unused set of inputs controlled by the Source selector (SE1, SE2, etc.) on the LS15. This signal will then be routed to the second tape deck when the appropriate input is selected on the Source selector.
Note that you can listen to a separate source through the Direct inputs while simultaneously recording any of five other input sources controlled by the Source selector switch.
Muting Provisions
The LS15 has several provisions to help protect against misuse of the exceptional dynamic range and wide bandwidth that it offers. It is not subject to damage itself, but some power amplifiers and speakers are more limited in their ability to withstand signal extremes. These provisions, both manual and automatic, are designed not to interfere with the listening experience, while giving reasonable protection against warm-up surges and power line interruptions. However, for absolute protection of associated equipment some operator understanding and responsibility are required.
Initial "settling" time of all circuit parameters within the LS15 requires approximately 5 to 10 minutes. The automatic muting circuitry timer is adjusted for about 30
Model LS15
seconds. (This is because recurrent interruption "settling" time is much less. You would not want to wait for 5 to 10 minutes each time such an interruption occurred.)
The Mute/Operate switch allows manual disabling of the LS15 outputs during the switching of equipment. Use of this switch will minimize stress on your amplifier even if it is "off". It is also highly recommended that manual muting be employed during turn-off for maximum protection.
The automatic muting operates as follows:
- The automatic muting always disables all outputs and overrides any manual settings. (The "Operate" position of the manual Mute switch is functional only when the unit is not in the automatic mute mode.)
- The 30-second warm-up timer will restart automatically and the LED will flash if the power is temporarily interrupted for 0.1 second or more.
Note: Power supply regulation of the LS15 is effective down to 100VAC without serious sonic degradation. - The automatic muting of the LS15 is designed to be effective only against power line interruptions and power line failures. It will not mute against subsonic signal transmissions from your input source. Proper fusing of speakers is essential to protect against excessive audio level or power amplifier faults.
Servicing
Because of its careful design and exacting standards of manufacture, your LS15 should normally require only minimal routine service to maintain its high level of performance.
CAUTION: Your LS15 contains sufficient levels of voltage and current to be lethal. Do not tamper with a component or part inside the unit. Refer any needed service to your authorized Audio Research dealer or other qualified technician.
The vacuum tubes inside your LS15 are quality 6922/E88CC twin triodes, and with normal use should not need to be changed for approximately 4,000 hours of use. Replacement tubes should be of equivalent quality and are available from Audio Research.
Should service be necessary, please contact your Audio Research dealer, or Audio Research Customer Service at (612) 939-0600 (CST).
Cleaning
To maintain the new appearance of this unit, occasionally wipe the front panel and top cover with a soft, damp (not wet) cloth to remove dust. A mild, non-alkaline soap solution or dilute isopropyl alcohol may be used to remove fingerprints or similar smudges. Cleaners containing abrasives should not be used as they will damage the anodized finish of the front panel. A small, soft paint brush is effective in removing dust from bevels, the recessed nameplate and other features of the front panel.
Limited Warranty
Audio Research Corporation products are covered by a 3-Year Limited Warranty (all products except CD players, transports, and vacuum tubes), a 2-Year Limited Warranty (CD players and transports), or a 90-Day Limited Warranty (vacuum tubes). This Limited Warranty initiates from the date of purchase, and is limited to the original purchaser, or in the case of demonstration equipment, limited to the balance of warranty remaining after original shipment to the retailer or importer.
In the United States, the specific terms, conditions and remedies for fulfillment of this Limited Warranty are listed on the warranty card accompanying the product in its shipping carton, or may be obtained from the authorized retailer or from the Audio Research Customer Service Department. Outside the United States, the authorized importing retailer or distributor has accepted the responsibility for warranty of Audio Research products sold by them. The specific terms and remedies for fulfillment of the Limited Warranty may vary from country to country. Warranty service should normally be obtained from the importing retailer or distributor from whom the product was purchased.
In the unlikely event that technical service beyond the ability of the importer is required. Audio Research will fulfill the terms and conditions of the Limited Warranty. Such product must be returned at the purchaser's expense to the Audio Research factory, along with a photocopy of the dated purchase receipt for the product, a written description of the problem(s) encountered, and any information necessary for return shipment. The cost of return shipment is the responsibility of the purchaser.
Model LS15
Specifications
FREQUENCY RESPONSE: ±.5dB, 2Hz to 30kHz at rated output. -3dB points below 0.3Hz and above 80kHz.
DISTORTION: Less than .01% at 2V RMS Balanced output.
GAIN: Main Output: 12.5dB Balanced, 6.5dB SE. Tape output: 0dB.
INPUT IMPEDANCE: 200K ohms Balanced. 100K ohms SE. Inputs (7): SE1, SE2, SE3, SE4, Bal, Direct (Bal), and Monitor (SE).
OUTPUT IMPEDANCE: 600 ohms Balanced, 300 ohms SE Main (2), 40K ohms minimum load and 1000pF maximum capacitance. Outputs (4): 2 Main Bal, 1 Main SE, 1 Record SE.
MAXIMUM INPUT: 14V RMS maximum Balanced, (7V RMS SE).
RATED OUTPUTS: 2V RMS (1V RMS SE) into 200K ohm Balanced load (maximum Balanced output capability is 30V RMS at less than 1% THD at 1kHz).
CONTROLS: Volume, Select Source. Toggle switches: Power On/Off, Mute/Operate, Monitor/Source, Direct/Source. All functions on Remote Control.
POWER SUPPLIES: Electronically regulated low and high voltage supplies. Automatic 30-sec. warmup mute. Automatic brown-out mute.
NOISE: 25μV RMS residual IHF weighted Balanced noise output with gain control at minimum, (98dB below 2V RMS output).
TUBE COMPLEMENT: 4-6922/E88CC dual triode. (Vacuum tube audio circuit, solid-state power supply.)
POWER REQUIREMENTS: 100-135VAC 60Hz (200-270VAC 50/60Hz) 35 watts maximum.
DIMENSIONS: 19" (48 cm) W x 5.25" (13.3 cm) H (standard rack panel) x 10.5" (26.7 cm) D. Handles extend 1.50" (3.8 cm) forward of the front panel.
WEIGHT: 11.6 lbs (5.3 kg) Net; 20 lbs (9.1 kg) Shipping.
Specifications subject to change without notice.
©1998 Audio Research Corporation.
Modèle LS15
Préface
© 1998 Audio Research Corporation.
Modell LS15
Vorwort
©1998 Audio Research Corporation.
Modello LS15
Prefazione
©1998 Audio Research Corporation.
Modelo LS15
Prefacio
©1998 Audio Research Corporation.
audio research
HIGH DEFINITION®
5740 GREEN CIRCLE DRIVE / MINNETONKA, MINNESOTA 55343-4424 / PHONE 612/939-0600, FAX 612/939-0604
LOCATION OF BLACK DAMPING RINGS ON 6922 TUBES FOR BEST SOUND QUALITY.
This procedure applies only to the current version 6922 (E88CC) vacuum tubes supplied with black damping rings, either factory installed, or sold as service replacement items for use in Audio Research products (ARC Part No. 32001162 for the 6922 tube, ARC Part No. 20004600 for the black damping ring).
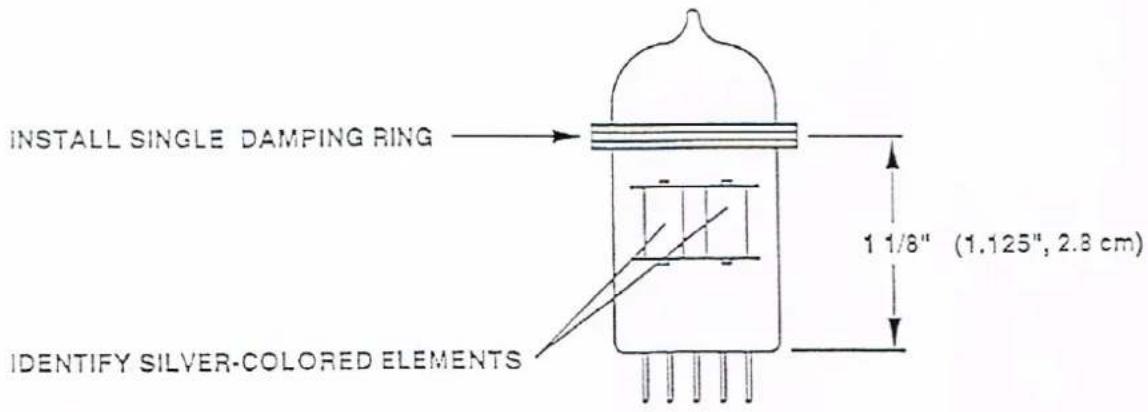
The current production style 6922 tube can be identified by two opposing silver-colored vertical elements located in the center section of the tube. (This procedure does not apply to older style production 6922 tubes with dark gray-colored vertical elements in the tube's center section.)
As of approximately October 10, 1996, most Audio Research products being built using 6922 tubes will be equipped with the current style "silver" 6922 tube and one companion black damping ring. This includes the LS5MKIII, LS22/R, LS15, LS7, SP9/R, PH3, REF600 (rings on four of the 6922 tubes only), VT150/SE, VT130/SE, VTM120/SE, VT100, VT60/SE and CA50.
If your Audio Research unit is already equipped with the new style "silver" 6922 tubes which came with black damping rings, or if you are installing new "silver" 6922 tubes with these damping rings, install only one ring on each tube according to the following locating diagram:
6922 TUBE, SIDE VIEW
The single black damping ring should be level and located 1 1/8" (1.125" or 2.8 cm) above the bottom of the glass portion of the tube as measured from the pin end of the tube to the center of the ring.
Take care when reinstalling each tube in its socket so that you don't push the damping ring from its proper position.
Audio Research does not endorse the use of its damping rings on tubes installed in non-Audio Research products. Consult the product manufacturer for specific recommendations.
MANUFACTURER'S
DECLARATION OF CONFORMITY
According to CENELEC EN45014
Manufacturer's Name: Audio Research Corporation
Manufacturer's Address: 5740 Green Circle Drive
Minnetonka, MN 55343-4424, U.S.A.
- Declares that the following 220-240V products -
Product Name: Stereo Line Amplifier
Model Number: LS2MKII, LS2MKIIR, LS2BMKII, LS2BMKIIR, LS3, LS3B,
LS3BR, LS3R, LS5MKIII, LS7, LS8, LS9, LS10, LS15.
LS22, LS22R, REF 1.
Product Name: Audio Power Amplifiers
Model Number: D130, D200, D300, D400MKII, REFERENCE 600, VT50,
VT60, VT60SE, VT100, VT200, VTM120, VTM120SE,
VT130, VT130SE, VT150, VT150SE, CA50, 100.2.
Product Name: Stereo Compact-disc Player
Model Number: CD1, CDT1, CD2.
Product Name: Stereo Digital-Analog Converter
Model Number: DAC3, DAC3MKII, DAC5.
Product Name: Stereo Phono Preamplifier
Model Number: PH3, PH3 SPECIAL EDITION.
- Conform to the following Product Specifications -
Safety: EN60065: 1994 Household Electronics.
EMC: EN55013: 1994 Emissions, EN55020: 1994 Immunity
EN61000-3-2: 1995 Harmonics
EN61000-3-3: 1995 Voltage Fluctuations/Flicker.
We declare under our sole responsibility that the products herewith comply with the European safety immunity, emissions, and mains disturbance requirements of the EMC Directive 89/330/EEC and 92/31/EEC, and LV Directive 72/23/EEC, and CE Mark Directive 93/68/EEC.
Gerald L. Oxborough, Executive Vice President
Audio Research Corporation
5740 Green Circle Drive. Minnetonka. MN 55343-4424. U.S.A.
Issued January 28, 1998
European Contact: Your Audio Research Distributor.
DÉCLARATION DE CONFORMITÉ DU FABRICANT
LS3B, LS3BR, LS3R, LS5MKIII LS7, LS8, LS9, LS10,
LS15, LS22, LS22R, REF 1.
VT50, VT60, VT60SE, VT100, VT200, VTM120,
VTM120SE, VT130, VT130SE, VT150, VT150SE,
CA50, 100.2.
LS3R, LS5MKIII, LS7, LS8, LS9, LS10, LS15, LS22, LS22R, REF 1.
VT60SE, VT100, VT200, VTM120, VTM120SE, VT130,
VT130SE, VT150, VT150SE, CA50, 100.2.
Gerald L. Oxborough, Executive Vice President
Audio Research Corporation
5740 Green Circle Drive, Minnetonka, MN 55343-4424, U.S.A.
Numero di modello: LS2MKII, LS2MKIIR, LS2BMKII, LS2BMKIIR, LS3, LS3B, LS3BR, LS3R, LS5MKIII, LS7, LS8, LS9, LS10, LS15, LS22, LS22R, REF 1.
Numero di modello: D130, D200, D300, D400MKII, REFERENCE 600, VT50, VT60, VT60SE, VT100, VT200, VTM120, VTM120SE, VT130, VT130SE, VT150, VT150SE, CA50, 100.2.
- Warnings
- Packaging
- Description of Controls
- Model LS15
- Connections
- Installation Instructions
- Operating Procedure
- Start-Up:
- Shut-Down:
- Tape Recording Procedure
- Muting Provisions
- Servicing
- Cleaning
- Limited Warranty
- Specifications
- Modèle LS15
- Préface
- Modell LS15
- Vorwort
- Modello LS15
- Prefazione
- Modelo LS15
- Prefacio
- audio research
- MANUFACTURER'S
- DECLARATION OF CONFORMITY
- DÉCLARATION DE CONFORMITÉ DU FABRICANT
Brand : AUDIO RESEARCH
Model : LS 15
Category : Audio Equipment