
PHANTOM-S - Controller ATEN - Free user manual and instructions
Find the device manual for free PHANTOM-S ATEN in PDF.


| Product Type | USB Gamepad Emulator |
| Model | PHANTOM-S |
| Dimensions (L x W x H) | 106 x 79 x 24.4 mm |
| Weight | 195 g |
| Power Supply | 5V DC via USB (no external power adapter needed) |
| Front Connectors | 1 x USB Type A (Keyboard), 1 x USB Type A (Mouse), 1 x USB Type A (Gamepad) |
| Rear Connectors | 1 x Mini USB (Game), 1 x Mini USB (PC), 1 x Mini USB (Power) |
| Reset Button | 1 x Semi-recessed Pushbutton |
| LED Indicators | Turbo/KB Mode (Orange), Setting, Power |
| Supported Consoles | PS3, PS4, Xbox 360, Xbox One (wired controllers only) |
| Supported Operating Systems (Software) | Windows 2000, XP, Vista, 7, 8.1, 10 |
| Key Features | Gamepad emulation for keyboard/mouse, macro editor (up to 8 commands), turbo mode, direct mapping, profile switching (F1-F8), adjustable deadzone and sensitivity, Play Mode for laptop + console |
| Housing Material | Metal |
| Operating Temperature | 0°C to 50°C |
| Regulatory Compliance | FCC Class B, RoHS |
| Package Contents | 1 x Phantom-S unit, 1 x 1.8m mini USB to USB cable, 1 x 1m mini USB to USB cable, 1 x 1m 3.5mm to 3.5mm cable, User Instructions |
| Emulation | USB keyboard and mouse signals emulated as gamepad inputs |
| Software Compatibility | Supports Phantom-S software for advanced configuration (mapping, macros, sensitivity) |
Frequently Asked Questions - PHANTOM-S ATEN
User questions about PHANTOM-S ATEN
0 question about this device. Answer the ones you know or ask your own.
Ask a new question about this device
Download the instructions for your Controller in PDF format for free! Find your manual PHANTOM-S - ATEN and take your electronic device back in hand. On this page are published all the documents necessary for the use of your device. PHANTOM-S by ATEN.
USER MANUAL PHANTOM-S ATEN
Federal Communication Commission Interference Statement: This equipment has been tested and found to comply with the limits for a Class B digital service, pursuant to Part 15 of the FCC rules. These limits are designed to provide reasonable protection against harmful interference in a residential installation. Any changes or modifications made to this equipment may void the user's authority to operate this equipment. This equipment generates, uses, and can radiate radio frequency energy. If not installed and used in accordance with the instructions, may cause harmful interference to radio communications. However, there is no guarantee that interference will not occur in a particular installation. If this equipment does cause harmful interference to radio or television reception, which can be determined by turning the equipment off and on, the user is encouraged to try to correct the interference by one or more of the following measures:
◆ Reorient or relocate the receiving antenna.
- Increase the separation between the equipment and receiver.
- Connect the equipment into an outlet on a circuit different from that to which the receiver is connected.
- Consult the dealer or an experienced radio/TV technician for help.
FCC Caution: Any changes or modifications not expressly approved by the party responsible for compliance could void the user's authority to operate this equipment.
RoHS
This product is RoHS compliant.
SJ/T 11364-2006
The following contains information that relates to China.
Be sure to register your product at our online support center:
| International http://eservice.aten.com |
Telephone Support
For telephone support, call this number:
| International 886-2-86 | 92-6959 |
| China 86-400-810-0-8 | 10 |
| Japan 81-3-5615-581 | 1 |
| Korea 82-2-467-6789 | |
| North America 1-888-999-ATEN ext 4988 | |
| United Kingdom 44-8-4481-58923 | |
User Notice
All information, documentation, and specifications contained in this manual are subject to change without prior notification by the manufacturer. The manufacturer makes no representations or warranties, either expressed or implied, with respect to the contents hereof and specifically disclaims any warranties as to merchantability or fitness for any particular purpose. Any of the manufacturer's software described in this manual is sold or licensed as is. Should the programs prove defective following their purchase, the buyer (and not the manufacturer, its distributor, or its dealer), assumes the entire cost of all necessary servicing, repair and any incidental or consequential damages resulting from any defect in the software.
The manufacturer of this system is not responsible for any radio and/or TV interference caused by unauthorized modifications to this device. It is the responsibility of the user to correct such interference.
The manufacturer is not responsible for any damage incurred in the operation of this system if the correct operational voltage setting was not selected prior to operation. PLEASE VERIFY THAT THE VOLTAGE SETTING IS CORRECT BEFORE USE.
Package Contents
Package
The Phantom-S package consists of:
♦ 1 Phantom-S USB Gamepad Emulator
◆ 1 1.8 m mini USB to USB cable
◆ 1 1 m mini USB to USB cable
◆ 1 1 m 3.5mm to 3.5mm cable
◆ 1 User Instructions*
Check to make sure that all the components are present and that nothing got damaged in shipping. If you encounter a problem, contact your dealer.
Read this manual thoroughly and follow the installation and operation procedures carefully to prevent any damage to the unit, and/or any of the devices connected to it.
* Features may have been added to the Phantom-S since this manual was published. Please visit our website to download the most up-to-date version.
© Copyright 2016 ATEN® International Co., Ltd.
F/W Version: V1.2.111.007
Manual Date: 2016-06-15
ATEN and the ATEN logo are registered trademarks of ATEN International Co., Ltd. All rights reserved. All other brand names and trademarks are the registered property of their respective owners.
Contents
FCC Information ...... ii
RoHS. ii
SJ/T 11364-2006....ii
User Information ....iii
Online Registration .....iii
Telephone Support ....iii
User Notice ....iii
Package Contents. iv
Package iv
About this Manual . . . . . . . . . . . . . . . . . . . . . . . . . . . . . . . . . . . . . . . . . . . . . . . . . . . . . . . . . . . . . . . . . . . . . . . . . . . . . . . . . . . . . . . . . . . . . . . . . . viii
Conventions ix
Product Information ix
Chapter 1.
Introduction
Overview....1
Features 2
Requirements 3
Game Console / Controller 3
Keyboard and Mouse 3
Audio Support ....3
Operating Systems 3
Components 4
Front View 4
Rear View ....5
Chapter 2.
Setup
Getting Started 6
Connecting Hardware 6
Game Console 6
Computer....7
Computer / Laptop + Console Setup. 9
Quick Start Mouse Configuration .....10
Mouse Settings 11
DPI 11
Report Rate....11
Chapter 3.
Basic Operation
Overview....12
Basic Operation....12
Mouse Map....12
Keyboard Map 13
Function Keys ....14
Direct Configuration 16
Beeps 16
Direct Mapping Mode 17
Deadzone Delay 19
Testing the Deadzone 21
Decrease Deadzone 21
Increase Deadzone 21
Keyboard / Gamepad Mode 22
Turbo Mode. 22
Play Mode 23
Chapter 4.
Phantom-S Software
Overview....24
Downloading 24
Phantom-S Interface 26
Software Overview 29
Groups 30
Profiles 31
Upload 33
Customizing Controls 35
A. Mouse Movement 41
B. Curve Setting 42
Settings 42
Curve. 43
Adjusting the Curve. 45
C. Deadzone Settings 48
Setting the Deadzone 49
Macro Settings 52
Chapter 5.
Firmware Upgrade
The Firmware Upgrade Utility....56
Before You Begin 56
Performing the Upgrade 57
Starting the Upgrade 57
Upgrade Succeeded 58
Upgrade Failed 59
Appendix
Safety Instructions 61
General 61
Technical Support. 63
International 63
North America 63
Specifications....64
Limited Warranty....65
About this Manual
This User Manual is provided to help you get the most from your system. It covers all aspects of installation, configuration and operation. An overview of the information found in the manual is provided below.
Chapter 1, Introduction, introduces you to the Phantom-S. Its purpose, features, benefits, and requirements are presented, and its front and back panel components are described.
Chapter 2, Setup, describes how to set up your Phantom-S. The necessary steps for configuring the mouse settings and hardware setup are provided.,
Chapter 3, Basic Operation, describes how to use the keyboard, mouse, and PS/Xbox game controller with your Phantom-S device.
Chapter 4, Phantom-S Software, explains how to use the Phantom-S software, as well as how to create Groups and configuration Profiles.
Chapter 5, Firmware Upgrade, explains how to download the firmware upgrade utility and install updates on the Phantom-S.
An Appendix, provides specifications, troubleshooting, and other technical information regarding the Phantom-S.
Conventions
This manual uses the following conventions:
Monospaced Indicates text that you should key in.
[ ] Indicates keys you should press. For example, [Enter] means to press the Enter key. If keys need to be chorded, they appear together in the same bracket with a plus sign between them: [Ctrl+Alt].
- Numbered lists represent procedures with sequential steps.
→ Indicates selecting the option (on a menu or dialog box, for example), that comes next. For example, Start → Run means to open the Start menu, and then select Run.

Indicates critical information.
Product Information
For information about all ATEN products and how they can help you connect without limits, visit ATEN on the Web or contact an ATEN Authorized Reseller. Visit ATEN on the Web for a list of locations and telephone numbers:
International http://www.aten.com
North America http://www.aten-usa.com
Overview
The Phantom-S is a USB Gamepad Emulator that allows you to use a keyboard and mouse with a PS/Xbox game console. The Phantom-S can be connected to your PS/Xbox and used straight out of the box. The Phantom-S has an easy to use software interface that allows you to customize all game controller buttons for use on a keyboard and mouse. Advanced features allow you to custom map keys, create macros, set turbo buttons, and adjust the sensitivity of movements. Quick macro setup allows up to 8 button combinations - set to one key.
Easy setup- simply click the on-screen controller button, press a key to use and its set for use on the keyboard. The Phantom-S allows you to map, set controller sensitivity and switches profiles directly from the keyboard, and alerts you with a beep.
With the Phantom-S you can create an unlimited number of keyboard and mouse configuration profiles - each suited for specific game play. Profiles can be switched and configured during game play for quick access. The Phantom-S gives gamers the ability to customize and fine tune all controls for the expert advantage with every game.
The Phantom-S allows you to:
Use a keyboard and mouse on a PS and Xbox game consoles
- Customize all Gamepad Controls for use on a keyboard and mouse
- Create custom keyboard/mouse profiles for different games
- Quickly setup controller buttons on-screen or in-hand
- Simultaneously use a keyboard, mouse, and PS/Xbox controller
◆ Map controls directly from the keyboard and controller
◆ Plug and Play - no software required
Features
- Gamepad Emulation transforms keyboard and mouse signals into game controller signals for keyboard and mouse use on a PS and Xbox game consoles
- Easy gamepad to keyboard key mapping and advanced configuration via GUI based software
- Macro editor allows for detailed configuration and command sequence control of a gamepads controller buttons
- Macros can combine up to 8 controller commands into a single key
◆ Supports direct configuration and control from a laptop’s keyboard
Hot Swap between the PS*/Xbox controller and keyboard/mouse instantly - Gamepad and Keyboard mode allow you to instantly switch between typing and gameplay
- Non-Powered – No need to use an additional power supply while connected to a game console
- Phantom-S software supports: Windows 2000, Windows XP, Windows Vista, and Windows 7, 8, and 8.1 Operating Systems
Note: The Phantom-S does not support use with PS1, PS2, or the original Xbox consoles.
Requirements
Game Console / Controller
◆ 1 PS3, PS4, Xbox 360 or Xbox One Console
◆ 1 Wired Game Controller
| USB Cable to Connect Controller to Phantom-S | ||
| Xbox One Micro USB Cable Requires separate cable purchase. | ||
| Xbox 360 Original Xbox 360 wired controller supported | Use original Xbox 360 controller cable.(Wireless Play and Charge kit is not supported) | |
| Play Station 3 | Mini USB Cable(included with game console) | Use USB cable included with the PS3 game console. |
| Play Station 4 | Micro USB Cable(included with game console) | Use USB cable included with the PS4 game console. |
Keyboard and Mouse
◆ 1 USB Keyboard
◆ 1 USB Mouse
Audio Support
| Supported Headsets | |
| Xbox One Headset is supported through the original Xbox One controller. | |
| Xbox 360 Wired headset is supported through the original Xbox 360 controller. | |
| Play Station 3 | Headset not supported. To use a headset for audio connect a USB audio adapter directly to the PS3. |
| Play Station 4 | Headset not supported. To use a headset for audio connect a USB audio adapter directly to the PS4. |
Operating Systems
Supported operating systems for the Phantom-S software, are shown in the table, below:
| Software Platform Version |
| Phantom-S Windows 2000, XP, Vista, 7, 8.1, 10 |
Components
Front View
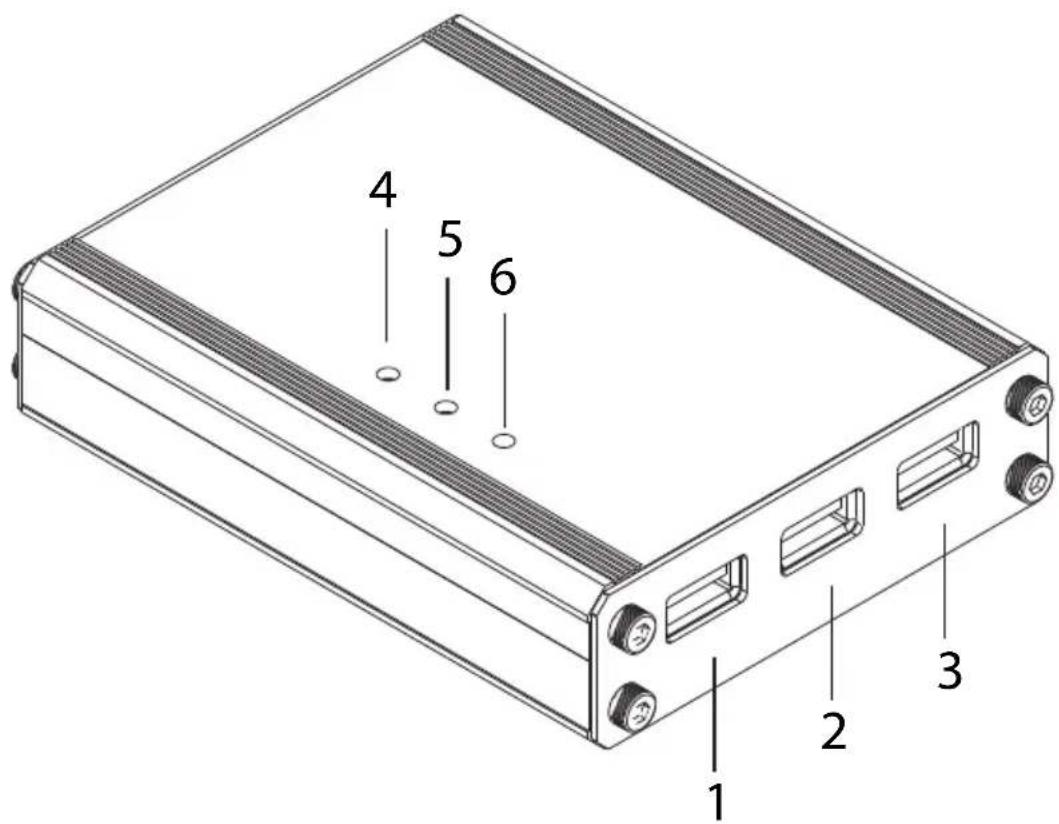
| No. | Component Description |
| 1 | Gamepad Port Plug the PS/Xbox game controller into this port. |
| 2 | Keyboard Port Plug a USB keyboard into this port. |
| 3 | Mouse Port Plug a USB mouse into this port. |
| 4 | Turbo/KB Mode LED |
| 5 | Setting LED |
| 6 | Power LED |
Rear View
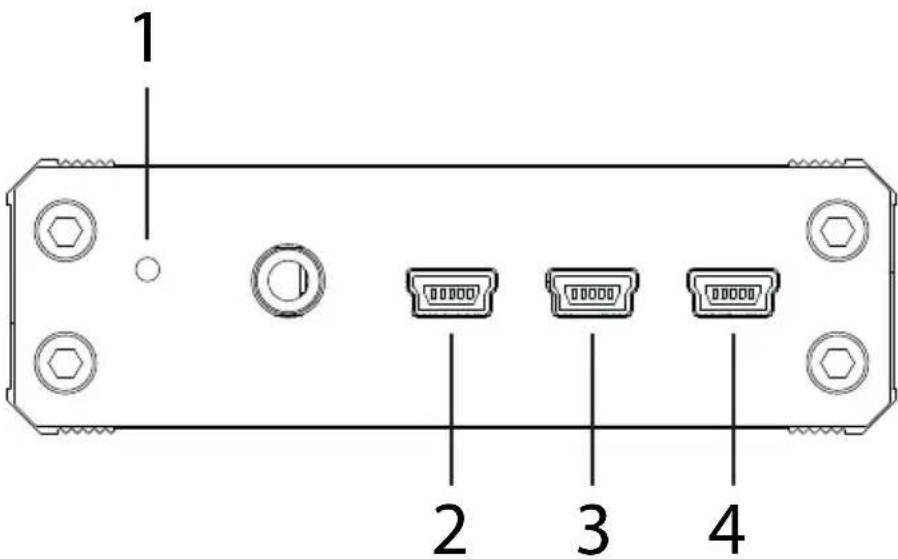
| No. | Component Description |
| 1 | Reset This switch resets the device. Press and release to reset the Phantom-S. |
| 2 | Game Port The Game Port is used to connect the Phantom-S to a PS or Xbox game console. This port also provides power to the unit when connected to a game console. |
| 3 | PC Port Use the PC port to connect the Phantom-S to a computer.This connection is used to configure the Phantom-S with the Phantom-S software, or connecting a laptop for game play.Note: The PC Port does not power the unit. |
| 4 | Power Port This port provides power to the unit. You must use this port for power when connected to a computer; or if you are using an advanced keyboard that requires additional power during gameplay.Use a mini USB to USB cable to connect this port to a 5V power source. |
Getting Started
To begin using the Phantom-S with your PS/Xbox, requires two steps:
- Connecting Hardware
- Configuring Mouse Settings
Connecting Hardware
To connect the Phantom-S to a game console use the steps below. To connect the Phantom-S to a computer use steps 7-9 on the next page. To connect to a computer and console simultaneously see Computer/Laptop + Console Setup, page 9.
Game Console
NOTE: If a wireless controller is used to power on the PS/Xbox, the game console will not recognize the Phantom-S as a controller. All wireless controllers need to be turned off.
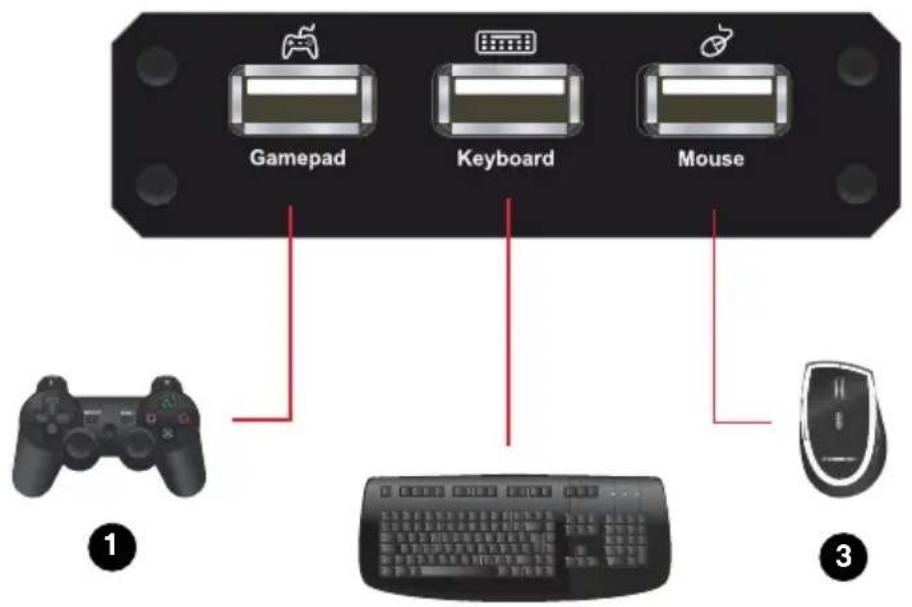
Power off the game console & wireless controllers then use the diagram on page 9 to do the following:
- Connect a game controller to the Gamepad Port.
- Connect a keyboard to the Keyboard Port.
- Connect a mouse to the Mouse Port.
- Connect the Phantom-S Game Port to the PS/Xbox USB port #1 with a mini/micro USB cable.
- Power on the PS/Xbox from the console ^* . Do not use a wireless controller to power on the PS/Xbox console.
- The Phantom-S is ready for use.
Note: The PS4 controller connected to the Phantom-S should have an Orange light bar when the console is powered on. If the light bar is blue – power off the game console & controllers, then repeat the steps above.
Computer
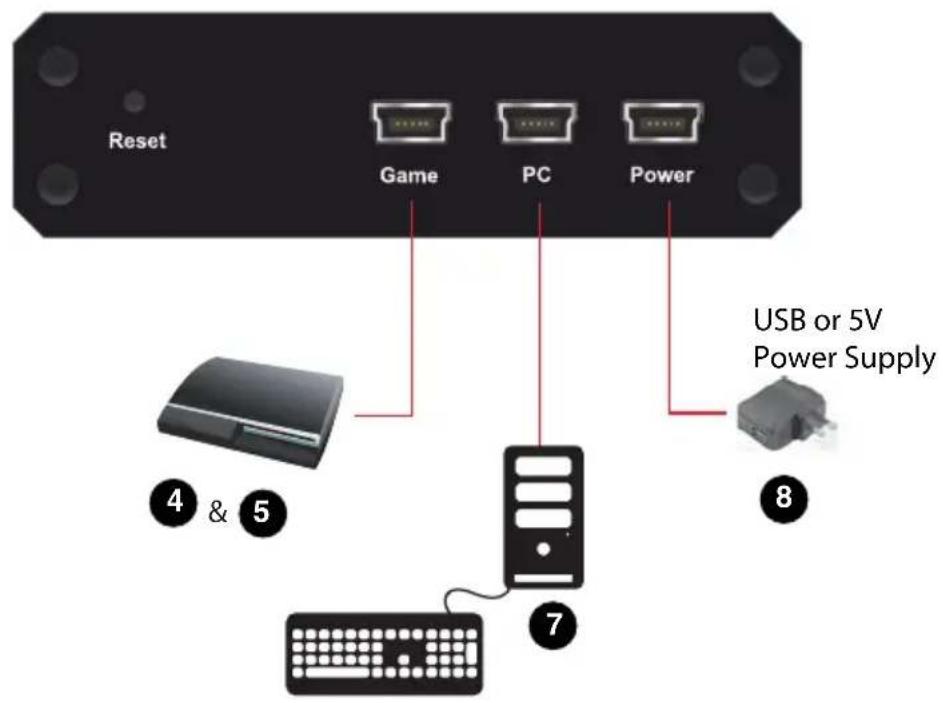
To connect the Phantom-S to a computer and use the Phantom-S software, use the diagram on page 8 and follow the steps below:
- Use the Mini USB to USB cable included with this package to connect the PC Port* to a computer.
- Use a Mini USB to USB cable (not included) to connect the Power Port* to a computer, or 5V USB power source.
- Start the Phantom-S software (see Phantom-S Software, page 24).
Note: The PC Port and Power Port must be connected to power the Phantom-S when connected to a computer to use the Phantom-S software.
2
Computer / Laptop + Console Setup
You can connect the Phantom-S to a PC and game console at the same time and switch keyboard use between the two. A computer also allows you to configure settings using the Phantom-S software and quickly switch back to gameplay. Use the diagram and steps to connect a laptop:
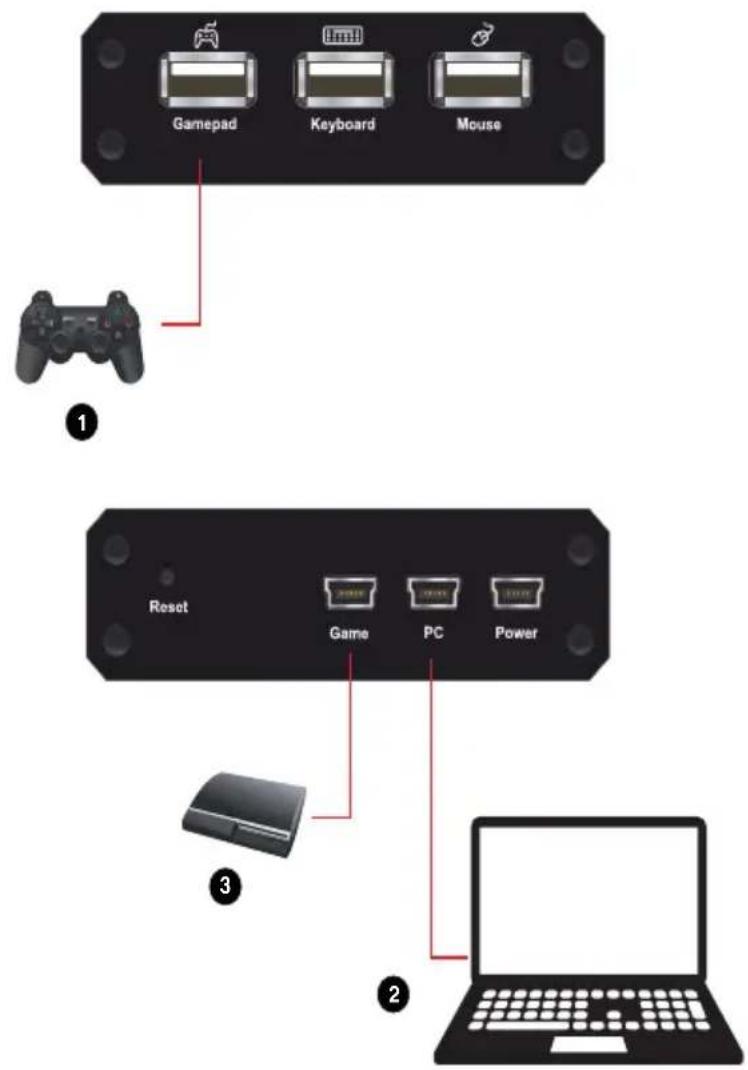
- Connect a controller to the Gamepad port*.
- Use the Mini USB to USB cable included with this package, to connect the PC port to a computer.
- Use the Mini USB to USB cable included with this package to connect the Game port to the PS/Xbox USB port #1.
- Power on all devices*.
- Press [F12] to toggle Playmode (See Play Mode, page 23).
Note: All wireless controllers must be powered off and the PS/Xbox must be powered on from the console. See Game Console, page 6 for details.
Quick Start Mouse Configuration
Before you begin there are four important settings that need to be set to improve mouse movements within games.
- Maximize all in-game sensitivity settings of the game that you are playing. See Mouse Settings, page 11.
- Check the manufacture for your mouse's DPI and set this in the Phantom-S software. See Menu, page 27.
- Adjust the Deadzone settings for the mouse. See Deadzone Delay, page 19.
- Adjust the mouse sensitivity to your liking, using the Phantom-S software. See Sensitivity, page 40.
Mouse Settings
If you are using a mouse with software such as Setpoint (Logitech), you will need to adjust the DPI (Dots-per-inch) and Report Rate settings for better gameplay. This can only be done with the software utility that came with the mouse.
DPI
If your mouse came with software - use the utility to set the mouse DPI to the highest possible setting. This will allow you to have a greater range of mouse sensitivity when adjusting the controls with the Phantom-S software.
If there is an adjustable DPI button on your mouse, be sure to set the maximum DPI setting (using the DPI button) every time it's plugged into the Phantom-S.
Report Rate
The report rate sets how often the computer requests the current position and button values of the mouse. Use the software utility that came with your mouse to set the report rate to its highest setting. The report rate is typically 125\~1000. You can start with the highest setting and adjust accordingly to what feels best when using your mouse on the PS/Xbox game console with the Phantom-S.
Note: Check each game's “Sensitivity” settings to ensure it is set to the maximum level to get the greatest range of adjustment with the Phantom-S.
Overview
This chapter explains how to use a keyboard and mouse for gameplay and how to configure basic modes from the keyboard and controller. For information on mapping, profiles and advanced settings, see Chapter 4.
Basic Operation
This section explains how to use the keyboard and mouse with the PS/Xbox game console. Once the hardware is connected the keyboard, mouse and controller will work on the game console. Here is how the controller is mapped to the keyboard and mouse:
Mouse Map
The mouse is used for up/down and right/left movements, just like the Right Stick control, as shown below:
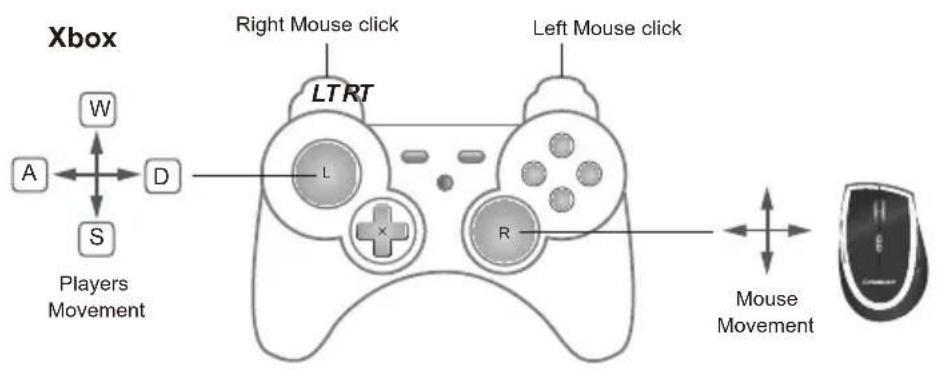
flowchart
graph TD
    A["Player Movement"] --> B["W"]
    B --> C["A"]
    C --> D["D"]
    D --> E["S"]
    E --> F["LTRT"]
    F --> G["R"]
    G --> H["Left Mouse click"]
    H --> I["Right Mouse click"]
    I --> J["Mouse Movement"]
    style A fill:#f9f,stroke:#333
    style J fill:#ccf,stroke:#333
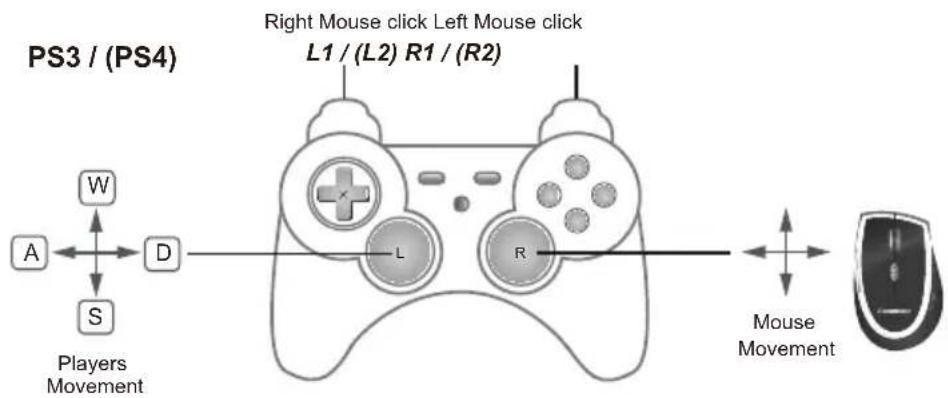
flowchart
graph LR
    A["Player Movement"] --> B["Right Mouse Click Left Mouse Click"]
    B --> C["L1 / (L2) R1 / (R2)"]
    C --> D["Right Mouse Click Left Mouse Click"]
    D --> E["Mouse Movement"]
    F["Player Movement"] --> G["W"]
    G --> H["A"]
    H --> I["S"]
    I --> J["D"]
    J --> K["L"]
    K --> L["R"]
    L --> M["Right Mouse Click Left Mouse Click"]
    M --> N["Mouse Movement"]
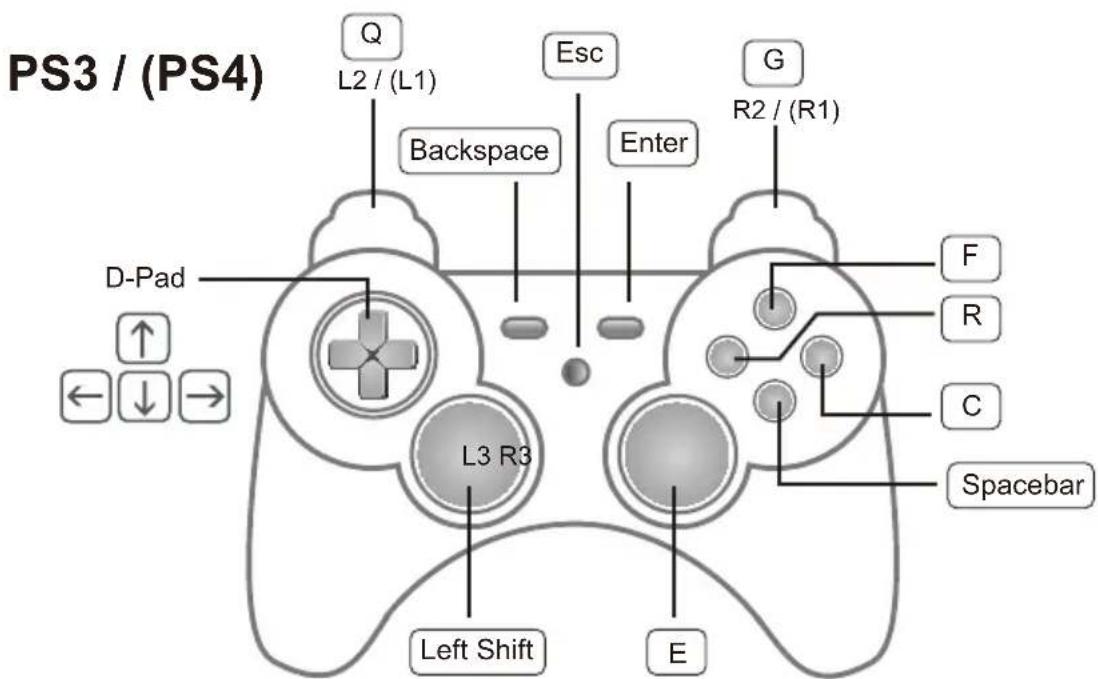
Keyboard Map
The controller buttons and directional pads are mapped to the keyboard, as shown here:
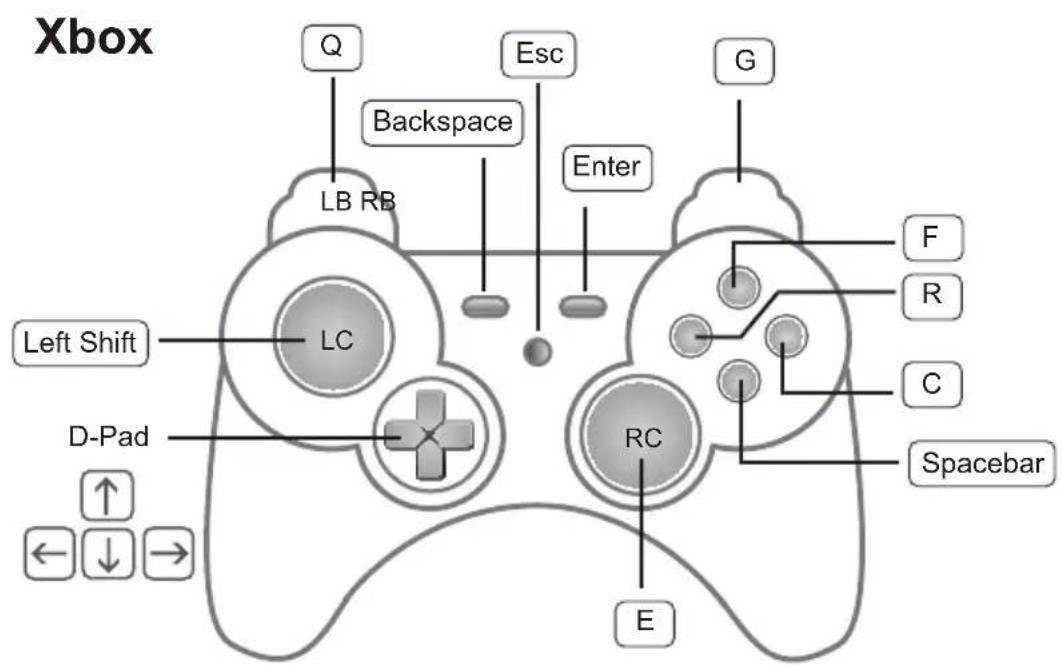
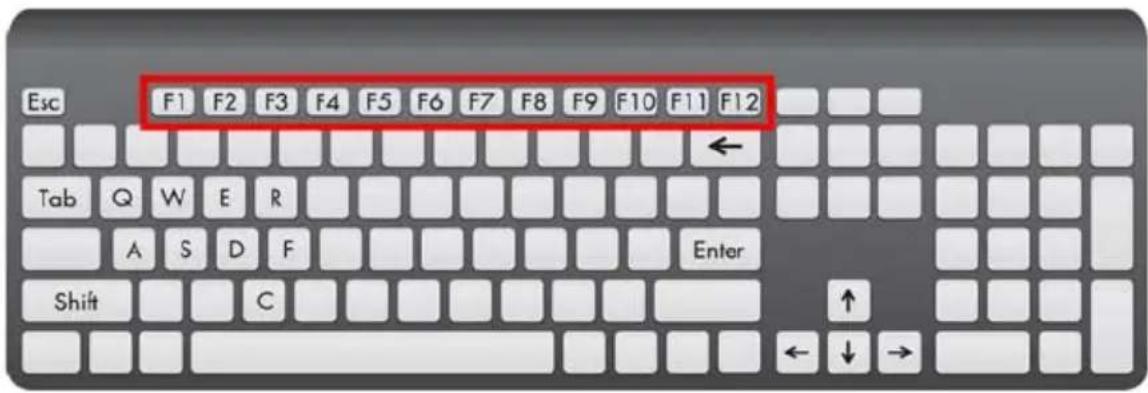
Function Keys
The function keys on the keyboard enable modes, switch profiles and map keys without the Phantom-S software. The table below explains each function key and provides a page with information on how it's used.
| Hotkey Function Description Page | |||
| [F1] ~ [F8] Switch Profile Switches to the Profile in the Current group set with the Profile Selection Hotkey that was pressed. Default Controller Profiles: [F1]: PS3 [F2]: Xbox 360 [F3]: Xbox One [F4]: PS4 | 22 | ||
| [F9] Keyboard /Gamepad Mode | Toggles between Keyboard and Gamepad Mode. Keyboard Mode: Allows you to type text during gameplay. Gamepad Mode: Allows you to use the keyboard as a controller on the game console. | 22 | |
| [F10] | Turbo Mode | Toggles Turbo Mode on and off. When Turbo mode is on buttons with Turbo settings will work. See Turbo, page 38, for details on Turbo settings. Note: Turbo settings only work on the keyboard and mouse. Turbo settings will not work from the game controller. | 22 |
| [F11] Macro Mode Turns Macro Mode on and off. When on, Macro keys will execute macro commands. See Macro Settings, page 52, for details on setting macros. | 23 | ||
| [F12] Play Mode Play Mode | allows you to use a keyboard and mouse connected to a PC for gameplay. | 23 | |
| (PS3 Controller)Select + Start -(PS4 Controller)Share + Option -(Xbox Controller)Back + Start | Mouse Sensitivity | This allows you to adjust the Aim/Look and ADS sensitivity of the mouse during game play. | 18 |
| (PS3 Controller)Select + Start & PS Button -(PS4 Controller)Share + Option & PS Button -(Xbox Controller)Back + Start & Xbox Guide Button | Direct Mapping Mode | Direct Mapping allows you to set the controller to keyboard mappings from the game controller and keyboard, so you don't have to use the Phantom-S software. | 17 |
Direct Configuration
You can map keyboard controls, enable game modes and adjust mouse sensitivity settings from the keyboard and game controller. This allows you to change settings without the Phantom-S software. Each control is explained in detail starting on the next page.
Beeps
The Phantom-S beeps when you make changes from the keyboard and game controller. Beeps let you know if settings are changed and when functions turn on and off. To turn beeps off see Menu, page 27 - Beep Sound.
Single Beep is a positive reply, meaning that a change is successful or that a mode has been turned on.
Double Beep is a negative reply, meaning a setting has reached its limit, a mode was turned off or a mode was exited.
Direct Mapping Mode
Direct Mapping allows you to change the controller button to keyboard mappings - using the controller and keyboard. For example, you can map controller button A to the spacebar on the keyboard.
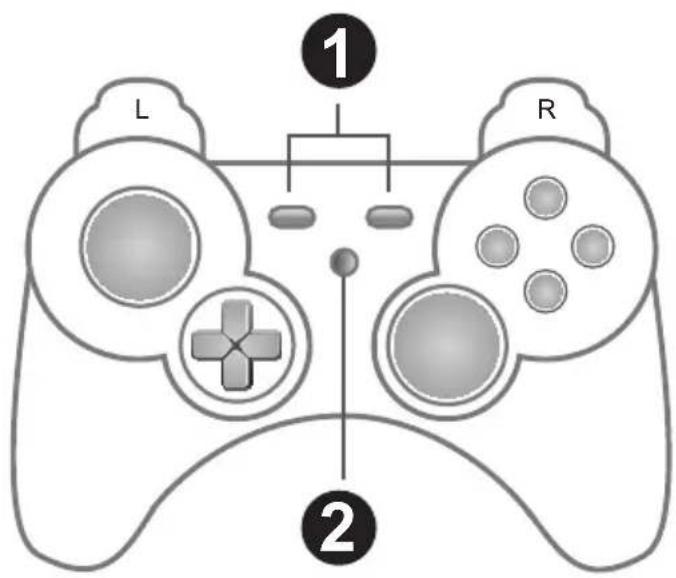
To use Direct Mapping Mode from the controller connected to the Phantom-S:
- Press Select + Start (PS3), Share + Option (PS4) or Back + Start (Xbox) at the same time.
-
Press the PS or Xbox Guide Button.
-
Press a button on the game controller.
-
Press a key on the keyboard to map the controller button.
-
Continue mapping buttons by repeating steps 3-4.
-
Press Select + Start (PS3), Share + Option (PS4) or Back + Start (Xbox) to exit Direct Mapping Mode.
Note: Direct Mapping changes are not permanently saved to a Profile.
Mouse Sensitivity Mode
Mouse Sensitivity Mode allows you to change the Aim/Look and ADS sensitivity for mouse movements - using the game controller. For information about mouse sensitivity see Sensitivity, page 40.
To enter Mouse Sensitivity mode:
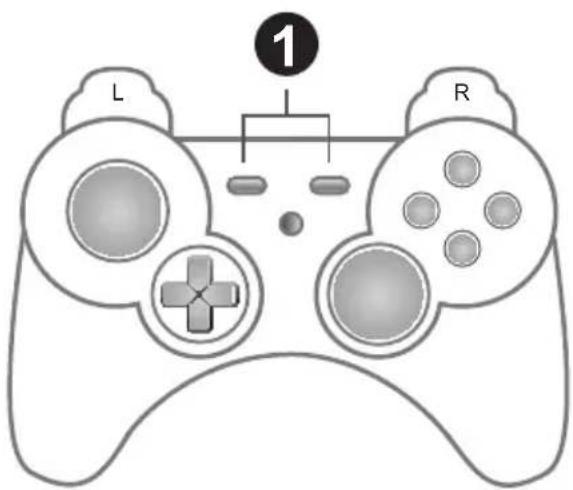
To use Mouse Sensitivity Mode from the controller connected to the Phantom-S:
- Press Select + Start (PS3), Share + Option (PS4) or Back + Start (Xbox) at the same time.
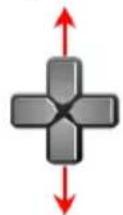
- To adjust Aim/Look sensitivity - use the Direction Up (more sensitive) or Direction Down (less sensitive) pad on the game controller.
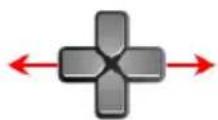
- To adjust ADS sensitivity - use the Direction Left (more sensitive) or Direction Right (less sensitive) pad on the game controller.
- Press Select + Start (PS3), Share + Option (PS4) or Back + Start (Xbox) at the same time to exit Mouse Sensitivity Mode.
Note: These changes are not permanently saved to a Profile.
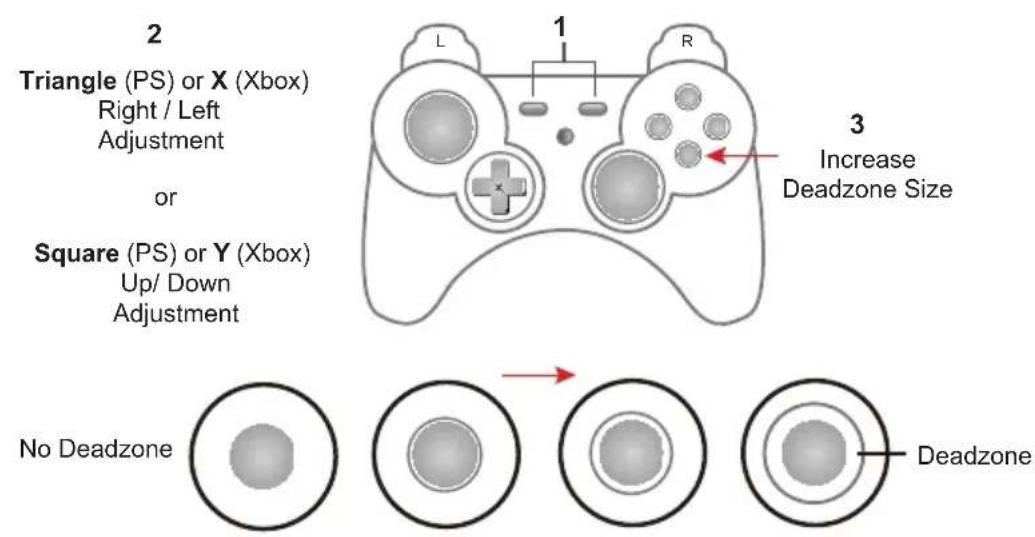
Deadzone Delay
The Deadzone is a small area around the Right Stick control that doesn't respond to movement. Movement only occurs when the Right Stick moves outside the Deadzone. Each game sets its own Deadzone size. With no Deadzone there is no delay with the mouse and movements are very straight and accurate.
Right Stick Deadzone
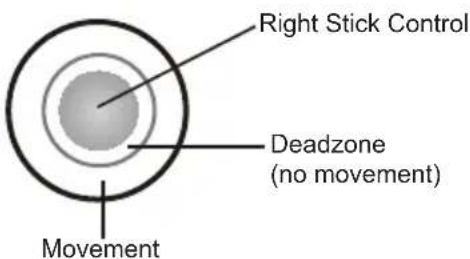
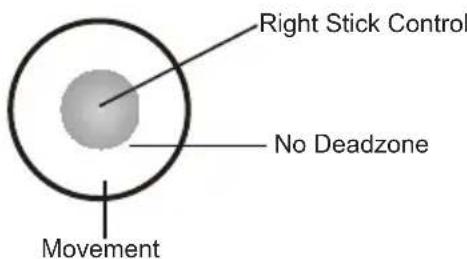
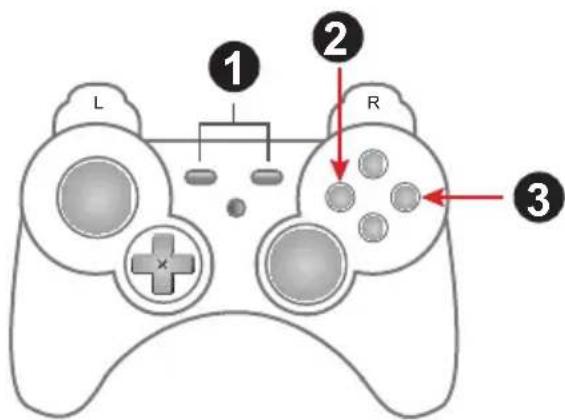
Set all 3 Deadzones for the best mouse performance. The Deadzone must be set while playing a first person shooter (FPS) game. The Deadzone is set when-after the last adjustment (step 3) the player starts to slowly move on-screen.
To set the Right/Left Deadzone:
-
From the game controller connected to the Phantom-S, press Select + Start (PS3), Share + Option (PS4) or Back + Start (Xbox) at the same time.
-
Press the Square (PS) or X (Xbox) button for right/left adjustment.
-
Repeatedly press O (PS) or B (Xbox) until you see a slow right movement on screen = no dead zone. (X or A to increase Deadzone)
-
Press the Square or X button to save.
-
Repeat step 1 to exit, or skip step 5 and continue with the next Deadzone settings without exiting.
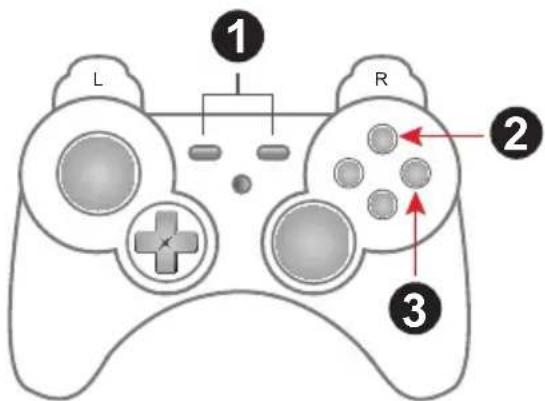
To set the Up/Down Deadzone:
-
Press Select + Start (PS3), Share + Option (PS4) or Back + Start (Xbox) at the same time.
-
Press the Triangle (PS) or Y (Xbox) button for up/down adjustment.
-
Repeatedly press O (PS) or B (Xbox) until you see a slow up movement on screen = no dead zone. (X or A to increase Deadzone)
-
Press the Triangle or Y button to save.
-
Repeat step 1 to exit.
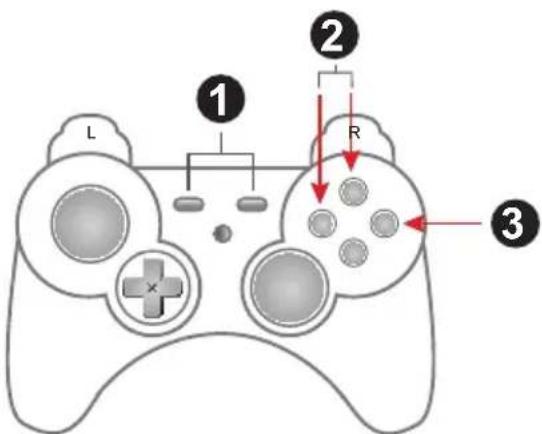
To set the Diagonal Deadzone:
-
Press Select + Start (PS3), Share + Option (PS4) or Back + Start (Xbox) at the same time.
-
Press the Triangle and Square (PS) or X and Y (Xbox) buttons for diagonal adjustment.
-
Repeatedly press O (PS) or B (Xbox) until you see a diagonal up movement on screen = no dead zone. (X or A to increase Deadzone)
-
Press the Square + Triangle (PS) or X + Y (Xbox) button to save.
- Repeat step 1 to exit.
Testing the Deadzone
Test the mouse within the first-person shooter game. Movements will be smooth, stable and accurate. You'll also notice that shooting becomes more steady and reliable than with the game controller. If any mouse movements are shaky or jumpy repeat the steps to set the Deadzone. With the Deadzone set the mouse performance should be excellent. You can also set the Deadzone using the Phantom-S software (see page 49).
Decrease Deadzone
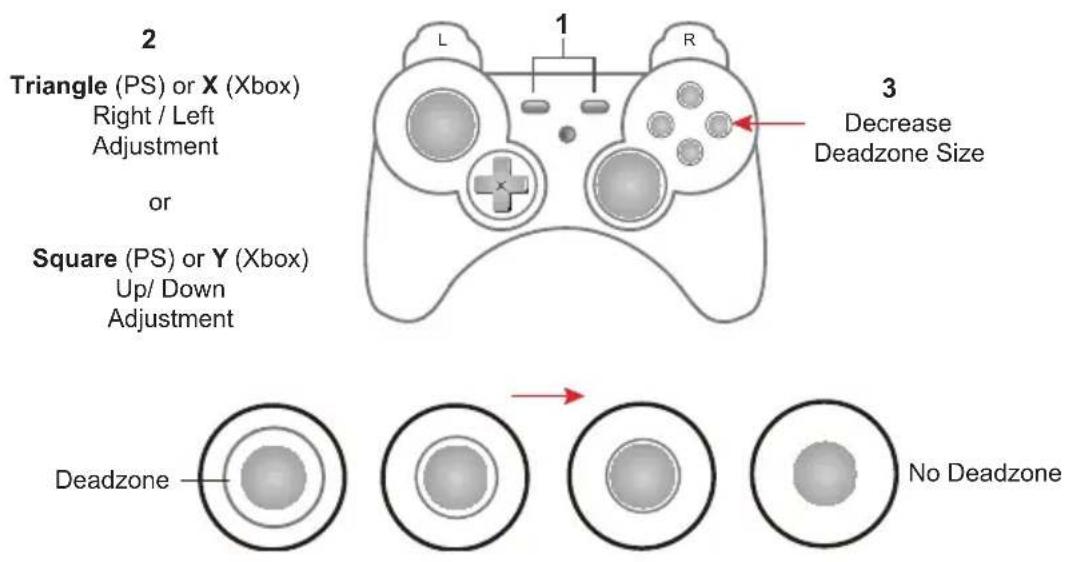
Increase Deadzone
Profile Selection
Profile Selection Hotkeys are assigned to profiles when they are created (see Adding Profiles, page 32). You can switch to a profile in the Current group during gameplay using the Profile Selection Hotkey assigned to it. The Profile Selection Hotkey is found on the top left corner of each profile, as shown here:
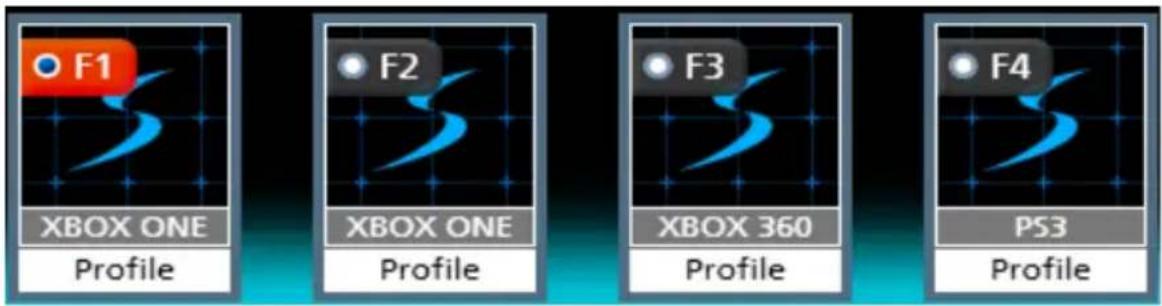
To switch profiles, press the Profile Selection Hotkey assigned to the profile. A single beep will alert you that the profile has changed. [F1]: Default PS Controller Profile. [F2]: Default Xbox Controller Profile.
To select to a profile, press the Profile Selection Hotkey [F1] to [F8]. A single beep will alert you that the profile has switched.
Keyboard / Gamepad Mode
Keyboard Mode allows you to use the keyboard to type during gameplay - for chatting or typing in information that requires text. Gamepad Mode is for normal gameplay with the keyboard.
Press [F9] to toggle between Keyboard Mode and Gamepad Mode.
Single Beep - Keyboard Mode on / Gamepad Mode off
Double Beep - Keyboard Mode off / Gamepad Mode on
Turbo Mode
With Turbo on all turbo setting set for the keyboard and mouse* will work (see Turbo, page 38). The orange Turbo LED lights up.
Press [F10] to toggle Turbo Mode on and off.
Single Beep - Turbo Mode on
Double Beep - Turbo Mode off
Note: Turbo settings only work on the keyboard and mouse. Turbo settings will not work from the game controller.
Macro Mode
With Macro Mode on macros will execute when the key is pressed (see Macro Mode, page 23). By default Macro mode is off.
Press [F11] to toggle Macro Mode on and off.
Single Beep - Macro Mode on
Double Beep - Macro Mode off
Play Mode
Play Mode allows you to toggle use of a computer or laptop keyboard and mouse for gameplay. For instructions to setup a PC for Playmode see Computer / Laptop + Console Setup, page 9.
With Play Mode on, keyboard and mouse use on the computer is locked and the keyboard and mouse signals are sent to the game console for gameplay. By default Play Mode is off.
Press [F12] to toggle Play Mode on and off.
Single Beep - Play Mode on
Double Beep - Play Mode off
Note: With Play Mode on you can use a keyboard connected to the Phantom-S's Keyboard Port, but it's [F12] key will not turn Play Mode off.
Overview
The Phantom-S software allows you to configure the keyboard and mouse settings for game console use. This chapter explains how to use the software in four sections:
- Downloading & Connecting
◆ Software Overview
◆ Groups, Profiles and Upload - Customizing Controls
Downloading
To download the Phantom-S software, do the following:
- Go to www.aten.com/phantoms
- Follow the instructions to download the Phantom-S software.
- Save and unzip the file to your hard drive.
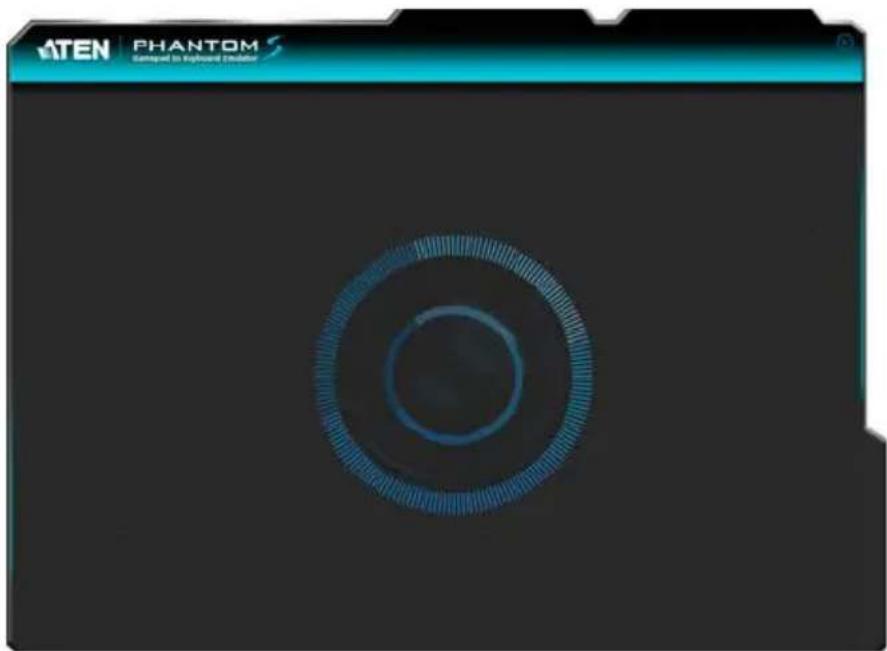
- Double click the Phantom-SR_.exe and the software opens:
natural_image
Exterior view of a Phantom 3 game controller monitor with a circular overlay (no text or symbols on the device itself)Connecting the Phantom-S Software
To connect the Phantom-S software to the Phantom-S:
- Connect the Phantom-S to a computer.
- Open the Phantom-S software. The connection page opens:
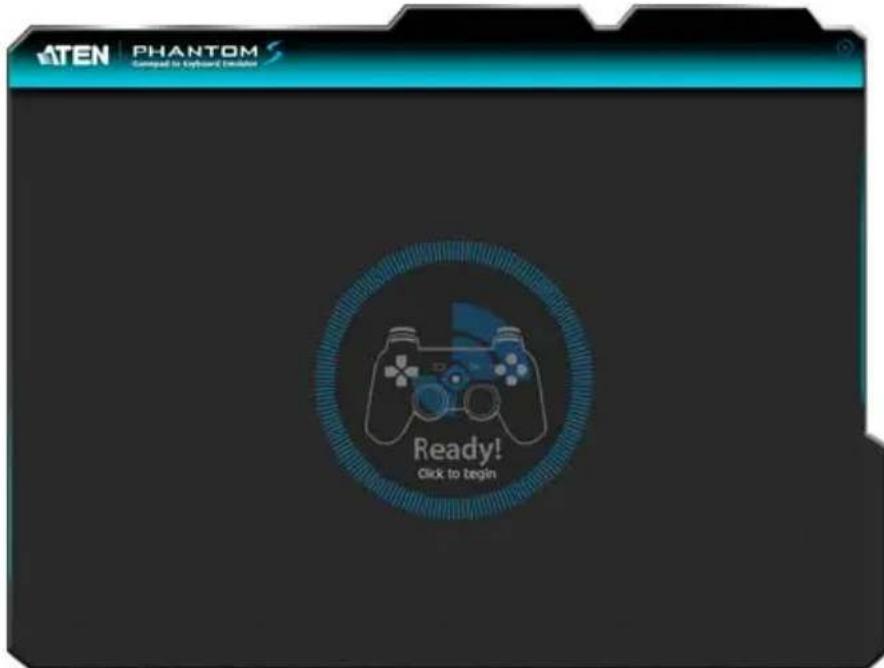
If the Ready image doesn't appear see Connecting Hardware, page 6.
- Click Ready.
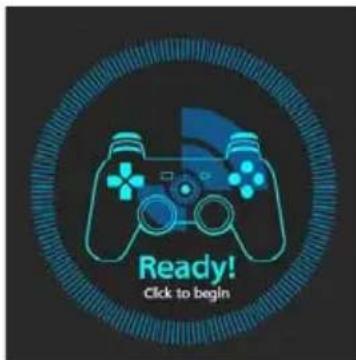
- The Phantom-S software opens as shown on the next page.
Phantom-S Interface
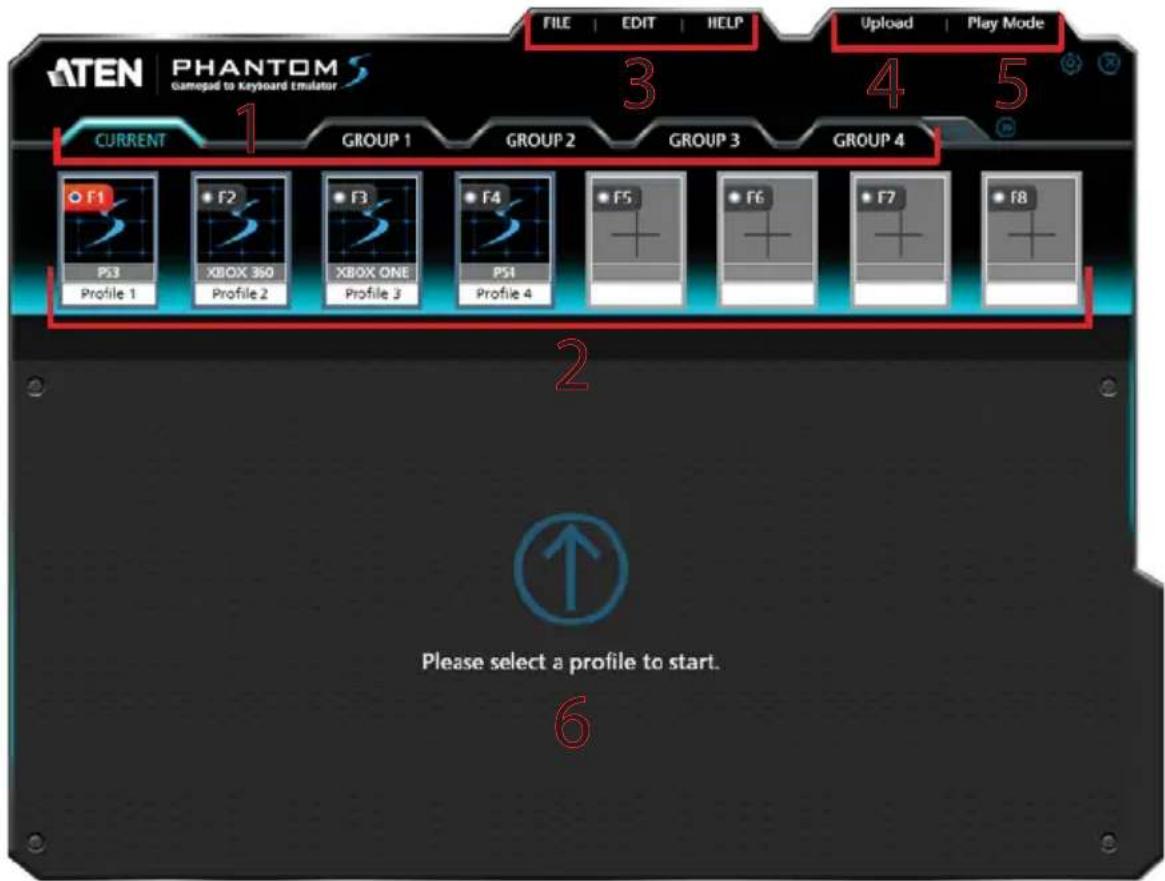
This is the main page of the Phantom-S software. The table below provides a brief description of each section and the page to find more information.
| # | Name Description | Page | |
| 1 | Groups This bar | lists and allows you to addGroups.◆ AGroupstores up to 8 profiles.◆Currentis the group of profiles on the Phantom-S.◆ A Group isUploadedto Current.◆ Only profiles in Current can be selected for use. | 30 |
| 2 | Proof Selection Bar | This lsection is where you add profiles. AProfileis a configuration that saves the settings and maps the controller buttons for the keyboard and mouse◆ Profiles are created and saved in a Group.◆ A Group of profiles is uploaded to Current.◆ Only profiles in Current can be selected for use. | 31 |
| 3 | Menu | Click the File, Edit or Help menu to display the options: FileSave: Saves the profile that is being configured.Save as: Use the drop-down menus to select a Group and Profile to save the current profile.Import: Use Profile to import a previously saved profile file (*.profile). Use Group to import a previously saved group file (*.group).Export: Use Profile to save a profile as a file (*.profile) that can be imported. Use Group to save a group as a file (*.group) that can be imported.Exit: Closes the Phantom-S software.EditDelete: Use Profile or Group to permanently remove either from the system.Rename: Select a profile and click rename to edit the profile name.Change Cover: Use to browse and select an image for the current profile's icon.Copy: Use Profile to copy the selected profile and paste it in another group. Group creates a copy of the selected group as a new group.Paste: Select a profile slot to Paste a copied profile from one group into another.HelpFirmware Upgrade: Use to browse to select the firmware upgrade file and click Open to start the process.SettingsKeyboard Setting: Select the type of keyboard connected for use. (default: US 104-Key)Menu Language: Select the language you would like to use for the software interface.Beep Sound: Select On to sound a beep when a configuration change is made via keyboard or controller. Single Beep: Successful. Double Beep: unsuccessful.Set Mouse DPI: Enter the number that matches the DPI specifications of the mouse connected to the Phantom-S. (default: 2000)Reset to Factory Default: Resets all software settings. | N/A |
| 4 | Upload Click this | button to upload the selected Group (of profiles) to Current for use. This uploads the group of profiles you want to use to the Phantom-S.◆ When you Upload a group it over-writes all profiles in Current.◆ Profiles in Current can be selected for use on the keyboard and mouse during game play.◆ You can edit Current profiles but changes are not saved and if a group is uploaded, all changes are lost. | 33 |
| 5 | Play Mode Play M | Mode is used when you connect a computer and game console to the Phantom-S – at the same time.When using a laptop or computer's keyboard and mouse, click Play Mode to send all keyboard/mouse signals to the PS/Xbox for gameplay.◆ In Playmode the keyboard/mouse won't work on the PC.◆ Press [F12] to exit Play Mode.◆ See Play Mode, page 23, for details. | 9 |
| 6 | Profile Editor This | is the main area where customize the controls for the keyboard and mouse. Items appear when you select or add a profile. | 35 |
Software Overview
This section provides an overview of how to use the Phantom-S software. The sections that follow provide details on each step. Connect the Phantom-S to a computer and do the following:
- Add a Group.
- Add Profiles to the group.
-
Upload the group to Current.
-
Go to the Current tab.
-
Use the Profile Selection Radio Button to set a profile (turns red) as the default start-up profile.
-
Connect the Phantom-S to the game console / keyboard / mouse.
-
The keyboard/mouse is ready for use with the profile set in step 5.
-
Press a Profile Selection Hotkey [F1]\~[F8] to switch profiles from the keyboard. Profiles in Current are selected for use.
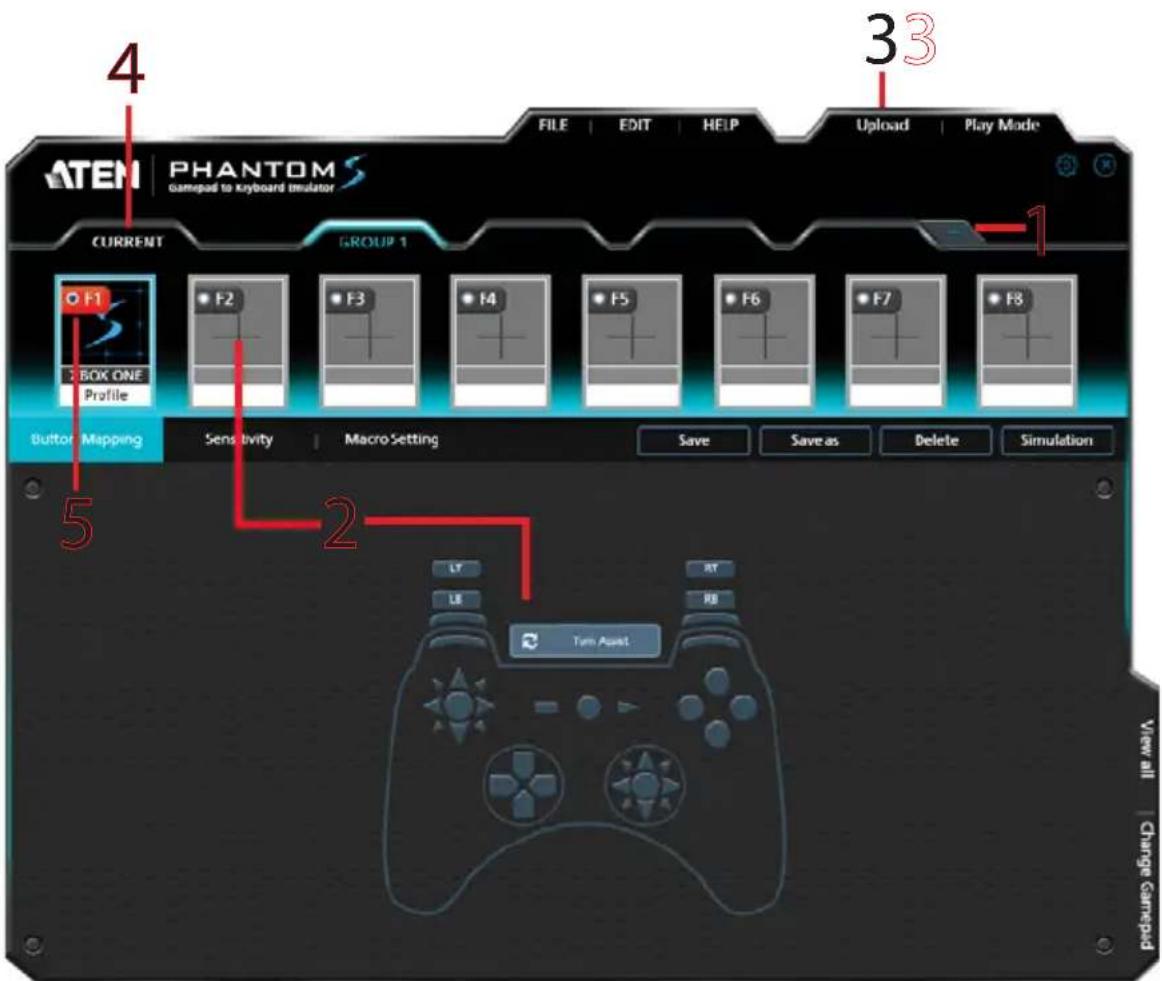
Groups
The Group bar is for selecting and adding groups. You can create up to 32 groups. You can add up to 8 profiles with keyboard/mouse settings to a group. Upload a group to Current and the profiles can be selected for use.
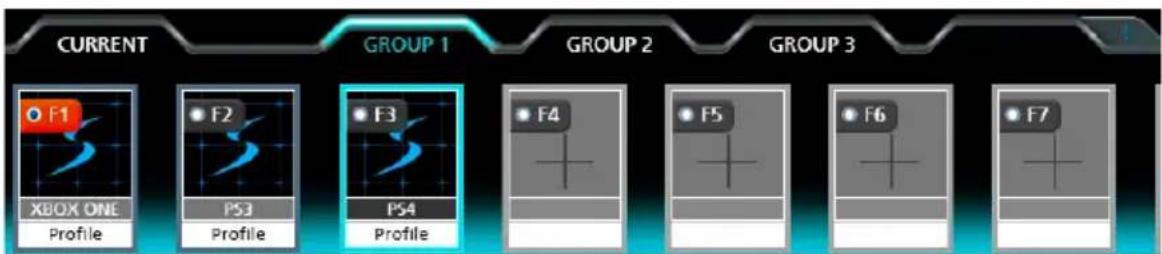
flowchart
graph LR
    A["CURRENT"] --> B["F1"]
    B --> C["XBOX ONE Profile"]
    A --> D["F2"]
    D --> E["PS3 Profile"]
    A --> F["F3"]
    F --> G["PS4 Profile"]
    A --> H["F4"]
    H --> I["..."]
    A --> J["F5"]
    J --> K["..."]
    A --> L["F6"]
    L --> M["..."]
    A --> N["F7"]
- Click to add a new group.
Click scroll to view more groups. - Click a group (Group 1, Group 2, Group 3, etc.) to add profiles.
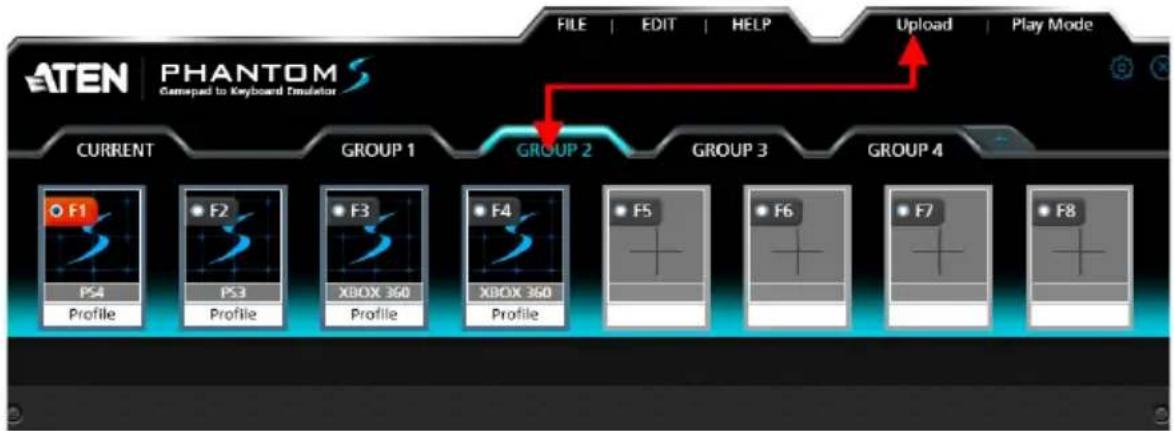
- Click Upload to send the group to Current.
- When a group is uploaded it over-writes all profiles in Current.
- Profiles changed in Current are not saved back to the group in which they were created.
- Only the Group (of profiles) uploaded to Current can be selected by using the Profile Selection Hotkey (F1\~F8).
Profiles
The Profile Selection Bar is for adding and configuring profiles in a group. A Profile is a keyboard/mouse configuration that is created and saved in a Group. Each profile has custom settings for a keyboard and mouse. Only the Group (of profiles) uploaded to Current can be selected for use.
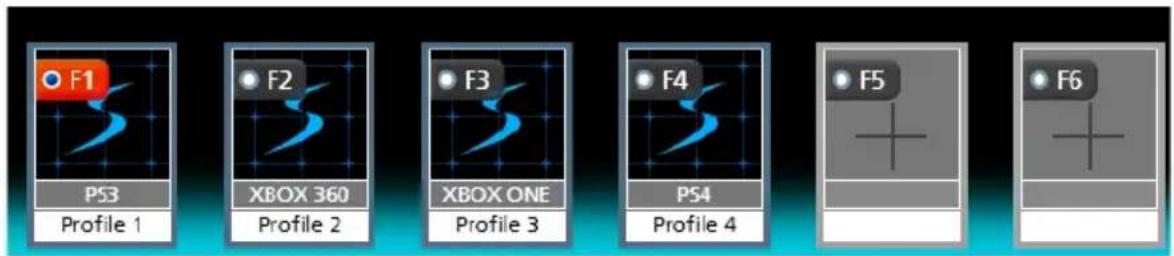
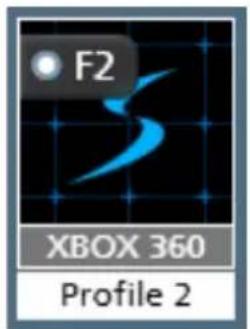
- Profile Selection Hotkey: Each profile has a hotkey [F1]\~[F8] to select it for use from the keyboard connected to the Phantom-S during gameplay.
- Start-up Profile: Click the radio button next to the Profile Selection Hotkey to set a profile as the default start-up profile for the group.
- The grey box displays the controller type and the white box displays the name.
- To edit a profile, Right Click:
| Rename |
| Change cover |
| Import |
| Export |
| Copy |
| Paste |
| Delete |
For details on these menu options see Menu, page 27 - Edit.
Adding Profiles
To create a new profile for your keyboard/mouse settings:
- Select a Group and click an empty profile slot:
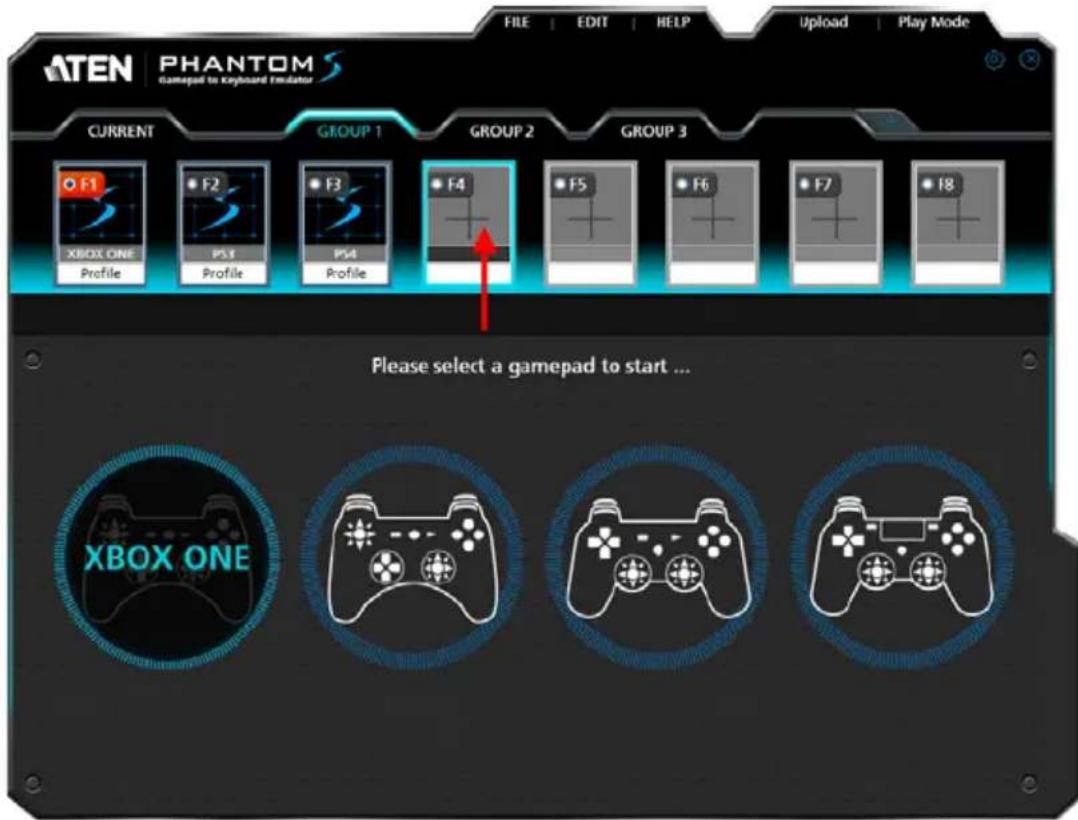
- Select the gamepad you are using.
- The Profile Editor appears to configure the keyboard and mouse settings and the new profile is added to the Profile Selection Bar.
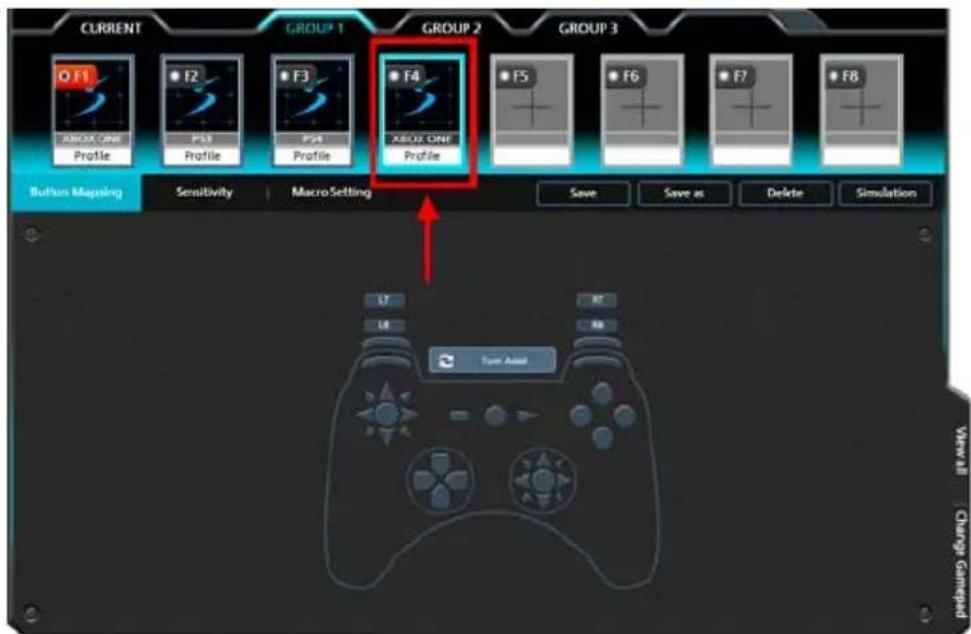
Note: The Profile Editor is discussed on page 35.
Upload
A Group (of profiles) needs to be uploaded to Current. Only the profiles in Current can be selected for use. You can view and edit profiles in Current but the changes are not saved back to the Group. When a group is uploaded to Current it over-writes all profiles. You can select Copy - Group from the Edit menu to save Current as a group.
To Upload a group, do the following:
- Select a Group and click Upload.
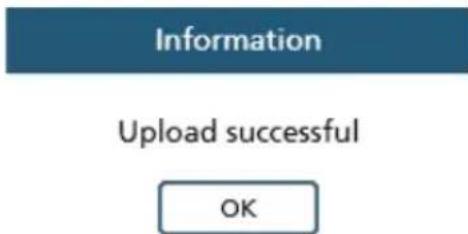
- A confirmation messages appears. Click OK.
-
Go to the Current tab.
-
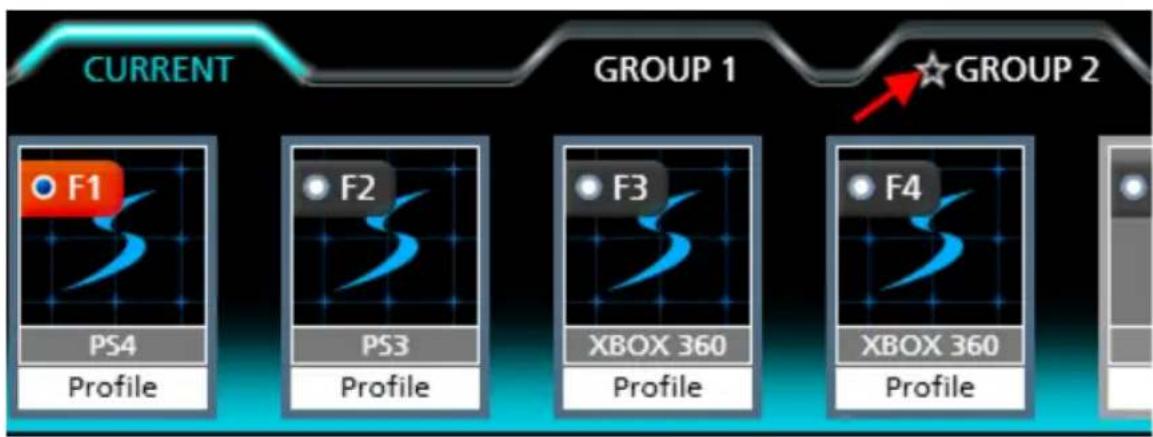
The Group is sent to Current and is marked with a star, as shown here:
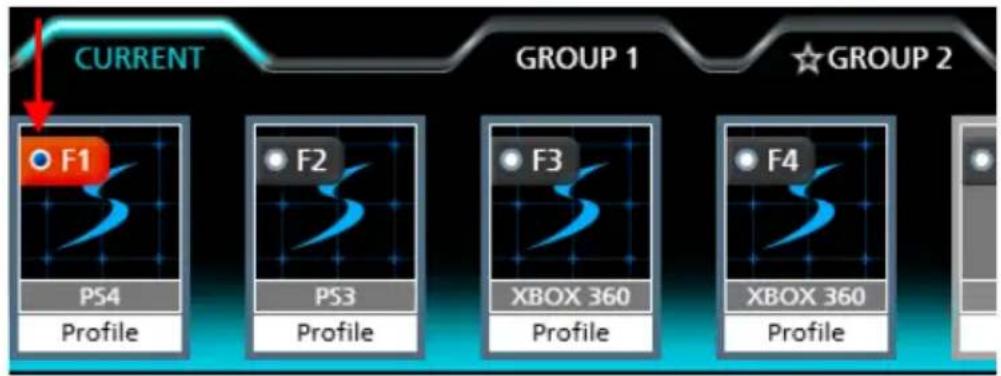
- Use the Radio Button to set the default start-up profile (turns red). This is the default profile that will be selected for use when the Phantom-S is connected to the game console
Customizing Controls
This section explains how to use the Profile Editor to configure the keyboard/mouse settings. When you select a profile from the Profile Selection Bar the Profile Editor opens on the Button Mapping screen:
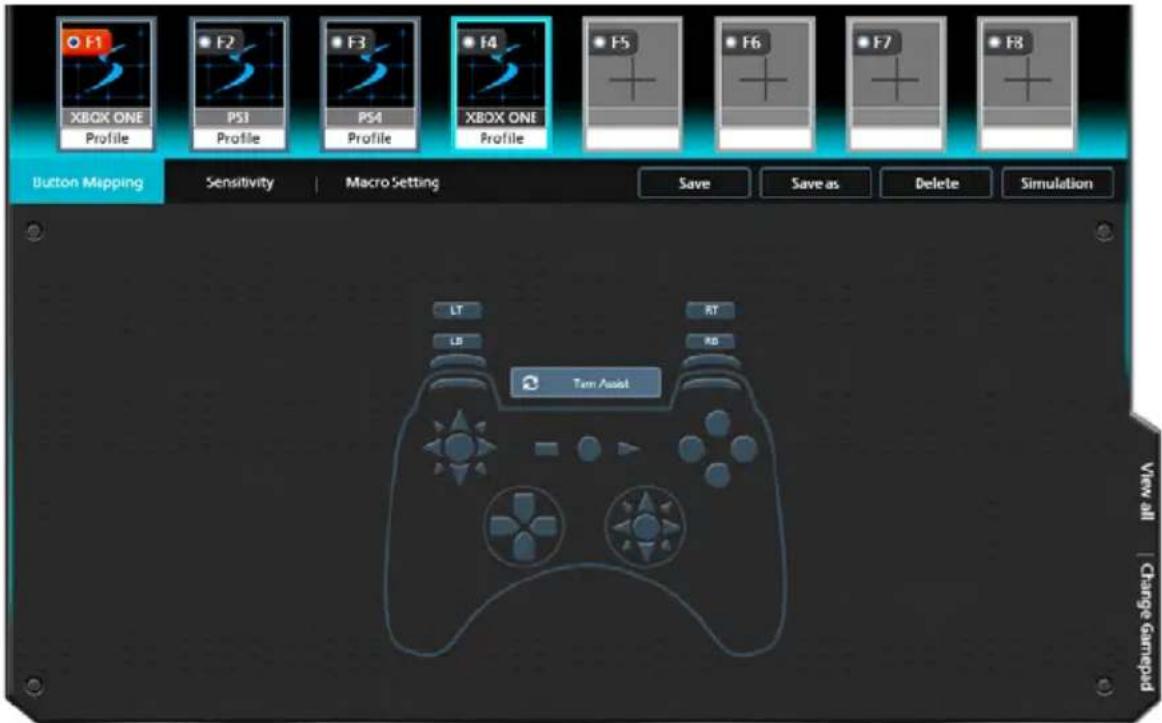
| Name Details | Page | |
| Button Mapping The Button | Mapping page is for mapping the game controller buttons to the keyboard and mouse. | 36 |
| Sensitivity The Sensitivity | page is used to configure the mouse sensitivity settings for Aim Look Mode and ADS Mode (Aim-Down-Sight). | 55 |
| Macro Settings The Macro | Settings page is used to create controller button macros which can be executed from a keyboard, mouse, or joystick. | 52 |
| Menu Options Click to use the Menu options:Save: Saves changes made to this Profile.Save as: Saves profile changes to a new group and profile.Delete: Permanently deletes the profile from the group.Simulation: Use this option to test changes you make to a profile on the game console. Press [F12] to exit. | N/A | |
Button Mapping
The Button Mapping screen is for mapping the controller buttons to the keyboard and mouse, setting Turbo and Turn Assist. When you select a profile from the Profile Selection Bar, the Button Mapping image appears:
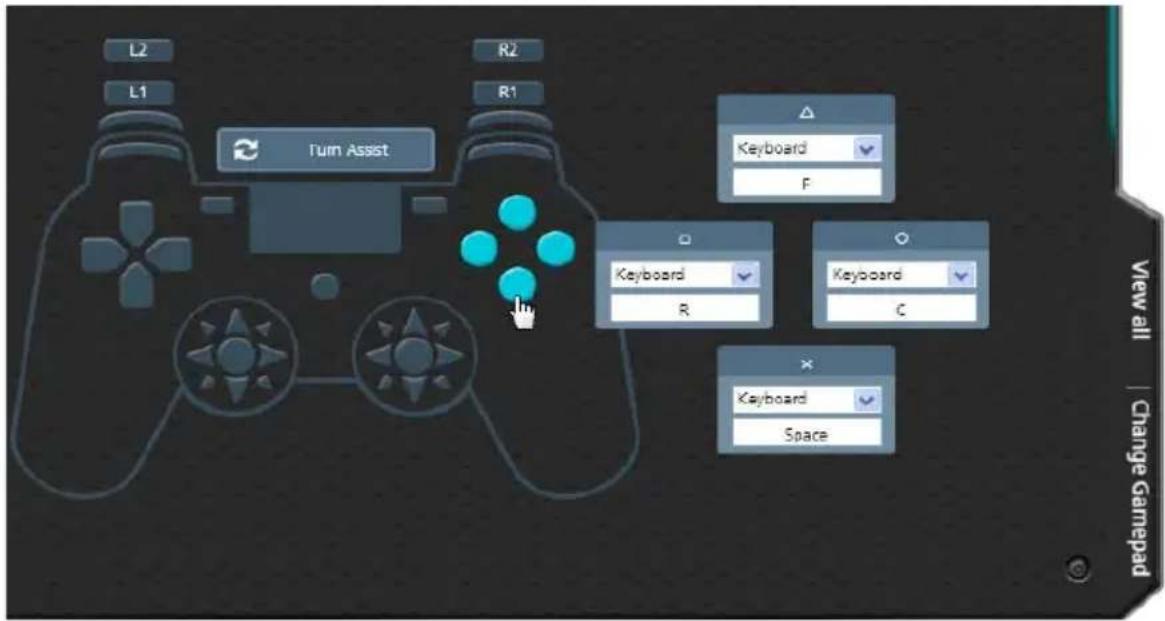
- Click a set of buttons or the touchpad to open the editor windows and set the mappings.
- View All: Click to view all controller button mappings.
- Change Gamepad: Click to change the gamepad type. A window opens with a drop-down menu to select a controller type. Some settings might change if the controller has different buttons.
- For default button mappings, see Keyboard Map, page 13.
- For Mapping, see page 37.
◆ To set Turbo, see page 38.
◆ To set Turn Assist, see page 39.
Mapping
Each controller button can be mapped to a keyboard, mouse or joystick. When you click a button set the editor windows open:
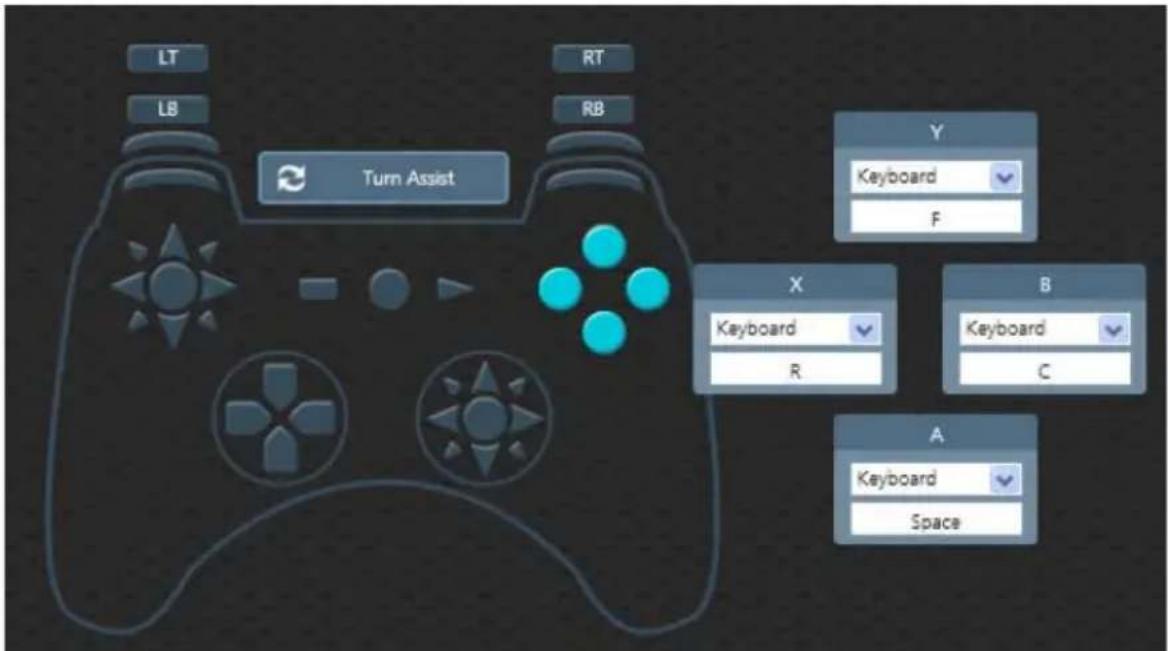
To map a controller button:
- Use the drop-down menu to select a device and then the key or button:
Keyboard: Click inside the box and press a key on the keyboard to map the controller button to a key.
Mouse: Use the drop-down menu to select a mouse button to map the controller button to.
Joystick: Use the drop-down menu to select a button to map the controller button to.
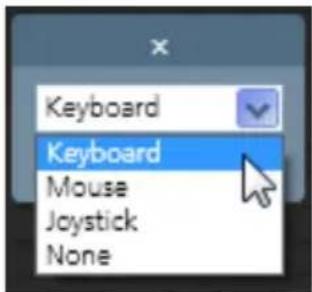
None: This option disables the controller button's mapping.
- Click Save to save the profile mappings.
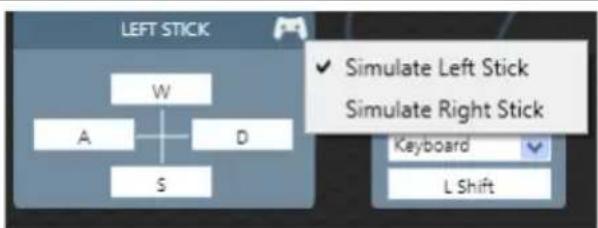
Note: When mapping the controller's analog sticks, click on the white controller icon to change emulation to the right/left stick.
Turbo
Turbo allows rapid fire of a button from the keyboard and mouse. You can enable or disable turbo for any controller button* and set the level (1\~3) of intensity. Turbo Mode must be on for turbo buttons to work (see Turbo Mode, page 22).
To set turbo on a button:
- Click a button set to open the editor windows.
- Click the top bar of the editor window to set the turbo level. A bullet icon will appear for each level.
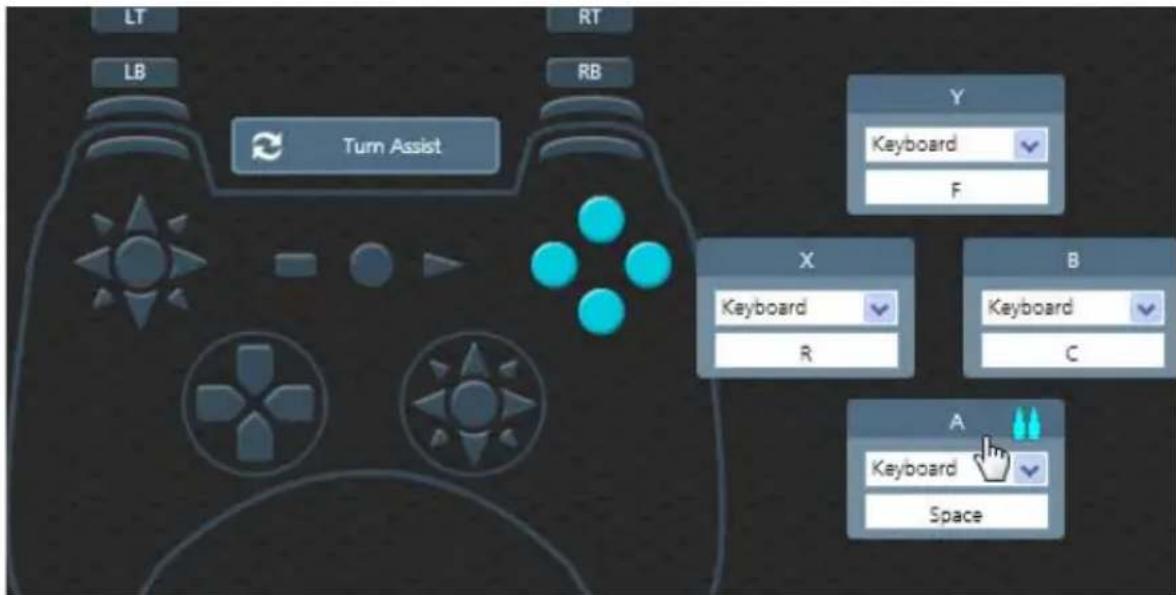
- Set the level (1\~3) of rapid fire you want to use:
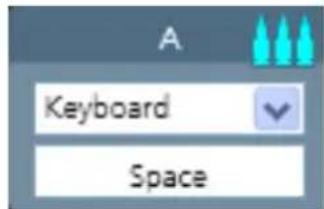
No bullets = Turbo off.
- Click Save.
Note: Turbo settings only work on the keyboard and mouse. Turbo settings will not work from the game controller.
Turn Assist
Turn Assist helps you continue long mouse movements without having to move the mouse. Turn Assist works by holding down the Turn Assist Button while moving the mouse. The turn continues automatically until you let go of the turn assist button. Select a device and assign the turn assist Button and then click Save.
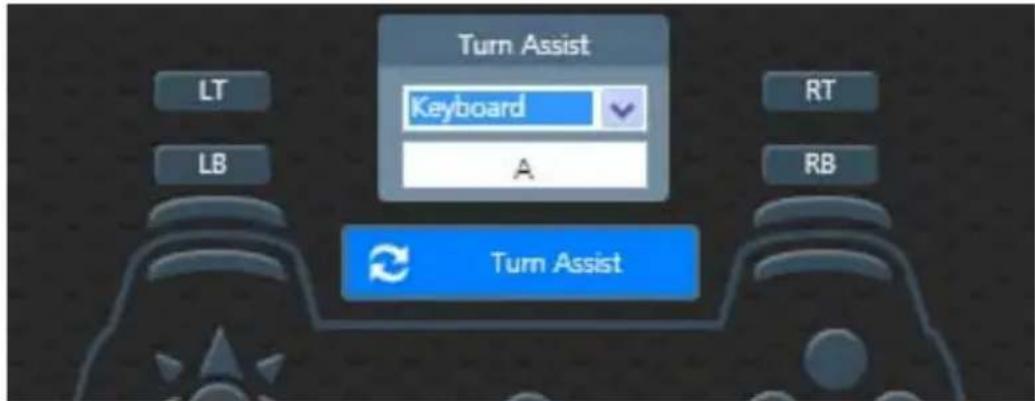
| Device Turn Assist Button | |
| Keyboard Enter a key you want to use as the Turn Assist button. | |
| Mouse Select a Mouse function to use as the Turn Assist button. | |
| Joystick Select a button 1~12 to use as the Turn Assist button. | |
| None No Turn Assist device assigned. |
Sensitivity
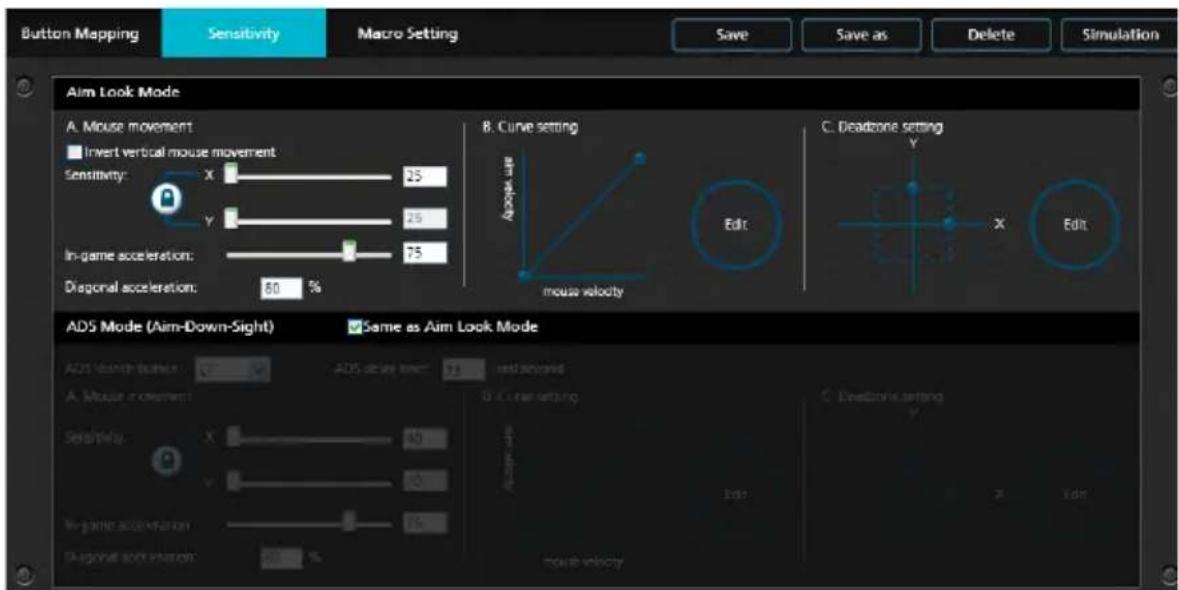
The Sensitivity section is for configuring the sensitivity of mouse movements. You can set the mouse sensitivity for Aim Look Mode: the normal view the character has walking around in the game, or ADS (Aim-Down-Sight) Mode: the view the character has when zooming-in to look through a scope. Instructions are provided beginning on the next page.
Aim Look Mode
These settings configure how the mouse movements respond during when the character has a normal view in the game (not zoomed in).
A. Mouse Movement
bar
Aim Look Mode | Category | Value (%) | |---|---| | Invert vertical mouse movement | 25 | | Sensitivity: X | 25 | | In-game acceleration: Y | 75 | | Diagonal acceleration: 80 % | 80 || Name Details | |
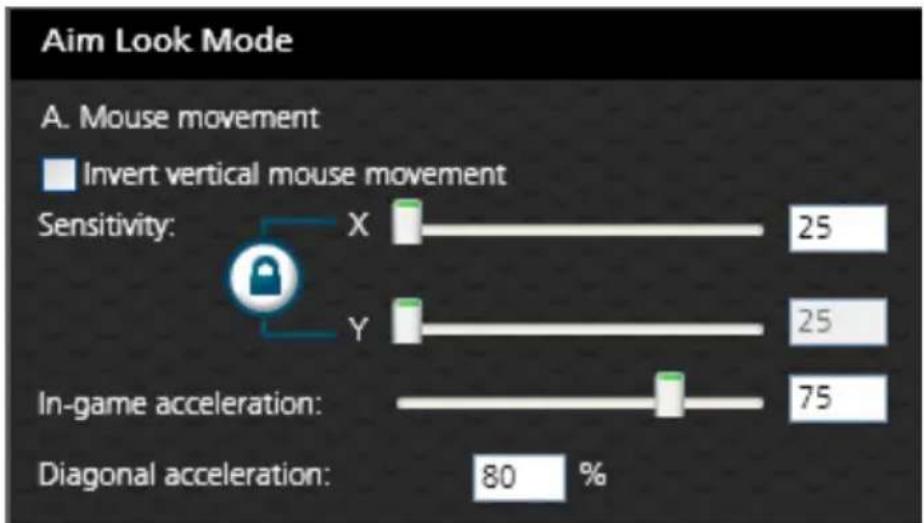
| Invert Vertical Mouse Movement | Checking the box reverses the up/down movements of the mouse, so that pushing the mouse forward causes a downward movement and pulling the mouse back causes an upward movement. |
| Sensitivity The Aim Lock | k sensitivity bar sets how quick or slow mouse movements respond. The higher the number the more loose the movements will feel and the lower the number the more tight the movements will feel.◆ Use X to set the sensitivity of right and left movements◆ Use Y to set the sensitivity of up and down movements |
Lock | The lock icon is used to fix the X and Y settings so that both stay the same. Click the icon to unlock the settings and set each to different values. |
| In-game Acceleration Sets the level of acceleration mouse movements make as they continue moving up, down, left or right. A higher value causes movements to speed up as they continue in the same direction. | |
| Diagonal Acceleration Diagonal Acceleration sets the shape of a circular movement made with the mouse. Change the value and test the setting within the game by making a circular mouse movement. | |
B. Curve Setting
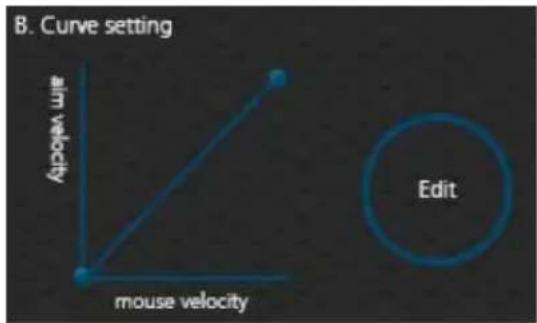
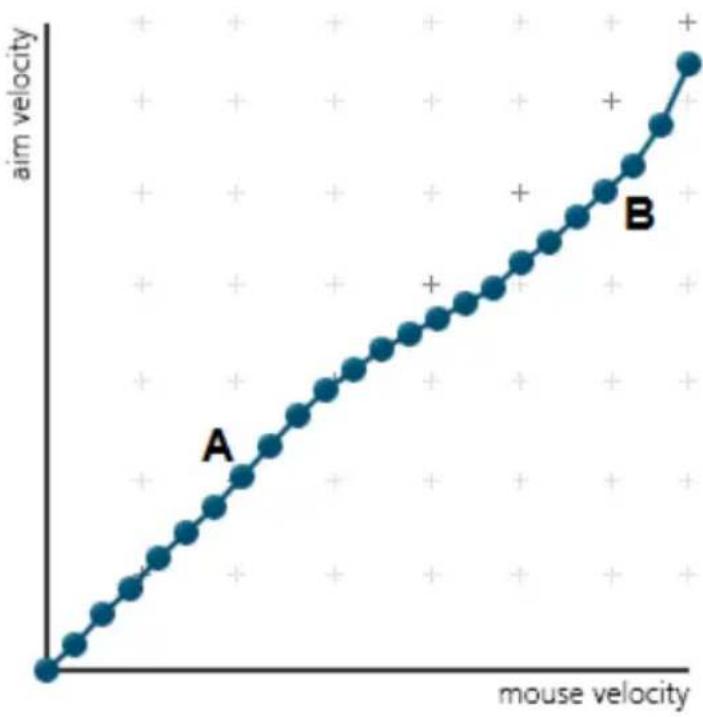
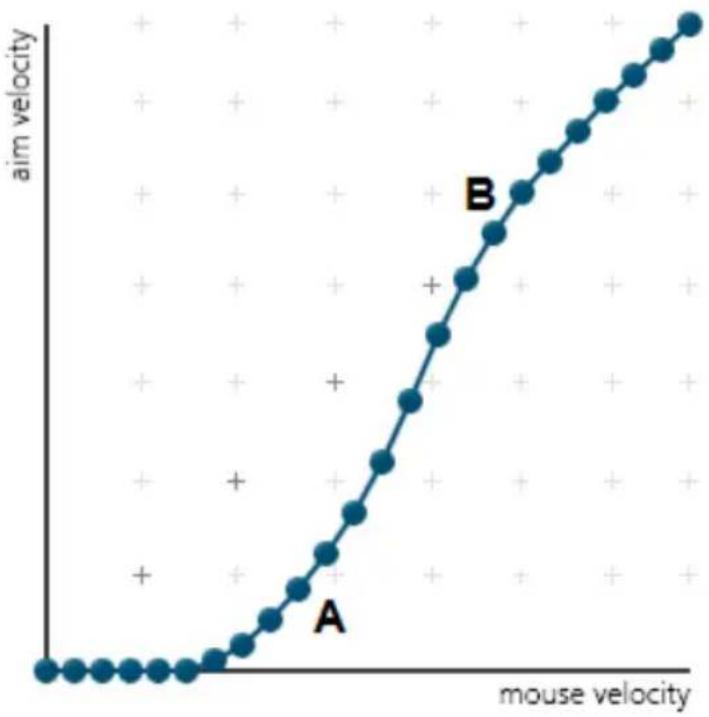
The Curve Setting is for adjusting the relationship of Mouse Velocity (physical mouse speed) to Aim Velocity (on-screen speed). Click Edit to open.
Settings
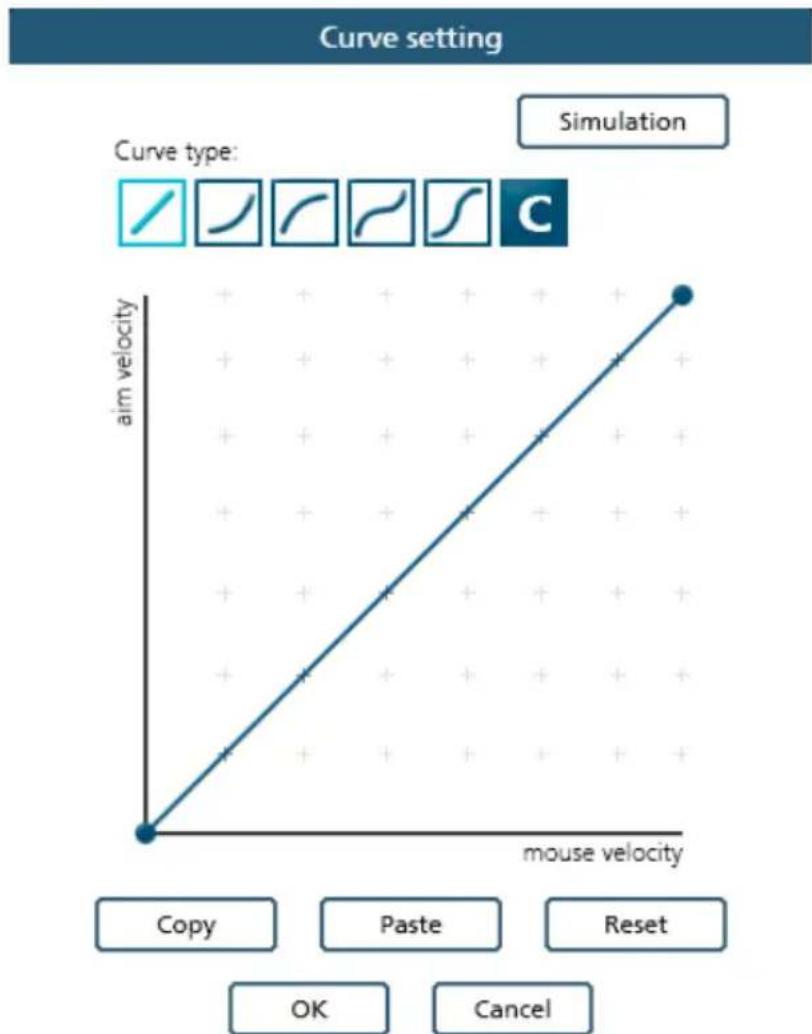
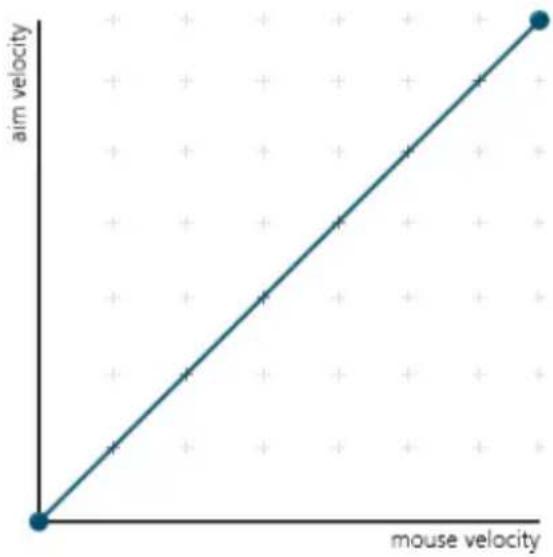
Curve settings are used to fine tune how physical mouse movements respond on-screen (in the game). The default curve has a 1:1 ratio: Physical mouse speed equals on-screen speed. Adjustments can limit movements, stretch movements and increase or decrease progressive movements. The Curve Setting table is provided on the next page and information on making adjustments to the curve starts on page 43.
line
| Curve type | mouse velocity | aim velocity | | ---------- | -------------- | ------------ | | Copy | 0 | 0 | | Paste | 1 | 1 | | Reset | 2 | 2 | | OK | 3 | 3 | | Cancel | 4 | 4 || Function Description | |
| Curve Type Click a curve | type to use a predefined curve for mouse movements. You can change the shape of a curve type at the points provided. Select a curve type to use as a template and then clickCustomto adjust the curve to suit your needs. |
| Custom Use custom to make fine adjustments to the curve. When selected 24 points appear allowing you to adjust the shape of the curve. Click and drag the points up or down to make adjustments. You can select a Curve Type and then clickCustomto adjust it as you wish.Examples are provided starting on page 45. | |
| Aim Velocity Aim Velocity refers to the speed of on-screen movements. | |
| Mouse Velocity Mouse Velocity refers to the speed of physical mouse movements. | |
| Simulation Use simulation when the Phantom-S is connected to a computer and game console to test the curve settings. Use [F12] to exit. | |
| Copy After customizing the curve you can copy your adjustments and paste them into another profile. | |
| Paste Paste a copied curve into the curve settings of another profile. | |
| Reset Resets the curve back the default values. | |
Curve
The Curve is the relationship of Mouse Velocity (physical mouse speed) to Aim Velocity (on-screen speed). When the physical mouse and on-screen speed are the same, the curve looks like this:
line
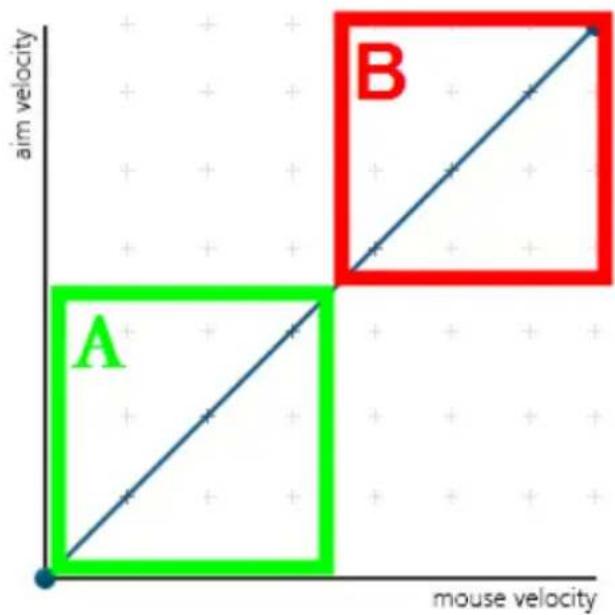
| mouse velocity | aim velocity | | -------------- | ------------ | | 0 | 0 | | 1 | 1 | | 2 | 2 | | 3 | 3 | | 4 | 4 | | 5 | 5 | | 6 | 6 | | 7 | 7 | | 8 | 8 | | 9 | 9 | | 10 | 10 |Mouse Velocity increases from left to right. Aim Velocity increases from bottom to top. As you adjust the curve up and down, the relationship of physical mouse speed to on-screen speed changes. The two sections represent different movements:
scatter
| Region | Start of x (mouse velocity) | End of x (aim velocity) | |--------|-----------------------------|--------------------------| | A | 0 | 0 | | B | 1 | 1 |A: Close Aiming Movements B: Long Turning Movements
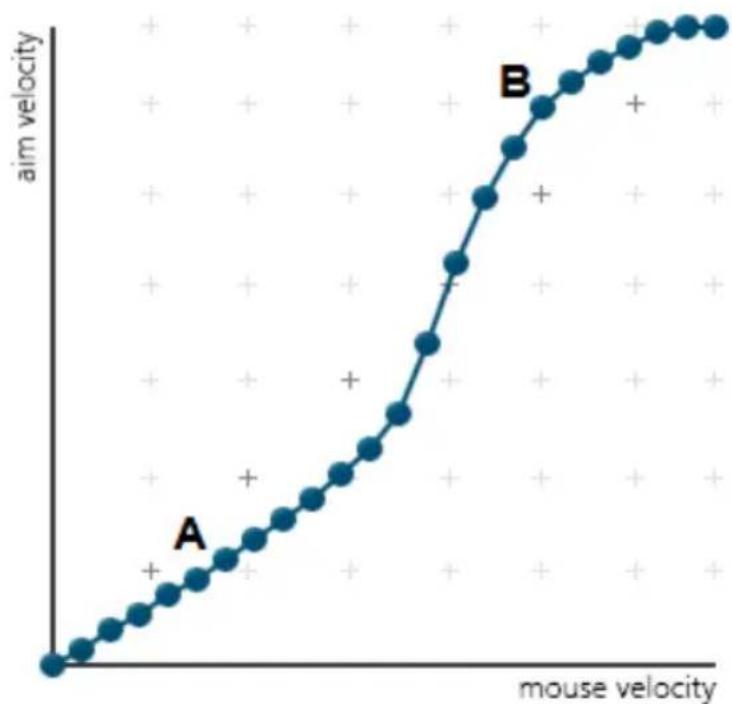
Pulling the Curve up makes the on-screen movements faster and pulling the Curve down restricts the speed – of A or B as the mouse is moved.
Adjusting the Curve
Adjusting the curve allows you to fine tune turn acceleration, deceleration, high and low speeds with limits, and boost velocity. Use the graph points to adjust the curve to suit your needs. Use the examples below to understand how adjusting (A) Aiming and (B) Turning affect movements in the game:
(A) Low Aim Speed / (B) High Turn Speed
line
| mouse velocity | aim velocity | | -------------- | ------------ | | 0 | 0 | | 1 | 1 | | 2 | 2 | | 3 | 3 | | 4 | 4 | | 5 | 5 | | 6 | 6 | | 7 | 7 | | 8 | 8 | | 9 | 9 | | 10 | 10 | | 11 | 11 | | 12 | 12 | | 13 | 13 | | 14 | 14 | | 15 | 15 | | 16 | 16 | | 17 | 17 | | 18 | 18 | | 19 | 19 | | 20 | 20 | | 21 | 21 | | 22 | 22 | | 23 | 23 | | 24 | 24 | | 25 | 25 | | 26 | 26 | | 27 | 27 | | 28 | 28 | | 29 | 29 | | 30 | 30 | | 31 | 31 | | 32 | 32 | | 33 | 33 | | 34 | 34 | | 35 | 35 | | 36 | 36 | | 37 | 37 | | 38 | 38 | | 39 | 39 | | 40 | 40 | | 41 | 41 | | 42 | 42 | | 43 | 43 | | 44 | 44 | | 45 | 45 | | 46 | 46 | | 47 | 47 | | 48 | 48 | | 49 | 49 | | 50 | 50 | | 51 | 51 | | 52 | 52 | | 53 | 53 | | 54 | 54 | | 55 | 55 | | 56 | 56 | | 57 | 57 | | 58 | 58 | | 59 | 59 | | 60 | 60 | | 61 | 61 | | 62 | 62 | | 63 | 63 | | 64 | 64 | | 65 | 65 | | 66 | 66 | | 67 | 67 | | 68 | 68 | | 69 | 69 | | 70 | 70 | | 71 | 71 | | 72 | 72 | | 73 | 73 | | 74 | 74 | | 75 | 75 | | 76 | 76 | | 77 | 77 | | 78 | 78 | | 79 | 79 | | 80 | 80 | | 81 | 81 | | 82 | 82 | | 83 | 83 | | 84 | 84 | | 85 | 85 | | 86 | 86 | | 87 | 87 | | 88 | 88 | | 89 | 89 | | 90 | 90 | | 91 | 91 | | 92 | 92 | | 93 | 93 | | 94 | 94 | | 95 | 95 | | 96 | 96 | | 97 | 97 | | 98 | 98 | | 99 | 99 | | 100 | |(A) Increasing Thrust for Aiming / (B) Prevent High Turn Speed
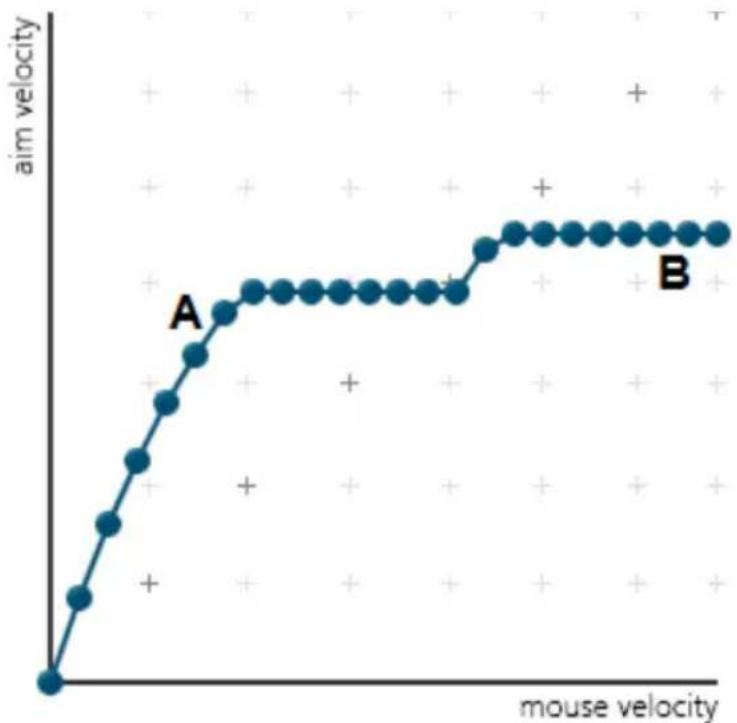
line
| mouse velocity | aim velocity | | -------------- | ------------ | | 0 | 0 | | 1 | 1 | | 2 | 2 | | 3 | 3 | | 4 | 4 | | 5 | 5 | | 6 | 6 | | 7 | 7 | | 8 | 8 | | 9 | 9 | | 10 | 10 | | 11 | 11 | | 12 | 12 | | 13 | 13 | | 14 | 14 | | 15 | 15 | | 16 | 16 | | 17 | 17 | | 18 | 18 | | 19 | 19 | | 20 | 20 | | 21 | 21 | | 22 | 22 | | 23 | 23 | | 24 | 24 | | 25 | 25 | | 26 | 26 | | 27 | 27 | | 28 | 28 | | 29 | 29 | | 30 | 30 | | 31 | 31 | | 32 | 32 | | 33 | 33 | | 34 | 34 | | 35 | 35 | | 36 | 36 | | 37 | 37 | | 38 | 38 | | 39 | 39 | | 40 | 40 | | 41 | 41 | | 42 | 42 | | 43 | 43 | | 44 | 44 | | 45 | 45 | | 46 | 46 | | 47 | 47 | | 48 | 48 | | 49 | 49 | | 50 | 50 | | 51 | 51 | | 52 | 52 | | 53 | 53 | | 54 | 54 | | 55 | 55 | | 56 | 56 | | 57 | 57 | | 58 | 58 | | 59 | 59 | | 60 | 60 | | 61 | 61 | | 62 | 62 | | 63 | 63 | | 64 | 64 | | 65 | 65 | | 66 | 66 | | 67 | 67 | | 68 | 68 | | 69 | 69 | | 70 | 70 | | 71 | 71 | | 72 | 72 | | 73 | 73 | | 74 | 74 | | 75 | 75 | | 76 | 76 | | 77 | 77 | | 78 | 78 | | 79 | 79 | | 80 | 80 | | 81 | 81 | | 82 | 82 | | 83 | 83 | | 84 | 84 | | 85 | 85 | | 86 | 86 | | 87 | 87 | | 88 | 88 | | 89 | 89 | | 90 | 90 | | 91 | 91 | | 92 | 92 | | 93 | 93 | | 94 | 94 | | 95 | 95 | | 96 | 96 | | 97 | 97 | | 98 | 98 | | 99 | 99 | | 100 | |(A) Normal Aim Speed / (B) Increasing Thrust for Turning
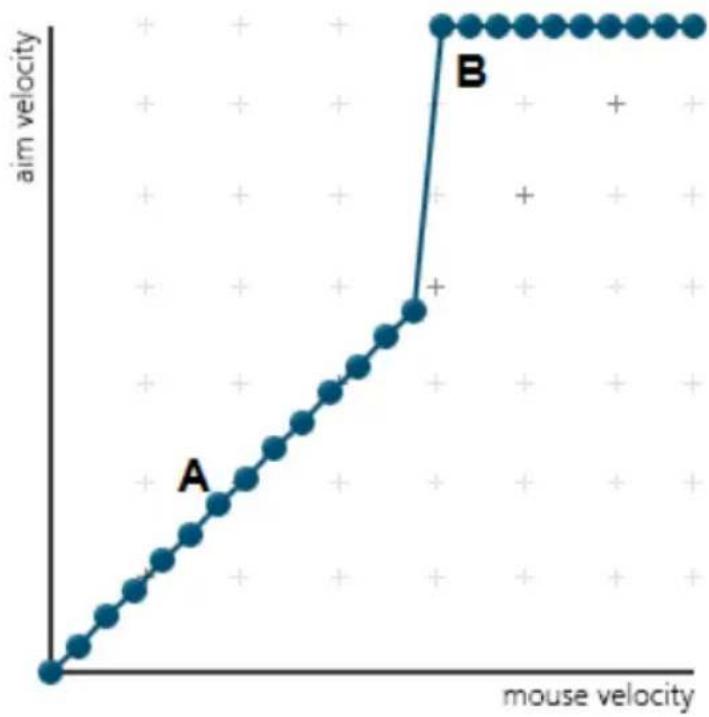
line
| mouse velocity | aim velocity | | -------------- | ------------ | | 0 | 0 | | A | A | | B | B |(A) Normal Aim Speed / (B) Low Turn Speed
line
| mouse velocity | aim velocity | | -------------- | ------------ | | 0 | 0 | | 1 | 1 | | 2 | 2 | | 3 | 3 | | 4 | 4 | | 5 | 5 | | 6 | 6 | | 7 | 7 | | 8 | 8 | | 9 | 9 | | 10 | 10 | | 11 | 11 | | 12 | 12 | | 13 | 13 | | 14 | 14 | | 15 | 15 | | 16 | 16 | | 17 | 17 | | 18 | 18 | | 19 | 19 | | 20 | 20 | | 21 | 21 | | 22 | 22 | | 23 | 23 | | 24 | 24 | | 25 | 25 | | 26 | 26 | | 27 | 27 | | 28 | 28 | | 29 | 29 | | 30 | 30 | | 31 | 31 | | 32 | 32 | | 33 | 33 | | 34 | 34 | | 35 | 35 | | 36 | 36 | | 37 | 37 | | 38 | 38 | | 39 | 39 | | 40 | 40 | | 41 | 41 | | 42 | 42 | | 43 | 43 | | 44 | 44 | | 45 | 45 | | 46 | 46 | | 47 | 47 | | 48 | 48 | | 49 | 49 | | 50 | 50 | | 51 | 51 | | 52 | 52 | | 53 | 53 | | 54 | 54 | | 55 | 55 | | 56 | 56 | | 57 | 57 | | 58 | 58 | | 59 | 59 | | 60 | 60 | | 61 | 61 | | 62 | 62 | | 63 | 63 | | 64 | 64 | | 65 | 65 | | 66 | 66 | | 67 | 67 | | 68 | 68 | | 69 | 69 | | 70 | 70 | | 71 | 71 | | 72 | 72 | | 73 | 73 | | 74 | 74 | | 75 | 75 | | 76 | 76 | | 77 | 77 | | 78 | 78 | | 79 | 79 | | 80 | 80 | | 81 | 81 | | 82 | 82 | | 83 | 83 | | 84 | 84 | | 85 | 85 | | 86 | 86 | | 87 | 87 | | 88 | 88 | | 89 | 89 | | 90 | 90 | | 91 | 91 | | 92 | 92 | | 93 | 93 | | 94 | 94 | | 95 | 95 | | 96 | 96 | | 97 | 97 | | 98 | 98 | | 99 | 99 | | Note: The actual values for 'aim velocity' are not provided in the code. I have used the label 'A' to denote the label 'A'. The other labels ('A', 'B', etc.) are not present in the code. There is only one data point labeled 'B' on the plot.(A) Decrease Aim Speed / (B) Normal Turn Speed
line
| mouse velocity | aim velocity | | -------------- | ------------ | | 0 | 0 | | 1 | 0 | | 2 | 0 | | 3 | 0 | | 4 | 0 | | 5 | 0 | | 6 | 0 | | 7 | 0 | | 8 | 0 | | 9 | 0 | | 10 | 0 | | 11 | 0 | | 12 | 0 | | 13 | 0 | | 14 | 0 | | 15 | 0 | | 16 | 0 | | 17 | 0 | | 18 | 0 | | 19 | 0 | | 20 | 0 | | 21 | 0 | | 22 | 0 | | 23 | 0 | | 24 | 0 | | 25 | 0 | | 26 | 0 | | 27 | 0 | | 28 | 0 | | 29 | 0 | | 30 | 0 | | 31 | 0 | | 32 | 0 | | 33 | 0 | | 34 | 0 | | 35 | 0 | | 36 | 0 | | 37 | 0 | | 38 | 0 | | 39 | 0 | | 40 | 0 | | 41 | 0 | | 42 | 0 | | 43 | 0 | | 44 | 0 | | 45 | 0 | | 46 | 0 | | 47 | 0 | | 48 | 0 | | 49 | 0 | | 50 | 0 | | 51 | 0 | | 52 | 0 | | 53 | 0 | | 54 | 0 | | 55 | 0 | | 56 | 0 | | 57 | 0 | | 58 | 0 | | 59 | 0 | | 60 | 0 | | 61 | 0 | | 62 | 0 | | 63 | 0 | | 64 | 0 | | 65 | 0 | | 66 | 0 | | 67 | 0 | | 68 | 0 | | 69 | 0 | | 70 | 0 | | 71 | 0 | | 72 | 0 | | 73 | 0 | | 74 | 0 | | 75 | 0 | | 76 | 0 | | 77 | 0 | | 78 | 0 | | 79 | 0 | | 80 | 0 | | 81 | 0 | | 82 | 0 | | 83 | 0 | | 84 | 0 | | 85 | 0 | | 86 | 0 | | 87 | 0 | | 88 | 0 | | 89 | 0 | | 90 | 0 | | 91 | 0 | | 92 | 0 | | 93 | 0 | | 94 | 0 | | 95 | 0 | | 96 | 0 | | 97 | 0 | | 98 | 0 | | 99 | 0 | |10 | -1 | | -1 | -2 | | -2 | -3 | | -3 | -4 | | -4 | -5 | | -5 | -6 | | -6 | -7 | | -7 | -8 | | -8 | -9 | | -9 | -10 | | -10 | -11 | | -11 | -12 | | -12 | -13 | | -13 | -14 | | -14 | -15 | | -15 | -16 | | -16 | -17 | | -17 | -18 | | -18 | -19 | | -19 | -20 | | -20 | -21 | | -21 | -22 | | -22 | -23 | | -23 | -24 | | -24 | -25 | | -25 | -26 | | -26 | -27 | | -27 | -28 | | -28 | -29 | | -29 | -30 | | -30 | -31 | | -31 | -32 | | -32 | -33 | | -33 | -34 | | -34 | -35 | | -35 | -36 | | -36 | -37 | | -37 | -38 | | -38 | -39 | | -39 | -40 | | | +∞ | | +∞ | +∞ | +∞ | +∞ | +∞ | +∞ | +∞ | +∞ | +∞ | +∞ | +∞ | +∞ | +∞ | +∞ | +∞ | +∞ | +∞ | +π + | +π + | +π + | +π + | +π + | +π + | +π + | +π + | +π + | +π + | +π + | +π + | +π + | +π + | +π + | +π + | +π + | +η + | +η + | +η + | +η + | +η + | +η + | +η + | +η + | +η + | +η + | +η + | +η + | +η + | +η + | +η + | +η + | +η + |C. Deadzone Settings
The Deadzone Settings lets you adjust the size of the controller's Deadzone. Click Edit to open the Deadzone settings.
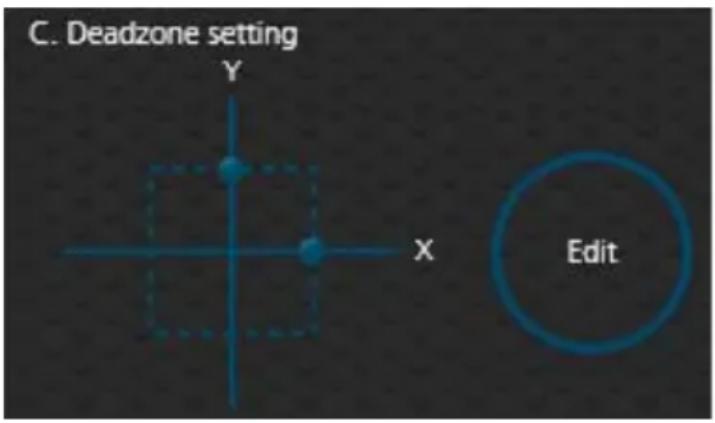
The Deadzone is a small area around the Right Stick control that doesn't respond to movement. Movement only occurs when the Right Stick moves outside the Deadzone. Each game sets its own Deadzone size. The Deadzone affects mouse movements. With no Deadzone there is no delay with the mouse and movements are very straight and accurate.
Right Stick Deadzone
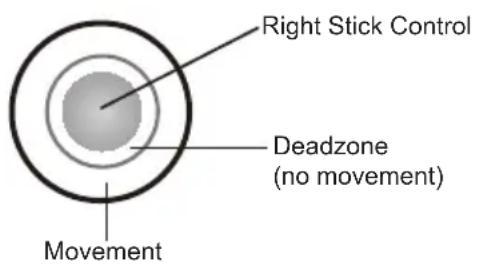
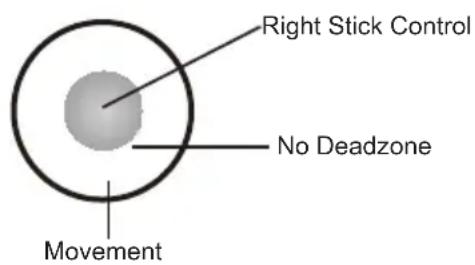
You can minimize the Deadzone with the game controller (see Deadzone Delay, page 19) or with the Phantom-S software as explained on the next page.
Setting the Deadzone
The Deadzone must be set while playing a first-person shooter (FPS) game. The Deadzone is minimized when—after the last adjustment on the graph, the player in the game starts to move slowly in the direction of the adjustment—up, right or diagonally up.
Deadzone setting
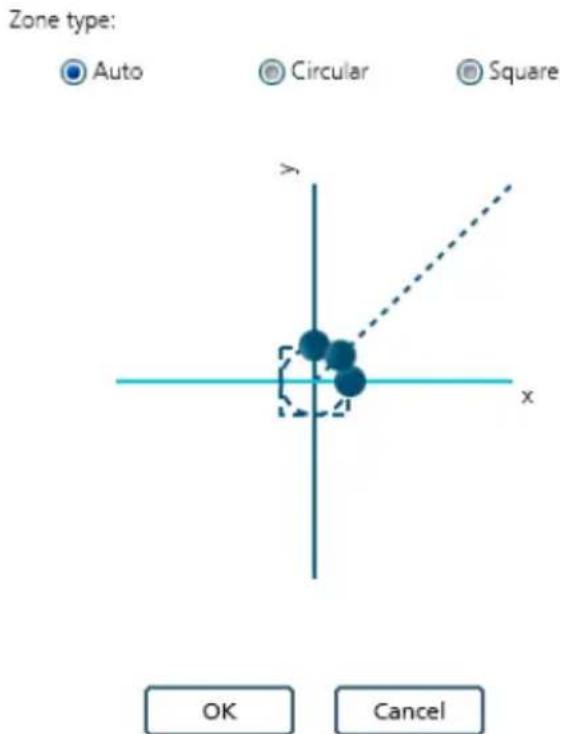
To set the Deadzone connect the Phantom-S to a computer & game console, then:
- Start a first-person shooter (FPS) game and open the Deadzone Settings.
- Select the Zone Type. If you do not know the zone type, select Auto.
- Put the mouse cursor over one of the blue dots on the graph to display the arrows, as shown here:
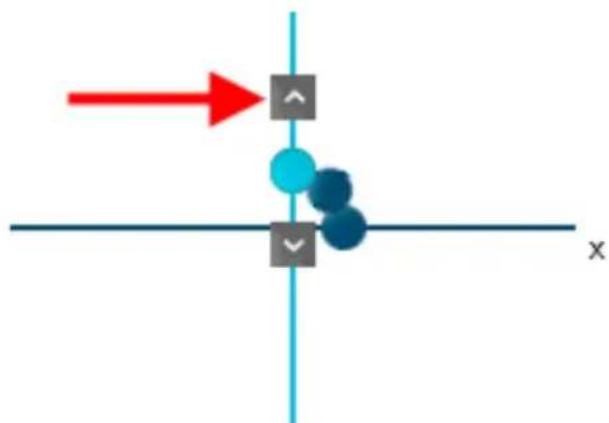
- Click the arrow to increase the value (up or right) while watching the game until the player in the game starts to move slowly in the direction of the adjustment.
It's important that you stop adjusting the graph at the point (mouse click) where the player begins to move in the game – this is where the Deadzone is set perfectly. If you go past the point, simply click the arrow to decrease the value until the player stops moving and repeat step 4.
- Repeat step 3 for each blue dot* on the graph.
Note: Its very important that you set each direction's Deadzone (X-axis, Y-axis and Diagonal) when using the Auto Zone Type.
- Click OK, then click Save to save the Deadzone settings to the current profile, and then click Upload to upload the new Deadzone settings to the Phantom-S. You can also click Save as to save the profile to another Group.
- Test the mouse within the first-person shooter game. Movements will be smooth, stable and accurate. You'll also notice that shooting becomes more steady and reliable than with the game controller.
If any mouse movements are shaky or jumpy repeat the steps to set the Deadzone. With the Deadzone set the mouse performance should be excellent. Also see Quick Start Mouse Configuration, page 10 for more mouse settings.
ADS Mode (Aim-Down-Sight)
Use these settings to set how the mouse movements respond when the character has zoomed in, such as through a scope. Except for the options listed below use the Aim Look Mode settings starting on page 41 to configure the ADS Mode settings.

- Same as Aim Look Mode: Uncheck this box to configure the ADS Mode settings. Checking this box sets the ADS Mode to use the same settings as the Aim Look Mode.
- ADS Launch button: Use the drop-down menu to select the controller button that is used to zoom-in to an ADS view.
- ADS delay time: Sets the delay for switching between views: Aim Look and ADS.
Macro Settings
Macros set multiple controller buttons into a single key or mouse click. For example you can set: “UP, UP, DOWN, LEFT, RIGHT, X, O” to execute by pressing the [Y] key on the keyboard. Within macros you can set combos where multiple buttons are pushed at the same time: “X+O” or “R3+L3+R2”. You can create up to 8 custom macros and each macro can have up to 8 controller buttons.
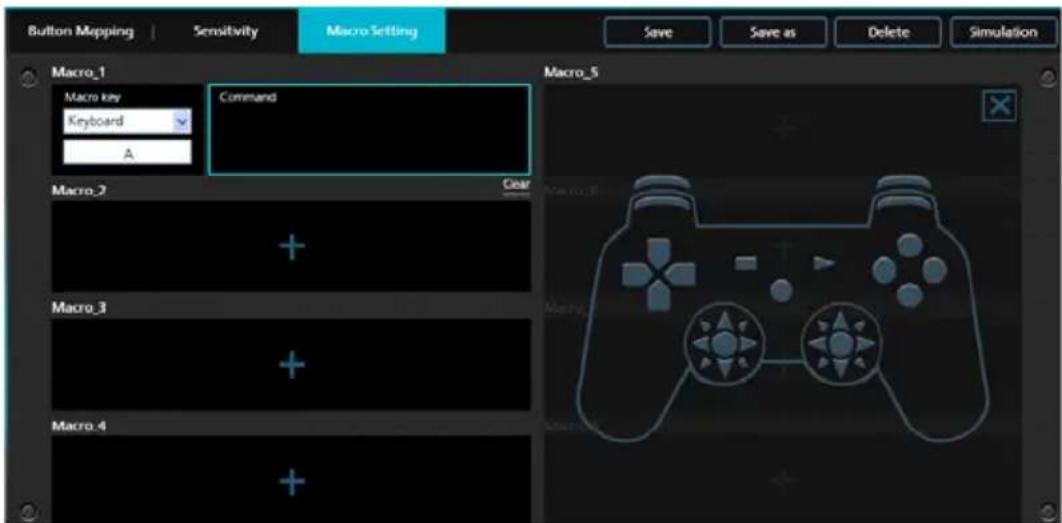
Macro Mode [F11] must be on for Macros to work (see Macro Mode, page 23).
| Function Description | |
| Macro Settings | Lists the macros created for the profile. Click + to add a macro. |
| Controller Image The controller image appears when you click the command window. The image allows you to click a controller button to add it to the command box. | |
| Command Window This is where your button commands appear when you click the controller image, enter up to 8 commands.♦Combo (A+B+C): To create a combo button click between buttons in the command box.♦Clear: If you make a mistake and want to start over, use clear to delete all commands.♦+ indicates the buttons are pressed together.♦> indicates buttons are pressed one by one.♦Click X to remove a button from the command.Note: Combos are not considered a single command. | |
| Macro Key Window | The Macro Key is the key or button selected to execute the macro during gameplay. Select a device and choose a key or button:♦ Keyboard: Press any key on the keyboard.♦ Mouse: Select a button from the drop-down menu.♦ Joystick: Select a button from the drop-down menu.♦ None: Delete the macro command. |
| Save After you enter the Macro Key and Command click Save to save the macro. | |
| Simulation Allows you to enter game mode to test the macro command. Use [F12] to exit. | |
To create a macro:
- Go to the Macro Settings page and click a macro box:
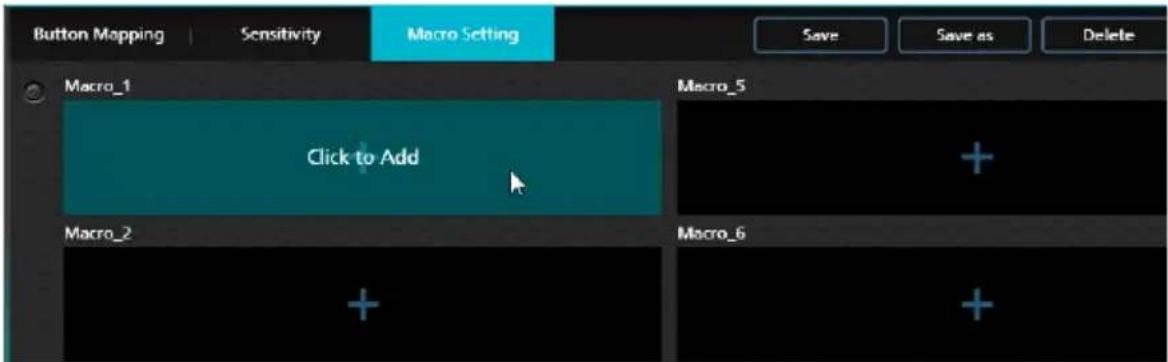
- The Macro Key and Command page opens:
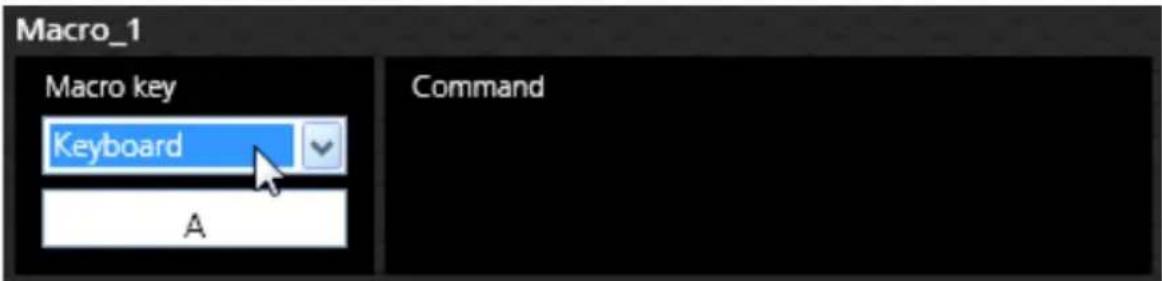
- Use the Macro Key drop-down menu to select a device and button that will be used to execute the macro:
♦ Keyboard: Click the box and press a key on the keyboard.
◆ Mouse: Use the drop-down menu to select a mouse button.
♦ Joystick: Use the drop-down menu to select a button.
- None: Deletes macro.
- Click the Command window:
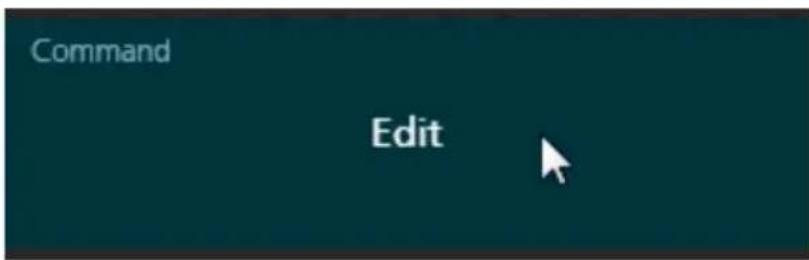
- A controller image appears to the right.
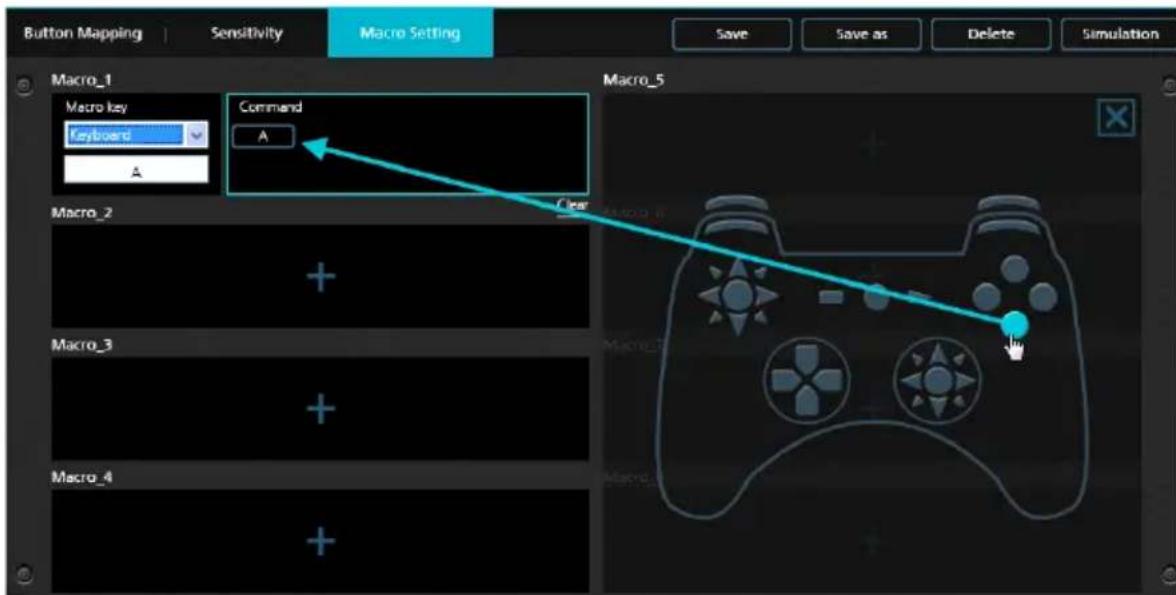
- Click a controller button to add it to the Command window in the order you want the buttons to execute:
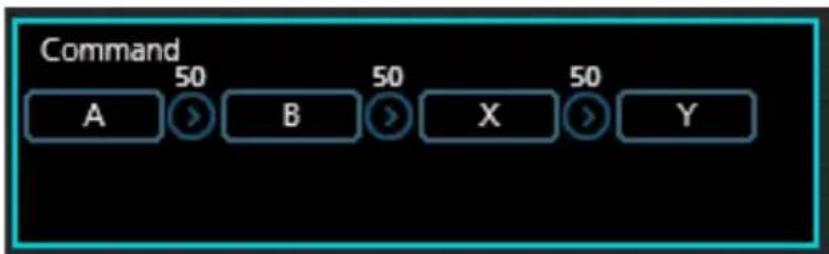
- Click on the values above the arrows to customize the command delay (default: 50 ms).
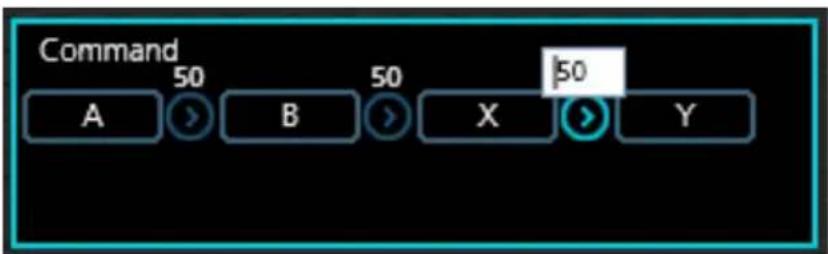
- To remove the delay and create a combo button (A+B+C), click between the controller buttons. Click again to remove the combo.
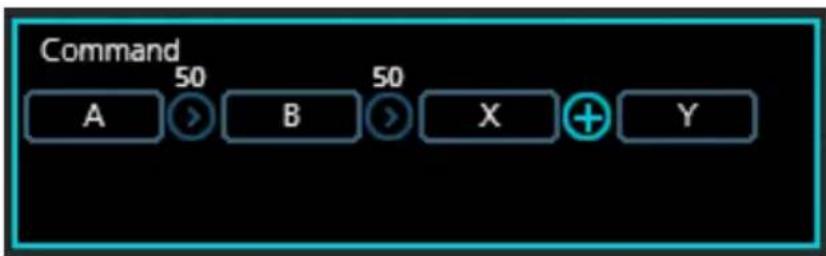
+ indicates the buttons are pressed together.
- Move the mouse over a command and click X to remove the button or Clear to remove all buttons.
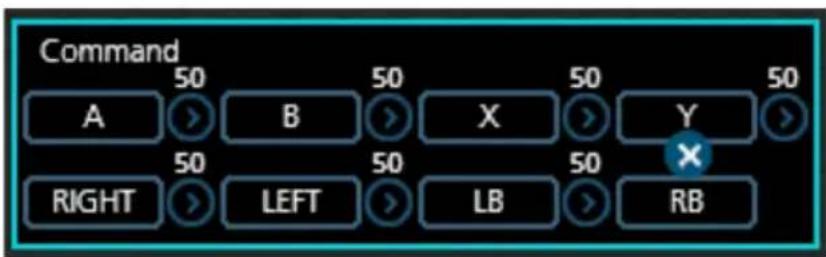
- Click Save. The macro appears in the Macro Settings list:
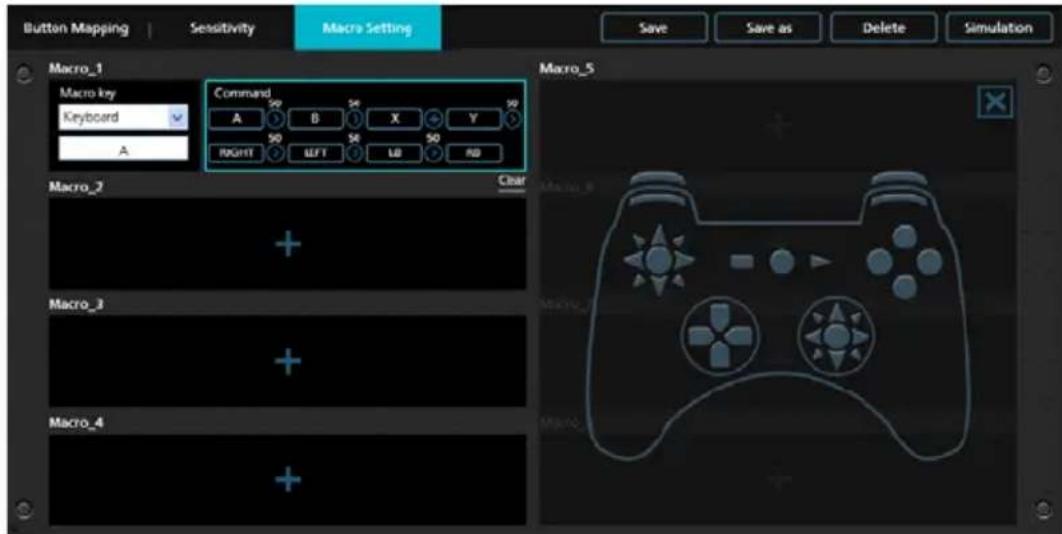
- Enable Macro Mode by pressing [F11] from the keyboard connected to the Phantom-S (see Macro Mode, page 23).
- Press the Macro Key set in step 3 to run the macro.
The Firmware Upgrade Utility
As new firmware versions become available firmware upgrade packages are posted on the ATEN web site. The Windows-based Firmware Upgrade Utility (FWUpgrade.exe) provides a smooth automated process for upgrading the Phantom-S's firmware. Check the web site regularly to find the latest firmware packages and information relating to them.
Before You Begin
To prepare for the firmware upgrade, do the following:
- Go to www.aten.com/phantoms
- Follow the instructions to download the firmware upgrade.
- Unzip the firmware upgrade package and connect the computer to the Phantom-S.
- Open the Phantom-S software, click Help and Firmware upgrade:
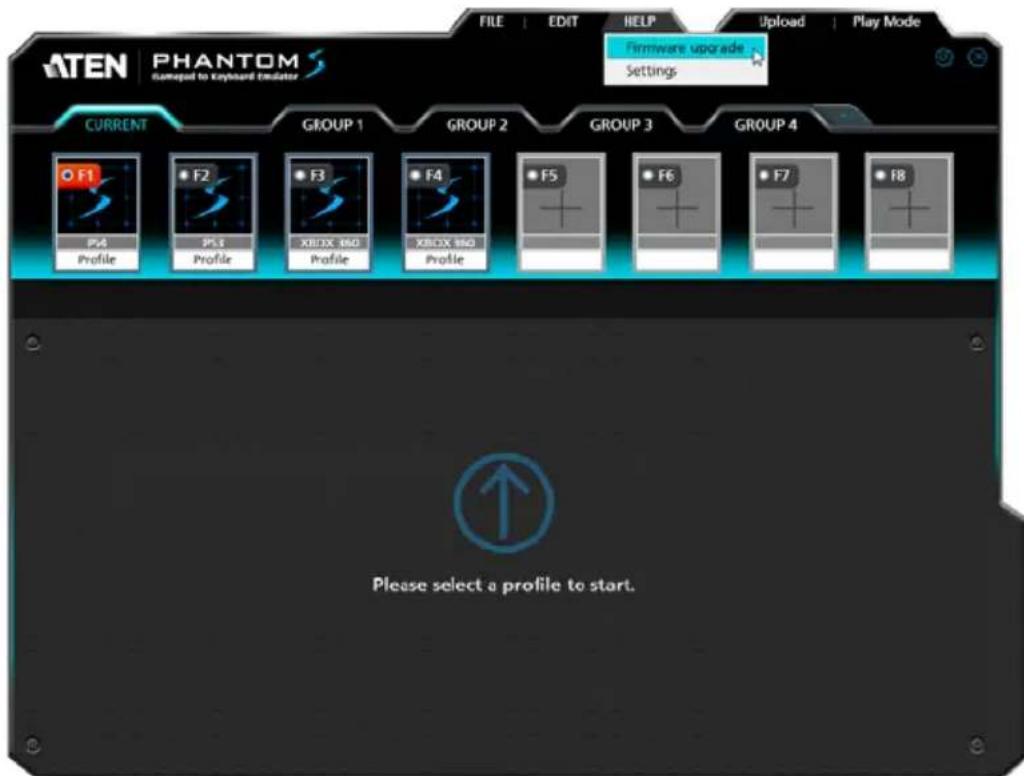
- Browse to the firmware upgrade (*.exe) file, select it and click Open:
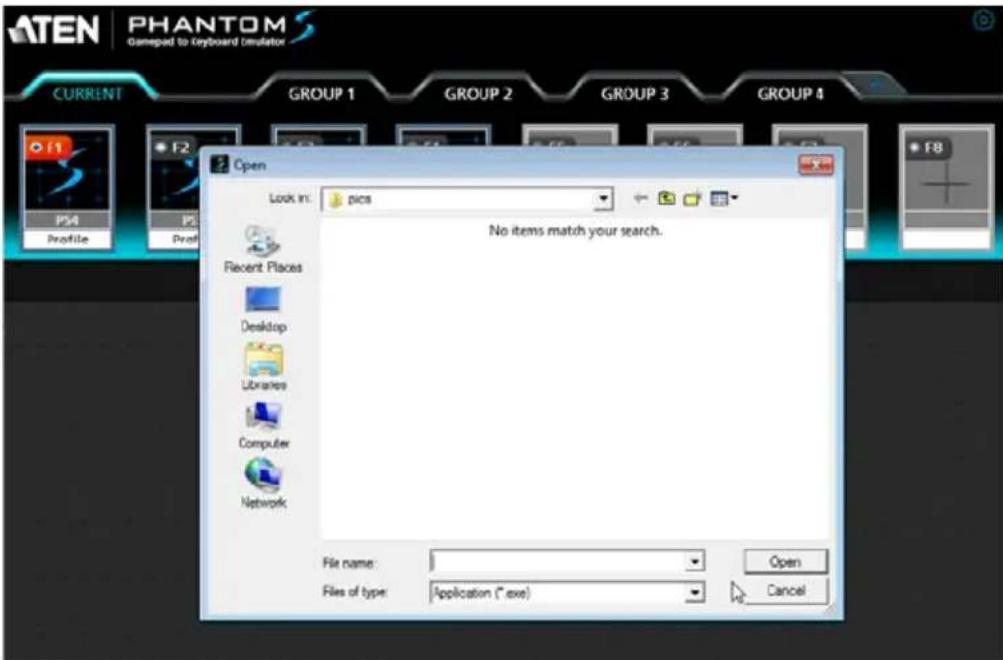
- This will start the Firmware Upgrade Utility, as described in the next section.
Performing the Upgrade
Starting the Upgrade
- The Firmware Utility inspects your installation. All the devices capable of being upgraded by the package are listed in the Device List panel.
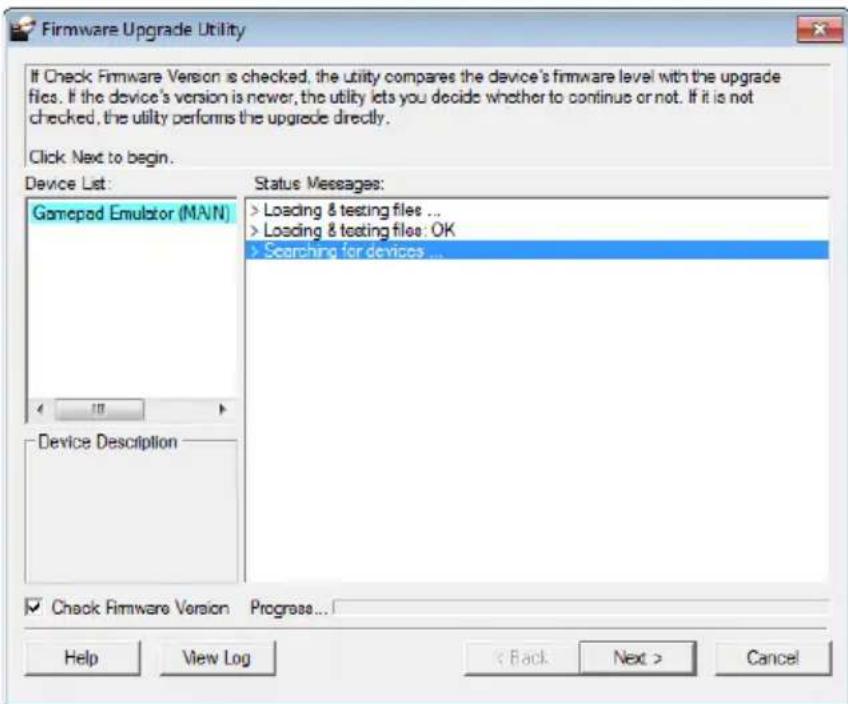
- Click Next to perform the upgrade.
- If you enabled Check Firmware Version, the Utility compares the device's firmware level with that of the upgrade files. If it finds that the device's version is higher than the upgrade version, it brings up a dialog box informing you of the situation and gives you the option to continue the upgrade:
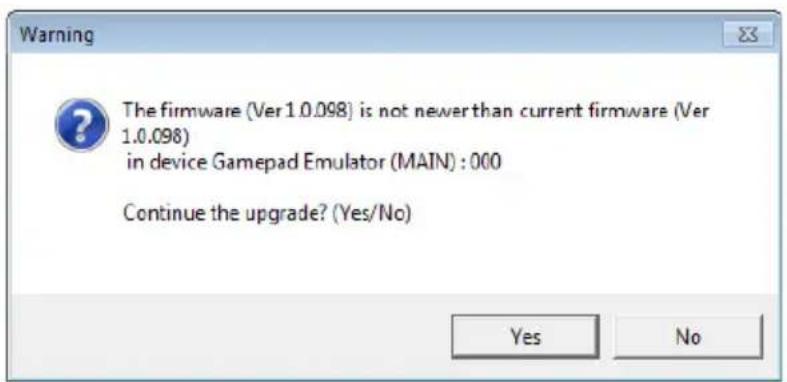
If you didn't enable Check Firmware Version, the Utility installs the upgrade files without checking whether they are a higher level, or not.
- As the Upgrade proceeds status messages appear in the Status Messages panel, and the progress toward completion is shown on the Progress bar.
Upgrade Succeeded
After the upgrade has completed, a screen appears to inform you that the procedure was successful:
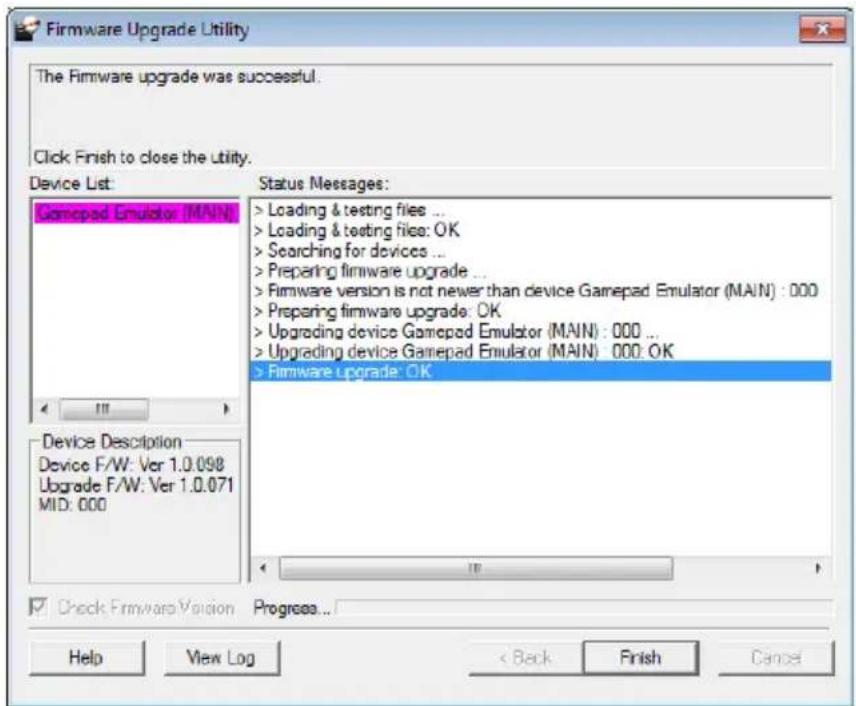
Click Finish to close the Firmware Upgrade Utility.
Upgrade Failed
If the upgrade failed to complete successfully the Upgrade Failed screen appears:
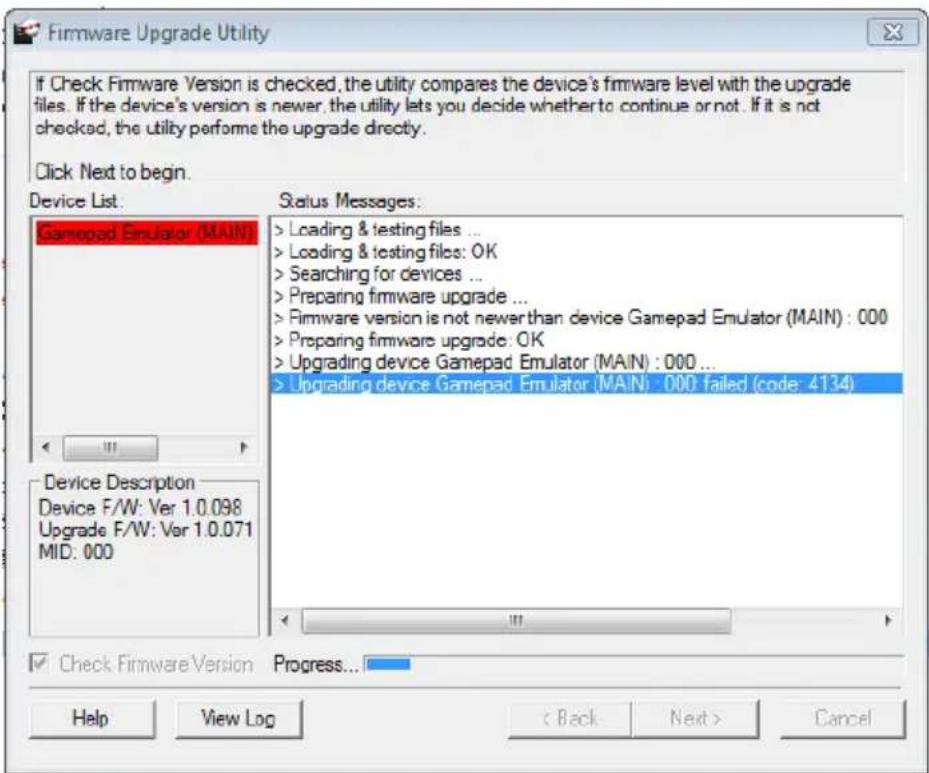
Click Cancel to close the Firmware Upgrade Utility. See the next section, Firmware Upgrade Recovery, for how to proceed.
Firmware Upgrade Recovery
There are three conditions that call for firmware upgrade recovery:
- When the unit’s firmware becomes corrupted and you are unable to operate it.
- When a firmware upgrade procedure is interrupted or the Phantom-S is unplugged.
- When a firmware upgrade procedure fails.
To perform a firmware upgrade recovery, do the following:
- Unplug the Phantom-S from the computer.
- Use a pen or paper clip to press the Reset button on the Phantom-S.
- With the Reset button pressed, connect the Phantom-S to the computer via the power and PC ports.
- Hold the Reset button for 5 seconds.
- Double click the Firmware Upgrade Utility to run it without the Phantom-S software.
- Upgrade the firmware as explained in Performing the Upgrade, page 57.
- Unplug the Phantom-S from the computer.
- Plug the Phantom-S into the computer.
Safety Instructions
General
- This product is for indoor use only.
- Read all of these instructions. Save them for future reference.
◆ Follow all warnings and instructions marked on the device. - Do not place the device on any unstable surface (cart, stand, table, etc.). If the device falls, serious damage will result.
- Do not use the device near water.
- Do not place the device near, or over, radiators or heat registers.
- The device cabinet is provided with slots and openings to allow for adequate ventilation. To ensure reliable operation, and to protect against overheating, these openings must never be blocked or covered.
- The device should never be placed on a soft surface (bed, sofa, rug, etc.) as this will block its ventilation openings. Likewise, the device should not be placed in a built-in enclosure unless adequate ventilation has been provided.
- Never spill liquid of any kind on the device.
- Unplug the device from the wall outlet before cleaning. Do not use liquid or aerosol cleaners. Use a damp cloth for cleaning.
- The device should be operated from the type of power source indicated on the marking label. If you are not sure of the type of power available, consult your dealer or local power company.
- To prevent damage to your installation it is important that all devices are properly grounded.
- Do not allow anything to rest on the power cord or cables. Route the power cord and cables so that they cannot be stepped on or tripped over.
- To help protect your system from sudden, transient increases and decreases in electrical power, use a surge suppressor, line conditioner, or un-interruptible power supply (UPS).
-
Position system cables and power cables carefully; Be sure that nothing rests on any cables.
-
Never push objects of any kind into or through cabinet slots. They may touch dangerous voltage points or short out parts resulting in a risk of fire or electrical shock.
- Do not attempt to service the device yourself. Refer all servicing to qualified service personnel.
- If the following conditions occur, unplug the device from the wall outlet and bring it to qualified service personnel for repair.
◆ The power cord or plug has become damaged or frayed.
- Liquid has been spilled into the device.
- The device has been exposed to rain or water.
- The device has been dropped, or the cabinet has been damaged.
- The device exhibits a distinct change in performance, indicating a need for service.
- The device does not operate normally when the operating instructions are followed.
- Only adjust those controls that are covered in the operating instructions. Improper adjustment of other controls may result in damage that will require extensive work by a qualified technician to repair.
Technical Support
International
- For online technical support – including troubleshooting, documentation, and software updates: http://eservice.aten.com
- For telephone support, See Telephone Support, page iii:
North America
| Email Support support@aten-usa.com | ||
| Online Technical Support | Troubleshooting Documentation Software Updates | http://www.aten-usa.com/support |
| Telephone Support 1-888-999-ATEN | ext 4988 | |
When you contact us, please have the following information ready beforehand:
- Product model number, serial number, and date of purchase.
- Your computer configuration, including operating system, revision level, expansion cards, and software.
- Any error messages displayed at the time the error occurred.
◆ The sequence of operations that led up to the error.
◆ Any other information you feel may be of help.
Specifications
| Function Phantom-S | |||
| Connectors Front | Keyboard | 1 x USB Type A Female (White) | |
| Mouse | 1 x USB Type A Female (White) | ||
| Gamepad | 1 x USB Type A Female (White) | ||
| Rear | Game | 1 x Mini USB Type A Female (black) | |
| PC | 1 x Mini USB Type A Female (black) | ||
| KB Power | 1 x Mini USB Type A Female (black) | ||
| Switches Reset 1 x Semi-recessed Pushbutton | |||
| LEDs Turbo / KB Mode 1 (Orange) | |||
| Emulation Keyboard USB, Emulation | |||
| Power Consumption 5v, W | |||
| Environment Operating Temp. | 0-50°C | ||
| Physical Properties | Housing Metal | ||
| Weight | 195 g | ||
| Dimensions (L x W x H) | 106 x 79 x 24.4 mm | ||
Limited Warranty
IN NO EVENT SHALL THE DIRECT VENDOR'S LIABILITY EXCEED THE PRICE PAID FOR THE PRODUCT FROM DIRECT, INDIRECT, SPECIAL, INCIDENTAL, OR CONSEQUENTIAL DAMAGES RESULTING FROM THE USE OF THE PRODUCT, DISK, OR ITS DOCUMENTATION.
The direct vendor makes no warranty or representation, expressed, implied, or statutory with respect to the contents or use of this documentation, and especially disclaims its quality, performance, merchantability, or fitness for any particular purpose.
The direct vendor also reserves the right to revise or update the device or documentation without obligation to notify any individual or entity of such revisions, or update. For further inquiries, please contact your direct vendor.
- RoHS
- SJ/T 11364-2006
- Telephone Support
- User Notice
- Package Contents
- Package
- Contents
- Chapter 1.
- Introduction
- Chapter 2.
- Setup
- Chapter 3.
- Basic Operation
- Chapter 4.
- Phantom-S Software
- Chapter 5.
- Firmware Upgrade
- Appendix
- About this Manual
- Conventions
- Product Information
- Overview
- The Phantom-S allows you to:
- Features
- Requirements
- Game Console / Controller
- Keyboard and Mouse
- Audio Support
- Operating Systems
- Components
- Front View
- Rear View
- Getting Started
- Connecting Hardware
- Game Console
- Computer
- Computer / Laptop + Console Setup
- Quick Start Mouse Configuration
- Mouse Settings
- DPI
- Report Rate
- Mouse Map
- Keyboard Map
- Function Keys
- Direct Configuration
- Beeps
- Direct Mapping Mode
- Mouse Sensitivity Mode
- Deadzone Delay
- Right Stick Deadzone
- Testing the Deadzone
- Decrease Deadzone
- Increase Deadzone
- Profile Selection
- Keyboard / Gamepad Mode
- Turbo Mode
- Macro Mode
- Play Mode
- Downloading
- Connecting the Phantom-S Software
- Phantom-S Interface
- Software Overview
- Groups
- Profiles
- Adding Profiles
- Upload
- Customizing Controls
- Button Mapping
- Mapping
- Turbo
- Turn Assist
- Sensitivity
- Aim Look Mode
- Mouse Movement
- Curve Setting
- Settings
- Curve
- Adjusting the Curve
- Deadzone Settings
- Setting the Deadzone
- ADS Mode (Aim-Down-Sight)
- Macro Settings
- The Firmware Upgrade Utility
- Before You Begin
- Performing the Upgrade
- Starting the Upgrade
- Upgrade Succeeded
- Upgrade Failed
- Firmware Upgrade Recovery
- Safety Instructions
- General
- Technical Support
- International
- Specifications
- Limited Warranty
Brand : ATEN
Model : PHANTOM-S
Category : Controller