
PR-836AS - Range hood PACIFIC - Free user manual and instructions
Find the device manual for free PR-836AS PACIFIC in PDF.


| Product Type | Under-cabinet range hood |
| Brand | Pacific |
| Model | PR-836AS |
| Width | 90 cm (36 inches) |
| Depth | 50 cm (20 inches) |
| Height | 15 cm (6 inches) |
| Weight | 18 kg (40 lbs) |
| Power Supply | 220-240 V ~ 50 Hz |
| Maximum Extraction Rate | 650 m³/h |
| Noise Level (max) | 65 dB(A) |
| Lighting | 2 x 20W halogen or LED (depending on version) |
| Controls | Push buttons with 3 speeds |
| Filter Type | Aluminum grease filter (washable) |
| Charcoal Filter | Optional for recirculation mode |
| Duct Size | 150 mm (6 inches) round |
| Installation Type | Under cabinet or wall mount (fixed) |
| Energy Class | B (estimated) |
| Material | Stainless steel |
| Maintenance | Clean grease filter monthly; replace charcoal filter every 3-6 months |
| Safety Features | Thermal cut-off protection |
| Warranty | 2 years |
| Included Accessories | Mounting kit, instruction manual, grease filter, duct adapter |
Frequently Asked Questions - PR-836AS PACIFIC
User questions about PR-836AS PACIFIC
0 question about this device. Answer the ones you know or ask your own.
Ask a new question about this device
Download the instructions for your Range hood in PDF format for free! Find your manual PR-836AS - PACIFIC and take your electronic device back in hand. On this page are published all the documents necessary for the use of your device. PR-836AS by PACIFIC.
USER MANUAL PR-836AS PACIFIC
Use, Care, and Installation Guide
Model:PR830AS / PR836AS
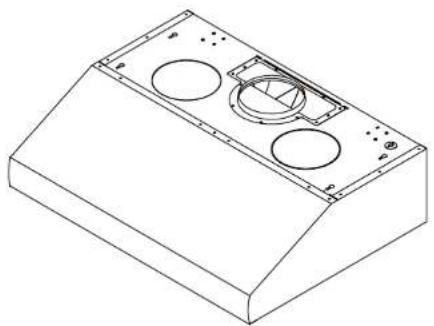
natural_image
Isometric line drawing of a technical enclosure or housing with two circular cutouts and mounting flanges (no text or symbols)
Model number: ____
Serial Number:
XP022396(1)
PACIFIC
抽油煙機使用說明書
型號:PR830AS / PR836AS

natural_image
Isometric line drawing of a technical enclosure or housing with three circular cutouts and mounting brackets (no text or symbols)
抽油機型號:
序號:
XP022396(1)
Table of Content
I. Product Functions/Performance Specification Chart ... 1
II. Parts Instructions ...... 2
III. Installation Guidelines ...... 3
IV. Installation Procedures 4
V. Venting Instruction.... 5
VI. Installation Air outlet 6\~7
VII. Operating Instructions 8
VIII. Replacing Light Bulb 9
IX. Surface Maintenance 10
X. Troubleshooting 11
目錄
I. Product Functions/Performance Specification Chart
A. Product Functions
- 3-speed options.
- Light has varying degrees of brightness: Bright, Dim and Off.
B. Specification Chart
| Models | PR836AS PR830AS | |
| Net weight(Pound) | 44 lbs40.7 lbs | |
| Measurement (inches) | 30"X22.5"X8" 36"X22.5"X8" | |
| Maximum Voltage | 120V – 60Hz | 120V – 60Hz |
| Exhaust Pipe Diameter | Round 6 inchesSquare3-1/4"x10" inches | Round 6 inchesSquare3-1/4"x10" inches |
| Light | Halogen light 35Wx2 | Halogen light 35Wx2 |
| Maximum consumption power | 2A/225W 2A/225W | |
1.
1.
II. Parts Instructions
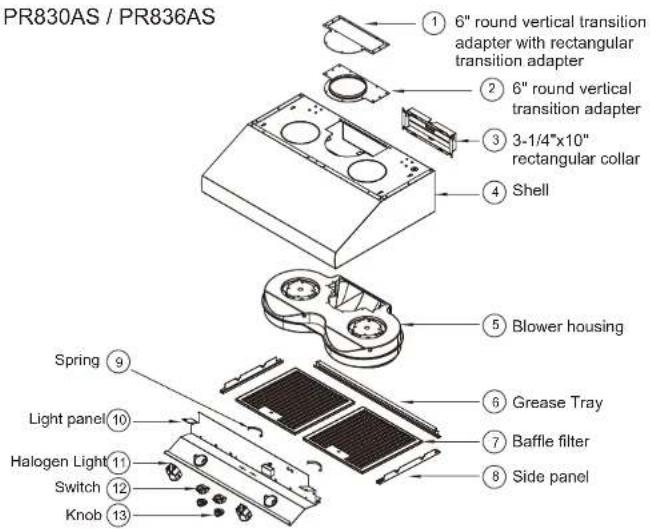
HARDWARE PACKAGE CONTENTS
| TYPE | DESCRIPTION | N° | |
| A | Wire Nuts | 3 | |
| B | 5 x 24m/m Washers | 4 | |
| C | 3/16 x 1/2 screws | 4 | |
| D | M6 x 1-1/2" wood screws | 4 | |
| E | Halogen light Suction Cup | 1 | |
| F | M6 x 2" wood screws | 4 | |
| G | M6 x 1" wood screws | 4 | |
| H | Wall bracket | 2 |
2.
二.配件說明

- Surrounding Environment (Pic.1)
Notice the surrounding of cooker hood. If there are too many windows or a door nearby, it is advisable to close the windows and door before switching on the cooker hood to prevent the external air current from affecting the suction. The smoke has to rise up to 10 inches from the stove/grate to be within the range of suction efficiency.

Too many windows, too much air current.
- Installation Heights (Pic.2)
The ideal installation height is a distance of 26 to 36 inches from the bottom of the hood to the surface of the stove top.

- Hood installed in parallel and horizontal level (Pic.3)
The front, back, right and left of hood must be in parallel and horizontal level, to avoid the oil in the oil tub from spilling over. To ensure that the hood is leveled when installing, it can be measured by the hook mark for the left and right side; and the screws fixed securely onto the wall to ensure the front and back of the hood are p

- Exhaust duct
In order to increase the efficiency of hood efficiency of hood, recommending using the provided 6 inch duct to maintain maximum air flow efficiency; the length of duct must be minimized.
- Socket arrangement
Please do not arrange the hood socket with the other high electricity consumption appliances.

3.
IV. Installation Procedures
Hood is designed for installation under a kitchen cabinet. See Fig.1 for details.
- Prepare duct location on hood(vertical or horizontal).
- Measure and cut out duct and electrical openings in cabinet or wall to match up with the hood. Make sure duct opening is large enough to apply aluminum duct tape
- Reinforce cabinet bottom with wood stips if additional strengthening is required or if cabinets are framed.
- Remove baffle filters from hood. Also remove side panels from hood using a Phillips screwdriver to remove each of the screws. And then remove the grease t
- Use 4 wooden screws to secure the hood to the bottom of the cabinet.
- Lift hood onto screws located on cabinet bottom and lock into place. Make sure all (4) key-holes cover the screws. Tighten each screw to secure hood to cabinet.

Fig 1
- Install electrical.
- Install ductwork and seal with aluminum duct tape.
- Power up hood and check for leaks around duct tape and test all functions.
- Reinstall grease tray., side panels and baffle filters.
四. 安装步骤
櫥櫃安裝說明:(如圖一)
V. Venting Instruction
WARNING FIRE HAZARD
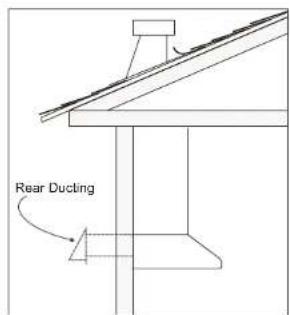
NEVER exhaust air or terminate duct work into spaces between walls, crawl spaces, ceiling, attics or garages. All exhaust must be ducted to the outside. Use metal ductwork only.
Fasten all connections with sheet metal screws and tape all joints with certified Silver Tape or Duct Tape.
Some Ducting Options


VI. Installation Air outlet
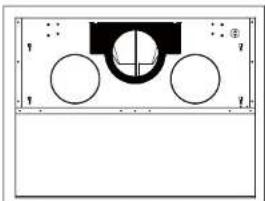
By default the PR830/836AS is pre-configured for 6" round vertical ducting. 3-1/4"x10" Rectangular Vertical Ducting
natural_image
Pure diagram of a mechanical or architectural component with circles and a central cross, no text or symbols present.- Using a Philips-head screwdriver remove the screws and 6" round vertical transition adapter from top of hood body.

natural_image
Simple line drawing of a basketball court with two white circles and a central bowl (no text or symbols)- Replace 6" round vertical transition adapter with rectangular transition adapter. Do not secure to hood body yet.

natural_image
Simple line drawing of a basketball court with two white circles and a central bowl (no text or symbols)- Place 3-1/4"x10" rectangular collar on top of rectangular transition adapter. Secure rectangular adapter and rectangular collar to hood body using the previously removed screws from step 1.
3-1/4"x10" Rectangular Horizontal Ducting

natural_image
Simple diagram of a basketball court with two white circles and a central black rectangle, no text or symbols present.- Using a Philips-head screwdriver remove the screws and 6" round vertical transition adapter from the top of the hood.

natural_image
Pure electrical circuit lines without any symbols- Using a flat head screwdriver or diagonal cutter, remove 3-1/4"x10" rectangular knock-out cover plate from back of hood.
六. 安装出風口
natural_image
Pure technical diagram of a mechanical component with circular features and centerlines (no text or symbols)natural_image
Simple line drawing of a basketball court with two white circles and a black header (no text or symbols)natural_image
Simple line drawing of a mechanical component with two circles and a central block, no text or symbols present.natural_image
Simple diagram of a basketball court with two circles and a central ring (no text or symbols)natural_image
Simple diagram of a rectangular frame with a central black rectangle and small circular elements, no text or symbols present.natural_image
Simple diagram with a black rectangle inside a rectangular frame, no text or symbols present.natural_image
Diagram showing a mechanical component with arrows indicating direction, no text or symbols presentnatural_image
Simple diagram with a black rectangle inside a rectangular frame, no text or symbols present- Using a Philips-head screwdriver, remove the screws and 3-1/4"x10" rectangular cover plate from back of hood.

natural_image
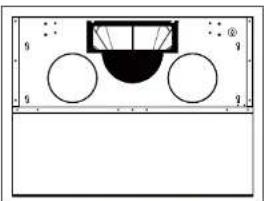
Diagram showing a mechanical or electrical component with circular holes and a central shaded section (no text or symbols)- Remove the two plastic air diverter blocks. The blocks are located in the hood and can be accessed from the top when the 6" round transition adapter is removed.
natural_image
Simple line drawing of a basketball court with two circles and a bowl, no text or symbols present.natural_image
Simple diagram of a basketball court with two white circles and a black half-court area, no text or symbols present.natural_image
Simple line drawing of a basketball court with two white circles and a central bowl (no text or symbols)- Replace 6" round vertical transition adapter with rectangular transition adapter. Do not secure to hood body yet.

natural_image
Simple diagram of a basketball court with two white circles and a black header (no text or symbols)- Place 3-1/4"x10" rectangular cover plate over the rectangular opening on top of hood from step 3. Secure rectangular transition adapter and cover plate to hood body using the previously removed screws from step 1.

natural_image
Pure technical diagram of a rectangular enclosure or enclosure with internal components, no text or symbols present.natural_image
Pure technical diagram of a rectangular enclosure or enclosure with internal components, no text or symbols present.- Place 3-1/4"x10" rectangular collar on back of hood and secure using the screws that previously secured the rectangular cover plate.
VII. Operating Instructions
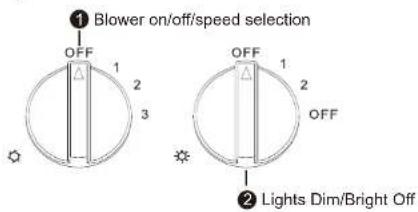
- Blower on/off/speed selection:
Rotate knob to change speed levels,(1) for low speed,
(2) for medium speed and,(3) for high speed.
- Lights Dim/Bright/Off:
Rotate knob to change light settings.(1) for dim light and
(2) for bright light.
七. 按鍵說明

natural_image
Three grayscale illustrations of different types of accessories or tools, including a bulb, a mushroom-shaped object, and a hand holding a cap (no text or symbols present)VIII. Replacing Light Bulb
Halogen light:
When the range hood is activated or has been running for a long time, be careful when handling the light bulb as it may be too hot to handle.
Please double check to make sure the power supply to the range hood is shut off and the light bulb is cool before removing it.
Remove the Halogen bulb by turning it counter-clockwise to remove.
The black rubber suction tool in the installation package. provided is for easier rewoval of the halogen light bulb.

natural_image
Three hand-drawn illustrations of different types of mushrooms, showing different angles and sizes (no text or symbols)9.
9.
IX. Surface Maintenance
A. Surface Maintenance
-
Please clean the range hood surface regularly with warm soapy water and wipe with a cotton cloth to prevent grease from accumulating.
-
Please do not use harsh cleansers or coarse material to clean the surface because that will damage the surface.
-
A non-invasive stainless steel polish is recommended to polish the surface after cleaning.
-
Please use soft material for polishing because it will make your range hood surface shinier.
-
Please do not use cleaning solutions that have bleach as an ingredient.
B. Surface Cleaning and Maintenance
-
Always disconnect from power supply before cleaning.
-
Clean both exterior and interior of the hood for long lasting. Do not use abrasive cleanser.
-
Filter can be placed in dishwasher. Dry filter andre-install before using hood.
-
No need to replace stainless steel baffle regularly, they are recommended to be cleaned every 30 hours of use, depending on cooking habit. (See below Figure to remove filters)
-
Make a habit of turning on the hood first before turning on the stove to avoid high temperature in the kitchen.

九.機身表面保養和清潔
一.機身表面保養
| Issue Cause | What to do | |
| After installation, the unit doesn't work. | 1. The power source is not turned ON. | 1. Make sure the circuit breaker and the unit's power is ON. |
| 2. The power line and the cable locking connector is not connecting properly. | 2. Check the power connection with the unit is connected properly. | |
| 3. The wires on rotary switch are loose. | 3. Make sure the wires on the switch are connected properly. | |
| 4. The switch is defective. 4. Change the switch. | ||
| Light works, but motor is not turning. | 1. The motor is defective, possible seized. | 1. Change the motor. |
| 2. The thermally protected system detects if the motor is too hot to operate and shuts the motor down system cool down. | 2. The motor will function properly after the thermally protected system cool down. | |
| 3. Damaged capacitor. | 3. Change the capacitor. | |
| 4. The motor wire is not connected. | 4. Make sure the motor wire is plugged into the molex connector. | |
| The unit is vibrating. | 1. The motor is not secure in place. | 1. Tighten the motor in place. |
| 2. Damaged blower wheel. | 2. Change the blower wheel. | |
| 3. The hood is not secured in place. | 3. Check the installation of the hood. | |
| The motor is working, but the lights are not. | 1. Defective halogen bulb. | 1. Change the halogen bulb. |
| 2. The light bulb is loose. | 2. Tighten the light bulb. | |
| 3. The wires on the switch are loose. | 3. Make sure the wires on switch are connected properly. | |
| The hood is not venting out properly. | 1. The hood might be hanging to high from the cook top. | 1. Adjust the distance between the cook top and the bottom of the hood within 26" and 36" range. |
| 2. The wind from the opened windows or opened doors in the surrounding area are affecting the ventilation of the hood. | 2. Close all the windows and doors to eliminate the outside wind flow. | |
| 3. Blockage in the duct opening or duct work. | 3. Remove all the blocking from the duct work or duct opening. | |
| 4. The direction of duct opening is against the wind. | 4. Adjust the duct opening direction. | |
| 5. Using the wrong size of ducting. | 5. Change the ducting to correct size. | |
| Metal filter is vibrating. | 1. Metal filter is loose. | 1. Change the metal filter. |
| 2. Spring clip is broken. | 2. Change the spring clip. | |
- PACIFIC
- Table of Content
- 目錄
- Product Functions/Performance Specification Chart
- Product Functions
- Installation Procedures
- 四. 安装步骤
- Venting Instruction
- Installation Air outlet
- 六. 安装出風口
- Operating Instructions
- 七. 按鍵說明
- Replacing Light Bulb
- Surface Maintenance
- Surface Maintenance
- Surface Cleaning and Maintenance
- 九.機身表面保養和清潔
- 一.機身表面保養
Brand : PACIFIC
Model : PR-836AS
Category : Range hood