
Intellitouch CH191 - Thermostat Fantini Cosmi - Free user manual and instructions
Find the device manual for free Intellitouch CH191 Fantini Cosmi in PDF.


| Product Type | Programmable Thermostat |
| Brand | Fantini Cosmi |
| Model | Intellitouch CH191 |
| Dimensions (WxHxD) | 80 x 80 x 25 mm |
| Weight | 100 g |
| Power Supply | 2 x 1.5 V AA alkaline batteries |
| Display Type | Touchscreen LCD |
| Temperature Control Range | 5 °C to 35 °C |
| Programmable Schedules | 7-day, up to 4 time periods per day |
| Frost Protection | Built-in, activates at 5 °C |
| Holiday Mode | Yes, allows temporary setback |
| Child Lock | Yes, keypad lock function |
| Battery Low Indicator | Yes, icon on display |
| Mounting | Wall-mounted with screws and anchors |
| Language Support | Multiple languages (EN, IT, FR, ES, DE, etc.) |
| Maintenance | Wipe with a soft dry cloth; do not use water or cleaners |
| Safety | Keep away from moisture; replace batteries promptly |
| Spare Parts | Replacement batteries (AA); no other user-serviceable parts |
| Reparability | Not user-repairable; contact authorized service for defects |
Frequently Asked Questions - Intellitouch CH191 Fantini Cosmi
User questions about Intellitouch CH191 Fantini Cosmi
0 question about this device. Answer the ones you know or ask your own.
Ask a new question about this device
Download the instructions for your Thermostat in PDF format for free! Find your manual Intellitouch CH191 - Fantini Cosmi and take your electronic device back in hand. On this page are published all the documents necessary for the use of your device. Intellitouch CH191 by Fantini Cosmi.
USER MANUAL Intellitouch CH191 Fantini Cosmi
WEEKLY PROGRAMMABLE THERMOSTAT WITH TOUCHSCREEN
![DAY 3 [ AUTO ] 13:50 20.5 °C SEL TEMP PROG DISP JOLLY OFF](/content/2026/05/990691/images/3c3caf10eb4a590b41f738c8bd45187108930278b9e62b0f499729c1db12dd73.jpg)
INDEX
INSTALLATION p. 3
ELECTRICAL CONNECTIONS ...... p. 4
INSERTION AND REPLACEMENT OF BATTERIES ...... p. 4
MAINTENANCE p. 5
QUICK GUIDE FOR PROGRAMMING ...... p. 5
description of keys/display p. 5
setting time and date p. 6
operating programs p. 6
settable temperatures ...... p. 7
setting operating programs p. 8
FUNCTIONS IN DETAIL ...... p. 11
available programs p. 11
settable temperatures p. 13
advanced keys and functions p. 14
TECHNICAL FEATURES ......p. 22
CONTENTS OF PACKAGE
1 chronothermostat
2 screws
1 user manual
1 INSTALLATION
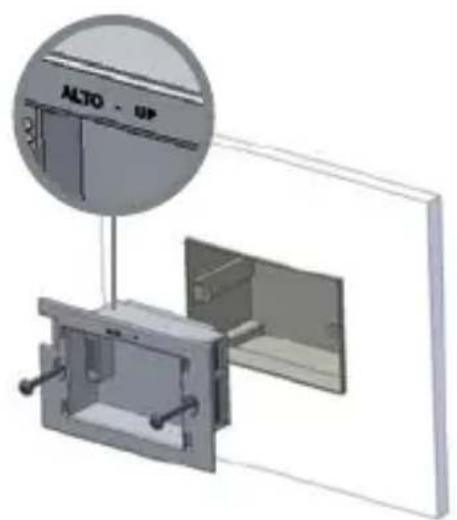
The CH191 chronothermostat must be installed in a 3-module recessed box, in the middle of the apartment, preferably 1.5 m off the ground.
natural_image
3D mechanical assembly diagram showing a bracket with mounting holes and a circular component labeled 'ALTO - UP' (no readable text or symbols beyond label)PERFORM THE FOLLOWING OPERATIONS:
1 Act on the master switch on the electric panel to cut power to the electrical system;
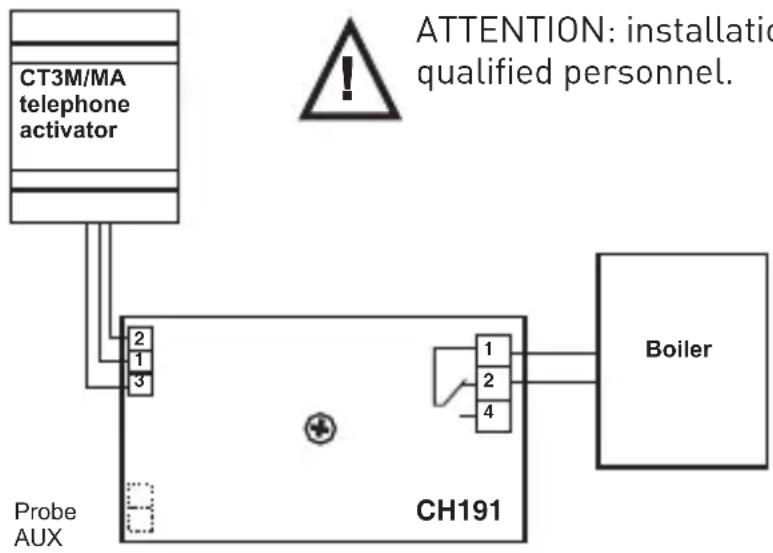
2 Connect the two wires of the boiler to terminals 1-2 of CH191;
3 Screw the frame onto the box using the provided screws, paying attention to the indicated assembly direction;
4 Switch the electric system back on;
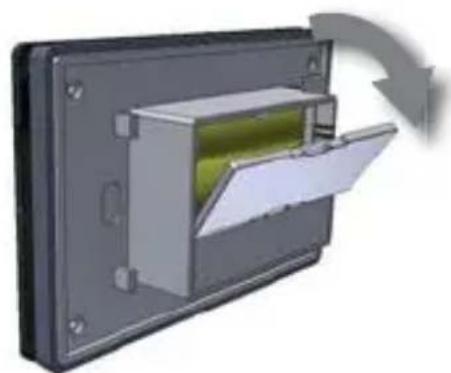
5 Insert 2 AA 1.5V alkaline batteries in the specific box;
6 Insert the thermostat body in the frame fixed to the wall.
natural_image
3D diagram of a device with a green internal channel and a gray arrow indicating rotation (no text or symbols)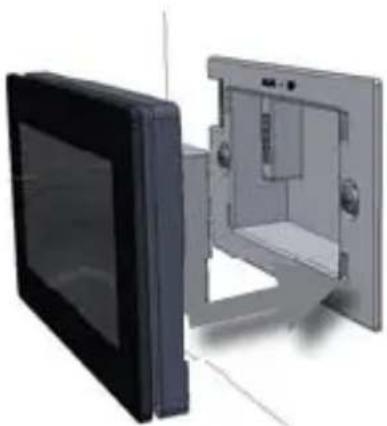
natural_image
3D rendering of a device showing internal components and exterior panel (no text or symbols visible)2 ELECTRICAL CONNECTIONS
flowchart
graph TD
    A["CT3M/MA telephone activator"] --> B["Probe AUX"]
    B --> C["CH191 Controller"]
    C --> D["Boiler"]
    style A fill:#f9f,stroke:#333
    style D fill:#ccf,stroke:#333
    note right of A: Attention: installation qualified personnel.
    note right of D: Alert!
    note right of C: CH191
    note right of D: Probe AUX
ATTENTION: installation must be carried out by qualified personnel.
N.B. When CH191 is disconnected, the boiler contact remains in its current position. Unscrew the lid to connect the auxiliary probe.
Use compatible Fantini Cosmi probes.
EC18 external probe EC19 floor probe EC20 room probe
3 INSERTION AND REPLACEMENT OF BATTERIES
Insert 2 AA 1.5 V alkaline long lasting batteries, of a good brand, paying attention to the marked polarities.
N.B. the life of the batteries is greatly affected by the type of use and the settings made by the user, especially the brightness of the display.
When the batteries are low, the symbol of the discharged battery flashes on the display: CH191 keeps working regularly.
If the batteries are completely discharged, the chronothermostat quits working (switching off the system) and the display reads "REPLACE BATTERIES", until the batteries are replaced.
To remove the batteries, extract CH191 from its housing pulling it upwards.
When you disconnect the chronothermostat, the text “Disconnected” is displayed for one minute as well as the symbol of the battery flashing (the battery symbol also flashes, but differently, when the batteries are charged, signalling that the body of the chronothermostat is disconnected from the base). The text “Connected” disappears when you press a key. All parameters remain stored while the batteries are being replaced.
4 MAINTENANCE
Use only a soft cotton cloth to clean the chronothermostat without any detergent. Do not use paper tissue to clean the screen.
KEYBOARD BLOCK
To make sure you don't change any settings on the chronothermostat unintentionally while cleaning, enable the keyboard block by pressing the middle of the display for 5 seconds. The text "BLOCKED" appears on the display when the keyboard has been blocked. The keys will re-enable automatically after 30 seconds.
5 QUICK GUIDE FOR PROGRAMMING
DESCRIPTION OF KEYS/DISPLAY
The chronothermostat is equipped with 6 keys, the function of which varies depending on the situation. It is described by the symbol which appears on the display next to the key.
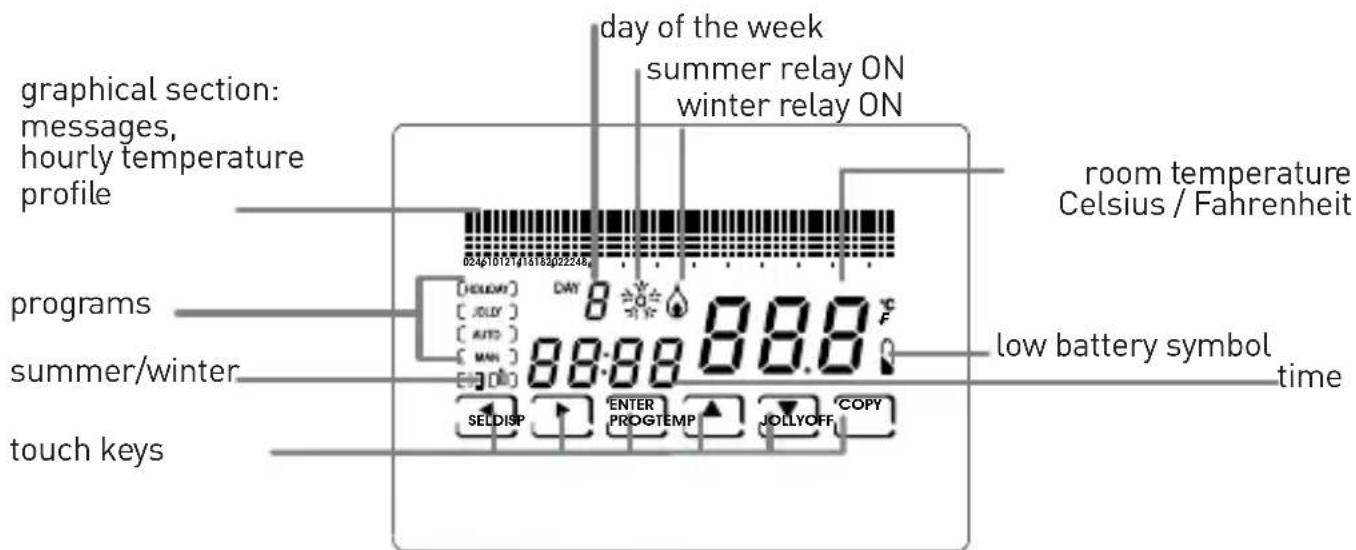
N.B.: to switch on the display, press in the middle; if no other keys are pressed, the display switches off after 2 seconds; if other keys are pressed, the display will switch off after remaining idle when the time set in the parameter LIGHT ON expires (see Chap. 6 CONFIG. PG03).
SETTING TIME AND DATE
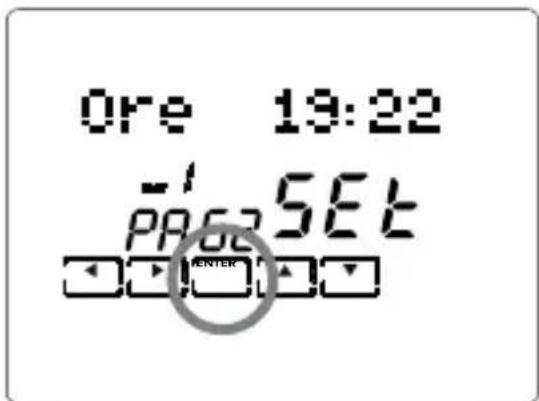
After the device switches on, press the key PROG briefly: the text "Setup" is displayed; now press ▶ to enter the "Hours" page. Set the hour by pressing ▲ and ▼ Then press ▶ to go to the "Minutes" setting.
Again press ▶ to select, in order, the Year, Month and Day.
Pressing again allows you to choose whether to disable automatic change of summer/winter time: initially this function is active can but can be deactivated by pressing "NO" using the keys ▲ and ▼ Pressing ◀ allows you to go back to the previous page. To exit the Setup menu, pressENTER.
OPERATING PROGRAMS
The CH191 chronothermostat has different operating modes, called programs:
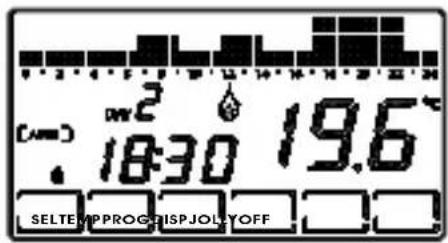
■ "AUTO" WEEKLY PROGRAM:
one of the four programmable temperatures can be associated to each half hour for each day of the week. This is the program displayed when the chronothermostat is switched on and is generally the one most used.
■ "HOLIDAY" DAILY PROGRAM:
Like in the AUTO program, you may select one of the 4 programmable temperatures for each half hour, but the identical sequence will be repeated every day.
![[HOLIDAY] DAY H 19:23 20.1 °C SEL TEMP PROG DEP JULY OFF](/content/2026/05/990691/images/893685d2f8f95a8d5f11ed8cc7d8e12edad325d363f96d6b656c9c801d6fabc2.jpg)
CH191
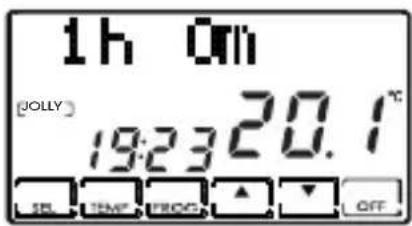
■ "JOLLY" TEMPORARY PROGRAM:
you may choose to hold a certain temperature for a certain number of hours, after which it will go back to the previously active program.
■ "MAN" MANUAL PROGRAM:
the chronothermostat maintains a fixed temperature, for an unlimited amount of time until another program is selected.
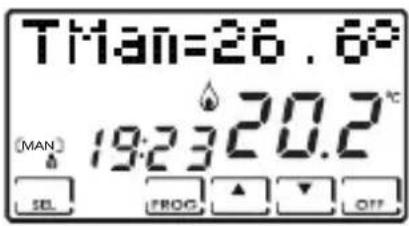
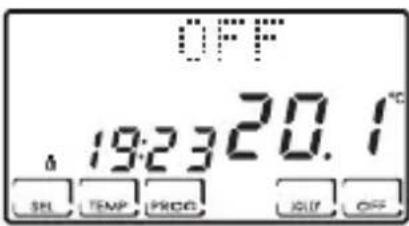
■ SYSTEM OFF OR WITH ANTIFREEZE PROGRAM "OFF/ANTIFREEZE":
the system remains off or else maintains a very low temperature (from 2 to 7°C) to prevent the fluid in the heating system from freezing.
SETTABLE TEMPERATURES
Four different temperatures can be set and one can be selected for each half hour of the day in the AUTO and HOLIDAY programs. Three of these temperatures (T1, T2 and T3) can have values from 2^ to 40^ C, while the fourth, T antifreeze (TA), can range from 2^ to 7^ C, or be set at “OFF” (system off). The manual program has its specific temperature (TMan), like the JOLLY program (Tj), which are set in the respective screens and can range from 2^ to 40^ C.
The ANTIFREEZE/OFF program, on the other hand, follows the temperature TA which, as we have said, can range from 2° to 7°C; or else, it can be set at “OFF”, switching the plant completely off.
SETTING OPERATING PROGRAMS
→ PROGRAM SELECTION
press SEL to select, in cyclical sequence, the different operating programs: AUTO -> MAN -> OFF -> HOLIDAY.
PLEASE NOTE: the JOLLY temporary program is not included in the program sequence, but can be selected directly by pressing the JOLLY key.
![OFF [OKLEAV] [JULF] [ALTO] [SHN] 19:23:20.2°C SEL](/content/2026/05/990691/images/49b21e3d7c1b56864bbdaab61cb396c4f3d0eebd3675c5e019a84ff7fb7bb78e.jpg)
→ SETTING THE TEMPERATURES
press TEMP in the AUTO, HOLIDAY and OFF programs to change the value of the 4 programmable temperatures: when you pressTEMP several times, the values T1, T2, T3, Ta appear in sequence; stop at the T you want to change and use the arrow keys ▲ and ▼ to increase or decrease the temperature by
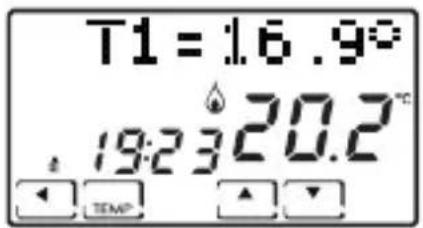
a tenth of degree at a time. Press ◀ to go back to the initial status. Remember that T1 will always be less than T2, and T2 than T3.
Pressing TEMP in the JOLLY program allows you to modify its temperature using the keys ▲ and ▼Press to go back to the page displaying the hours, allowing you to modify them using ▲ and . ▼
The MAN program allows you to modify the fixed temperature TMan using the keys ▲ and ▼
→ EDITING CURRENT DATE AND TIME
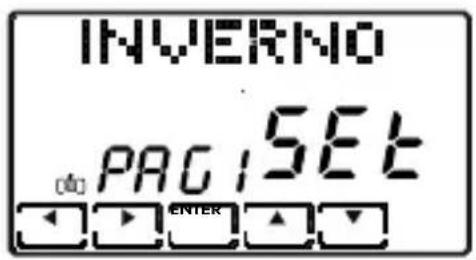
Press PROG briefly to enter the "SETUP" menu. Using ◀ and ▶ allows you to modify: winter/summer, hours, minutes, year, month, day, summer time.
These values can be changed using the keys ▲ and ▼
→ CUSTOMISATION OF WEEKLY "AUTO" PROGRAMMING AND DAILY "HOLIDAY" PROGRAMMING
Keep the key PROG pressed until the text "Config" is displayed. This menu allows you to program the weekly profiles (AUTO program) and daily profiles (HOLIDAY program) and to set the advanced functions (see the following paragraphs for their description).
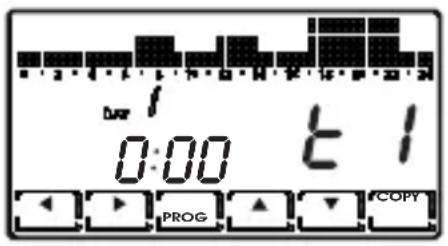
PLEASE NOTE: if the text "Setup" appears instead of "Config", you did not press the key long enough and you must press ENTER to go back to the normal operating condition and try again.
When you enter the “Config” menu, a page appears which allows you to choose the desired temperature (T1/T2/T3/Ta) for each half hour of the indicated day (from 1 to 7 indicating the days from Monday to Sunday).
PLEASE NOTE: T1/T2/T3/Ta are displayed on the right of the screen with the symbols
$$ \varepsilon 1 - \varepsilon 2 - \varepsilon 3 - \varepsilon 8 $$
Pressing ◀ and ▶ allows you to move one half hour at a time to the right or to the left.
Pressing ▲ and ▼ allows you to go from one programmed temperature to another.
Pressing PROG (briefly) switches you to the next day (DAY 1 -> 2 -> 3 -> 4 -> 5 -> 6 -> 7 -> H).
PressCOPY to copy the temperature profile of the current day on the following day.
After H (profile of the Holiday daily program) you go to the Correction parameter page.
Then pressing ENTER from the Correction page allows you to the exit the "Config" menu.
N.B.: press ◀ at the start of day 1 to go right to the Correction page.
→ "JOLLY" PROGRAM SETTING
In all programs, except MAN, pressing the key JOLLY selects the temporary program: this program allows you to define the desired temperature and its duration in hours (up to a maximum of 240, so to say 10 days).
For example, you may want to keep a lower temperature during the entire weekend when no one is home.
When you enter this program, you may modify the duration, which initially is one hour, and increase the number of hours by pressing ▲, or decrease them by pressing ▼.
Pressing TEMP allows you to view and modify temperature Tj, again using the keys ▲ and ▼
Pressing ◀ sends you back to view the duration of the JOLLY program.
When this time elapses, you go back to the initial program.
→ "OFF/ANTIFREEZE" PROGRAM SETTING
Pressing OFF from any program switches the chronothermostat to the off/antifreeze status. The antifreeze temperature (Ta) can be programmed by pressing TEMP, from OFF (boiler always off) to an interval between 2.0 and 7.0°C, using the arrow keys ▲ and ▼
Go back to the OFF status by pressing ◀.
Pressing OFF again sends you back to the previous operating status.
→ ALTERNATIVE DISPLAYS
Other information can be viewed in the AUTO and HOLIDAY programs in place of the temperature profile, by pressing the keyDISP several times.
The first time it is pressed the programmed temperature for the current half hour appears, the second time it displays the date, the third time it displays the temperature of the external probe and the fourth time it goes back to the initial temperature profile.
6 FUNCTIONS IN DETAIL
AVAILABLE PROGRAMS
CH191 has several operating modes (programs):
■ "AUTO" weekly program
■ "HOLIDAY" daily program
■ “JOLLY” temporary program
■ “MAN” manual program
■ system off or with antifreeze "OFF" program
→ "AUTO" WEEKLY PROGRAM
4 temperature levels can be used in the AUTO operating mode (Ta, T1, T2, T3), according to a programming with 30 minute steps, 24 hours a day, 7 days a week. The days are numbered from 1 to 7 and correspond to the seven days of the week, starting from Monday.
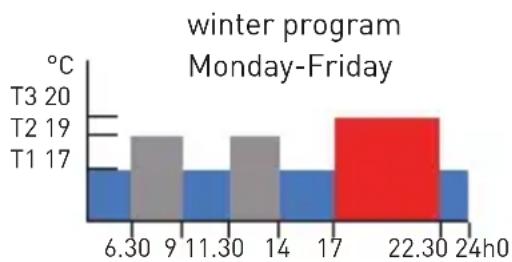
To simplify programming, you may set the first day and copy it on the following days. The default for days 1 – 5 (Monday to Friday) is:
| 00:00 - 06:30 T1 |
| 06:30 - 09:00 T2 |
| 09:00 - 11:30 T1 |
| 11:30 - 14:00 T2 |
| 14:00 - 17:00 T1 |
| 17:00 - 22:30 T3 |
| 22:30 - 24:00 T1 |
bar
| Time | T1 | T2 | T3 | |------|------|------|------| | 6.30 | 17 | 19 | 20 | | 9 | 17 | 19 | 20 | | 11.30| 17 | 19 | 20 | | 14 | 17 | 19 | 20 | | 17 | 17 | 19 | 20 | | 22.30| 17 | 19 | 20 | | 24h0 | 17 | 19 | 20 |while the default for days 6 and 7 (Saturday and Sunday) is:
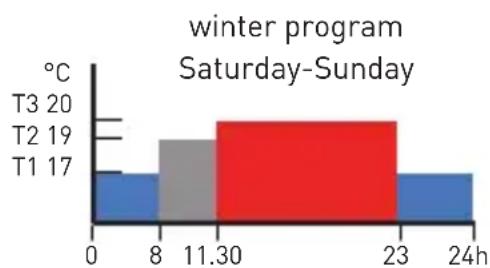
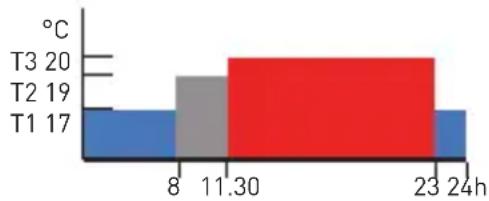
| 00:00 - 08:00 T1 |
| 08:00 - 11:30 T2 |
| 11:30 - 23:00 T3 |
| 23:00 - 24:00 T1 |
bar
| Time | Temperature (°C) | | ---- | ---------------- | | T1 | 17 | | T2 | 19 | | T3 | 20 |The value of the 4 temperatures can be programmed using the TEMP function. The temperature profile (hourly variation) can be programmed using the PROG function.
bar
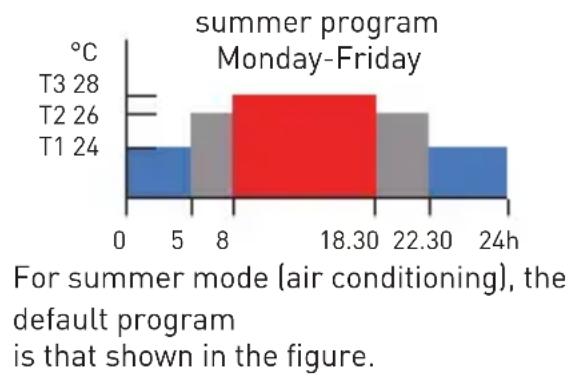
| Time | Temperature (°C) | | ---- | ---------------- | | 0 | 24 | | 5 | 26 | | 8 | 28 | | 18.30| 26 | | 22.30| 24 | | 24h | 24 |→ "HOLIDAY" DAILY PROGRAM
4 temperature levels can be used in HOLIDAY operating mode, according to a programming with 30 minute steps, 24 hours a day.
This achieves a daily programming, regardless of the days of the week. The default temperature profile is:
| 00:00 - 08:00 T1 |
| 08:00 - 11:30 T2 |
| 11:30 - 23:00 T3 |
| 23:00 - 24:00 T1 |
bar
| Time | Temperature (°C) | | :--- | :--- | | 8 h | 17 | | 11.30 h | 20 | | 23 h | 19 |The value of the temperatures can be programmed using the TEMP function.
The temperature profile (hourly variation) can be programmed using the PROG function.
→ JOLLY
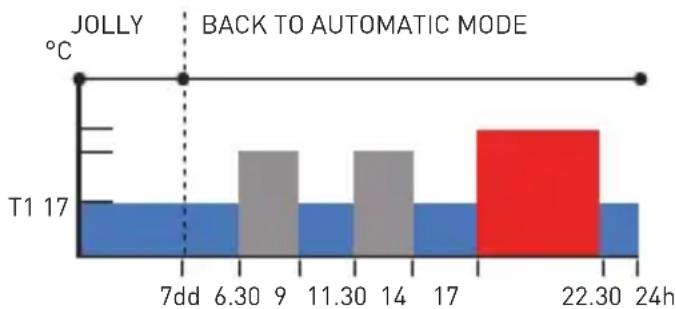
The JOLLY mode allows you to set a programmable temperature (Tj) for a programmable number of hours (from 1 to 240). It is used when you wish to introduce a temporary variation to programming without changing the parameters, for example to maintain a high temperature for longer when spending an evening with
bar
| Time | T1 17 | BACK TO AUTOMATIC MODE | |------|-------|------------------------| | 7dd | | | | 6.30 | | | | 9 | | | | 11.30| | | | 14 | | | | 17 | | | | 22.30| | | | 24h | | |friends or to keep it low when no one is home the weekend.
If you enter JOLLY mode using the specific function key, when time is up it goes back automatically to programming in progress.
→ MANUAL
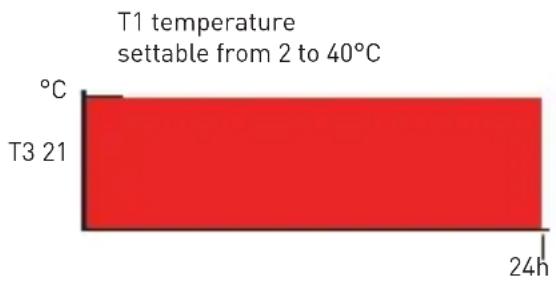
MAN mode allows you to set a fixed temperature manually (Tman), ranging from +2.0 to +40.0 degrees, without expiring and without needing to modify the weekly or daily program.
For example it can be used to keep the house at a different temperature than that of the daily program when no one is home, or to switch on the system remotely, bringing it to a constant temperature.
bar
T1 temperature settable from 2 to 40°C | Time (h) | Temperature (°C) | | :--- | :--- | | 24h | 21 | | 25h | 40 |→ OFF
OFF mode is used when you want to switch the system off.
It uses the temperature TA (antifreeze) as a reference, to guarantee protection of the system at low temperatures.
TA is normally set at +5 degrees, but it can also be set at OFF, to switch the boiler completely off. Weekly or daily programs remain unchanged.
SETTABLE TEMPERATURES
The system can use 4 different temperature levels, three for normal use and one, called “antifreeze”, to be used when you wish to keep the boiler off, but without risking having the fluid in the system freeze.
Programming of the three T is conditioned by reciprocal values:
T1 cannot be higher than T2,
T2 cannot be higher than T3.
The temperatures are set using the keyTEMP and ▲ and . ▼
T1 ranges between +2.0 and +T2 degrees, with variations every tenth of degree [default 17.0].
T2 ranges between +T1 and +T3 degrees, with variations every tenth of degree [default 19.0].
T3 ranges between +T2 and +40.0 degrees, with variations every tenth of degree [default 20.0].
TA (antifreeze) ranges between +2.0 and +7.0 degrees, with variations every tenth of degree, or a can be OFF, when the boiler remains off [default 5.0].
ADVANCED KEYS AND FUNCTIONS
■ USING THE SEL KEY
The SEL key allows you to select the operating mode of the chronothermostat, according to the following programs:
→ HOLIDAY
→ AUTO
→ MANUAL
→ OFF
To change the selected program, press SEL in sequence (cyclical). The first 3 statuses are signalled with a small text on the left of the display, while the OFF status appears in the graphical area at the top.
■ USING THEEMP KEY
→ In AUTO, HOLIDAY and OFF
Pressing TEMP allows you to enter programming of the 4 temperatures used in these statuses.
Change the temperatures using the arrow keys ▲ and ▼, as long as T1 is no higher than T2, T2 is not lower than T1 and higher than T3, T3 is not lower than T2.
Press TEMP to go to the next temperature (cyclical) T1>T2>T3>Ta>T1.
Press ◀ to go back to the home page.
→ In JOLLY
Press TEMP to program Tj;
Using ▲ and ▼ allows you to change Tj (between +2 and +40°) while pressing ◀ sends you back to the home page.
■ USING THE PROG KEY
→ PRO brief) -> SETUP
→ Winter/PAG1/Set using ▲ or ▼ you switch from Winter to Summer and vice versa press ▶ to go to the next page and ENTER to exit from PROG.
→ Hours HH : MM/PAG2/SEt
pressing ▲ cyclically increases the hours while decreases them. press ▶ to change page and press ENTER to exit PROG.
→ Min. HH:MM /PAG3/SEt
pressing ▲ cyclically increases the minutes while decreases them. press to change page and press ENTER to exit PROG.
→ Year: YYYY/PAG4/SEt
pressing ▲ increases the years while ▼ decreases them press ▶ to change page and press ENTER to exit PROG.
→ Month: MM/PAG5/SEt
pressing cyclically increases the months while decreases them press to change page and press ENTER to exit PROG.
→ Date: DD/PAG6/SEt
pressing ▲ cyclically increases the days while ▼ decreases them. press ▶ to change page and press ENTER to exit PROG.
PLEASE NOTE: when the date is set, the chronothermostat automatically determines the day of the week.
→ Summer Time YES/PAG7/SEt
Automatically selects summer time, applicable in Europe and some of the countries. This set up automatically updates the time when it changes (March and October). Use ▲ or ▼ to say YES or NO. Press to go back to page.1 (Winter/Summer) and press ENTER to exit PROG.
→ PRO(Gong) -> CONFIG.
The display of day 1 appears, with the graphical display of the temperatures each half hour, indication of the half hour and the associated temperature (E)1-E2-E3-E4
Day 1 corresponds to Monday, and so on. Day H is the Holiday, which does not Change during the week.
Pressing moves forward a half hour
Pressing ▲r moves up or down from tA to t1 to t2 to t3.
Press PROG (briefly) to change the day (1, 2, 3, 4, 5, 6, 7, H).
After H you go to page1 (Correction).
Press COPY to copy the temperature profile of the current day on the following day. From page 1 on, pressing ENTER allows you to exit programming.
Press ◀ to go back to the previous half hour (even the day before).
N.B.: press at the start of day 1 to go right to page 1 (correction).
→ Correction/PG01/XX.X°
This allows you to modify the read temperature, which due to the recessed wall installation or perhaps a non-ideal height might not indicate the true temperature perceived.
It is recommended to calibrate it by comparing it with a thermometer placed at the desired height/area.
Use ▲nd to modify the temperature value on the display.
Press to go to page 2 and ENTER to exit.
→ Celsius/PG02/XX.X°
This allows you to choose the temperature display scale between Celsius and Fahrenheit degrees.
Press ▲ or ▼ to switch from Celsius to Fahrenheit.
Press to go to page 3 and ENTER to exit.
→ Light ON Xs/PG03
To adjust back lighting time of the display.
Pressing ▲ or ▼ allows you to set the programmable duration between
2 and 29 seconds. Press to go to page 4 and ENTER to exit.
→ Int. Light X/PG04
Allows you to modify the luminous intensity of the display, at 10 levels.
Press ▲ or ▼ to modify the brightness level (1-10).
Press to go to page 5 and ENTER to exit.
→ Italiano/PG05
Allows you to change the language used during programming.
Press ▲ to cyclically switch from one language to another.
Press ▶ to go to page 6 and ENTER to exit.
→ Block? NO(YES)/PG06
Allows you to block the keyboard, with the 4-digit password. It only works once and then must be re-enabled.
Pressing ▲ or ▼ switches from NO to YES, and press ENTER to request the password, entered with the arrow keys ▲ or ▼ selecting the digits with ◀ and ▶
Press ENTER to store it, going back to the normal operating display, where only the function key ENTER is visible. When you press it you are requested to enter the password, using the arrow keys ▲ and ▼, followed by ENTER. The display goes back to normal programming, enabling all the functions.
Press to go to page 7 and ENTER to exit.
→ Reset? NO (YES)/PG07
Press ▲r to switch from NO to YES. Pressing ENTER, while "YES" is displayed restores all the parameters (except date and time) to the default values.
Press ▶ to go to page 8 and ENTER to exit.
→ CH191 vX.Y/--/PG08
Displays the software version of the CH191 chronothermostat.
Press ▶ to go to the next page and ENTER to exit.
→ EXT IN: ---/PG12
Allows you to modify management mode of the auxiliary input using keys ▲ and ▼o change:
---: not active
Connecting a probe- EC18 - EC19 - EC20 allows you to set:
VIS: visualisation of the temperature;
REG: regulation of room temperature with the external probe;
UP: use as maximum temperature threshold, to manage it you must: press the key ▶ and set the desired maximum threshold using the keys ▲ and ▼
This function deactivates the system when the temperature read by the external probe is higher than the set temperature.
LOW: use as minimum temperature threshold, to manage it you must: press the key ▶ and set the desired minimum threshold using the keys ▲ and ▼
This function deactivates the system when the temperature read by the external probe is lower than the set temperature.
Connecting a voltage-free contact allows you to set:
ALR C: views an alarm in presence of closed contact. With this function active, you may also enable a buzzer by pressing the key ▶ followed by ▲nd . ▼
ALR 0: views an alarm in presence of an open contact. With this function active, you may also enable a buzzer by pressing the key ▶ followed by ▲ and ▼
Having selected ALR C or ALR 0, pressing ▲ and ▼ allows you to enable (ALM SND: ON) or disable (ALM SND: OFF) the buzzer after the alarm is triggered. Press▶ to go to the next page and ENTER to exit.
→ BEEP ON (OFF)/PG14
enables or disables the beep upon pressing a key. The selection is made by pressing ▲ and ▼Press to go to the next page and ENTER to exit.
→ LED ON (OFF)/PG15
enables or disables switch on of the front LED (1 flash every 10 seconds). The selection is made by pressing ▲ and ▼
Press ▶ to go to the next page and ENTER to exit.
→ TOUCH TEST/PG16
This function is used by technical support. Exit by pressing ◀ and ▶ If the key ENTER is pressed accidentally, the function is activated for about 5 minutes, after which it ends automatically. Press ▶ to go back to the hourly programming menu.
→ TOUCH SENS. (MED)/PG18
This function indicates the level of touch sensitivity. The user can choose between 3 levels (HI-MED-LO) by pressing the ▲ and ▼eys. Press to go back to the hourly programming menu.
USING THDISP
KEYThe DISP key allows you to view windows with different information regardless of the operating status, only when in AUTO or HOLIDAY modes.
The following windows may be viewed:
→ Profile of the day / hour:min / Tamb
→ Currently set temperature (e.g T3=20.0°) / hour:min /Tamb
→ Dd/Mm/YYYY / hour:min /Tamb
→ External probe/hour:min/Tamb
The JOLLY key allows you to force a temperature to a fixed value for a preset amount of time to replace normal operation.
The following window is displayed:
→ Duration of JOLLY status (HH h MM m) / hour:min / Tamb
Using the arrow keys ▲ and ▼ allows you to change the duration of the JOLLY status with hourly steps. The Jolly temperature is set by pressing the keyTEMP, which displays a window such as the following:
→ Tj=xx.x° / hour:min / Tamb
Modify the temperature by using the arrow keys and .
Pressing ◀ allows you to go back to view the “JOLLY status duration”.
To exit JOLLY status before time is up, change the number of hours to zero using the arrow key ▼ or else press SEL to go to the desired status (AUTO, MAN, HOLIDAY, OFF).
■ USING THOFF KEY
The OFF key allows you to switch the system off, in whatever operating status it is found. The following window is displayed:
→ OFF / hour:min / Tamb
The antifreeze temperature (Ta) can be programmed by pressing TEMP, from OFF
(boiler always off) to an interval between 2.0 and 7.0°C, using the arrow keys ▲ and ▼. The following window is displayed:
→ Ta=x.x° / hour:min / Tamb
To go back to the OFF window, press the arrow key Pressing OFF again sends you back to the previous operating status.
WASTE DISPOSAL
The symbol of the crossed-out wheeled bin indicates that the products must be collected and disposed of separately from household waste. The batteries and integrated accumulators may be disposed of together with the product. They will be separated at the recycling facilities. A black bar indicates that the product was placed on the market after August 13th, 2005.
Participating in the separate collection of products and batteries contributes to the correct disposal of these materials and therefore avoids possible negative consequences for the environment and human health. For more detailed information on the collection and recycling programmes available in your country, contact the local authorities or the sales point where you purchased the product.

natural_image
Symbol of a trash bin crossed with diagonal lines, no text or numbers presentTECHNICAL FEATURES
| Temperature adjustment scale 2-40 ÷ 0,1 °C, increase 0.1°C | |
| Measurement scale/room T display -35 +60 °C | |
| Power supply 2AA 1.5V alkaline batteries | |
| Battery duration approximately 1 year * | |
| Connection to boiler 3 screw clamps (closed + open) | |
| Contact range 5(3)A / 250 Vac | |
| Type of action 1.B.U (micro disconnection) | |
| Software class A | |
| Minimum adjustment differential 0.1°C | |
| Thermal gradient of reference 4K/h | |
| Maximum room temperature T45 | |
| Electric insulation | □double insulation |
| Degree of protection IP20 | |
| Pollution degree 2 | |
| Pulse voltage 4000V | |
| Connection with CT3M or CT3MA telephone activator | screw |
| Assembly | recessed in 3-module box type 503, with 2 screws |
| Dimensions | 127 x 82 x 56 mm |
| Compliant with standards | EN 60730-1 and second parts |
| ErP classification | ErP Class IV; 2% (Reg. EU 811/2013 - 813/2013) |
* Duration refers to standard use with default settings.

FANTINI COSMI S.p.A.
- INDEX
- CONTENTS OF PACKAGE
- INSTALLATION
- PERFORM THE FOLLOWING OPERATIONS:
- ELECTRICAL CONNECTIONS
- INSERTION AND REPLACEMENT OF BATTERIES
- MAINTENANCE
- KEYBOARD BLOCK
- QUICK GUIDE FOR PROGRAMMING
- DESCRIPTION OF KEYS/DISPLAY
- SETTING TIME AND DATE
- OPERATING PROGRAMS
- CH191
- ■ "JOLLY" TEMPORARY PROGRAM:
- ■ "MAN" MANUAL PROGRAM:
- ■ SYSTEM OFF OR WITH ANTIFREEZE PROGRAM "OFF/ANTIFREEZE":
- SETTABLE TEMPERATURES
- SETTING OPERATING PROGRAMS
- → PROGRAM SELECTION
- → SETTING THE TEMPERATURES
- → EDITING CURRENT DATE AND TIME
- FUNCTIONS IN DETAIL
- AVAILABLE PROGRAMS
- → "AUTO" WEEKLY PROGRAM
- → "HOLIDAY" DAILY PROGRAM
- → JOLLY
- → MANUAL
- → OFF
- ADVANCED KEYS AND FUNCTIONS
- ■ USING THE SEL KEY
- ■ USING THEEMP KEY
- ■ USING THE PROG KEY
- → Block? NO(YES)/PG06
- → Reset? NO (YES)/PG07
- → CH191 vX.Y/--/PG08
- → EXT IN: ---/PG12
- USING THDISP
- ■ USING THOFF KEY
- WASTE DISPOSAL
Brand : Fantini Cosmi
Model : Intellitouch CH191
Category : Thermostat