Sanctuary II RT - Tent Jack Wolfskin - Free user manual and instructions
Find the device manual for free Sanctuary II RT Jack Wolfskin in PDF.


| Product Type | Tunnel tent |
| Brand | Jack Wolfskin |
| Model | Sanctuary II RT |
| Capacity | 2 persons |
| Poles | 2 pre-shaped aluminum pole sections |
| Pegs | 14 pegs |
| Repair sleeve | Yes, 1 pole repair sleeve |
| Design Principle | REAL TUNNEL for wind stability, easy pitching, and increased space |
| Ventilation | Two sealable ventilation ducts |
| Vestibule | Generous front and rear porches |
| Storage | Volume-adjustable pack sack, mesh pouches, drying line loops |
| Flysheet Material | Silicone-coated polyester (ultra-lightweight) |
| Care Instructions | Clean with mild soap and water; no machine wash or dry clean |
| Lubrication | Silicone-based lubricant for poles and zips |
| Fire Safety | Keep open flames away from tent materials |
| UV Protection | Flysheet resists UV but avoid prolonged direct sunlight |
| Seam Sealing | Silicone seam sealant recommended for certain seams |
| Storage | Dry thoroughly before storing to prevent mildew |
| Repair | Minor repairs with included materials; professional repair available for charge |
| Weight | Approx. 3.5 kg |
Frequently Asked Questions - Sanctuary II RT Jack Wolfskin
User questions about Sanctuary II RT Jack Wolfskin
0 question about this device. Answer the ones you know or ask your own.
Ask a new question about this device
Download the instructions for your Tent in PDF format for free! Find your manual Sanctuary II RT - Jack Wolfskin and take your electronic device back in hand. On this page are published all the documents necessary for the use of your device. Sanctuary II RT by Jack Wolfskin.
USER MANUAL Sanctuary II RT Jack Wolfskin
SANCTUARY II / III RT

GB SANCTUARY II / III RT are wind stable, light tunnel tents with many convenient, comfort-plus features and are designed for demanding use.
The tents are constructed in accordance with the JACK WOLFSKIN REAL TUNNEL design principle, which improves the wind stability enormously, increases the usable space within the tent and simplifies the pitching procedure. External pole channels and the REAL TUNNEL guying system make the tent extremely easy to pitch and dispense with the need for guy lines (in normal wind conditions).
The generous vestibule area and the two sealable ventilation ducts improve tent-bound life considerably. Additional useful features include a volume-adjustable pack sack, and mesh storage pouches and drying line loops inside the tent.
natural_image
Illustration of a black camping tent with a patterned roof and visible tentacles (no text or symbols)SANCTUARY II RT

natural_image
Illustration of a black camping tent with tarpaulins and tassels (no text or symbols)SANCTUARY III RT
www.jack-wolfskin.com
SANCTUARY II / III RT
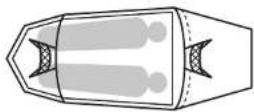
SANCTUARY II RT

natural_image
Top-down schematic of a symmetrical mechanical or architectural component with internal channels and mesh patterns (no text or symbols)SANCTUARY III RT
D
ZELTPACKSACKINHALT
- 1 Inner tent/ flysheet combination
- 14 (18)* pegs, repair materials in peg bag
- 1 pole bag
- 2 (3) preshaped aluminium pole sections
- 1 pole repair sleeve
* data for SANCTUARY III RT appear in this order in brackets

At JACK WOLFSKIN we are continually improving and upgrading our products. We therefore reserve the right to make changes to individual components. Diagrams used for the pitching instructions may differ slightly from the actual product.

Your tent is equipped with sufficient ventilation options. Try to ensure that there is always a good flow of air through the tent to reduce the risk of condensation build-up. However, condensation cannot completely be avoided. Please do not confuse condensation with actual water penetration through the fabric of the tent.
CARE AND MAINTENANCE
Clean your tent when pitched, using only a little soap and water. Zips in particular should be cleaned regularly to remove dirt and grit. On no account should the tent be machine washed or dry cleaned, since this could cause irreversible damage to the protective coating on the tent fabric. Suitable silicone-based lubricants protect poles from corrosion and prevent zips freezing.
FIRE PREVENTION
Open fires and flames are a hazard for tent materials. Avoid naked flames in the immediate vicinity of the tent.

F
VENTILATION
natural_image
Simple line drawing of two mountain peaks with a cross mark, no text or symbols present1
natural_image
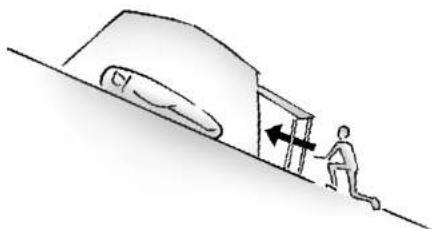
Simple line drawing of a person pushing a door with an arrow indicating motion (no text or symbols)Pitching your tent for the first time: We recommend you to do a dry run, pitching your new tent, in order to become familiar with all the pitching instructions before your first trip.
Choose a suitable pitching site, removing all sharp objects which may damage the groundsheet. Spread out the tent on the ground and carefully connect all pole sections, ensuring a tight fit.
Ensure that all zips are closed when pitching the tent.

natural_image
Illustration of hands holding a tool with arrows indicating motion, alongside a bundle of metallic rods (no text or symbols)2


natural_image
Line drawing of a car body panel with a black arrow pointing to the front panel (no text or symbols)natural_image
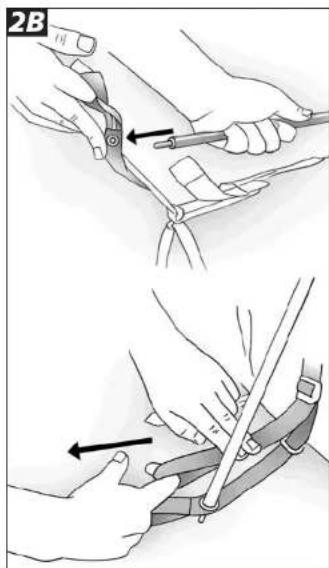
Illustration of a medical procedure showing hands using a tool to adjust or install a patient's arm (no text or symbols present)Carefully insert the poles into their respective external pole channels (1). Do not use force. If resistance is met when the poles are inserted or tensioned, check and remedy the problem.
Tension the poles by inserting the pole ends into their respective eyelets at the open ends of the pole channels (2A or 2B).


natural_image
Line drawing of a conical structure with internal circular elements and hanging weights (no text or symbols)Making sure all zips are closed, anchor GB your tent at the rear end (1).
Next, take hold of the two front porch anchor points and pull the tent forward, opening it up like a concertina.
Straighten the tent and peg out the front and rear porches. Make sure that the flysheet guying tapes at ground level are equally tensioned and that the tent is positioned in a straight line (2).
natural_image
Illustration of a person's seatbelt being adjusted for a cable, showing a hand holding the belt and a black arrow indicating the angle (no text or symbols present)Continue to tension the tent by pegging GB out the remaining anchor points and REAL TUNNEL tensioning triangles (1). Peg out the remaining guy lines to make the tent wind stable (2/3).
When wet, the polyester flysheet material may stretch slightly. Retension if necessary (1).


natural_image
Line drawing of a tent structure with support poles and a propeller, no text or symbols presentWhen folding the tent, make sure that the REAL TUNNEL stabilisers always lie at right angles to the direction in which the tent is rolled up.
Fold the tent in two, lay it on its side (1) and fold in the vestibule sections (2).
Fold the tent lengthways into three (3) and then crossways (4).
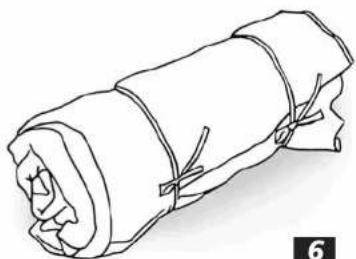
Finally, roll the tent up around the pole bag (5/6).

natural_image
Line drawing of a boat hull with visible ribs and hull edges (no text or symbols)
natural_image
Diagram of a folded paper or plastic sheet with directional arrows indicating movement (no text or symbols)
natural_image
Simple line drawing of a rolled document with arrows indicating rotation, no text or symbols present3
FOLDING INSTRUCTION


natural_image
Simple line drawing of a closed book or document (no text or symbols)4
PLIAGE DE LA TENTE:
F
natural_image
Simple line drawing of a pen writing on paper (no text or symbols)5
natural_image
Line drawing of a rolled-up blanket with straps (no text or symbols)INFO
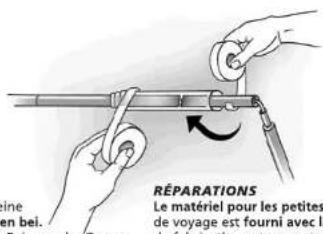
Repair materials for minor repairs during usage are provided. Production faults will be repaired under the terms of our guarantee. Our service department will be pleased to perform other repairs for a small charge. Please send in your cleaned tent via your nearest dealer, enclosing clear repair instructions and proof of purchase.
STORAGE
Allow your tent to dry thoroughly while still assembled before storing it for any longer period. This will prevent mildew and damp stains forming.
UV LIGHT
Ultraviolet (UV) radiation reduces the tear strength of all tent materials in the course of time. The special silicone coated tent flysheet increases the service life in comparison with conventional materials. Tent materials, however, cannot permanently defy the effects of nature. Therefore, please avoid subjecting the tent to intensive sunlight for extended periods of time. JACK WOLFSKIN will not assume any liability for damage caused by ultraviolet light.
RÉPARATIONS
Check to ensure that the poles are positioned correctly inside the pole channels. The rounded end of the pole section should slot snugly into the tape pouch at the closed end of the pole channel. Vary the position of the pointed pole tips in the tape eyelets at the open end of the pole channels to ensure that the poles and the REAL TUNNEL guying system are correctly tensioned. This is the prerequisite for a secure, wind stable pitch.
SEAM SEALANT
A silicone coating on the ultra-lightweight flysheet fabric increases the tear strength and UV resistance several fold, compared to conventional PU coatings. However, conventional tape seals will not adhere to this coating. Instead a Cotton-Core-Spun thread is used to seal the seams of this silicone coated fly sheet. We recommend additional sealing with a special SILICONE seam sealant (available at your outdoor retailer), particularly at those points of the seam where integrated tapes or tensioning loops interrupt the continuity of the tape seal.
AUTRES CONSEILS
Brand : Jack Wolfskin
Model : Sanctuary II RT
Category : Tent